
If you crave a treat that mixes sweet and tart, you’ll love these White Chocolate Raspberry Scones. Flaky, tender, and easy to make, these scones are perfect for any occasion. In this post, I’ll guide you through every step, from gathering your ingredients to storing leftovers. Trust me, your taste buds will thank you. Let’s dive into the world of baking these delightful scones together!
Why I Love This Recipe
- Delicious Flavor Combination: The pairing of sweet white chocolate and tart raspberries creates a delightful contrast that tantalizes the taste buds.
- Easy to Make: This recipe requires minimal ingredients and straightforward steps, making it perfect for both novice and experienced bakers.
- Perfect for Any Occasion: These scones are versatile enough to serve at brunch, tea time, or as a snack, making them suitable for any gathering.
- Beautiful Presentation: The warm golden scones, adorned with raspberries and a drizzle of white chocolate, are visually appealing and sure to impress guests.
Ingredients
List of Ingredients
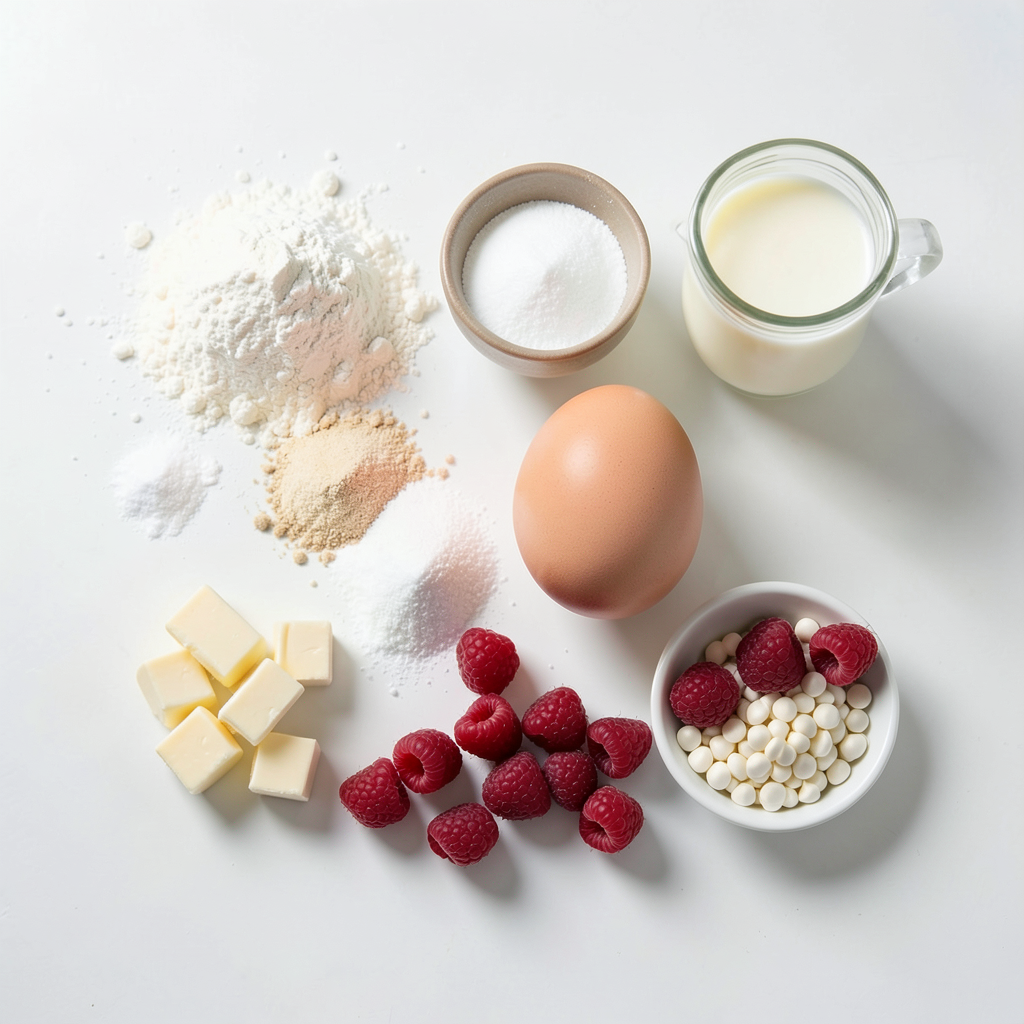
Here are the key ingredients you will need for these tasty white chocolate raspberry scones:
- 2 cups all-purpose flour
- 1/2 cup granulated sugar
- 2 teaspoons baking powder
- 1/2 teaspoon salt
- 1/4 cup cold unsalted butter, cubed
- 1/2 cup heavy cream
- 1 large egg
- 1 teaspoon vanilla extract
- 1 cup fresh raspberries
- 1/2 cup white chocolate chips
- 1 tablespoon milk (for brushing)
Substitutions for Ingredients
You can swap ingredients for different flavors or dietary needs:
- Use almond flour for gluten-free scones.
- Replace heavy cream with coconut cream for a dairy-free option.
- Substitute granulated sugar with brown sugar for a richer taste.
- Try dark chocolate chips instead of white chocolate for a different twist.
Recommended Brands for Best Results
For the best scones, I suggest these brands:
- King Arthur Flour for all-purpose flour.
- C&H for granulated sugar.
- Land O’Lakes for unsalted butter.
- Callebaut or Ghirardelli for high-quality white chocolate chips.
Using these brands can enhance your scones' taste and texture, making them even more delightful!
Step-by-Step Instructions
Preheating the Oven
First, preheat your oven to 400°F (200°C). This step is key to getting a nice, golden color on your scones. While the oven heats, line a baking sheet with parchment paper. This will keep the scones from sticking and make cleanup easy.
Mixing Dry Ingredients
Next, grab a large mixing bowl. In this bowl, combine 2 cups of all-purpose flour, 1/2 cup of granulated sugar, 2 teaspoons of baking powder, and 1/2 teaspoon of salt. Whisk these dry ingredients well. A good mix helps the scones rise evenly.
Combining Wet Ingredients
Now, let’s move to the wet mix. In a separate bowl, whisk together 1/2 cup of heavy cream, 1 large egg, and 1 teaspoon of vanilla extract. Make sure this mixture is smooth. This adds richness and flavor, making your scones even better.
Forming and Cutting the Dough
Gradually pour the wet ingredients into the dry mix. Use a spatula to gently fold everything together. Be careful not to overmix. You want a nice, soft dough. Now, fold in 1 cup of fresh raspberries and 1/2 cup of white chocolate chips. Try not to squish the raspberries; they should keep their shape.
Transfer the dough to a lightly floured surface. Knead it gently a few times. Flatten the dough into a circle about 1 inch thick. Take a sharp knife or pizza cutter and slice the circle into 8 wedges. Place the wedges on your prepared baking sheet, leaving space between each one.
Baking and Cooling Procedure
Before baking, use a pastry brush to lightly coat the tops of the scones with 1 tablespoon of milk. This helps them turn a beautiful golden brown. Bake the scones in your preheated oven for 15-20 minutes. They should be lightly golden on top. Stick a toothpick in the center; it should come out clean when they are done.
Once baked, let the scones cool on a wire rack for a few minutes. For an extra touch, drizzle some melted white chocolate over the top before serving. Enjoy these flaky, sweet treats!
Tips & Tricks
Ensuring Flakiest Scones
To make the flakiest scones, cold butter is key. Use unsalted butter straight from the fridge. Cut it into small cubes before adding it to the flour mix. When mixing, you want to see little lumps of butter, like peas. This helps create layers. Avoid overmixing the dough; stop as soon as you see no dry flour. Gently fold in the raspberries and chocolate chips to keep them whole.
Storing Leftover Scones
If you have extra scones, store them in an airtight container. Keep them at room temperature for up to two days. For longer storage, place them in the fridge. You can also freeze them for up to three months. Just wrap each scone in plastic wrap before placing them in a freezer bag. This keeps them fresh and tasty.
Serving Suggestions
These scones shine when served warm. Try them with clotted cream or whipped cream for extra richness. Fresh raspberries make a lovely touch on the side. Pair them with a hot cup of tea or coffee for a perfect snack. Drizzling melted white chocolate over the top adds a nice finish. Enjoy every bite!
Pro Tips
- Use Cold Ingredients: Make sure your butter and cream are cold to ensure the scones rise properly and have a flaky texture.
- Don’t Overmix: When combining the wet and dry ingredients, mix just until combined. Overmixing can lead to dense scones rather than light and fluffy ones.
- Fresh Raspberries: Use fresh raspberries for the best flavor and texture. If using frozen, be sure to thaw and drain them to avoid excess moisture.
Variations
Flavor Variations
You can switch up the fruits in these scones. Try using blueberries, strawberries, or even peaches. Each fruit gives a unique taste. Blueberries add a sweet burst. Strawberries bring a juicy flavor. Peaches offer a soft, sweet touch. Mix and match to find your favorite!
Gluten-Free Option
To make gluten-free scones, swap all-purpose flour with a gluten-free blend. Look for one that has xanthan gum. This helps give the scones structure. You may need to adjust the liquid a bit. Start with less cream, then add more if needed.
Vegan Modification
For a vegan version, replace the egg with a flax egg. Mix one tablespoon of flaxseed meal with three tablespoons of water. Let it sit until it thickens. Use coconut cream in place of heavy cream. This keeps the richness without dairy. Enjoy these scones with no animal products!
Storage Info
Best Practices for Storage
To keep your White Chocolate Raspberry Scones fresh, store them in an airtight container. This helps maintain their flaky texture. Place parchment paper between layers to avoid sticking. Keep the container at room temperature for up to two days. If you need to store them longer, consider freezing.
How to Reheat Scones
Reheating your scones can bring back their delightful warmth. Preheat your oven to 350°F (175°C). Place the scones on a baking sheet. Heat them for about 5 to 10 minutes. This method keeps them nice and flaky. You can also use a microwave for a quicker option. Heat for about 15 to 20 seconds, but they may not be as crispy.
Freezing Instructions
Freezing is a great way to save extra scones. Allow the baked scones to cool completely. Wrap each scone tightly in plastic wrap. Place them in a freezer-safe bag or container. They can last up to three months in the freezer. When you're ready to enjoy, thaw them in the fridge overnight. Then, reheat as mentioned above.
FAQs
What is the best way to keep scones fresh?
To keep scones fresh, store them in an airtight container. A cool, dry place works best. If you want to keep them longer, wrap them in plastic and freeze them. This way, they stay soft and tasty for weeks. Just thaw them at room temperature when you’re ready to enjoy.
Can I use frozen raspberries instead?
Yes, you can use frozen raspberries. Just remember to add them straight from the freezer. Thawing them first can make the dough soggy. Frozen raspberries may burst while mixing. This can change the color of your scones, but they'll still taste great.
How do I know when the scones are baked properly?
To know if your scones are done, look for a light golden color on top. Insert a toothpick into the center. If it comes out clean, your scones are ready. If there's wet dough on the toothpick, bake them a few more minutes.
Can these scones be made ahead of time?
You can make the dough ahead of time and chill it. Wrap the dough in plastic wrap and store it in the fridge for up to 24 hours. When ready, just shape and bake as usual. You can also bake them ahead and store them. Enjoy them warm or at room temperature.
You learned how to make great scones. We covered key ingredients, great substitutes, and the best brands to use. I shared easy steps for mixing and baking them. Tips helped you achieve flakiness and great storage ideas kept them fresh. You also explored fun variations and answered common questions.
Now, you're ready to bake delicious scones that your friends and family will love. Enjoy the process and make it your own!