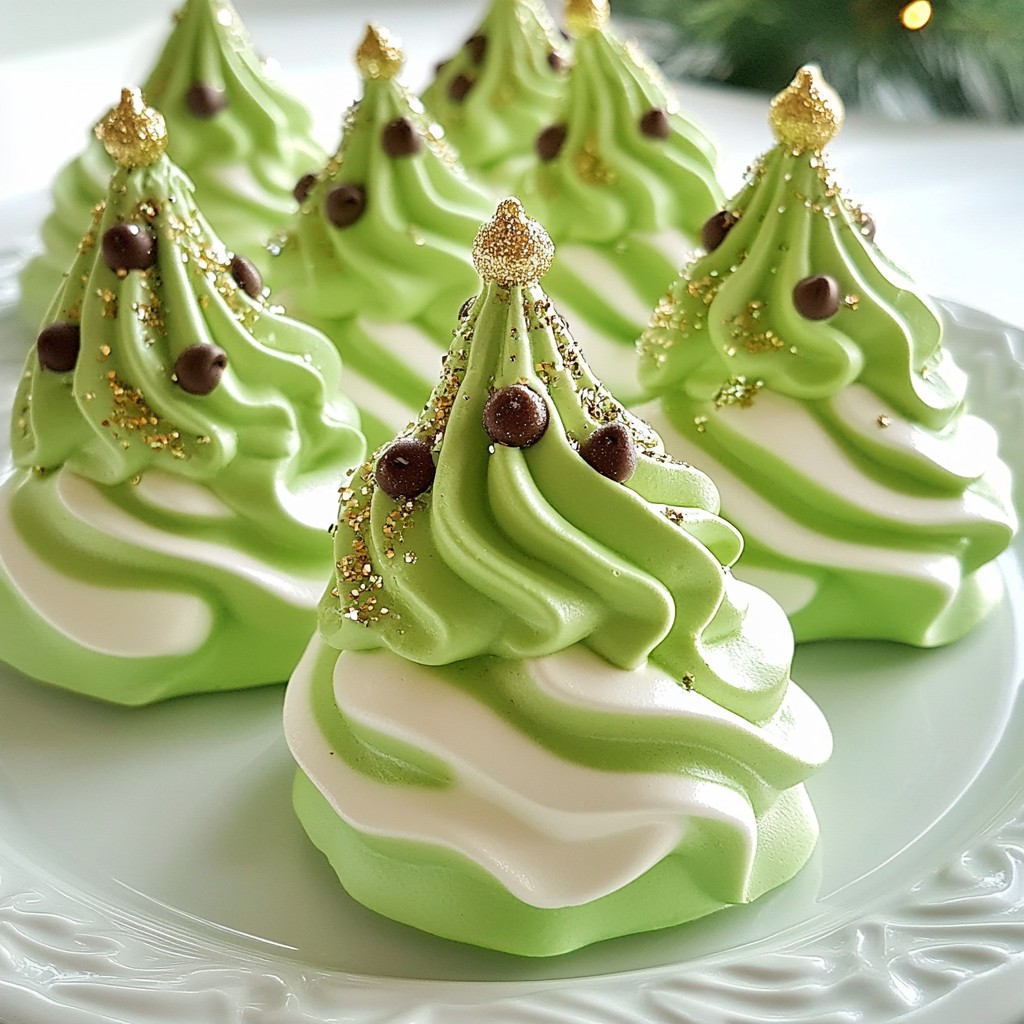
Get ready for a festive treat that adds cheer to any occasion: Tree Meringue Cookies! These delightful, crunchy confections are easy to make and taste amazing. With just a few simple ingredients and some fun decorating tips, you can create your own edible holiday trees. Whether it's Christmas or a spring celebration, these cookies will impress your friends and family. Let’s get started on this tasty adventure!
Why I Love This Recipe
- Fun and Festive Presentation: These whimsical tree-shaped cookies bring a holiday spirit to any gathering, making them a delightful centerpiece.
- Easy to Customize: With options for decorating, you can personalize the meringues with your favorite colors and toppings to match any theme.
- Light and Airy Texture: The meringue base creates a heavenly, melt-in-your-mouth experience that is sure to impress your guests.
- Perfect for Gifting: These cookies make a charming and unique gift during the holiday season, beautifully wrapped for friends and family.
Ingredients
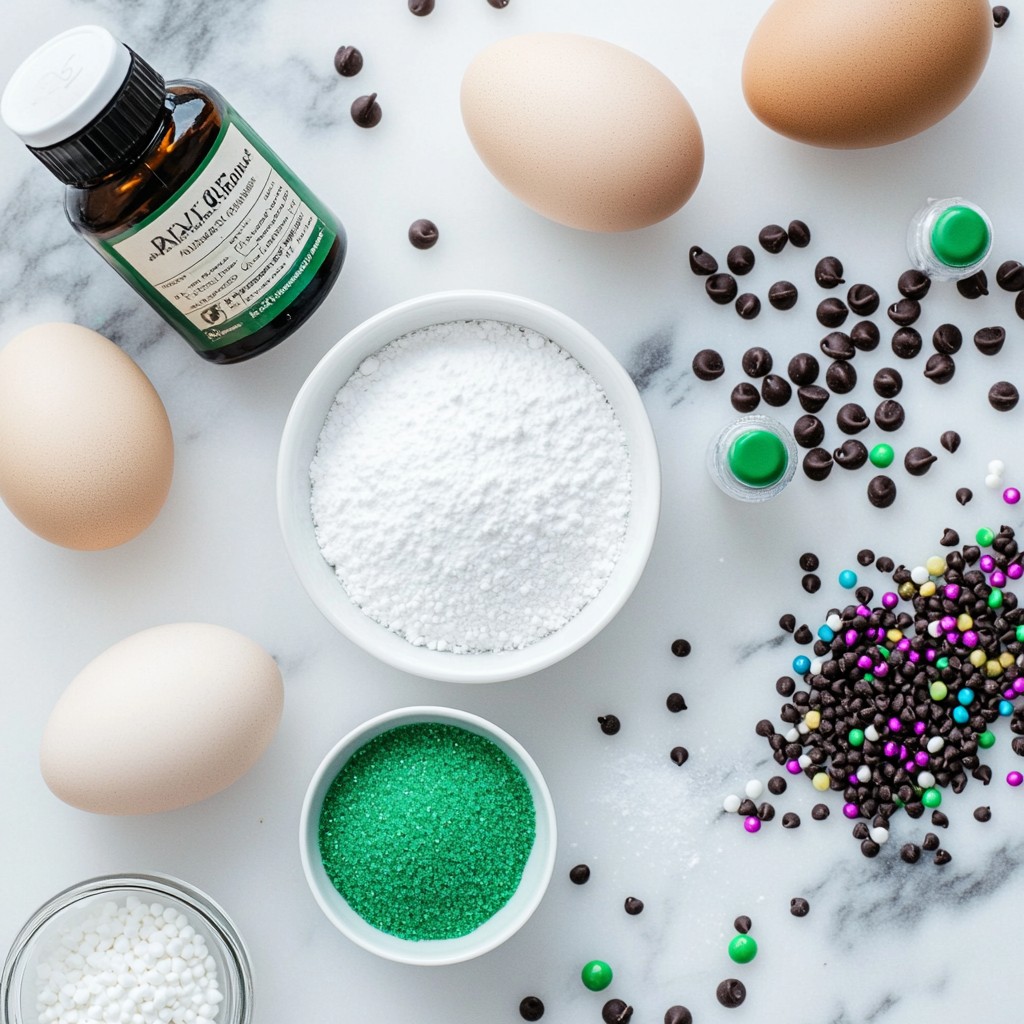
Main Ingredients for Tree Meringue Cookies
- 3 large egg whites, brought to room temperature
- 1/4 teaspoon cream of tartar
- 3/4 cup granulated sugar
- 1 teaspoon pure vanilla extract
- 1/2 teaspoon pure almond extract
- 1 cup powdered sugar, sifted
- Green gel food coloring
- Edible glitter or festive sprinkles (optional)
- Mini chocolate chips (for decorating as ornaments)
These ingredients create a light and airy cookie. The egg whites are key for the meringue's structure. Cream of tartar helps stabilize the egg whites, ensuring they whip well. Granulated sugar adds sweetness and gives the meringue its glossy finish.
The flavorings, like vanilla and almond extracts, add depth to the taste. You can choose different extracts for unique flavors. The powdered sugar helps create a smooth texture and adds sweetness.
Green gel food coloring brings the festive tree look to life. You can adjust the color to your liking. Edible glitter and sprinkles make these cookies sparkle. They add a fun, festive touch that kids love.
Mini chocolate chips serve as ornaments for your tree cookies. They make it easy to add a personal touch to each cookie. You can let your creativity shine with these delicious and festive treats!
Step-by-Step Instructions
Preparation of Baking Sheet and Egg Whites
Start by preheating your oven to 225°F (110°C). This low heat helps the meringues dry out without browning. Next, line a baking sheet with parchment paper. This creates a smooth surface for your cookies to bake on.
Creating the Meringue Base
In a large, clean mixing bowl, combine 3 large egg whites and 1/4 teaspoon of cream of tartar. Use an electric mixer on medium speed. Beat the mixture until soft peaks form, which takes about 2-3 minutes. Then, add 3/4 cup of granulated sugar slowly, one tablespoon at a time. Turn the mixer to high speed. Keep beating until the meringue is glossy and stiff peaks form. This usually takes another 3-5 minutes.
Finalizing the Meringue Mixture
Once your meringue base is ready, fold in 1 teaspoon of pure vanilla extract and 1/2 teaspoon of pure almond extract with a spatula. Be gentle to keep the air in the mixture. Next, sift in 1 cup of powdered sugar and fold carefully until smooth. Add a few drops of green gel food coloring and mix gently until you get your desired shade.
Piping the Cookie Shapes
Transfer the meringue to a piping bag fitted with a star tip. On the lined baking sheet, pipe tree shapes. Start with a larger base and create smaller peaks to form the tips of the trees. For extra fun, you can add mini chocolate chips as ornaments on each tree.
Baking Process
Place the baking sheet in the preheated oven. Bake for 1.5 to 2 hours, or until the meringues feel dry to the touch. They should lift off the parchment paper easily. After baking, turn off the oven. Let the meringues cool inside for about 1 hour. This helps them dry out further and prevents cracks. Once cooled, gently peel the cookies from the parchment and enjoy your festive treats!
Tips & Tricks
Achieving Perfect Meringue
To make great meringue, clean your bowl well. Any grease can hurt the foam. I always use a glass or metal bowl. Avoid plastic, as it can hold onto oils.
For stiff peaks, beat the egg whites and cream of tartar together. Start with medium speed for 2-3 minutes. Then, add the sugar slowly. Mix on high speed until the peaks are shiny and stiff. This should take about 3-5 minutes.
Shaping and Decorating Tips
Piping the tree shapes is fun! Start with a wide base and make smaller peaks on top. This creates a lovely tree shape. Use a star tip for a nice texture.
Decorating is where you can get creative! Use mini chocolate chips as ornaments. Sprinkle edible glitter or colorful sprinkles for a festive look. Let your imagination run wild!
Presentation Suggestions
For a festive display, arrange your meringue trees on a nice platter. A tiered stand adds height and interest. Sprinkle more edible glitter around the base for a magical touch. This makes your cookies not just tasty but also beautiful!
Pro Tips
- Room Temperature Eggs: Ensure your egg whites are at room temperature for better volume and stability when whipping.
- Stiff Peaks Check: To check if you’ve reached stiff peaks, turn the mixing bowl upside down — if the meringue stays put, it's ready!
- Gentle Folding: When incorporating the powdered sugar and extracts, fold gently to maintain the airy texture of the meringue.
- Cooling Time: Allow the meringues to cool inside the oven to prevent cracks from sudden temperature changes.
Variations
Flavor Variations
You can easily switch up the flavor of your Tree Meringue Cookies. One fun way is by adding different extracts to the mix. For instance, try using peppermint extract instead of vanilla for a minty twist. You can even use flavored powdered sugars, like hazelnut or coconut, to add a unique taste to your meringues. These flavors can make your cookies stand out during holiday gatherings.
Color Variations
Color is key to making your meringues festive. While green is classic for tree shapes, you can explore other color themes. Use white for a snowy look or gold for a touch of elegance. Mixing colors can also be fun. You might pipe some trees in green and others in gold to create a beautiful display. Just remember to use gel food coloring, as it won’t make your meringue too runny.
Seasonal Adaptations
Meringue cookies can fit any holiday theme. For Christmas, the tree shape is perfect, but you can adapt them for other seasons too. For Easter, consider shaping bunnies or eggs and using pastel colors. For Halloween, you might pipe them in orange and black. These adaptations keep your treats fresh and exciting for every celebration.
Storage Info
Proper Storage Techniques
To keep your tree meringue cookies fresh, store them at room temperature. Make sure to use airtight containers. This prevents air from making them soft. If you leave them out in the open, the cookies can lose their crunch.
Shelf Life
Meringue cookies can last up to two weeks when stored properly. This makes them great for holiday gifts or parties. Just make sure they stay in a cool, dry place. If you see any signs of moisture, it’s best to toss them.
Re-crisping Meringues
If your meringue cookies lose their crunch, don't worry! You can re-crisp them in the oven. Preheat the oven to 200°F (93°C) and place the cookies on a baking sheet. Bake for about 10-15 minutes. This will help restore their texture. Just keep an eye on them to avoid browning. Enjoy your festive treats!
FAQs
What is the best way to achieve stiff peaks?
To get stiff peaks, start with clean, dry tools. Any grease can ruin your meringue. Use a stand mixer or electric mixer for best results.
1. Egg whites should be at room temperature. This helps them whip better.
2. Add cream of tartar. It stabilizes the egg whites.
3. Beat on medium speed until soft peaks form. This takes about 2-3 minutes.
4. Gradually add sugar. Mix one tablespoon at a time on high speed.
5. Continue beating until the meringue is glossy and forms stiff peaks. This can take 3-5 minutes.
Can I make meringue cookies ahead of time?
Yes, you can make meringue cookies ahead of time. Store them in an airtight container at room temperature. They stay fresh for about a week.
- Don’t refrigerate them. Moisture can make them soft.
- If you want to make them even earlier, freeze them. Place them in a single layer, then move to a container. They last up to a month in the freezer.
How do I prevent meringue from weeping?
Meringue can weep due to moisture. Here are some tips to avoid this:
- Make sure your bowl and tools are completely dry.
- Use fresh egg whites. Older ones may not whip well.
- Avoid humidity. Make meringue on dry days.
- Once baked, cool meringues in the oven with the door slightly open. This helps prevent moisture.
What can I substitute for egg whites?
If you need a substitute for egg whites, try these options:
- Aquafaba: Use the liquid from canned chickpeas. Three tablespoons equals one egg white.
- Silken tofu: Blend until smooth. Use 1/4 cup for each egg white.
- Commercial egg replacers: Follow the package instructions for the correct amounts.
These alternatives can help you make meringue-like textures, though results may vary.
In this article, I shared how to make tree meringue cookies. We discussed key ingredients, precise steps, and helpful tips. You learned how to achieve that perfect meringue, shape your cookies, and decorate them for any occasion. Remember, practicing is key to getting it just right. Store your cookies well to keep them crispy. With these insights, you can impress anyone with your tasty confections. Enjoy baking your festive treats!