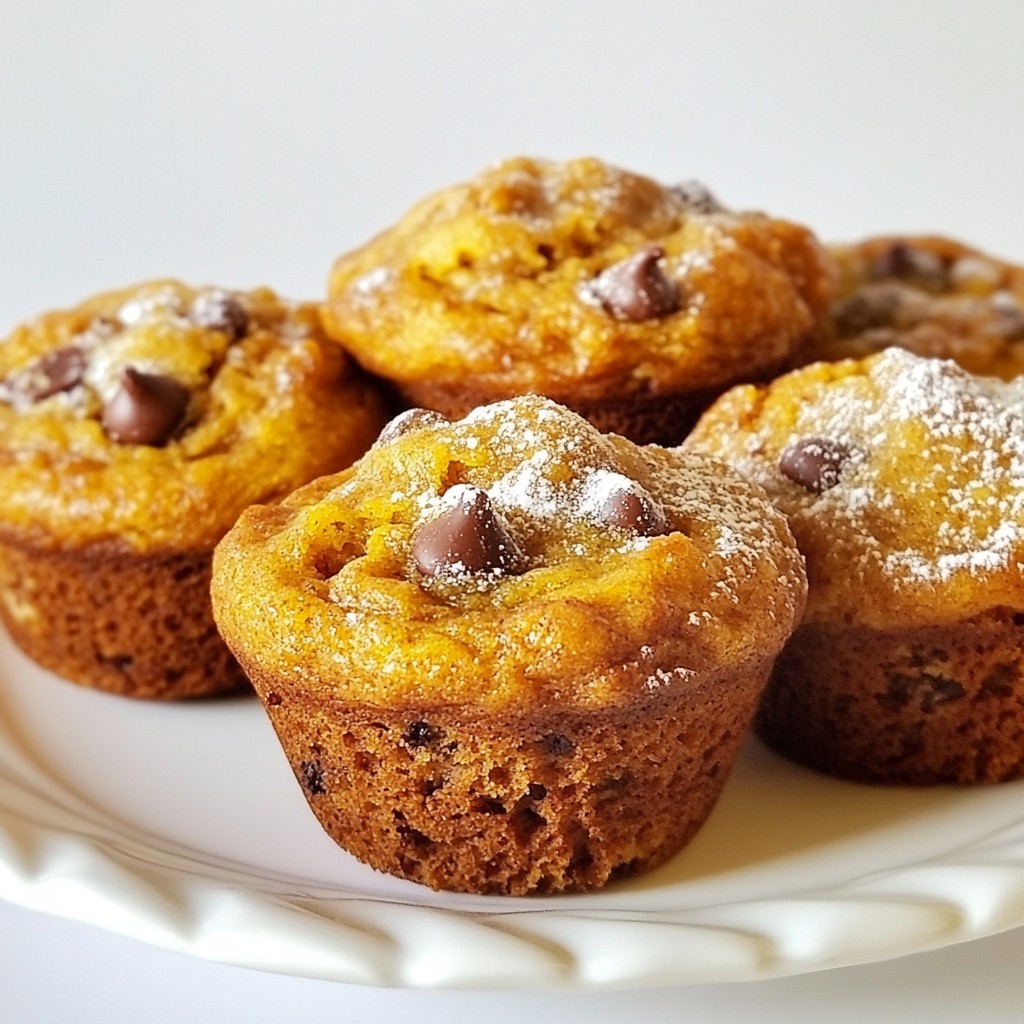
Are you ready to enjoy the warm flavors of fall? These Pumpkin Chocolate Chip Muffins are fluffy, tasty, and perfect for any time of year. In this post, I’ll share my simple recipe, essential ingredients, and helpful tips to elevate your baking. Whether you’re a seasoned baker or a newbie, you’ll love how easy and delicious these muffins are. Let's dive in and bake something amazing together!
Why I Love This Recipe
- Delicious Flavor Combination: The pairing of pumpkin and chocolate creates a delightful contrast that is both comforting and indulgent, perfect for fall or any time of the year.
- Moist and Tender Texture: Thanks to the pumpkin puree, these muffins are incredibly moist and tender, making them a delightful treat that melts in your mouth.
- Easy to Make: This recipe is straightforward and quick, perfect for busy mornings or when you need a last-minute dessert option.
- Versatile Options: Feel free to experiment with different add-ins like nuts or dried fruits, or adjust the sweetness to suit your taste preferences!
Ingredients
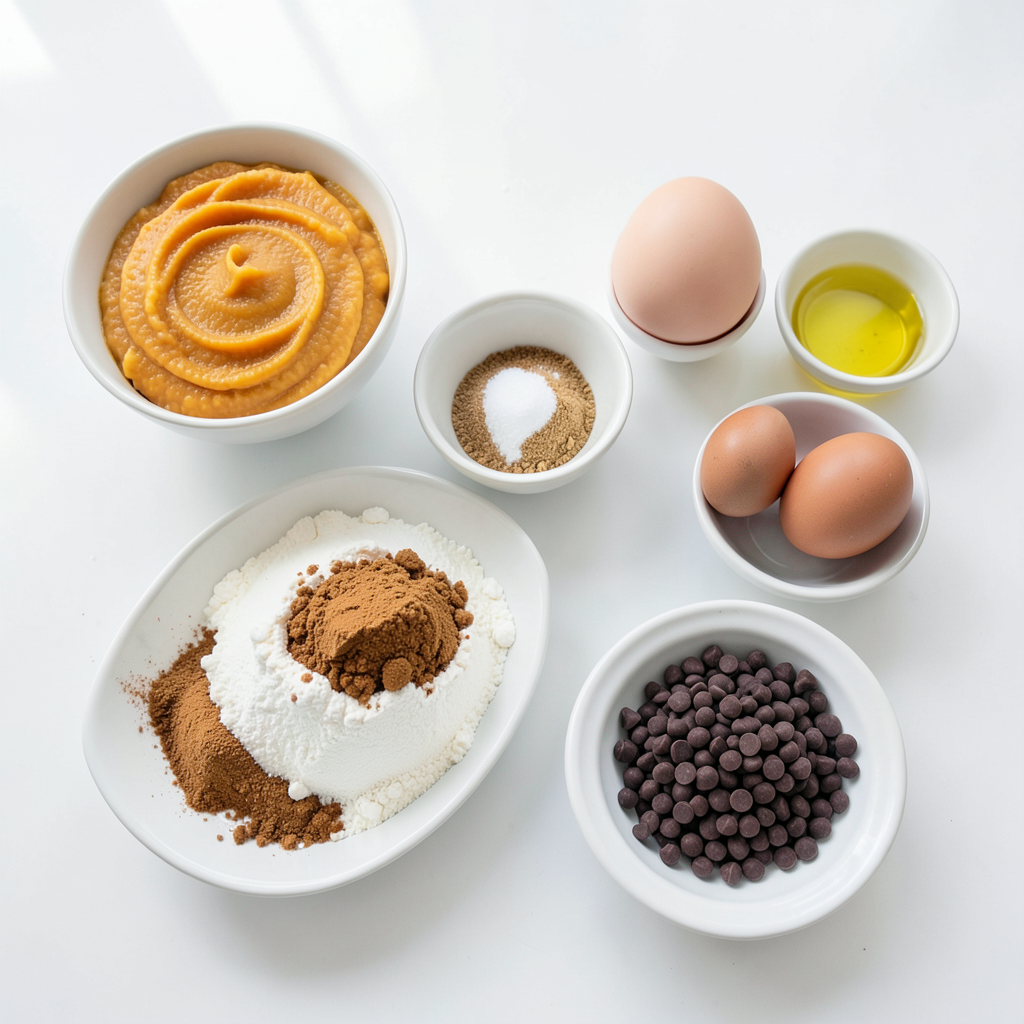
Essential Ingredients for Pumpkin Chocolate Chip Muffins
To make these tasty muffins, you need the following items:
- 1 cup pumpkin puree (either canned or fresh)
- 1/2 cup vegetable oil (can substitute with coconut oil for a unique flavor)
- 1/2 cup packed brown sugar
- 1/2 cup granulated sugar (feel free to adjust to taste)
- 2 large eggs, at room temperature
- 1 teaspoon pure vanilla extract
- 1 1/2 cups all-purpose flour (or substitute half with whole wheat flour for additional nutrition)
- 1 teaspoon baking powder
- 1 teaspoon baking soda
- 1 teaspoon ground cinnamon
- 1/2 teaspoon ground nutmeg
- 1/4 teaspoon salt
- 1 cup semi-sweet chocolate chips (dark chocolate can be used for a richer taste)
These ingredients come together to create a moist and flavorful muffin. The pumpkin puree adds a rich taste and keeps the muffins soft. The chocolate chips give a sweet touch that pairs perfectly with pumpkin.
Optional Substitutes and Add-ins
You can switch some ingredients to suit your taste. Here are some ideas:
- Use coconut oil instead of vegetable oil for a tropical twist.
- Swap out half the all-purpose flour for whole wheat flour for extra fiber.
- Add nuts like walnuts or pecans for crunch.
- Use dark chocolate chips for a richer flavor.
- Mix in dried fruits like cranberries or raisins for added sweetness.
These changes can make the muffins your own. Play with the flavors and find what you love best.
Nutritional Information Breakdown
Each muffin has about:
- Calories: 180
- Total fat: 8g
- Saturated fat: 1g
- Cholesterol: 30mg
- Sodium: 150mg
- Total carbohydrates: 27g
- Dietary fiber: 1g
- Sugars: 10g
- Protein: 3g
These muffins are a tasty treat. They include healthy fats from the oil and protein from the eggs. The pumpkin adds vitamins and minerals, making them a good snack option. Enjoy these muffins for breakfast or a sweet snack!
Step-by-Step Instructions
Preparation of Muffin Batter
Start by preheating your oven to 350°F (175°C). Line your muffin tin with paper liners or spray it with non-stick spray. This helps the muffins come out easily. In a large bowl, mix 1 cup of pumpkin puree, 1/2 cup of vegetable oil, 1/2 cup of brown sugar, 1/2 cup of granulated sugar, 2 large eggs, and 1 teaspoon of vanilla extract. Whisk these ingredients until smooth. In another bowl, whisk together 1 1/2 cups of all-purpose flour, 1 teaspoon of baking powder, 1 teaspoon of baking soda, 1 teaspoon of ground cinnamon, 1/2 teaspoon of ground nutmeg, and 1/4 teaspoon of salt. This step spreads the leavening agents and spices evenly.
Next, gently fold the dry mixture into the pumpkin mixture. Be careful not to over-mix because this can make the muffins dense. After that, fold in 1 cup of chocolate chips until they are well mixed. This gives the muffins a sweet and rich flavor.
Baking the Muffins
Now it’s time to fill the muffin cups. Use a spoon or an ice cream scoop to fill each cup about 2/3 full with batter. This allows room for the muffins to rise. Place the muffin tray in the oven and bake for 18 to 20 minutes. To check if they are done, insert a toothpick into the center of a muffin. If it comes out clean, the muffins are ready.
Cooling and Serving Suggestions
Once baked, let the muffins cool in the pan for 5 minutes. Then transfer them to a wire rack to cool completely. This keeps them moist. You can serve these muffins warm or at room temperature. For a fun touch, dust them with powdered sugar or add a dollop of whipped cream. A sprinkle of cinnamon on top makes them look and taste even better.
Tips & Tricks
How to Achieve the Perfect Muffin Texture
To get the perfect muffin texture, always use room temperature eggs. Cold eggs can cause the batter to be uneven. Mixing wet and dry ingredients should be done gently. Over-mixing can lead to tough muffins. Aim for a lumpy batter; it’s okay! Also, consider using fresh baking powder and baking soda. They help the muffins rise better and stay fluffy.
Common Mistakes to Avoid When Baking
One common mistake is not measuring ingredients accurately. Use dry measuring cups for flour and sugar. Another mistake is baking muffins at the wrong temperature. Always preheat your oven to 350°F (175°C) before baking. Avoid opening the oven door too often. This can cause temperature drops, leading to uneven baking. Lastly, don’t skip cooling the muffins in the pan. This helps them set before moving.
Ingredient Substitutions for Specific Diets
If you want to make these muffins healthier, use whole wheat flour. It gives extra fiber and nutrients. For a dairy-free option, swap vegetable oil with coconut oil. It adds a nice coconut flavor. If you need a lower sugar version, use a sugar substitute. Just ensure it measures the same as regular sugar. For gluten-free muffins, use a gluten-free flour blend. This keeps the muffins light and tasty.
Pro Tips
- Use Fresh Pumpkin: For the best flavor and texture, consider using fresh pumpkin puree made from roasted sugar pumpkins. It adds a delightful sweetness and richness to your muffins.
- Room Temperature Ingredients: Make sure your eggs are at room temperature before mixing. This helps create a smoother batter and contributes to a better rise in your muffins.
- Don’t Overmix: When combining the dry and wet ingredients, mix until just combined. Overmixing can lead to dense muffins instead of light and fluffy ones.
- Chocolate Chip Variations: Feel free to experiment with different types of chocolate chips, such as white chocolate or butterscotch, for a unique twist on the classic recipe.
Variations
Pumpkin Chocolate Chip Muffins with Nuts
You can add nuts for extra crunch. Walnuts or pecans work well. Simply chop them coarsely. Mix in about 1/2 cup of nuts when you add the chocolate chips. This gives a nice texture and flavor contrast to the soft muffins. Plus, nuts add healthy fats and protein.
Gluten-Free Pumpkin Chocolate Chip Muffins
If you need gluten-free muffins, swap the all-purpose flour. Use a gluten-free flour blend instead. Check that the blend includes xanthan gum. This helps mimic the structure of regular flour. Follow the same steps in the recipe, and enjoy a fluffy muffin without gluten.
Seasonal Variations: Adding Spices or Other Flavors
You can change the spices for seasonal tastes. Try adding ginger or cloves for a warm kick. Adjust the cinnamon and nutmeg to your liking. You could also mix in dried fruits like cranberries or raisins. They add sweetness and a chewy texture. For a twist, replace some pumpkin with applesauce or mashed bananas. This makes the muffins extra moist and flavorful.
Storage Information
Best Practices for Storing Muffins
To keep your pumpkin chocolate chip muffins fresh, follow these steps:
- Allow the muffins to cool completely before storage.
- Store them in an airtight container at room temperature.
- For best taste, enjoy them within 2-3 days.
- If you want to keep them longer, consider freezing.
Keeping them in a cool, dry place helps maintain their flavor and texture. Avoid direct sunlight, as it can dry them out. You can also layer parchment paper between muffins to prevent sticking.
How to Freeze Pumpkin Chocolate Chip Muffins
Freezing muffins is easy and keeps them tasty. Here’s how:
- Wrap each muffin in plastic wrap tightly.
- Place the wrapped muffins in a freezer bag or container.
- Label the bag with the date and type of muffin.
- Store them in the freezer for up to 3 months.
When you are ready to enjoy a muffin, simply remove it from the freezer. Let it thaw in the fridge overnight or at room temperature for a few hours.
Reheating Tips to Retain Freshness
To enjoy your muffins warm and fresh, use these tips:
- Preheat your oven to 350°F (175°C).
- Place the muffins on a baking sheet.
- Heat for about 5-10 minutes until warm.
You can also microwave muffins for a quick fix. Heat them for 15-20 seconds on a microwave-safe plate. This keeps them soft and delicious. Enjoy your muffins warm for the best experience!
FAQs
What Can I Use Instead of Pumpkin Puree?
You can use mashed bananas or applesauce. Both add moisture and sweetness. If you want a different taste, try using butternut squash puree. It gives a similar texture and flavor. Just make sure your substitute is thick and not too watery.
How Long Do Pumpkin Chocolate Chip Muffins Last?
These muffins stay fresh for about 3 to 5 days. Store them in an airtight container at room temperature. If you want to keep them longer, refrigerate them for up to a week. You can also freeze muffins, which can last up to three months.
Can I Make These Muffins Ahead of Time?
Yes, you can make these muffins ahead! They taste great stored overnight. Just let them cool completely before covering. You can also freeze the batter. Just thaw it and bake when you are ready. This way, you’ll have fresh muffins whenever you want!
You now know how to create delicious pumpkin chocolate chip muffins. We covered key ingredients, handy tips, and tasty variations. Remember to avoid common mistakes for great results. Proper storage will keep your muffins fresh. With the right substitutions, you can tailor these muffins to fit your diet. Baking is fun, and these muffins will bring joy to your table. Enjoy experimenting with flavors and sharing them with friends and family! Happy baking!