
If you're looking for a tasty, quick meal, then you’re in for a treat! This Parmesan Crusted Tilapia is perfect for busy days or when you just want something delicious without a lot of fuss. With a crispy, cheesy crust and tender fish, it’s sure to impress. Get ready to dive into this easy recipe that will have your family asking for seconds! Let's make meal time delightful and fun!
Why I Love This Recipe
- Deliciously Crispy: The combination of Parmesan cheese and panko breadcrumbs creates an incredibly crunchy texture that elevates the tilapia to a whole new level of deliciousness.
- Quick and Easy: This recipe is perfect for busy weeknights, taking only 30 minutes from start to finish while delivering a gourmet experience.
- Healthy and Flavorful: With fresh fish, minimal oil, and a delightful blend of spices, this dish is a healthy choice without sacrificing flavor.
- Customizable: Feel free to add your favorite herbs or spices to the breadcrumb mixture for a personalized touch that suits your taste!
Ingredients
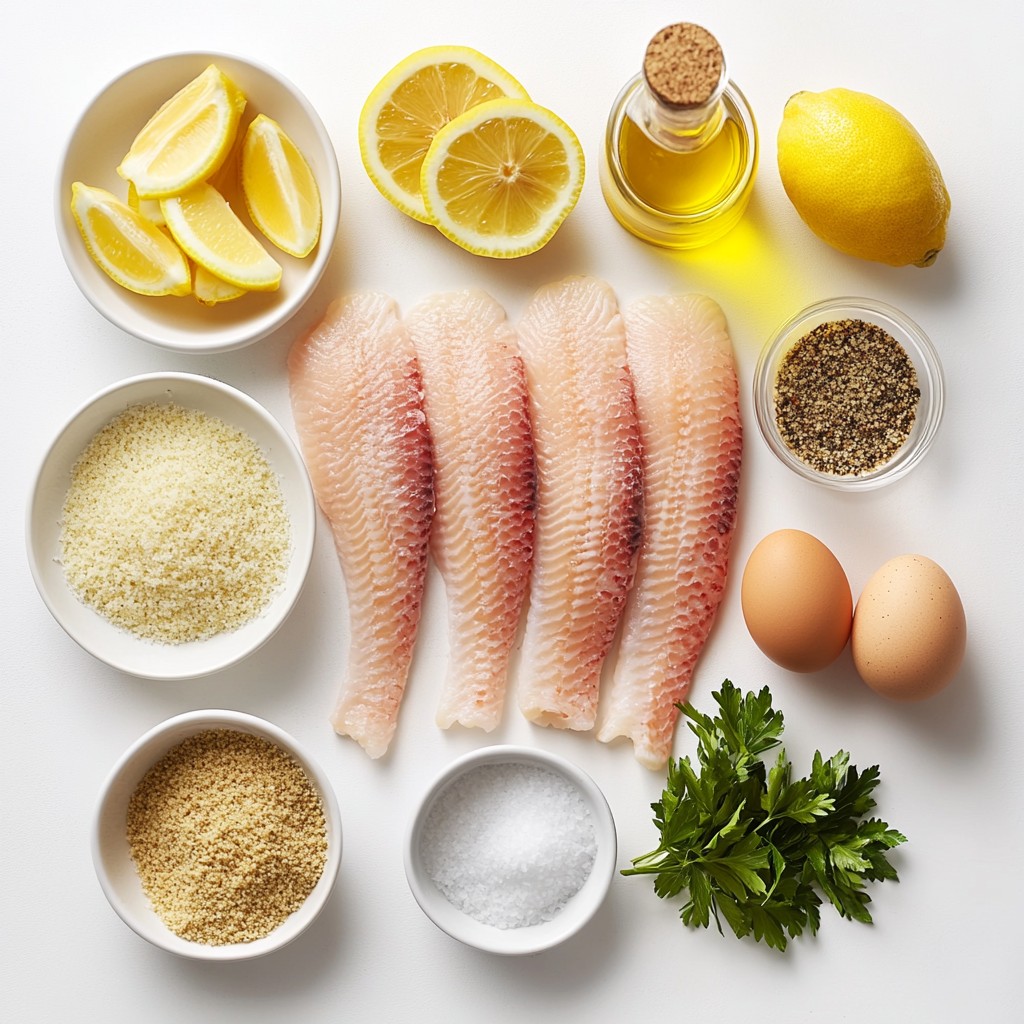
To make Parmesan crusted tilapia, gather these simple ingredients:
- 4 tilapia fillets, fresh or thawed
- 1 cup finely grated Parmesan cheese
- 1 cup panko breadcrumbs for extra crispiness
- 1 teaspoon garlic powder for depth of flavor
- 1 teaspoon onion powder to enhance taste
- 1 teaspoon dried parsley for a touch of freshness
- 1 teaspoon salt to season
- 1/2 teaspoon freshly ground black pepper
- 2 large eggs, beaten
- 2 tablespoons extra-virgin olive oil for drizzling
- Lemon wedges, for serving
Each ingredient plays a key role in making your tilapia delicious. The Parmesan cheese adds a salty, nutty flavor while the panko breadcrumbs give a satisfying crunch. Garlic and onion powders boost the taste, making every bite enjoyable. Dried parsley brings freshness, and the lemon wedges add brightness when you serve the dish. This meal is quick and easy, perfect for a weeknight dinner.
Step-by-Step Instructions
Preparation and Preheating
First, preheat your oven to 400°F (200°C). This step is key for a perfect cook. Next, line a baking sheet with parchment paper. This will help keep the fish from sticking. It also makes for easy cleanup.
Coating the Tilapia
In a shallow dish, combine these ingredients:
- 1 cup finely grated Parmesan cheese
- 1 cup panko breadcrumbs
- 1 teaspoon garlic powder
- 1 teaspoon onion powder
- 1 teaspoon dried parsley
- 1 teaspoon salt
- 1/2 teaspoon freshly ground black pepper
Mix these together with a fork. Make sure the flavors mix well. In another shallow bowl, beat 2 large eggs until frothy. This egg will help the coating stick to the fish.
Now, take a tilapia fillet. Dip it in the beaten egg, covering both sides. Let the extra egg drip back into the bowl. Next, transfer the fillet to the Parmesan mixture. Press down gently to coat the fish well.
Baking Instructions
Place the coated tilapia on your baking sheet. Leave space between each fillet for even cooking. Drizzle 2 tablespoons of olive oil over the tops. This step adds flavor and helps with crispiness.
Bake the fish in your preheated oven for 15-20 minutes. You will know it’s done when the fish is opaque and flakes easily with a fork. The crust should be golden brown and crispy.
After baking, take the sheet from the oven. Let the tilapia rest for a few minutes. For serving, add lemon wedges on the side. A squeeze of lemon adds a nice zesty flavor.
To make your dish look even better, serve the tilapia on a bed of mixed greens. Add a sprinkle of freshly chopped parsley for a colorful touch.
Tips & Tricks
Achieving Perfect Crispiness
To get that perfect crunch, use panko breadcrumbs. They are lighter and crispier than regular breadcrumbs. Mix them well with Parmesan cheese to create a flavorful coating. Drizzle extra-virgin olive oil on top of the fillets before baking. This adds moisture and helps the crust turn golden. Bake your tilapia at 400°F (200°C) for 15-20 minutes. Make sure the fish flakes easily with a fork.
Storing Leftovers Properly
If you have leftovers, store them in an airtight container. This helps keep the fish fresh and tasty. Place a paper towel in the container to absorb moisture. Keep it in the fridge for up to 2 days. When ready to eat, avoid microwaving. Instead, reheat in the oven to keep the crust crispy.
Recommended Serving Pairings
Parmesan crusted tilapia pairs well with many sides. Try serving it on a bed of mixed greens for freshness. Roasted vegetables or a light pasta dish also work great. Don't forget lemon wedges! They add a nice zesty flavor. You can also serve this dish with a creamy dip, like tartar sauce or aioli, for an extra treat.
Pro Tips
- Freshness is Key: Always use fresh tilapia fillets for the best flavor and texture. If using frozen, ensure they are completely thawed and patted dry before coating.
- Perfecting the Crust: For an extra crispy crust, consider adding a tablespoon of melted butter to the breadcrumb mixture.
- Rest Before Serving: Allow the tilapia to rest for a few minutes after baking. This helps the juices redistribute, keeping the fish moist.
- Lemon Zest Boost: For an extra layer of flavor, add some lemon zest to the breadcrumb mixture before coating the fish.
Variations
Herb-Infused Parmesan Variation
You can boost the flavor of your Parmesan crust with fresh herbs. Mix a tablespoon of chopped fresh basil, thyme, or dill into the Parmesan and breadcrumb mix. This adds a bright taste to the fish. Fresh herbs bring a burst of flavor that dried herbs can’t match.
Spicy Parmesan Crusted Version
If you enjoy a kick, add some heat. Mix in a teaspoon of cayenne pepper or red pepper flakes to the breadcrumb mix. The spice gives a nice contrast to the savory cheese. You can even serve it with a spicy dipping sauce for extra flavor.
Switching Fish Types
Not a fan of tilapia? You can swap it for other fish like cod or haddock. These fish have a mild taste and work well with the Parmesan crust. Just keep in mind to adjust the cooking time if you choose thicker fillets. Always check for doneness by ensuring the fish flakes easily.
Storage Info
Refrigeration Guidelines
After cooking, let the tilapia cool to room temperature. Place it in an airtight container. Store it in the fridge for up to three days. Make sure to keep it sealed to keep it fresh.
Freezing Instructions
If you want to freeze the tilapia, wrap each fillet tightly in plastic wrap. Then, place them in a freezer-safe bag. This keeps them fresh for up to three months. When you're ready to enjoy, thaw them overnight in the fridge.
Reheating Recommendations
To reheat, preheat your oven to 350°F (175°C). Place the tilapia on a baking sheet. Heat for about 10-15 minutes, or until warmed through. This keeps the crust crispy, so you can enjoy that satisfying crunch again!
FAQs
What can I substitute for tilapia?
You can use other mild fish. Good options include cod, haddock, or catfish. These fish have a similar texture. They also absorb flavors well. If you prefer a meatier option, try chicken breasts. Just adjust cooking times to ensure they cook through.
How to keep the crust from burning?
To avoid burning the crust, keep an eye on your oven. Bake at 400°F (200°C) and check after 15 minutes. If the crust browns too fast, cover the fish loosely with foil. This will protect it while cooking fully. Drizzling olive oil on top will also help maintain moisture and crispness.
Can I make this dish ahead of time?
Yes, you can prep the tilapia in advance. Coat the fillets and place them in the fridge. This keeps them fresh for up to 24 hours. When ready to cook, just bake as directed. You may need a few extra minutes in the oven. Enjoy fresh tilapia with a crispy crust any day!
In this article, we explored how to make a delicious Parmesan-crusted tilapia. We covered the key ingredients, step-by-step cooking instructions, and helpful tips for perfect results. You learned about variations and proper storage methods, ensuring your dish stays fresh and tasty. Remember, with these easy steps, you can impress anyone with your cooking. Don't hesitate to get creative with flavors and enjoy your meal. Happy cooking!