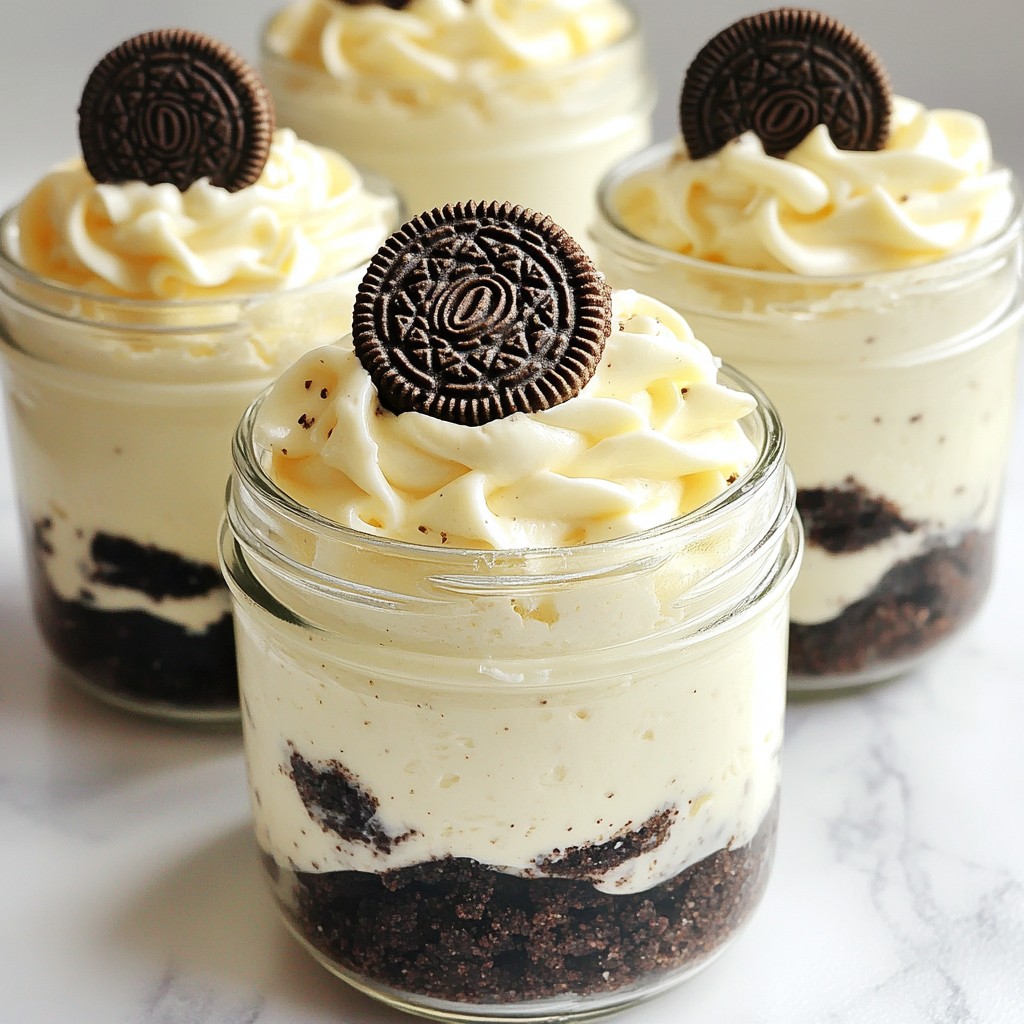
Craving a sweet treat that’s both easy and delicious? Look no further! My No-Bake Oreo Cheesecake Jars recipe brings you creamy goodness layered with crunchy cookie bits. These jars are perfect for quick desserts and impressing friends. Plus, you can customize them to fit any taste! Let’s dive into the fun world of no-bake desserts that will delight your taste buds.
Why I Love This Recipe
- No-Bake Convenience: This cheesecake requires no baking, making it a quick and easy dessert option that anyone can master.
- Rich and Creamy Texture: The combination of cream cheese and whipped cream creates a light yet indulgent filling that melts in your mouth.
- Perfect Portion Control: Serving the cheesecake in jars allows for individual portions, ideal for gatherings or a personal treat.
- Customizable Toppings: These jars can be topped with various garnishes, from crushed Oreos to fresh berries, allowing for creativity in presentation.
Ingredients
Main Ingredients
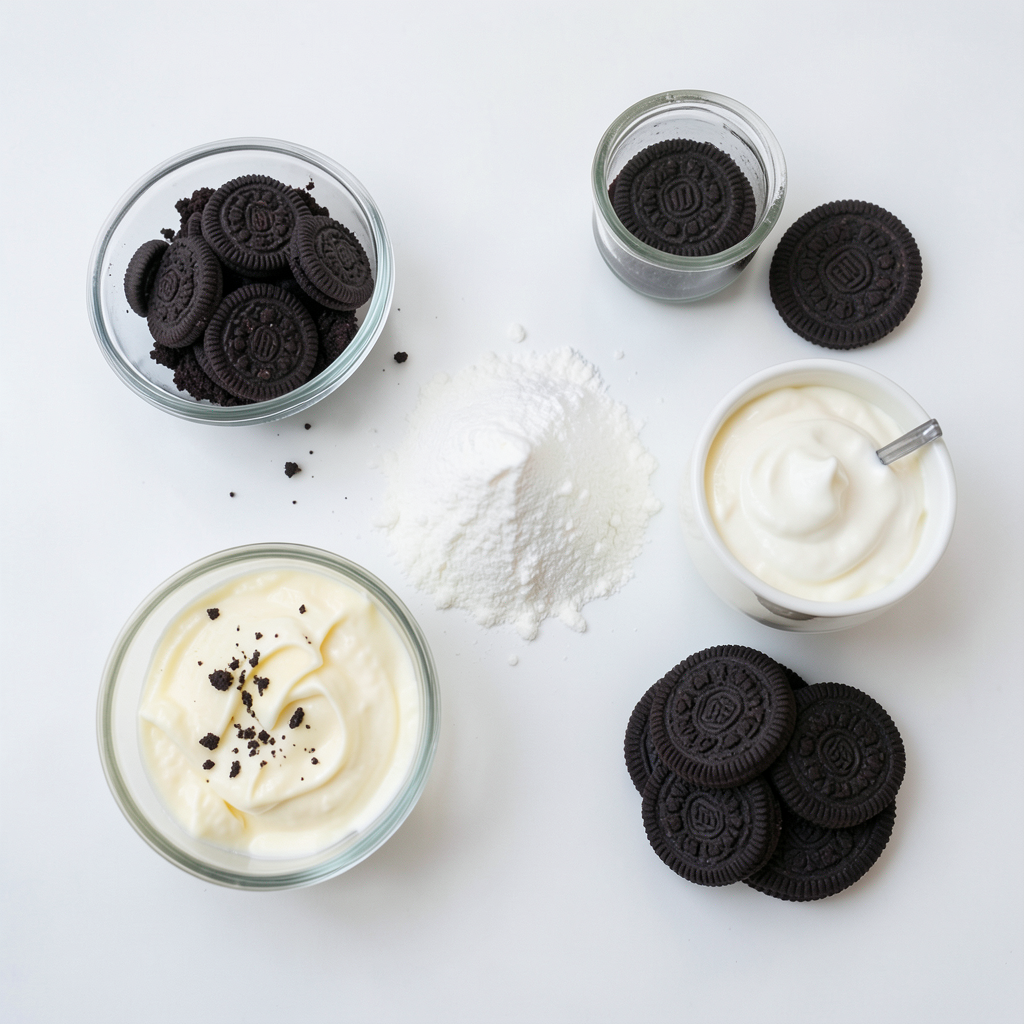
- 16 Oreo cookies, finely crushed
- 2 tablespoons unsalted butter, melted
- 1 cup cream cheese, softened
- 1 cup powdered sugar
- 1 teaspoon pure vanilla extract
- 1 cup heavy whipping cream
- Additional Oreo cookies for garnish
You need some key items to make this dessert. First, grab 16 Oreo cookies. These will give you that rich, chocolatey flavor. Crush them finely for the crust. Next, melt 2 tablespoons of unsalted butter. This helps bind the crushed Oreos together.
Now, for the creamy filling, get 1 cup of softened cream cheese. Softening it makes mixing easier. Add 1 cup of powdered sugar for sweetness. A teaspoon of pure vanilla extract will add a nice touch.
Finally, use 1 cup of heavy whipping cream. Whipping it gives the cheesecake a light and airy feel. You can also keep extra Oreo cookies for garnish. It looks great and adds extra crunch. With these ingredients, you set the stage for a tasty treat!
Step-by-Step Instructions
Preparing the Oreo Crust
- First, take 16 Oreo cookies and crush them finely.
- In a medium bowl, mix the crushed Oreos with 2 tablespoons of melted butter.
- Stir well until all crumbs are coated.
- Now, take 4 to 6 small jars and divide the Oreo mixture evenly among them.
- Press down firmly to form a solid crust layer. Set these aside to firm up.
Making the Cheesecake Filling
- In a large bowl, beat 1 cup of softened cream cheese until smooth.
- Next, add 1 cup of powdered sugar and 1 teaspoon of pure vanilla extract.
- Mix until everything is blended and smooth.
Combining and Chilling
- In another bowl, whip 1 cup of heavy cream on high speed until stiff peaks form.
- Carefully fold the whipped cream into the cheesecake mixture. Use a spatula to avoid deflating the cream.
- Spoon the fluffy filling over the crusts in each jar. Smooth the tops with a spatula.
- Cover the jars with lids or plastic wrap and chill for at least 4 hours.
- Before serving, top each jar with a mini Oreo cookie for a fun touch.
Tips & Tricks
Achieving the Perfect Texture
Whipping cream is key to a light cheesecake. It adds air to the mixture. Use cold cream for the best results. Beat it on high speed until stiff peaks form. This step makes your filling fluffy and smooth.
Folding is an art. Use a spatula to gently combine whipped cream with the cream cheese mix. Start from the bottom and go up. This keeps air in the mix. Do not stir too hard, or you will lose that fluffiness.
Presentation Suggestions
For a great look, serve your jars on a wooden platter. It adds warmth and charm. Scatter crushed Oreos around your jars for a nice touch. It makes the dessert pop visually.
For garnishing, place a mini Oreo cookie on top of each jar. You can also add whipped cream if you like. These small details elevate your dessert's look and taste.
Pro Tips
- Chill the Mixing Bowls: Before whipping the heavy cream, chill your mixing bowl and beaters in the freezer for about 10-15 minutes. This helps the cream whip up faster and achieve a better volume.
- Use Room Temperature Cream Cheese: Ensure your cream cheese is at room temperature to avoid lumps in the filling. This will create a smoother, creamier cheesecake texture.
- Don’t Overmix the Whipped Cream: When folding the whipped cream into the cheesecake mixture, be gentle. Overmixing can deflate the whipped cream, leading to a denser cheesecake filling.
- Customize Your Jars: Get creative with your presentation! Use different sizes or shapes of jars and layer in some additional fillings like chocolate or fruit for variety.
Variations
Flavor Variations
You can change the taste of your No-Bake Oreo Cheesecake Jars easily. Try adding chocolate or fruit flavors. For example, you can mix in melted chocolate or fruit puree with the cream cheese. This adds a fun twist to the classic cheesecake taste. You can even add some chocolate chips for extra crunch.
If you want a different crunch, swap Oreos for other cookies. Try using chocolate chip cookies or graham crackers instead. Each option will give your dessert a new twist. You can experiment until you find your favorite mix.
Dietary Adjustments
Making this dessert fit your needs is simple. To make it gluten-free, use gluten-free cookies. Many brands offer tasty gluten-free Oreos. You can also find gluten-free chocolate cookies to use.
For a dairy-free option, swap cream cheese with a dairy-free cream cheese alternative. Use coconut cream instead of heavy cream for a lighter taste. Always check that your ingredients are dairy-free.
Adjust the sweetness to fit your taste. If you like less sugar, reduce the powdered sugar. Taste as you mix and add more if needed. This way, you can make it just right for you!
Storage Info
How to Store Leftovers
To keep your No-Bake Oreo Cheesecake Jars fresh, store them in the fridge. Place the jars in an airtight container or cover them tightly with plastic wrap. This helps keep them cool and safe from other smells in the fridge.
The shelf life of these cheesecake jars is about 3 to 5 days. If you try to keep them longer, they may lose their creamy texture.
Freezing Instructions
Yes, you can freeze the cheesecake jars! Freezing is a good option if you want to save some for later. To freeze, first, make sure the jars are tightly covered. You can use plastic wrap or a lid. This prevents freezer burn.
To thaw the jars, move them to the fridge. Let them sit overnight to slowly come to temperature. This keeps the texture nice and creamy. Avoid thawing them at room temperature, as it may change the consistency.
FAQs
How do I make a larger batch?
To make a larger batch, just multiply the ingredients. For example, if you want to serve 12 jars, double the recipe. Use 32 Oreos, 4 tablespoons of butter, and adjust the cream cheese and sugar accordingly. Keep the same method for mixing and layering. This way, everyone can enjoy this tasty treat!
Can I use a different cookie instead of Oreos?
Yes, you can use other cookies! Try chocolate sandwich cookies, graham crackers, or even digestive biscuits. Each type of cookie adds a different flavor to the crust. For a fun twist, use peanut butter cookies for a rich taste. Just crush them the same way as Oreos.
How long does it take to set?
The cheesecake needs at least 4 hours to set in the fridge. If you want a firmer texture, chill it overnight. Factors like room temperature and how well you mix the filling can affect setting time. Ensure you cover the jars well to avoid drying out.
This blog post showed you how to make delicious Oreo cheesecake jars. We discussed the key ingredients, like Oreo cookies and cream cheese. You learned how to prepare the crust and make a smooth filling. We also shared tips for creating the perfect texture and beautiful presentation. You can customize flavors and adjust for dietary needs. Last, we covered storage methods for leftovers and freezing. Enjoy making this treat and impressing your friends with your new skill!