Key Lime Pie Bars Sweet and Tangy Dessert Delight

WANT TO SAVE THIS RECIPE?

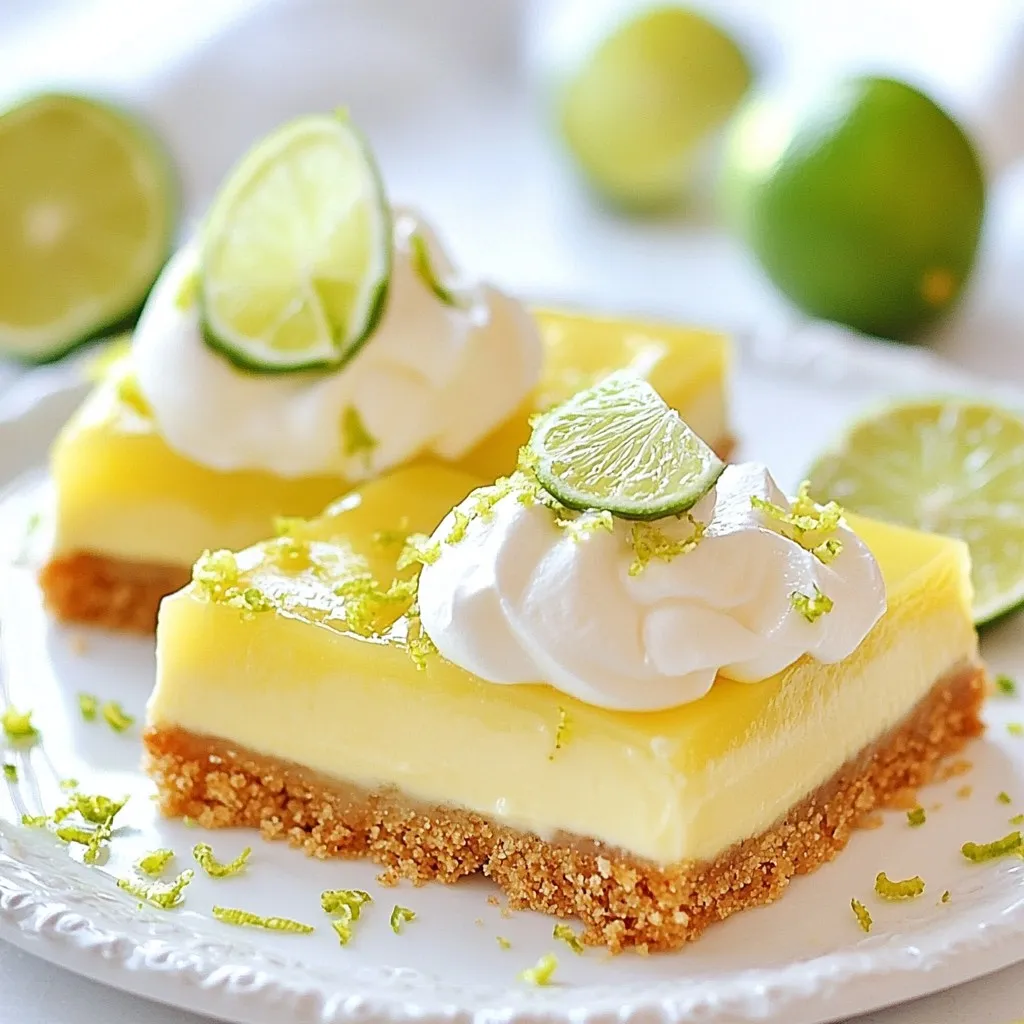
Get ready to indulge in a sweet and tangy dessert with my Key Lime Pie Bars! These bars combine a buttery, crunchy crust with a smooth and zesty filling. Whether you crave a refreshing treat for summer or a unique dessert to impress, you’ll love every bite. Let’s dive into this easy recipe, filled with tips, variations, and all you need to create this delightful dessert!

When making key lime pie bars, you'll need the following ingredients: - 1 ½ cups graham cracker crumbs - ½ cup unsalted butter, melted - ⅓ cup granulated sugar - 2 (14-ounce) cans sweetened condensed milk - ½ cup key lime juice (freshly squeezed preferred) - 4 large egg yolks - Zest of 2 key limes - A pinch of salt - Optional: Whipped cream for topping - Optional: Slices of key lime for garnish Each ingredient plays a key role in creating the perfect balance of flavors. The graham cracker crumbs form the crust, giving it a nice crunch. The melted butter helps bind the crumbs together. Granulated sugar adds sweetness, while sweetened condensed milk provides creaminess. Key lime juice brings that bright, tangy flavor. Freshly squeezed juice is best for true taste. The egg yolks add richness and help set the filling. Lime zest enhances the citrus aroma. A pinch of salt balances the sweetness, making every bite delightful. Don't forget the optional toppings! Whipped cream and key lime slices add a lovely finish. They also make the bars look pretty and inviting. Enjoy these bars as a sweet and tangy treat any time! {{ingredient_image_2}} Start by preheating your oven to 350°F (175°C). In a medium bowl, mix 1 ½ cups of graham cracker crumbs, ½ cup of melted unsalted butter, and ⅓ cup of granulated sugar. Stir well until everything blends together. Then, press this mixture firmly into the bottom of a 9x9-inch baking dish. This will form a solid crust for your bars. Once the crust is pressed down, place the baking dish in the preheated oven. Bake for 10-12 minutes. You want the crust to turn lightly golden. After baking, take it out and let it cool for a few minutes. In a large bowl, whisk together 2 cans of sweetened condensed milk, ½ cup of freshly squeezed key lime juice, 4 large egg yolks, the zest of 2 key limes, and a pinch of salt. Mix until the filling is smooth and creamy. Make sure there are no lumps in the mixture. Now, carefully pour the key lime filling over the cooled graham cracker crust. Use a spatula to spread the filling evenly over the entire crust. Return the baking dish to the oven and bake for an additional 15-18 minutes. The filling should be set but still have a slight jiggle in the center. This jiggle means the filling remains creamy. After baking, remove the dish from the oven. Allow it to cool at room temperature for about 30 minutes. Then, move the dish to the refrigerator. Chill for at least 2 hours so the bars can fully set. Once chilled, use a sharp knife to slice the bars into squares or rectangles. This ensures clean edges for a pretty presentation. For a delightful finish, add a dollop of whipped cream on top of each bar. You can also garnish with a thin slice of key lime if you wish. This adds a touch of freshness and beauty to your dessert. Using fresh key limes makes a big difference. Fresh limes give your bars a bright, zesty taste. Bottled juice can taste flat. If you can, always choose fresh key limes. They add true flavor that shines in each bite. To get the most juice, roll the limes on your counter. This softens them and helps release more juice. To get a creamy filling, mix well. Start with sweetened condensed milk in a big bowl. Add the key lime juice, egg yolks, and zest. Whisk everything until smooth. If you see lumps, keep mixing. Lumps can make your filling grainy. The goal is a silky and smooth texture. This will help the bars set perfectly. Cracks can happen when the filling bakes too long. To avoid this, watch the time. Bake until it has a slight jiggle in the center. This means it’s creamy and not overcooked. Also, let the bars cool before chilling. Rapid cooling can cause cracks too. By taking your time, you will have a beautiful, smooth top. Pro Tips Use Fresh Key Limes: For the best flavor, opt for fresh key limes instead of bottled juice. The zest and juice from fresh limes will elevate the taste of your bars. Chill Thoroughly: Allow the bars to chill in the refrigerator for at least 2 hours after baking. This helps them set properly and enhances the flavor. Cut with a Warm Knife: To achieve clean, neat slices, run your knife under hot water before cutting the bars, then wipe it dry. This prevents sticking and mess. Garnish Creatively: Enhance presentation by garnishing with whipped cream and lime slices. Consider adding a sprinkle of lime zest for added color and flavor. {{image_4}} To make your Key Lime Pie Bars even more fun, add coconut! Shredded coconut gives a sweet, chewy texture. Use about 1 cup of unsweetened shredded coconut. Mix it into the graham cracker crust for a delightful crunch. You can also sprinkle some on top before baking for added flavor. This twist brings a taste of the tropics to your dessert! If you need a gluten-free option, swap regular graham crackers for gluten-free ones. You can find gluten-free graham cracker crumbs in stores. If you want to make your own, crush gluten-free cookies. The rest of the recipe stays the same. This way, everyone can enjoy these tasty bars without worry! While key limes shine in this recipe, you can explore other citrus flavors. Try using fresh lime juice or even lemon juice. Each citrus brings its own unique taste. For a fun twist, mix different juices. Use half key lime juice and half lemon juice for a bright flavor. The options are endless, so get creative! To keep your key lime pie bars fresh, store them in the fridge. Use an airtight container to prevent drying out. If you have extra bars, wrap them tightly in plastic wrap before placing them in the container. This helps keep the bars moist and tasty. These bars stay fresh in the fridge for about five days. After that, they may lose some flavor and texture. Always check for any signs of spoilage before enjoying them. If they smell off or look unusual, it's best to toss them. You can freeze key lime pie bars for longer storage. First, cut the bars into squares. Wrap each piece in plastic wrap and then place them in a freezer bag. They can last for up to three months in the freezer. When you're ready to eat, thaw them in the fridge overnight for the best taste. Yes, you can use regular limes. Key limes have a unique flavor that is sweeter and more tart. If you choose regular limes, your bars will taste a bit different. They will still be tasty, but not the same as using key limes. The bars are done when the filling is set but still has a slight jiggle in the center. This means the filling is creamy. Bake them for about 15-18 minutes. Keep an eye on them to avoid overcooking. Yes, you can make these bars dairy-free. Use coconut cream instead of sweetened condensed milk. Look for dairy-free options in stores. This swap keeps the flavor close to the original. Serve the bars chilled for the best taste. You can add a dollop of whipped cream on top. Garnishing with a slice of key lime adds a nice touch. Arrange them on a plate with lime zest for a pretty look. To get clean slices, use a sharp knife. Dip the knife in hot water and wipe it dry before each cut. This keeps the edges smooth and neat. Be sure to let the bars chill completely before slicing. Making Key Lime Pie Bars is easy and fun. We covered ingredients, steps, tips, variations, and storage. You can use fresh key limes or try coconut for a twist. Remember to let the bars cool before slicing for neat pieces. These bars stay fresh in the fridge and freeze well too. Enjoy this summery treat anytime! Whether for a party or a quiet night, these bars will impress. With this guide, you are ready to make your own perfect Key Lime Pie Bars.

Why I Love This Recipe

  1. Refreshing Flavor: The bright, tangy taste of key lime combined with the sweetness of the condensed milk creates a delightful balance that is perfect for any occasion.
  2. Easy to Make: This recipe requires simple ingredients and straightforward steps, making it accessible even for novice bakers.
  3. Perfect for Sharing: These bars are easy to slice and serve, making them an ideal treat for gatherings, parties, or a summer barbecue.
  4. Beautiful Presentation: With a sprinkle of lime zest and a dollop of whipped cream, these bars look as delightful as they taste.

Ingredients

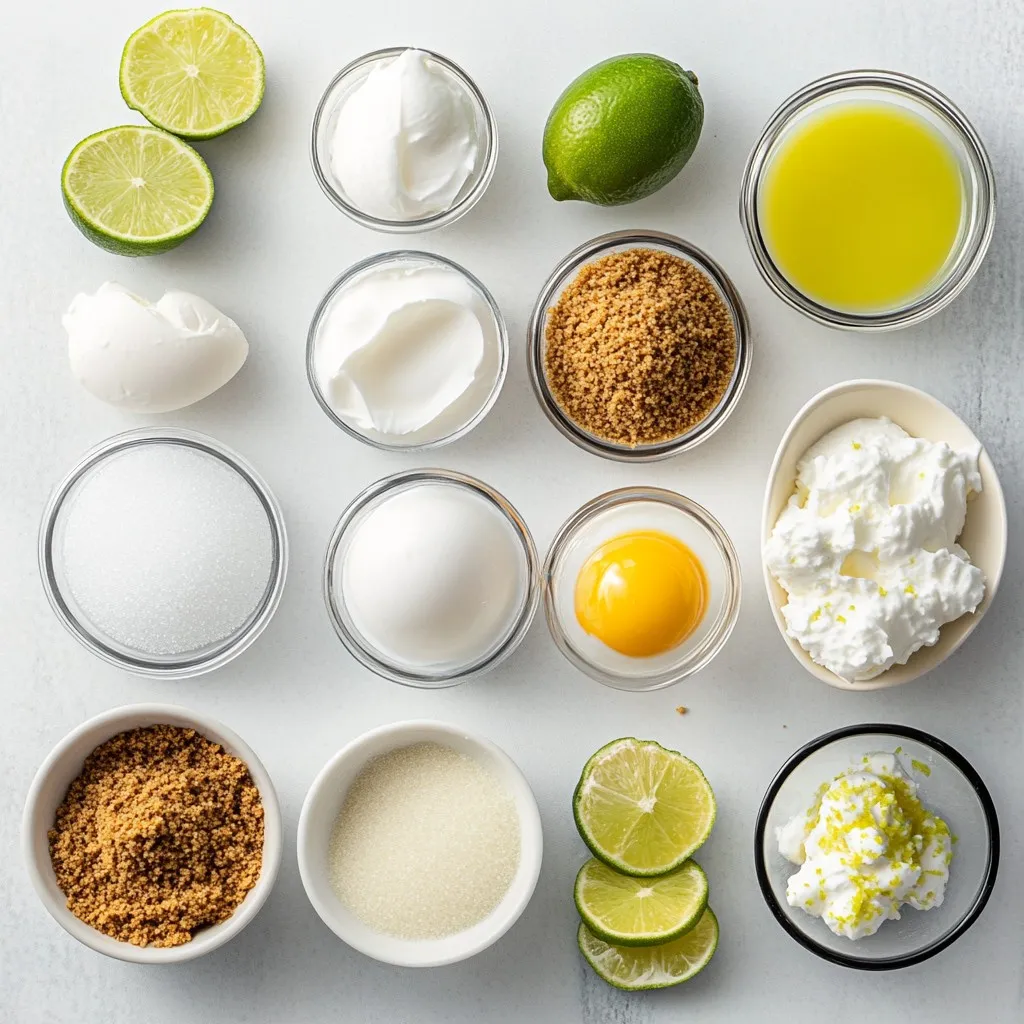
When making key lime pie bars, you’ll need the following ingredients:

– 1 ½ cups graham cracker crumbs

– ½ cup unsalted butter, melted

– ⅓ cup granulated sugar

– 2 (14-ounce) cans sweetened condensed milk

– ½ cup key lime juice (freshly squeezed preferred)

– 4 large egg yolks

– Zest of 2 key limes

– A pinch of salt

– Optional: Whipped cream for topping

– Optional: Slices of key lime for garnish

Each ingredient plays a key role in creating the perfect balance of flavors. The graham cracker crumbs form the crust, giving it a nice crunch. The melted butter helps bind the crumbs together. Granulated sugar adds sweetness, while sweetened condensed milk provides creaminess.

Key lime juice brings that bright, tangy flavor. Freshly squeezed juice is best for true taste. The egg yolks add richness and help set the filling. Lime zest enhances the citrus aroma. A pinch of salt balances the sweetness, making every bite delightful.

Don’t forget the optional toppings! Whipped cream and key lime slices add a lovely finish. They also make the bars look pretty and inviting. Enjoy these bars as a sweet and tangy treat any time!

Step-by-Step Instructions

Preparing the Crust

Start by preheating your oven to 350°F (175°C). In a medium bowl, mix 1 ½ cups of graham cracker crumbs, ½ cup of melted unsalted butter, and ⅓ cup of granulated sugar. Stir well until everything blends together. Then, press this mixture firmly into the bottom of a 9×9-inch baking dish. This will form a solid crust for your bars.

Baking the Crust

Once the crust is pressed down, place the baking dish in the preheated oven. Bake for 10-12 minutes. You want the crust to turn lightly golden. After baking, take it out and let it cool for a few minutes.

Making the Filling

In a large bowl, whisk together 2 cans of sweetened condensed milk, ½ cup of freshly squeezed key lime juice, 4 large egg yolks, the zest of 2 key limes, and a pinch of salt. Mix until the filling is smooth and creamy. Make sure there are no lumps in the mixture.

Combining Layers

Now, carefully pour the key lime filling over the cooled graham cracker crust. Use a spatula to spread the filling evenly over the entire crust.

Baking the Bars

Return the baking dish to the oven and bake for an additional 15-18 minutes. The filling should be set but still have a slight jiggle in the center. This jiggle means the filling remains creamy.

Cooling and Setting

After baking, remove the dish from the oven. Allow it to cool at room temperature for about 30 minutes. Then, move the dish to the refrigerator. Chill for at least 2 hours so the bars can fully set.

Slicing and Serving

Once chilled, use a sharp knife to slice the bars into squares or rectangles. This ensures clean edges for a pretty presentation.

Adding Optional Toppings

For a delightful finish, add a dollop of whipped cream on top of each bar. You can also garnish with a thin slice of key lime if you wish. This adds a touch of freshness and beauty to your dessert.

Tips & Tricks

Using Fresh Key Limes vs. Bottled Juice

Using fresh key limes makes a big difference. Fresh limes give your bars a bright, zesty taste. Bottled juice can taste flat. If you can, always choose fresh key limes. They add true flavor that shines in each bite. To get the most juice, roll the limes on your counter. This softens them and helps release more juice.

How to Achieve a Creamy Filling

To get a creamy filling, mix well. Start with sweetened condensed milk in a big bowl. Add the key lime juice, egg yolks, and zest. Whisk everything until smooth. If you see lumps, keep mixing. Lumps can make your filling grainy. The goal is a silky and smooth texture. This will help the bars set perfectly.

Preventing Cracks in the Top

Cracks can happen when the filling bakes too long. To avoid this, watch the time. Bake until it has a slight jiggle in the center. This means it’s creamy and not overcooked. Also, let the bars cool before chilling. Rapid cooling can cause cracks too. By taking your time, you will have a beautiful, smooth top.

Pro Tips

  1. Use Fresh Key Limes: For the best flavor, opt for fresh key limes instead of bottled juice. The zest and juice from fresh limes will elevate the taste of your bars.
  2. Chill Thoroughly: Allow the bars to chill in the refrigerator for at least 2 hours after baking. This helps them set properly and enhances the flavor.
  3. Cut with a Warm Knife: To achieve clean, neat slices, run your knife under hot water before cutting the bars, then wipe it dry. This prevents sticking and mess.
  4. Garnish Creatively: Enhance presentation by garnishing with whipped cream and lime slices. Consider adding a sprinkle of lime zest for added color and flavor.

Variations

Adding Coconut for a Tropical Twist

To make your Key Lime Pie Bars even more fun, add coconut! Shredded coconut gives a sweet, chewy texture. Use about 1 cup of unsweetened shredded coconut. Mix it into the graham cracker crust for a delightful crunch. You can also sprinkle some on top before baking for added flavor. This twist brings a taste of the tropics to your dessert!

Gluten-Free Alternatives

If you need a gluten-free option, swap regular graham crackers for gluten-free ones. You can find gluten-free graham cracker crumbs in stores. If you want to make your own, crush gluten-free cookies. The rest of the recipe stays the same. This way, everyone can enjoy these tasty bars without worry!

Citrus Variations (Using Other Citrus Juices)

While key limes shine in this recipe, you can explore other citrus flavors. Try using fresh lime juice or even lemon juice. Each citrus brings its own unique taste. For a fun twist, mix different juices. Use half key lime juice and half lemon juice for a bright flavor. The options are endless, so get creative!

Storage Info

Best Practices for Storing Leftovers

To keep your key lime pie bars fresh, store them in the fridge. Use an airtight container to prevent drying out. If you have extra bars, wrap them tightly in plastic wrap before placing them in the container. This helps keep the bars moist and tasty.

How Long Do They Stay Fresh?

These bars stay fresh in the fridge for about five days. After that, they may lose some flavor and texture. Always check for any signs of spoilage before enjoying them. If they smell off or look unusual, it’s best to toss them.

Freezing Key Lime Pie Bars

You can freeze key lime pie bars for longer storage. First, cut the bars into squares. Wrap each piece in plastic wrap and then place them in a freezer bag. They can last for up to three months in the freezer. When you’re ready to eat, thaw them in the fridge overnight for the best taste.

FAQs

Can I use regular limes instead of key limes?

Yes, you can use regular limes. Key limes have a unique flavor that is sweeter and more tart. If you choose regular limes, your bars will taste a bit different. They will still be tasty, but not the same as using key limes.

How do I know when the bars are done baking?

The bars are done when the filling is set but still has a slight jiggle in the center. This means the filling is creamy. Bake them for about 15-18 minutes. Keep an eye on them to avoid overcooking.

Can I make this recipe dairy-free?

Yes, you can make these bars dairy-free. Use coconut cream instead of sweetened condensed milk. Look for dairy-free options in stores. This swap keeps the flavor close to the original.

What are the best ways to serve Key Lime Pie Bars?

Serve the bars chilled for the best taste. You can add a dollop of whipped cream on top. Garnishing with a slice of key lime adds a nice touch. Arrange them on a plate with lime zest for a pretty look.

How do I get clean slices when cutting the bars?

To get clean slices, use a sharp knife. Dip the knife in hot water and wipe it dry before each cut. This keeps the edges smooth and neat. Be sure to let the bars chill completely before slicing.

Making Key Lime Pie Bars is easy and fun. We covered ingredients, steps, tips, variations, and storage. You can use fresh key limes or try coconut for a twist. Remember to let the bars cool before slicing for neat pieces. These bars stay fresh in the fridge and freeze well too. Enjoy this summery treat anytime! Whether for a party or a quiet night, these bars will impress. With this guide, you are ready to make your own perfect Key Lime Pie Bar

When making key lime pie bars, you'll need the following ingredients: - 1 ½ cups graham cracker crumbs - ½ cup unsalted butter, melted - ⅓ cup granulated sugar - 2 (14-ounce) cans sweetened condensed milk - ½ cup key lime juice (freshly squeezed preferred) - 4 large egg yolks - Zest of 2 key limes - A pinch of salt - Optional: Whipped cream for topping - Optional: Slices of key lime for garnish Each ingredient plays a key role in creating the perfect balance of flavors. The graham cracker crumbs form the crust, giving it a nice crunch. The melted butter helps bind the crumbs together. Granulated sugar adds sweetness, while sweetened condensed milk provides creaminess. Key lime juice brings that bright, tangy flavor. Freshly squeezed juice is best for true taste. The egg yolks add richness and help set the filling. Lime zest enhances the citrus aroma. A pinch of salt balances the sweetness, making every bite delightful. Don't forget the optional toppings! Whipped cream and key lime slices add a lovely finish. They also make the bars look pretty and inviting. Enjoy these bars as a sweet and tangy treat any time! {{ingredient_image_2}} Start by preheating your oven to 350°F (175°C). In a medium bowl, mix 1 ½ cups of graham cracker crumbs, ½ cup of melted unsalted butter, and ⅓ cup of granulated sugar. Stir well until everything blends together. Then, press this mixture firmly into the bottom of a 9x9-inch baking dish. This will form a solid crust for your bars. Once the crust is pressed down, place the baking dish in the preheated oven. Bake for 10-12 minutes. You want the crust to turn lightly golden. After baking, take it out and let it cool for a few minutes. In a large bowl, whisk together 2 cans of sweetened condensed milk, ½ cup of freshly squeezed key lime juice, 4 large egg yolks, the zest of 2 key limes, and a pinch of salt. Mix until the filling is smooth and creamy. Make sure there are no lumps in the mixture. Now, carefully pour the key lime filling over the cooled graham cracker crust. Use a spatula to spread the filling evenly over the entire crust. Return the baking dish to the oven and bake for an additional 15-18 minutes. The filling should be set but still have a slight jiggle in the center. This jiggle means the filling remains creamy. After baking, remove the dish from the oven. Allow it to cool at room temperature for about 30 minutes. Then, move the dish to the refrigerator. Chill for at least 2 hours so the bars can fully set. Once chilled, use a sharp knife to slice the bars into squares or rectangles. This ensures clean edges for a pretty presentation. For a delightful finish, add a dollop of whipped cream on top of each bar. You can also garnish with a thin slice of key lime if you wish. This adds a touch of freshness and beauty to your dessert. Using fresh key limes makes a big difference. Fresh limes give your bars a bright, zesty taste. Bottled juice can taste flat. If you can, always choose fresh key limes. They add true flavor that shines in each bite. To get the most juice, roll the limes on your counter. This softens them and helps release more juice. To get a creamy filling, mix well. Start with sweetened condensed milk in a big bowl. Add the key lime juice, egg yolks, and zest. Whisk everything until smooth. If you see lumps, keep mixing. Lumps can make your filling grainy. The goal is a silky and smooth texture. This will help the bars set perfectly. Cracks can happen when the filling bakes too long. To avoid this, watch the time. Bake until it has a slight jiggle in the center. This means it’s creamy and not overcooked. Also, let the bars cool before chilling. Rapid cooling can cause cracks too. By taking your time, you will have a beautiful, smooth top. Pro Tips Use Fresh Key Limes: For the best flavor, opt for fresh key limes instead of bottled juice. The zest and juice from fresh limes will elevate the taste of your bars. Chill Thoroughly: Allow the bars to chill in the refrigerator for at least 2 hours after baking. This helps them set properly and enhances the flavor. Cut with a Warm Knife: To achieve clean, neat slices, run your knife under hot water before cutting the bars, then wipe it dry. This prevents sticking and mess. Garnish Creatively: Enhance presentation by garnishing with whipped cream and lime slices. Consider adding a sprinkle of lime zest for added color and flavor. {{image_4}} To make your Key Lime Pie Bars even more fun, add coconut! Shredded coconut gives a sweet, chewy texture. Use about 1 cup of unsweetened shredded coconut. Mix it into the graham cracker crust for a delightful crunch. You can also sprinkle some on top before baking for added flavor. This twist brings a taste of the tropics to your dessert! If you need a gluten-free option, swap regular graham crackers for gluten-free ones. You can find gluten-free graham cracker crumbs in stores. If you want to make your own, crush gluten-free cookies. The rest of the recipe stays the same. This way, everyone can enjoy these tasty bars without worry! While key limes shine in this recipe, you can explore other citrus flavors. Try using fresh lime juice or even lemon juice. Each citrus brings its own unique taste. For a fun twist, mix different juices. Use half key lime juice and half lemon juice for a bright flavor. The options are endless, so get creative! To keep your key lime pie bars fresh, store them in the fridge. Use an airtight container to prevent drying out. If you have extra bars, wrap them tightly in plastic wrap before placing them in the container. This helps keep the bars moist and tasty. These bars stay fresh in the fridge for about five days. After that, they may lose some flavor and texture. Always check for any signs of spoilage before enjoying them. If they smell off or look unusual, it's best to toss them. You can freeze key lime pie bars for longer storage. First, cut the bars into squares. Wrap each piece in plastic wrap and then place them in a freezer bag. They can last for up to three months in the freezer. When you're ready to eat, thaw them in the fridge overnight for the best taste. Yes, you can use regular limes. Key limes have a unique flavor that is sweeter and more tart. If you choose regular limes, your bars will taste a bit different. They will still be tasty, but not the same as using key limes. The bars are done when the filling is set but still has a slight jiggle in the center. This means the filling is creamy. Bake them for about 15-18 minutes. Keep an eye on them to avoid overcooking. Yes, you can make these bars dairy-free. Use coconut cream instead of sweetened condensed milk. Look for dairy-free options in stores. This swap keeps the flavor close to the original. Serve the bars chilled for the best taste. You can add a dollop of whipped cream on top. Garnishing with a slice of key lime adds a nice touch. Arrange them on a plate with lime zest for a pretty look. To get clean slices, use a sharp knife. Dip the knife in hot water and wipe it dry before each cut. This keeps the edges smooth and neat. Be sure to let the bars chill completely before slicing. Making Key Lime Pie Bars is easy and fun. We covered ingredients, steps, tips, variations, and storage. You can use fresh key limes or try coconut for a twist. Remember to let the bars cool before slicing for neat pieces. These bars stay fresh in the fridge and freeze well too. Enjoy this summery treat anytime! Whether for a party or a quiet night, these bars will impress. With this guide, you are ready to make your own perfect Key Lime Pie Bars.

Zesty Key Lime Pie Bars

Delicious and tangy key lime pie bars with a graham cracker crust, perfect for a refreshing dessert.
Prep Time 15 minutes
Cook Time 30 minutes
Total Time 2 hours 30 minutes
Course Dessert
Cuisine American
Servings 16
Calories 150 kcal

Ingredients
  

  • 1.5 cups graham cracker crumbs
  • 0.5 cup unsalted butter, melted
  • 0.33 cup granulated sugar
  • 28 ounces sweetened condensed milk
  • 0.5 cup key lime juice
  • 4 large egg yolks
  • 2 pieces zest of key limes
  • 1 pinch salt
  • 1 serving whipped cream for topping (optional)
  • 1 slice slices of key lime for garnish (optional)

Instructions
 

  • Prepare the Crust: Preheat your oven to 350°F (175°C). In a medium mixing bowl, combine the graham cracker crumbs, melted butter, and granulated sugar. Mix well until all ingredients are thoroughly combined. Press this mixture firmly and evenly into the bottom of a 9x9-inch baking dish to create a solid crust.
  • Bake the Crust: Place the baking dish in the preheated oven and bake for 10-12 minutes. The crust should become lightly golden. Once baked, remove it from the oven and let it cool for a few minutes.
  • Make the Filling: In a large mixing bowl, whisk together the sweetened condensed milk, freshly squeezed key lime juice, egg yolks, lime zest, and a pinch of salt. Mix until the filling is smooth and creamy, ensuring no lumps remain.
  • Combine Layers: Carefully pour the key lime filling over the cooled graham cracker crust. Use a spatula to evenly spread the filling across the whole crust.
  • Bake the Bars: Return the baking dish to the oven and bake for an additional 15-18 minutes. The filling should be set but will still have a slight jiggle in the center, indicating creaminess.
  • Cool and Set: Once baked, remove the dish from the oven and allow it to cool at room temperature for about 30 minutes. Then, transfer the dish to the refrigerator and chill for at least 2 hours to completely set.
  • Slice and Serve: After the bars have chilled, slice them into squares or rectangles using a sharp knife for clean edges.
  • Optional Topping: For a finishing touch, add a dollop of whipped cream on top of each bar and garnish with a thin slice of key lime if desired.

Notes

Arrange the bars on a decorative platter and sprinkle some extra lime zest around for an appealing presentation!
Keyword bars, dessert, key lime

WANT TO SAVE THIS RECIPE?