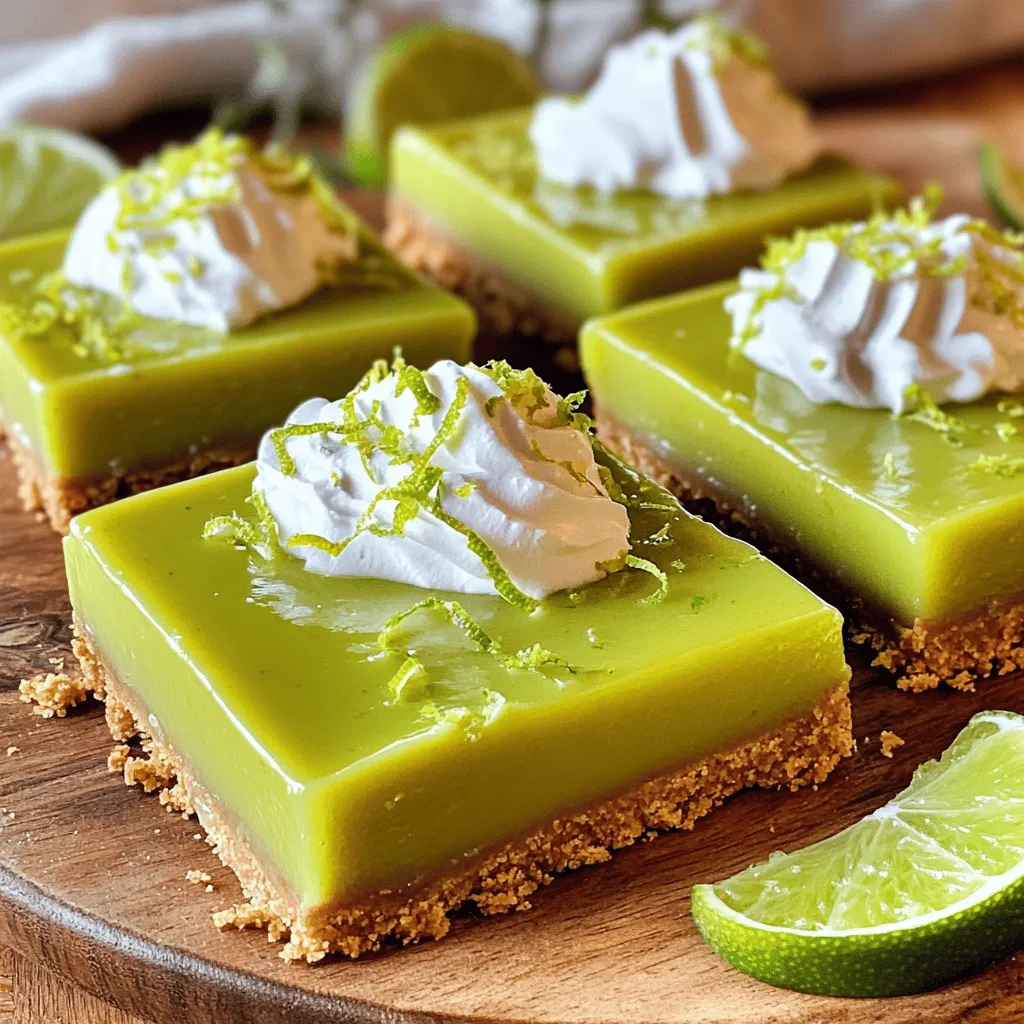
Are you ready to whip up a dessert that’s simple yet bursting with flavor? Key Lime Pie Bars are the perfect treat for anyone craving a tangy delight. With a crunchy crust and smooth filling, these bars hit the spot every time. In this post, I’ll guide you through every step, from gathering your ingredients to storing your leftovers. Let’s dive into the world of zesty Key Lime Pie Bars!
Ingredients
In this recipe for Key Lime Pie Bars, you will need the following ingredients:
– 1 cup graham cracker crumbs
– 1/4 cup granulated sugar
– 1/2 cup unsalted butter, melted
– 2 large eggs
– 1 can (14 oz) sweetened condensed milk
– 1/2 cup freshly squeezed key lime juice
– Zest of 2 key limes
– 1/4 teaspoon salt
– Whipped cream (for topping)
– Lime slices and additional zest (for garnish)
These ingredients come together to create a sweet and tart treat that everyone will love. The graham cracker crumbs form the crust, while the sweetened condensed milk and key lime juice make the filling rich and tangy. Using fresh key lime juice will give your bars the best flavor. You’ll top the finished bars with whipped cream and a sprinkle of zest for a beautiful finish. Each bite offers a burst of zesty goodness that brightens any day.
Step-by-Step Instructions
Preheat the Oven
Set the temperature to 350°F (175°C). This step is key for even baking.
Prepare the Crust
Combine graham cracker crumbs, sugar, and melted butter in a bowl. Mix until it looks like wet sand. Press this mixture into the bottom of an 8×8-inch baking dish. Bake for 8-10 minutes, until the crust is light golden. Take it out and let it cool.
Make the Filling
In another bowl, whisk together the eggs, sweetened condensed milk, freshly squeezed key lime juice, lime zest, and salt. Whisk until smooth. Pour this creamy filling over the cooled crust. Bake for 15-20 minutes. The filling should not jiggle when you shake the dish gently.
Let it cool at room temperature, then chill in the fridge for at least 2 hours. Cut into squares and serve with whipped cream, lime zest, and a slice of lime on top. Enjoy the sweet and tart flavors!
Tips & Tricks
Achieving the Perfect Crust
To make a great crust, press the crumb mixture down firmly. This helps form an even base. Aim for a smooth and flat layer. Bake it until it turns lightly golden. This gives your bars a nice crunch and flavor.
Making the Filling
For the best taste, always use fresh key lime juice. The flavor really shines through. After baking the filling, gently shake the dish to check for doneness. If it jiggles in the center, it needs more time. You want it to be set but not overcooked.
Presentation Tips
To make your bars look amazing, serve them with whipped cream on top. Add some fresh lime zest for a pop of color. Mint leaves also work great as a garnish. They add a nice touch and make your dessert even more inviting.
Variations
Gluten-Free Option
You can make these bars gluten-free. Just swap regular graham cracker crumbs for gluten-free ones. This simple change keeps the taste and texture just right. Many brands offer tasty gluten-free options. Look for crumbs made from rice or almond flour.
Vegan Version
To make a vegan version, use aquafaba instead of eggs. Aquafaba is the liquid from canned chickpeas. It works great for baking! You also want to use coconut cream instead of sweetened condensed milk. This gives the bars a creamy texture without any dairy.
Flavored Variations
Want to add a twist to your key lime pie bars? Try mixing in some coconut or strawberry puree. Coconut adds a tropical flair, while strawberry gives a sweet touch. Just fold in the puree after mixing the filling. This will create a fun surprise in every bite.
Storage Info
How to Store
You can store these Key Lime Pie Bars in the fridge. Use an airtight container. They will stay fresh for up to a week. This keeps them tasty and safe to eat.
Freezing Instructions
If you want longer storage, freeze the cut bars. Wrap each bar in plastic wrap. Place them in a zip-top bag. This way, they will stay fresh for up to three months.
Best Way to Serve After Storage
To serve after freezing, thaw the bars in the fridge. This keeps them cool and creamy. Add fresh whipped cream on top before serving. You can also add a sprinkle of zest for extra flavor. Enjoy the tartness!
FAQs
Can I make Key Lime Pie Bars ahead of time?
Yes, these bars can be made in advance and stored. I often prepare them the day before a gathering. This way, they chill overnight. Chilling helps the flavors mix and deepen. Just keep them in the fridge in an airtight container. They stay fresh and tasty for several days.
Can I use regular limes instead of key limes?
Yes, regular lime juice can be used if key limes are unavailable. Key limes have a unique tartness. However, regular limes work well too. I recommend using fresh juice for the best taste. The flavor may be a bit different, but still delicious.
What is the best way to cut these bars?
Use a hot knife for clean, even cuts to avoid crumbling. Run the knife under hot water, then dry it. This simple trick helps you slice through the bars smoothly. Clean cuts make for a nice presentation. Plus, it keeps the filling intact.
To wrap up, you’ve learned how to make delicious Key Lime Pie Bars. We covered the ingredients needed, like graham cracker crumbs and sweetened condensed milk. I shared the step-by-step instructions for a perfect crust and filling.
Remember, you can customize these bars to fit your taste. Store leftovers carefully for later enjoyment. With these tips, you can impress anyone with your baking skills. Enjoy your tasty creation!