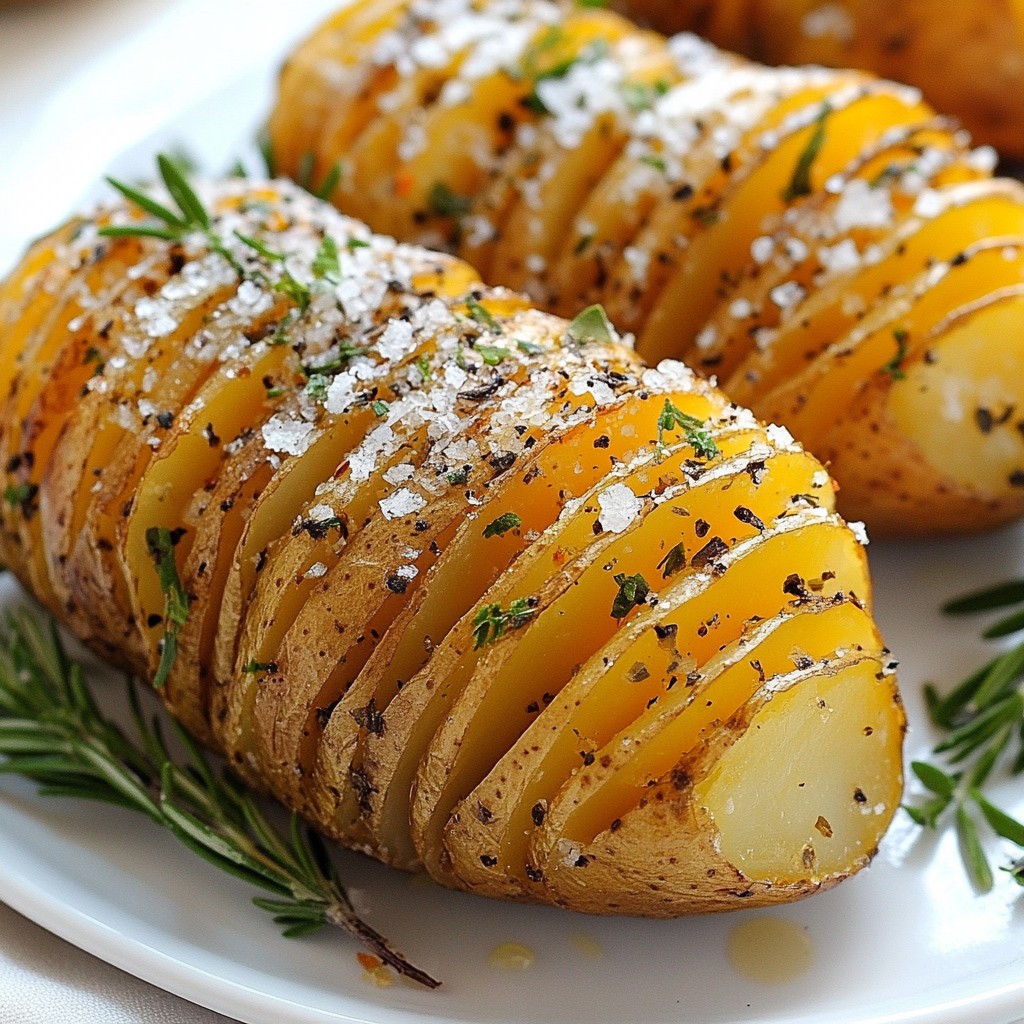
Looking for a side dish that’s both crispy and bursting with flavor? Garlic Herb Hasselback Potatoes are your answer! With just a handful of simple ingredients, you can create a stunning dish that steals the show. In this guide, I’ll walk you through every step, from prepping the potatoes to baking them to perfection. Join me as we dive into this delicious recipe that will impress family and friends alike!
Why I Love This Recipe
- Delicious Flavor Combination: The blend of garlic, rosemary, and thyme creates an irresistible aroma and taste that elevates the humble potato to a gourmet level.
- Stunning Presentation: The Hasselback style not only enhances the flavor but also makes for a visually impressive dish that’s perfect for entertaining.
- Customizable Toppings: You can easily switch up the herbs or add cheese and other toppings, making this recipe versatile for any occasion.
- Easy to Prepare: With simple steps and minimal ingredients, this recipe is straightforward enough for both novice and experienced cooks.
Ingredients
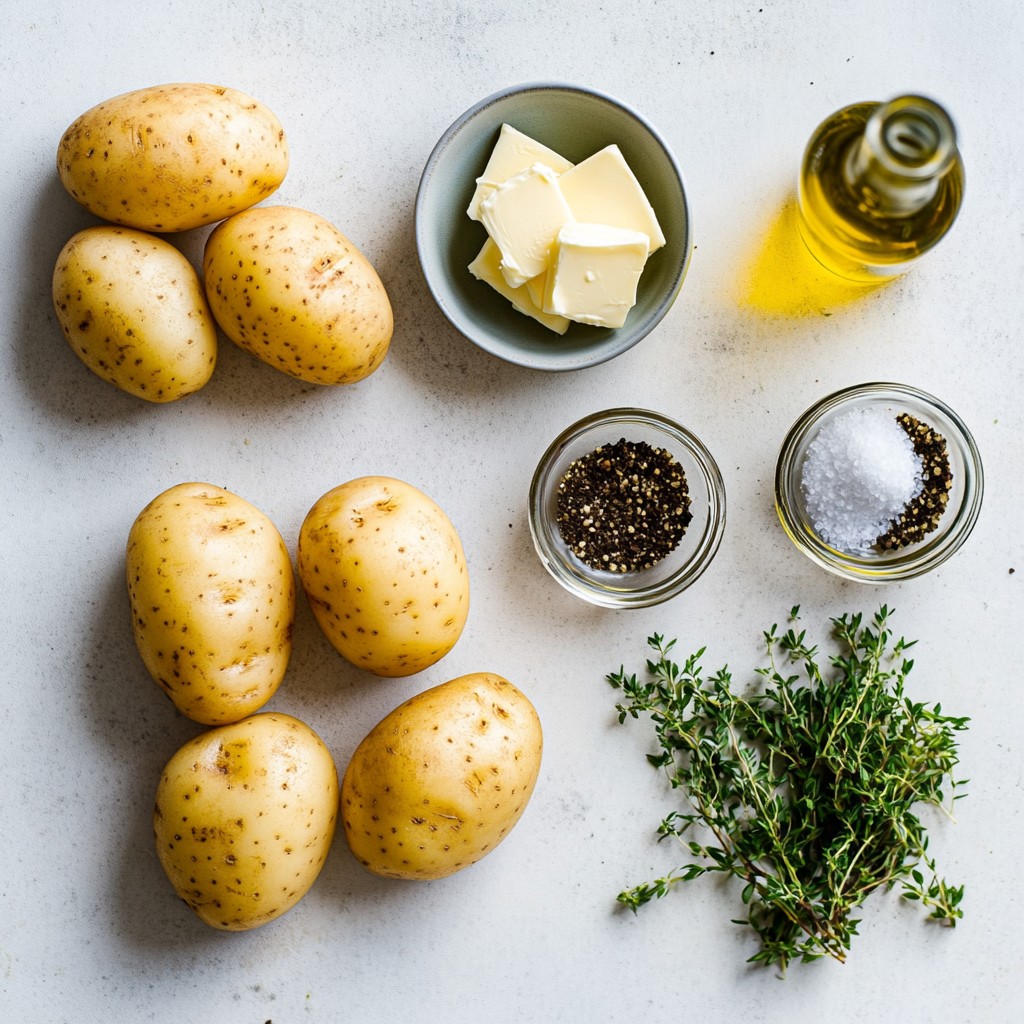
List of Ingredients
- 4 medium-sized russet potatoes
- 4 tablespoons unsalted butter, melted
- 4 cloves garlic, minced
- 2 tablespoons fresh rosemary, finely chopped
- 2 tablespoons fresh thyme, finely chopped
- 1 teaspoon sea salt
- ½ teaspoon black pepper
- Olive oil for drizzling
- Fresh parsley, chopped, for garnish
Nutritional Information
Garlic Herb Hasselback Potatoes are not only tasty but also provide good nutrition. Each serving has around 220 calories. They offer a balance of macronutrients:
- Carbohydrates: 37 grams
- Fats: 10 grams
- Proteins: 4 grams
The potatoes are rich in vitamins and minerals. Garlic can boost your immune system. Fresh herbs like rosemary and thyme add antioxidants. Using unsalted butter allows you to control salt intake. These ingredients combine taste with health benefits.
Enjoying this dish can help you feel satisfied without guilt. Garlic Herb Hasselback Potatoes taste great and can fit your healthy eating goals. Plus, they look beautiful on any plate!
Step-by-Step Instructions
Preheating the Oven
Set your oven to 425°F (220°C). This is the ideal temperature for baking. Preheating is vital. It ensures that your potatoes cook evenly. If you skip this step, your potatoes may turn out soggy.
Preparing and Slicing Potatoes
First, rinse and scrub each potato under running water. This removes dirt and makes them clean. After washing, use a towel to dry them completely. Next, use a sharp knife to slice the potatoes. Cut thin slices along the length, about ⅛ inch apart. Be careful not to cut all the way through. Leave a small base at the bottom intact. To help, place chopsticks or wooden spoons beside each potato. They will guide your cuts and prevent cutting too deep.
Mixing and Applying the Garlic Herb Butter
Now, it’s time to mix flavors. In a small bowl, combine 4 tablespoons of melted butter, 4 cloves of minced garlic, 2 tablespoons of finely chopped rosemary, and 2 tablespoons of finely chopped thyme. Add 1 teaspoon of sea salt and ½ teaspoon of black pepper. Stir until well mixed. This butter mixture adds great flavor to your potatoes. Use a brush to apply this mixture between the slices of each potato. Make sure to coat them well. Drizzle any remaining mixture over the tops of the potatoes.
Baking and Finishing Touches
Place the sliced potatoes on a baking sheet with parchment paper. This helps with easy cleanup. Now, lightly drizzle olive oil over the tops of each potato. This will add flavor and help them get crispy. Bake the potatoes for about 50-60 minutes. They should be golden and crispy outside, soft inside. Halfway through, baste the potatoes with the butter mixture. This enhances the flavor even more. After baking, let the potatoes cool for a few minutes before serving.
Tips & Tricks
How to Achieve Perfectly Crispy Potatoes
To get crispy potatoes, you need the right heat. I bake them at 425°F (220°C). This high temperature helps the outside crisp up while the inside stays soft. Bake them for about 50-60 minutes. Check for doneness by poking a potato with a fork. If it goes in easily, the potatoes are ready.
Flavor Enhancements
Don’t stop with just garlic and herbs! You can add more flavors. Try using fresh oregano or basil for a twist. You can also sprinkle cheese on top during the last ten minutes of baking. Cheddar or Parmesan work well and add a nice richness.
Common Mistakes to Avoid
When slicing the potatoes, be careful not to cut too deep. If you slice all the way through, they won’t hold their shape. Another mistake is not letting the butter mix seep in. Make sure to brush it well between the slices. This helps the flavor spread throughout.
Pro Tips
- Use a Mandoline: A mandoline slicer can help achieve perfectly even slices for your potatoes, ensuring they cook uniformly.
- Experiment with Herbs: Feel free to substitute or add different herbs like sage or dill to customize the flavor to your liking.
- Check for Doneness: Use a fork to check if the potatoes are tender inside before removing them from the oven. They should be easy to pierce.
- Let Them Rest: After baking, allow the potatoes to rest for a few minutes. This helps the flavors settle and makes them easier to handle.
Variations
Different Potato Varieties to Use
You can switch up the potatoes in this dish. While russet potatoes are great, other types work too. Try Yukon Gold potatoes. They have a creamy texture and a buttery taste. Fingerling potatoes are also fun. They add a unique shape and flavor to your meal.
Sweet potatoes are another tasty option. They bring a natural sweetness to the dish. The color is vibrant too. Just remember, cooking time may change a bit. They often take less time to bake than russet potatoes. Check them around 40-50 minutes to see if they're done.
Dietary Modifications
If you follow a vegan diet, you can still enjoy this recipe. Simply swap the butter for olive oil or vegan butter. This keeps the flavors rich and tasty. For a gluten-free option, rest easy! The ingredients are naturally gluten-free. Just make sure any added sauces or seasonings are also gluten-free.
Flavor Profile Adjustments
The herbs in this recipe are key to its taste. You can mix it up by adding other herbs. Basil and oregano can bring a different flair. Dill or tarragon can also add a fresh twist.
If you like spice, try adding chili flakes. This gives the dish a kick. You can sprinkle them in with the garlic herb mix. Just a little can make a big difference. Enjoy experimenting with these flavor changes!
Storage Info
How to Store Leftover Potatoes
After enjoying your Garlic Herb Hasselback Potatoes, you might have some left. Store them in the fridge. Place the leftover potatoes in an airtight container. They will stay fresh for up to three days. If you want to keep them longer, freezing is an option. Wrap each potato in plastic wrap. Then, place them in a freezer-safe bag. They can last up to three months in the freezer.
Reheating Instructions
To enjoy your leftover potatoes, reheating is key. The best method is to use the oven. Preheat your oven to 350°F (175°C). Place the potatoes on a baking sheet. Cover them with foil to keep moisture in. Bake for about 20 minutes, or until heated through. This method helps maintain crispiness.
You can also use a microwave, but it may not keep them crispy. If you choose the microwave, place the potatoes on a plate. Heat in short bursts of 30 seconds. Check after each burst to avoid overcooking.
FAQs
Can I make Garlic Herb Hasselback Potatoes ahead of time?
Yes, you can prepare Garlic Herb Hasselback Potatoes ahead of time. For easy prep, follow these steps:
- Wash and slice the potatoes as described.
- Mix the garlic herb butter and apply it between the slices.
- Place the potatoes in an airtight container.
- Store them in the fridge for up to 24 hours before baking.
This way, you save time on busy days.
How long do Garlic Herb Hasselback Potatoes last in the fridge?
Garlic Herb Hasselback Potatoes last for about 3 to 5 days in the fridge.
- Store them in an airtight container.
- Ensure they cool down before sealing.
The potatoes may lose some crispiness, but they will still taste great.
What can I serve with Garlic Herb Hasselback Potatoes?
These potatoes pair well with many dishes. Here are some tasty ideas:
- Grilled chicken or steak for protein.
- A fresh garden salad for crunch.
- Roasted vegetables for extra flavor.
- A creamy dip like sour cream or yogurt.
Mix and match to create a balanced meal.
Can I use dried herbs instead of fresh?
Yes, you can use dried herbs instead of fresh. Here’s how to adjust:
- Use 1 teaspoon of dried herbs for every tablespoon of fresh herbs.
- Mix the dried herbs with the butter for even flavor.
Dried herbs will add good taste, but fresh herbs provide a brighter flavor.
In this blog post, I covered how to make Garlic Herb Hasselback Potatoes. We discussed the key ingredients, nutritional facts, and step-by-step instructions for perfect results. You learned tips for crispy potatoes and creative variations to suit your taste. Remember, choosing the right herbs can elevate your dish. Always store leftovers properly to maintain freshness. With these insights, you can confidently prepare a tasty side dish that impresses everyone at the dinner table. Enjoy exploring new flavors while cooking this delightful recipe!