If you’re craving a tasty snack, look no further! Crispy Chicken Parmesan Sliders are the perfect blend of flavor and crunch. With juicy chicken, gooey cheese, and zesty marinara, these sliders pack a punch in every bite. They’re easy to make and great for sharing or enjoying all by yourself. Get ready to impress your family and friends with this delicious recipe that’s sure to become a favorite!
Why I Love This Recipe
- Quick and Easy: This recipe comes together in just 40 minutes, making it perfect for a weeknight dinner or a last-minute gathering.
- Deliciously Crispy: The chicken is coated in a crunchy breadcrumb layer that adds fantastic texture and flavor to each bite.
- Cheesy Goodness: With gooey mozzarella and savory marinara, these sliders are a comforting twist on the classic chicken Parmesan.
- Customizable: You can easily swap out ingredients or add your favorite toppings to personalize each slider to your liking.
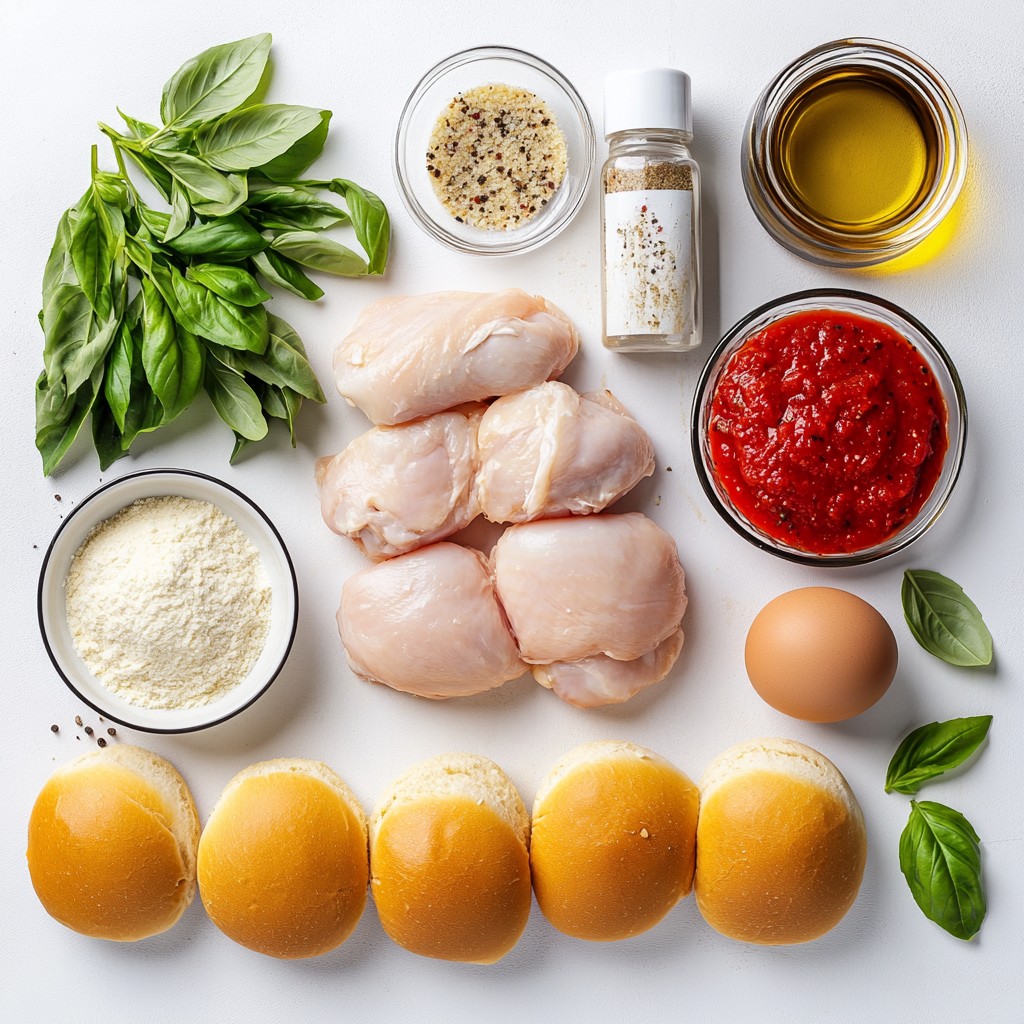
Ingredients
Main Ingredients
- 1 lb boneless, skinless chicken breasts
- 1 cup all-purpose flour
- 2 large eggs, beaten
- 1 cup Italian-seasoned breadcrumbs
Cheese and Sauce Ingredients
- 1/2 cup grated Parmesan cheese
- 1 cup marinara sauce
- 1 cup shredded mozzarella cheese
Seasoning and Bun Ingredients
- 1 teaspoon garlic powder
- 1 teaspoon dried oregano
- Salt and freshly ground black pepper, to taste
- 4 slider buns
These ingredients come together to create a tasty treat. You need chicken breasts for the main part. I prefer boneless and skinless. They cook evenly and stay juicy. The flour, eggs, and breadcrumbs form a crispy coating. Italian-seasoned breadcrumbs add a nice flavor.
Next, Parmesan cheese gives a salty kick. Marinara sauce provides a sweet and tangy touch. The mozzarella cheese melts beautifully and adds creaminess.
For seasoning, garlic powder and oregano enhance the taste. Salt and pepper make everything better. Finally, slider buns hold it all together. They are soft and perfect for these sliders.
Gather these ingredients before you start cooking. This will make the process smooth and fun!
Step-by-Step Instructions
Preparing the Chicken
First, preheat your oven to 375°F (190°C). Next, take the chicken breasts and place them between two sheets of plastic wrap. Use a meat mallet to pound the chicken to an even thickness of about 1/2 inch. This step helps the chicken cook evenly. After that, season both sides of the chicken with salt, pepper, garlic powder, and oregano. Rubbing these spices into the meat gives it a nice flavor.
Setting Up the Breading Station
Now, prepare your breading station. Get three shallow bowls ready. In the first bowl, add all-purpose flour. In the second bowl, beat two large eggs. In the third bowl, mix Italian-seasoned breadcrumbs with grated Parmesan cheese. This setup makes the breading process easy and fun.
Bread and Fry the Chicken
Take each chicken breast and dip it first into the flour. Make sure to coat both sides and shake off any excess. Then, dip the floured chicken into the beaten eggs. Let any excess egg drip off. Finally, coat it in the breadcrumb mixture, pressing firmly so the crumbs stick well. In a large skillet, pour enough olive oil to cover the bottom and heat it over medium heat. When the oil is hot, carefully place the breaded chicken in the skillet. Fry each side for about 4-5 minutes until golden brown. The chicken is done when its internal temperature is at least 165°F (74°C). Transfer the cooked chicken to a plate lined with paper towels to soak up the extra oil.
Assemble and Bake the Sliders
Take your slider buns and slice them in half horizontally. Place one crispy fried chicken breast on each bottom half. Generously spoon marinara sauce over the chicken, ensuring it gets a good layer. Then, top it off with a hefty sprinkle of shredded mozzarella cheese. Arrange the sliders on a baking sheet and place them in your preheated oven. Bake for about 10 minutes until the cheese is melted and bubbly. The smell will be amazing!
Tips & Tricks
Achieving Crispy Texture
To get that perfect crunch, use hot oil when frying. Heat the oil until it shimmers. This signals that it's ready. If the oil is too cold, your chicken will absorb it. Aim for a golden brown color.
Also, make sure you coat the chicken well with breadcrumbs. After dipping in flour and eggs, press the breadcrumbs firmly onto the chicken. This helps them stick better during frying.
Best Types of Chicken Breasts
For sliders, I recommend using boneless, skinless chicken breasts. They are easy to handle and cook quickly. Look for chicken that is plump and fresh. This ensures juicy meat. If possible, buy organic or free-range chicken. They often have better flavor and texture.
When choosing chicken for frying, avoid any chicken that looks discolored or has a strong odor. Freshness is key for great taste.
Serving Suggestions
Crispy chicken parmesan sliders pair well with many sides. Try serving them with a simple salad or crispy fries. A side of roasted vegetables also adds color and health.
For presentation, serve the sliders on a rustic wooden board. Add fresh basil leaves for a pop of color. You can also include small bowls of marinara sauce for dipping. This makes for a beautiful and tasty dish.
Pro Tips
- Choose the Right Chicken: For the crispiest sliders, opt for thinly pounded chicken breasts. This ensures even cooking and a perfect crispy texture.
- Perfect Breading Technique: Make sure to press the breadcrumbs onto the chicken firmly during the breading process to create a thick, crunchy coating.
- Oil Temperature Matters: Always ensure your oil is hot enough before adding the chicken. If the oil isn’t hot, the chicken will absorb more oil and become greasy.
- Customize Your Sauce: Feel free to spice up your marinara sauce by adding a pinch of red pepper flakes or fresh herbs for an extra kick of flavor.
Variations
Different Cheese Options
You can mix up the cheese to add more flavor. Instead of just mozzarella, try provolone for a sharp taste. Fontina melts well and adds creaminess. Mixing these cheeses can create a delightful blend.
Sauces to Try
If you want something new, switch out the marinara. Pesto brings a fresh flavor that pairs nicely with chicken. You can also make a creamy garlic sauce for a rich twist. Homemade sauces are easy to whip up and add a personal touch.
Adding Extra Ingredients
Consider adding veggies for extra crunch and taste. Sliced bell peppers or spinach can enhance the flavor. If you like spice, add jalapeños or crushed red pepper to the mix. These small changes can make your sliders even more exciting!
Storage Info
How to Store Leftover Sliders
To keep your crispy chicken parmesan sliders fresh, first let them cool. Place them on a wire rack to prevent sogginess. Once cooled, wrap each slider tightly in plastic wrap. This keeps the moisture in and stops them from drying out. You can also place them in an airtight container. Choose a container that fits snugly to avoid extra air.
Reheating Instructions
When it’s time to enjoy your leftovers, reheating is key. For best results, use an oven. Preheat it to 350°F (175°C). Place the sliders on a baking sheet and cover with foil. Heat for about 10 minutes, or until warm. This method keeps the bread crispy. If you're in a hurry, the microwave works too. Heat them for 30 seconds to 1 minute, but the bread may get a bit soft.
Freezing Tips
If you want to save sliders for later, freezing is a great option. Wrap each slider tightly in plastic wrap. Then, place them in a freezer bag. Squeeze out as much air as possible. This helps avoid freezer burn. To enjoy, take them out and let them thaw in the fridge overnight. Reheat in the oven as mentioned above, or in the microwave. Enjoy your tasty sliders anytime!
FAQs
Can I use frozen chicken breasts?
Yes, you can use frozen chicken breasts. Just remember to thaw them first. Place the frozen breasts in the fridge overnight. If you’re in a hurry, you can use the microwave. Be careful to not cook them. After thawing, pound the chicken and season as you would with fresh chicken.
How can I make this recipe gluten-free?
To make this recipe gluten-free, swap the all-purpose flour and breadcrumbs for gluten-free options. Use gluten-free flour and certified gluten-free breadcrumbs. This way, you can enjoy the crispy texture without any gluten.
What can I serve with crispy chicken parmesan sliders?
These sliders pair well with many sides. Try a fresh salad for a light option. Sweet potato fries add a nice crunch. You can also serve them with a side of marinara for dipping. Garlic bread is another tasty choice.
Can I make these sliders in advance?
Yes, you can prepare these sliders ahead of time. Bread and fry the chicken, then store it in the fridge. Assemble the sliders just before baking. This keeps them fresh and crispy. You can also freeze the cooked sliders for later enjoyment. Just reheat them in the oven.
This blog post covers everything you need for crispy chicken parmesan sliders. We discussed key ingredients, easy steps to prepare the dish, and tips for the best texture. I shared ways to make your sliders unique with different sauces and cheeses. Storing and reheating tips ensure your leftovers stay tasty. You can enjoy this meal any night, impress guests, or prepare a fun family dinner. Keep experimenting with flavors, and enjoy every bite!