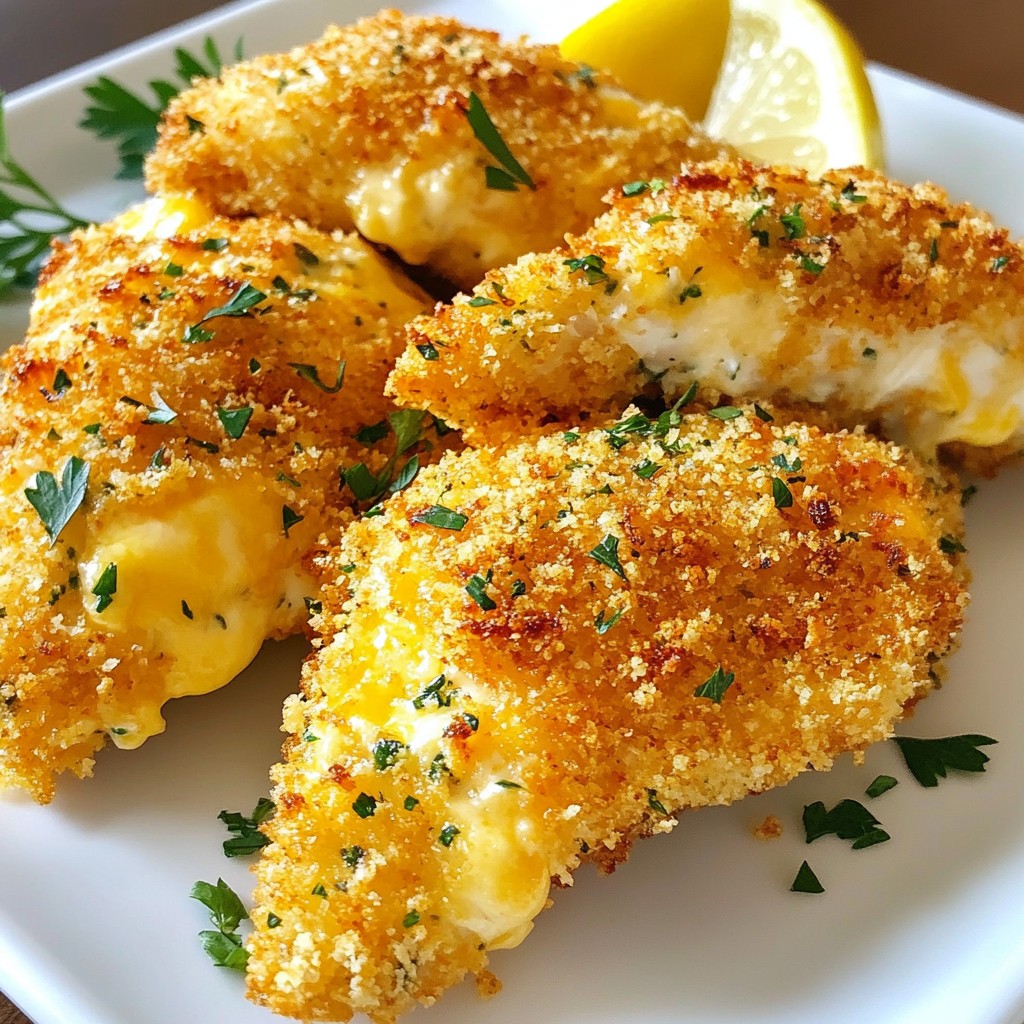
Get ready to elevate your dinner game with my Crispy Cheesy Herb Chicken Tenders! These tender strips combine juicy chicken with a crunchy, cheesy coating, all packed with flavor. Perfect for a quick weeknight meal or a fun snack, this recipe is simple and delicious. With just a few ingredients and easy steps, you’ll impress your friends and family. Let's dive in and make these tasty tenders together!
Why I Love This Recipe
- Easy Preparation: This recipe is quick and simple, making it perfect for weeknight dinners or last-minute gatherings.
- Crispy Texture: The combination of panko breadcrumbs and cheese creates a delightful crunchy coating that everyone loves.
- Flavorful Herbs: Fresh parsley and thyme add an aromatic touch that elevates the dish beyond ordinary chicken tenders.
- Customizable: You can easily switch up the cheese or herbs to suit your taste preferences or use what you have on hand.
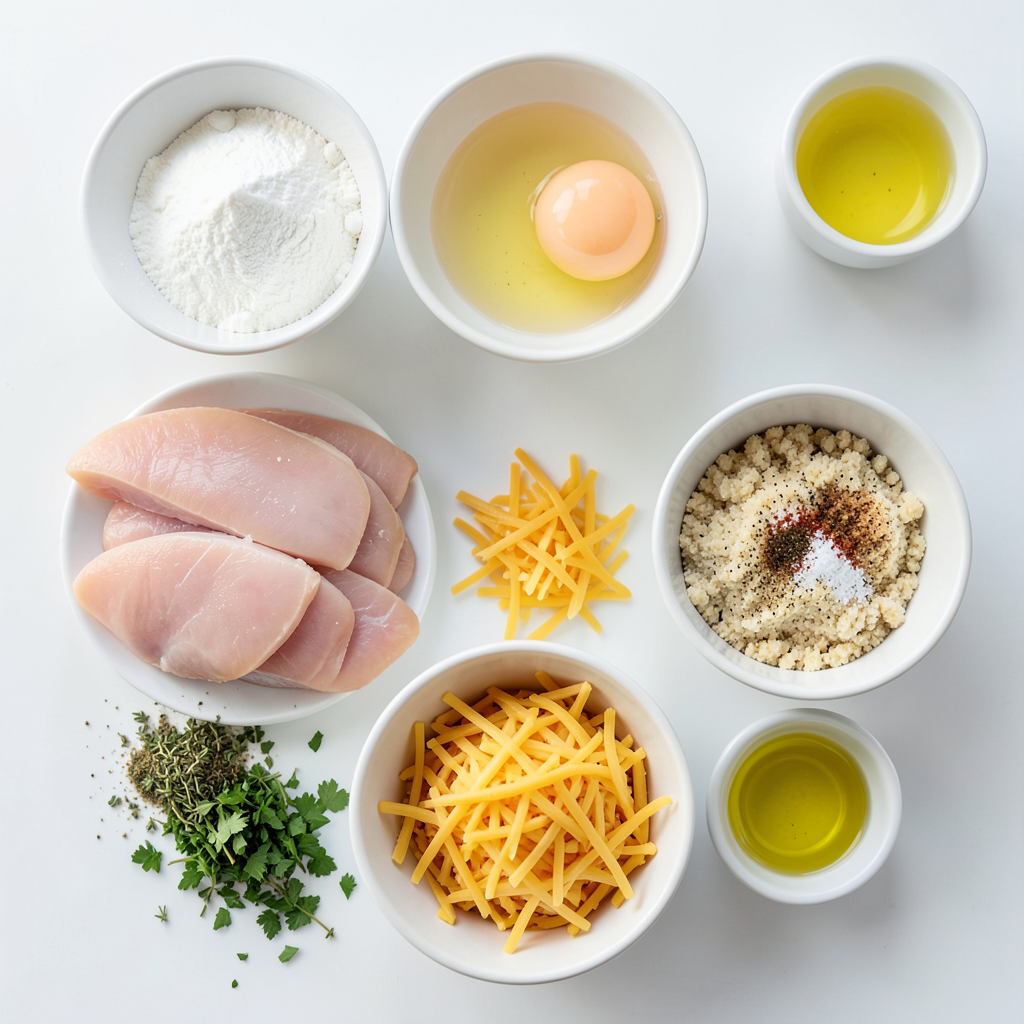
Ingredients
Main Ingredients
- 1 pound boneless, skinless chicken breasts
- 1 cup all-purpose flour
- 2 large eggs
Coating Ingredients
- 1 cup panko breadcrumbs
- 1 cup shredded cheese (cheddar or mozzarella)
- Fresh herbs (parsley and thyme)
Seasoning Ingredients
- Garlic powder
- Onion powder
- Paprika
- Salt and pepper
These ingredients create a great balance for crispy cheesy herb chicken tenders. The chicken breasts need to be cut into strips for even cooking. The flour helps the coating stick well. Eggs are the glue that holds everything together while frying.
Panko breadcrumbs give the tenders their crunchiness. You can use either cheddar or mozzarella cheese for a creamy texture and rich flavor. Fresh herbs like parsley and thyme add a nice touch of brightness.
Seasoning is key in this recipe. Garlic powder and onion powder add depth. Paprika gives a slight warmth and color. Make sure to add salt and pepper to taste. This will enhance all the flavors.
Gather these ingredients, and you’re ready to create a dish that will delight your taste buds!
Step-by-Step Instructions
Preparing the Coating Mixtures
- Mixing the seasoned flour: In a shallow dish, mix 1 cup of all-purpose flour with salt, pepper, garlic powder, onion powder, and paprika. This mix adds great flavor to the chicken. Make sure to stir it well.
- Whisking the eggs: In a separate bowl, take 2 large eggs and whisk them until they are smooth. This egg wash helps the coating stick well to the chicken.
- Combining breadcrumbs with cheese and herbs: In a third bowl, mix 1 cup of panko breadcrumbs with 1 cup of shredded cheese, chopped parsley, and thyme. Stir until all ingredients are evenly distributed. This mix gives the chicken its cheesy crunch.
Coating the Chicken
- Dredging in the flour mixture: Grab a chicken strip and coat it in the seasoned flour. Shake off any extra flour to keep it from clumping.
- Dipping in the egg wash: Next, dip the floured chicken strip into the egg wash. Make sure every part is well-covered for a good coating.
- Rolling in the cheesy breadcrumb coating: Finally, roll the chicken in the cheesy breadcrumb mix. Press down lightly to help the coating stick well.
Cooking the Chicken Tenders
- Heating oil in the skillet: In a large skillet, heat about 1 inch of cooking oil over medium heat. Wait until the oil shimmers before adding the chicken.
- Frying the chicken strips: Carefully add the chicken tenders to the hot oil. Fry them in batches for about 4-5 minutes on each side. Look for a golden brown color and ensure they are fully cooked inside.
- Draining and seasoning after frying: Once cooked, move the chicken tenders to a plate lined with paper towels. This absorbs extra oil. Sprinkle a bit of salt on top while they’re warm for extra flavor.
Tips & Tricks
Achieving Perfect Crispiness
To get your chicken tenders nice and crispy, use panko breadcrumbs. Panko is lighter and airier than regular breadcrumbs, which adds crunch. It gives a lovely texture to your tenders.
Another key is the oil temperature. Heat your oil until it shimmers, around 350°F. This ensures the tenders fry quickly, locking in moisture. Too cool oil leads to soggy chicken, so watch that temperature!
Substitutions & Enhancements
If you want different flavors, try other cheeses. Gouda or pepper jack can add a fun twist. You can also mix in some parmesan for a rich taste.
Herb choices matter too! Instead of parsley and thyme, try basil or oregano. Each herb brings a new flavor, making every batch unique.
Serving Suggestions
For dipping sauces, ranch or honey mustard work great. They add a creamy or sweet touch. You can also try a spicy aioli for a kick!
For serving, arrange your tenders on a wooden platter. Add a small bowl of sauce in the center. Garnish with fresh herbs for a pop of color. This makes your dish look inviting and fresh!
Pro Tips
- Keep it Crispy: For extra crunch, consider double-dipping your chicken in the egg and breadcrumb mixture. This adds an additional layer of coating, ensuring a crispy texture.
- Use Fresh Herbs: Fresh herbs like parsley and thyme enhance the flavor profile significantly. Dried herbs can be used, but fresh will elevate the dish to another level.
- Heat Control: Make sure your oil is at the right temperature before frying. If it’s too hot, the outside will burn before the inside cooks; too cool, and the chicken will absorb excess oil.
- Perfect Pairings: Serve these chicken tenders with a variety of dipping sauces such as honey mustard, ranch, or a spicy aioli for an exciting flavor combination.
Variations
Baked Version
For a healthier take, you can bake these chicken tenders. Here’s what you need:
- 1 pound boneless, skinless chicken breasts
- 1 cup whole wheat flour (instead of all-purpose)
- 2 large eggs
- 1 cup panko breadcrumbs
- 1 cup shredded cheese (cheddar or mozzarella)
- Fresh herbs (parsley and thyme)
- Cooking spray
To bake, preheat your oven to 400°F (200°C). Line a baking sheet with parchment paper. Spray it lightly with cooking spray. Follow the same steps for coating the chicken. Place the coated strips on the sheet. Bake for 15-20 minutes, flipping halfway, until golden brown.
Flavor Additions
Want to spice things up? You can add hot sauce to the egg wash. This gives the chicken a nice kick. You can also mix honey or maple syrup into your coating for sweet and savory bites. Think about adding a dash of chili powder or smoked paprika for extra flavor.
Gluten-Free Options
For gluten-free chicken tenders, substitute the flour and breadcrumbs. Use almond flour or gluten-free flour blend. For breadcrumbs, try crushed gluten-free crackers or cornmeal. You can also use dairy-free cheese alternatives if you want to avoid dairy. This way, everyone can enjoy these tasty tenders!
Storage Info
Storing Leftovers
To keep your crispy cheesy herb chicken tenders fresh, place them in an airtight container. This helps prevent moisture from getting in. If you refrigerate them, they stay good for about 3 to 4 days. Always let them cool down before sealing to avoid condensation.
Freezing Chicken Tenders
If you want to save some for later, freezing is a great option. First, let the cooked tenders cool completely. Then, lay them in a single layer on a baking sheet. Freeze until solid, about 1-2 hours. Once frozen, transfer them to a freezer bag. They can last for up to 3 months in the freezer. For reheating, bake them at 400°F (200°C) for about 15-20 minutes. This will help keep them crispy.
Tips for Maintaining Crispiness
When it’s time to reheat, the oven is your best friend. Preheat your oven to 400°F (200°C) and place the tenders on a baking sheet. This method helps keep them crispy. Avoid the microwave, as it makes them soggy. If you have leftover tenders, store them in a single layer. This keeps air around them and prevents moisture build-up.
FAQs
How long do I cook chicken tenders?
Cook chicken tenders for about 4 to 5 minutes on each side. They should turn golden brown and reach an internal temperature of 165°F. Make sure to check that they are fully cooked. This timing works well when frying in a skillet. Frying too long can dry them out, so keep an eye on them.
Can I make these chicken tenders ahead of time?
Yes, you can prep chicken tenders ahead of time. Bread them and store them in the fridge for up to 24 hours before cooking. This saves time when you’re ready to fry. Just remember to let them sit at room temperature for about 15 minutes before cooking. This helps them cook evenly.
What sides go well with crispy chicken tenders?
Crispy chicken tenders pair well with many sides. Here are some tasty options:
- French fries
- Coleslaw
- Macaroni and cheese
- Fresh salad
- Veggie sticks with dip
These sides complement the crunch of the tenders and add color to your plate.
How can I make chicken tenders in an air fryer?
To make chicken tenders in an air fryer, follow these steps:
1. Preheat the air fryer to 400°F.
2. Prepare the chicken tenders as usual.
3. Lightly spray them with cooking oil.
4. Place them in the air fryer basket in a single layer.
5. Cook for about 10 to 12 minutes, flipping halfway through.
Using an air fryer gives you a crispy texture with less oil.
What is the best temperature to fry chicken?
The best temperature to fry chicken is around 350°F to 375°F. This range ensures a crispy outside without burning. Use a deep-fry thermometer to check the oil temperature. If the oil is too hot, the chicken will brown too quickly. If it’s too cool, the chicken will absorb more oil and be greasy.
You can make crispy chicken tenders at home easily. We covered the main ingredients like chicken, flour, and spices. I shared step-by-step instructions for coating and cooking to get great results. Remember the tips for crispiness and options for baking or gluten-free versions. You can store leftovers properly to keep them fresh. With this guide, you're ready to impress everyone with your tasty chicken tenders! Enjoy your cooking adventure and try different flavors as you go!