Craving a sweet treat that’s quick and easy? You’re in the right place! I’ll show you how to make delightful Chocolate Hazelnut Crepes that will impress anyone. With just a few simple ingredients, you can whip up this tasty dessert in no time. I promise, once you taste these crepes, you’ll want to make them again and again. So let’s dive into this delicious recipe together!
Why I Love This Recipe
- Decadent Flavor: The rich combination of chocolate and hazelnuts creates an indulgent treat that satisfies every sweet tooth.
- Versatile Toppings: These crepes can be garnished with a variety of fruits and whipped cream, allowing for endless customization.
- Easy to Make: The recipe is straightforward, making it perfect for both beginners and experienced cooks alike.
- Perfect for Any Occasion: Whether it's breakfast, dessert, or a brunch gathering, these crepes are sure to impress your guests.
Ingredients
List of Ingredients
To make chocolate hazelnut crepes, you need the following ingredients:
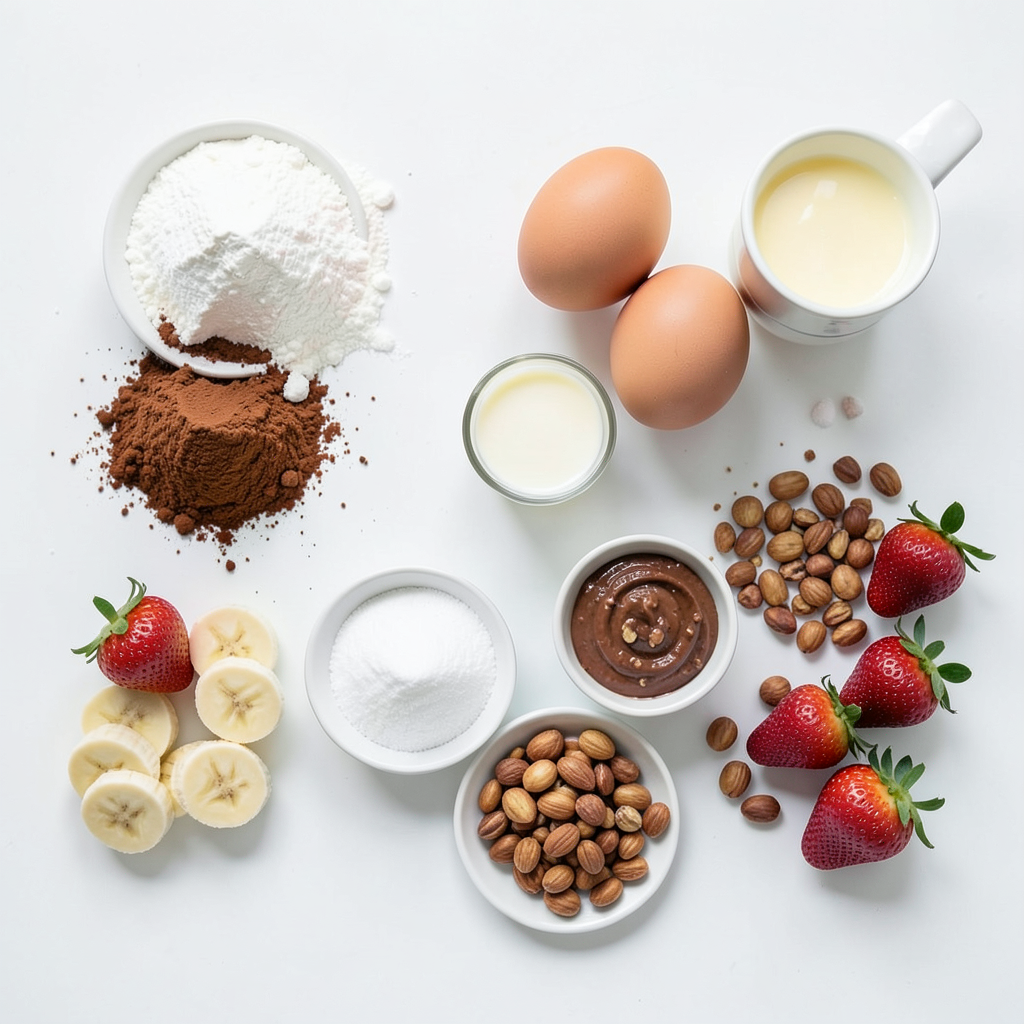
- 1 cup all-purpose flour
- 2 tablespoons unsweetened cocoa powder
- 2 tablespoons granulated sugar
- 1/4 teaspoon fine sea salt
- 2 large eggs, room temperature
- 1 1/2 cups whole milk
- 2 tablespoons unsalted butter, melted
- 1 teaspoon pure vanilla extract
- 1/2 cup chocolate hazelnut spread (such as Nutella)
- Finely chopped toasted hazelnuts for garnish
- Fresh strawberries or banana slices for topping
- Whipped cream (optional for serving)
Ingredient Substitutions
You can swap some ingredients if needed:
- All-purpose flour: Use whole wheat flour or gluten-free flour.
- Cocoa powder: Carob powder works as a great alternative.
- Granulated sugar: Substitute with coconut sugar or honey.
- Whole milk: Almond milk or oat milk can be used instead.
- Unsalted butter: Use coconut oil for a dairy-free option.
- Chocolate hazelnut spread: Sunflower seed butter can replace it for nut allergies.
Recommended Tools and Equipment
Having the right tools helps make this recipe easier:
- Large mixing bowl
- Medium mixing bowl
- Whisk
- Non-stick skillet or crepe pan
- Spatula
- Plastic wrap
- Measuring cups and spoons
- Plate for stacking crepes
With these ingredients and tools, you are ready to create delightful chocolate hazelnut crepes. Enjoy the process of cooking and the delicious results!
Step-by-Step Instructions
Preparing the Batter
To start, gather your ingredients. You need flour, cocoa powder, sugar, salt, eggs, milk, melted butter, and vanilla. In a large bowl, mix one cup of flour, two tablespoons of cocoa powder, two tablespoons of sugar, and a quarter teaspoon of salt. Whisk these dry ingredients together until smooth.
Next, take another bowl for the wet ingredients. Beat two large eggs lightly and add one and a half cups of whole milk, two tablespoons of melted unsalted butter, and one teaspoon of pure vanilla extract. Whisk until combined. Slowly pour the wet mix into the dry ingredients. Stir with a whisk until the batter is smooth with no lumps. Cover the bowl and let it rest for thirty minutes. This step helps the batter become silky.
Cooking the Crepes
Now it’s time to cook! Heat a non-stick skillet over medium heat. Lightly grease the pan with a small amount of unsalted butter or non-stick spray. Pour about a quarter cup of batter into the center of the pan. Quickly tilt and swirl the pan until the batter covers the bottom in a thin layer.
Cook the crepe for one to two minutes. Watch for the edges to lift and the surface to set. Carefully flip it with a spatula and cook for another thirty seconds to one minute until lightly golden. Remove the crepe and place it on a plate. Repeat this with the rest of the batter, stacking the crepes neatly.
Assembling the Chocolate Hazelnut Crepes
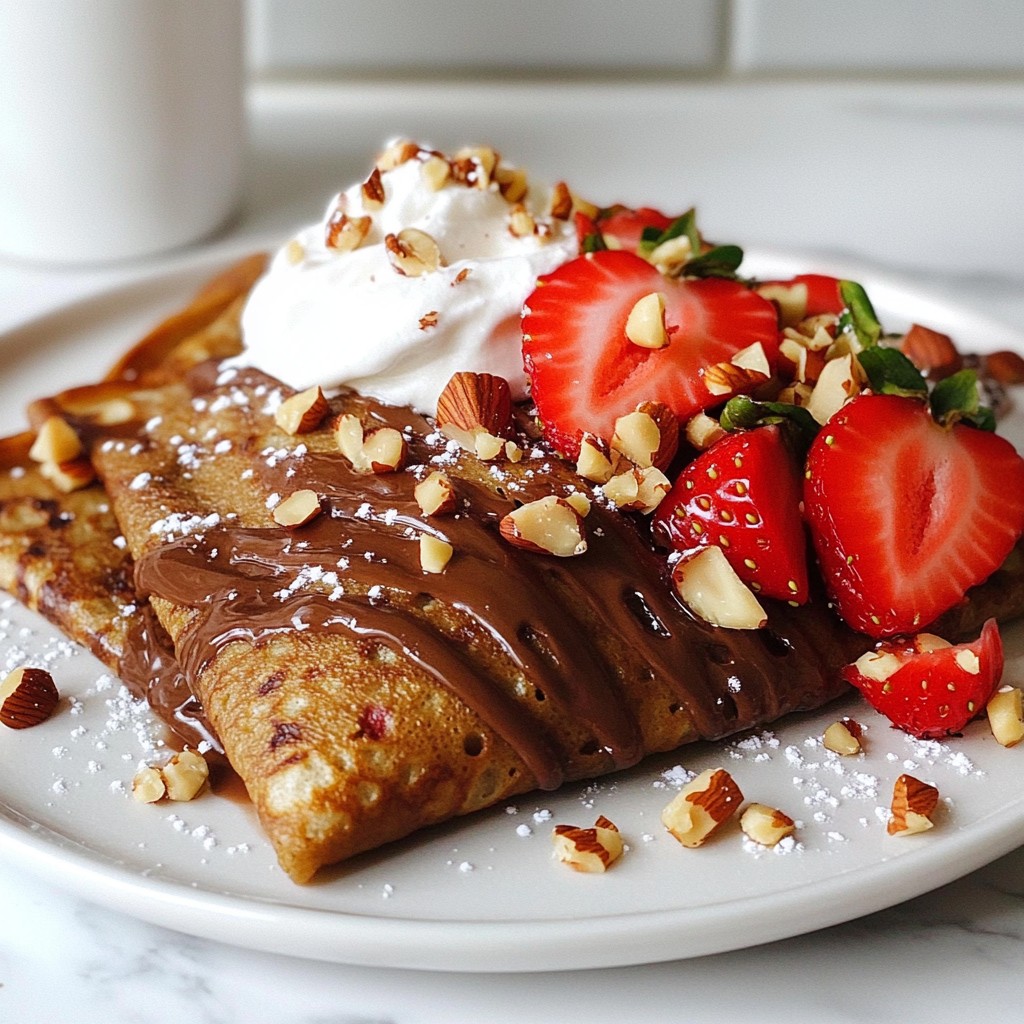
Once your crepes are ready, it’s time to fill them. Take each crepe and spread a generous amount of chocolate hazelnut spread on half. Fold the crepe in half, and then fold it again to form a triangle. You can also roll them into a cylinder if you prefer.
Serve the warm crepes on a platter. Top them with finely chopped toasted hazelnuts and add fresh strawberries or banana slices. If you want, add whipped cream for extra delight. Enjoy your delicious chocolate hazelnut crepes!
Tips & Tricks
How to Achieve Perfectly Thin Crepes
To make thin crepes, start with a smooth batter. Whisk the dry and wet ingredients well. Letting the batter rest is key. This helps the flour absorb the liquid. When cooking, use a non-stick pan. Pour about 1/4 cup of batter into the center. Quickly tilt the pan to spread it evenly. Cook for 1-2 minutes until the edges lift. Flip it carefully and cook for a bit longer. Practice will help you get the right thickness.
Storage Hacks for Leftover Batter
If you have leftover batter, store it in the fridge. Use an airtight container to keep it fresh. It can last for up to two days. Before using, give the batter a good stir. If it seems thick, add a little milk. This will bring it back to the right consistency. You can also freeze the batter for longer storage. Just thaw it in the fridge before you cook.
Serving Suggestions and Pairings
For serving, I love to add fresh fruit. Strawberries and bananas work great. They add a nice touch of sweetness. You can also sprinkle chopped hazelnuts on top. This adds crunch and flavor. For extra creaminess, a dollop of whipped cream is perfect. Feel free to get creative with toppings. Drizzle some honey or chocolate sauce for a fun twist.
Pro Tips
- Rest the Batter: Allowing the batter to rest for at least 30 minutes helps achieve a smoother texture and prevents the crepes from tearing during cooking.
- Use a Non-Stick Pan: A non-stick skillet or specialized crepe pan ensures easy flipping and prevents the crepes from sticking, making the cooking process much smoother.
- Control the Heat: Cooking the crepes over medium heat ensures they cook evenly without burning. Adjust the heat as necessary while cooking the crepes.
- Layer Flavors: Add layers of flavor by incorporating fresh fruits or a dusting of powdered sugar between crepes for added sweetness and texture.
Variations
Flavor Variations
You can change the taste of your crepes easily. Try adding fresh fruits like strawberries or bananas. They taste great with chocolate hazelnut spread. You can also sprinkle some cinnamon or nutmeg for warmth. These spices add an exciting twist. If you love nuts, chop up some toasted hazelnuts and mix them into the batter. This step adds a nice crunch.
Vegan Adaptations
Want to make vegan crepes? You can swap out the eggs and milk. Use flaxseed meal mixed with water as an egg substitute. It works well in batters. For milk, choose almond milk or coconut milk. You can use coconut oil instead of butter. This change will still give you that rich flavor you love.
Gluten-Free Options
If you need gluten-free crepes, replace all-purpose flour with a gluten-free blend. Look for a blend that has good binding properties. You may also use almond flour for a nutty taste. Adjust the liquid in your batter as needed. It helps to create the right texture. Enjoy your crepes without worry!
Storage Info
Storing Cooked Crepes
To keep your cooked crepes fresh, stack them carefully. Place parchment paper between each crepe to avoid sticking. Then, wrap the stack in plastic wrap. Store in the fridge for up to three days. This keeps them soft and ready to enjoy.
Freezing Instructions
Freezing crepes is simple and smart. First, cool the crepes completely. Then, follow the same stacking method with parchment paper. Wrap the stack tightly in plastic wrap and then in aluminum foil. You can freeze crepes for up to two months. Just label the package with the date for easy tracking.
Reheating Tips
Reheating crepes is quick. You can use a skillet or microwave. For the skillet, heat on low for about one minute on each side. If using a microwave, place a crepe on a plate and cover it with a damp paper towel. Heat for about 20 seconds. This keeps the crepes soft and tasty. Enjoy them warm with your favorite toppings!
FAQs
Can I make these crepes ahead of time?
Yes, you can make these crepes ahead of time. Cook the crepes and let them cool. Stack them with parchment paper in between. Store them in an airtight container in the fridge for up to three days. You can also freeze the crepes for up to two months. Just make sure to wrap them well to avoid freezer burn.
What can I use instead of chocolate hazelnut spread?
If you don’t have chocolate hazelnut spread, you can try other options. Almond butter or peanut butter works well. You can also use any chocolate spread you like. For a healthier choice, consider using a fruit spread or jam.
How do I know when my crepes are done cooking?
You’ll know the crepes are done when the edges lift up. The top should look set and not shiny. After cooking for 1-2 minutes, gently flip the crepe. It should be golden brown on the bottom. If it looks dry and firm, it's ready to come off the pan.
You learned about the key ingredients for chocolate hazelnut crepes and their substitutes. I walked you through clear steps to prepare, cook, and assemble the crepes. You also got tips for making them thin and storing any leftovers. I shared different flavor options, vegan choices, and gluten-free methods.
In the end, these crepes offer a fun way to enjoy sweet treats. Experiment with your favorite flavors and enjoy making this dish your own.