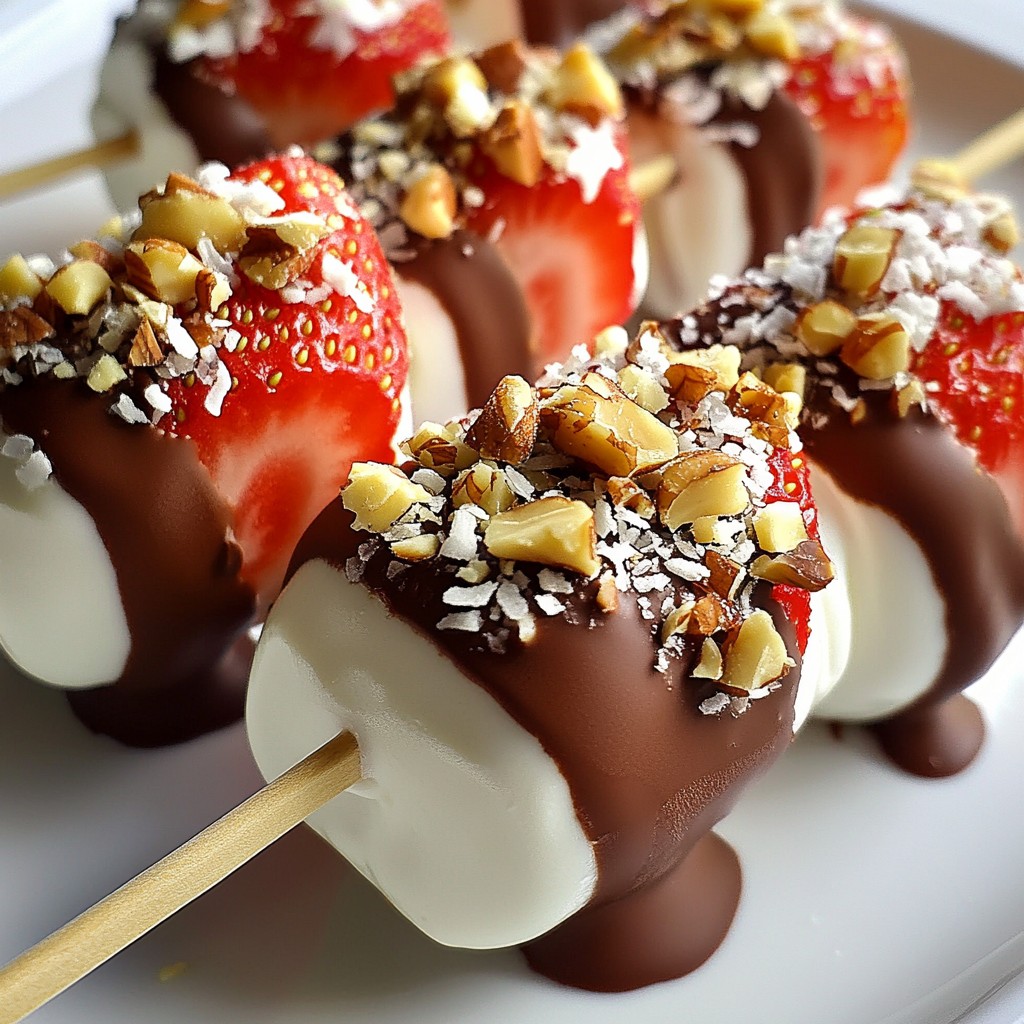
Looking for a fun, tasty treat that’s easy to make? You’re in the right place! These Chocolate Dipped Strawberry Yogurt Pops are a delightful combination of flavors that everyone will love. With fresh strawberries, creamy Greek yogurt, and a rich chocolate coating, these pops are perfect for hot days. Get ready to impress your friends and family with a delicious dessert that’s healthy and simple to create. Let’s dive into the recipe!
Why I Love This Recipe
- Refreshing Treat: These yogurt pops are the perfect refreshing snack for hot days, combining the sweetness of strawberries with creamy yogurt.
- Customizable Flavors: You can easily modify the sweetness and toppings to suit your taste, making each batch unique!
- Healthier Dessert Option: With Greek yogurt and fresh fruit, these pops are a healthier alternative to traditional ice creams.
- Fun for All Ages: This recipe is a hit with kids and adults alike, making it a wonderful family activity to create together.
Ingredients
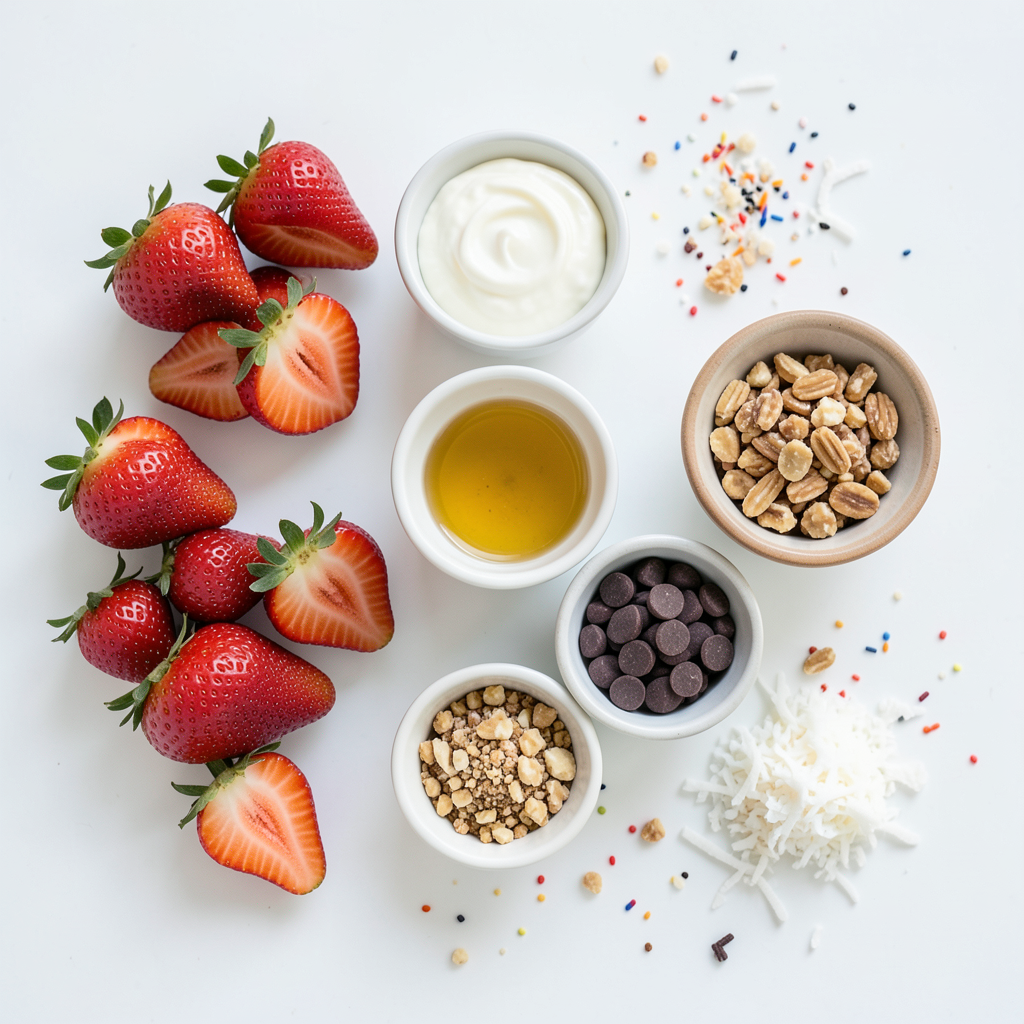
List of Ingredients
- Fresh strawberries
- Greek yogurt
- Sweetener options
- Chocolate coating components
- Optional toppings
To make Chocolate Dipped Strawberry Yogurt Pops, gather your ingredients first. You need fresh strawberries, ripe and sweet. Use about 2 cups, hulled and halved for the best flavor and look.
Next, choose your yogurt. I suggest 1 cup of creamy Greek yogurt. You can pick plain or vanilla flavors to match your taste.
For sweetening, you have options. Use 2 tablespoons of honey or maple syrup. Taste as you mix to get your perfect level of sweetness.
Now, let’s talk about the chocolate coating. You will need 1 cup of chocolate chips. Dark or milk chocolate works well; it’s your choice! Add 1 tablespoon of coconut oil to help the chocolate melt smoothly.
Lastly, think about optional toppings. You can add crushed nuts, shredded coconut, rainbow sprinkles, or chopped freeze-dried fruits. These give a nice touch and extra flavor to your pops.
With these ingredients, you’re ready to create a fun and tasty treat!
Step-by-Step Instructions
Preparing the Yogurt Base
First, mix your Greek yogurt with honey or maple syrup in a bowl. Use a whisk or spoon to blend. You want a creamy and smooth texture. Taste the mix to check the sweetness. If it needs more sweetness, add a bit more honey or syrup.
Layering the Pops
Next, grab your popsicle molds. Start by adding a spoonful of the yogurt mix to each mold. Then, add the halved strawberries on top. Follow this with another layer of yogurt. Leave about a quarter inch of space at the top. This space helps when the yogurt expands as it freezes.
Freezing Process
Now, insert popsicle sticks into each mold. Make sure the sticks are straight and centered. Freeze the molds for at least four hours. You want them to be completely solid before moving on.
Melting the Chocolate Coating
To melt the chocolate, place chocolate chips and coconut oil in a microwave-safe bowl. Heat in the microwave for 20 seconds at a time. Stir well after each time until the chocolate is smooth and glossy. This step is key for a nice coating.
Dipping the Pops
After the yogurt pops are frozen, take them out of the molds. Dip each pop into the melted chocolate. Make sure they are fully coated. Allow any extra chocolate to drip back into the bowl. This keeps your pops from being too messy.
Adding Toppings
While the chocolate is still soft, sprinkle your favorite toppings on each pop. You can use crushed nuts, shredded coconut, or rainbow sprinkles. Place the pops on a parchment-lined baking sheet after dipping for easy handling.
Final Freeze Instructions
To set the chocolate coating, place the pops back in the freezer. Let them freeze for an extra 30 minutes. This step ensures the chocolate is firm and ready to enjoy.
Tips & Tricks
Perfecting the Pops
To get a smooth yogurt mixture, mix the Greek yogurt and sweetener well. Use a whisk for a creamier blend. Taste as you go to find your perfect sweetness. If the mix feels too thick, add a splash of milk.
Avoiding mess while dipping chocolate can be tricky. Use a tall bowl for the melted chocolate. This makes dipping easier. Hold the pops by the stick, and dip quickly. Let excess chocolate drip back into the bowl.
Presentation Ideas
For serving, place the pops on a colorful platter. You can drizzle extra melted chocolate over the pops for a fun touch. To elevate your look, garnish with fresh strawberries or edible flowers. This adds color and makes the pops more inviting.
Adjusting Sweetness and Flavors
If you want to try different sweeteners, consider using agave nectar or stevia. These can provide a unique twist. For flavor enhancement, add a splash of vanilla extract or a hint of lemon zest. These small changes can make a big difference in taste!
Pro Tips
- Use Frozen Strawberries: For a creamier texture, consider using frozen strawberries instead of fresh. They blend smoothly into the yogurt and add a delightful chill.
- Experiment with Yogurt Flavors: Try flavored Greek yogurt for an extra twist! Options like strawberry or vanilla can enhance the overall taste of your pops.
- Chocolate Alternatives: If you prefer a healthier option, try using dark chocolate or yogurt coating for a lighter version of these pops.
- Storage Tips: Store leftover pops in an airtight container or wrap them individually in plastic wrap to prevent freezer burn and keep them fresh.
Variations
Fruit Mixes
You can use other fruits for these pops. Try bananas, blueberries, or raspberries. Mixing different fruits adds fun flavors. For example, strawberries and bananas taste amazing together. You can layer berries for a colorful look. Each fruit brings its own taste and sweetness, making every bite special.
Yogurt Options
Greek yogurt is creamy and rich, but you can try other flavors. Vanilla or berry-flavored yogurts work great too. If you're lactose intolerant, use dairy-free yogurt. Almond or coconut yogurt can be good swaps. Check the labels to find your favorite taste and texture. Each yogurt option can change the flavor of your pops.
Chocolate Choices
Decide between dark chocolate and milk chocolate for the coating. Dark chocolate gives a rich, bold taste. Milk chocolate is sweeter and creamier. You can also try white chocolate for a fun twist. Other coatings like yogurt melts or caramel can make these pops unique. Mixing different chocolates can create a fun layer of flavor too.
Storage Info
How to Store
To keep your chocolate dipped strawberry yogurt pops fresh, store them properly. Use airtight containers or freezer bags. This keeps out moisture and prevents freezer burn. If you use freezer bags, remove as much air as possible before sealing. Label the containers with the date so you know when you made them.
Shelf Life
These pops last up to two months in the freezer. They may still taste good after that, but the quality may drop. Look for signs of freezer burn or ice crystals on the pops. If you see these, it's best to toss them. Enjoy your treats while they are fresh and tasty!
FAQs
Can I use frozen strawberries?
Yes, you can use frozen strawberries. Just thaw them first. Drain any excess juice. This keeps the pops from getting too watery. Frozen strawberries give a nice texture, too.
What can I substitute for yogurt?
You can use dairy-free yogurt, like almond or coconut yogurt. Silken tofu also works well. Just blend it until smooth. Each option gives a unique flavor and texture.
How do I remove the pops from the molds?
To remove the pops, run warm water over the outside of the molds. Hold them under warm water for a few seconds. Twist gently to release the pops without breaking them.
Can I make these vegan?
Absolutely! Use plant-based yogurt and maple syrup instead of honey. Choose dairy-free chocolate for the coating. This keeps your pops vegan and just as tasty.
How do I prevent the chocolate from cracking?
To prevent cracking, mix coconut oil into the melted chocolate. This helps create a smooth coating. Also, dip the pops while the chocolate is warm and not too thick.
You now have a complete guide to making delicious yogurt and strawberry pops. We covered the key ingredients, step-by-step instructions, helpful tips, and fun variations. Remember to experiment with flavors and toppings to make it your own. These pops are easy to store and can be a healthy treat. Enjoy creating and sharing these tasty snacks with friends and family! You’ll impress everyone with your skills and creativity. So grab your ingredients and start making these fun pops today!