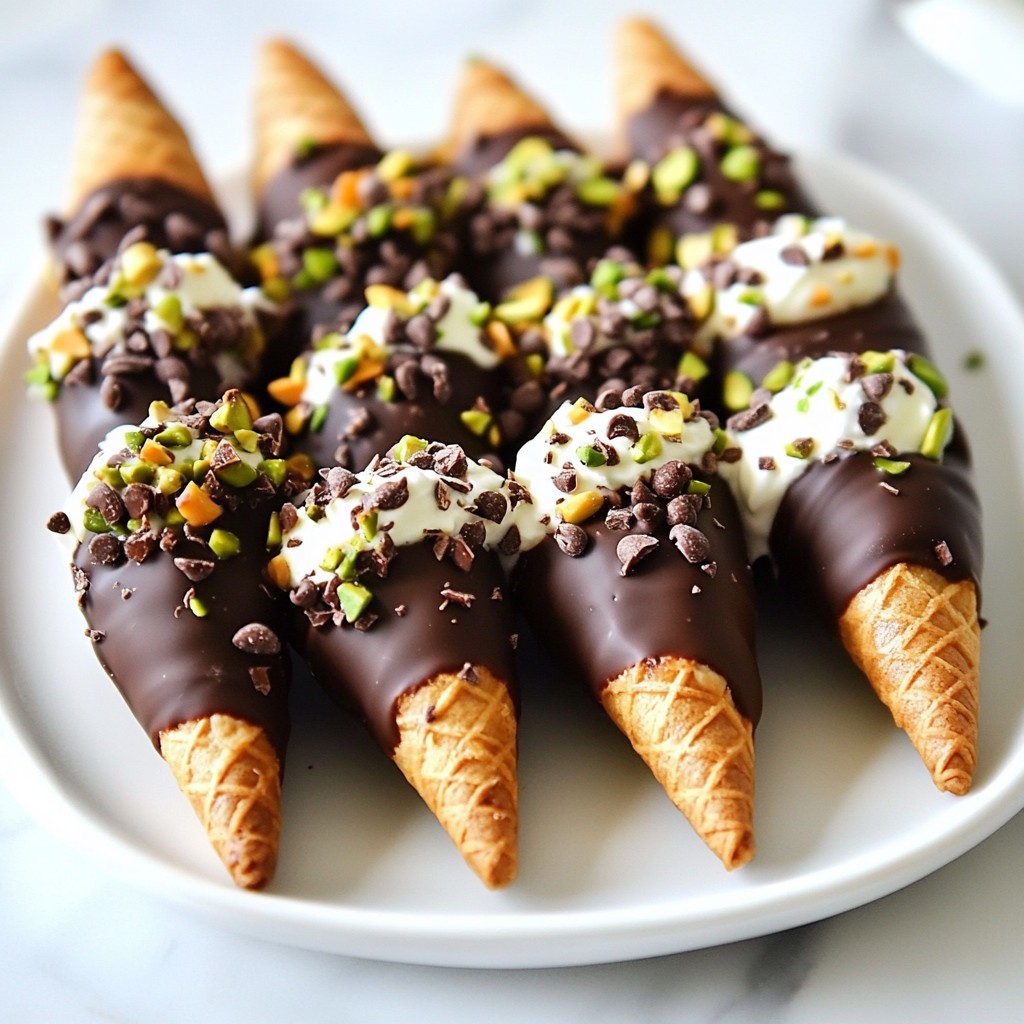
Indulge your sweet tooth with my Chocolate Dipped Cannoli Cones! This dessert combines creamy filling and a crunchy shell, all wrapped in rich chocolate. You’ll love how simple these are to make. Whether you're a beginner or a pro, I'm here to guide you step-by-step. From essential ingredients to clever tips, you'll have all you need for this tasty treat. Get ready for a delicious adventure that will impress everyone!
Why I Love This Recipe
- Decadent Flavor: The combination of creamy ricotta and mascarpone with rich chocolate creates an irresistible treat that satisfies every sweet tooth.
- Fun Presentation: The cannoli cones not only taste amazing but also look stunning, making them perfect for parties and special occasions.
- Easy to Make: With simple ingredients and straightforward steps, even beginner bakers can create these delightful desserts without any hassle.
- Customizable: You can easily adapt the filling or toppings to suit your taste, whether you prefer nuts, fruits, or different types of chocolate.
Ingredients
Essential Ingredients for Chocolate Dipped Cannoli Cones
- 12 mini cannoli shells
- 1 cup ricotta cheese
- 1/2 cup mascarpone cheese
- 1/2 cup powdered sugar
- 1 teaspoon vanilla extract
- 1/2 cup mini chocolate chips
- 1 cup dark chocolate chips (for dipping)
These ingredients form the base of your cannoli cones. The ricotta and mascarpone mix creates a rich and creamy filling. The mini chocolate chips add little bursts of chocolate in each bite.
Optional Ingredients for Enhancements
- 1 tablespoon coconut oil (optional)
- Chopped pistachios for garnish
- Colorful sprinkles for garnish
Coconut oil helps the chocolate melt smoothly. Chopped pistachios or sprinkles add a fun crunch and color. You can skip these if you want a simpler look.
Ingredient Substitutions and Alternatives
- For a lighter version, use part-skim ricotta.
- Swap mascarpone with cream cheese for a tangy twist.
- Use milk chocolate chips if you prefer a sweeter filling.
These swaps keep your dish tasty while matching your pantry's needs. You can also play with flavors by using flavored extracts, like almond or orange.

Step-by-Step Instructions
Preparing the Cannoli Filling
To start, gather your ingredients. You need ricotta cheese, mascarpone cheese, powdered sugar, and vanilla extract. In a medium bowl, mix the ricotta and mascarpone together. Add the powdered sugar and vanilla. Use a hand mixer or whisk to blend everything well. You want it smooth and creamy. This is the heart of your cannoli.
Next, fold in the mini chocolate chips with a spatula. This step adds sweet bursts of chocolate in every bite. Make sure they are evenly mixed.
Filling the Cannoli Shells
Now, it’s time to fill the cannoli shells. Grab a piping bag with a large round tip. If you don’t have a piping bag, a spoon works too. Carefully fill each mini cannoli shell with your rich filling. Pack it in generously. The more filling, the better the taste!
Melting and Dipping the Chocolate
For the chocolate dip, gather dark chocolate chips and coconut oil if you want. In a microwave-safe bowl, mix the chocolate chips and coconut oil. Microwave in 30-second bursts. Stir well after each time. Keep going until the chocolate is smooth and melted. Be careful not to overheat it.
Once melted, hold each filled cannoli by the tip. Dip the open end in the warm chocolate. Let the extra chocolate drip back into the bowl. Place the dipped cannoli on a parchment-lined baking sheet.
Final Presentation Steps
While the chocolate is still wet, sprinkle chopped pistachios or colorful sprinkles on top. This adds a nice crunch and makes your dessert look fancy.
Now, move the baking sheet to the fridge. Chill the cannoli cones for about 30 minutes. This helps the chocolate set.
When ready, arrange the cannoli cones on a nice platter. Watch as everyone enjoys this tasty treat!
Tips & Tricks
Common Mistakes to Avoid
Making chocolate dipped cannoli cones can be fun. However, some common mistakes can ruin your dessert. First, avoid overfilling the cannoli shells. If you overfill, the filling may spill out when you dip them in chocolate. Another mistake is not allowing the chocolate to cool a bit before dipping. If the chocolate is too hot, it can melt the filling. Lastly, don’t rush the chilling step. Chilling helps the chocolate set properly.
Tips for Perfectly Melted Chocolate
Melting chocolate can be tricky. I recommend using a microwave for easy melting. Combine dark chocolate chips with a tablespoon of coconut oil in a microwave-safe bowl. Heat in 30-second intervals, stirring each time. This helps the chocolate melt evenly. If you notice any lumps, keep stirring until smooth. Avoid overheating, as this can make the chocolate seize up. You want it silky for dipping.
Enhancing the Flavor and Texture
To make your cannoli cones even better, consider a few flavor boosts. You can add a pinch of sea salt to the chocolate for a tasty contrast. This will enhance the sweetness of the chocolate. For the filling, try adding a bit of orange zest. This brings a fresh note to the rich flavors. Lastly, use chopped pistachios or colorful sprinkles as a garnish. They add crunch and a pop of color that makes your dessert even more appealing.
Pro Tips
- Use Fresh Ingredients: Always opt for fresh ricotta and mascarpone cheese for a richer and creamier filling. This will enhance the overall flavor and texture of your cannoli cones.
- Customize Your Chocolate: Experiment with different types of chocolate for dipping, such as milk or white chocolate, to create unique flavor profiles that suit your taste.
- Chill the Filling: Before filling the cannoli shells, chill the ricotta mixture for about 15 minutes. This will make it easier to pipe into the shells and help it hold its shape better.
- Decorative Presentation: For an elegant touch, consider using edible gold or silver flakes on top of the chocolate, or serve the cones in a decorative stand to impress your guests.
Variations
Alternative Fillings for the Cannoli
You can change the filling to keep things exciting. Use cream cheese instead of ricotta for a tangy twist. Try adding lemon zest for a fresh kick. For a fruity touch, mix in crushed strawberries or raspberries. You can even use pistachio paste for a nutty flavor. Each option brings a unique taste to your cannoli cones.
Flavor Variations for the Chocolate Dip
The chocolate dip can also change. Use white chocolate for a sweet contrast. Milk chocolate adds creaminess, while dark chocolate gives a rich taste. For a fun twist, mix in some espresso powder for a coffee flavor. You can also add peppermint extract for a minty touch. Each chocolate variation enhances your dessert.
Seasonal and Themed Toppings
Toppings can make your cannoli cones stand out. In spring, use colorful sprinkles or edible flowers. For fall, add crushed candied pecans or caramel drizzle. During the holidays, think about crushed candy canes or festive colored sprinkles. Match your toppings to the season or theme for fun and creativity.
Storage Info
How to Store Leftover Cannoli Cones
To store leftover cannoli cones, place them in an airtight container. Keep them in the fridge. Cannoli cones taste best fresh, but they can last up to two days. If you notice the shells getting soft, enjoy them quickly. You can also store the filling separately. This way, the shells stay crunchy.
Freezing Instructions for Cannoli Components
You can freeze components of the cannoli for later use. First, freeze the cannoli shells on a baking sheet. Once solid, transfer them to a freezer-safe bag. They can last up to three months. For the filling, place it in a sealed container. This also lasts up to three months. When ready to use, thaw the filling in the fridge overnight.
Shelf Life of Ingredients Used
Each ingredient has its own shelf life:
- Ricotta cheese: Use within 5 to 7 days after opening.
- Mascarpone cheese: Best if used within 5 days after opening.
- Powdered sugar: Can last indefinitely when stored in a cool, dry place.
- Dark chocolate chips: Usually last up to a year if unopened.
- Mini chocolate chips: Similar to dark chocolate, they can last a year.
Keep track of these dates to ensure your dessert stays fresh and tasty.
FAQs
Can I make the filling ahead of time?
Yes, you can make the filling ahead of time. Mix the ricotta, mascarpone, powdered sugar, and vanilla. Store it in the fridge for up to two days. This saves you time on the day you plan to serve your cannoli cones. Just remember to fold in the mini chocolate chips right before filling the shells. This keeps them fresh and tasty.
Where to buy mini cannoli shells?
You can find mini cannoli shells at many grocery stores. Look in the bakery section or the international foods aisle. If your local store does not carry them, try Italian markets. You can also order them online from specialty baking websites. Buying shells from a trusted source ensures they are fresh and crunchy.
What is the best type of chocolate for dipping?
For dipping, dark chocolate chips are the best choice. They have a rich flavor that pairs well with the sweet filling. You can also use milk or white chocolate if you prefer a sweeter taste. Just make sure the chocolate is high quality. This will give you a smooth and shiny finish on your cannoli cones.
In this blog post, we explored how to make chocolate dipped cannoli cones. We covered key ingredients, step-by-step instructions, helpful tips, and fun variations. You learned how to prepare the filling, melt the chocolate, and present your cones beautifully. Remember to avoid common mistakes and try different flavors for a unique twist. Enjoy making these delicious treats and impress your friends and family with your new skills. Happy cooking!