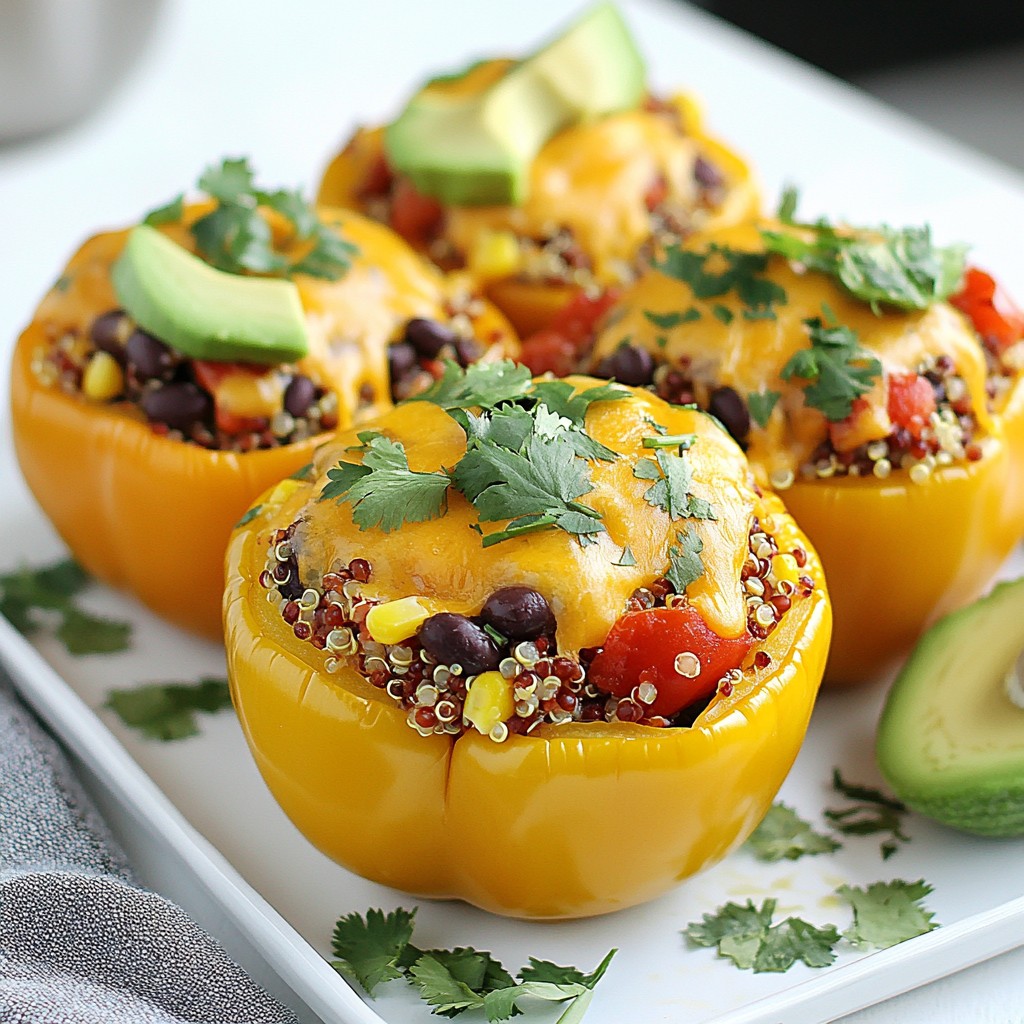
Are you ready to treat your taste buds to an amazing dish? Chili Cheese Stuffed Bell Peppers are bursting with flavor and packed with goodness. This fun recipe combines fresh ingredients like quinoa, black beans, and melted cheese. Perfect for any meal or occasion, these colorful peppers will bring joy to your table. Let’s dive into the tasty details!
Why I Love This Recipe
- Healthful and Satisfying: These stuffed peppers are packed with nutritious ingredients like quinoa, black beans, and fresh vegetables, making them a filling yet healthy meal option.
- Customizable Flavors: You can easily adjust the spices and fillings to suit your taste preferences, whether you prefer more heat or different veggies.
- One-Pan Wonder: Everything cooks in one baking dish, allowing for easy preparation and cleanup, which is perfect for busy weeknights.
- Colorful Presentation: The vibrant colors of the bell peppers and garnishes make this dish visually appealing, perfect for impressing guests or family!
Ingredients
List of Ingredients
- 4 large bell peppers (any color)
- 1 cup cooked quinoa (or substitute with rice)
- 1 can (15 oz) black beans, drained and rinsed
- 1 cup corn (fresh or frozen)
- 1 cup diced tomatoes with green chilies (canned)
- 1 cup shredded cheddar cheese, divided
- Spices (chili powder, ground cumin, garlic powder, onion powder)
- Seasoning (salt and pepper)
- Optional garnishes (fresh cilantro, sliced avocado, sour cream or Greek yogurt)
To make Chili Cheese Stuffed Bell Peppers, gather these fresh and simple ingredients. Start with four large bell peppers. You can use any color you like—red, yellow, green, or orange. Next, prepare one cup of cooked quinoa. If you prefer, you can swap quinoa for rice.
You will need one can of black beans. Be sure to drain and rinse them well. Then grab one cup of corn. You can use fresh corn or frozen corn, depending on what you have.
For a spicy kick, include one cup of diced tomatoes with green chilies. This canned ingredient adds flavor and heat.
Cheese lovers will enjoy one cup of shredded cheddar cheese. You will divide this cheese into two portions for the recipe.
Don't forget your spices! You will need chili powder, ground cumin, garlic powder, and onion powder. These spices bring the dish to life. Lastly, season with salt and pepper to taste.
For those who want to add extra flair, consider optional garnishes. Fresh cilantro, sliced avocado, and sour cream or Greek yogurt can elevate your dish.
With these delicious ingredients, you're ready to create a hearty meal that bursts with flavor.

Step-by-Step Instructions
Preparation Steps
- Preheat the oven to 375°F (190°C).
- Prepare bell peppers by cutting tops and removing seeds.
Start by taking your bell peppers. You can choose any color you like. The red, yellow, and green peppers all taste great. Cut the tops off and scoop out the seeds. This will make room for your tasty filling. Place the prepared peppers upright in a baking dish. This helps them stay stable while baking.
Filling the Peppers
- Mix cooked quinoa, black beans, corn, tomatoes, cheddar, spices, and seasonings.
- Fill the hollowed peppers and add remaining cheese on top.
Next, grab a large bowl. In this bowl, combine your cooked quinoa, black beans, corn, and diced tomatoes with green chilies. This mix gives the peppers a great flavor. Then, add half of the shredded cheddar cheese, along with your chili powder, cumin, garlic powder, salt, and pepper. Stir everything together until it’s well mixed.
Now it’s time to fill your peppers! Spoon the mix into each pepper. Press it down gently to pack it tightly. This ensures every bite is full of flavor. Once filled, sprinkle the remaining cheddar cheese on top of each pepper. This will make a delicious cheesy crust when we bake them.
Baking Instructions
- Add water to the baking dish and cover with foil.
- Bake for 25-30 minutes, then uncover and bake for an additional 10-15 minutes.
Pour about a quarter cup of water into the bottom of your baking dish. This water will create steam while baking. The steam helps cook the peppers evenly. Cover the dish tightly with aluminum foil.
Put the dish in your preheated oven. Bake for 25 to 30 minutes. After that, carefully take off the foil. Bake for another 10 to 15 minutes. You’ll know they are done when the peppers are tender, and the cheese is melted and golden brown. Enjoy the rich taste of your chili cheese stuffed bell peppers!
Tips & Tricks
Cooking Tips
- Pack the filling tightly in each pepper. This step helps them cook evenly.
- Cover the baking dish with foil during the first half of baking. This keeps the peppers moist.
Serving Suggestions
- Add fresh cilantro on top for a burst of flavor.
- Serve with slices of ripe avocado for creaminess.
- A dollop of sour cream or Greek yogurt adds tangy goodness.
Customization Ideas
- Swap quinoa for rice or other grains you like. This change can add variety.
- Feel free to mix in more veggies, like spinach or mushrooms, for extra nutrition.
- Spice it up! Add more chili powder or hot sauce for a fiery kick.
Pro Tips
- Choose Colorful Peppers: Using a mix of colored bell peppers not only makes the dish visually appealing but also adds different flavors.
- Pack the Filling Tightly: Press the filling down as you stuff the peppers to ensure they hold together and maximize flavor in every bite.
- Customize Your Cheese: Experiment with different types of cheese like pepper jack or mozzarella for a unique taste and texture.
- Serve with Fresh Ingredients: Adding fresh toppings like cilantro, avocado, or a squeeze of lime enhances the flavors and adds a refreshing touch.
Variations
Ingredient Swaps
You can change things up by using different cheeses. Monterey jack or mozzarella can add a nice twist. You can also switch the protein. Ground turkey or tofu works great. This keeps your meal fresh and exciting.
Dietary Adjustments
Want a vegetarian version? Just skip any meat products. Use beans and grains for protein. For a gluten-free option, pick gluten-free grains like brown rice or quinoa. This way, everyone can enjoy the dish.
Flavor Variations
If you enjoy heat, add jalapeños to the mix. They bring a nice kick! You can also try different canned tomatoes. Spicy or herbed tomatoes can add depth and flavor. Experimenting with ingredients leads to unique tastes.
Storage Info
Refrigeration Guidelines
Store any leftovers in an airtight container. This keeps the peppers fresh and tasty. You can keep them in the fridge for up to 3 days. Make sure to let them cool before sealing the container. This helps prevent moisture buildup.
Freezing Instructions
You can freeze these stuffed peppers if you have extras. Wrap each one in plastic wrap. Then, place them in a freezer bag. They will stay good for up to 3 months. When you are ready to eat, just thaw them in the fridge overnight.
Reheating Methods
To reheat your stuffed peppers, you have a couple of options. You can use the oven for a crispy finish. Bake them at 350°F (175°C) until heated through. Alternatively, you can use the microwave for quick reheating. Just heat them in short bursts of 1-2 minutes until warm. Enjoy your meal!
FAQs
How do I make Chili Cheese Stuffed Bell Peppers vegan?
You can make these stuffed peppers vegan by swapping regular cheese for vegan cheese. You also need to ensure no animal products are used in other ingredients. Using ingredients like black beans, corn, and quinoa makes this dish hearty and filling.
Can I make this recipe in advance?
Yes, you can make this dish ahead of time. Just prepare and fill the peppers, then store them in the fridge until you're ready to bake. This way, you save time on busy days or when hosting a dinner.
What can I serve with Chili Cheese Stuffed Bell Peppers?
You can serve these tasty peppers with a side salad for freshness. Rice makes a great choice too, as it absorbs the flavors well. Chips can add a nice crunch and fun texture to your meal.
Chili cheese stuffed peppers are a tasty, easy meal. We covered ingredients, preparation steps, and baking tips. The mix of quinoa, beans, and cheese offers a great flavor. Don't forget to customize with your favorite veggies or spices. Store leftovers in the fridge or freeze for later. You can enjoy this simple dish any day. Happy cooking!