FREE DINNER EBOOK! Get your copy!
  • Cookie Policy
  • GDPR Policy
  • Disclaimer
  • Terms Of Use
  • Visit my other site: Fun Cookie Recipes
snack joy kitchen
  • Home
  • Dinner
  • Desserts
  • Drinks
  • Appetizers
  • Contact
  • About
  • Privacy Policy
  • Home
  • Dinner
  • Desserts
  • Drinks
  • Appetizers
  • Contact
  • About
  • Privacy Policy
  • Cookie Policy
  • GDPR Policy
  • Disclaimer
  • Terms Of Use
Visit my other site: Fun Cookie Recipes

HOME / CATEGORIES /

Latest

To make this tasty dish, gather these main ingredients: - 2 packs of instant ramen noodles (discard the seasoning packets) - 4 tablespoons unsalted butter - 4 cloves garlic, finely minced - 1 tablespoon chili paste (adjust for spice level) - 2 cups low-sodium chicken or vegetable broth - 1 tablespoon soy sauce - 1 tablespoon sesame oil - 1 teaspoon sugar - Salt and pepper to taste You can add these optional ingredients to boost flavor: - 1 soft-boiled egg (for creaminess) - Extra chili paste (for more heat) - Sliced mushrooms (for earthy notes) - Baby spinach (for freshness) Garnishes make your ramen look great and taste better: - 1 teaspoon green onions, finely chopped - Sesame seeds for crunch - Slices of chili for a pop of color These ingredients and garnishes will help you create a wonderful bowl of spicy garlic butter ramen. Each adds flavor and makes the dish visually appealing. Enjoy the vibrant tastes and textures! First, grab a large pot. Fill it with water and bring it to a boil. Once the water bubbles, add the two packs of instant ramen noodles. Cook them for about 3 to 4 minutes. You want them to be just right, or al dente. After cooking, drain the noodles and set them aside. Next, take a spacious skillet and place it on medium heat. Add 4 tablespoons of unsalted butter. Let the butter melt completely. Once melted, toss in 4 cloves of finely minced garlic. Sauté the garlic for about 1 to 2 minutes. Stir it well until it smells amazing but does not brown. Now, add 1 tablespoon of chili paste to the garlic butter. Mix it all together. Then, pour in 2 cups of low-sodium chicken or vegetable broth. Add 1 tablespoon of soy sauce, 1 tablespoon of sesame oil, and 1 teaspoon of sugar. Increase the heat a bit and let the mixture simmer gently. Now comes the fun part! Carefully add the drained ramen noodles into your skillet. Toss and mix the noodles in the spicy garlic butter sauce for about 2 to 3 minutes. Make sure every noodle gets coated in that tasty sauce. Finally, taste it and add salt and pepper as needed. Serve your spicy garlic butter ramen in deep bowls. If you want, top each bowl with a soft-boiled egg for extra flavor. Finish it off with sesame seeds and chopped green onions for a lovely look. Enjoy your meal! To get the best garlic taste, use fresh cloves. Finely mince them to release more flavor. Sauté the garlic in butter over medium heat. Cook until it smells great, about 1-2 minutes. Don’t let it brown too much; burnt garlic tastes bitter. If you want a stronger garlic punch, add more minced garlic or use garlic powder for a different twist. Spice is all about balance. Start with 1 tablespoon of chili paste. Taste the sauce and see if it’s spicy enough. If you want more heat, add more chili paste a little at a time. Remember, you can always add heat, but you can’t take it away. For a milder dish, use less chili paste or add a bit of sugar to balance the heat. Perfect noodles are key for great ramen. Cook the noodles until they are al dente, which means firm but not hard. This usually takes 3-4 minutes. After cooking, drain them well. Toss them in the garlic butter sauce quickly to coat evenly. This helps keep them from getting mushy. If they sit too long, they may clump together. Serve them right away for the best texture! {{image_4}} For a meat-free version, choose vegetable broth. It adds depth and flavor. You can also use mushroom broth for a richer taste. Both options keep the dish hearty and satisfying. If you want more protein, add tofu. Firm tofu works best. Cook it until golden brown for added texture. You can also use edamame or chickpeas for a protein punch. Both options mix well with the flavors. Toppings can elevate your ramen. Try adding fresh spinach or bok choy for greens. You can sprinkle chopped peanuts for crunch. Seaweed strips give a nice umami touch. For a citrus kick, add lime wedges on the side. Each topping adds its own twist to the dish. To keep your spicy garlic butter ramen fresh, store it in an airtight container. Let it cool to room temperature before sealing. This helps prevent sogginess. You can keep it in the fridge for up to three days. Always check for any off smells or changes in color before eating. When you're ready to enjoy your leftovers, reheat the ramen on the stove. Place it in a skillet over low heat. Add a splash of broth or water to prevent it from drying out. Stir gently until heated through. You can also microwave it in a bowl. Cover with a damp paper towel and heat for 1-2 minutes. Stir halfway to ensure even heating. If you want to freeze your ramen for later, I suggest storing the noodles and sauce separately. This keeps the noodles from getting mushy. Use freezer-safe bags or containers. Label them with the date and contents. You can freeze the sauce for up to three months. When you're ready to eat, thaw overnight in the fridge and reheat as mentioned above. Yes, you can use regular ramen noodles. Just cook them according to the package. They will take a bit longer than instant noodles. Make sure they are al dente before mixing them with the sauce. This way, they stay firm and absorb the flavors well. To make this dish vegan, swap the butter for vegan butter or olive oil. Use vegetable broth instead of chicken broth. Skip the soft-boiled egg for a fully plant-based meal. You can add more veggies, like mushrooms or bok choy, for extra flavor and nutrition. If you don’t have chili paste, try sriracha or hot sauce. Adjust the amount based on your spice level. You can also blend fresh chili peppers with garlic for a homemade option. This keeps the dish bold and spicy without losing flavor. This blog post explored how to make spicy garlic butter ramen. We discussed key ingredients, step-by-step cooking instructions, and helpful tips. I shared ways to customize your ramen with variations and provided storage tips for leftovers. In the end, this dish is simple and fun to make. You can enjoy it your way. Experiment with the flavors and find what you love! Happy cooking!

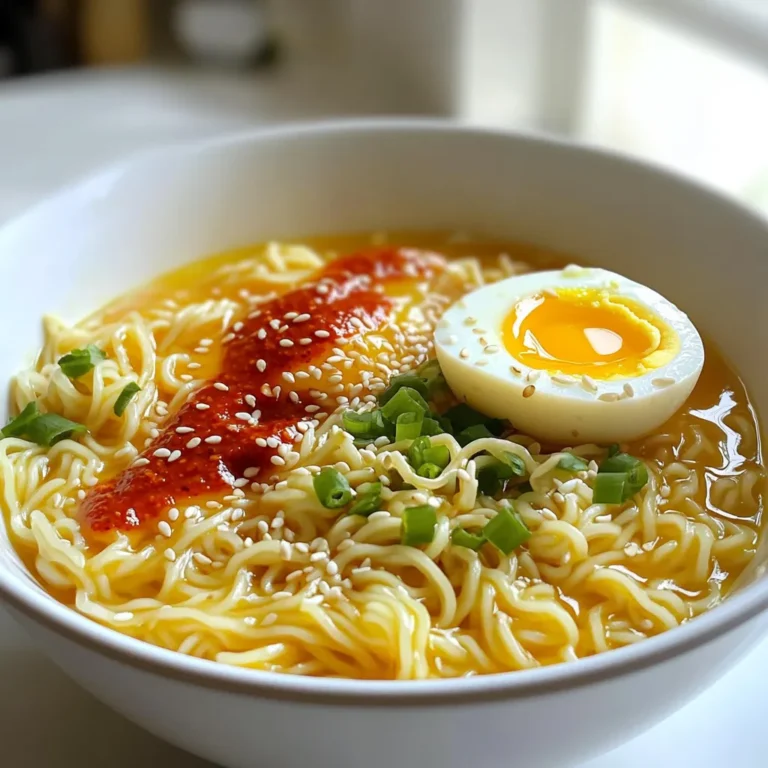
Spicy Garlic Butter Ramen Quick and Flavorful Meal

To make buttermilk fried chicken tenders, you need just a few main ingredients. Here’s what you’ll need: - 1 pound chicken tenderloins - 1 cup buttermilk Chicken tenderloins are perfect for this dish. They are tender and cook quickly. Buttermilk adds flavor and helps keep the chicken juicy. Next, we add some spices to kick up the flavor. Here are the key seasonings: - 1 teaspoon garlic powder - 1 teaspoon onion powder - 1 teaspoon smoked paprika - 1 teaspoon freshly ground black pepper - 1 teaspoon kosher salt These spices bring out the best in your chicken. Garlic and onion powder add depth, while smoked paprika gives a nice, subtle kick. Finally, the coating mix makes the tenders crispy. Here’s what you need: - 1 cup all-purpose flour - 1/2 cup cornstarch - 1 teaspoon baking powder - Vegetable oil, for frying The flour and cornstarch create a crunchy shell. Baking powder helps make it extra crispy. Using vegetable oil ensures that the chicken fries evenly and stays golden brown. With these ingredients, you’re ready to create a dish that is both crispy and flavorful! {{ingredient_image_2}} To start, grab a large mixing bowl. In it, combine 1 cup of buttermilk, 1 teaspoon of garlic powder, 1 teaspoon of onion powder, 1 teaspoon of smoked paprika, 1 teaspoon of black pepper, and 1 teaspoon of kosher salt. Whisk these ingredients together until smooth. This mixture adds flavor and helps the chicken become tender. Next, add 1 pound of chicken tenderloins to the marinade. Make sure each piece is covered well. Cover the bowl with plastic wrap or a lid. Place it in the fridge for at least 1 hour, or even better, overnight. This step is key for great taste and juicy chicken. While the chicken marinates, prepare the coating. In another large bowl, mix together 1 cup of all-purpose flour, 1/2 cup of cornstarch, and 1 teaspoon of baking powder. Stir well to avoid lumps. After the chicken has marinated, take it out of the fridge. Let the extra buttermilk drip off each piece. Dredge the chicken in the flour mixture, making sure to coat it evenly. Shake off any excess flour. This coating gives the tenders their crispy texture. Now it’s time to fry! Heat about 1 inch of vegetable oil in a large, deep skillet over medium-high heat. Use a cooking thermometer to check the temperature; aim for around 350°F (175°C). Carefully add the coated chicken tenders to the hot oil in batches. Don't overcrowd the pan; this keeps the oil hot. Fry each tender for about 4 to 6 minutes on each side, until they turn golden brown. Use a meat thermometer to check that the internal temperature reaches 165°F (75°C). Once cooked, use a slotted spoon to move the fried tenders to a paper towel-lined plate. This step helps absorb any extra oil. Repeat with the remaining chicken until all are crispy and golden. Enjoy your delicious buttermilk fried chicken tenders! To get that perfect crisp, start with a good coating. Mix all-purpose flour with cornstarch. The cornstarch adds extra crunch. Use baking powder in the mix to help the coating puff up. Make sure to shake off any extra flour. This helps keep the coating light. Marinating your chicken is key. Let it soak in buttermilk for at least one hour. For the best results, marinate overnight. This makes the chicken tender and full of flavor. The longer it sits, the better it tastes! Keep an eye on the oil temperature. Heat it to about 350°F (175°C). Use a cooking thermometer for accuracy. If the oil is too hot, the outside will burn. If it's too cool, the chicken will absorb oil and become greasy. Fry in small batches to maintain the right temperature. Pro Tips Marinate Longer for Flavor: For the best flavor and tenderness, consider marinating the chicken tenderloins overnight. This allows the spices to penetrate deeper into the meat. Perfect Oil Temperature: Use a cooking thermometer to maintain the oil temperature at 350°F (175°C) for optimal frying. This ensures a crispy exterior while keeping the chicken juicy inside. Batch Frying: Fry the chicken tenders in small batches to avoid overcrowding the pan, which can lower the oil temperature and lead to soggy tenders. Rest After Frying: Allow the fried chicken tenders to rest on a paper towel-lined plate for a few minutes after cooking. This helps to remove excess oil and keeps them crispy. {{image_4}} Want to kick the heat up a notch? Add some heat with spices. Mix in 1-2 teaspoons of cayenne pepper into your buttermilk marinade. This adds a spicy kick without overpowering the flavor. You can also use hot sauce. Just whisk in a few dashes to the buttermilk. The longer you let the chicken soak, the spicier it gets. Not in the mood for frying? You can create crispy chicken tenders in the oven. Preheat your oven to 400°F (200°C). After coating the chicken, place them on a baking sheet lined with parchment paper. Spray them lightly with cooking oil. Bake for 20-25 minutes. Flip halfway through for even cooking. The tenders will still be tasty and crunchy! Need a gluten-free option? Swap out regular flour for a gluten-free blend. You can find many mixes that work well. Cornstarch is already gluten-free, which helps keep the coating light and crispy. Just make sure all your ingredients are certified gluten-free. This way, everyone can enjoy these tasty tenders! After enjoying your buttermilk fried chicken tenders, store leftovers properly. First, let them cool at room temperature for about 30 minutes. This step helps prevent sogginess. Next, place them in an airtight container. You can layer parchment paper between the tenders to keep them crispy. Keep the container in the fridge. They will stay fresh for up to three days. To reheat your chicken tenders without losing that crispy texture, use an oven. Preheat your oven to 375°F (190°C). Spread the tenders on a baking sheet lined with parchment paper. Bake for about 10-15 minutes. This method helps revive their crunch. If you’re in a hurry, use an air fryer. Set it to 350°F (175°C) for about 5-7 minutes. This keeps them crispy and tasty. Freezing is great for keeping your chicken tenders longer. First, let them cool completely. Then, place them in a single layer on a baking sheet. Freeze them for 1-2 hours until firm. After that, transfer the frozen tenders to a freezer-safe bag. Remove as much air as possible before sealing. They will last up to three months in the freezer. When ready to eat, follow the reheating method for best results. Yes, you can use regular milk. Buttermilk adds a tangy taste and helps the chicken stay moist. If you use regular milk, try adding a tablespoon of vinegar or lemon juice to mimic buttermilk's tang. Let it sit for about five minutes before using. To check if your chicken tenders are done, use a meat thermometer. The safe internal temperature is 165°F (75°C). You can also cut into a tender. The meat should be white, not pink, and the juices should run clear. Cook them until they are golden brown and crispy on the outside. There are many tasty sauces to try! Here are a few ideas: - Zesty honey mustard - Creamy ranch - Spicy buffalo sauce - Sweet and sour sauce - BBQ sauce These sauces enhance the flavor of your crispy chicken tenders and make each bite exciting! In this post, we explored how to make delicious buttermilk fried chicken tenders. We covered key ingredients and spices, detailed step-by-step cooking methods, and shared tips for the best texture and flavor. You learned about variations like spicy options and oven-baked alternatives, along with storage and reheating tips. Now, you have everything you need to create perfect tenders at home. Enjoy experimenting and sharing these tasty bites with friends and family!

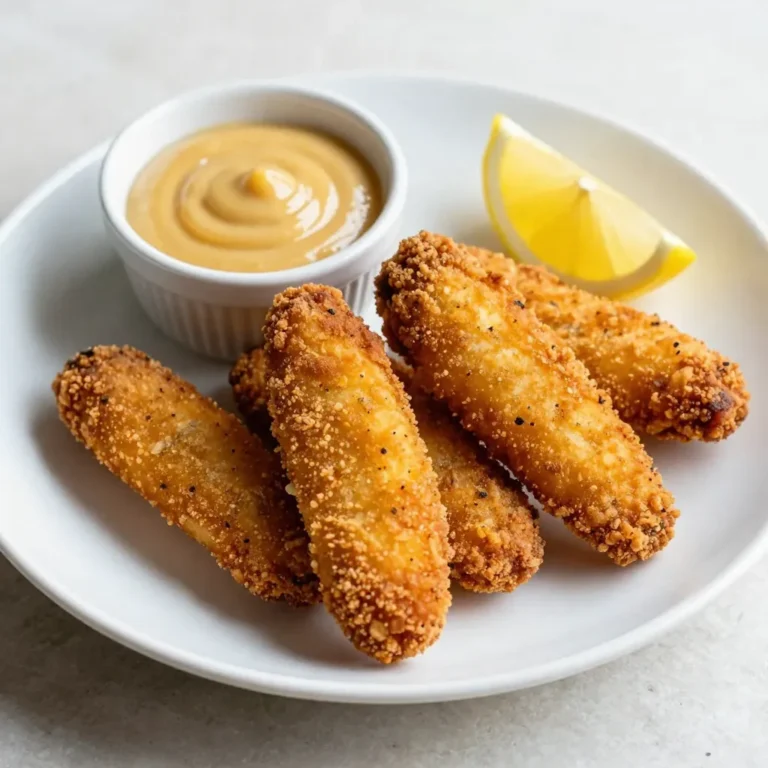
Buttermilk Fried Chicken Tenders Crispy and Flavorful

- 2 cans of pre-made cinnamon rolls - 6 large eggs - 1 cup whole milk - 1/2 cup heavy cream - 1 teaspoon pure vanilla extract - 1 teaspoon ground cinnamon - 1/4 teaspoon freshly grated nutmeg - 1/4 cup packed brown sugar - 1/2 cup chopped pecans - Maple syrup for serving In this recipe, the main ingredients make up the base of your dish. The pre-made cinnamon rolls save time and add sweet flavor. Eggs, whole milk, and heavy cream create a rich custard that soaks into the rolls. To elevate the taste, we add flavor enhancers. Vanilla extract brings warmth, while ground cinnamon adds that classic cinnamon flavor. Freshly grated nutmeg gives a nice hint of spice. Brown sugar adds sweetness and depth. If you want some crunch, you can toss in chopped pecans. They add texture and a nutty flavor. Don't forget to serve with maple syrup for a sweet finish! This combination of ingredients creates a delightful breakfast treat that everyone will love. {{ingredient_image_2}} - Set oven temperature to 350°F (175°C) - Prepare baking dish First, preheat your oven to 350°F (175°C). While it heats, grab a 9x13 inch baking dish. Grease it well with cooking spray or softened butter. This makes for easy serving later. - Cut each roll into quarters - Arrange in the baking dish Next, open two cans of pre-made cinnamon rolls. Use a sharp knife or kitchen scissors to cut each roll into quarters. Place these small pieces evenly in the greased baking dish. If you like, sprinkle chopped pecans over the rolls for a nice crunch. - Whisk eggs until fluffy - Combine with milk, cream, vanilla, cinnamon, nutmeg, and brown sugar In a medium mixing bowl, crack six large eggs. Whisk them until they are fluffy. Then add one cup of whole milk, half a cup of heavy cream, one teaspoon of pure vanilla extract, one teaspoon of ground cinnamon, a pinch of freshly grated nutmeg, and a quarter cup of brown sugar. Mix these ingredients well until smooth and slightly frothy. - Pour custard over cinnamon roll pieces - Optionally drizzle icing over the top Now, pour the custard mixture evenly over the cinnamon roll pieces. Make sure every piece gets soaked in that delicious custard. Press down gently with a spatula to help the rolls absorb the mixture. If your cinnamon rolls came with icing, drizzle it over the top for extra sweetness. - Bake for 30-35 minutes - Check for doneness with a toothpick Place the baking dish in the preheated oven. Bake for about 30 to 35 minutes. You’ll know it’s done when the top turns golden brown. Insert a toothpick in the center; if it comes out clean, it’s ready. - Let rest for 5 minutes - Serve with maple syrup After baking, take the dish out of the oven. Let it rest for about five minutes. This helps it set a bit, making it easier to serve. When ready, pour some maple syrup over each serving for a sweet finish. Enjoy your warm and tasty breakfast treat! Soaking the cinnamon rolls is key. When you cut the rolls into quarters, make sure to let them soak in the creamy egg mixture. This step helps the rolls absorb all the flavors. The longer they soak, the softer and more custardy they become. I usually press down gently with a spatula to ensure every piece gets coated well. You can always add more spices for a flavor boost. Try adding a pinch of nutmeg or even some allspice. A little extra vanilla can also lift the taste. For toppings, consider sliced bananas or fresh berries. They add brightness and a nice contrast to the sweet cinnamon. A sprinkle of chopped pecans adds crunch, too! To make your dish look stunning, dust it with powdered sugar right before serving. Fresh berries or banana slices on top add color and freshness. You can also drizzle some icing over the top for that extra sweet touch. A beautiful dish makes breakfast feel special! Pro Tips Use Fresh Ingredients: Using fresh eggs and high-quality milk will enhance the overall flavor and texture of your bake, making it even more delicious. Customize the Toppings: Feel free to experiment with different toppings like chocolate chips, dried fruits, or different nuts to personalize your dish. Soaking Time Matters: Allowing the cinnamon roll pieces to soak in the custard mixture for a bit longer can lead to a richer and more flavorful result. Serve Immediately: This dish is best enjoyed fresh out of the oven, so be sure to serve it right away for maximum flavor and warmth. {{image_4}} You can add different nuts to this dish. Almonds or walnuts work great. They bring a nice crunch and flavor. If you prefer no nuts, that's fine too! The recipe still tastes amazing without them. Change the flavors based on the season. In fall, try using pumpkin spice. It adds a warm and cozy taste. In summer, add fresh fruit like berries or peaches. The fruit keeps it light and fresh. You can even mix in both for a fun twist! For those who need gluten-free options, you can use gluten-free cinnamon rolls. Look for rolls made with almond or coconut flour. This way, everyone can enjoy this tasty dish. Just make sure to check all labels for gluten-free status. To keep your Cinnamon Roll French Toast Bake fresh, use airtight containers. Glass or plastic containers work well. Make sure to let it cool before sealing. This helps prevent sogginess. For the best results, reheat in the oven. Preheat your oven to 350°F (175°C). Place the leftovers in an oven-safe dish. Cover it with foil to keep moisture in. Heat for about 15-20 minutes. This will help maintain the soft texture. You can also use the microwave. Place a piece on a microwave-safe plate. Heat for 30 seconds to 1 minute. Check to see if it is warm throughout. You can freeze this dish for later. Cut it into portions before freezing. Wrap each piece in plastic wrap. Then, place them in a freezer bag. Make sure to squeeze out the air. It keeps the dish fresh for up to three months. When you’re ready to eat, thaw in the fridge overnight. Reheat in the oven or microwave as described above. This way, you can enjoy your tasty breakfast treat anytime! Yes, you can use homemade cinnamon rolls. Make sure they are soft and fluffy. If they are a bit dry, soak them in the custard mix longer. This helps them soak up more flavor. Cut them into quarters, just like the store-bought ones. This way, they will bake evenly. The bake time is about 30 to 35 minutes. You will know it’s done when the top turns golden brown. A toothpick should come out clean from the center. If it still has wet batter, bake for a few more minutes. Yes, you can double or halve the recipe. If you double it, use a larger baking dish. For halving, use a smaller dish. Keep the same bake time but check for doneness. Adjusting the recipe is easy, and it helps with serving size. In this blog post, we explored how to create a delicious baked cinnamon roll dish. We covered key ingredients, from eggs to flavor enhancers, and added tips for perfect texture. Each step was detailed, making sure you can easily follow along. Remember, you can customize this dish with your favorite nuts or spices. It’s fun to experiment and find what you love. Enjoy your cooking!

Cinnamon Roll French Toast Bake Tasty Breakfast Treat

- 1 small butternut squash, peeled and diced into bite-sized cubes - 2 tablespoons extra virgin olive oil, plus more for brushing - 4 ounces goat cheese, softened to room temperature - Sea salt and freshly cracked black pepper to taste - 1 teaspoon ground cinnamon - 2 tablespoons honey - 1 French baguette, sliced into 1/2-inch thick pieces - 1 tablespoon fresh thyme leaves, plus extra for garnish - 1 tablespoon balsamic glaze for drizzling Let me share the magic of these ingredients. Butternut squash brings a sweet, nutty taste. It also adds a lovely, bright color. The goat cheese offers a creamy, tangy flavor that pairs well with the squash. Next, olive oil not only helps roast the squash but also keeps the baguette slices crispy. Sea salt and black pepper enhance all the flavors, while ground cinnamon adds warmth. Honey ties everything together with a hint of sweetness. You can’t forget the baguette! It forms the perfect base for the crostini. Fresh thyme leaves add a lovely herb note, and balsamic glaze gives a delightful finish. Each ingredient plays a key role. They come together to create a dish that is both tasty and beautiful. First, you need to dice the butternut squash. Peel it and cut it into bite-sized cubes. This size helps it cook evenly. In a bowl, mix the squash with olive oil, sea salt, black pepper, and ground cinnamon. Make sure each piece is coated well. Next, spread the squash on a baking sheet in a single layer. Roast it in a preheated oven at 425°F for 25-30 minutes. Halfway through, turn the squash with a spatula. It should be tender and caramelized when done. Now, let’s prepare the baguette slices. Cut the French baguette into half-inch thick pieces. Place them on a separate baking sheet. Brush each slice with olive oil on both sides. This step adds flavor and helps them crisp up. Toast the baguette slices in the oven for about 5-7 minutes. Watch them closely to avoid burning. They should turn golden brown and be crispy. While the squash and bread toast, it’s time to make the goat cheese spread. In a clean bowl, combine softened goat cheese, honey, and fresh thyme leaves. Mix these ingredients well until smooth. You want a creamy spread that will complement the squash. Once the squash cools, you can assemble your crostini. Start by spreading a good layer of the goat cheese mixture onto each toasted baguette slice. Cover the bread well with the cheese. Then, add a spoonful of the roasted butternut squash on top. Let some edges show for a rustic look. This adds color and texture to each bite. To finish, drizzle a little balsamic glaze over each crostini. This adds a sweet and tangy flavor. For a beautiful presentation, garnish with extra thyme leaves. This final touch makes the crostini look appealing and adds aroma. To roast butternut squash well, heat your oven to 425°F. This high temperature helps the squash cook through and caramelize nicely. Roast the cubes for 25 to 30 minutes. Turn them halfway to get even browning. When done, the squash should be tender and golden. A little char adds great flavor! You can add extra flavors to your crostini. Try mixing in some garlic powder or smoked paprika with the squash. This will give it a nice kick. If you want a different cheese, use feta or cream cheese instead of goat cheese. Each cheese brings its own taste and texture. These crostini work great for many occasions. Serve them at parties, as appetizers, or even at a cozy dinner. They pair well with drinks like white wine or sparkling cider. A light salad on the side makes for a balanced meal. Enjoy your savory bites warm or at room temperature for the best taste. {{image_4}} You can change the recipe based on the season. Try adding other veggies like roasted beets or sweet potatoes. They will add color and taste. You can also switch up the spices. In fall, use nutmeg or allspice. In spring, think about fresh herbs like basil or dill. This keeps your crostini fresh and fun. If you need gluten-free options, use gluten-free bread. There are many tasty choices available. For those who follow a vegan diet, swap goat cheese for cashew cheese or a nut-based spread. You can mix in a bit of nutritional yeast for a cheesy flavor. These changes make the dish friendly for everyone. To add more crunch, try adding nuts or seeds. Chopped walnuts or pumpkin seeds give a nice texture. You can also include fruits like pomegranate seeds or thin apple slices. These add sweetness and a burst of flavor. Experimenting with these additions can make your crostini even more exciting. To keep your crostini fresh, place leftovers in an airtight container. You can store them in the fridge for up to three days. This keeps the flavors intact while preventing them from drying out. Avoid stacking the crostini to keep them crispy. When reheating, place crostini on a baking sheet. Heat them in an oven at 350°F (175°C) for about 5-7 minutes. This method warms them without making them soggy. You want to maintain the crispiness of the bread. You can freeze the assembled crostini, but I recommend freezing the components separately for best results. Wrap the roasted butternut squash tightly in plastic wrap. Store the goat cheese spread in a sealed container. You can freeze these for up to a month. When you are ready to enjoy them, thaw in the fridge overnight before assembling and toasting. The best way to prepare butternut squash is to peel, dice, and roast it. Start by cutting the squash into bite-sized cubes. Toss the cubes with olive oil, sea salt, black pepper, and cinnamon for great flavor. Roast them at 425°F (220°C) for 25-30 minutes. The heat will caramelize the squash, giving it a sweet taste. Yes, you can make crostini ahead of time. Prepare the goat cheese spread and roasted squash in advance. You can also toast the baguette slices earlier in the day. Store the components separately in airtight containers. Assemble the crostini just before serving for the best flavor and texture. If you prefer a different cheese, you can use cream cheese or ricotta. Both provide a creamy texture. Feta cheese also makes a nice alternative with a tangy flavor. Choose a cheese that suits your taste. Check the squash for tenderness. It should be soft enough to pierce with a fork. The edges should be slightly caramelized for the best flavor. This usually takes 25-30 minutes in the oven, but keep an eye on it. You can use several types of bread for crostini. Sourdough, ciabatta, or whole grain bread work well. Just cut them into thin slices and toast them until crispy. Choose a bread that you enjoy to create your perfect crostini. This blog post covered how to make delicious butternut squash crostini. You learned about the key ingredients like butternut squash, goat cheese, and olive oil. We discussed simple steps for prepping and assembling, plus tips for perfect roasting. You can even customize it for seasons and dietary needs. Remember, leftovers can last a while if stored right. Enjoy creating this dish for gatherings or a quiet night in. Happy cooking!

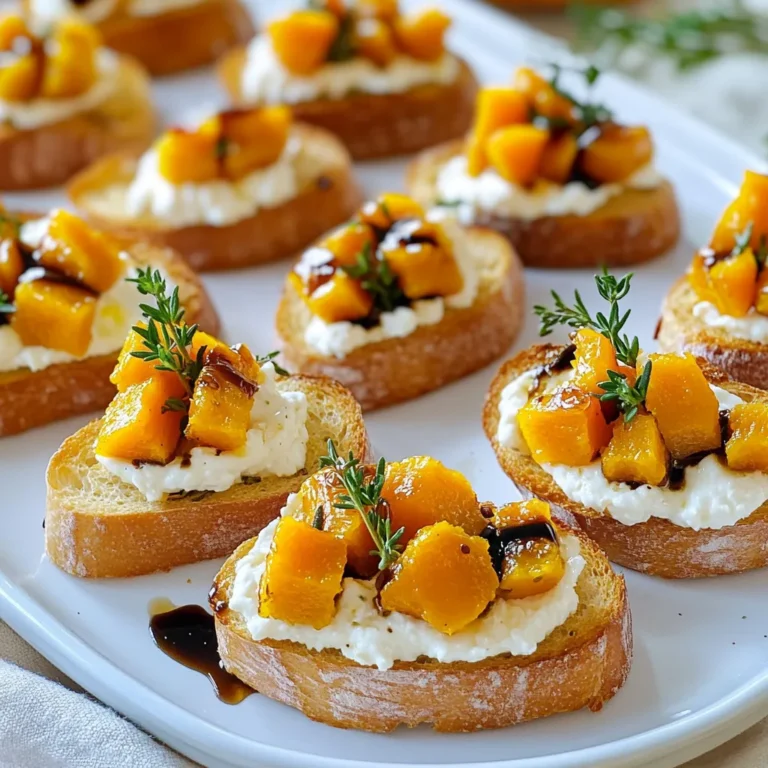
Savory Butternut Squash Goat Cheese Crostini Delight

- 1 pound boneless, skinless chicken thighs - 4 cups chicken broth - 1 cup carrots, finely diced - 1 cup celery, finely diced - 1 medium onion, chopped - 3 cloves garlic, minced For your soup, start with good quality chicken thighs. They stay juicy and tender. Next, grab some chicken broth. It forms the base of the soup and adds rich flavor. Chop up fresh vegetables too. Carrots, celery, onion, and garlic bring both taste and nutrition. The brighter the veggies, the better your soup will be! - 1 teaspoon dried thyme - 1 teaspoon dried oregano - 1/2 teaspoon freshly ground black pepper - 1 cup heavy cream - 2 cups fresh spinach, roughly chopped - Salt to taste Seasoning is key to great soup. Add dried thyme and oregano for warmth. Black pepper gives a little kick. Once the chicken cooks, stir in heavy cream. This makes the soup creamy and rich. Fresh spinach adds color and nutrients. Don't forget to adjust salt to your taste. - Fresh parsley, chopped (for garnish) - Crusty bread for serving Toppings can make a big difference. Fresh parsley adds a pop of color. Serve with crusty bread for dipping. This makes the meal feel special and cozy. In your slow cooker, start by adding the chicken thighs. Pour in the chicken broth next. Then, add the diced carrots, diced celery, chopped onion, and minced garlic. These fresh vegetables give the soup a great taste. Now, sprinkle in the dried thyme, oregano, and black pepper. These seasonings will enhance the flavor of your soup. Cover your slow cooker with its lid. You can set it to cook on low for 6-7 hours or on high for 3-4 hours. The key is to make sure the chicken is tender and fully cooked. When it’s done, remove the chicken from the slow cooker. Place it on a cutting board. Use two forks to shred the chicken into small pieces. After shredding, return the chicken back into the slow cooker. Next, stir in the heavy cream and gnocchi. Mix them well to combine. Cover the slow cooker and let it cook on low for another 30 minutes. This lets the gnocchi become fluffy and cooked through. Just before serving, stir in the chopped spinach. Mix until the spinach is wilted and bright green. Lastly, taste the soup and add salt if needed. Ladle the soup into bowls and enjoy! To get a rich and creamy soup, use heavy cream. It gives the soup a nice smooth texture. If you want lighter options, try whole milk or half-and-half. Coconut milk is also a great dairy-free choice. It adds creaminess and a hint of sweetness. For fluffy gnocchi, cook them for just 30 minutes in the slow cooker. You want them soft but not mushy. To prevent sticking, stir them gently when you add them to the soup. A little olive oil can also help keep them separate. To boost flavor, add fresh herbs like basil or dill. A pinch of red pepper flakes can add a nice kick. Using homemade broth makes a big difference in taste. Store-bought broth is fine, but it may lack depth. If you can, go for homemade for the best flavor! {{image_4}} You can switch the chicken for turkey or even tofu. Both options work great! Turkey adds a nice flavor, while tofu gives you a plant-based choice. For veggies, think about using mushrooms or zucchini. Mushrooms add a rich taste, and zucchini brings a fresh crunch. Both will keep your soup exciting! If you want a dairy-free version, use coconut milk instead of heavy cream. It gives a nice creaminess and a hint of coconut flavor. You can also find plant-based cream alternatives. They mimic the texture of cream well and fit right into your soup. Want more protein? Try adding beans or lentils. They make the soup heartier and fill you up faster. You can also toss in greens like kale or chard. They give your soup a boost of color and nutrients. Plus, they taste great! To store leftover soup in the fridge, let it cool first. Pour the soup into clean, airtight containers. I recommend using glass jars or plastic containers with lids. This keeps the soup fresh and safe. You can enjoy it for up to four days. For freezing soup, use freezer-safe containers or bags. Leave some space at the top since the soup expands when frozen. Label each container with the date. To thaw, move the soup to the fridge overnight. Reheat it on the stove over low heat for the best quality. Stir often to warm evenly. Refrigerated soup lasts about four days. Frozen soup can stay good for three months. Check for signs that the soup has gone bad. If it smells sour or has mold, it is best to throw it away. Always trust your senses when it comes to food safety. Yes, you can use frozen chicken thighs. Just remember, cooking time will change. If you cook on low, it may take about 8 hours. On high, expect around 4 to 5 hours. Always check if the chicken is fully cooked before serving. The chicken should reach an internal temperature of 165°F. Cooking from frozen keeps the meat juicy and tender. To add heat, try a few simple tricks. You can mix in red pepper flakes or cayenne pepper. Start with a small amount, like 1/4 teaspoon, then taste. If you want more spice, add slowly. You can also use spicy sausage instead of chicken. This adds flavor and heat in one step. Another option is to toss in jalapeños for a fresh kick. Yes, this soup is great for meal prep. You can make it a day ahead. Just store it in the fridge after it cools. If you want to freeze it, let it cool first. Use airtight containers for the best results. When ready to eat, thaw overnight in the fridge. Reheat it on the stove or in the microwave. Add more broth if it’s too thick after reheating. This blog covered a tasty slow cooker soup with chicken thighs, fresh veggies, and creamy goodness. You learned how to prepare it, cook it, and store it for later. I shared tips for achieving the best texture and flavor. You can also try variations for different diets and tastes. Now you have the tools to make your own special version. Enjoy every bite and share it with others!

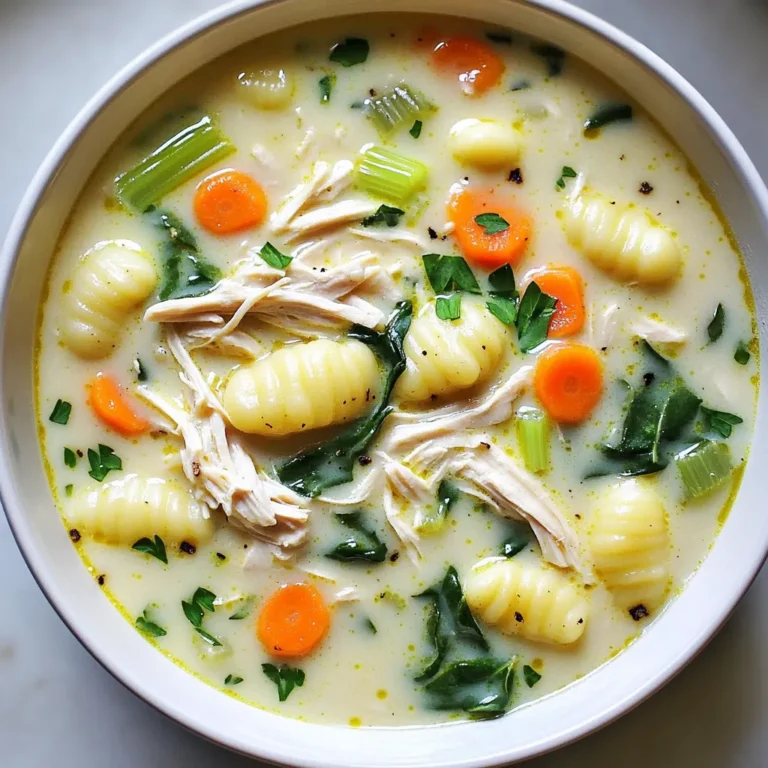
Slow Cooker Creamy Chicken Gnocchi Soup Delight

- 1 pound ground beef or ground turkey - 1 medium onion, finely diced - 3 cloves garlic, minced - 1 can (28 oz) crushed tomatoes - 4 cups chicken or vegetable broth - 8 sheets lasagna noodles, broken into bite-sized pieces - 1 cup ricotta cheese - 1 cup shredded mozzarella cheese (plus extra for garnish) - ½ cup grated Parmesan cheese The key to a great lasagna soup starts with choosing your meat. I love using either ground beef or turkey. Both options add flavor and richness to the dish. Next, I always use crushed tomatoes and a good broth. They create a base that is hearty and comforting. I break the lasagna noodles into small pieces, making them easy to eat and soak up the soup's flavor. Finally, I add a mix of cheeses. Ricotta gives creaminess, while mozzarella brings that melty goodness. - 2 teaspoons Italian seasoning - 1 teaspoon granulated sugar - Salt and freshly ground pepper to taste - Fresh basil leaves for garnish Seasonings are crucial for taste. Italian seasoning brings warmth and depth. A bit of sugar balances the acidity of the tomatoes. I always season with salt and pepper to enhance all the flavors. Fresh basil leaves are a must for garnish. They add a lovely aroma and a touch of freshness that makes every bowl special. To start, I brown 1 pound of ground beef or turkey in a large skillet. I set the heat to medium. I keep stirring until the meat turns brown. This usually takes about 5 to 7 minutes. Next, I add 1 medium onion, finely diced. I stir this in and let it cook until the onion softens. After about 3 minutes, I add 3 cloves of minced garlic. I sauté for 1 more minute, just until I smell the garlic. Now, I transfer the cooked meat and onion mix to my slow cooker. I want every bit of that flavor in the pot. Next, I add one 28-ounce can of crushed tomatoes. Then, I pour in 4 cups of chicken or vegetable broth. To this, I sprinkle in 2 teaspoons of Italian seasoning and 1 teaspoon of granulated sugar. I also season with salt and freshly ground pepper to taste. I mix everything well to make sure the flavors blend. With everything combined, I cover the slow cooker with its lid. I set it to low for 4 to 6 hours. If I’m in a hurry, I can set it to high for 2 to 3 hours. About 30 minutes before I want to serve, I add 8 broken lasagna noodle pieces. I stir gently to make sure they are all submerged in the broth. In the last 10 minutes, I add 1 cup of ricotta cheese and half of the shredded mozzarella cheese. I stir well, letting the cheese melt and blend into the soup. This makes it creamy and rich. When the cooking time is up, I ladle the hot soup into bowls. I garnish each bowl with the remaining mozzarella, a sprinkle of grated Parmesan, and fresh basil leaves. This adds a nice touch and great flavor! - Choosing the right setting (low vs. high) I recommend using the low setting for this lasagna soup. It lets the flavors blend well. Cooking on low for 4 to 6 hours creates a rich taste. If you are short on time, the high setting works too. Just set it for 2 to 3 hours. - Ensuring noodle doneness Add the broken lasagna noodles about 30 minutes before serving. This timing keeps them tender, not mushy. Gently stir to cover the noodles in the broth. This way, they soak up all the flavor. - Adjusting seasoning to taste Taste your soup before serving. If it needs more flavor, add salt and pepper. You can also add more Italian seasoning if you love that herb taste. Always adjust to your liking for the best results. - Adding vegetables for more nutrition For extra health benefits, try adding veggies like spinach or bell peppers. They cook well in the slow cooker and add color. You can toss them in with the other ingredients at the start. This makes your soup heartier and more nutritious. {{image_4}} You can switch the ground beef or turkey for different meats. Try using sausage for a spicy kick. Ground chicken is lighter and still tasty. Each meat brings its own flavor to the soup. This way, you can make it fit your taste. If you want a meatless option, replace the meat with lentils or mushrooms. Lentils add protein and a nice texture. Mushrooms bring a rich, earthy flavor that makes it hearty. Both choices make this soup filling and flavorful without meat. Feel free to add more veggies to your soup. Spinach adds color and nutrients. Bell peppers give it a sweet crunch. These extra ingredients can make your soup even more delicious and healthy. They also help you enjoy a variety of flavors in each bowl. You can store leftover lasagna soup in the fridge. Place it in an airtight container. Make sure it cools down first. It will stay fresh for about 3 to 4 days. When ready to eat, just scoop out the amount you want. Freezing is a great option for lasagna soup. First, let it cool completely. Then, transfer it to a freezer-safe container. Leave some space at the top for expansion. It can last up to 3 months in the freezer. When you want to enjoy it, simply thaw it in the fridge overnight. Reheating lasagna soup is easy. You can use the stove or microwave. For the stove, pour the soup into a pot. Heat it on medium and stir often until warm. In the microwave, use a microwave-safe bowl. Heat it for 1 to 2 minutes, stirring halfway. Always check the temperature before serving. Enjoy your warm and comforting dish! Yes, you can make this lasagna soup ahead of time. The soup tastes even better after sitting for a day. Just prepare it as directed and let it cool. Store it in an airtight container in the fridge. When you're ready to eat, just reheat it on the stove or in the microwave. This makes meal prep easy and gives you more time to enjoy your day. If you want to thicken the lasagna soup, there are a few simple tricks. You can add more lasagna noodles, as they soak up some broth. Another option is to stir in a cornstarch slurry made from water and cornstarch. Mix one tablespoon of cornstarch with two tablespoons of cold water. Add it to the soup and let it cook for a few more minutes. This will help give it a thicker, heartier texture. Lasagna soup is great on its own, but pairing it with sides makes it even better. Consider serving it with crusty garlic bread. The bread is perfect for dipping into the warm soup. A fresh garden salad also works well, adding a crisp contrast. You can even sprinkle some extra cheese or fresh basil on top for a nice touch. Enjoy your comforting meal! In this post, I shared how to make delicious lasagna soup. We covered the main ingredients, from ground meat to cheeses, and looked at spices like Italian seasoning. I shared step-by-step cooking tips for using a slow cooker. Plus, we explored variations like vegetarian options or using different meats. Remember to store leftovers properly and reheat them for the best taste. Lasagna soup is easy and fun to make! Enjoy your tasty creation.

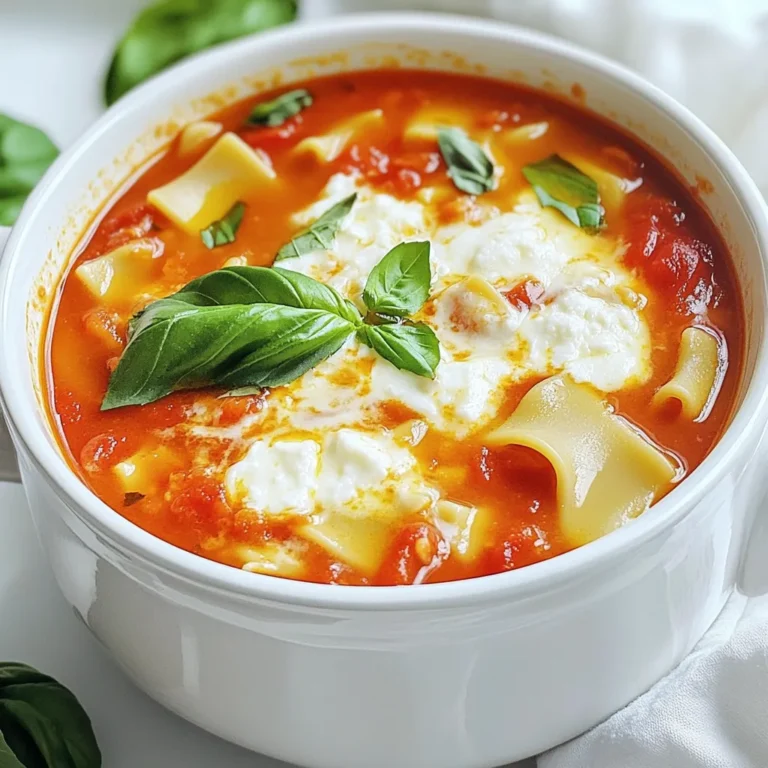
Lasagna Soup Slow Cooker Delicious Comfort Dish

- 1 pound boneless chicken breast, cut into bite-sized pieces - 1 cup assorted bell peppers (red, green, and yellow), sliced into strips - 1 cup pineapple chunks (fresh for the best flavor, or canned if preferred) - 1/2 cup onion, finely chopped - 1/2 cup granulated sugar - 1/2 cup apple cider vinegar - 1/4 cup low-sodium soy sauce - 2 tablespoons ketchup - 1 tablespoon cornstarch - 1 teaspoon garlic powder - 1/2 teaspoon ground ginger - Salt and black pepper to taste When you gather these ingredients, you set the stage for a dish that beats takeout every time. The chicken gives you protein, while the bell peppers and pineapple add color and flavor. The sugar and vinegar create that sweet and sour taste we love. Each ingredient plays a key role. For the sauce, apple cider vinegar and soy sauce balance out the sweetness. Ketchup adds a rich depth, while cornstarch helps everything stick together. The seasonings enhance the dish, making it unforgettable. Make sure your ingredients are fresh. This leads to a tastier meal. You can change some ingredients if needed. For example, use low-sugar options or swap chicken for tofu. Each change can create a new flavor journey! Start by drying the chicken pieces with paper towels. This step helps achieve a nice sear. Next, season the chicken with salt, black pepper, garlic powder, and ground ginger. Make sure each piece gets a good amount of seasoning. This will add flavor and make each bite tasty. To cook chicken evenly, try to cut the pieces into the same size. This way, they will cook at the same rate. Heat a large skillet over medium-high heat. Add one tablespoon of vegetable oil to the hot skillet. Once the oil shimmers, add the seasoned chicken in a single layer. Cook for 5-7 minutes, turning occasionally. Look for a golden-brown color and ensure no pink remains in the center. When it’s done, remove the chicken and set it aside on a plate. In the same skillet, add another tablespoon of vegetable oil. Toss in the chopped onion and sliced bell peppers. Stir-fry them gently for about 3-4 minutes. The goal is to soften them slightly while keeping them crisp. If you want to add more vegetables, like carrots or snap peas, add them based on their cooking times. This ensures all veggies stay vibrant and crunchy. For the sauce, grab a mixing bowl. Whisk together granulated sugar, apple cider vinegar, soy sauce, ketchup, and cornstarch. Whisk until the mixture is smooth and well combined. This step is crucial for a smooth sauce. Make sure to break up any clumps of cornstarch, as this will help the sauce thicken nicely later. Now, return the cooked chicken to the skillet with the veggies. Pour the sauce over everything and add the pineapple chunks. Stir well to coat the chicken and vegetables in the sauce. Reduce the heat to medium and let it simmer for 5-7 minutes. Keep an eye on the sauce, stirring occasionally. It should thicken and cling to the chicken and veggies. Once the sauce is thick, it’s time to serve. Plate the sweet and sour chicken over fluffy cooked rice. White or brown rice works well. To make your dish pop, sprinkle sesame seeds on top. Add chopped green onions or fresh cilantro for extra color and freshness. This will not only enhance the look but also the flavor. Enjoy your homemade delight! To make your chicken taste even better, consider marinating it. A simple mix of soy sauce, garlic, and ginger works wonders. Let it sit for at least 30 minutes. This adds depth to the flavor. If you want a unique twist, try using orange juice in place of apple cider vinegar. You can also mix in some honey for a sweeter sauce. This change gives a fresh taste that spices things up. You can pan-fry the chicken for a crispy texture. Heat oil in your skillet and cook the chicken until golden brown. This method takes about 5-7 minutes. If you prefer baking, coat the chicken in the sauce and place it in a preheated oven at 400°F for about 20 minutes. It will cook through and turn tender. For an easy option, use a slow cooker. Add the chicken, veggies, and sauce. Cook on low for 4-6 hours. This method makes the chicken very juicy and full of flavor. To make your dish look great, choose a large white plate. Place the rice in the center and top it with the sweet and sour chicken. This contrast creates a stunning visual. Use bright garnishes like chopped green onions or sesame seeds. These add color and make your meal more inviting. Fresh cilantro also gives a nice pop that enhances the look and taste. {{image_4}} - Gluten-free options: Use gluten-free soy sauce instead of regular soy sauce. This swap keeps the dish tasty while making it safe for those with gluten issues. - Low-sugar alternatives: Try using a sugar substitute or reduce the sugar amount. You can also add more pineapple for natural sweetness. - Sweet and spicy version: Add some red pepper flakes or sriracha. This gives your dish a nice kick without losing the sweet taste. - Tropical twist with additional fruits: Toss in mango or kiwi along with the pineapple. These fruits add a fun twist and extra flavor to your meal. - Chicken substitutions: Try using tofu for a vegetarian option or shrimp for a seafood twist. Both will soak up the sauce well. - Vegetable replacement ideas: Swap bell peppers for snap peas or broccoli. They add nice color and crunch while keeping the dish healthy. Store leftover sweet and sour chicken in an airtight container. This keeps it fresh and tasty. Try to eat it within three to four days. If you notice any strange smells or colors, throw it away. To freeze your sweet and sour chicken, let it cool completely first. Place it in a freezer-safe container or bag. Squeeze out air to avoid freezer burn. It will last for up to three months. When you're ready to eat, thaw it in the fridge overnight. To bring back the flavor when reheating, add a splash of soy sauce or vinegar. Heat it gently in a skillet or microwave, stirring often. Serve it over fresh rice to enjoy. For a nice touch, add sesame seeds or chopped green onions on top for extra flavor. To make sweet and sour chicken less sweet, reduce the sugar. Start with 1/4 cup instead of 1/2 cup. You can also add more vinegar. This adds tanginess and balances the flavor. Taste as you go to find the right mix for you. Yes, you can use frozen vegetables. They save time and are easy to use. Just make sure to thaw them first. This helps them cook evenly. Frozen veggies might lose some crunch, but they will still taste great. If your sauce is too runny, mix 1 tablespoon of cornstarch with 2 tablespoons of cold water. Stir this mixture into the sauce while it simmers. Cook for a few more minutes, and it will thicken nicely. Sweet and sour chicken lasts about 3 to 4 days in the fridge. Store it in an airtight container. Make sure it cools down before you put it in the fridge. This keeps it fresh and safe to eat. Yes, you can use other fruits! Try mango, peaches, or even oranges for a twist. Just make sure they complement the flavors well. Fresh fruit adds a nice touch and makes the dish even more vibrant. You now have all the tools to make delicious sweet and sour chicken. We covered the key ingredients, cooking steps, and sauce secrets. You learned tips to enhance flavor and explored fun variations. Storing leftovers and reheating them keeps the dish fresh. Enjoy this dish with your favorite rice and garnishes for a beautiful meal. Now, get in the kitchen and have fun creating your own sweet and sour chicken masterpiece!

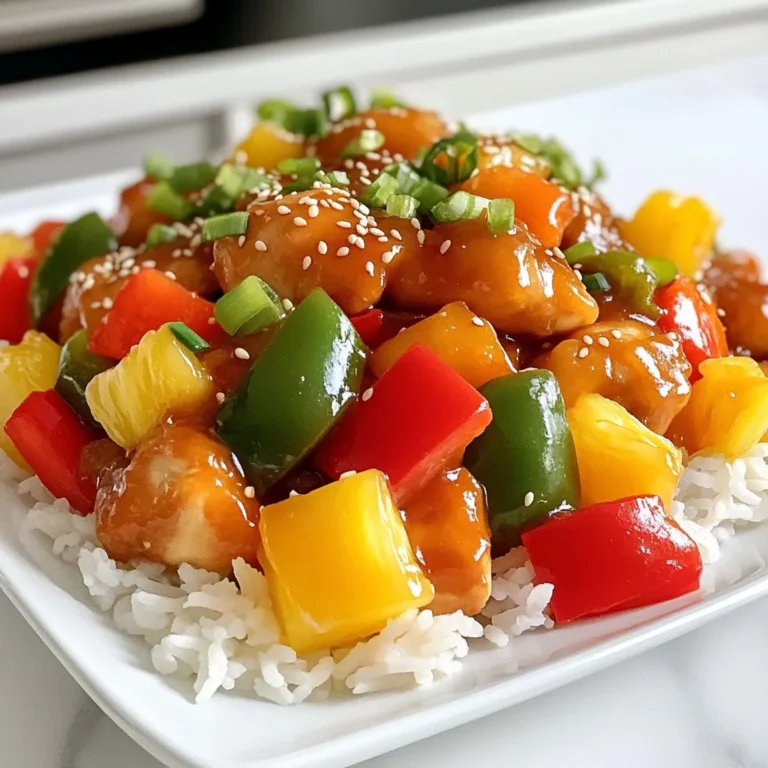
Sweet and Sour Chicken Better Than Takeout Delight

- 200g rice noodles - 2 tablespoons sweet chili sauce - 2 cloves garlic, finely minced - 1 tablespoon soy sauce - 1 tablespoon sesame oil - 1 small carrot, julienned - 1 bell pepper, thinly sliced (any color) - 1 green onion, finely chopped - Sesame seeds for garnish - Fresh cilantro for garnish (optional) In this recipe, the rice noodles are key. They cook quickly and soak up all the flavors. I love using sweet chili sauce because it brings a nice balance of sweet and spicy. Garlic adds depth to each bite. For the extra ingredients, soy sauce and sesame oil boost the umami taste. The julienned carrot and bell pepper add color and crunch. You can choose any color for the pepper. When it comes to garnishes, green onions add freshness. Sesame seeds give a nutty note. If you like, add fresh cilantro for an herbal touch. This mix of ingredients makes the dish vibrant and tasty. Start by boiling water in a large pot. Once the water is bubbling, add 200g of rice noodles. Cook them for about 3-4 minutes, or until they are tender. Pay attention to the package instructions, as some noodles might vary. After cooking, drain the noodles in a colander and set them aside. Take a large skillet or wok and set it on medium heat. Pour in 1 tablespoon of sesame oil and let it heat up until it shimmers. Then, add 2 cloves of finely minced garlic. Sauté the garlic for about 30 seconds, just until it smells great but does not brown. Now, toss in 1 small julienned carrot and 1 thinly sliced bell pepper. Stir-fry these veggies for about 2-3 minutes. You want them to soften a bit but still stay crisp. Lower the heat and add the drained rice noodles to the skillet with the veggies. Pour in 2 tablespoons of sweet chili sauce and 1 tablespoon of soy sauce. This will make the noodles flavorful. Use tongs or chopsticks to gently toss everything together. Heat the mixture for another 2-3 minutes until everything is warm. Finally, sprinkle chopped green onions over the noodles and give it a last gentle toss. Serve the noodles in bowls, and add sesame seeds and fresh cilantro for a nice touch. To make great Minute Sweet Chili Garlic Noodles, do not overcook the rice noodles. Cooking them for 3-4 minutes is just right. Check them often to ensure they stay tender but firm. After cooking, rinse them with cold water. This stops the cooking process and helps the noodles stay separate. You can add proteins to your noodles for extra taste. Chicken or shrimp works well. Just cook them in the skillet before adding the noodles. For those who like heat, sprinkle chili flakes on top. This makes the dish spicy and more exciting. Serving in bowls looks nice and makes it easy for everyone. You can also use plates for a fun twist. Garnish with sesame seeds for crunch. Adding fresh cilantro gives a pop of color and flavor. These small touches make your meal look and taste amazing! {{image_4}} You can switch up the flavor with different chili sauces. Try sriracha for heat or go for a sweet soy sauce for a milder taste. If you want to make your own sauce, mix honey, soy sauce, and red pepper flakes. This gives you control over sweetness and spice. Add a variety of vegetables to change the dish. Broccoli, snap peas, or zucchini work well. You can even use seasonal veggies like asparagus in spring or squash in fall. This keeps your meal fresh and exciting. Pair these noodles with proteins like grilled chicken, shrimp, or tofu. They add heartiness to your meal. For side dishes, consider spring rolls or a fresh salad. These options make a balanced and tasty dinner. To store leftovers, let the noodles cool down first. Place them in an airtight container. This helps keep the noodles fresh. Store them in the fridge for up to three days. To keep their taste, try to eat them within this time. For reheating, the best method is to use a skillet. Heat it on medium-low. Add a splash of water or oil to help the noodles steam. Stir gently to warm them evenly. Avoid using the microwave if you want to keep the noodles' texture. The microwave can make them mushy. Yes, you can freeze sweet chili garlic noodles. However, the texture may change. To freeze, place cooled noodles in a freezer-safe bag. Squeeze out as much air as possible. They can last up to three months. To thaw, leave them in the fridge overnight. You can also use cold water to speed up the process. This dish is quick to make. The prep takes about 5 minutes. Cooking the noodles takes around 3-4 minutes. So, you can have your meal ready in just 15 minutes. If you don’t have rice noodles, you can use several alternatives. Regular pasta works well. You can also try zucchini noodles for a low-carb option. Another idea is using soba noodles made from buckwheat. These options will give you a tasty meal. This recipe can be gluten-free with a few changes. You can use gluten-free soy sauce instead of regular soy sauce. For noodles, choose rice noodles or check for gluten-free options. Always read labels to be sure. You learned how to make tasty Sweet Chili Garlic Noodles with easy steps. We covered key ingredients like rice noodles and veggies, plus sauces that bring flavor. Remember, perfecting the noodles and using fresh garnishes can elevate your dish. Don’t hesitate to try different sauces or veggies for variety. With proper storage and reheating tips, you can enjoy these noodles later. You now have everything you need to create a delicious meal! Enjoy cooking and make it your own!

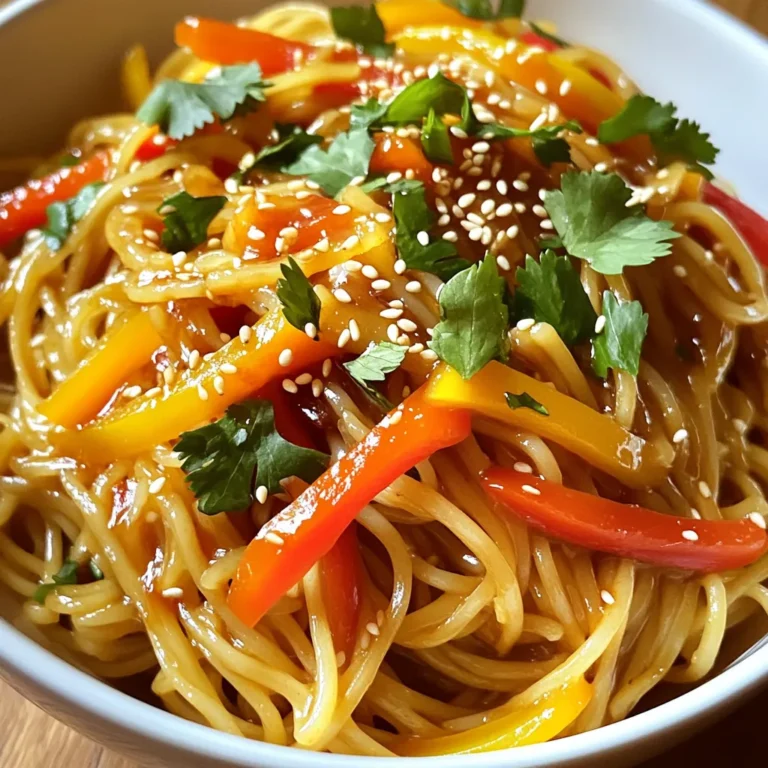
Minute Sweet Chili Garlic Noodles Quick and Easy Meal

To make the Chocolate Espresso Loaf, gather these items: - 1 ½ cups all-purpose flour - 1 cup granulated sugar - ½ cup unsweetened cocoa powder - 1 teaspoon baking powder - ½ teaspoon baking soda - ¼ teaspoon sea salt - 2 large eggs, at room temperature - ½ cup vegetable oil - 1 cup brewed espresso, cooled to room temperature - 1 teaspoon pure vanilla extract - ½ cup semi-sweet chocolate chips - ¼ cup chopped walnuts (optional) The dry ingredients form the base of your loaf. Each plays a key role: - All-purpose flour: This gives structure and helps the loaf rise. - Granulated sugar: Adds sweetness and helps with browning. - Unsweetened cocoa powder: Provides rich chocolate flavor. - Baking powder: This helps the loaf rise and become fluffy. - Baking soda: Works with the espresso to create a nice lift. - Sea salt: Enhances flavors and balances sweetness. Mix these dry items well to ensure even flavor and texture. You can elevate your loaf with these tasty extras: - Chopped walnuts: They add crunch and a nutty flavor. - Extra chocolate chips: For more chocolatey goodness, feel free to add more! - Spices: A pinch of cinnamon or nutmeg can add warmth. These add-ins let you customize your loaf and make it your own. First, preheat your oven to 350°F (175°C). This helps the loaf bake evenly. Grease a 9x5 inch loaf pan with butter or oil. Then, line the bottom with parchment paper. This makes it easy to remove the loaf later. In a large bowl, whisk together the dry ingredients. Combine 1 ½ cups all-purpose flour, 1 cup granulated sugar, ½ cup cocoa powder, 1 teaspoon baking powder, ½ teaspoon baking soda, and ¼ teaspoon sea salt. Mix until it is airy and well combined. In a separate bowl, crack 2 large eggs and whisk them until smooth. Gradually add ½ cup vegetable oil, 1 cup cooled espresso, and 1 teaspoon vanilla extract. Stir until everything blends together. Now, pour the wet mixture into the dry ingredients. Gently fold them together using a spatula. Be careful not to overmix; a few lumps are okay! Once combined, add ½ cup semi-sweet chocolate chips and ¼ cup chopped walnuts if you like. Fold these in gently. Next, transfer the batter into your prepared loaf pan. Use a spatula to smooth the top. Bake in the oven for 55-60 minutes. Check for doneness by inserting a toothpick into the center. It should come out clean or with a few moist crumbs. When the loaf is ready, remove it from the oven. Let it cool in the pan for 10 minutes. After that, carefully move it to a wire rack. Let it cool completely to let the flavors meld. To get a soft and moist Chocolate Espresso Loaf, follow these tips: - Use room temperature eggs. This helps mix better. - Don’t overmix the batter. A few lumps are okay. - Fold in chocolate chips gently. This keeps them from sinking. - Bake at 350°F (175°C) for even cooking. - Check doneness with a toothpick. It should come out clean. Avoid these common pitfalls: - Using cold eggs can lead to a dense loaf. - Overmixing can make the loaf tough. - Not measuring ingredients correctly can throw off the texture. - Forgetting to grease the pan can cause sticking. - Opening the oven too soon can lead to sinking. Make your loaf even better with these ideas: - Add a pinch of cinnamon for warmth. - Use dark chocolate chips for a richer taste. - Top with powdered sugar for a pretty finish. - Serve with whipped cream or vanilla ice cream. - Slice and arrange on a wooden board for a rustic look. {{image_4}} You can change the flavor of your loaf by adding nuts or different chocolates. For nuts, I love using walnuts, but pecans or almonds work well too. Chop them roughly and fold them in at the end. If you want to switch up the chocolate, try using dark chocolate chips or even white chocolate for a sweeter bite. Mixing different chocolates gives your loaf a rich taste and unique look. Spices and extracts can elevate your chocolate espresso loaf. Adding a bit of cinnamon or nutmeg brings warmth to the chocolate. A dash of espresso powder can also boost the coffee flavor. If you want a hint of fruitiness, try adding orange or almond extract. These little changes can make your loaf feel special and exciting. Finishing touches can make your loaf truly shine. A simple glaze of powdered sugar and milk can add a sweet shine. For a more decadent option, melt semi-sweet chocolate and drizzle it over the top. You can also sprinkle some sea salt on the glaze for a fun contrast. Top your slices with whipped cream or vanilla ice cream for an extra treat. These additions make the loaf not just a dessert but a delightful experience. To keep your chocolate espresso loaf fresh, wrap it tightly in plastic wrap. This helps keep out air and moisture. You can store it at room temperature for up to three days. If you want it to last longer, consider refrigerating it. Just remember to wrap it well to avoid drying out. You can freeze chocolate espresso loaf for up to three months. First, let the loaf cool completely. Then, slice it into pieces, if you wish. Wrap each slice in plastic wrap and place them in a freezer-safe bag. Label the bag with the date. This way, you can enjoy a slice anytime you want a treat! To refresh leftover slices, let them sit at room temperature for about 30 minutes. You can also warm them in the oven. Preheat your oven to 350°F (175°C) and heat the slices for about 5-10 minutes. This warms them up and brings back their soft texture. Enjoy with a cup of coffee or tea for a delightful snack! If you want to skip the eggs, use unsweetened applesauce. A quarter cup of applesauce works well. You can also use flaxseed meal. Mix one tablespoon of flaxseed meal with three tablespoons of water. Let it sit for five minutes to thicken. This can replace one egg in your recipe. Both options keep the loaf moist and help bind the ingredients together. Yes, you can make the loaf without espresso. Use brewed coffee for a similar flavor. If you prefer, you can also use hot water. Just add a bit of cocoa powder to keep the chocolate taste strong. Your loaf may have a milder flavor, but it will still be delicious. Chocolate espresso loaf lasts about three to four days at room temperature. Wrap it tightly in plastic wrap or store it in an airtight container. If you want it to last longer, you can freeze it. The loaf freezes well for up to three months. Just slice it first for easy thawing later. This article covered all you need to know about making chocolate espresso loaf. We explored ingredients and shared step-by-step instructions to guide your baking. I provided tips for the best texture and flavor while avoiding common mistakes. You learned about variations, storage, and even answered some FAQs. Now, it’s your turn to try this recipe. Enjoy the taste and impress your friends! Happy baking!

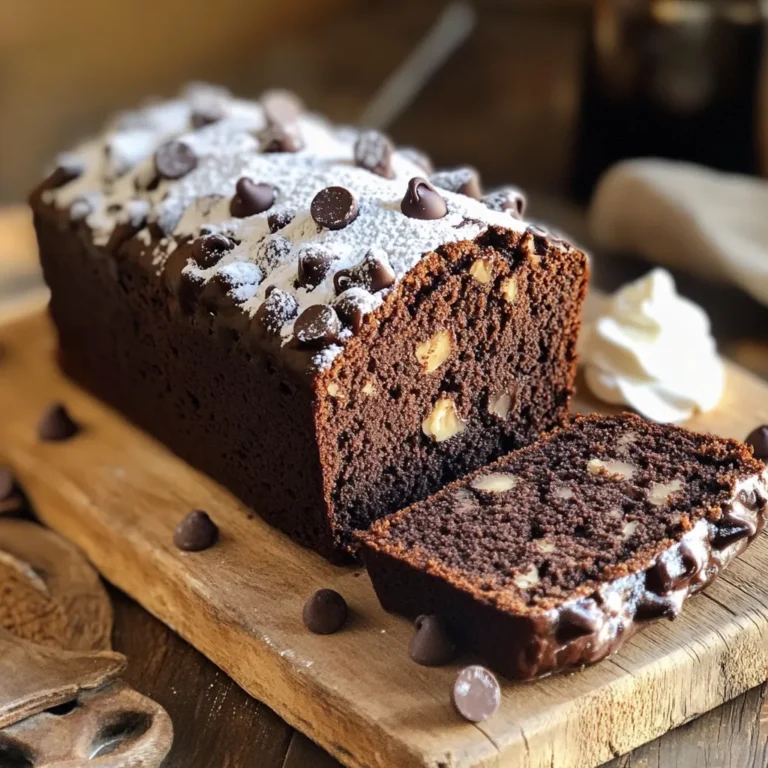
Chocolate Espresso Loaf Deliciously Rich and Simple

- 2 medium sweet potatoes, peeled and diced into 1-inch cubes - 1 can (15 oz) black beans, drained and thoroughly rinsed - 1 can (14.5 oz) diced tomatoes, including all juices - 1 medium onion, finely chopped - 2 cloves of garlic, minced - 1 red bell pepper, chopped into bite-sized pieces - 1 green bell pepper, chopped into bite-sized pieces - 2 cups vegetable broth, low-sodium preferred - Fresh cilantro leaves, for garnishing (optional) - Ripe avocado slices, for serving (optional) When you gather these ingredients, you set the stage for a rich and hearty chili. Sweet potatoes give it a sweet and creamy texture. Black beans add protein and fiber. Diced tomatoes bring juicy acidity that balances the flavors. Onion and garlic provide a base of flavor. They build a savory aroma as you sauté them. Bell peppers add crunch and sweetness. The vegetable broth keeps the chili moist and helps blend the flavors. For garnishes, fresh cilantro adds a burst of color and freshness. Avocado slices bring creaminess and richness to each bowl. You can mix and match these ingredients to suit your taste. {{ingredient_image_2}} - Heating Olive Oil Start by taking a large pot or Dutch oven. Add 2 tablespoons of olive oil and heat it over medium heat. You want the oil to shimmer but not smoke. - Cooking Onion and Garlic Next, chop 1 medium onion finely. Add it to the pot along with 2 cloves of minced garlic. Cook them for about 5 minutes. Stir them often until the onion turns soft and clear. This step builds a tasty base for your chili. - Incorporating Bell Peppers Now, chop 1 red bell pepper and 1 green bell pepper into bite-sized pieces. Toss these peppers into the pot. Cook them for about 3-4 minutes. This step adds sweet and colorful flavors. - Adding Sweet Potatoes and Spices Take 2 medium sweet potatoes, peel them, and cut them into 1-inch cubes. Add them to the pot. Sprinkle in 1 tablespoon of chili powder, 1 teaspoon of ground cumin, and 1 teaspoon of smoked paprika. Stir well for about a minute. This helps the spices release their bold aromas. - Pouring in Broth and Tomatoes Carefully pour in 2 cups of vegetable broth. Then, add a can of 14.5 oz diced tomatoes with their juices. Stir everything together. - Adjusting Cooking Time for Sweet Potatoes Increase the heat until the mixture starts to boil. Then, reduce the heat to low and cover the pot. Let it simmer for 25-30 minutes. Check if the sweet potatoes are tender by using a fork. - Folding in Black Beans Once the sweet potatoes are soft, gently fold in 1 can of black beans that you drained and rinsed. - Adjusting Seasoning Season the chili with salt and freshly cracked black pepper to taste. Let it simmer for another 5-10 minutes. If you want a creamier texture, mash some sweet potato against the pot’s side. Now, your sweet potato black bean chili is ready to serve! Mashing Sweet Potato for Creaminess To make the chili creamy, mash a few sweet potato pieces. Use a fork or potato masher against the pot’s side. This adds a rich, velvety texture to your chili. It makes each bite feel luxurious and satisfying. Simmering for Enhanced Flavor Letting the chili simmer builds deep flavors. Simmer for at least 25 minutes after adding the broth and tomatoes. This allows the spices to blend well. Stir occasionally to keep the ingredients from sticking. The longer you simmer, the better the taste. Pairing with Bread or Tortilla Chips Serve the chili hot with crusty bread or tortilla chips. The bread soaks up the chili, while chips add a crunchy bite. Both options enhance the meal and make it more fun to eat. Ideal Serving Temperature For the best taste, serve the chili hot. The warmth brings out the flavors. If you want, you can keep it warm in a pot on low heat. This way, it stays cozy for all to enjoy. Alternative Beans or Vegetables Feel free to swap black beans for other beans. Kidney beans or pinto beans work well too. You can also add extra veggies. Try corn, zucchini, or carrots for more nutrients and fun textures. Using Different Spices Experiment with spices to change the flavor. Add a pinch of cayenne for heat or some oregano for a different taste. You can also use fresh herbs like thyme or basil. This keeps the chili exciting and fresh every time you make it. Pro Tips Enhance Flavor: Add a dash of lime juice before serving to brighten the flavors of the chili. Make it Spicier: For an extra kick, toss in some diced jalapeños or a pinch of cayenne pepper during cooking. Meal Prep: This chili stores well in the fridge for up to 4 days and can be frozen for up to 3 months, making it perfect for meal prep. Garnishing Ideas: Consider topping with crumbled feta or a dollop of sour cream for added creaminess and flavor contrast. {{image_4}} If you love heat, add jalapeños or hot sauce. You can chop fresh jalapeños and toss them into the pot with the onions and garlic. This step brings a delightful kick to the chili. For a quicker option, drizzle in your favorite hot sauce while stirring in the black beans. Adjust the amount based on your spice tolerance. Just remember, a little heat goes a long way. To make this chili even heartier, mix in quinoa or lentils. Quinoa cooks quickly and adds a nutty flavor. Cook it separately, then stir it in during the last few minutes. Lentils are great too; they thicken the chili and boost protein. Use cooked lentils right before serving. Both options help create a filling meal for everyone. Get creative with flavors by adding cocoa powder or cinnamon. A teaspoon of cocoa powder adds depth and richness. It makes the chili taste more complex without being sweet. Cinnamon gives a warm spice that enhances the sweetness of the potatoes. Just a pinch will surprise you with its warmth and comfort. Try these twists for a new experience every time. To store leftover chili, let it cool first. Transfer the chili to an airtight container. Seal it well to keep out air. Place the container in the fridge. Leftover chili stays good for about 4 to 5 days. If you want to keep chili longer, freezing works great. Spoon the cooled chili into freezer-safe bags. Press out as much air as you can before sealing. You can also use airtight containers. Make sure to label the containers with the date. Frozen chili lasts about 3 to 6 months. When you’re ready to eat, thaw the chili in the fridge overnight. You can reheat it on the stove or in the microwave. On the stove, warm it over low heat, stirring often. In the microwave, use a microwave-safe bowl. Heat in short bursts, stirring in between. Check that it’s hot all the way through before serving. Yes, you can make this chili in a slow cooker. Just follow these steps: 1. Sauté the onion and garlic: Begin by heating olive oil in a pan. Sauté the chopped onion and minced garlic until soft. This will add great flavor. 2. Add to the slow cooker: Place the sautéed mixture into your slow cooker. Then, add the diced sweet potatoes, black beans, diced tomatoes, and bell peppers. 3. Season it: Sprinkle in the chili powder, cumin, smoked paprika, salt, and pepper. Stir everything together. 4. Pour in the broth: Add vegetable broth and mix well. Make sure all ingredients are covered. 5. Set and cook: Cover and cook on low for about 6-8 hours. If you're short on time, cook on high for 3-4 hours. Adjust the cooking time based on your slow cooker. You want the sweet potatoes to be fork-tender when done. This chili brings many health benefits. Here are some key nutrients: - Sweet Potatoes: They are high in fiber and vitamins A and C. These help with your immune system and skin health. - Black Beans: These are rich in protein and fiber. They help keep you full and support muscle health. - Bell Peppers: They provide vitamins A and C, which are good for your eyesight and skin. - Vegetable Broth: Low-sodium broth keeps the chili flavorful without too much salt. This chili is not only tasty but also nutritious. It fits well into many diets, providing a great mix of flavors and health benefits. Making this chili vegan is easy. Here’s how: - Use plant-based broth: Ensure you use vegetable broth, not chicken broth. - Check canned goods: Look for black beans and diced tomatoes that have no animal products. Most brands are vegan-friendly. - Skip dairy garnishes: If you like to add cheese or sour cream, use avocado or skip it for a vegan option. Following these steps will give you a hearty vegan chili that everyone can enjoy! This article has covered how to make a tasty Sweet Potato Black Bean Chili. You learned about key ingredients, like sweet potatoes, black beans, and spices. We walked through each cooking step, ensuring your chili is perfect every time. Remember, you can adjust this recipe to fit your tastes. Add spice or mix in other veggies. With the right tips, your chili will be creamy and flavorful. Try different variations to keep it exciting. Enjoy your cooking adventure!

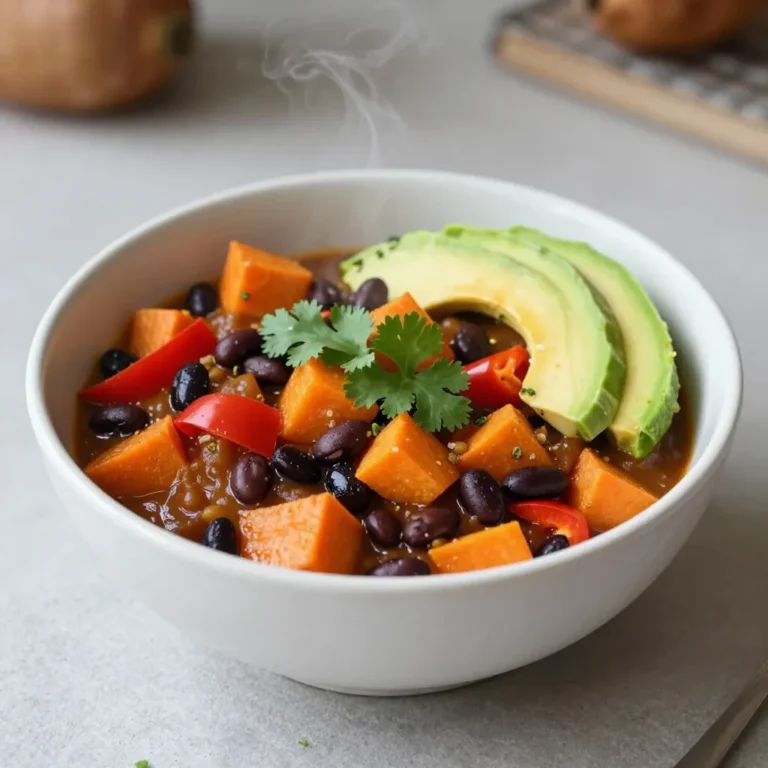
Sweet Potato Black Bean Chili Cozy and Flavorful Recipe

PREV 1 … 7 8 9 … 47 NEXT
snack joy kitchen

explore

DessertsDinnerAppetizersDrinks

Our Policies

  • Cookie Policy
  • Copyright Policy
  • Disclaimer
  • GDPR Policy
  • Terms Of Use
Back to Top
  • About
  • Contact Us
  • Privacy Policy
© 2026 snack joy kitchen