FREE DINNER EBOOK! Get your copy!
  • Cookie Policy
  • GDPR Policy
  • Disclaimer
  • Terms Of Use
  • Visit my other site: Fun Cookie Recipes
snack joy kitchen
  • Home
  • Dinner
  • Desserts
  • Drinks
  • Appetizers
  • Contact
  • About
  • Privacy Policy
  • Home
  • Dinner
  • Desserts
  • Drinks
  • Appetizers
  • Contact
  • About
  • Privacy Policy
  • Cookie Policy
  • GDPR Policy
  • Disclaimer
  • Terms Of Use
Visit my other site: Fun Cookie Recipes

HOME / CATEGORIES /

Latest

For a tasty make-ahead cranberry sauce, gather these key ingredients: - 12 ounces of fresh cranberries, thoroughly rinsed and drained - 1 cup granulated sugar - 1 cup fresh orange juice - Zest of 1 large orange, finely grated - 1/2 teaspoon ground cinnamon - 1/4 teaspoon ground ginger - A pinch of salt - 1 cup water To boost the flavor and texture, consider adding: - 1/4 cup chopped walnuts or pecans, toasted Pick fresh cranberries with bright, deep red color. They should feel firm and bounce when dropped. Avoid any soft or shriveled berries, as these can spoil your sauce. If possible, check for the harvest date; fresher berries yield a better taste. {{ingredient_image_2}} To start, gather your ingredients. You will need: - 12 ounces of fresh cranberries, rinsed and drained - 1 cup granulated sugar - 1 cup fresh orange juice - Zest of 1 large orange - 1/2 teaspoon ground cinnamon - 1/4 teaspoon ground ginger - A pinch of salt - 1 cup water - Optional: 1/4 cup chopped walnuts or pecans Make sure the orange juice is fresh. It makes the sauce taste bright and lively. Now, let’s cook! Place the cranberries and water in a medium saucepan. Heat it over medium heat. Wait until it boils, then lower the heat to a gentle simmer. Add the granulated sugar, orange juice, and orange zest. Mix well to blend all the flavors. Now, sprinkle in the ground cinnamon, ground ginger, and salt. Stir again to incorporate the spices evenly. Let the mixture simmer for 10-15 minutes. You’ll know it’s done when the cranberries pop and the sauce thickens. Make sure to stir occasionally to avoid sticking. If you want some crunch, fold in the chopped nuts during the last 2 minutes of cooking. After cooking, remove the saucepan from the heat. Let the cranberry sauce cool to room temperature. Cooling helps the flavors meld together. Once cooled, transfer the sauce to an airtight container. Refrigerate it for at least 2 hours, or overnight for the best taste. This step is key for a great make-ahead sauce! To get the best sauce, cook until the cranberries pop. This means they are soft. Stir often to stop them from sticking. You want a nice thick sauce. If it's too runny, let it cook a bit longer. If it’s too thick, add a splash of water. This keeps it smooth and easy to serve. Serve the cranberry sauce in a pretty bowl. A festive bowl makes it special. Garnish it with a slice of orange on the rim. This adds color and a fresh smell. You can also sprinkle some toasted walnuts or pecans on top. This gives the sauce a nice crunch and extra flavor. If you have leftovers, reheat gently. Place the sauce in a small pot over low heat. Stir often to warm it without burning. You may need to add a splash of water if it thickens too much. Keep it covered until warm, and enjoy it again! Pro Tips Fresh is Best: Always use fresh cranberries for the best flavor and texture. Frozen cranberries can be used in a pinch, but they may not provide the same bright taste. Sweetness Balance: Adjust the sugar level to your preference. If you prefer a tart sauce, reduce the sugar slightly to let the natural tartness of the cranberries shine through. Spice Variations: Feel free to experiment with additional spices like nutmeg or allspice for a unique twist. Just be cautious with the amounts to avoid overpowering the sauce. Storage Secrets: This sauce can be made ahead of time and stored in the refrigerator for up to a week. The flavors deepen and improve over time, making it a perfect make-ahead option. {{image_4}} You can make your cranberry sauce stand out with fun flavors. Try adding spices like cloves or nutmeg for warmth. A splash of vanilla extract can add a sweet note. If you want a fruity twist, mix in chopped apples or pears. For a tropical vibe, add diced pineapple. Each addition brings a new taste and keeps the sauce exciting. If you need a nut-free version, just skip the nuts. The sauce will still be tasty and have a great texture. You can add sunflower seeds for a bit of crunch. They are a good choice and safe for those with nut allergies. The sauce will still shine without the nuts. The sweetness of your sauce can be just right for you. If you like it less sweet, cut back on the sugar. Start with 3/4 cup instead of 1 cup. For more sweetness, add a bit of honey or maple syrup. Always taste as you go. This way, you can find the perfect balance that fits your personal preference. Storing cranberry sauce right helps keep its fresh flavor. First, let the sauce cool to room temperature. This step is key. Then, transfer it to an airtight container. Make sure to seal it tightly. This keeps out air and moisture, which can spoil the sauce. If you plan to use it later, label the container with the date. This way, you know when you made it. In the refrigerator, cranberry sauce lasts about two weeks. Store it properly to maintain its taste. If you need to keep it longer, freeze it. In the freezer, it can last up to six months. Just place it in a freezer-safe container. When ready to use, thaw it in the fridge overnight for best results. Check for signs of spoilage before using your sauce. If you see mold, discard it immediately. A sour smell is another bad sign. If the sauce has changed color or texture, it’s best to throw it away. Always trust your senses. If something seems off, don’t take the risk. Enjoy your cranberry sauce fresh and safe! Yes, you can make cranberry sauce ahead of time. I love making it a day or two before a big meal. This lets the flavors mix and deepen. Just store it in the fridge in an airtight container. Homemade cranberry sauce can last about one week in the fridge. Make sure it is in a sealed container. You can also freeze it for up to three months if you want to keep it longer. Just thaw it in the fridge when you’re ready to use it. Yes, frozen cranberries work well in this recipe. Just use them straight from the freezer without thawing. They may take a bit longer to cook, but they will still taste great. Using frozen cranberries can save time if fresh ones are not available. This blog post covered everything you need to know about making cranberry sauce. We explored the main ingredients and tips for selecting fresh cranberries. I walked you through step-by-step cooking, cooling, and even reheating tips. We looked at creative variations to match your taste, and I shared key storage facts to keep your sauce fresh. Cranberry sauce can boost many meals. By following this guide, you can make a delicious sauce with ease. Enjoy making your own unique version!

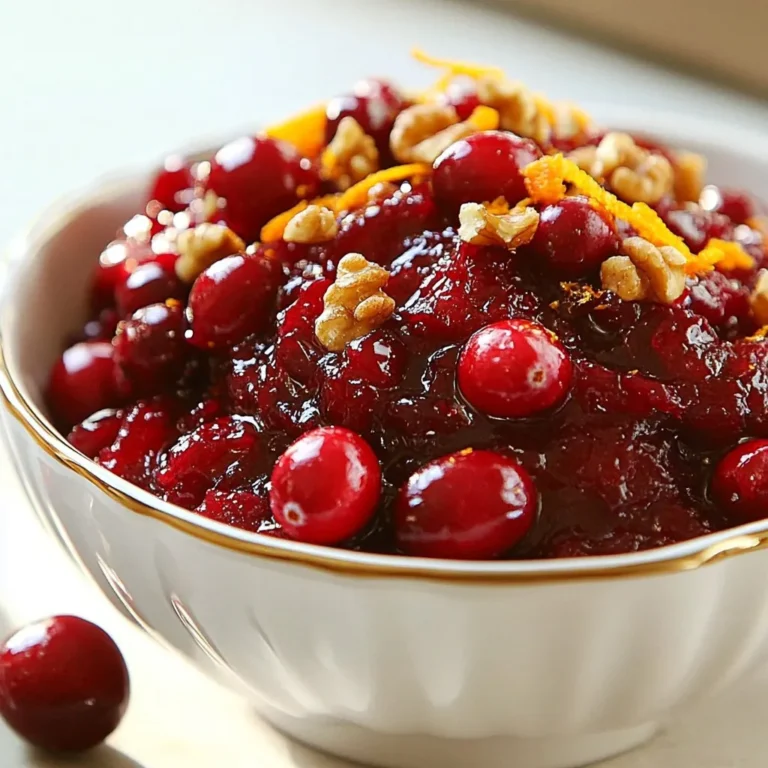
Make-Ahead Cranberry Sauce Simple Holiday Staple

- 1 cup long-grain rice - 2 cups vegetable broth - 3 tablespoons extra virgin olive oil - 4 cloves garlic, finely minced - 1 small onion, finely diced - 1 teaspoon dried thyme - 1 teaspoon dried rosemary - Salt and freshly ground black pepper to taste - Fresh parsley, finely chopped (for garnish) To make Garlic Herb Rice, you will need: - A medium saucepan - A wooden spoon for stirring - A measuring cup - A knife and cutting board for chopping You can add fun twists to your Garlic Herb Rice with these options: - Lemon zest for a fresh kick - Fresh basil or cilantro for a different herb flavor - Peas, carrots, or bell peppers for added color and nutrition - A splash of soy sauce for an umami boost Garlic Herb Rice is not just simple; it’s a canvas for your creativity! Start by rinsing the long-grain rice. Place it under cold running water. Rinse until the water runs clear. This step removes excess starch and helps the rice stay fluffy. After rinsing, drain the rice well and set it aside. Next, grab a medium saucepan. Pour in three tablespoons of extra virgin olive oil. Heat it over medium heat. Add the finely diced onion. Cook for 3 to 4 minutes until it turns soft and clear. This makes your kitchen smell amazing. Then, add the minced garlic. Cook it for 1 to 2 minutes while stirring. Be careful not to let it burn. Burnt garlic can taste bitter. Now, add the drained rice to the saucepan. Stir gently to coat each grain with the oil. This toasting step adds great flavor. Cook for about 2 minutes. After that, pour in the vegetable broth. Sprinkle in the dried thyme and rosemary. Add salt and freshly ground black pepper to taste. Stir to mix everything well. Raise the heat until it boils. Once it boils, reduce the heat to low. Cover the saucepan and let it simmer for 15 to 18 minutes. The rice will absorb all the liquid and become tender. After cooking, remove it from heat but keep it covered for another 5 minutes. This helps the rice steam and fluff up. Finally, use a fork to fluff the rice. Stir in the chopped fresh parsley and taste. Adjust the seasoning if needed. Fluffing rice is key to a great texture. Once the rice finishes cooking, let it sit covered for 5 minutes. This step allows steam to finish the cooking. After that, use a fork to gently fluff the rice. This technique helps separate the grains and keeps it light. Avoid using a spoon, as it can mash the rice. You can easily change the flavor of your Garlic Herb Rice. Want a zestier dish? Add lemon zest or a squeeze of lemon juice. For a deeper flavor, try using low-sodium soy sauce or balsamic vinegar. You can also swap the herbs. Basil or cilantro can bring a fresh twist. Simply adjust the amounts based on your taste. Burnt garlic can ruin your dish. To prevent this, keep a close eye on it while cooking. Add garlic after the onion has softened. Cook it for only 1-2 minutes until it’s fragrant. Stir it constantly to keep it from burning. If you notice browning, lower the heat. Remember, the goal is a golden color, not dark brown. {{image_4}} You can boost the flavor of Garlic Herb Rice by adding herbs and spices. Consider fresh basil or dill for a light taste. You can also try a pinch of paprika for warmth or chili flakes for heat. Mix and match to find your perfect blend. Experimenting with spices not only enhances the taste but also makes each dish unique. Adding vegetables makes the dish more colorful and nutritious. You can stir in diced bell peppers, peas, or carrots. Cook them with the onion and garlic to soften them. For a fresh twist, try adding spinach or kale near the end of cooking. This will give your rice a vibrant look and extra flavor. Want to brighten up the rice? Try a citrus version! Add zest from a lemon or lime before cooking. You can also squeeze some fresh juice in at the end. This will give the rice a fresh, zesty kick. It pairs well with seafood or grilled chicken. To store leftover Garlic Herb Rice, let it cool first. Place it in an airtight container. You can keep it in the fridge for up to four days. If you want it to last longer, consider freezing it. When you're ready to eat the rice, take it out of the fridge. Add a splash of water to keep it moist. Heat it in a pan over medium heat. Stir often to warm it evenly. You can also microwave it for a quick option. Just cover it with a damp paper towel. To freeze Garlic Herb Rice, use a freezer-safe bag or container. Divide it into portions for easy use. Label the bag with the date. It can stay in the freezer for up to three months. When you want to use it, thaw it in the fridge overnight before reheating. I recommend using long-grain rice for Garlic Herb Rice. Long-grain rice stays fluffy and separate. Basmati or jasmine rice also work well. These types absorb flavors without clumping. Yes, you can use chicken broth if you prefer. Chicken broth adds a rich flavor. Just make sure to adjust the salt since chicken broth can be saltier than vegetable broth. To make Garlic Herb Rice vegan, simply stick with vegetable broth. All the other ingredients are already plant-based. This dish is naturally vegan and still tastes great! Yes, you can prepare Garlic Herb Rice ahead of time. Cook it and let it cool. Store it in an airtight container in the fridge for up to three days. Reheat it in a pan or microwave. Garlic Herb Rice pairs well with many dishes. Try it with grilled chicken, fish, or roasted vegetables. It also complements stews and curries nicely. The rice adds a fresh flavor to any meal. This blog post guided you through making Garlic Herb Rice. You learned about key ingredients, necessary tools, and variations. I shared step-by-step cooking instructions and practical tips. You can now avoid burnt garlic and adjust flavors easily. With proper storage tips, you can enjoy leftovers too. Experimenting with herbs and spices will keep your meals fresh. Dive into making Garlic Herb Rice and delight in every bite!

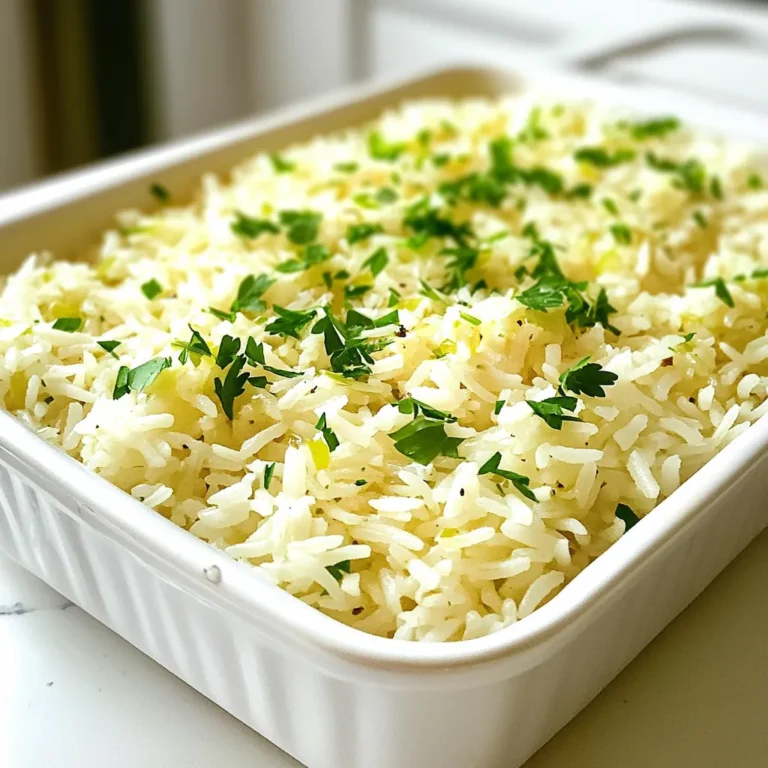
Garlic Herb Rice Flavorful and Simple Side Dish

- 4 ripe bananas - 1/3 cup unsalted butter - 1 teaspoon pure vanilla extract - 1 teaspoon baking soda - Generous pinch of salt - 3/4 cup granulated sugar (or 1/2 cup for lighter sweetness) - 1 large egg - 1 cup all-purpose flour - 1/2 cup semi-sweet chocolate chips (optional) - 1/2 cup nuts (walnuts or pecans, optional) For my TikTok banana bread, choose ripe bananas. They should have brown spots. These bananas will give the bread a sweet taste. Use unsalted butter, so you can control the salt. Pure vanilla extract adds a rich flavor. Baking soda helps the bread rise. A pinch of salt brings out the sweetness. Granulated sugar is the main sweetener. You can use less sugar if you want a lighter taste. One large egg binds the mix together. All-purpose flour gives the bread structure. Optional chocolate chips and nuts add texture and flavor. If you like chocolate, add the chips. For crunch, fold in nuts. These ingredients work together to create a moist, tasty loaf. Prepare your kitchen with these items before you start. This will make the process smooth and fun! - Preheat oven to 350°F (175°C). - Grease a 9x5 inch loaf pan with butter or spray. - In a big bowl, combine melted butter and mashed bananas. - Add a beaten egg, vanilla extract, and sugar. Stir until smooth. - Mix in baking soda and salt. - Gradually fold in flour. Be gentle to keep lumps. - If you like, fold in chocolate chips and nuts. Make sure they spread evenly. - Pour the batter into the loaf pan. - Bake for 60-65 minutes. A toothpick should come out clean. - Let the bread cool in the pan for 10 minutes. - Move it to a wire rack to cool completely. This easy guide will help you make the best TikTok banana bread! To make your banana bread fluffy, avoid over-mixing the batter. Mix just until you see no flour streaks. A few lumps are okay! For testing doneness, use a toothpick. Insert it into the center of the bread. If it comes out clean or with a few moist crumbs, your bread is ready. You can add spices like cinnamon or nutmeg to boost flavor. Chopped nuts, like walnuts or pecans, add a nice crunch. For serving, try melting butter on warm slices. A drizzle of honey can add sweetness too. Pair your banana bread with coffee or tea for a cozy treat. Always use ripe bananas for the best taste. Unripe bananas may make your bread dense and less sweet. Also, grease your pan well. This step helps the bread come out easily after baking. Skipping this can lead to a messy cleanup! {{image_4}} You can make banana bread healthier in a few ways. First, swap all-purpose flour for whole wheat flour. This adds fiber and nutrients. If you want less sugar, reduce the sugar to 1/2 cup. You still get good taste without so much sweetness. For vegan options, replace the egg with 1/4 cup of applesauce. Use coconut oil or vegan butter instead of regular butter. These changes keep the bread moist and tasty. If you want to change the flavor, try adding dried fruits like raisins or cranberries. These add sweetness and texture. You can also add a teaspoon of cinnamon for a warm taste. Instead of chocolate chips, use peanut butter chips for a nutty twist. This makes the bread a bit different yet delicious. You don’t have to stick to one size. You can make mini loaves or muffins instead. For mini loaves, bake for about 30-35 minutes. If you make muffins, check them after 20 minutes. Adjust the baking time based on the size you choose to ensure they cook evenly. This way, you can serve them at parties or enjoy a quick snack! To keep your banana bread fresh, wrap it well. Use plastic wrap or aluminum foil to cover it. This helps keep moisture in and air out. Store it at room temperature for up to three days. If you need it to last longer, put it in the fridge. The cold slows down spoilage but may dry it out slightly. Freezing banana bread is easy and smart. First, let it cool completely. Then, wrap it in plastic wrap tightly. You can also put it in a freezer bag. Press out as much air as you can. This keeps the flavor and texture nice. To thaw, take it out and leave it at room temperature. It’ll be ready to enjoy in a few hours! To ripen bananas fast, you can use a few simple tricks. - Place bananas in a brown paper bag. - Add an apple or tomato to the bag. - Keep the bag closed for a day or two. - Use the oven method: wrap bananas in foil and bake at 300°F for 15-20 minutes. These methods help release ethylene gas, speeding up the ripening. Yes, you can use frozen bananas! - Thaw bananas in the fridge or at room temperature. - Once thawed, mash them well before adding to the mix. - You may need to drain some excess liquid. Frozen bananas work great in banana bread. If your banana bread turns out dense, here are reasons and fixes. - You may have over-mixed the batter. - Ensure you use ripe bananas for natural sweetness. - Check that your baking soda is fresh. - Add a bit more flour if the batter is too wet. These tips can help achieve a lighter texture. Banana bread can last quite a while if stored correctly. - At room temperature, it lasts about 3-4 days. - Store in an airtight container to keep it fresh. - In the fridge, it can last up to a week. - For long-term storage, freeze it for up to 3 months. Wrap it well to maintain flavor and texture. This banana bread recipe is simple and easy to follow. You learned about essential ingredients, step-by-step instructions, and clever tips for baking. Remember to mix well but avoid overdoing it. You can also customize your banana bread with different flavors or healthier swaps. Proper storage keeps it fresh longer. With this guide, you now have everything you need to bake a delicious loaf. Enjoy sharing this treat with friends and family!

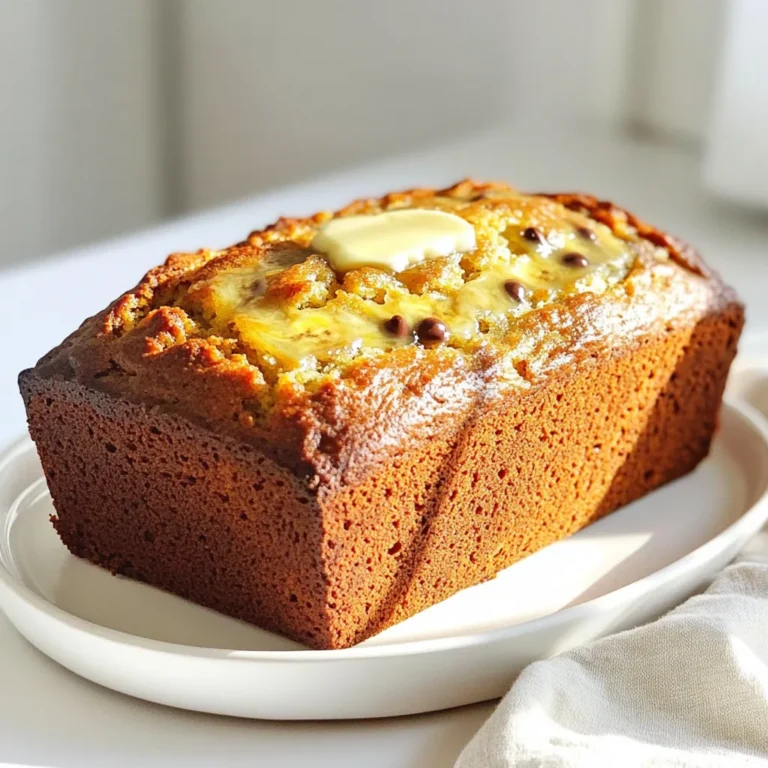
TikTok Banana Bread Quick and Tasty Recipe Guide

- 1 lb baby carrots (or 4-5 medium regular carrots, peeled and cut into sticks) - 3 tablespoons honey - 2 tablespoons extra virgin olive oil - 4 large garlic cloves, finely minced - 1 teaspoon ground cumin - 1 teaspoon smoked paprika - Salt and freshly cracked black pepper to taste The main ingredients create a sweet and savory blend. The honey brings sweetness, while garlic adds depth. Olive oil helps with roasting and adds richness. Ground cumin and smoked paprika give a warm, earthy flavor. Together, they coat the carrots in a tasty glaze. - Fresh parsley, finely chopped - Sesame seeds Adding garnishes enhances the dish. Fresh parsley adds color and brightness. Sesame seeds provide crunch and a nutty flavor. These garnishes make your carrots look stunning and taste even better. - Mixing bowl - Baking sheet - Parchment paper Using the right tools simplifies cooking. A mixing bowl allows for easy combining of ingredients. A baking sheet helps with even roasting. Parchment paper makes cleanup a breeze. With these tools, you will create perfect honey garlic roasted carrots every time. {{ingredient_image_2}} Preheating your oven to 425°F (220°C) is key for roasting. High heat helps the carrots caramelize. This brings out their natural sweetness. A hot oven also cooks them evenly. In a large mixing bowl, combine honey, olive oil, minced garlic, ground cumin, smoked paprika, salt, and black pepper. Whisk these ingredients together until smooth. This mixture will coat the carrots and add rich flavor. Add the baby carrots to the bowl with the honey garlic mixture. Gently toss the carrots. Make sure each piece gets coated well. Use your hands or a spoon for this. Next, line a baking sheet with parchment paper for easy cleanup. Spread the carrots in a single layer. This ensures they roast evenly. Place the baking sheet in your preheated oven. Roast the carrots for 25-30 minutes. Halfway through, take them out and toss them. This promotes even cooking and caramelization. When done, the carrots should be tender and lightly browned. Once roasted, remove the baking sheet from the oven. Let the carrots cool slightly. For serving, transfer them to a rustic wooden platter. Drizzle with a bit of extra honey for shine. Sprinkle with freshly chopped parsley for color. This presentation looks inviting and tastes amazing! To get perfect Honey Garlic Roasted Carrots, it's key to space them well. Place the carrots on the baking sheet in a single layer. Make sure they do not touch. This allows hot air to circulate around each carrot. If they are too close, they will steam instead of roast, losing their nice texture and flavor. You can customize the taste of your carrots easily. If you want them sweeter, add more honey in the mix. For a spicy kick, try adding a pinch of cayenne pepper or chili flakes. You can also swap spices. Use thyme or rosemary for a fresh herb taste. This lets you adjust the flavor to what you enjoy most. For the best results, use uniform carrot sizes. Baby carrots work great, but if you use regular carrots, cut them into even sticks. Aim for pieces about the same thickness. This helps them cook at the same rate. You want every bite to be tender and flavorful, not overdone or raw. Pro Tips Use Fresh Garlic: Fresh minced garlic delivers the best flavor. Avoid pre-minced garlic for optimal taste. Experiment with Spices: Feel free to add other spices like cayenne pepper or thyme for a unique twist on the flavor profile. Check for Doneness: Test the carrots with a fork; they should be tender but not mushy. Adjust roasting time as needed. Serve Warm: These carrots are best enjoyed warm right out of the oven, enhancing their sweet and savory flavors. {{image_4}} You can use different kinds of carrots for this dish. Baby carrots are cute and easy to use. They cook quickly and are tender. Regular carrots can give you a richer flavor. Peel and cut them into sticks for even cooking. Both types work well in this recipe, so choose what you like best! You can add more vegetables to your roasted carrots. Try adding diced bell peppers or zucchini for extra color. Broccoli florets can add a nice crunch. Just make sure to chop the veggies to similar sizes. This way, they all cook evenly. Mixing in other vegetables makes the dish more fun and tasty. Experimenting with herbs and spices can make your carrots unique. Try adding thyme or rosemary for an earthy taste. A pinch of chili flakes can bring some heat. If you love citrus, a splash of lemon juice can brighten the dish. Feel free to get creative with flavors! Each twist can lead to a new favorite version of honey garlic roasted carrots. To keep your honey garlic roasted carrots fresh, store them in the fridge. Use an airtight container for best results. This helps lock in moisture and keeps them crisp. If you have leftovers, cool them down first. Place them in the container and seal it tightly. When reheating, I recommend using the oven. Preheat it to 350°F (175°C). Spread the carrots on a baking sheet. Heat for about 10-15 minutes. This method helps maintain their flavor and texture. You can also use the microwave, but be careful not to overcook them. This can make them mushy. If stored properly, your roasted carrots can last in the fridge for up to 4 days. After that, they may lose their taste and texture. Always check for any signs of spoilage before eating. Enjoy your delicious carrots while they're still fresh! To make this dish vegan, you can swap honey for maple syrup or agave nectar. Both options add sweetness that works well with the carrots. You can use the same amount, three tablespoons, for either substitute. The rest of the recipe stays the same. This change keeps the flavor rich and tasty. Yes, you can use frozen carrots. However, fresh carrots taste better. If you decide to use frozen, thaw them first. Drain off any extra water. Then, toss them in the honey garlic mixture. Since frozen carrots may cook faster, check for doneness after 20 minutes. You want them tender but not mushy. These roasted carrots pair well with many dishes. Try serving them with grilled chicken or fish for a complete meal. They also complement rice or quinoa nicely. For a plant-based option, serve with lentils or chickpeas. Adding a fresh salad can balance the meal too. In this article, we explored how to make Honey Garlic Roasted Carrots. We covered the key ingredients, from baby carrots to spices and honey. You learned the steps for roasting perfection, plus tips for even cooking and flavorful variations. Storing leftovers safely and reheating them was also discussed. These simple tips can elevate your dish. Enjoy trying new flavors and sharing this delicious recipe. Cooking can be fun and rewarding, so make it your own!

Honey Garlic Roasted Carrots Easy and Flavorful Side

To make a delicious broccoli cheddar quiche, you'll need: - 1 pre-made pie crust - 2 cups broccoli florets, blanched - 1 cup shredded sharp cheddar cheese - 4 large eggs - 1 cup whole milk - 1/2 cup grated Parmesan cheese These main ingredients create a rich and creamy quiche. The cheese adds flavor, while the broccoli gives it a nice crunch. For flavor, you'll want to include: - 1/2 teaspoon garlic powder - 1/2 teaspoon onion powder - 1/4 teaspoon ground nutmeg - Salt and freshly ground black pepper to taste These spices bring out the best in your quiche. Garlic powder adds depth, while nutmeg gives it a warm touch. You can enhance your quiche by adding: - 1 tablespoon olive oil - Fresh parsley, chopped (for garnish, optional) If you want to switch things up, consider using other cheeses or vegetables. Spinach or bell peppers can be great additions. These options keep your quiche fresh and exciting. {{ingredient_image_2}} First, preheat your oven to 375°F (190°C). This step is key for a great bake. While it heats up, grab your pre-made pie crust. Place it in a pie dish, making sure it fits snugly. Next, heat 1 tablespoon of olive oil in a medium skillet over medium heat. Once the oil is warm, add 2 cups of blanched broccoli florets. Sauté for about 3-4 minutes. You want the broccoli to be tender but still bright green. This keeps it crunchy and tasty. After cooking, take it off the heat and let it cool for a few minutes. Now, grab a large mixing bowl. Crack 4 large eggs into the bowl and beat them lightly. Then, pour in 1 cup of whole milk. Add 1/2 teaspoon of garlic powder, 1/2 teaspoon of onion powder, and 1/4 teaspoon of ground nutmeg. Don’t forget a pinch of salt and black pepper. Whisk everything together until it’s well mixed and smooth. Fold in 1 cup of shredded sharp cheddar cheese and 1/2 cup of grated Parmesan cheese. Make sure the cheese is spread evenly in the egg mixture. Once the broccoli has cooled, gently fold it into your egg and cheese mix. Be careful not to break the florets. Now, pour this mixture into your pie crust. Spread it out evenly so every slice has a bit of everything. Place the quiche in your preheated oven. Bake it for 35-40 minutes. You’ll know it’s ready when the egg is set in the center and the top is golden brown. It’s okay if there’s a slight jiggle in the middle. After baking, take it out and let it cool for about 10 minutes. This step helps with slicing and makes the flavors pop. To get a perfectly set quiche, use fresh eggs. Fresh eggs help the quiche rise well. Whisk the eggs and milk until smooth. Don’t rush this step; a good mix makes a big difference. Bake at 375°F for 35-40 minutes. You want the center to jiggle slightly, but it should not be runny. If you like a firmer texture, bake it a bit longer. Let it rest for 10 minutes before slicing. This helps it hold its shape. For extra flavor, try adding fresh herbs like thyme or basil. You can also add a splash of hot sauce for a kick. Use smoked cheddar instead of sharp cheddar for a deeper taste. Adjust your spices too. If you like garlic, add more garlic powder. A pinch of cayenne pepper can add a nice warmth. Remember to taste your egg mixture before pouring it into the crust. This way, you can adjust the salt and pepper to your liking. A common mistake is overcooking the quiche. Keep an eye on it as it bakes. Another mistake is not letting it cool. Slicing too soon can make a mess. Avoid using frozen broccoli; fresh or blanched broccoli works best. Do not skip the resting time after baking. This makes slicing easy and keeps the filling together. Lastly, don’t forget to preheat your oven. Baking in a cold oven can ruin the texture. Pro Tips Choose Fresh Broccoli: Fresh broccoli will give your quiche a vibrant color and better texture compared to frozen. Look for firm, bright green florets. Let It Rest: Allowing the quiche to rest for 10 minutes after baking helps it set and makes it easier to slice cleanly without falling apart. Experiment with Cheeses: Feel free to mix different types of cheese such as Gruyère or feta for a unique flavor profile and texture in your quiche. Customize Your Veggies: Add other vegetables like spinach, bell peppers, or mushrooms to enhance the flavor and nutrition of your quiche. {{image_4}} You can boost the flavor of your quiche by adding more veggies. Spinach, bell peppers, or mushrooms work well. Just chop them small and sauté them like the broccoli. This way, they stay tender. Mix them into the egg and cheese mixture. Each veggie adds a new taste and color. For meat lovers, adding cooked bacon or ham can enhance your quiche. Cook the meat first, then chop it into small pieces. Fold it into the egg mixture with the cheese and broccoli. This adds a savory punch to your dish. You can also use cooked sausage for a spicy kick. If you need a gluten-free option, use a gluten-free crust. You can find these in stores, or make your own. For a dairy-free twist, replace the milk and cheese with almond milk and vegan cheese. This keeps the quiche creamy without the dairy. Just make sure to adjust the baking time slightly. Each variation gives you a new take on this classic dish! To keep your leftover quiche fresh, let it cool first. Wrap it well with plastic wrap or foil. You can also use an airtight container. Store it in the fridge for up to three days. Keeping it sealed helps prevent it from drying out. When you're ready to enjoy leftover quiche, preheat your oven to 350°F (175°C). Place the quiche on a baking sheet. Heat it for about 15-20 minutes. You can also microwave it. Heat each slice for 1-2 minutes. Just be careful, as the crust may get soggy in the microwave. If you want to save quiche for later, freezing is a good option. Wrap each slice in plastic wrap first. Then, place them in a freezer bag. Quiche can last up to three months in the freezer. To thaw, move the slices to the fridge overnight. Reheat as described above to enjoy a creamy, cheesy treat. A broccoli cheddar quiche lasts about 3 to 4 days in the fridge. To keep it fresh, store it in an airtight container. This helps keep moisture in while keeping other smells out. If you want to enjoy it later, just reheat it in the oven or microwave. Yes, you can use a homemade crust for your quiche. Making your own crust adds a personal touch and can taste even better. Just be sure to roll it out flat and fit it into your pie dish before filling it with the quiche mix. You can serve your quiche with a fresh side salad or some fruit. A light salad adds color and crunch, while fruit brings sweetness. Some people also enjoy serving it with a dollop of sour cream or hot sauce for extra flavor. Yes, you can make this quiche ahead of time. Prepare it the day before and store it in the fridge. When you are ready to serve, just bake it according to the instructions. This makes for an easy breakfast or brunch option when you have guests. Broccoli cheddar quiche is a simple but tasty dish. You learned about key ingredients, spices, and substitutes. We covered step-by-step cooking methods to get it right. I shared tips to avoid common mistakes and how to store leftovers well. You can even try fun variations with other veggies or meats. Enjoy this dish any time you want a warm meal. It's versatile, easy to make, and great for sharing. Happy cooking!

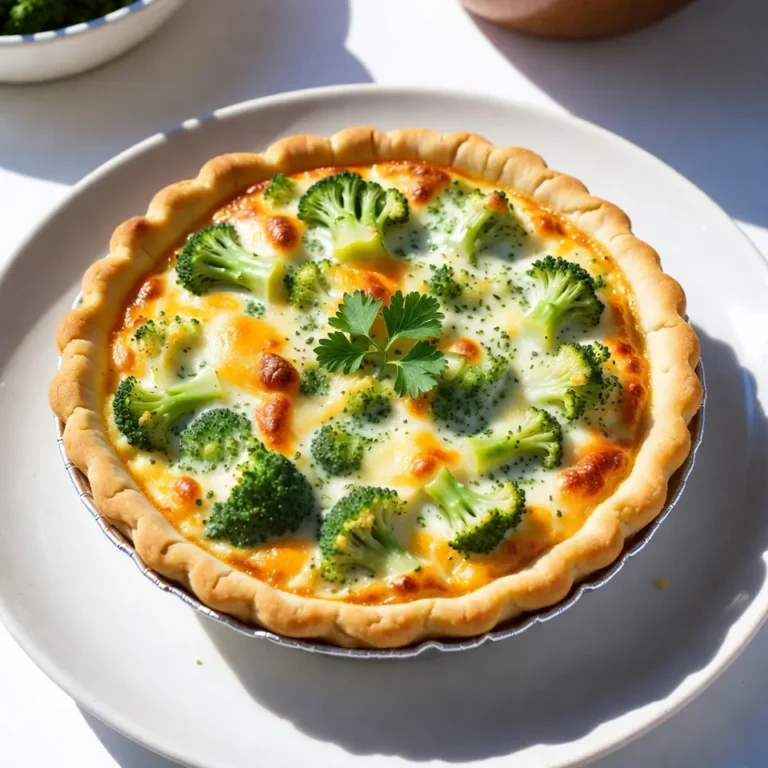
Broccoli Cheddar Quiche Tasty and Simple Recipe

To make the ultimate chicken pot pie, gather these main ingredients: - 2 cups cooked chicken, shredded - 1 cup carrots, diced - 1 cup peas (fresh or frozen) - 1 cup potatoes, peeled and diced - 1 large onion, chopped - 3 cloves garlic, minced - 1 cup chicken broth - 1 cup heavy cream - 1 tablespoon fresh thyme, finely chopped (or 1 teaspoon dried thyme) - 1 tablespoon olive oil - Salt and freshly ground black pepper to taste - 1 package of refrigerated pie crusts (contains 2 crusts) - 1 large egg, beaten (for egg wash) You can add more flavor and texture to your pot pie. Consider these options: - 1 cup corn for sweetness - 1 cup mushrooms, sliced for earthiness - 1 teaspoon Worcestershire sauce for depth - Fresh herbs like parsley or rosemary for brightness - A pinch of cayenne pepper for heat This chicken pot pie serves six people. Here’s a rough nutritional breakdown per serving: - Calories: 450 - Protein: 25g - Carbohydrates: 35g - Fat: 25g - Fiber: 3g These values can change based on your ingredient choices. For a lighter version, use less cream or try low-fat options. {{ingredient_image_2}} Start by heating olive oil in a large skillet over medium heat. Add chopped onion and minced garlic. Sauté for about 2 minutes until fragrant. Next, toss in diced carrots and potatoes. Cook for another 5-7 minutes. Stir the veggies often until they begin to soften. This step builds the base of flavor in your pot pie. Once the vegetables are ready, add shredded chicken and peas. Sprinkle in chopped thyme, salt, and black pepper. Cook this mixture for 2-3 minutes. It allows all the flavors to meld together. Now, pour in chicken broth and heavy cream. Stir well and bring to a gentle simmer. Cook for about 5-7 minutes until the sauce thickens. Remove from heat and let it cool slightly. Preheat your oven to 425°F (220°C). Take one pie crust and roll it out to fit a 9-inch pie dish. Place the rolled crust into the dish. Pour the creamy chicken filling evenly into the crust. Roll out the second crust and place it over the filling. Crimp the edges to seal them tightly. Cut a few slits in the top crust for steam to escape while baking. Next, use a pastry brush to apply the beaten egg over the top crust. This gives your pie a golden finish. Place the pie in the oven and bake for 30-35 minutes. Look for a lovely golden brown crust and bubbling filling. After baking, let the pie cool for about 10 minutes before slicing. This helps the filling set for easier serving. Enjoy your delicious chicken pot pie! To boost flavor in your chicken pot pie, use fresh herbs like thyme. They add a bright taste. A dash of lemon juice can also bring a zing. Don't skip the garlic; it gives depth. Always season your filling well with salt and pepper. Taste as you cook to get it just right. A flaky crust makes your pot pie special. Start with cold ingredients. Keep your butter or shortening chilled. When mixing, avoid overworking the dough. This keeps the layers light. Use a sharp knife for slits on top. It helps steam escape and keeps the crust flaky. Many make the mistake of overcooking the filling. It can get dry and lose flavor. Don’t skip the cooling step. Let the filling cool before adding it to the crust. This helps the crust stay crisp. Lastly, make sure to crimp the edges well. A good seal keeps the filling inside. Pro Tips Use Leftover Chicken: For a quicker preparation, use leftover rotisserie chicken or any cooked chicken you have on hand. Customize Your Vegetables: Feel free to add or substitute other vegetables like corn, green beans, or mushrooms based on your preference. Thicken the Filling: If you prefer a thicker filling, you can whisk in a tablespoon of cornstarch mixed with a bit of cold water before simmering. Let It Rest: Allow the pot pie to rest for 10 minutes after baking. This helps the filling set, making it easier to serve. {{image_4}} You can make a veggie version of chicken pot pie. Start with the same filling base but swap the chicken for hearty vegetables. Use mushrooms, zucchini, and bell peppers as your main stars. Add in some extra protein with chickpeas or lentils. This gives your dish a nice texture and taste. You can also use vegetable broth instead of chicken broth. It keeps the flavor rich without meat. Don't forget to add a touch of thyme for that classic taste! Making a gluten-free chicken pot pie is easy. You can use gluten-free pie crusts that you can find at most stores. For the filling, ensure that your chicken broth and any other ingredients are gluten-free. Instead of regular flour, try using cornstarch to thicken your filling. It works great and keeps the dish creamy. This way, everyone can enjoy a slice without worries! If you want more protein choices, think outside the chicken box! You can use turkey, which gives a similar taste. Another option is cooked shrimp for a seafood twist. If you like beef, try diced beef stew meat. It adds a hearty flavor that is also comforting. Just remember to cook the protein well before adding it to the pie. This way, it blends nicely with the creamy filling. After enjoying your delicious chicken pot pie, you may have some leftovers. To store them, let the pie cool down to room temperature. Wrap the pie tightly with plastic wrap or foil. You can also place it in an airtight container. Store it in the fridge. Enjoy your leftovers within three to four days to keep them fresh and tasty. When you're ready to enjoy your leftovers, preheat your oven to 350°F (175°C). If you have a whole pie, place it on a baking sheet. Cover it lightly with foil to keep it from getting too brown. Bake for about 20-25 minutes. If you have single slices, place them on a plate and cover them. Microwave each slice for about 2 minutes or until hot. Remember to check the temperature to ensure it’s heated through. If you want to save your chicken pot pie for later, freezing is a great option. First, let the pie cool completely. Wrap it tightly in plastic wrap. Then, wrap it again in foil or place it in a freezer-safe container. You can freeze it for up to three months. When you're ready to eat it, thaw the pie in the fridge overnight. Bake it at 350°F (175°C) for about 30-40 minutes until it's hot and bubbly. Enjoy your cozy meal anytime you crave it! Yes, you can use store-bought chicken. It saves time and is very handy. Look for rotisserie chicken for great flavor. Just shred it, and you are set. You will know the pot pie is done when the crust is golden brown. The filling should also bubble through the slits in the top crust. This shows it's hot and ready to eat. Chicken pot pie pairs well with light sides. A fresh green salad works great. You can also serve steamed vegetables or mashed potatoes. These sides balance the rich flavors of the pie nicely. You learned how to make a delicious chicken pot pie. We covered key ingredients, step-by-step instructions, and helpful tips. Variations make this dish perfect for anyone. Proper storage keeps leftovers fresh for later. Remember to avoid common mistakes for the best results. With these details, you can create a meal loved by all. Enjoy your cooking adventure!

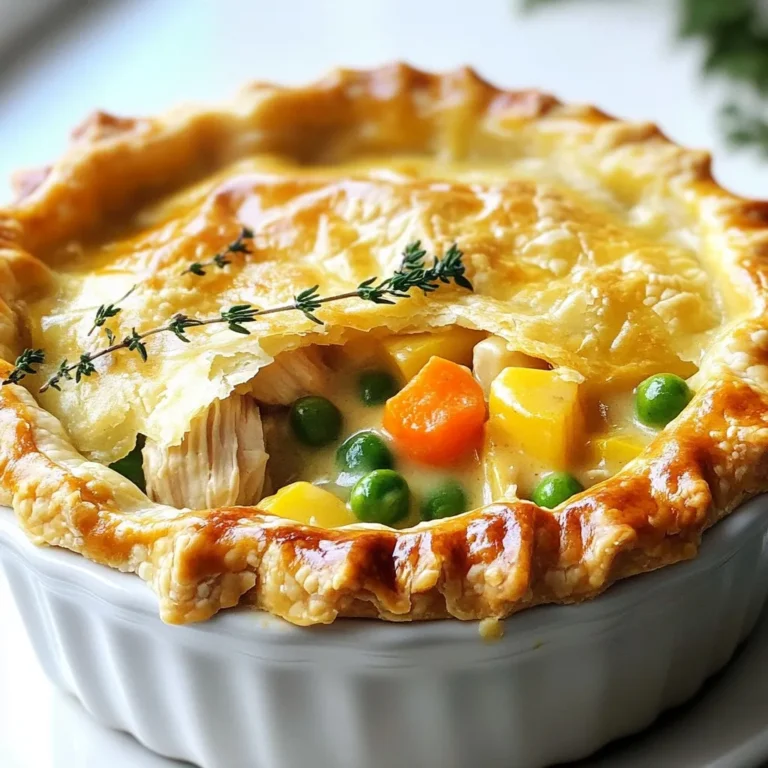
Ultimate Chicken Pot Pie Comfort Food Recipe Delight

- 2 cups rolled oats - 1 cup pecans, roughly chopped - 1/2 cup almonds, roughly chopped - 1/4 cup pumpkin seeds - 1/3 cup pure maple syrup - 1/4 cup coconut oil, melted - 1 teaspoon vanilla extract - 1/2 teaspoon sea salt - 1/2 teaspoon ground cinnamon - Optional: 1/2 cup dried cranberries or raisins To make maple pecan granola clusters, you need simple, wholesome ingredients. The main ingredients are rolled oats, pecans, almonds, and pumpkin seeds. These create a crunchy base full of good nutrients. The wet ingredients add flavor and sweetness. Pure maple syrup gives it that sweet touch. Coconut oil helps bind everything together and adds richness. Vanilla extract adds a lovely aroma. Next, seasonings like sea salt and ground cinnamon balance the sweetness. Salt brings out the flavors, while cinnamon adds warmth. If you want a fruity twist, toss in dried cranberries or raisins. These add a chewy texture and extra sweetness. Gather these ingredients, and you’re ready to create a delicious snack that’s both salty and sweet! - Preheat your oven to 325°F (160°C). - Line a baking sheet with parchment paper for easy release. - In a large bowl, combine the rolled oats, chopped pecans, chopped almonds, and pumpkin seeds. Stir well to mix the dry ingredients. - In a smaller bowl, whisk together the maple syrup, melted coconut oil, vanilla extract, sea salt, and ground cinnamon until it is smooth. - Pour the wet mixture into the dry ingredients. Mix gently but thoroughly. Make sure all the oats and nuts are coated. - Spread the mixture evenly on the prepared baking sheet. - Use your hands or a spatula to press the mixture down. Form clusters to help them stick together. - Bake for 20 to 25 minutes. Stir halfway through to ensure even browning. Keep a close watch to prevent burning. - Once golden brown and fragrant, take it out of the oven and let it cool completely on the baking sheet. - Break the cooled granola into clusters of your desired size. If using dried cranberries or raisins, stir them in now for added sweetness. - Store the granola clusters in an airtight container at room temperature for up to two weeks. To get the best granola, mix your dry ingredients well. This step helps every bite taste great. After mixing, press the clusters firmly. This action helps them stick together better during baking. When you press the mixture, it creates nice clusters. Cooling your granola is key. It helps the clusters firm up and become crunchy. Leave it on the baking sheet until it cools completely. For storage, use an airtight container. This way, your granola stays fresh for longer. It can last up to two weeks at room temperature. You can serve your granola clusters in many ways. One fun idea is to pair them with yogurt. They also work well as toppings for smoothies. For display, try a clear glass jar. It shows off the clusters nicely. You can drizzle more maple syrup on top for extra sweetness. {{image_4}} You can switch up the nuts in your granola. Walnuts and cashews work well. They add a new taste while still keeping the crunch. You can also mix in seeds like sunflower or chia seeds. These will boost nutrition and give your granola a fun twist. If you want to try something different, honey or agave syrup can replace maple syrup. Both options add their unique flavor. You can adjust how sweet you want your granola, too. Taste it as you mix to find your perfect balance. Want to spice things up? Add some nutmeg or ginger for a warm flavor. These spices can brighten the taste and make your granola special. You might also consider adding dried fruits like apricots or figs. They bring extra sweetness and chewiness to each bite. To keep your maple pecan granola clusters fresh, use an airtight container. Glass jars are great because they show off the clusters. You can also use plastic containers, but make sure they seal tightly. Store the granola at room temperature, away from heat and light. This keeps it crunchy and full of flavor. Your granola will stay fresh for up to two weeks. Check for any signs of spoilage, like a change in smell or texture. Refrigerating granola has some pros and cons. On the plus side, it can last longer in the fridge. But, it may lose some of its crunch. If you live in a hot climate, refrigeration might be a good choice. You can also refrigerate if you add fresh ingredients, like yogurt or fruit. However, for best texture, I recommend storing it at room temperature. If you want to keep your granola clusters for a longer time, freezing works well. To freeze, let the granola cool completely. Then, place it in a freezer-safe bag or container. Make sure to remove any air to prevent freezer burn. When you want to eat it, take out what you need and let it thaw at room temperature. Freezing may change the texture slightly, making it a bit softer, but the flavor will remain. To make your granola crunchy, you need to bake it just right. Here are some tips: - Use enough oil: Coconut oil helps create that crunchy texture. - Press it down: After mixing, press the granola firmly on the baking sheet. - Bake at the right temperature: Bake at 325°F (160°C) for even browning. - Stir halfway through: This helps it brown evenly without burning. - Cool completely: Let it cool on the baking sheet. It will harden more as it cools. Yes, you can easily make this recipe vegan. Here are some substitutes: - Coconut oil: Use any plant-based oil, like avocado oil. - Maple syrup: This ingredient is already vegan, so keep it! - Optional add-ins: If you want to add chocolate, use dairy-free chocolate chips. Leftover granola is super versatile. Here are some fun ideas: - Top your yogurt: Sprinkle it over yogurt for breakfast or a snack. - Mix into smoothies: Blend it into smoothies for extra crunch. - Use in baking: Add it to cookie dough or muffins for added flavor. - Create a parfait: Layer with fruit and yogurt for a tasty dessert. - Gift it: Put it in a jar with a ribbon for a homemade gift. You now have a simple and tasty granola recipe to try. We covered the main ingredients, detailed steps, and useful tips for perfecting your granola. You learned how to store it, explore variations, and clear up common questions. Granola is easy to customize and a healthy snack option. Enjoy it with yogurt or on its own. Your kitchen will smell amazing, and you’ll have a delicious treat that’s fresh and homemade. So, get cooking and have fun experimenting with your own flavors!

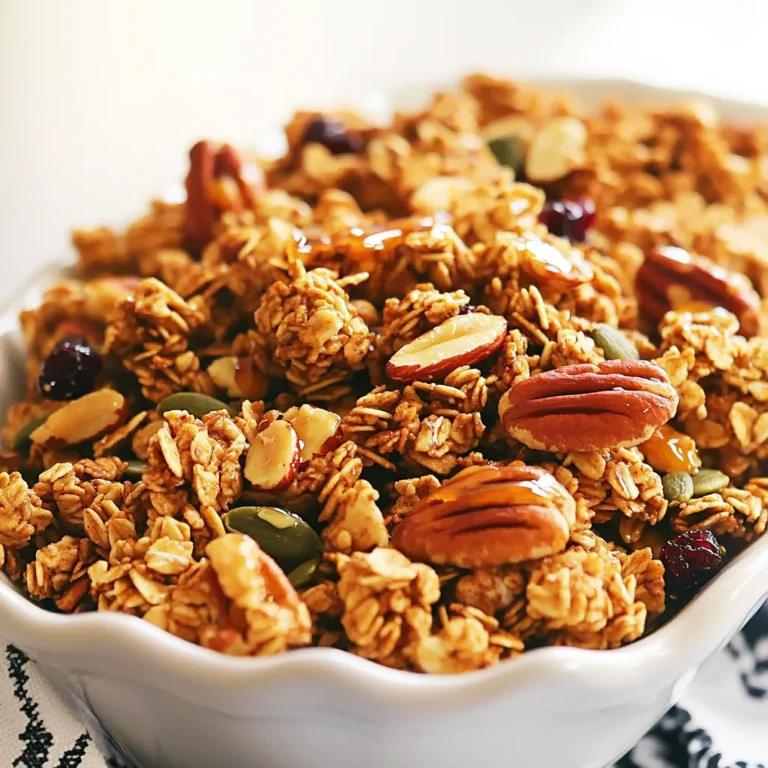
Maple Pecan Granola Clusters Salty and Sweet Snack

- Mixed Beans Overview For this soup, I use 2 cups of mixed beans. Cannellini, kidney, and black beans work well. Soak them overnight, rinse, and drain. This step helps soften them and makes cooking easier. - Fresh Vegetables Needed You will need: - 1 large onion, finely diced - 3 cloves garlic, minced - 2 medium carrots, peeled and diced - 2 stalks celery, diced - 2 cups fresh kale, stems removed and chopped - 1 can (14.5 oz) diced tomatoes, including juice These fresh veggies add nutrition and flavor to your soup. They create a nice base and add color. - Seasonings and Optional Ingredients For seasoning, gather: - 4 cups vegetable broth (homemade or store-bought) - 1 tablespoon Italian seasoning blend - 1 teaspoon red pepper flakes (optional for added heat) - Salt and freshly ground black pepper to taste - 1 tablespoon extra virgin olive oil - Fresh basil leaves, for garnish The Italian seasoning gives the soup its classic flavor. Red pepper flakes can add a nice kick if you like spice. Salt and pepper enhance all the tastes, while basil adds a fresh touch when serving. Start by heating olive oil in a skillet over medium heat. Add diced onion, carrots, and celery. Sauté these for about five minutes. Stir often until the veggies soften and the onion turns translucent. Then, add minced garlic and cook for one more minute. This step builds a great base for your soup. Once done, transfer the sautéed vegetables to your slow cooker. Make sure to scrape in all those tasty bits from the skillet. Now, it’s time to layer the ingredients. Add the soaked and drained mixed beans next. Then, pour in the can of diced tomatoes with all their juice. Follow this with vegetable broth and your Italian seasoning. If you like heat, sprinkle in red pepper flakes as well. After adding everything, stir gently to mix all the ingredients. This helps ensure even flavor throughout the soup. Cover the slow cooker with its lid. You can choose to cook on low for six to eight hours or on high for three to four hours. The cooking time will depend on your schedule. Check for doneness by tasting a bean. It should be tender and flavorful, ready to enjoy. About 15 minutes before serving, stir in the chopped kale. It will wilt quickly in the warm soup. This adds a fresh touch to your meal. Finally, taste the soup and adjust the seasoning with salt and freshly ground black pepper. This step is key to making the flavors pop. Enjoy serving your Tuscan bean soup in warmed bowls, topped with fresh basil leaves for a lovely finish. To make your Slow Cooker Tuscan Bean Soup burst with flavor, focus on herbs and spices. I recommend using: - 1 tablespoon Italian seasoning blend - 1 teaspoon red pepper flakes (optional for heat) These add depth. You can also try adding fresh herbs like rosemary or thyme for a fragrant note. For texture, consider adding a splash of balsamic vinegar or a squeeze of lemon juice just before serving. This brightens the flavors and adds a zing. Pair your soup with crusty artisan bread. This adds a nice crunch to each bite. You can also serve it with a simple salad for a fresh touch. For garnishing, sprinkle fresh basil leaves on top just before serving. A drizzle of extra virgin olive oil also enhances the soup’s look and taste. This recipe is already vegetarian. To make it vegan, simply ensure your vegetable broth is free from animal products. You can also add more veggies like bell peppers or zucchini for added nutrition. For extra flavor, toss in some nutritional yeast. It gives a cheesy taste without dairy. {{image_4}} You can mix beans for more flavor and texture. Try these options: - Navy Beans: Creamy and mild, they add richness. - Pinto Beans: Earthy and soft, they blend well with spices. - Chickpeas: Add a nutty taste and extra protein. Using different beans gives you a unique taste. Each type has its own benefits. It can change your soup from ordinary to extraordinary! Adding protein makes the soup heartier. Here are two easy ways: - Incorporating Sausage or Chicken: Slice cooked sausage or diced chicken into the pot. Both add a savory flavor. Use Italian sausage for a spicy kick. - Vegetarian Protein Sources: For a meat-free option, add lentils or quinoa. They are great sources of protein and keep the soup filling. These options allow you to customize your dish based on your diet or mood. You can give your soup a local twist. Here are some ideas: - Italian Variants to Try: Add some pancetta or prosciutto for a smoky flavor. Top with grated Parmesan for an authentic touch. - Cultural Influences on Ingredients: Use spices from other cultures, like cumin or coriander. This adds a new dimension to your soup. Exploring these adaptations can make your Tuscan Bean Soup exciting and new every time! - Store leftovers in airtight containers. - Let soup cool before sealing it. - Keep in the fridge for up to 4 days. - To freeze, use freezer-safe containers. - Leave some space at the top for expansion. - Thaw overnight in the fridge before reheating. - Use within three months for best taste. - Reheat in a pot over low heat. - Stir often to heat evenly. - If soup is thick, add a splash of broth. - Serve hot and enjoy! Yes, you can use dried beans. They add great taste and texture. First, soak the dried beans overnight. This helps them cook better. Rinse and drain them well before adding to the soup. You will need to cook the soup longer if using dried beans. Aim for 8-10 hours on low or 4-6 hours on high. This will ensure the beans get soft and delicious. If you want heat, try adding more red pepper flakes. Start with a pinch and taste. You can also add chopped jalapeños or diced green chilies. For a smoky flavor, try some smoked paprika. These options will give your soup a nice kick. Tuscan bean soup is full of nutrients. Beans are a great source of protein and fiber. They help keep you full longer. The vegetables add vitamins and minerals. Kale is rich in antioxidants and vitamins A, C, and K. This soup is also low in fat, making it a healthy choice. Yes, you can swap out the vegetable broth. Chicken broth adds a nice flavor. If you want a richer taste, try mushroom broth. Each type of broth will change the flavor slightly, so pick what you like best. You learned how to make Tuscan Bean Soup using fresh ingredients and simple steps. From mixing beans to adding your favorite seasonings, this soup is delicious and healthy. I shared tips for enhancing the flavor and storing leftovers. Remember, you can customize it with proteins or spices to fit your taste. Enjoy making this warm dish that draws on various cultural influences. Explore new variations and feel free to experiment. Your soup will not only taste great but also nourish and satisfy. Happy cooking!

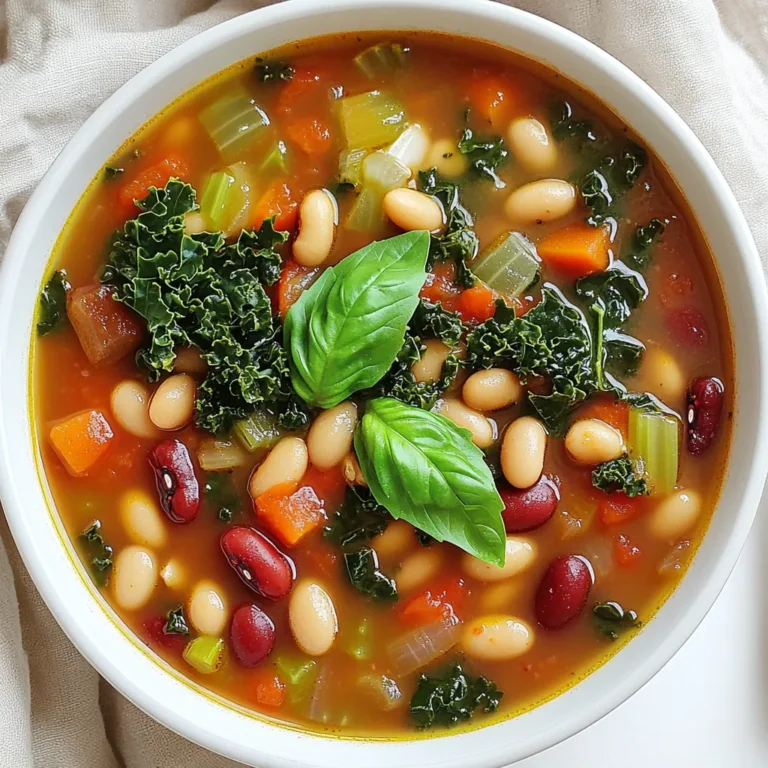
Slow Cooker Tuscan Bean Soup Flavorful and Easy Meal

For this tasty dish, you need four bone-in, skin-on chicken thighs. The skin keeps the meat juicy and adds crunch. The marinade is where the magic happens. Gather these items: - 1/4 cup low-sodium soy sauce - 2 tablespoons honey - 2 tablespoons rice vinegar - 1 tablespoon sesame oil - 2 cloves garlic, minced - 1 teaspoon fresh ginger, grated - 1 tablespoon cornstarch - 1 tablespoon water These ingredients work together to create a sweet and savory flavor. To make your dish look and taste even better, use: - Sesame seeds for garnish - Sliced green onions for garnish These add a nice touch and extra flavor to your meal. {{ingredient_image_2}} To make the marinade, grab a medium bowl. Combine these ingredients: - 1/4 cup low-sodium soy sauce - 2 tablespoons honey - 2 tablespoons rice vinegar - 1 tablespoon sesame oil - 2 cloves garlic, minced - 1 teaspoon fresh ginger, grated Whisk these ingredients until they blend well. The mix will bring a lot of flavor to the chicken. Take your chicken thighs and place them in a resealable bag or a shallow dish. Pour the marinade over the chicken. Make sure each thigh gets coated. Seal the bag or cover the dish with plastic wrap. Let the chicken sit in the fridge for at least 30 minutes, or up to 2 hours. This allows the flavors to soak in. Preheat your air fryer to 375°F (190°C). Remove the chicken from the marinade. Shake off any extra liquid. Place the thighs skin-side down in the air fryer basket. Cook for 10 minutes. This phase gives the chicken a nice sear. While the chicken cooks, take the leftover marinade and pour it into a small saucepan. Heat it on medium until it starts to boil. Lower the heat and let it simmer for about 5 minutes. In a small bowl, mix 1 tablespoon of cornstarch with 1 tablespoon of water. Add this mix to the simmering sauce. Stir until it thickens, then take it off the heat. After the first 10 minutes, flip the chicken thighs over so they are skin-side up. Brush them with some of the thickened sauce. Cook for another 10 to 12 minutes. Ensure the chicken reaches an internal temperature of 165°F (75°C) and the skin is crispy. Once the chicken is done, take it out of the air fryer. Let it rest for about 5 minutes. This step helps keep the chicken juicy. To get the best flavor, marinate your chicken thighs. Use a mix of low-sodium soy sauce, honey, rice vinegar, sesame oil, garlic, and ginger. Coat the thighs well and let them sit in the fridge for at least 30 minutes. If you can, let them marinate for up to 2 hours. This extra time makes a big difference in taste. Crispy skin is a must for great chicken. Start by cooking the thighs skin-side down in the air fryer. This step helps render the fat. After the first 10 minutes, flip them over. Brush the chicken with the thickened marinade before the final cook. This adds flavor and helps the skin crisp up nicely. For serving, drizzle the thickened sauce over the cooked chicken. Add a sprinkle of sesame seeds and sliced green onions. These garnishes add a pop of color and extra flavor. You can pair this dish with steamed rice or a fresh salad for a complete meal. Enjoy your tasty, homemade teriyaki chicken! Pro Tips Marinating Time: For the best flavor, marinate the chicken thighs for at least 2 hours or even overnight if you have the time. This allows the flavors to penetrate deeply into the meat. Cooking in Batches: If your air fryer is small, cook the chicken thighs in batches to avoid overcrowding, which can prevent even cooking and crisping. Checking Doneness: Use a meat thermometer to check the internal temperature of the chicken. It should reach 165°F (75°C) for safe consumption. Crispier Skin: For extra crispy skin, brush the chicken thighs with a little oil before air frying and ensure they are skin-side up during the final cooking phase. {{image_4}} You can switch up the main protein in this dish. Try using chicken breast instead of thighs. Breasts cook faster, so reduce the time by a few minutes. If you prefer a different meat, pork chops work well too. For a plant-based option, use firm tofu. Cut it into cubes and marinate just like the chicken. Air fry until crispy for a tasty vegan twist. Feel free to get creative with the marinade. Instead of soy sauce, try coconut aminos for a gluten-free option. You can also add a splash of orange juice for a citrus kick. For a spicy touch, mix in sriracha or chili paste. Each change will give a unique flavor, so don't hesitate to experiment! Pair your teriyaki chicken with great side dishes. Steamed broccoli or snap peas add a fresh crunch. Serve it with rice or quinoa to soak up the sauce. You can also add a simple salad with sesame dressing. These sides will make your meal colorful and nutritious! You can store leftover Air Fryer Teriyaki Chicken Thighs in the fridge. Place them in an airtight container. This keeps them fresh for up to three days. Make sure the chicken cools down before sealing the container. Always label the container with the date to keep track. If you want to keep the chicken longer, freezing is a great option. First, let the chicken cool completely. Then, wrap each thigh in plastic wrap. Place them in a freezer bag or container. This way, they can last up to three months. Remember to label the bag with the date. To reheat the chicken, use your air fryer for the best results. Preheat the air fryer to 350°F (175°C). Place the chicken in the basket and heat for about 5-7 minutes. This will help keep the skin crispy and the meat juicy. You can also use the microwave, but it may make the skin soft. If you use the microwave, cover the chicken with a damp paper towel to keep it moist. You should marinate the chicken for at least 30 minutes. If you have time, marinate for up to 2 hours. This allows the flavors to soak in well. The longer you marinate, the more flavorful the chicken will be. Yes, you can use boneless chicken thighs. They will cook faster than bone-in thighs. Adjust the cooking time to about 15 minutes in the air fryer. Always check that they reach 165°F to ensure they are safe to eat. The thickened marinade from your recipe works great as a dipping sauce. You can also try sweet chili sauce for a spicy kick. Soy sauce mixed with a bit of rice vinegar makes a simple and tasty dip as well. This blog post covered how to make Air Fryer Teriyaki Chicken Thighs. We explored the ingredients, including chicken thighs and marinades. I shared step-by-step instructions for marinating and cooking the chicken. You learned tips for flavor and texture, plus ways to alter the recipe. We also discussed storage methods and answered common questions. Incorporating these ideas can help you create tasty meals. Enjoy the cooking process and the delicious results!

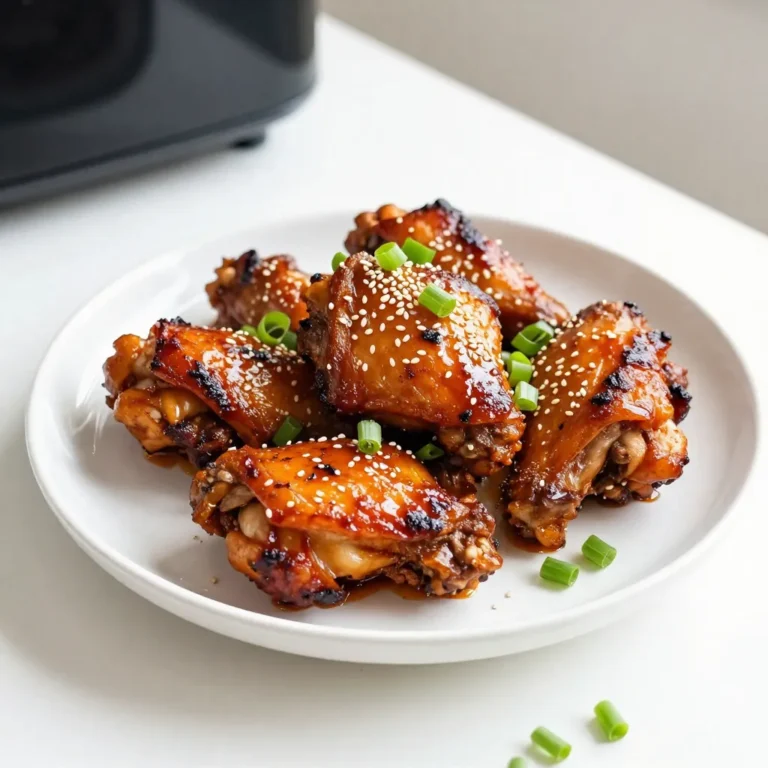
Air Fryer Teriyaki Chicken Thighs Flavorful Recipe

- 2 cups shredded cooked chicken - 1 cup BBQ sauce (your favorite) - 2 cups coleslaw mix (shredded cabbage and carrots) The main ingredients bring this dish to life. Shredded cooked chicken forms the protein base. Pair it with your favorite BBQ sauce. This sauce adds a smoky and sweet flavor. The coleslaw mix gives it a fresh crunch. It combines cabbage and carrots for color and texture. - ½ cup fresh cilantro, finely chopped - 1 ripe avocado, thinly sliced - ½ cup pickled jalapeños (optional for added spice) Add-ins can make your wraps even better. Fresh cilantro adds a bright taste. Sliced avocado offers creaminess and healthy fats. Pickled jalapeños add heat for those who enjoy spice. Use these add-ins to fit your taste. - 1 tablespoon apple cider vinegar - 1 teaspoon granulated sugar - Salt and freshly ground black pepper, to taste The seasoning helps balance flavors. Apple cider vinegar adds tanginess. Granulated sugar gives a hint of sweetness. Salt and pepper enhance all the other tastes. Mix these ingredients into the coleslaw for a tasty dressing. {{ingredient_image_2}} To start, mix the shredded cooked chicken with your favorite BBQ sauce. Use a large mixing bowl to ensure everything blends well. Stir until the chicken is fully coated with the sauce. This step is key for great flavor. Set the chicken aside to let the flavors meld together. Next, prepare the coleslaw. In a separate bowl, combine the coleslaw mix with finely chopped cilantro. Add apple cider vinegar, granulated sugar, and a pinch of salt and pepper. Toss everything together until the cabbage and carrots are well-dressed. This will add a nice balance to the wraps. Now, let’s assemble the wraps. Lay a tortilla flat on a clean surface. Place a generous scoop of the BBQ chicken mixture in the center of the tortilla. On top of the chicken, add the prepared coleslaw. Then, arrange a few slices of avocado. If you like spice, toss in some pickled jalapeños. Carefully fold the sides of the tortilla inward. Then, roll it from the bottom upwards. Make sure the filling is secure as you wrap. For a crispy texture, grill the wraps. Heat a non-stick skillet over medium heat. Place the wraps seam-side down in the skillet. Cook for 2-3 minutes on each side until they are golden brown. This step adds an extra layer of flavor and crunch. Once grilled, slice each wrap in half diagonally. Serve with extra BBQ sauce on the side for dipping. Enjoy every bite! To make your BBQ chicken even tastier, try adding spices. A sprinkle of smoked paprika adds a nice kick. You can also use garlic powder or onion powder for extra depth. If you want a tangy twist, mix in a bit of lime juice or hot sauce. Marinating the chicken in BBQ sauce overnight helps the flavors soak in. Crunch is key in coleslaw. To keep it fresh, mix the coleslaw just before serving. You can also add sliced radishes for a nice crunch. Using fresh cabbage instead of pre-shredded can enhance the texture. If you want more crunch, toss in some sunflower seeds or nuts. Slice the wraps on a diagonal for a nice look. Arrange the halves on a platter, with the cut side facing up. This shows off the colorful filling. You can also garnish with extra cilantro or avocado slices on top. Serve with small bowls of BBQ sauce for dipping to make it fun. Pro Tips Choose Quality BBQ Sauce: The flavor of your wraps largely depends on the BBQ sauce you use. Pick a sauce that complements the chicken and coleslaw for a delicious outcome. Prep Ahead for Convenience: You can prepare the BBQ chicken and coleslaw mixture a day in advance to save time. Just assemble the wraps when you're ready to serve! Experiment with Add-Ins: Feel free to add other ingredients like diced bell peppers or corn to the coleslaw for extra flavor and texture. Serve with Sides: Pair your wraps with a side of sweet potato fries or a light salad to create a complete meal that everyone will enjoy. {{image_4}} You can change up the protein in these wraps easily. Try using turkey instead of chicken. It gives a nice flavor and is leaner. If you want a plant-based option, use tofu. Press the tofu to remove water, then grill or sauté it. Toss it with your favorite BBQ sauce for a tasty treat. Both options work well in the wraps. If you want a vegetarian wrap, skip the chicken entirely. Use extra veggies instead. You can add cooked beans, like black beans or chickpeas, for protein. Mix in more shredded carrots or bell peppers for crunch. A creamy dressing can replace BBQ sauce. This keeps the wrap fresh and flavorful. You can easily change the flavor of your BBQ chicken wraps. Try different BBQ sauces for variety. A smoky sauce gives a deep flavor, while a sweet sauce adds brightness. Add spices like cumin or smoked paprika to the chicken mix for warmth. For a kick, mix in hot sauce or fresh chilis. These small tweaks create exciting new tastes. To store leftover BBQ chicken coleslaw wraps, wrap them tightly in plastic wrap or foil. Place them in an airtight container. Store in the fridge for the best results. You can also freeze them for later. Just make sure to separate each wrap with parchment paper. This way, they won’t stick together. To reheat your wraps, use a skillet. Heat it over medium heat and add a little oil if needed. Place the wrap in the skillet and cook for about 3-5 minutes on each side. This method keeps the tortilla crispy. You can also use a microwave, but this may make the wrap soft. Heat it for 30 seconds, check, and repeat if needed. These wraps can last in the fridge for about 3 days. If you freeze them, they can last up to 2 months. Just remember to thaw them in the fridge overnight before reheating. Enjoy your wraps fresh for the best taste and texture! Yes, you can use pre-cooked chicken. It's a great time saver. Look for rotisserie chicken or leftover grilled chicken. Just shred it and mix it with BBQ sauce. This option still gives you tasty, juicy wraps. Choose a BBQ sauce that you love. Sweet sauces add a nice touch, while smoky sauces bring depth. For a spicy kick, try a hot BBQ sauce. You can mix different flavors too. Just find what makes your taste buds dance! Yes, this recipe is very kid-friendly! Kids love the fun of wraps. To make it more appealing, keep the spice level low. You can also let them help with assembly. This makes them more excited to eat what they made! You can easily adjust the spice level. If you like it mild, skip the jalapeños. For more heat, add a few slices. You can also mix in hot sauce or cayenne pepper in the BBQ sauce. Just taste as you go! This post covered how to make BBQ chicken coleslaw wraps. We discussed the main ingredients, optional add-ins, and seasoning tips. The step-by-step instructions help you prepare, assemble, and even grill your wraps. I shared tips for enhancing flavor and texture. We explored fun variations and gave storage advice. Remember, you can customize this recipe to suit your taste. With these insights, you can impress everyone at your next meal. Enjoy creating delicious wraps that are both fun and satisfying!

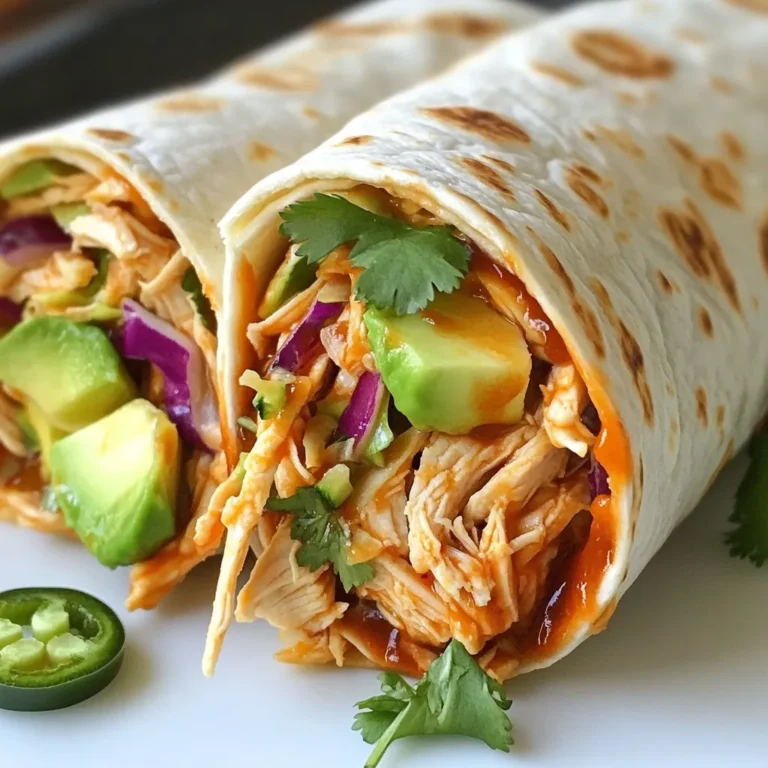
BBQ Chicken Coleslaw Wraps Flavorful and Easy Meal

PREV 1 … 5 6 7 … 47 NEXT
snack joy kitchen

explore

DessertsDinnerAppetizersDrinks

Our Policies

  • Cookie Policy
  • Copyright Policy
  • Disclaimer
  • GDPR Policy
  • Terms Of Use
Back to Top
  • About
  • Contact Us
  • Privacy Policy
© 2026 snack joy kitchen