FREE DINNER EBOOK! Get your copy!
  • Cookie Policy
  • GDPR Policy
  • Disclaimer
  • Terms Of Use
  • Visit my other site: Fun Cookie Recipes
snack joy kitchen
  • Home
  • Dinner
  • Desserts
  • Drinks
  • Appetizers
  • Contact
  • About
  • Privacy Policy
  • Home
  • Dinner
  • Desserts
  • Drinks
  • Appetizers
  • Contact
  • About
  • Privacy Policy
  • Cookie Policy
  • GDPR Policy
  • Disclaimer
  • Terms Of Use
Visit my other site: Fun Cookie Recipes

HOME / CATEGORIES /

Latest

- 1 cup coconut milk (canned or carton) - 1/4 cup chia seeds - 2 tablespoons maple syrup (or honey) - 1 ripe mango, diced - 1/2 teaspoon vanilla extract - A pinch of sea salt - Toasted coconut flakes (for garnish) - Fresh mint leaves (for garnish) To make mango coconut chia pudding, gather these fresh ingredients. First, choose your coconut milk. You can use canned or carton, based on what you like. Next, the chia seeds are key. They soak up the liquid and create a thick, creamy texture. Maple syrup adds sweetness, but honey works too if you prefer. A ripe mango is essential. It gives a bright flavor and a lovely color. Don’t forget the vanilla extract! Just a little boosts the taste. A pinch of sea salt helps balance the sweetness. For garnish, I love using toasted coconut flakes. They add crunch and extra coconut flavor. Fresh mint leaves are perfect for a pop of color and scent. With these ingredients ready, you're set for a delicious and healthy treat! {{ingredient_image_2}} - In a medium bowl, combine: - 1 cup coconut milk - 1/4 cup chia seeds - 2 tablespoons maple syrup (or honey) - 1/2 teaspoon vanilla extract - A pinch of sea salt Whisk the mixture until it blends well. This makes sure the chia seeds are evenly spread. The coconut milk creates a creamy base. Cover the bowl tightly with plastic wrap or a lid. Place it in the fridge for at least 4 hours or overnight. Chilling is key. It helps the chia seeds absorb the liquid. After this time, you will have a thick, pudding-like texture. When ready to serve, stir the pudding well to mix the chia seeds again. Take small serving dishes and layer the diced mango at the bottom. This adds a fresh taste. Spoon the chia pudding on top of the mango. Fill the dishes about halfway. For the final touch, add more diced mango on top. Sprinkle toasted coconut flakes for crunch. Garnish with fresh mint leaves for color and aroma. Enjoy your healthy treat! To get the best texture, chill your chia pudding well. The chia seeds need time to soak up the coconut milk. I recommend chilling for at least 4 hours or overnight. This time makes the pudding creamy and thick. Before serving, check the consistency. If it looks too thick, stir in a bit of coconut milk to loosen it up. A smooth texture makes it more enjoyable. You can easily change the sweetness of your pudding. Use maple syrup for a natural touch or honey if you prefer. Start with 2 tablespoons and taste it. If you want it sweeter, add a bit more. Remember, the ripe mango adds sweetness too. Adjust to your liking for the best flavor. Make your pudding look as good as it tastes. Start with a layer of diced mango at the bottom of each dish. This adds a fresh burst of color. Then, spoon the creamy chia pudding on top. Finish with more mango and sprinkle toasted coconut flakes. For a touch of green, add fresh mint leaves. These simple steps elevate the dish's visual appeal. Pro Tips Use Chia Seeds Wisely: Make sure to allow the chia seeds enough time to absorb the liquid; this is key to achieving the creamy pudding-like texture. Ripeness of Mango: Choose a ripe mango for the best flavor; it should be slightly soft to the touch and fragrant. Experiment with Sweeteners: Feel free to adjust the sweetness to your liking by using more or less maple syrup or honey according to your taste. Garnishing Tips: For added texture and flavor, consider adding nuts or seeds along with toasted coconut flakes as a garnish. {{image_4}} You can make this mango coconut chia pudding even better by adding more fruits. Pineapple chunks can bring a sweet and tangy taste. Passion fruit adds a unique flair with its tartness. You can also try bananas for a creamy texture or berries for a pop of color. These fruits pair well with mango and coconut, creating a tropical party in your bowl. To boost the flavor, think about adding spices. A dash of cinnamon brings warmth and sweetness. Cardamom adds a lovely, fragrant note. You can even try a hint of nutmeg for a cozy twist. These spices can elevate your pudding and make it more exciting to eat. Feel free to experiment with your favorite flavors. If you want to change up the base, many plant milks work great. Almond milk gives a nutty taste, while oat milk adds creaminess. Cashew milk also offers a rich flavor that blends well. These options are perfect if you want to keep things dairy-free. Each milk brings its unique taste, making your pudding a fun experience. Chia pudding stays good in the fridge for about 4 to 5 days. Store it in an airtight container. This keeps it fresh and tasty. Always check for any signs of spoilage before eating. If it smells off or has a strange color, it’s best to toss it. You can freeze chia pudding if you want to save it for later. Pour your pudding into a freezer-safe container. Leave some space at the top because it will expand when frozen. To thaw, move it to the fridge overnight. Stir well before serving to get the right texture back. For the best taste, serve the pudding within a few days. Keep it covered in the fridge. If you add fresh fruit, like mango, do this just before serving. This keeps it from getting mushy. Storing it properly ensures every bite is fresh and delightful! Chia pudding can last up to five days in the fridge. Store it in an airtight container. Check for signs of spoilage like a sour smell or off texture. If you see any changes, it’s best to toss it. Yes, you can use frozen mango! Frozen fruit can be just as tasty. It’s often picked at peak ripeness, making it sweet. Just let it thaw before adding it to your pudding. You can also blend it into a puree for a smooth texture. This recipe is vegan-friendly! All the ingredients are plant-based. The coconut milk and chia seeds provide healthy fats and protein. Maple syrup is a great sweetener that fits a vegan diet. Enjoy this tasty treat without worry! This article shared a simple chia pudding recipe using coconut milk, chia seeds, and mango. You learned how to mix the ingredients and chill them for the best texture. Tips for sweetness and presentation can help you make it your own. You also saw fun variations and storage ideas for this treat. Chia pudding is not only tasty but also healthy. Enjoy making it with your favorite mix-ins and share it with friends. Now, go create your perfect chia pudding!

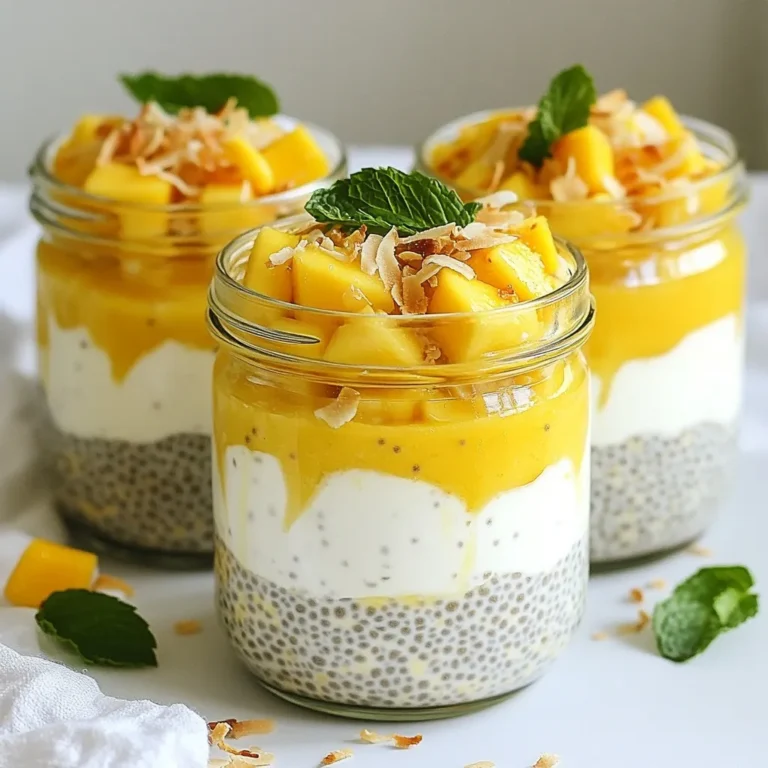
Mango Coconut Chia Pudding Easy and Tasty Recipe

- 1 lb chicken breast, cut into bite-sized pieces - 3 tablespoons unsalted butter - 1 cup heavy cream - 1 teaspoon garlic powder - 1 teaspoon paprika - 1 teaspoon onion powder - 1 teaspoon dried oregano - 1 teaspoon salt - 1/2 teaspoon black pepper - 1/2 cup shredded cheddar cheese - 1/2 cup chopped fresh parsley - 2 cups cooked rice or quinoa This dish starts with fresh chicken breast. Cut it into small, bite-sized pieces to ensure even cooking. You’ll want unsalted butter for a rich flavor without extra salt. Heavy cream is key for that creamy sauce we all love. Next, the spices bring life to the chicken. Garlic powder adds depth. Paprika gives color and a bit of heat. Onion powder and dried oregano round out the flavor profile. Salt and black pepper elevate everything. For serving, shredded cheddar cheese adds a gooey texture. Fresh parsley brightens the dish and adds color. Finally, cooked rice or quinoa makes a perfect base to soak up all that delicious sauce. Get ready to enjoy a meal that’s as tasty as it is easy to make! {{ingredient_image_2}} First, place a large skillet over medium-high heat. This step is key to getting the perfect chicken. Next, add 3 tablespoons of unsalted butter. Let the butter melt completely until it starts to sizzle. This sound means the skillet is ready for the chicken. Now, add 1 pound of bite-sized chicken pieces to the hot skillet. Sprinkle garlic powder, paprika, onion powder, oregano, salt, and black pepper over the chicken. Stir well to coat the chicken in all the spices. Cook the chicken for about 5 to 7 minutes. Make sure to stir occasionally. You want the chicken to turn golden brown and reach an internal temperature of 165°F. Once the chicken is cooked, lower the heat to medium-low. Pour in 1 cup of heavy cream while stirring gently. This will help create a rich sauce. Let the cream simmer for about 3 to 4 minutes. Stir occasionally until the sauce thickens slightly. Now, gradually add 1/2 cup of shredded cheddar cheese, mixing until it melts completely. This will give your dish a creamy texture. Taste the sauce and adjust the seasoning if needed. Finally, serve the butter chicken over 2 cups of cooked rice or quinoa. Garnish with chopped fresh parsley for that final touch. To cook chicken evenly, cut it into small, bite-sized pieces. This ensures that each piece cooks at the same rate. Always check the color; it should be golden brown when done. Use a meat thermometer to check for doneness. Your chicken should reach 165°F. This avoids undercooked chicken, which can spoil your meal. For the sauce's right consistency, let the heavy cream simmer. This thickens it nicely. Stir regularly to avoid sticking. If you find it too thick, add a splash of chicken broth or more cream. Adjust seasoning by tasting. If it needs more flavor, add a pinch of salt or pepper to suit your taste. Pair your butter chicken with cooked rice or fluffy quinoa. The grains soak up the sauce well and add a nice texture. For a rustic look, serve it straight from the skillet. Add extra cheese and parsley on top for a pop of color. This makes your dish eye-catching and pleasing. Pro Tips Use Fresh Herbs: Fresh parsley adds bright flavor and color; consider using other fresh herbs like basil or cilantro for different variations. Perfectly Cooked Chicken: Ensure your chicken pieces are uniform in size for even cooking. A meat thermometer can help check for doneness at 165°F. Adjust Creaminess: For a richer sauce, use half-and-half instead of heavy cream, or add a splash of chicken broth if you prefer a lighter dish. Serving Suggestions: This dish pairs wonderfully with crusty bread or a side salad for a complete meal experience. {{image_4}} You can swap the chicken for other proteins. Shrimp works well for a seafood twist. Tofu is a great choice if you want a plant-based option. Both will soak up the sauce nicely. If you need a dairy-free option, you can replace the heavy cream with coconut milk. It adds a nice sweetness. To make this dish even better, try adding vegetables. Spinach adds color and nutrients. Bell peppers give a sweet crunch. You can also spice things up with curry powder. It adds warmth and a hint of exotic flavor. Pair your butter chicken with tasty sauces. A tangy yogurt sauce or a spicy mango chutney complements the dish well. For grains, serve it over rice or quinoa. A fresh salad on the side can add a nice crunch and balance the meal. To store leftovers of the Texas Roadhouse Butter Chicken Skillet, place them in an airtight container. Make sure to let the dish cool to room temperature before sealing. Your leftovers will stay fresh for up to three days in the fridge. For best results, reheat only the portion you plan to eat. If you want to save the butter chicken for later, you can freeze it. Pour the cooled dish into a freezer-safe container. It can last up to three months in the freezer. When you're ready to enjoy it, take it out and let it thaw in the fridge overnight. To reheat, warm it on the stove over low heat until hot. Stir occasionally to ensure even heating. Leftover butter chicken can shine in many new meals. You can make butter chicken tacos by using tortillas. Just add some fresh veggies and cheese. Another idea is to mix it into pasta for a creamy twist. If you like meal prep, consider portioning the chicken over rice or quinoa for quick lunches. You can even blend it into a soup with broth and veggies for a cozy dinner. Texas Roadhouse Butter Chicken Skillet is a rich and creamy dish. It features tender chicken cooked in a buttery sauce. The flavors pop with garlic, paprika, and oregano. This dish pairs well with rice or quinoa. The addition of cheddar cheese adds a nice touch. Fresh parsley on top gives it a bright finish. Overall, it’s a comforting meal that warms your heart. Making this dish is quick and easy. It takes about 10 minutes to prepare. Cooking the chicken and sauce takes around 15 minutes. In total, you can have it ready in just 25 minutes. This makes it perfect for busy weeknights. Yes, you can make this recipe ahead of time! I recommend cooking it and then storing it in the fridge. Use an airtight container for storage. It stays fresh for up to three days. If you want to freeze it, that works too. Just make sure to thaw it in the fridge first. Reheat it on the stove or in the microwave. Enjoy it just like fresh! In this blog post, we explored the Texas Roadhouse Butter Chicken Skillet. We covered the key ingredients, from chicken and butter to spices and serving options. You learned step-by-step instructions, helpful cooking tips, and creative ways to mix things up. Remember, leftovers can inspire new meals. Take your time to enjoy this satisfying dish. Experiment with the recipe, and you'll discover your favorite version. Your kitchen awaits—start cooking and create something special!

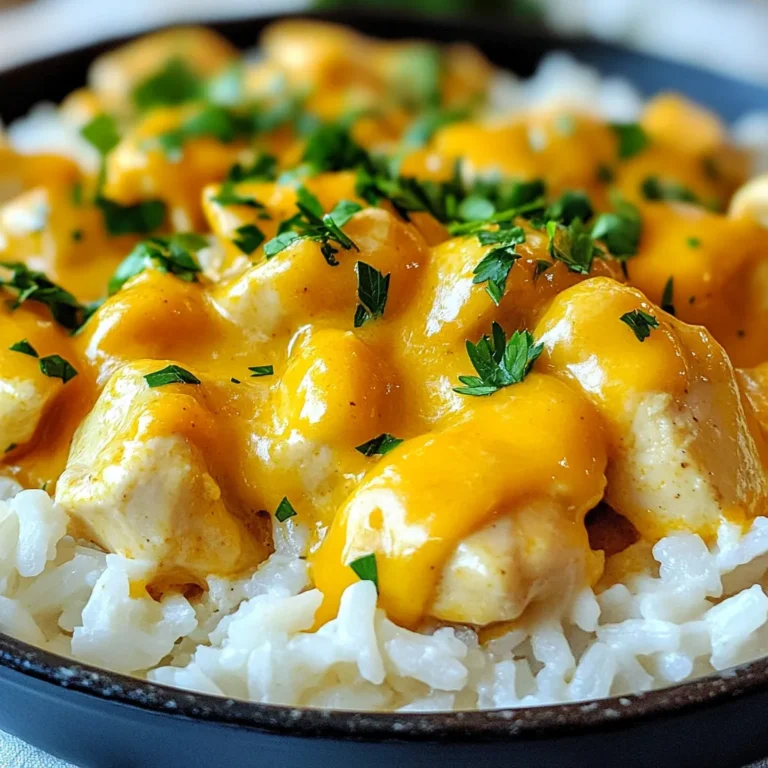
Texas Roadhouse Butter Chicken Skillet Delight

To make garlic herb roasted potatoes, gather these key ingredients: - 1.5 lbs baby potatoes (mixed colors are fun) - 4 cloves garlic (minced finely) - 3 tablespoons extra virgin olive oil - 2 teaspoons dried thyme (or 1 tablespoon fresh thyme) - 2 teaspoons dried rosemary (or 1 tablespoon fresh rosemary, chopped) - 1 teaspoon smoked paprika - Sea salt and black pepper (to taste) - Fresh parsley (finely chopped for garnishing) Each ingredient adds a special touch. The baby potatoes give a lovely texture. Garlic packs flavor, while herbs bring freshness. Olive oil helps everything roast nicely. Feel free to change up the recipe! Here are some optional ingredients: - Lemon zest (for a fresh twist) - Red pepper flakes (for a spicy kick) - Parmesan cheese (for a cheesy finish) - Other herbs like oregano or basil These options let you create your own unique flavor. Try mixing in what you love! Understanding the nutritional value helps you enjoy these tasty potatoes. Here’s a quick look: - Calories: Around 200 per serving - Protein: 4 grams - Carbohydrates: 35 grams - Fat: 8 grams - Fiber: 4 grams These potatoes make a great side dish. They are not just tasty but also provide good nutrition. Enjoying them in moderation fits well in a balanced diet. {{ingredient_image_2}} Start by gathering your ingredients. You will need: - 1.5 lbs baby potatoes, preferably mixed colors, halved - 4 cloves garlic, finely minced - 3 tablespoons extra virgin olive oil - 2 teaspoons dried thyme, or 1 tablespoon fresh thyme if available - 2 teaspoons dried rosemary, or 1 tablespoon fresh rosemary, chopped - 1 teaspoon smoked paprika for a rich flavor - Sea salt and freshly cracked black pepper, to taste - Fresh parsley, finely chopped, for garnishing Next, preheat your oven to 425°F (220°C). This step is key for getting crispy edges on your potatoes. In a large bowl, combine the halved potatoes with the minced garlic. Drizzle the olive oil over them. Make sure to cover all the potatoes well. Now, add the thyme, rosemary, smoked paprika, sea salt, and black pepper. Mix everything together using your hands or a spoon. This ensures that each potato gets a nice coating of flavor. Line a baking sheet with parchment paper. This helps keep the potatoes from sticking. Spread the seasoned potatoes in a single layer on the sheet. Make sure they have some space between them. This allows the hot air to circulate and roast them evenly. Place the baking sheet in the hot oven. Roast the potatoes for 25 to 30 minutes. Halfway through cooking, pull the sheet out. Gently toss the potatoes to help them brown evenly. When they are golden brown and tender, take them out to cool for a few minutes. To get the best results, choose small, uniform potatoes. This helps them cook evenly. Always cut them in half for more surface area. This gives you more crispy bits. Don't skip the garlic! It adds a wonderful flavor. If you want a deeper taste, try using fresh herbs instead of dried. They can give a lively twist to your dish. If you want extra crispiness, you can let the potatoes rest uncovered for a few minutes after roasting. This helps to keep them crunchy. Finally, sprinkle fresh parsley on top right before serving. It adds color and freshness to your dish. To make the best garlic herb roasted potatoes, start with the right potatoes. I love baby potatoes for their sweet taste and creamy texture. Look for mixed colors to add fun to your dish. Choose firm potatoes without any dark spots. If you can’t find baby potatoes, Yukon Gold or red potatoes work well too. They roast nicely and have great flavor. Fresh herbs make a big difference in flavor. If you can, use fresh thyme and fresh rosemary. They add bright notes to the dish. Use one tablespoon of each herb, chopped finely. If you only have dried herbs, that’s okay! Just use two teaspoons of each. Don’t forget to add garlic! Freshly minced garlic gives a strong taste that blends well with the herbs. Avoid overcrowding the baking sheet. If the potatoes are too close, they won’t roast well. They need space to get crispy. Another mistake is not tossing the potatoes halfway through cooking. This helps them brown evenly. Lastly, don’t skip the salt and pepper. They are key to bringing out the flavors in your dish. Pro Tips Choose the Right Potatoes: For the best texture and flavor, opt for a mix of baby potatoes like red, yellow, and purple. Each type brings a unique taste and visual appeal. Don't Skimp on Oil: Ensure the potatoes are well-coated in olive oil for optimal crispiness. A good amount helps to caramelize the edges and enhances the flavor. Experiment with Seasonings: Feel free to mix in other herbs and spices like oregano or garlic powder for a personal touch. Adjust the seasoning to suit your taste preferences. Check for Doneness: To ensure your potatoes are perfectly cooked, pierce them with a fork; they should be tender inside with a golden-brown exterior. {{image_4}} You can change the herbs to fit your taste. Try using fresh herbs like basil or dill. They add a nice twist to the flavor. If you like more heat, add crushed red pepper flakes. Mix and match herbs for a unique blend. This keeps your dish fresh and fun. You don’t have to roast potatoes in the oven. An air fryer works great too! Simply set it to 400°F (200°C). Cook the potatoes for about 15-20 minutes. Shake the basket halfway through for even cooking. You can also boil the potatoes first for a softer texture. Then, toss them with the garlic and herbs before roasting or air frying. This recipe is quite flexible for different diets. It’s already vegan and gluten-free! If you need a higher protein option, add chickpeas. They roast well and add crunch. You can also swap olive oil for avocado oil if you prefer. Just check your seasonings for allergies. Enjoy these tasty potatoes without worry! To keep your garlic herb roasted potatoes fresh, allow them to cool down first. Place them in an airtight container. This keeps moisture out and helps maintain flavor. You can store them in the fridge for up to three days. Make sure to label the container with the date. This way, you won’t forget them! When you reheat your potatoes, aim for a hot oven. Preheat your oven to 350°F (175°C). Spread the potatoes in a single layer on a baking sheet. Heat them for about 10 to 15 minutes. This method helps retain their crispy edges. Avoid the microwave, as it can make potatoes soggy. You can freeze garlic herb roasted potatoes for up to three months. First, let them cool completely. Then, spread them in a single layer on a baking sheet. Freeze them for a few hours until firm. Once frozen, transfer them to a freezer bag or container. Remove as much air as possible. When ready to eat, thaw them overnight in the fridge before reheating. For roasting, baby potatoes work best. I prefer mixed colors for a fun look. They cook evenly and have a creamy texture. You can also use Yukon Gold or red potatoes. These types keep their shape well. The skins add flavor and crispiness when roasted. Yes, you can prepare them ahead of time. Cut the potatoes and mix with garlic and herbs. Store them in the fridge for up to 24 hours. Just remember to toss them again before roasting. This keeps the flavors fresh and bright. Garlic herb roasted potatoes last about 3 to 5 days in the fridge. Store them in an airtight container. To reheat, warm them in the oven or a skillet. This helps them regain their crispy texture. Enjoy them as a tasty side dish again! Garlic Herb Roasted Potatoes are easy to make and delicious. We covered key ingredients, step-by-step instructions, and tips to perfect them. You can customize your dish with variations for dietary needs. Don't forget to store leftovers properly to keep them tasty. Now, with these insights, you can create your own perfect dish. Enjoy experimenting in your kitchen and impressing family and friends!

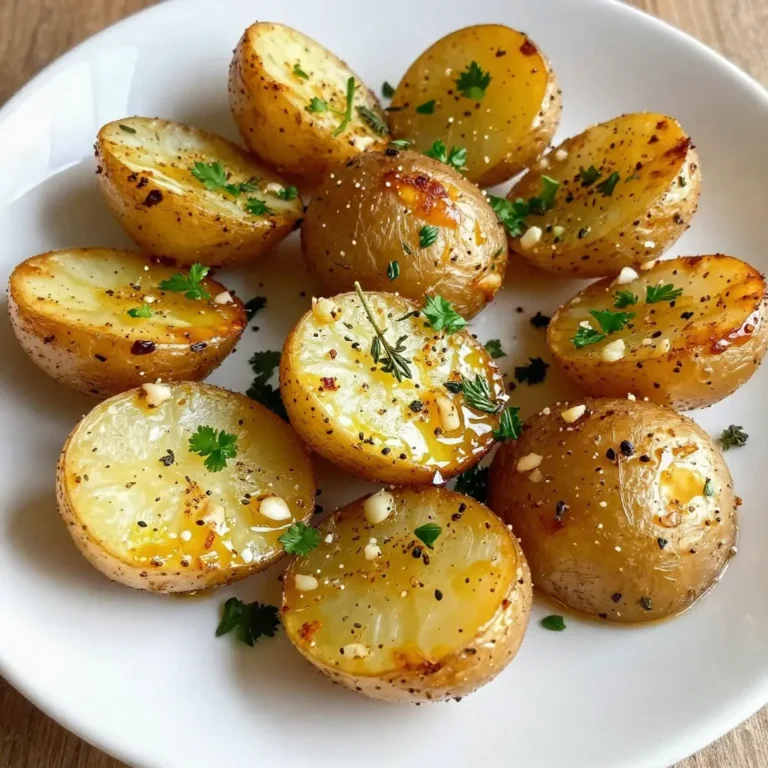
Garlic Herb Roasted Potatoes Flavorful Side Dish

- 4 boneless, skinless chicken breasts - 1 cup grated Parmesan cheese - 1 cup panko breadcrumbs - Olive oil, for drizzling - 2 tablespoons Italian seasoning - 1 teaspoon garlic powder - 1 teaspoon onion powder - Salt and freshly ground pepper to taste - 2 large eggs - 1 tablespoon Dijon mustard - ½ cup all-purpose flour In this recipe, the ingredients create a great balance of flavor and texture. The chicken breasts form the base of the dish. You want to use boneless and skinless pieces for the best results. This choice keeps the chicken juicy and easy to handle. The crumb coating gives the chicken its crunchy crust. Grated Parmesan cheese adds a rich flavor. The panko breadcrumbs provide extra crunch. Together, they make each bite satisfying. Seasoning is key in this dish. Italian seasoning brings in herbs that complement the chicken. Garlic and onion powder add depth to the taste. Salt and pepper enhance all these flavors. Use these ingredients to ensure each bite is full of taste. To create the coating, you will need eggs, Dijon mustard, and flour. The eggs help the crumbs stick to the chicken. The mustard adds a slight tang, enhancing the overall flavor. Flour helps dry the chicken surface, allowing the coating to adhere better. Gather these ingredients before you start cooking. Having everything ready makes the process smooth and fun. This dish will impress your family and friends. Enjoy the cooking journey! {{ingredient_image_2}} - Preheat the oven to 400°F (200°C). - Prepare a baking sheet with parchment paper and a drizzle of olive oil. - In a bowl, combine 1 cup of grated Parmesan cheese, 1 cup of panko breadcrumbs, 2 tablespoons of Italian seasoning, 1 teaspoon of garlic powder, 1 teaspoon of onion powder, and a pinch of salt and pepper. Mix it well. - In a separate bowl, whisk together 2 large eggs and 1 tablespoon of Dijon mustard until smooth. - Set up a dredging station with ½ cup of all-purpose flour in a shallow dish. - Take a chicken breast and coat it lightly with flour. Shake off the excess. - Dip the floured chicken into the egg mixture, making sure it gets coated well. - Finally, roll the chicken in the Parmesan-breadcrumb mixture. Press gently to help the coating stick. - Place the coated chicken breasts on the lined baking sheet, leaving space between them. - Drizzle a little olive oil over each piece to ensure they bake crispy. - Bake for 25-30 minutes. Look for a golden-brown crust and an internal temperature of 165°F (74°C). - Once cooked, take the chicken out of the oven. - Let it rest for about 5 minutes before slicing. This helps keep the chicken juicy. To keep your chicken juicy, start with proper seasoning. Use salt and pepper on both sides before cooking. This helps the flavors soak in. After baking, let the chicken rest for about five minutes. This allows the juices to settle. If you cut it too soon, the juices run out, and you lose flavor. For a crunchy coating, use panko breadcrumbs in your mix. They create that delightful crunch. When coating, press down gently to make sure it sticks. Adjust cooking times based on the thickness of your chicken. Thinner pieces need less time, around 20-25 minutes. Thicker pieces may take up to 30 minutes. Always check for a golden brown color. Serve your chicken with fresh sides. A bright side salad or steamed veggies works well. You can also add lemon wedges on the plate. This adds color and a fresh taste. For visual appeal, use a rustic wooden board to serve the chicken. It makes a great presentation and adds charm to your meal. Pro Tips Use Fresh Ingredients: Opt for fresh, high-quality chicken breasts and freshly grated Parmesan cheese to enhance the flavor and texture of your dish. Season Generously: Don’t skip the seasoning step! Properly seasoning the chicken before coating ensures every bite is full of flavor. Make it Ahead: Prepare the chicken up to the baking step and refrigerate. This allows the coating to set and results in an even crunchier crust when baked. Experiment with Flavors: Feel free to customize the breadcrumb mixture by adding herbs or spices like paprika or cayenne for an extra kick! {{image_4}} You can swap out the Parmesan cheese for other cheeses. Mozzarella works well if you want a milder taste. It melts nicely, giving you a different texture. If you prefer a sharper flavor, try using aged cheddar. For a gluten-free option, use almond flour or gluten-free breadcrumbs instead of panko. This way, you can still enjoy the crunch without the gluten. To make your chicken even tastier, add more herbs and spices. Try mixing in some dried basil or oregano into the coating. You can also add a pinch of cayenne pepper for a little heat. If you love garlic, consider adding fresh minced garlic to the egg mixture. Another great addition is lemon zest. It brightens the dish and adds a fresh flavor. If you want to try a different cooking method, use an air fryer. Preheat the air fryer to 375°F (190°C). Cook the chicken for about 15-20 minutes, flipping halfway through. This gives you a crispy crust without using a lot of oil. For outdoor cooking, grilling is a fantastic option. Grill the coated chicken for about 6-8 minutes on each side until cooked through. This adds a lovely smoky flavor to the chicken. To store leftovers, let the chicken cool first. Place it in an airtight container. Keep it in the fridge for up to three days. When you want to enjoy it again, simply reheat. You can freeze leftover chicken for later meals. Wrap each piece tightly in plastic wrap. Place the wrapped chicken in a freezer bag. It can stay good for up to three months. To reheat, thaw it overnight in the fridge. Then, warm it in the oven or microwave. To keep the crust crispy when reheating, avoid the microwave if you can. Instead, use an oven or toaster oven. Preheat the oven to 375°F (190°C). Place the chicken on a baking sheet and warm it for about 10-15 minutes. This helps to restore the crispiness. Cooking Juicy Parmesan Crusted Chicken takes about 25 to 30 minutes. You should preheat your oven to 400°F (200°C). This ensures the chicken cooks evenly and gets a nice golden crust. You can use frozen chicken breasts, but thaw them first. Frozen chicken needs more time to cook through. Always check the internal temperature. It should reach 165°F (74°C) for safety. Pair this chicken with a fresh side salad or steamed vegetables. You can also serve it with mashed potatoes or rice. These sides create a balanced meal that is both tasty and filling. Yes, you can prep this recipe ahead. You can coat the chicken and store it in the fridge for a few hours. This will save you time when you are ready to cook. Make sure to cover it well to keep it fresh. In summary, this blog laid out how to make Juicy Parmesan Crusted Chicken. You learned about the main ingredients, seasoning components, and the step-by-step process. I shared tips to keep your chicken juicy and ideas for tasty sides. You also saw variations and storage tips to fit your needs. Enjoying this dish will impress anyone at your table. Dive in, get cooking, and savor every bite!

Juicy Parmesan Crusted Chicken Easy and Flavorful Meal

To make these tasty tacos, gather these main ingredients: - 1 pound large shrimp, peeled and deveined - 8 small corn tortillas - 1 cup red cabbage, finely shredded - 1 ripe avocado, sliced - ½ cup cherry tomatoes, halved - ¼ cup fresh cilantro, roughly chopped - ¼ cup sour cream These ingredients come together for a flavorful meal. The shrimp provides the main protein. The corn tortillas offer a nice base. The veggies add crunch and freshness. The seasoning is key to the flavor. Use these components: - 2 tablespoons Cajun seasoning - 1 tablespoon olive oil - 1 tablespoon fresh lime juice - Salt and freshly ground black pepper to taste Mix the shrimp with Cajun seasoning, olive oil, lime juice, and some salt and pepper. This mix gives the shrimp a zesty kick. Letting it marinate for ten minutes helps the flavors blend. You can customize your tacos with these optional toppings: - Lime wedges for serving - Extra cilantro for garnish These additions can enhance taste. Squeezing fresh lime juice right before eating adds a bright flavor. More cilantro can give a fresh finish. Feel free to get creative with your toppings! {{ingredient_image_2}} First, gather your shrimp and Cajun seasoning. In a medium bowl, mix the shrimp with two tablespoons of Cajun seasoning. Add one tablespoon of olive oil and one tablespoon of fresh lime juice. Toss the shrimp until they are well-coated. Sprinkle in a pinch of salt and freshly ground black pepper. Let the shrimp sit for ten minutes. This time helps the flavors blend. Heat a large skillet over medium-high heat. Once hot, add the shrimp in a single layer. Cook the shrimp for about two to three minutes on each side. They are done when they turn pink and opaque. Remove the skillet from the heat once cooked. This step is quick, but it makes a big difference in taste. To warm your corn tortillas, use a dry skillet over low heat. Heat each tortilla until it is warm and pliable. You can also microwave them for about thirty seconds. Now, it’s time to assemble your tacos! Place a good portion of shrimp on each tortilla. Add a layer of shredded red cabbage for crunch. Next, add slices of creamy avocado and halved cherry tomatoes. Drizzle sour cream on top and sprinkle fresh cilantro for extra flavor. Serve with lime wedges on the side for a zesty finish. Enjoy your delicious meal! To cook shrimp well, start with fresh or frozen shrimp. If using frozen, thaw them first. Peel and devein the shrimp for a clean bite. Use a hot skillet to sear them quickly. This helps keep shrimp tender. Overcooking makes them tough. Cook shrimp for just 2-3 minutes on each side. When they turn pink and opaque, they are done. Always cook shrimp in a single layer. This ensures even cooking. Marinating shrimp adds great flavor. For Cajun shrimp tacos, mix Cajun seasoning, olive oil, and lime juice. Toss shrimp in this mix and let them sit for about 10 minutes. This short marinating time is key. It helps the shrimp absorb the spices without overpowering them. Feel free to add garlic or hot sauce for extra kick. Always taste your marinade. Adjust seasoning to suit your taste before adding shrimp. Presentation makes tacos more appealing. Use colorful ingredients to brighten your dish. Start with the shrimp on warmed corn tortillas. Then, layer on red cabbage for crunch. Add creamy avocado slices for richness. Scatter halved cherry tomatoes for color. Drizzle sour cream on top for creaminess. Finish with fresh cilantro for a pop of green. Arrange tacos on a vibrant plate. Garnish with lime wedges and extra cilantro. This adds a fresh touch and makes them look gourmet. Pro Tips Marination Magic: Allow the shrimp to marinate for at least 10 minutes to let the Cajun seasoning fully penetrate the shrimp for maximum flavor. Cooking Technique: Ensure the skillet is hot before adding the shrimp; this prevents them from steaming and helps achieve a nice sear. Tortilla Warm-Up: Warming the tortillas enhances their flavor and makes them more pliable, preventing them from cracking when filled. Serving Zest: Serve with lime wedges and encourage guests to squeeze fresh lime juice over their tacos for a bright, fresh finish. {{image_4}} You can switch shrimp for other proteins. Chicken, fish, or tofu work great. For chicken, use boneless and skinless pieces. Season and cook them like shrimp. For fish, choose firm types like cod or tilapia. If you prefer plant-based, tofu absorbs flavors well. Corn tortillas are classic, but you can try flour tortillas too. Whole wheat tortillas add a nutty taste. Lettuce wraps make a fresh, low-carb option. Each type of tortilla changes the taco's texture and flavor. Toppings can make your tacos unique. Try different veggies like diced bell peppers or radishes. You can use pico de gallo for a fresh kick. Add cheese for richness or hot sauce for heat. Don't forget lime juice for brightness! Each topping brings its own taste, so mix and match to find your favorite. You can store leftover Cajun shrimp tacos in the fridge. First, separate the shrimp from the tortillas and toppings. Place each in airtight containers. The shrimp will stay fresh for up to three days. Corn tortillas can become soggy, so store them separately. If you want to freeze the shrimp, place it in a freezer-safe bag. Remove as much air as possible before sealing. The shrimp can be frozen for up to three months. You can freeze the tortillas too, but it’s best to stack them with parchment paper in between. To reheat the shrimp, thaw it in the fridge overnight. Heat a skillet over medium-high heat and add the shrimp. Cook until warmed through, about 3-4 minutes. For tortillas, warm them in a dry skillet or microwave for about 30 seconds. This will keep them soft and tasty. Enjoy your tacos as if they were fresh! You should marinate shrimp for at least 10 minutes. This allows the Cajun seasoning to soak in. If you have time, marinating for up to 30 minutes will boost the flavor even more. Just don’t leave them too long, or they can become mushy. Many side dishes go well with Cajun shrimp tacos. Here are some tasty options: - Black bean salad - Cilantro lime rice - Grilled corn on the cob - Mango salsa - Simple green salad These sides will add color and balance to your meal. Yes, you can make these tacos gluten-free! Choose corn tortillas instead of flour ones. Most Cajun seasonings are gluten-free, but check the label to be sure. This way, everyone can enjoy these delicious tacos. Cajun shrimp tacos are a tasty and fun meal. We covered what makes these tacos great, from the main ingredients to the best cooking tips. Remember to play with flavors and toppings to match your taste. You can add your own twist with different proteins and tortillas. Storing and reheating leftovers is easy with the right methods. Enjoy crafting these delicious tacos and sharing them with friends or family. There’s always room for creativity in the kitchen, so have fun!

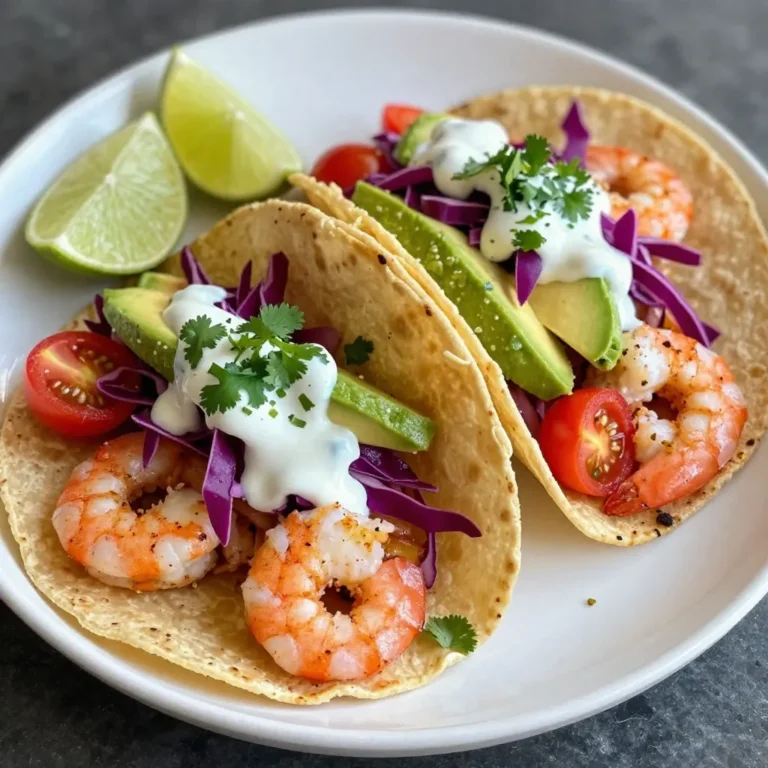
Cajun Shrimp Tacos Flavorful and Quick Dinner Recipe

- 1 cup unsweetened cranberry juice - 1 cup sparkling water - 1 tablespoon fresh rosemary leaves, finely chopped - 1 tablespoon honey or agave syrup - Juice of 1 fresh lime - Ice cubes To make the Cranberry Rosemary Mocktail, you need fresh and tasty ingredients. Start with unsweetened cranberry juice for a bold flavor. You will also need sparkling water to add a fizzy kick. Fresh rosemary leaves bring an earthy taste that blends well. For sweetness, choose honey or agave syrup, depending on your preference. Fresh lime juice brightens the drink and adds a zesty touch. Finally, don’t forget ice cubes to keep your drink chilled and refreshing. - Fresh rosemary sprigs - Lime slices Garnishes are key to making your mocktail look great. Use fresh rosemary sprigs to add a lovely touch. Lime slices brighten up the drink and look pretty on the rim of the glass. These small details not only elevate the look but also enhance the flavor! {{ingredient_image_2}} In a mixing glass, pour in 1 cup of unsweetened cranberry juice. Add 1 tablespoon of finely chopped fresh rosemary leaves. Then, add 1 tablespoon of honey or agave syrup, based on your taste. Squeeze the juice from 1 fresh lime into the mix. Stir well until the honey fully dissolves. This step is key for a smooth base. After mixing, let the drink sit for about 5 minutes. This waiting time lets the rosemary add its lovely flavor to the juice. The longer you let it sit, the more robust the flavor becomes. It’s worth it! While the mixture rests, grab two serving glasses. Fill each glass with ice cubes to chill your drink. After 5 minutes, strain the cranberry-rosemary blend into the filled glasses. Aim to fill them about two-thirds full. Next, carefully pour in sparkling water to top off each glass. Give it a gentle stir to mix everything without losing the bubbles. For a pretty finish, add a sprig of fresh rosemary and a lime slice on the rim. Enjoy your refreshing and easy cranberry rosemary mocktail! For a tasty mocktail, you can adjust the sweetness to fit your taste. I suggest using honey or agave syrup. Both sweeteners dissolve well in the drink. If you want a different option, try maple syrup or a sugar substitute. Each will give a unique flavor. Start with one tablespoon and taste. You can always add more if needed. To make the rosemary flavor pop, it helps to infuse it well. After mixing the juice and rosemary, let it sit for five minutes. This step allows the rosemary to release its oils. You can also experiment with other flavors. Try adding a splash of orange juice or a few slices of fresh ginger. These additions can elevate the taste, making it even more refreshing. Serving your mocktail with style is key. Use fresh rosemary sprigs as a garnish. Place one on top of the drink for a lovely touch. Adding a lime slice on the rim brings a splash of color. You can even use colorful straws or fun glasses. These small details make your mocktail inviting and festive. Pro Tips Infuse Longer for Stronger Flavor: If you prefer a more pronounced rosemary flavor, allow the mixture to infuse for up to 10 minutes instead of 5. Chill Your Ingredients: For an extra refreshing mocktail, chill the cranberry juice and sparkling water in the fridge before preparing the drink. Add Other Fruits: Feel free to experiment by adding slices of fresh fruits like oranges or strawberries for a fruity twist! Adjust Sweetness to Taste: Depending on your preference, you can adjust the amount of honey or agave syrup to make it sweeter or less sweet. {{image_4}} You can add warmth to your mocktail with spices. Ginger adds a nice kick. Just grate a bit into the mix. Cinnamon brings a cozy flavor. Sprinkle a dash into the drink for a twist. Both spices pair well with cranberry and rosemary. Fruity juices can make your drink even better. Try adding orange juice for a citrusy burst. Pineapple juice gives a tropical vibe. Mix these juices with cranberry for a refreshing taste. You can blend them in equal parts or adjust to your liking. For festive occasions, think about seasonal flavors. Add a splash of apple cider for fall parties. Pomegranate juice is a great choice for winter holidays. You can also garnish with seasonal fruits. Fresh cranberries or orange wedges make it look special. These touches will surely impress your guests. You can prepare the cranberry-rosemary mixture a day in advance. Just mix the cranberry juice, rosemary, honey, and lime juice. Store this mixture in an airtight container in the fridge. This keeps the flavors fresh and ready for serving. Before serving, strain the mixture and add sparkling water. This will keep the fizz. The prepared mocktail stays fresh for up to two days in the fridge. You'll know it's time to toss it if you see any changes in color or smell. If it smells off or looks cloudy, it’s best to discard it. Always trust your senses to ensure the best taste. Enjoy your refreshing drink! Yes, you can use sweetened cranberry juice. It will make the drink sweeter. If you do this, you might want to skip the honey or agave syrup. Using sweetened juice can change the drink's taste. It might not have the same tartness that we love in this mocktail. The fresh lime juice will help balance the sweetness. Experiment with your preferences! To make this for a party, just multiply the ingredients. For example, if you want to serve 10 people, use 5 cups of cranberry juice and 5 cups of sparkling water. Mix everything in a large pitcher. Add the rosemary, lime juice, and sweetener just like in the original recipe. Then, serve in individual glasses with ice. This way, everyone can enjoy the drink together! Cranberries are rich in vitamins and antioxidants. They can help support your immune system. Rosemary is also good for you. It may help improve digestion and boost memory. Together, these ingredients make a tasty and healthy drink. Enjoying this mocktail lets you sip on something delicious while getting some health benefits too! This mocktail blends cranberry juice, soda, and fresh herbs. You start by combining key ingredients like honey and lime juice in a fun way. Letting the flavors rest adds a tasty kick. Adjust sweetness easily and try extra herbs or fruit for variety. Make it ahead for parties and store wisely. Remember, this drink is not just refreshing; it also offers nutritional benefits. Enjoy creating your own versions and let your creativity shine!

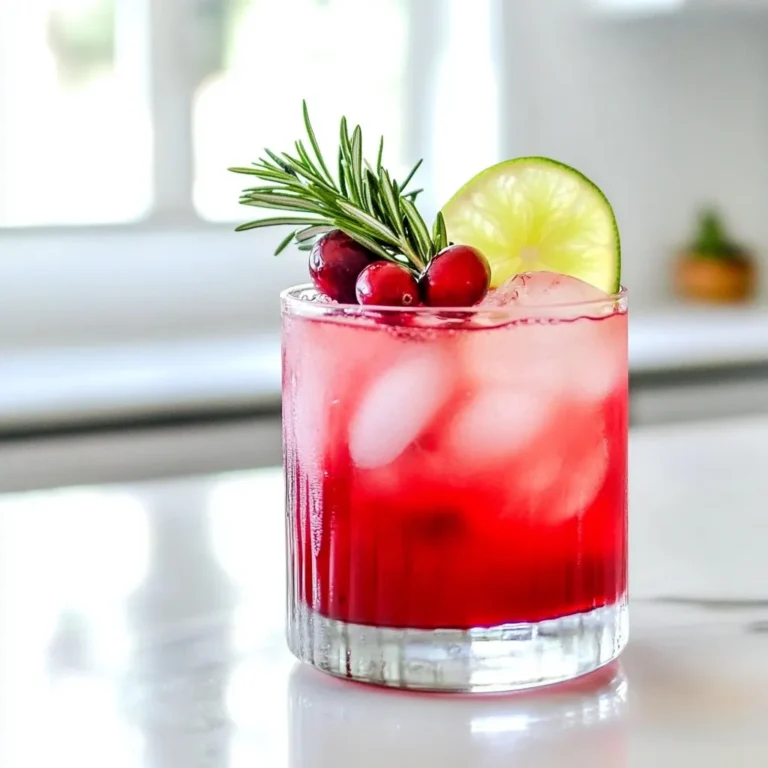
Cranberry Rosemary Mocktail Refreshing and Easy Recipe

- 200g unsalted butter - 200g brown sugar - 4 large eggs - 250g all-purpose flour - 1 teaspoon baking powder - 1 teaspoon mixed spice powder - 150g mixed dried fruits - 100g candied orange peel - 50g sliced almonds - 100g cream cheese - 50g icing sugar - Zest of 1 orange - 2 tablespoons fresh orange juice Gathering the right ingredients is key to making a great Christmas cake traybake. Start with 200g of unsalted butter. This should be soft, near room temperature. Next, you need 200g of brown sugar. This adds warmth and depth of flavor. You will then crack 4 large eggs into your bowl. Make sure they are also at room temperature. Use 250g of all-purpose flour. This is the base of your cake. Add in 1 teaspoon of baking powder to help your cake rise and be fluffy. For a warm, festive taste, include 1 teaspoon of mixed spice powder, which is a blend of cinnamon, nutmeg, and ginger. Now for the fun part! Toss in 150g of mixed dried fruits like raisins, currants, and chopped apricots. They give your cake that holiday feel. You will also want to add 100g of candied orange peel, finely chopped. This adds a sweet citrus twist. Don't forget 50g of sliced almonds for that nice crunch. To make a lovely cream cheese frosting, grab 100g of softened cream cheese and 50g of sifted icing sugar. The zest of 1 orange and 2 tablespoons of fresh orange juice will brighten your frosting. These ingredients bring everything together to create a festive and flavorful treat. {{ingredient_image_2}} First, preheat your oven to 180°C (350°F). This step is key for even baking. Next, take a 9x13 inch baking tray. Grease it well with butter or line it with parchment paper. This makes it easy to lift out the cake later. Start by creaming the butter and brown sugar together. Use an electric mixer or whisk. Mix until it is light and fluffy. This takes about three minutes. Then, crack the eggs into the bowl one at a time. Make sure to mix well after each egg. This keeps the batter smooth. Now, in another bowl, sift the flour, baking powder, and mixed spice powder together. This helps to mix the dry ingredients evenly. Gradually fold the dry mix into the wet mix. Use a spatula and be gentle. You want to avoid overmixing, so a few lumps are okay. Now it's time for the fun part! Fold in the mixed dried fruits, candied orange peel, and sliced almonds. Mix them in well, so every bite has a touch of festive flavor. Once everything is combined, pour the batter into the prepared tray. Use a spatula to spread it evenly across the tray. Place the tray in your preheated oven. Bake for 25-30 minutes. Keep an eye on it. To check if it’s done, insert a toothpick into the center. If it comes out clean, your traybake is ready. After baking, let it cool in the tray for about 10 minutes. Then, carefully transfer it to a wire rack to cool completely. While the cake cools, let’s make the cream cheese frosting. In a small bowl, beat the softened cream cheese until it is smooth. Gradually add the sifted icing sugar, orange zest, and orange juice. Mix this until it is fluffy and well combined. Once the cake is cool, it’s time to frost it. Spread the cream cheese frosting evenly over the top of the traybake. For a decorative touch, add extra sliced almonds on top. You can also sprinkle some edible glitter or a light dusting of icing sugar. This adds a festive sparkle, making your Christmas Cake Traybake truly special! To get a great bake, start with the right oven temperature. Set your oven to 180°C (350°F) before you mix your batter. This helps the cake rise evenly. Also, use room temperature ingredients like butter and eggs. When they are warm, they mix better and create a fluffier cake. Spices are key to a tasty Christmas cake traybake. You can adjust the mixed spice powder to suit your taste. If you love cinnamon, add a little more! You can also add zest from other citrus fruits. Lemon or lime zest adds a bright note. Extracts like vanilla or almond can deepen the flavor too. Garnishing makes your traybake shine. Slice the cake into squares, then place them on a lovely platter. Top each piece with sliced almonds for a nice crunch. For a festive touch, sprinkle some edible glitter or dust with icing sugar. This adds a magical sparkle, perfect for holiday gatherings. Pro Tips Room Temperature Ingredients: Ensure your butter and eggs are at room temperature before starting. This helps create a smoother batter and improves the cake's texture. Don't Overmix: When combining the dry and wet ingredients, mix just until incorporated. Overmixing can lead to a dense cake. Customize Your Dried Fruits: Feel free to swap out the mixed dried fruits with your favorites. Dried cherries, cranberries, or even chocolate chips can add a unique twist! Frosting Variations: For a different flavor, consider adding spices like cinnamon or nutmeg to the cream cheese frosting, or even a splash of vanilla extract for extra depth. {{image_4}} Vegan Christmas Cake Traybake You can make this traybake vegan. Replace the eggs with flaxseed meal or applesauce. Use a plant-based butter substitute and ensure your sugar is vegan. This keeps the festive taste while being plant-friendly. Gluten-free options To make a gluten-free version, swap all-purpose flour for gluten-free flour. You can also add a bit of xanthan gum to help with texture. This way, everyone can enjoy the holiday treat! Change up dried fruits Feel free to mix and match dried fruits. You can use cranberries, figs, or even cherries. This adds different flavors and textures to your traybake. Using different spices Spices can make or break your cake. Try adding cardamom, allspice, or even a hint of cloves. This gives a unique twist to the traditional taste. Experiment to find your favorite blend! Other frosting ideas While cream cheese frosting is classic, you can try a simple buttercream. Just mix butter with icing sugar and a splash of vanilla. This gives a sweeter option that pairs well with the cake. Glaze options If you want something lighter, a glaze works too! Mix icing sugar with a bit of orange juice. Drizzle it over the cooled traybake for a sweet finish. It's pretty and adds a burst of flavor! To keep your leftover traybake fresh, follow these tips: - Refrigeration: Place the traybake in an airtight container. You can also wrap it tightly in plastic wrap. This keeps moisture in and prevents it from drying out. - Freezing: Cut the traybake into squares. Wrap each piece in plastic wrap, then place them in a freezer bag. This way, you can enjoy a slice whenever you want. The traybake lasts about 5 days in the fridge. You’ll know it's still good if it smells sweet and looks moist. If the cake feels hard or has an off smell, it’s time to toss it. To warm up your leftovers, use these methods: - Oven: Preheat your oven to 160°C (320°F). Place the traybake on a baking sheet. Heat for about 10 minutes. - Microwave: Put a slice on a microwave-safe plate. Heat for 15-20 seconds. This keeps it soft and tasty. Avoid reheating too much, as it can dry out the cake. Enjoy your festive treat warm! A Christmas Cake Traybake is a festive dessert that brings joy to any holiday table. It combines rich flavors and textures into one easy-to-make treat. This cake has a soft, moist crumb and is filled with mixed dried fruits, candied orange peel, and sliced almonds. The warm spices create a lovely aroma, making it perfect for Christmas. Topped with creamy frosting, it looks as good as it tastes. Yes, you can prepare this traybake ahead of time. You can bake it one to two days before serving. After it cools, wrap it tightly in plastic wrap. This keeps it fresh and moist. You can also freeze it for up to three months. Just thaw it overnight in the fridge before serving. For serving, cut the traybake into squares and add the frosting right before guests arrive. To check if the traybake is done, look for a golden top. Insert a toothpick in the center. If it comes out clean, the cake is ready. If there is batter on the toothpick, bake it for a few more minutes. Always keep an eye on it during the last few minutes of baking. It should spring back lightly when touched. Pair this traybake with a warm drink like spiced apple cider or hot chocolate. If you want something cold, serve it with vanilla ice cream or whipped cream. For a fun twist, try it with a scoop of eggnog ice cream. You can also add a sprinkle of extra sliced almonds on top for added crunch. This blog post gives you all the tools to make a festive Christmas Cake Traybake. You learned about the key ingredients, step-by-step instructions, and plenty of tips and tricks. We also explored fun variations for dietary needs and flavor preferences. Remember, this treat can be stored well and enjoyed later. With your newfound skills, impress your friends and family this holiday season. Happy baking!

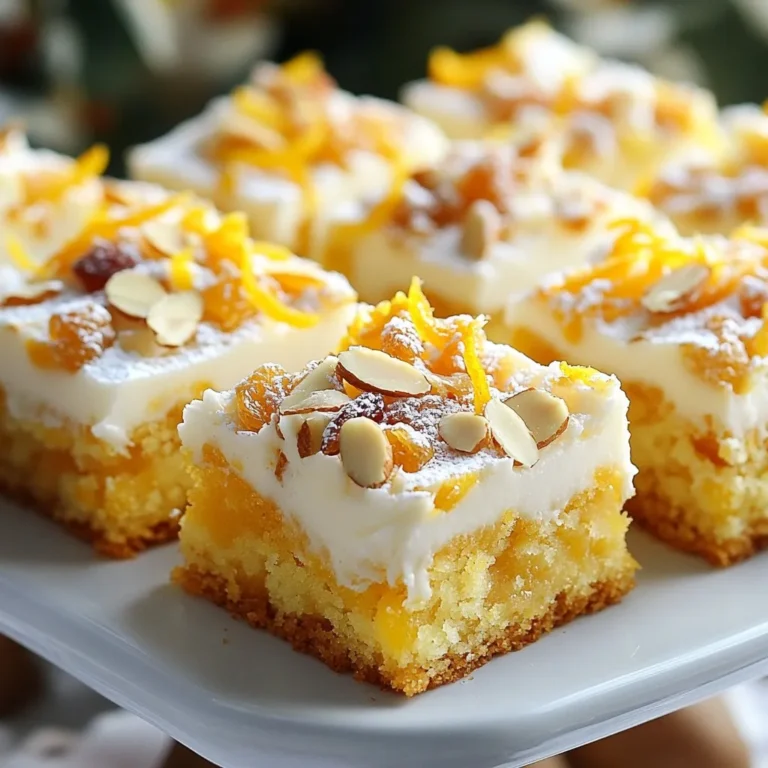
Christmas Cake Traybake Festive and Flavorful Delight

To make a delicious Pumpkin Pot de Crème, you need these key ingredients: - 1 cup canned pumpkin puree - 1 ½ cups heavy cream - ½ cup whole milk - ½ cup granulated sugar - 4 large egg yolks - 1 teaspoon vanilla extract - 1 teaspoon ground cinnamon - ¼ teaspoon ground nutmeg - ¼ teaspoon ground ginger - ¼ teaspoon salt - Whipped cream and crushed gingersnap cookies for topping Each ingredient plays a role in creating that rich, creamy texture. The canned pumpkin puree provides that warm, comforting flavor. Heavy cream and whole milk add a silky smoothness that makes each bite melt in your mouth. Granulated sugar sweetens the mixture perfectly. The egg yolks help thicken the custard, giving it that classic pot de crème feel. Spices like cinnamon, nutmeg, and ginger bring warmth and depth to the dessert. You can adjust these spices to match your taste. Finally, the toppings of whipped cream and crushed gingersnap cookies give a delightful crunch and a burst of flavor. This balance of ingredients makes your Pumpkin Pot de Crème truly special. {{ingredient_image_2}} To start, preheat your oven to 325°F (160°C). This step is key for even baking. Next, arrange your ramekins in a deep baking dish. Make sure they fit well without touching. This setup is important because we will use a water bath. The water bath keeps the heat gentle and helps the custard cook evenly. In a medium saucepan, combine 1 ½ cups of heavy cream, ½ cup of whole milk, and 1 cup of canned pumpkin puree. Heat this mixture over medium heat. Stir it often until it steams. Be careful not to let it boil. If it boils, it can change the texture of your pot de crème. In a separate bowl, whisk together 4 large egg yolks and ½ cup of granulated sugar. Keep whisking until it is smooth. Then, add in 1 teaspoon of vanilla extract, 1 teaspoon of ground cinnamon, ¼ teaspoon of ground nutmeg, ¼ teaspoon of ground ginger, and ¼ teaspoon of salt. This will add a warm spice flavor to your dessert. Now it’s time to mix the two mixtures. Gradually pour the warm pumpkin mixture into the egg yolk mixture. Whisk continuously as you pour. This step is called tempering. It helps prevent the eggs from scrambling. After you combine them, strain the mixture through a fine sieve into a clean bowl. This will ensure your pot de crème is smooth and free of lumps. Carefully pour the strained mixture evenly into the prepared ramekins. Then, fill the baking dish with hot water. The water should reach halfway up the sides of the ramekins. This water bath allows for gentle cooking. Place the baking dish in the preheated oven and bake for 30-35 minutes. Look for centers that are just set but still slightly jiggly. Once baking is done, carefully remove the ramekins from the water bath. Let them cool to room temperature. After they cool, transfer them to the refrigerator. Chill for at least 2 hours. This time helps the flavors develop and the texture to set. To get a great texture, avoid overcooking. The key is to bake until just set. The center should jiggle a bit. This means your pot de crème will be creamy, not rubbery. Use a water bath for even cooking. The steam helps keep it moist and smooth. Always check the consistency with a toothpick. If it comes out clean, it's done! For a beautiful presentation, serve the pot de crème in the ramekins. You can also unmold them onto plates for a fancy look. Add a cinnamon stick for a pretty touch. The best time to serve is after chilling for at least two hours. This wait allows the flavors to shine. Enjoy it as a dessert after dinner or at a gathering with friends. You can spice things up a bit! Try adding a pinch of cloves or allspice. These will give a warm, cozy flavor. If you want a twist, consider topping with caramel sauce or chocolate shavings. Crushed gingersnap cookies add a nice crunch, too. Experiment with flavors to find your favorite mix! Pro Tips Use Fresh Pumpkin: If possible, use fresh pumpkin instead of canned for a more vibrant flavor. Roast and puree it for the best results. Control the Temperature: Be careful not to let the cream mixture boil. Boiling can cause the custard to curdle, ruining the smooth texture. Chill Thoroughly: Let the pot de crème chill for at least 2 hours. This helps the flavors meld and the custard to set properly. Garnish Creatively: Experiment with toppings beyond whipped cream and gingersnap cookies. Consider drizzling caramel or adding a sprinkle of toasted pecans. {{image_4}} You can make a chocolate version of this dessert. Simply add cocoa powder to the pumpkin mix. Start with ¼ cup of unsweetened cocoa powder. This gives a rich chocolate flavor. You might need to add a bit more sugar. Taste as you go to adjust sweetness. To make this dessert vegan, swap out the dairy and eggs. Use coconut milk or almond milk instead of cream and milk. For the egg yolks, try silken tofu or a mix of cornstarch and water. For sweeteners, maple syrup or agave nectar works well. These options keep the dessert creamy and tasty. For a fun twist, serve in mini jars or shot glasses. This makes it perfect for parties. When using smaller containers, bake for a shorter time. Check them at 20-25 minutes. You want the centers to be just set but still jiggly. These mini servings look cute and are easy to share. You can keep pumpkin pot de crème in the fridge for up to four days. Store it in an airtight container or cover the ramekins with plastic wrap. This keeps it fresh and prevents it from absorbing other odors. Make sure to let it cool to room temperature before you cover it. I do not recommend freezing pumpkin pot de crème. Freezing can change its creamy texture. If you must freeze it, place it in a freezer-safe container. Thaw it overnight in the fridge when you're ready to enjoy it again. If you need to reheat it, do so gently. Place the ramekins in a warm water bath or microwave at a low setting. Heat it slowly to keep the silky texture. Avoid high heat, as it may curdle the custard. Yes, you can use fresh pumpkin. Fresh pumpkin gives a brighter flavor. To prepare fresh pumpkin, roast it first. Cut the pumpkin, scoop out seeds, and bake until soft. Then, blend until smooth. Canned pumpkin is easier and saves time. Both options work well, but fresh has a unique taste. The ideal texture is creamy and smooth. It should feel velvety in your mouth. When you bake it, the center should be slightly jiggly. This means it is not overcooked. After chilling, the pot de crème firms up nicely. The goal is a rich, custardy consistency. Yes, you can make pot de crème ahead of time. It stores well in the fridge for up to three days. Prepare it a day before you plan to serve it. This allows the flavors to develop more. Just remember to chill it for at least two hours. This waiting period makes it even more delicious! This blog post took you through making pumpkin pot de crème from start to finish. We covered key ingredients, step-by-step instructions, and tips for that perfect texture. You learned about cool variations, how to store, and even FAQs to handle any questions. Remember, each step matters for the best result. Enjoy exploring flavors and sharing your creations. Happy cooking!

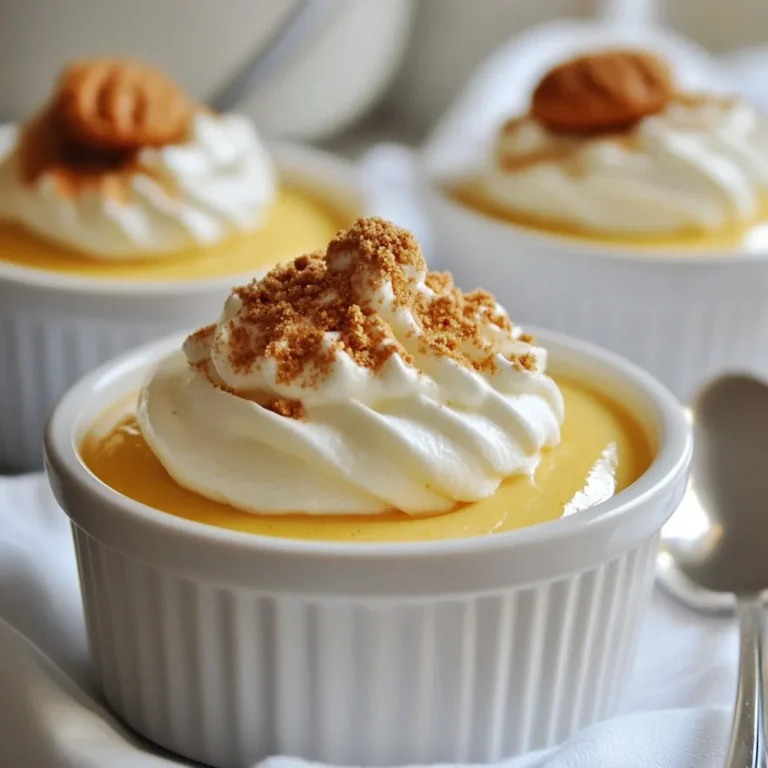
Pumpkin Pot de Crème Indulgent and Creamy Delight

To create a tasty Caramelized Onion Gruyère Tart, you need: - 1 sheet of puff pastry, thawed - 2 large onions, thinly sliced - 2 tablespoons extra virgin olive oil - 1 tablespoon balsamic vinegar - ½ teaspoon granulated sugar - Sea salt and freshly cracked black pepper to taste - 1 cup Gruyère cheese, freshly grated - 2 large eggs - 1 cup heavy cream - Fresh thyme leaves for garnish Each ingredient plays a key role. The puff pastry forms a flaky base. Onions bring sweetness when caramelized. Gruyère cheese adds a rich, nutty flavor. Eggs and cream give the tart a creamy texture. You can enhance your tart with these garnishes: - Fresh thyme leaves - A drizzle of balsamic glaze - A sprinkle of crushed red pepper flakes These add freshness and a pop of color. They also boost the flavor profile. If you need to swap ingredients, try these options: - Use cheddar cheese instead of Gruyère for a sharper taste. - Swap balsamic vinegar with red wine vinegar for a different tang. - Replace heavy cream with half-and-half for a lighter filling. These substitutions maintain the tart's deliciousness while catering to dietary needs. Feel free to mix and match to fit your taste. {{ingredient_image_2}} 1. Start by preheating your oven to 400°F (200°C). This step is key for a crispy crust. 2. Line your tart pan with parchment paper. This makes it easier to remove the tart later. 3. Slice two large onions thinly. Aim for even slices to cook them uniformly. 4. Heat two tablespoons of extra virgin olive oil in a large skillet over medium heat. 5. Add the sliced onions and a pinch of sea salt. This helps draw out moisture from the onions. 6. Cook the onions for 15-20 minutes. Stir occasionally until they turn golden brown and soft. 7. Mix in one tablespoon of balsamic vinegar and half a teaspoon of granulated sugar. This adds a sweet depth. 8. Cook for another five minutes. The onions should become sticky and caramelized. Remove from heat and allow to cool slightly. 9. Lightly flour your work surface and roll out the puff pastry. Make it large enough for the tart pan. 10. Carefully place the pastry in the tart pan. Press it against the bottom and sides. 11. Prick the pastry bottom with a fork. This prevents bubbling during baking. 12. Spread the caramelized onions evenly over the pastry base. 13. Sprinkle one cup of freshly grated Gruyère cheese over the onions. Use a generous amount for flavor. 14. In a bowl, whisk together two large eggs and one cup of heavy cream. Make it smooth and creamy. 15. Season this mixture with sea salt and freshly cracked black pepper. Pour it over the cheese and onions. 16. Place the tart in the oven and bake for 25-30 minutes. Look for a golden crust and set filling. 17. Once baked, remove the tart from the oven. Let it cool for about 10 minutes before slicing. 18. Just before serving, add fresh thyme leaves on top for a lovely aroma. - Use fresh Gruyère cheese for the best flavor. Grate it yourself if possible. - Make sure the onions are fully caramelized. This adds a rich, sweet flavor. - Allow the tart to cool slightly for easier slicing. This helps the filling set. - For a beautiful presentation, serve slices on individual plates with thyme on top. - Pair with a light side salad dressed in vinaigrette to balance the richness. To get sweet and rich caramelized onions, focus on low heat. Start by adding sliced onions to a hot pan with olive oil. A pinch of sea salt helps draw out moisture. Stir every few minutes. After about 20 minutes, your onions should turn a deep golden brown. Adding balsamic vinegar and sugar near the end boosts flavor and sticky texture. Cook for five more minutes. Your onions will be sweet and caramelized, perfect for the tart. Puff pastry should be flaky and airy. After rolling it out, ensure it fits snugly in the tart pan. Pricking the bottom with a fork prevents bubbling. Bake it until the edges are golden brown. This ensures a crisp base that supports the filling. If you want extra crunch, brush the pastry with egg wash before baking. This tart shines in any season. In spring, serve it with a fresh green salad. In summer, add sliced tomatoes for a bright touch. In fall and winter, pair it with roasted vegetables. Adding a light vinaigrette enhances the flavors. For special occasions, sprinkle fresh thyme on top before serving. Enjoy the blend of flavors with a glass of white wine for a delightful experience. Pro Tips Use Sweet Onions: For the best flavor, opt for sweet onions, such as Vidalia or Walla Walla, which enhance the caramelization process. Chill the Puff Pastry: Before rolling out, chill the puff pastry for about 10-15 minutes to ensure it stays flaky during baking. Don’t Rush the Onions: Take your time when caramelizing the onions; low and slow cooking enhances their natural sweetness and flavor. Experiment with Cheeses: While Gruyère is delicious, feel free to mix in other cheeses like aged cheddar or fontina for a unique flavor profile. {{image_4}} You can switch Gruyère for other cheeses to change the flavor. Here are some great options: - Fontina: This cheese melts well and has a rich taste. - Comté: Similar to Gruyère, it adds a nutty flavor. - Goat Cheese: For a tangy kick, crumbled goat cheese works well. - Cheddar: A sharp cheddar adds a bold touch and melts nicely. Feel free to mix and match cheeses for a fun flavor experience. Adding vegetables can give your tart a fresh twist. Here are some tasty choices: - Spinach: Adds color and nutrients. Sauté it before adding. - Mushrooms: Sautéed mushrooms add a rich, earthy flavor. - Zucchini: Thinly sliced zucchini brings a light taste. - Roasted Peppers: Sweet roasted peppers can add depth. These add-ins can balance the sweetness of the onions. You can use more than just puff pastry for the base. Consider these options: - Shortcrust Pastry: This gives a crumbly, buttery feel. - Phyllo Dough: For a lighter, crispier texture, use layers of phyllo. - Whole Wheat Pastry: A healthier choice that adds a nutty flavor. - Savory Cracker Crust: Blend crushed crackers with butter for a unique base. Exploring different pastries can keep your tart exciting and fresh. To store leftovers, let the tart cool first. Wrap it tightly in plastic wrap or aluminum foil. You can also place it in an airtight container. This keeps the flavors fresh and the crust from getting soggy. Store the tart in the fridge for up to three days. When you're ready to enjoy leftovers, preheat your oven to 350°F (175°C). Place the tart on a baking sheet. Heat for about 15-20 minutes. This warms the tart and makes the crust crispy again. Check to ensure it is heated through before serving. You can freeze the tart for future meals. First, let the tart cool completely. Wrap it well in plastic wrap, then in foil. It can last in the freezer for up to three months. To reheat, thaw it in the fridge overnight. Then follow the reheating instructions above for best results. Yes, you can make the tart ahead. Prepare the tart, but don't bake it. Cover it well with plastic wrap and keep it in the fridge. You can store it for up to 24 hours. When ready to serve, bake it as directed. This saves time and helps the flavors meld. This tart pairs well with a light salad. A simple green salad with vinaigrette works nicely. You can also serve it with roasted vegetables or a bowl of soup. These options balance the rich flavors of the tart. Fresh herbs like thyme add a nice touch too. You can tell the tart is done when the edges are golden brown. The filling should be set and not jiggly. If you insert a knife, it should come out clean. If the pastry looks pale, it needs more time. Trust your eyes and nose; the aroma should be delicious! This blog post covered the ingredients, steps, and tips for making a delicious Caramelized Onion Gruyère Tart. We explored essential ingredients, optional garnishes, and easy substitutions. I shared preparation and cooking tips to help you achieve the perfect texture. We also discussed variations, storage, and answered common questions about the tart. In summary, this tart is easy and versatile. You can impress family and friends with this delightful dish wherever you serve it. Enjoy your cooking, and make this tart your own!

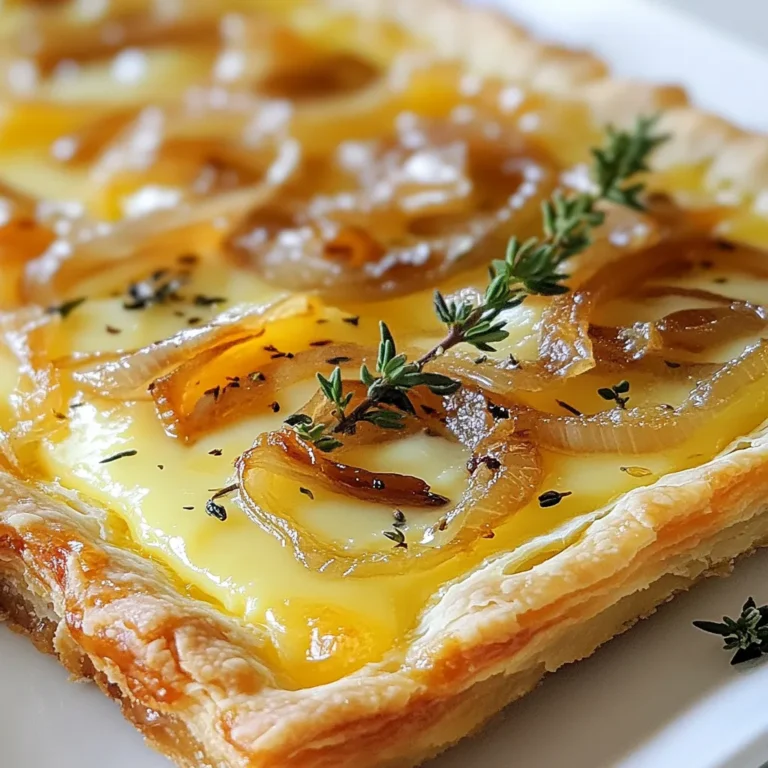
Caramelized Onion Gruyère Tart Flavorful Culinary Delight

- Whole chicken (4-5 lbs) - Unsalted butter (1/2 cup, softened) - Garlic (6 cloves, minced) - Fresh herbs (rosemary, thyme, parsley) - Lemons (halved) - Vegetables (onion, carrots, potatoes) - Seasonings (salt and black pepper, olive oil) To make Garlic Herb Butter Roasted Chicken, gather these ingredients. Start with a whole chicken, around 4-5 pounds. This size cooks well, giving you juicy meat. Use unsalted butter, half a cup, left out to soften. This makes it easy to mix. Next, you need six cloves of garlic. Mince them finely to release their strong flavor. Fresh herbs are key. Use rosemary, thyme, and parsley for a fresh taste. You’ll need two tablespoons of rosemary, two tablespoons of thyme, and one tablespoon of parsley. Lemons add brightness. Halve one lemon and set it aside. For the veggies, use one quartered onion, four thick chunks of carrots, and three potato wedges. These veggies roast nicely with the chicken. Finally, season with salt and black pepper. Drizzle some olive oil over the veggies to enhance their flavor. Each ingredient plays a role in making the chicken taste great. The herbs and garlic give deep flavor, while the lemon keeps it fresh. Enjoy the cooking process! {{ingredient_image_2}} 1. Preheat the oven to 425°F (220°C). This helps cook the chicken evenly. 2. In a bowl, mix the softened butter, minced garlic, rosemary, thyme, parsley, salt, and pepper. Stir until smooth. 3. Pat the chicken dry with paper towels. This makes the skin crispy. Place the chicken breast-side up in a roasting pan. Lift the skin gently over the breast and thighs. 1. Spread half of the herb butter mixture under the skin. This adds deep flavor. 2. Rub the rest of the herb butter all over the chicken’s surface. Coat every spot for rich taste. 3. Squeeze juice from one lemon half inside the chicken cavity. Place both lemon halves and the quartered onion inside. This adds moisture and flavor. Surround the chicken with carrots and potato wedges in the roasting pan. Drizzle olive oil over the veggies and season with salt and pepper. 1. Roast the chicken in the oven for about 1 hour and 15 minutes. Check that the internal temperature reaches 165°F (75°C) in the thigh. 2. Halfway through, baste the chicken with its juices. This keeps it moist and tasty. 3. When it’s golden and cooked, remove the chicken. Let it rest for 10-15 minutes before carving. This helps the juices settle for a tender bite. - How to achieve crispy skin: Start by drying the chicken well with paper towels. This step helps crisp the skin. Use a high oven temperature, like 425°F, to create a nice golden crust. Basting the chicken halfway through with its own juices adds flavor and moisture. - Importance of letting the chicken rest: Resting the chicken is key to juicy meat. After roasting, let it sit for 10-15 minutes. This time allows the juices to settle, giving you tender, flavorful bites. - Using dry white wine in the pan: Pour a splash of dry white wine in the pan. This adds depth to the flavor and creates a tasty base for the drippings. The wine also helps keep the chicken moist as it cooks. - Alternate herb combinations: You can mix and match herbs. Try using sage or oregano for a different taste. Fresh herbs bring brightness, while dried herbs can add a robust flavor. - Using a meat thermometer: A meat thermometer is your best friend. Insert it into the thickest part of the thigh. The chicken is done when it reads 165°F. This step ensures you avoid undercooked or dry meat. - Adjusting cooking time for different sizes of chicken: Cooking time varies with size. A larger chicken may need more time, while smaller ones cook faster. Keep an eye on the thermometer for perfect results. Pro Tips Pat the Chicken Dry: Thoroughly drying the chicken with paper towels before seasoning helps achieve a crispy skin during roasting. Use Fresh Herbs: Fresh herbs enhance the flavor significantly compared to dried ones, so opt for fresh rosemary, thyme, and parsley for the best results. Baste for Moisture: Basting the chicken with its own juices halfway through the cooking time will keep it moist and flavorful. Let it Rest: Allowing the chicken to rest for 10-15 minutes after roasting allows the juices to redistribute, ensuring a tender and juicy bite. {{image_4}} You can change the taste of your garlic herb butter roasted chicken with just a few tweaks. - Lemon herb version: Add more lemon zest to the butter. This will give a fresh, bright flavor. You can also sprinkle lemon juice over the chicken before roasting. The citrus will keep the meat juicy and add a nice zing. - Spicy garlic butter version: Mix in red pepper flakes with the herb butter. This will give your chicken a warm kick. You can also add some smoked paprika for a deeper flavor. This version pairs well with roasted vegetables. If you have special dietary needs, you can still enjoy this dish. - Gluten-free modifications: This recipe is naturally gluten-free. All the ingredients are safe for those who avoid gluten. Just ensure that any added ingredients, like broth or sauces, are gluten-free. - Low-calorie alternatives: To cut calories, you can use less butter. Try replacing half the butter with a mix of olive oil and lemon juice. This keeps the flavor but makes it lighter. Pair your roasted chicken with the right sides for a full meal. - Best side dishes to pair: Roasted vegetables like carrots and potatoes are perfect. You can also serve a fresh salad or some steamed green beans for balance. - Creating a complete meal experience: To make this a special meal, add some crusty bread and a nice wine. A light white wine complements the flavors well. Finish with a simple dessert like fruit or sorbet for a lovely end to your dinner. To keep your leftover garlic herb butter roasted chicken fresh, follow these tips: - Allow the chicken to cool down at room temperature for about 30 minutes. - Wrap the chicken tightly in plastic wrap or foil. - Place the wrapped chicken in an airtight container. - Store it in the fridge. Leftovers can last up to four days. If you want to keep them longer, consider freezing them. Just make sure to use a freezer-safe bag or container. When reheating, you have two main choices: the oven or the microwave. - Oven Method: Preheat your oven to 350°F (175°C). Place the chicken in a baking dish and cover it with foil. Heat for about 20-30 minutes, or until warmed through. This method keeps the skin crispy and the meat juicy. - Microwave Method: Place the chicken on a microwave-safe plate. Cover it with a microwave-safe lid or paper towel. Heat in short bursts of 1-2 minutes. This method is quicker, but it may dry out the meat. To maintain moisture and flavor, add a splash of broth or water before reheating. What is the best way to ensure the chicken is juicy? The best way to keep your chicken juicy is to use a meat thermometer. Check the thickest part of the thigh for a temperature of 165°F (75°C). Also, let it rest before slicing. This helps the juices spread throughout the meat. Can I use frozen chicken for this recipe? It is not best to cook frozen chicken directly. It is safer and better to thaw it first in the fridge. Thawing helps the chicken cook evenly, keeping it juicy and full of flavor. What can I substitute for fresh herbs? If you don’t have fresh herbs, you can use dried herbs. Use one-third of the amount if they are dried. For example, use 1 tablespoon of dried herbs instead of 3 tablespoons of fresh. Herbs like Italian seasoning can work well too. How do I know when the chicken is fully cooked? Use a meat thermometer to check for doneness. Insert it in the thickest part of the thigh. The chicken is done when it reaches 165°F (75°C). If you don’t have a thermometer, the juices should run clear when you slice into the meat. This blog post covered the key steps to make a delicious garlic herb butter roasted chicken. You learned about the necessary ingredients, the step-by-step cooking process, and important tips for perfecting the roast. We also explored flavorful variations and how to store and reheat leftovers effectively. By following these guidelines, you can create a tasty meal that your family will love. Enjoy the cooking process, and trust that with practice, you’ll master this dish!

Garlic Herb Butter Roasted Chicken Juicy Flavor Boost

PREV 1 … 44 45 46 47 NEXT
snack joy kitchen

explore

DessertsDinnerAppetizersDrinks

Our Policies

  • Cookie Policy
  • Copyright Policy
  • Disclaimer
  • GDPR Policy
  • Terms Of Use
Back to Top
  • About
  • Contact Us
  • Privacy Policy
© 2026 snack joy kitchen