FREE DINNER EBOOK! Get your copy!
  • Cookie Policy
  • GDPR Policy
  • Disclaimer
  • Terms Of Use
  • Visit my other site: Fun Cookie Recipes
snack joy kitchen
  • Home
  • Dinner
  • Desserts
  • Drinks
  • Appetizers
  • Contact
  • About
  • Privacy Policy
  • Home
  • Dinner
  • Desserts
  • Drinks
  • Appetizers
  • Contact
  • About
  • Privacy Policy
  • Cookie Policy
  • GDPR Policy
  • Disclaimer
  • Terms Of Use
Visit my other site: Fun Cookie Recipes

HOME / CATEGORIES /

Latest

- 1 medium butternut squash, peeled and diced into 1-inch cubes - 2 large red bell peppers, seeds removed and chopped into bite-sized pieces - 1 medium onion, finely diced - 2 cloves garlic, minced - 1 can (400 ml) of creamy coconut milk - 4 cups vegetable broth, low-sodium recommended - 2 tablespoons extra virgin olive oil - 1 tablespoon fresh ginger, finely grated - 1 teaspoon ground cumin - 1 teaspoon smoked paprika - Sea salt and freshly cracked black pepper to taste - Fresh cilantro leaves, for garnish (optional) - Soup pot - Immersion blender or countertop blender When I make this soup, I love how simple the ingredients are. But each one packs a punch. The butternut squash gives a creamy texture and sweetness. The red bell peppers add a vibrant color and flavor. You need onion and garlic to build that tasty base. Ginger brightens the soup with its warmth. Coconut milk makes it rich and smooth. I recommend low-sodium vegetable broth for a balanced taste. To create this dish, you will need a good soup pot. An immersion blender helps you achieve a smooth texture right in the pot. If you prefer a countertop blender, that works too. Just be careful with hot soup. Gather all these ingredients, and you're ready to make a delicious bowl of Coconut Butternut Red Pepper Soup! {{ingredient_image_2}} 1. Start by warming 2 tablespoons of extra virgin olive oil in your large soup pot over medium heat. It should shimmer but not smoke. 2. Add 1 medium onion, finely diced. Sauté it for about 5 minutes. The onion should become soft and clear. 3. Next, stir in 2 cloves of minced garlic and 1 tablespoon of finely grated fresh ginger. Cook this mix for 1 minute until it smells great. Be careful not to let the garlic brown. 4. Now, add 2 large chopped red bell peppers. Toss in the diced butternut squash, too. Mix everything well and let it cook for 5 to 7 minutes. Stir often so the veggies get tender. 5. Sprinkle 1 teaspoon of ground cumin and 1 teaspoon of smoked paprika over the vegetables. Stir for about 1 minute. This helps release the spices' flavors. 6. Carefully pour in 4 cups of low-sodium vegetable broth. Turn up the heat until it starts to boil. Once boiling, lower the heat. Let it simmer uncovered for 20 to 25 minutes. The butternut squash should be fork-tender. 7. After the veggies are soft, use an immersion blender. Blend until your soup is smooth and creamy. If you prefer, you can use a countertop blender. Just be careful with the hot soup! 8. Return the blended soup to the pot if you used a blender. Stir in 1 can of creamy coconut milk. Warm it over low heat. Season with sea salt and freshly cracked pepper to taste. 9. When ready to serve, ladle the soup into bowls. You can add a garnish of fresh cilantro leaves if you like. Serve hot for the best flavor! To make your soup smooth, you can use either an immersion blender or a countertop blender. An immersion blender is great for blending in the pot. It’s easy and keeps the mess down. Just blend until smooth. If you use a countertop blender, let the soup cool a bit first. Blend it in small batches. Remember, hot soup can splatter! Both methods work well, but the immersion blender is quicker. Want to amp up the taste? You can add more spices or herbs. A pinch of cayenne can add heat. Thyme or basil can bring fresh notes. You might also try a dash of lemon juice for brightness. Each addition changes the flavor in fun ways. Feel free to experiment and find your favorite mix! Garnishing your soup adds flair. Fresh cilantro leaves give a pop of color and taste. You can also drizzle coconut milk on top for creaminess. A sprinkle of smoked paprika adds a nice touch, too. Serve it hot, and enjoy the vibrant flavors! Pro Tips Use Fresh Ingredients: Fresh butternut squash and red peppers will give the soup the best flavor and texture. If possible, choose organic produce for optimal taste. Adjusting Consistency: If you prefer a thicker soup, use less vegetable broth. For a thinner soup, simply add more broth or coconut milk until you reach your desired consistency. Flavor Enhancements: Experiment with additional spices like coriander or chili powder to elevate the soup’s flavor profile. A squeeze of lime juice just before serving can also add a delightful bright note. Storage Tips: This soup stores well in an airtight container in the fridge for up to 4 days. To freeze, let it cool completely before transferring to freezer-safe containers, where it can last up to 3 months. {{image_4}} You can switch coconut milk for other options. Almond milk adds a nutty flavor. Cashew cream creates a rich texture. If you want a lighter soup, use low-fat milk. For squash, you can try pumpkin or acorn squash. Both have a sweet taste. They will change the soup's color but keep it delicious. You can create your own spice blends. For a kick, add red pepper flakes or cayenne. For warmth, try curry powder or turmeric. Each blend gives a new flavor twist. Mixing in herbs like thyme or basil can also change the taste. Experiment with what you enjoy most. This soup is already vegan and gluten-free. Just make sure your vegetable broth is free from animal products. Always check labels for gluten in broth. Enjoy the soup guilt-free while keeping it plant-based. To store your Coconut Butternut Red Pepper Soup, let it cool first. Once cooled, transfer it to an airtight container. This will keep the soup fresh in the fridge for up to 5 days. Make sure to label the container with the date. If you want to save some for later, freezing is a great option. Pour the soup into freezer-safe bags or containers. Leave some space at the top, as it will expand when frozen. The soup can last up to 3 months in the freezer. When you're ready to eat it, just thaw it in the fridge overnight. When it's time to enjoy your soup again, reheat it gently on the stove. Pour the soup into a pot and warm it over low heat, stirring often. You can also use the microwave. Just heat it in short bursts, stirring in between, until it's hot. Avoid boiling the soup to keep it smooth and creamy. You can create a full meal by adding: - Crusty bread for dipping - A fresh green salad for crunch - Grilled cheese sandwiches for warmth - Roasted veggies for extra flavor These sides will complement the soup’s creamy and rich taste. Each bite will be a delight. To kick up the heat, try these ideas: - Add chopped fresh chili peppers - Mix in red pepper flakes - Stir in a dash of cayenne pepper - Use a spicy vegetable broth Each option adds warmth without losing the soup's flavor. Adjust the spice to fit your taste. Yes, frozen veggies can work well. Here’s how: - Thaw them before adding to the pot - Reduce cooking time by a few minutes - Check for tenderness as you cook Frozen vegetables can save time and still taste great. Enjoy the ease of using what you have on hand. This blog post guides you through making a delicious Coconut Butternut Red Pepper Soup. We covered key ingredients like squash, bell peppers, and spices. You learned cooking methods, blending tips, and storage info. There are ways to adjust flavors and textures, too. In essence, this soup is flexible and easy. Enjoy experimenting with different ingredients and spices. You'll create a tasty dish that fits your taste. Now, grab your tools and start cooking!

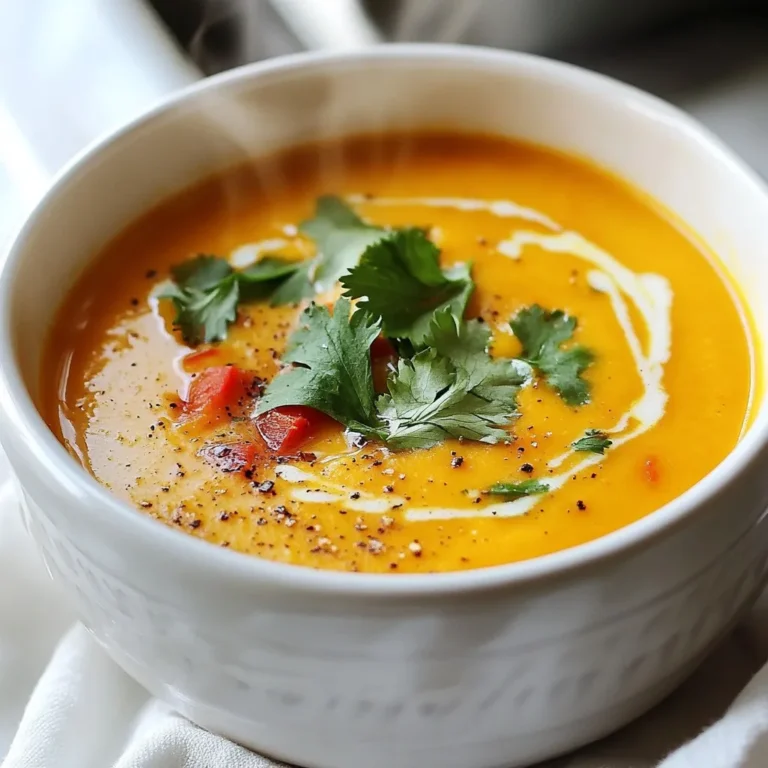
Coconut Butternut Red Pepper Soup Easy and Flavorful Dish

- 1 lb boneless, skinless chicken breast, thinly sliced - 2 tablespoons cornstarch - 2 tablespoons vegetable oil - 1 red bell pepper, thinly sliced - 1 yellow bell pepper, thinly sliced - 1 cup broccoli florets - 1 cup sugar snap peas - 3 green onions, finely chopped - 3 cloves garlic, minced - 1 tablespoon fresh ginger, minced - 1/4 cup sweet chili sauce - 1 tablespoon soy sauce - 1 teaspoon sesame oil - Salt and pepper, to taste - Cooked jasmine rice, for serving You can swap chicken for tofu or shrimp. This gives you great flavor. For the veggies, try using carrots or bok choy. These choices work well in stir-fries. You can also use any sweet sauce you prefer if you want to mix it up. Serve this dish over fluffy jasmine rice. You can also pair it with a fresh salad or spring rolls. For a fun twist, try adding some crunchy sesame seeds on top. Enjoying it with friends makes it even better! {{ingredient_image_2}} Start by slicing the boneless chicken breast into thin strips. This helps it cook fast and evenly. In a large bowl, add the chicken strips and sprinkle with cornstarch. Mix well until each piece is coated. This coating gives the chicken a crispy texture when cooked. Heat 1 tablespoon of vegetable oil in a skillet over medium-high heat. When the oil is hot, add the chicken strips. Cook for 5-7 minutes, stirring often. Look for a golden brown color. Once it’s done, move the chicken to a plate and set it aside. Using the same skillet, add the other tablespoon of oil. When it’s hot, throw in the minced garlic and ginger. Stir for about 30 seconds. You want to smell the great aroma but avoid burning them. Next, add the sliced red and yellow bell peppers, broccoli florets, and sugar snap peas to the skillet. Stir-fry these veggies for 4-5 minutes. They should be bright and tender but still a bit crunchy. This keeps the texture lively. Return the cooked chicken to the skillet. Pour in the sweet chili sauce, soy sauce, and sesame oil. Gently toss everything together, coating all the chicken and veggies in sauce. Cook for another 2-3 minutes to heat everything through. Taste and add salt and pepper if needed. Once everything is well mixed and hot, take the skillet off the heat. Serve the stir-fry over fluffy jasmine rice. For a nice touch, sprinkle finely chopped green onions and sesame seeds on top. This makes your dish pretty and adds extra flavor. Enjoy your meal! To make the chicken crispy, use cornstarch. Coat each chicken strip well. This helps lock in moisture and create a nice crunch. Make sure the oil is hot before adding the chicken. Cook for 5-7 minutes. Don’t crowd the pan. This allows the chicken to fry evenly. To boost flavor, add fresh garlic and ginger. These ingredients give a nice pop. Sweet chili sauce adds sweetness and heat. You can mix in soy sauce for depth. A dash of sesame oil adds a nutty taste. Adjust the seasoning with salt and pepper. Always taste as you go. Start with high heat for a quick cook. This keeps veggies crisp and vibrant. Stir often to avoid burning. If you’re new, prep all your ingredients first. This makes cooking smooth and easy. Use a large skillet or wok for space. This helps all ingredients cook evenly. Enjoy the process, and have fun! Pro Tips Marinate for Extra Flavor: For an even richer taste, marinate the chicken in a mixture of sweet chili sauce, soy sauce, and ginger for at least 30 minutes before cooking. Use High Heat: Ensure your skillet or wok is hot enough before adding the chicken. This helps to sear the meat quickly, locking in juices and flavor. Mix Vegetables Wisely: Choose a variety of colorful vegetables not only for visual appeal but also to add different textures and flavors to your stir fry. Garnish for Presentation: Enhance the look of your dish by garnishing with chopped green onions and sesame seeds just before serving. It adds a delightful crunch and freshness. {{image_4}} You can easily make a vegetarian version of sweet chili chicken stir fry. Instead of chicken, use tofu or tempeh. Both options soak up flavors well. Cut them into strips like chicken. Cook them until golden and crisp. You can also add more vegetables, like mushrooms or carrots. This adds texture and color. Sweet chili sauce gives this dish a unique kick. However, you can switch it up! Try using teriyaki sauce for a sweeter taste. Hoisin sauce adds a rich flavor. If you like heat, mix in some sriracha. Each sauce creates a new twist on the original recipe. Experiment to find your favorite! Don't have all the ingredients? No problem! You can swap out the bell peppers for zucchini or snap peas. Use any vegetables you have on hand. If you lack fresh ginger, ground ginger works too. For a soy-free option, use coconut aminos instead of soy sauce. These simple changes still make a tasty stir fry. You can store leftover sweet chili chicken stir fry in the fridge. Use an airtight container to keep it fresh. It lasts up to three days. Ensure it cools down before sealing. For best taste, eat it within two days. If you want to save the stir fry for later, freezing works well. Place the cooled stir fry in a freezer-safe container. It can last up to three months in the freezer. When you're ready to eat, thaw it overnight in the fridge before reheating. Reheating is simple. You can use a microwave or a skillet. For the microwave, heat it in short bursts. Stir after each burst to ensure even heating. If using a skillet, add a teaspoon of water to help steam the dish. Heat over medium until hot. Enjoy your stir fry just like the first time! To add heat, try these tips: - Use more sweet chili sauce. - Add red pepper flakes. - Slice fresh chili peppers. - Drizzle with sriracha before serving. These changes will boost the spice level while keeping the sweet flavor. Yes, you can use frozen vegetables! Just keep in mind: - Thaw them first to avoid excess water. - Cook them a bit longer to heat through. Frozen veggies are a quick and easy choice. Here are a few great side dishes: - Jasmine rice for a fluffy base. - Fried rice for an added twist. - Steamed dumplings for a fun bite. - A simple green salad for freshness. These sides complement the stir fry well. To make this dish gluten-free, swap these ingredients: - Use gluten-free soy sauce instead of regular soy sauce. - Check the sweet chili sauce for gluten-free options. This way, you can enjoy the stir fry without worries. Absolutely! You can try these proteins: - Shrimp for a seafood twist. - Tofu for a vegetarian option. - Beef or pork for a heartier meal. Each protein will offer a new flavor and texture. This blog post covers all you need for a great sweet chili chicken stir fry. We explored main and alternative ingredients, offered cooking steps, and shared valuable tips. Don't forget the variations and storage tips to keep your dish fresh. With these ideas, you can make this meal fit your taste and needs. Remember, cooking is about making it your own. Enjoy creating a dish that's not only tasty but also fun to make!

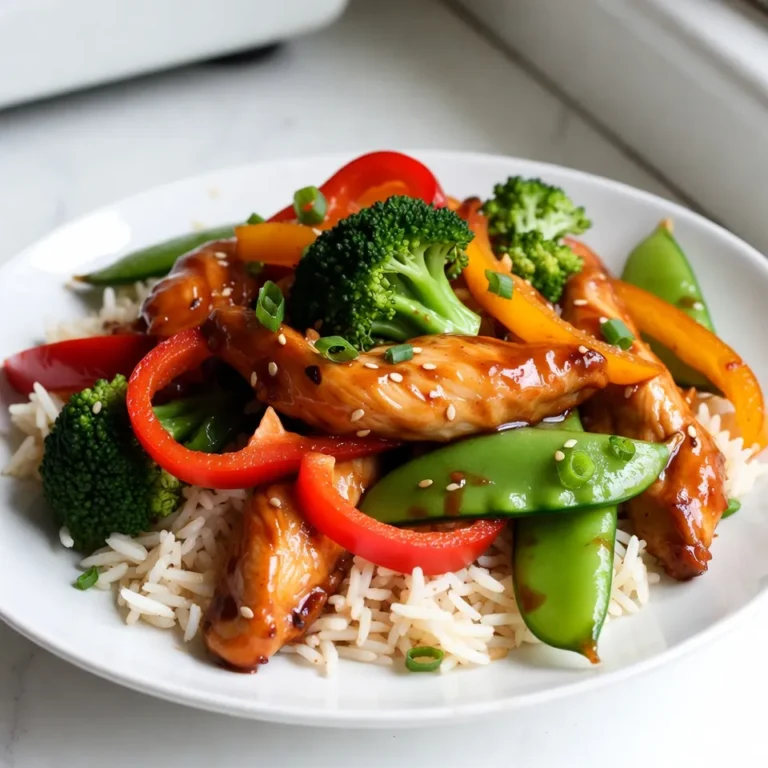
Sweet Chili Chicken Stir Fry Flavorful Dinner Delight

To make the caramel apple cheesecake dip, you will need: - 8 oz cream cheese, softened - 1/2 cup powdered sugar, sifted - 1 tsp vanilla extract - 1/2 cup sour cream - 1 cup caramel sauce, divided - 1 medium apple, finely diced (try Granny Smith or Honeycrisp) - 1/2 tsp ground cinnamon - 1/4 cup chopped walnuts or pecans (optional) You can add extra flavor with some fun mix-ins. Consider: - Chopped chocolate chips for sweetness - A dash of nutmeg for warmth - Mini marshmallows for added texture Serve the dip with tasty dippers. Here are my favorites: - Sliced apples for a fresh crunch - Graham crackers for a sweet bite - Pretzel sticks for a salty twist - Cinnamon sugar pita chips for extra flavor These ingredients and dippers make the perfect combo for your caramel apple cheesecake dip. Each bite will be creamy, sweet, and oh-so-delicious! {{ingredient_image_2}} Start by taking your cream cheese out. Let it sit at room temperature for a bit. This makes it soft and easy to mix. In a large bowl, use a hand mixer. Beat the cream cheese until it is smooth and creamy. This step is key for a great dip. Next, slowly add the sifted powdered sugar. Mix until it is well combined and fluffy. Pour in the vanilla extract and sour cream. Blend until everything is silky and smooth. Now, it's time to add some fun flavors. Take half a cup of caramel sauce and pour it into the cream cheese mix. Stir gently, but save some caramel for later. Next, grab your diced apple and ground cinnamon. Carefully fold these into the mixture. Make sure each bite has a nice apple flavor. If you like nuts, you can add chopped walnuts or pecans now. This adds a great crunch and taste. When your dip is ready, spoon it into a nice bowl. Drizzle the reserved caramel sauce on top. This makes it look yummy! Now, get some sliced apples and graham crackers. Arrange them around the dip for dipping. For a fun touch, sprinkle a little cinnamon on top. Enjoy this easy and tasty treat with friends and family! To get smooth cream cheese, start with it at room temperature. Cold cream cheese will not mix well. Use a hand mixer for best results. Beat it until it’s creamy. Mixing well makes the dip light and fluffy. Add powdered sugar slowly. This helps avoid lumps. You want a nice, smooth texture for the dip. You can change the flavor of this dip easily. Try adding a bit of nutmeg for warmth. A dash of maple syrup can give it a fall twist. If you like a bit of zest, mix in some orange juice. This adds a fresh taste. For a chocolate twist, fold in mini chocolate chips. Each idea gives you a new way to enjoy this dip. A shallow bowl works best for serving. It lets the caramel drizzle shine. After you add the dip, drizzle more caramel on top. This makes it look tasty. Surround the bowl with sliced apples and graham crackers. Use colorful apples for a fun display. A light sprinkle of cinnamon on top adds both flavor and charm. These steps make your dip a feast for the eyes too! Pro Tips Choose the Right Apples: Opt for tart apples like Granny Smith or Honeycrisp to balance the sweetness of the caramel and cream cheese, enhancing the overall flavor profile. Room Temperature Ingredients: Ensure your cream cheese and sour cream are at room temperature for a smoother blend, preventing lumps in your dip. Caramel Sauce Variations: Experiment with different types of caramel sauce, such as salted caramel, to add an exciting twist to the dip’s flavor. Make Ahead: Prepare the dip a few hours in advance and refrigerate it; this allows the flavors to meld beautifully before serving. {{image_4}} If you want a nut-free dip, just leave out the walnuts or pecans. The dip still tastes great without them. You can add a bit more cinnamon or even some crushed cookies for crunch. Use your favorite cookie bits for added flavor. While apples are the star, you can use other fruits too. Pears, for example, add a nice sweetness. You can also try diced strawberries or bananas. These fruits bring their unique flavors and textures to the dip. Mix and match to find your favorite fruit combo. You can serve this dip in many fun ways. Instead of only graham crackers, try pretzel sticks for a salty twist. You can also use vanilla wafers or even chocolate cookies. For a healthier option, serve with carrot sticks or celery. Each choice makes the dip exciting and new! To store any leftover Caramel Apple Cheesecake Dip, first, place it in an airtight container. This keeps the dip fresh and prevents it from drying out. Make sure to cover it well. You can keep it in the fridge for up to three days. You don’t need to reheat this dip. It tastes great cold or at room temperature. If you prefer it warm, you can microwave it for a few seconds. Stir it well after microwaving to ensure even warmth. The dip stays good for three days in the fridge. Keep an eye on it for any changes in smell or texture. If it looks off, it’s best to throw it away. Always use clean utensils to scoop out the dip. This helps it last longer and stay safe to eat. Yes, you can make this dip ahead of time. Just prepare it and store it in the fridge. It stays fresh for about two days. Cover it tightly to keep it from drying out. Before serving, give it a good stir. Add more caramel on top for a fresh look. If you don’t have sour cream, use Greek yogurt. It gives a similar tangy flavor. You can also use cream cheese alone, but it may change the dip’s texture. Another option is to use buttermilk, but it will make the dip thinner. To cut down on the sweetness, use less powdered sugar. You can reduce it to 1/4 cup. Another way is to mix in more diced apples. Tart apples like Granny Smith help balance the sweetness. Adding a pinch of salt can also tone it down. Yes, you can use gluten-free dippers. Sliced apples are a great choice. Rice cakes or gluten-free graham crackers work too. Just read the labels to ensure they are truly gluten-free. You won't miss the regular dippers! This blog post covered how to create a delicious Caramel Apple Cheesecake Dip. We explored key ingredients and mix-ins that enhance the flavor. I shared step-by-step instructions for making the dip easy. Tips on consistency and presentation help it stand out. You can also try nut-free options and different dippers for variety. In closing, this dip is versatile and perfect for any gathering. I hope you enjoy making and sharing it!

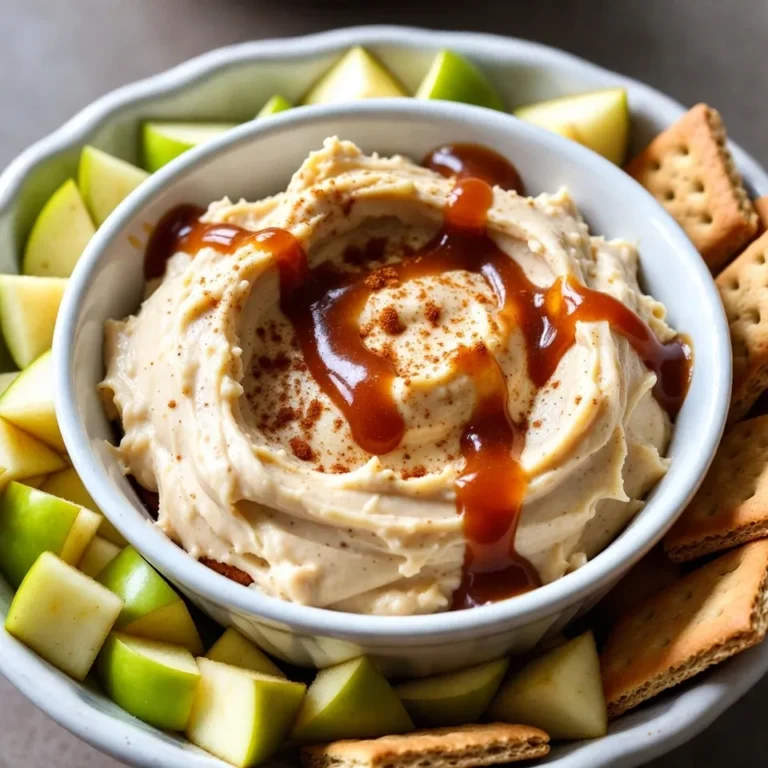
Caramel Apple Cheesecake Dip Easy and Delicious Treat

- 1 cup uncooked brown rice - 2 cups vegetable broth - 4 cups fresh broccoli florets - 1 cup sharp cheddar cheese, shredded - 1 cup cream of mushroom soup - 1/2 cup milk - 1/2 teaspoon garlic powder - 1/2 teaspoon onion powder - 1/4 teaspoon black pepper - 1/4 teaspoon salt - 1/2 cup breadcrumbs - 2 tablespoons olive oil - 1/4 cup grated Parmesan cheese - Fresh parsley, chopped I use 1 cup of uncooked brown rice for a hearty base. The 2 cups of vegetable broth ensure the rice cooks well. You need 4 cups of fresh broccoli florets for a bright green touch. I recommend using 1 cup of sharp cheddar cheese for a rich flavor. The cream of mushroom soup adds creaminess. For a bit of liquid, 1/2 cup of milk works perfectly. I add 1/2 teaspoon each of garlic powder and onion powder for flavor. A pinch of salt and black pepper brings balance. The breadcrumbs, mixed with olive oil, create a crunchy topping. Finally, a sprinkle of grated Parmesan cheese enhances taste and texture. If you want a different grain, try quinoa instead of brown rice. You can swap vegetable broth for chicken broth if you prefer. Instead of cheddar, use mozzarella or gouda for a unique twist. You can also use a different cream soup, like celery or chicken. If you need a dairy-free option, almond milk works well in place of regular milk. {{ingredient_image_2}} First, preheat your oven to 350°F (175°C). This step is key for even cooking. While the oven heats, lightly grease a 9x13 inch baking dish with olive oil. This helps the casserole come out easily. Next, cook the rice. In a medium saucepan, bring 2 cups of vegetable broth to a boil. Add 1 cup of uncooked brown rice and cover the pot. Lower the heat and simmer for about 45 minutes. Check the rice to ensure it is tender and all liquid is gone. Now, let’s prepare the broccoli. Steam 4 cups of fresh broccoli florets in a steamer basket over boiling water. Steam for about 5-7 minutes. You want the broccoli to be bright green and just tender. Set it aside once done. In a large mixing bowl, combine the cooked rice and broccoli. Add 1 cup of shredded sharp cheddar cheese, 1 cup of cream of mushroom soup, and 1/2 cup of milk. Then, sprinkle in 1/2 teaspoon of garlic powder, 1/2 teaspoon of onion powder, 1/4 teaspoon of black pepper, and 1/4 teaspoon of salt. Use a spatula to mix everything until well combined. Carefully pour the mixture into the greased baking dish. Use your spatula to spread the mixture evenly. Make sure it is level across the dish. For a crunchy topping, mix 1/2 cup of breadcrumbs with 2 tablespoons of olive oil and 1/4 cup of grated Parmesan cheese in a small bowl. Ensure the breadcrumbs are well coated. Then, sprinkle this topping over the casserole mixture. Place the baking dish in your preheated oven. Bake for 25-30 minutes. You know it’s done when the top is golden brown and the edges are bubbling. Once baked, take the casserole out and let it cool for a few minutes. For a nice touch, sprinkle freshly chopped parsley on top before serving. This adds color and flavor to your dish. Serve it warm and enjoy! Start with brown rice for a nutty flavor. Use vegetable broth for cooking. Bring it to a boil before adding the rice. Cover the pot and reduce the heat. Let it simmer for about 45 minutes. Check the rice to ensure it absorbs all the liquid. If it's not tender, let it cook a bit longer. Fresh broccoli florets work best in this dish. Look for bright green, firm florets at the store. Avoid any yellow or wilted parts. Frozen broccoli can work too, but fresh gives better taste and texture. Steam it just until tender to keep it bright and flavorful. I love using garlic powder and onion powder for depth. A little black pepper and salt will boost flavors too. You can also add a pinch of red pepper flakes for some heat. Mixing in herbs like thyme or basil can add freshness. Don’t be afraid to experiment with spices! You can prepare this casserole a day in advance. Just follow all steps until baking. Cover and store it in the fridge. When ready to bake, let it sit at room temp for 20 minutes. Then, pop it in the oven. This saves time and makes meal prep easier! Pro Tips Cooking the Rice: Using vegetable broth instead of water will enhance the flavor of the rice, making it more savory and delicious. Broccoli Preparation: Do not overcook the broccoli; steaming it just until bright green retains its color and nutrients, adding a nice crunch to the casserole. Cheese Variations: Feel free to mix different types of cheese like mozzarella or gouda with cheddar for a unique flavor profile. Breadcrumb Topping: For an extra crispy topping, broil the casserole for the last 2-3 minutes of baking, watching carefully to prevent burning. {{image_4}} You can make this dish heartier by adding protein. Chicken works well, while tofu is great for a plant-based option. Simply cook the chicken or tofu in a pan before mixing it with the rice and broccoli. Shred the chicken or chop the tofu into bite-sized pieces. This adds flavor and makes the casserole more filling. Cheddar cheese is classic, but you can mix it up. Try using mozzarella for a gooey texture or gouda for a smoky flavor. A blend of cheeses can also work great. Mixing different types of cheese adds a nice depth and keeps things interesting. While cream of mushroom is standard, you can switch it out. Cream of chicken adds a rich taste. If you want something lighter, use cream of celery. You can even make your own cream soup if you prefer a homemade touch. Swapping soups gives you a chance to change the flavor profile easily. To keep your Cheesy Broccoli Rice Casserole fresh, store it in an airtight container. Allow it to cool down before sealing it. This step prevents moisture build-up and keeps your casserole tasty. If you plan to eat it in a few days, place it in the fridge. Make sure to enjoy it within three to four days for the best flavor. When you’re ready to enjoy leftovers, reheat your casserole in the oven. Set the oven to 350°F (175°C). Cover the dish with foil to keep it moist. Heat it for about 15-20 minutes or until warm. You can also use the microwave. Just place a portion in a microwave-safe bowl. Heat it in short bursts of 30 seconds, stirring in between until hot. If you want to save some for later, freezing is a great option. Cut the casserole into portions and wrap each piece tightly in plastic wrap. Then, place them in a freezer bag. This helps prevent freezer burn. You can freeze it for up to three months. When you're ready to eat it, let it thaw in the fridge overnight before reheating. Enjoy the cheesy goodness! Yes, you can use white rice. Just reduce the cooking time. White rice cooks faster than brown rice. It usually takes about 15-20 minutes to cook. To make it gluten-free, use gluten-free cream of mushroom soup. You can also use gluten-free breadcrumbs. Make sure to check labels on all ingredients. This dish goes well with a fresh salad. You can also serve it with roasted chicken or fish. It pairs nicely with a side of garlic bread too. In the fridge, this casserole lasts up to 4 days. Make sure to store it in an airtight container. It will keep its flavor and texture longer this way. Yes, you can prepare it ahead of time. Assemble the casserole and store it in the fridge for up to 24 hours before baking. This saves you time on busy days. This blog post covered how to make a delicious Cheesy Broccoli Rice Casserole. We went through ingredients, cooking steps, and tips for success. I shared ideas for adding proteins and different cheeses. Proper storage and reheating methods ensure your casserole stays tasty. Remember, you can adjust this dish to suit your needs. Enjoy your cooking journey and share this tasty meal with others. It’s simple yet satisfying!

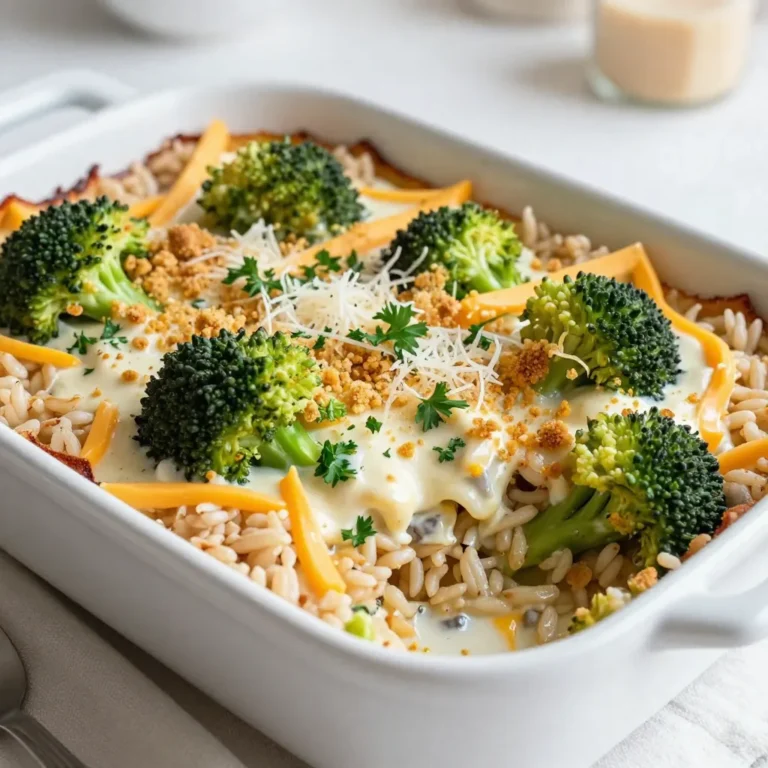
Cheesy Broccoli Rice Casserole Simple and Tasty Dish

- 1 cup fresh ricotta cheese - 1/2 cup powdered sugar - 1 teaspoon pure vanilla extract - 1 teaspoon fresh lemon zest - 1/2 teaspoon ground cinnamon - 1 cup all-purpose flour - 1/2 teaspoon baking powder - 1/4 teaspoon fine salt - 1/2 cup mini chocolate chips (plus extra for topping) - 1 egg, beaten (for egg wash) - 1/4 cup chopped pistachios (for garnish) For these easy cannoli cookies, I focus on fresh and simple ingredients. First, I use fresh ricotta cheese, which gives the cookies a creamy texture. The powdered sugar adds sweetness, while pure vanilla extract brings a warm flavor. Fresh lemon zest brightens up the mix, and ground cinnamon adds a cozy touch. Next, I combine all-purpose flour, baking powder, and fine salt. This mix helps the cookies rise and keeps them light. Mini chocolate chips make every bite delightful. I also use an egg wash to give the cookies a lovely golden finish. Finally, I top the cookies with chopped pistachios for crunch and color. Each ingredient plays a vital role in creating a delicious treat. These cookies are not just easy to make; they also pack a punch of flavor. {{ingredient_image_2}} 1. Preheat the Oven: First, set your oven to 350°F (175°C). This ensures your cookies bake perfectly. Line two baking sheets with parchment paper. This helps with cleanup and prevents sticking. 2. Prepare the Ricotta Mixture: In a medium bowl, mix 1 cup of fresh ricotta cheese, 1/2 cup of powdered sugar, 1 teaspoon of pure vanilla extract, 1 teaspoon of fresh lemon zest, and 1/2 teaspoon of ground cinnamon. Use a whisk or mixer to blend until smooth. 3. Combine Dry Ingredients: In another bowl, whisk together 1 cup of all-purpose flour, 1/2 teaspoon of baking powder, and 1/4 teaspoon of fine salt. Mix well until all ingredients are even. 4. Add Chocolate Chips: Gently fold in 1/2 cup of mini chocolate chips. Make sure they spread evenly through the dough without breaking too much. 1. Shape the Cookies: Using a tablespoon, scoop out portions of dough. Place them on the baking sheets, leaving about 2 inches between each ball. This space allows them to spread as they bake. 2. Flatten Slightly: Lightly press down on each cookie ball. This will help them bake evenly and create a nice shape. 3. Brush with Egg Wash: Use a pastry brush to coat the tops of the cookies with a beaten egg. This gives them a lovely golden color as they bake. 4. Decorate with Extra Chocolate Chips: Sprinkle a few more mini chocolate chips on top of each cookie. This adds a nice touch and makes them look extra yummy. 5. Bake: Place the baking sheets in your preheated oven. Bake for 12-15 minutes. The edges should be lightly golden, and the centers should be set. 1. Cool the Cookies: Once baked, remove the cookies from the oven. Let them cool on a wire rack. This helps them firm up and makes them easier to handle. 2. Garnish with Chopped Pistachios: Before serving, generously sprinkle 1/4 cup of chopped pistachios on top. This adds flavor and a nice crunch. Enjoy your easy cannoli cookies! - Avoid Overmixing: Mixing too much makes cookies tough. Blend just until combined. - Best Baking Practices: Use parchment paper to prevent sticking. Space cookies well on the sheet. - Achieving the Perfect Texture: Flatten slightly for even baking. Golden edges mean a perfect bite. - Flavor Variations: Add orange zest for a citrus twist. Try almond extract for a nutty flavor. - Healthier Substitutions: Swap half the ricotta for Greek yogurt. Use whole wheat flour for a nutty taste. - Presentation Enhancements: Drizzle melted chocolate on top for style. Use colorful sprinkles for fun. Pro Tips Use Fresh Ricotta: The quality of ricotta can greatly affect the flavor and texture of your cookies. Opt for fresh ricotta for the creamiest results. Chill the Dough: If the dough is too sticky, consider chilling it in the refrigerator for 15-30 minutes. This will make it easier to handle and shape. Even Baking: To ensure even baking, rotate the baking sheets halfway through the baking time, moving the sheet from the top rack to the bottom and vice versa. Experiment with Flavors: Feel free to add other flavorings such as almond extract or orange zest for a unique twist on the classic cannoli taste. {{image_4}} You can make cannoli cookies in many fun flavors. Here are some ideas: - Chocolate or Vanilla Cannoli Cookies: Add cocoa powder for chocolate cookies. Use vanilla extract for a sweeter touch. Both flavors mix well with ricotta. - Nutty Cannoli Cookies with Almonds: Fold in chopped almonds for a crunchy texture. Almond extract can also boost the nutty flavor. - Tropical Cannoli Cookies with Coconut: Add shredded coconut to the dough. This gives a lovely tropical twist and makes the cookies chewy. If you have special dietary needs, you can still enjoy cannoli cookies: - Gluten-Free Cannoli Cookies: Use gluten-free flour instead of all-purpose flour. This keeps the cookies just as tasty. - Vegan-Friendly Cannoli Cookies: Replace the egg with a flax egg. Use plant-based ricotta for a vegan option. These changes help everyone enjoy this treat. - Room Temperature Storage: Keep your cannoli cookies in an airtight container. They stay fresh for about three days. Place a piece of parchment paper between layers to avoid sticking. - Refrigeration Tips: If you want to keep them longer, store them in the fridge. They can last up to a week. Make sure the container is sealed tightly to prevent drying out. - Freezing Instructions: For the best long-term storage, freeze the cookies. Place them in a freezer-safe bag or container. They can last up to three months. Thaw them in the fridge when you're ready to enjoy. - How Long Do They Last?: Cannoli cookies last about three days at room temperature and a week in the fridge. Frozen cookies can last up to three months, keeping their flavor and texture. - Signs of Spoilage: Check for any off odors, dry texture, or mold. If they look or smell strange, it’s best to toss them. Keeping them in proper storage helps avoid spoilage. Can I use cottage cheese instead of ricotta? Yes, you can use cottage cheese. For best results, blend it until smooth. Ricotta has a creamier texture, so adjust as needed. How can I make them ahead of time? You can prepare the dough and chill it. Shape the cookies and store them in the fridge for up to 24 hours. Bake them fresh when ready. What is the best way to reheat cookies? To reheat, place cookies in a 300°F oven for about 5-7 minutes. This helps keep them soft. You can also microwave them for 10-15 seconds. What to substitute for powdered sugar? You can use granulated sugar. Blend it in a food processor until fine. This gives a similar sweetness. Can I use whole wheat flour? Yes, whole wheat flour can work. It may change the texture, making cookies a bit denser. Alternatives for mini chocolate chips? You can swap mini chocolate chips for chopped nuts or dried fruit. These add different flavors and textures to your cookies. You learned how to make delicious cannoli cookies with fresh ricotta and chocolate chips. I shared tips to ensure perfect texture and flavor. You can also customize your cookies to suit your taste. Storing them properly keeps them fresh for longer. Enjoy your baking journey and explore different variations. Each cookie can become a personal treat or a gift to share. Happy baking!

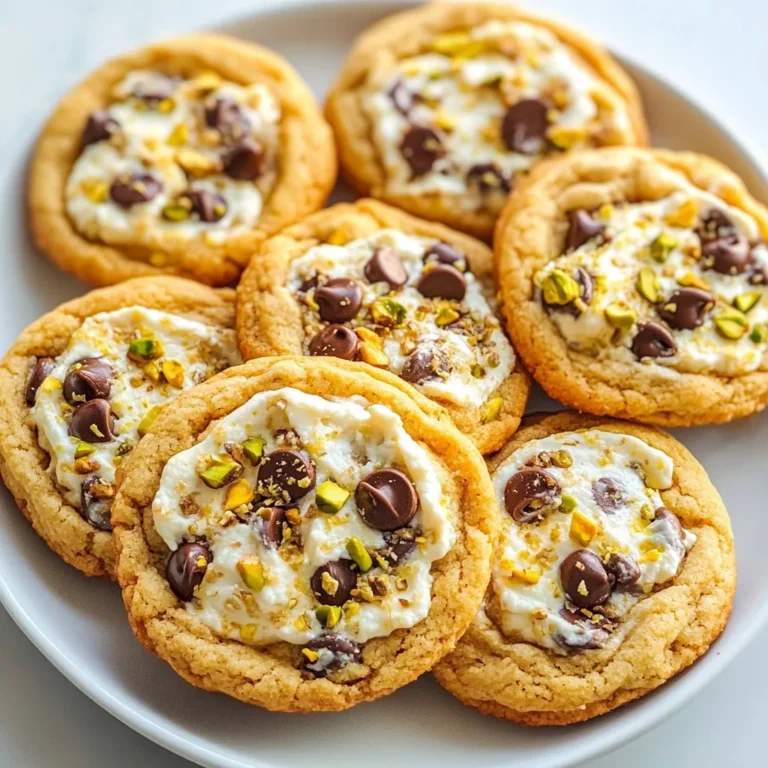
Easy Cannoli Cookies Irresistible Italian Delight

To make Keto Everything Bagel Bites, you need the right ingredients. Here’s what you’ll need: - 2 cups almond flour - 1 tablespoon baking powder - 1 teaspoon garlic powder - 1 teaspoon onion powder - 1 teaspoon ground sea salt - 2 large eggs - 1 cup shredded mozzarella cheese - 2 tablespoons cream cheese, softened - 2 tablespoons everything bagel seasoning These ingredients work together to create a tasty, low-carb snack that captures the delicious flavors of a classic bagel. If you want to make this recipe even lighter, try these substitutes: - Use coconut flour instead of almond flour. - Swap cream cheese with a dairy-free alternative, like cashew cream. - Replace mozzarella with a low-fat cheese option. These swaps can help you adjust the recipe to fit your dietary needs while keeping it low-carb. To prepare these bagel bites, you’ll want to gather a few tools: - Mixing bowls (large and medium) - Whisk for blending ingredients - Baking sheet - Parchment paper for easy clean-up - Measuring cups and spoons for accuracy Having these items ready makes cooking smooth and fun! {{ingredient_image_2}} First, set your oven to 375°F (190°C). This helps the bagel bites cook evenly. While it heats, grab a baking sheet. Line it with parchment paper to stop the bites from sticking. This step is key for easy cleanup. In a large bowl, combine 2 cups of almond flour, 1 tablespoon of baking powder, 1 teaspoon of garlic powder, 1 teaspoon of onion powder, and 1 teaspoon of ground sea salt. Use a whisk to mix well. Make sure no clumps are left. A good mix ensures every bite has flavor. In another bowl, crack two large eggs. Whisk them until blended. Then, add 1 cup of shredded mozzarella cheese and 2 tablespoons of softened cream cheese. Mix until smooth. This creamy blend adds richness to your bagel bites. Now, slowly add the dry mix to the wet mix. Stir continuously. You want all the ingredients to combine into a sticky dough. If it feels too sticky, wet your hands slightly. This helps when you shape the dough. With your hands, take small portions of dough. Roll them into balls, about 1 inch wide. Place each ball on the baking sheet, leaving 1-2 inches of space between them. This space allows the bites to puff up as they bake. Sprinkle everything bagel seasoning on top of each ball. Make sure they are coated well for that classic taste. Then, place the baking sheet in the oven. Bake for 12-15 minutes. Look for a golden brown color. When done, take them out and let them cool on the sheet for a few minutes. This cooling time helps them firm up before you enjoy them. To get the dough just right, mix well. Start with the dry ingredients. Whisk them until they blend. Then, combine wet ingredients slowly. Mix until it forms a sticky dough. If the dough sticks too much, wet your hands. This helps shape the bites easily. You can store the bagel bites in an airtight container. Keep them in the fridge for up to three days. For reheating, use your oven for the best results. Place the bites on a baking sheet. Heat them at 350°F (175°C) for about 5-7 minutes. This keeps them crispy on the outside. Serve your bagel bites on a nice platter. Add some color with fresh herbs like chives or parsley. For extra flavor, pair them with a creamy dip. A keto-friendly cheese spread works great too. Enjoy these bites at parties or as a snack! Pro Tips Use Room Temperature Ingredients: Allow your cream cheese and eggs to come to room temperature before mixing. This helps create a smoother dough and ensures even baking. Experiment with Seasonings: Feel free to customize the seasoning blend! Add sesame seeds, poppy seeds, or even a dash of cayenne pepper for a spicy kick. Check for Doneness: Keep an eye on your bagel bites as they bake. If they start to brown too quickly, you can cover them loosely with foil to prevent burning while they finish cooking. Storage Tips: Store any leftovers in an airtight container in the fridge for up to 3 days. Reheat in the oven for a few minutes to regain their crispiness. {{image_4}} You can change the flavors of your bagel bites easily. Try adding fresh herbs like dill or chives for a bright taste. You can also add sundried tomatoes or olives for a Mediterranean twist. Want something sweet? A touch of cinnamon and a few drops of vanilla can make a fun dessert version. Experiment with different spices to find your favorite mix! If you want to try different cheeses, feel free to swap them! Cream cheese can be replaced with goat cheese for a tangy taste. Cheddar cheese works well too, adding a sharp flavor. For a creamier texture, use ricotta. Each cheese brings a new character to the bites and keeps things exciting. For those who love heat, make spicy everything bagel bites! Add a dash of red pepper flakes to the dough. You can also mix in jalapeños for a kick. Top with spicy everything bagel seasoning to intensify the heat. These bites will wake up your taste buds and add a fun twist to your snack! Keto Everything Bagel Bites are perfect for low-carb diets. Each bite has about 100 calories. This makes them a great snack without guilt. You can enjoy them while staying on track with your keto goals. These bagel bites provide a good balance of fats, proteins, and carbs. Each serving has roughly: - Fat: 6 grams - Protein: 7 grams - Net Carbs: 2 grams This profile helps maintain energy without spiking your blood sugar. The ingredients in these bagel bites offer great health perks: - Almond Flour: This is low in carbs and high in healthy fats. It also has fiber, which aids digestion. - Eggs: Packed with protein and nutrients, they help keep you full longer. - Mozzarella Cheese: This cheese is low in carbs and a good source of calcium. It adds flavor and texture. - Everything Bagel Seasoning: This mix adds flavor and includes onion and garlic, which may boost heart health. These ingredients come together to make a tasty snack that fits into a healthy lifestyle. Yes, you can freeze these bagel bites. After baking, let them cool completely. Then, place them in a freezer-safe bag or container. They will stay fresh for up to three months. When you want to eat them, just thaw them in the fridge overnight. You can also reheat them in the oven for a few minutes at 350°F. This keeps them soft and tasty. To make these bagel bites dairy-free, you can swap the mozzarella and cream cheese. Use dairy-free cheese alternatives that melt well. Look for brands made from nuts or soy. You can also try using cashew cream instead of cream cheese. This will help you keep the creamy texture while staying dairy-free. These bagel bites pair well with many dips and spreads. Some great options include: - Creamy avocado dip - Keto-friendly ranch dressing - Hummus (check for low-carb versions) - Cream cheese (plain or flavored) - A side of fresh veggies for crunch You can also serve them with fresh herbs on top for added flavor. You learned how to make tasty Keto Everything Bagel Bites. We covered ingredients, tools, and detailed steps to create them. You now know tips for perfect dough and fun serving ideas. Many variations can spice things up too. Plus, understanding the nutrients helps you enjoy these bites guilt-free. With this guide, you can bake delicious snacks while sticking to your diet. Happy cooking!

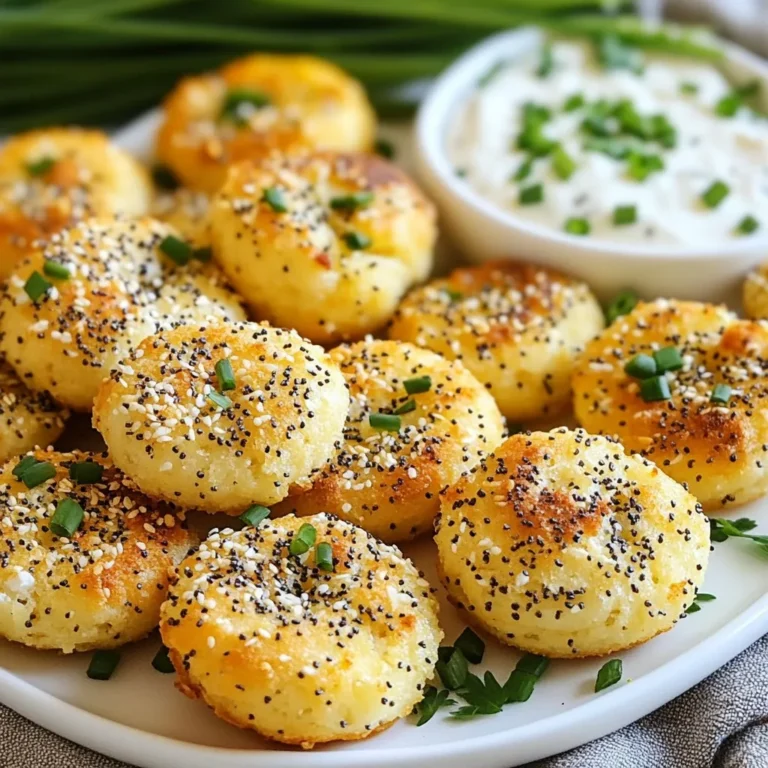
Keto Everything Bagel Bites Tasty Low-Carb Snack

To make this salad, you need: - 1 cup quinoa, thoroughly rinsed - 2 cups vegetable broth or water - 1 can (15 oz) black beans, drained and rinsed - 1 cup cherry tomatoes, halved - 1 red bell pepper, diced - 1 cup corn, fresh, frozen, or canned - 1 ripe avocado, diced - 1/4 cup red onion, finely chopped - 1/4 cup fresh cilantro, chopped - 2 tablespoons freshly squeezed lime juice - 2 tablespoons extra virgin olive oil - 1 teaspoon ground cumin - 1/2 teaspoon smoked paprika - Salt and freshly ground black pepper to taste These ingredients bring bright colors and flavors to the dish. Quinoa serves as a healthy base, while black beans add protein. The cherry tomatoes and bell pepper provide sweetness and crunch. Corn brings a nice texture and the avocado adds creaminess. Finally, the dressing ties everything together with zesty notes. You can get creative with these optional items: - Jalapeños for some heat - Feta cheese for added creaminess - Lime zest for extra zing - Chopped green onions for a fresh touch Feel free to mix and match based on what you like. Adding these can change the taste and make it even more exciting. Here's what you get per serving of the salad: - Calories: Approximately 250 - Protein: 9g - Fat: 12g - Carbohydrates: 30g - Fiber: 8g This salad is not only tasty but also healthy. It provides a good balance of protein and fiber. It fits well into a balanced diet. Enjoy this colorful dish as a light meal or a side! {{ingredient_image_2}} To cook the quinoa, start with a medium pot. Add 1 cup of rinsed quinoa and 2 cups of vegetable broth. Bring it to a boil on medium-high heat. Once boiling, reduce the heat to low. Cover the pot and let it simmer for about 15 minutes. The quinoa will absorb all the liquid. When it’s done, fluff it gently with a fork. Allow it to cool for a few minutes. While the quinoa cooks, let’s make the dressing. In a small mixing bowl, combine 2 tablespoons of olive oil, 2 tablespoons of lime juice, 1 teaspoon of ground cumin, and 1/2 teaspoon of smoked paprika. Add a pinch of salt and pepper. Whisk these together until they blend well. Set this zesty dressing aside for later. In a large salad bowl, it’s time to mix the colorful ingredients. Add 1 can of black beans, 1 cup of halved cherry tomatoes, 1 diced red bell pepper, and 1 cup of corn. Then, add 1 diced avocado, 1/4 cup of finely chopped red onion, and 1/4 cup of fresh cilantro. Stir gently to mix everything together. Once the quinoa has cooled, add it to the bowl with the vegetables. Drizzle the dressing over the salad. Carefully toss everything to coat well. Taste the salad and adjust the seasoning if needed. For the best flavor, cover and chill the salad for at least 30 minutes before serving. Serve in a large bowl with extra cilantro and lime wedges for garnish. Enjoy this colorful and healthy delight! To cook quinoa perfectly, rinse it first. Rinsing removes the bitter coating called saponin. Next, use two cups of vegetable broth for each cup of quinoa. This adds great flavor. Bring the mixture to a boil, then lower the heat. Cover it and let it simmer for 15 minutes. When done, fluff it with a fork. Let it cool slightly before adding to your salad. You can mix up the flavors easily. Try adding diced jalapeños for a kick. A sprinkle of feta cheese can add creaminess. For a sweeter touch, mix in diced mango or pineapple. You can also swap the lime juice for lemon juice. Each change brings a new twist to your salad. Fresh ingredients make a big difference. Look for bright, firm cherry tomatoes and ripe avocados. Choose bell peppers that are crisp and colorful. If using corn, fresh corn is best, but frozen works too. Always check for quality in your herbs. Fresh cilantro adds a lot of flavor, so pick the freshest bunch you can find. Pro Tips Rinse Your Quinoa: Always rinse quinoa under cold water for a few seconds to remove its natural coating, called saponin, which can impart a bitter taste. Choose Quality Ingredients: Opt for fresh or high-quality canned ingredients, especially when it comes to vegetables and beans, to enhance the overall flavor of the dish. Let It Chill: Allowing the salad to chill for at least 30 minutes before serving lets the flavors meld together, resulting in a more flavorful dish. Adjust to Your Taste: Don’t hesitate to adjust the seasoning according to your palate; adding more lime juice or spices can take the salad to the next level. {{image_4}} You can easily make this salad vegan. The base of quinoa, beans, and veggies is already plant-based. Just avoid any animal products. The dressing uses olive oil and lime juice, both vegan-friendly. Boost the protein in your salad for extra energy. Add grilled chicken or shrimp for a meat option. You can also use tofu or tempeh for a veggie protein. Adding nuts like almonds or walnuts gives a nice crunch too. The dressing is tasty, but you can switch it up. Try a tangy vinaigrette with apple cider vinegar. A creamy avocado dressing works well for a rich flavor. You can even mix in some salsa for a fun twist! Store your Southwest Quinoa Salad in an airtight container. This keeps it fresh longer. Place it in the fridge right after it cools. It is best to eat it cold. Enjoy the flavors more when they blend together. Freezing this salad isn't the best choice. The texture of veggies may change. If you must freeze it, store without the avocado. Add fresh avocado after thawing. Place it in a freezer-safe bag for up to three months. In the fridge, your salad lasts about three to five days. Check for any signs of spoilage before eating. If it looks or smells off, it's best to toss it. Always trust your senses when it comes to food safety. Yes, you can make this salad ahead of time. It tastes even better after sitting. The flavors blend well when chilled. I suggest making it the day before. Just keep it in the fridge. You can serve it cold or let it warm slightly before eating. If you want a substitute for quinoa, try brown rice or farro. Both options have a nice texture. You can also use couscous, but it cooks faster. Choose what you like best. Each grain gives a different taste to the salad. Yes, this salad is gluten-free. Quinoa is naturally gluten-free. All the other ingredients are safe, too. Just check any canned items for gluten. This makes it a great dish for those with gluten sensitivities. To add spice, you can include chopped jalapeños. Fresh or pickled jalapeños work well. You can also add red pepper flakes for heat. Another option is to use a spicy dressing. Adjust the spice level to fit your taste. This blog post covered how to make a tasty Southwest quinoa salad. We looked at key ingredients, cooking methods, and tips for perfecting your dish. You can customize it with proteins or different dressings. Remember to check storage tips to enjoy it later. Making this salad is easy, fun, and healthy. You can impress your friends with your skills. Enjoy your cooking and get creative as you explore all the great options!

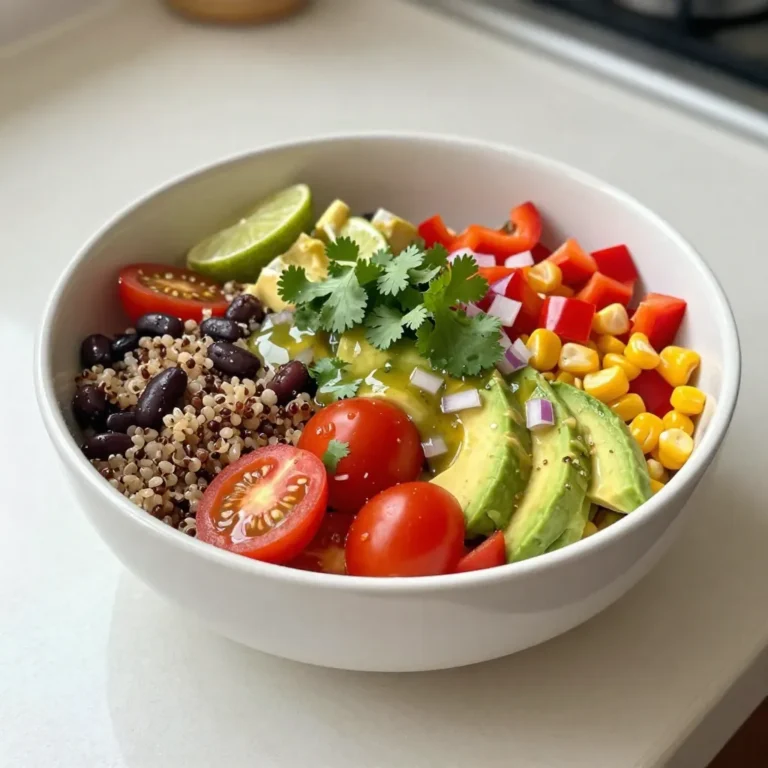
Southwest Quinoa Salad Colorful and Healthy Delight

Here is a complete list of the ingredients you will need to make this delicious chocolate hazelnut babka: - 4 cups all-purpose flour - 1/4 cup granulated sugar - 1 packet (2¼ teaspoons) active dry yeast - 1/2 teaspoon salt - 1/2 cup whole milk, warmed to about 110°F (43°C) - 1/2 cup unsalted butter, melted and cooled to room temperature - 3 large eggs, at room temperature - 1 teaspoon vanilla extract - 1 cup hazelnuts, toasted and roughly chopped - 1 cup chocolate hazelnut spread (such as Nutella) - 1/4 cup unsweetened cocoa powder - 1 egg (for egg wash) These ingredients come together to create a soft dough with a rich filling. You’ll notice the warmth of the milk helps the yeast activate. The hazelnuts add a nice crunch, and the chocolate hazelnut spread provides a sweet, creamy texture. Make sure you have everything before you start. This way, you can enjoy the process without interruptions. Happy baking! {{ingredient_image_2}} To start, gather your dry ingredients. In a large bowl, mix together: - 4 cups all-purpose flour - 1/4 cup granulated sugar - 1 packet (2¼ teaspoons) active dry yeast - 1/2 teaspoon salt Whisk these together until they blend well. In another bowl, whisk the wet ingredients: - 1/2 cup whole milk, warmed to about 110°F (43°C) - 1/2 cup unsalted butter, melted and cooled - 3 large eggs, at room temperature - 1 teaspoon vanilla extract Once mixed, pour the wet ingredients into the dry mix. Stir them with a wooden spoon until the dough starts to form. Now, transfer the dough to a floured surface. Knead it for about 8 to 10 minutes. The dough should feel smooth and elastic. Gather it into a ball and place it in a greased bowl. Turn it in the bowl to coat it in oil. Cover the bowl with a clean kitchen towel. Let it rise in a warm spot for 1 to 2 hours. It should double in size. In a medium bowl, mix together: - 1 cup chocolate hazelnut spread - 1/4 cup unsweetened cocoa powder Blend them until smooth. For more crunch, you can add half of the chopped hazelnuts to the filling. Once your dough has risen, punch it down to release air. On a floured surface, roll the dough into a rectangle about 16 by 24 inches. Spread the chocolate hazelnut filling evenly over the surface. Sprinkle the remaining chopped hazelnuts on top of the filling. From one long edge, roll the dough tightly into a log. Pinch the seam to seal it well. Using a sharp knife, slice the log in half lengthwise. You’ll see the gooey filling. Twist the two halves together, making sure the filling faces up. Coil the twisted dough into a spiral and place it into a greased 9 by 5 inch loaf pan. Cover the loaf pan with a towel. Let the babka rise for another 30 to 45 minutes. It should look puffy and expanded. During the last 10 minutes of rising, preheat your oven to 350°F (175°C). For the egg wash, beat one extra egg in a small bowl. Brush this over the top of the risen babka. This gives it a nice shine. Bake the babka in the oven for 30 to 35 minutes. It should turn deep golden brown and sound hollow when tapped. If it browns too fast, cover it with aluminum foil halfway through. Knowing when dough is ready The dough should feel soft and smooth. It should spring back when you poke it gently. If it sticks to your hands, add a little more flour. You want a dough that is not too sticky. Adjusting for humidity Humidity can change how your dough feels. On a humid day, you might need less flour. If the dough is too wet, add more flour in small amounts. Always check the texture as you mix. Oven tips for even baking Use an oven thermometer to check the heat. Make sure your oven is preheated to 350°F (175°C). If your oven has hot spots, rotate the pan halfway through baking. This helps the babka cook evenly. Troubleshooting common issues If your babka is too dark on top, cover it with foil. If it is undercooked, bake a little longer. Check the center with a toothpick. If it comes out clean, it is done. Serving suggestions Serve the babka on a wooden board. Slice it into thick pieces for sharing. Pair it with fresh berries or a scoop of ice cream for extra flair. Garnishing ideas Dust the top with powdered sugar for a sweet touch. Add a few hazelnuts on top for crunch. A drizzle of chocolate can make it look even more tempting. Pro Tips Use Fresh Ingredients: Ensure your yeast is fresh for the best rise and texture. Check the expiration date and perform a quick proofing test if unsure. Temperature Matters: Maintain the dough at a warm temperature while it rises. If your kitchen is cool, consider placing the bowl in a slightly warmed oven or near a warm stove. Don't Rush the Rise: Allow the dough to rise until it has doubled in size for a light and fluffy babka. Patience is key for achieving the perfect texture. Perfect the Twisting: When twisting the dough, handle it gently to avoid squeezing out the filling. Aim for a tight twist for a beautiful presentation. {{image_4}} You can change up the filling to make your babka unique. Try adding: - Cream cheese for a tangy twist - Dried fruits like cherries or apricots - Spices such as cinnamon or nutmeg - Different nuts like walnuts or pecans These additions can give your babka new flavors to enjoy. If you need to follow a special diet, there are options for you. - For gluten-free babka, use a gluten-free flour blend. - To make it vegan, swap eggs with flaxseed meal and use plant-based milk. Replace the butter with coconut oil or vegan butter, and choose vegan chocolate hazelnut spread. You can shape your babka in fun ways. Here are some ideas: - Try different braiding techniques for a unique look. - Make mini babkas by dividing dough into smaller portions. These shapes can be great for sharing or for gifts. To cool the babka correctly, let it sit in the pan for about 10 minutes. This prevents it from getting soggy. Then, move it to a wire rack. This helps air flow around it, keeping the crust nice and crisp. Avoid cooling it in the pan too long, or it may get too moist. For best practices in storage, wrap the babka tightly in plastic wrap. This keeps it soft and fresh. Store at room temperature for up to three days. If you want to keep it longer, freezing is a great option. To freeze, slice the babka first. Wrap each slice in plastic wrap, then place them in a freezer bag. This way, you can enjoy a piece anytime. To reheat for optimal enjoyment, use the oven. Preheat it to 350°F (175°C). Place the babka on a baking sheet and cover it with foil. Heat for about 10-15 minutes. This warms it without drying it out. You can also use a microwave for a quick warm-up. Heat a slice for about 15-20 seconds. Enjoy it warm for the best taste! Babka has roots in Eastern Europe. It started as a simple bread. Jewish families made it as a sweet treat. Babka means "grandma" in Polish. This bread often had leftover dough. Bakers filled it with chocolate or fruit. Over time, it became a favorite in many homes. Yes, you can prepare the dough one day ahead. After the first rise, wrap it tightly. Store it in the fridge overnight. The next day, let it come to room temp before shaping. You can also bake the babka ahead. Cool it completely and wrap it. Store at room temp for a few days. A few factors can cause this. First, check the yeast. If it’s old, it may not work. Make sure the liquid is warm, not hot. Hot liquid can kill the yeast. Also, let the dough rise in a warm spot. Cold air can slow down the rise. Look for a deep golden brown color. Tap the top gently; it should sound hollow. If you want to be sure, use a thermometer. The inside should be about 190°F (88°C). Let it cool in the pan for ten minutes before slicing. Enjoy the warm, rich flavors! You now understand how to make delicious Babka. From the right ingredients to the final bake, each step matters. Use tips for dough consistency and baking for great results. You can adjust flavors and even make it vegan or gluten-free. Store it correctly for freshness, and enjoy it later by reheating. Babka is not just tasty; it has history and gives joy to any gathering. Now, it’s your turn to create something special in the kitchen!

Chocolate Hazelnut Babka Delightful and Simple Recipe

To make Biscoff Cookie Truffles, you need these simple ingredients: - 2 cups Biscoff cookies, finely crushed - 1 cup cream cheese, softened at room temperature - 1/2 cup powdered sugar - 1 teaspoon vanilla extract - 1 cup white chocolate chips - 1 tablespoon coconut oil - Additional crushed Biscoff cookies for coating and garnish Each ingredient plays a key role. The Biscoff cookies give a sweet and spiced taste. Cream cheese adds a rich and creamy texture. The powdered sugar provides sweetness. Vanilla extract enhances the flavors. White chocolate gives a smooth coating. Coconut oil helps the chocolate melt well. Gather these ingredients before you start. It makes the process easier and more fun. Plus, you'll enjoy these truffles sooner! {{ingredient_image_2}} First, gather your ingredients. You need crushed Biscoff cookies, cream cheese, powdered sugar, and vanilla extract. In a large mixing bowl, add 2 cups of finely crushed Biscoff cookies. Next, add 1 cup of softened cream cheese. Follow this with 1/2 cup of powdered sugar and 1 teaspoon of vanilla extract. Use a spatula or your hands to mix everything well until you form a smooth dough. Once your dough is ready, it’s time to shape the truffles. Take small portions of the dough and roll them into balls. Aim for about 1 inch in size. Place these balls on a parchment-lined baking sheet. Make sure to leave some space between each ball. This helps with easy handling later. Now, it’s time to chill your truffles. Put the baking sheet in the fridge for about 30 minutes. This will help the truffles firm up. While they chill, melt your white chocolate chips. In a microwave-safe bowl, combine 1 cup of white chocolate chips with 1 tablespoon of coconut oil. Heat the mixture in 30-second intervals, stirring well each time until smooth. After chilling, take the truffles out of the fridge. Dip each truffle into the melted white chocolate using a fork. Make sure each one gets an even coating. Shake off any extra chocolate. While the chocolate is warm, sprinkle more crushed Biscoff cookies on top. Place the coated truffles back on the baking sheet. Return them to the fridge for about 15 minutes to set. Enjoy your sweet treat! To melt chocolate well, use a microwave-safe bowl. Add your white chocolate chips and coconut oil together. Heat the bowl for 30 seconds, then stir. Repeat this until smooth. Be careful not to overheat, as chocolate can burn easily. Stirring is key to even melting. The right texture makes your truffles stand out. Mix the Biscoff cookies and cream cheese until smooth. Ensure no dry bits remain. If the dough is too soft, chill it longer to firm up. Rolling them into 1-inch balls helps keep them bite-sized and easy to eat. To impress your guests, focus on how you serve the truffles. Use a decorative platter for a beautiful display. Sprinkle crushed Biscoff cookies on the plate for extra flair. You can also serve a side of melted chocolate for dipping. This makes for a fun and tasty experience! Pro Tips Chill the Dough: Ensure the truffle mixture is well chilled before rolling into balls. This helps maintain their shape during the coating process. Perfect Chocolate Coating: When melting the white chocolate, add the coconut oil to achieve a smoother consistency and easier dipping. Crushed Cookie Coating: Use a food processor to finely crush the Biscoff cookies for an even coating and a more appealing texture. Storage Tips: Store the truffles in an airtight container in the refrigerator to keep them fresh and maintain their creamy texture. {{image_4}} You can change up the look and taste of your truffles. Instead of white chocolate, try using dark chocolate. It adds a rich flavor that pairs well with Biscoff. You could also roll the truffles in cocoa powder or crushed nuts. These options give a nice crunch and a touch of elegance. Want to boost the flavor? Add a pinch of sea salt for a sweet-salty combo. You can also mix in some cinnamon for warmth. Try adding a few drops of almond extract to give it a nutty twist. Each of these small changes can make a big difference! Make your truffles festive with seasonal flavors. For fall, mix in pumpkin spice for a cozy vibe. Around the holidays, you can add peppermint extract for a refreshing touch. These seasonal ideas can help you enjoy Biscoff cookie truffles all year long! To keep your Biscoff truffles fresh, place them in an airtight container. I recommend putting a layer of parchment paper between layers of truffles. This helps prevent them from sticking together. Store the container in the fridge. Your truffles will stay tasty for about one week. If you want to save truffles for later, freezing is a great option. First, let the truffles chill in the fridge for 30 minutes. Then, place them on a baking sheet in a single layer. Freeze them for about two hours. Once frozen, transfer the truffles to a freezer-safe bag or container. They can last in the freezer for up to three months. Choose containers that seal well. Glass or plastic containers with lids work best. If you use a bag, make sure to squeeze out any air before sealing. This helps keep the truffles fresh and prevents freezer burn. Enjoy your truffles whenever you want a sweet treat! You can use any similar cookie. Ginger snaps or speculoos cookies work well. They have a nice spice and crunch. You can also try vanilla wafers for a milder flavor. Just make sure to crush them finely. Yes, you can! These truffles are perfect for making ahead. You can store them in the fridge for up to three days. Just keep them in an airtight container. If you want to freeze them, that works too! They last up to three months in the freezer. If stored correctly, these truffles last about a week in the fridge. They can stay fresh for months in the freezer. Just remember to let them thaw in the fridge before eating. Absolutely! Dark chocolate adds a rich taste. Just melt it the same way as the white chocolate. You can also mix both for a fun flavor twist. Chilling the truffles helps them firm up. Use parchment paper on your baking sheet. This keeps them from sticking and makes for easy removal. Yes! Chopped nuts or dried fruit can enhance your truffles. Just fold them into the mixture before shaping. Make sure to adjust the amount of Biscoff cookies to keep the texture right. Use a microwave-safe bowl and heat in short bursts. Stir well after each interval. This prevents the chocolate from burning. You can also use a double boiler for more control. These truffles pair well with coffee or tea. You can also serve them with whipped cream or a fruit sauce. They make a lovely treat for any gathering! These Biscoff cookie truffles blend sweet and creamy with simple ingredients. We discussed the mix of crushed cookies, cream cheese, and chocolate. You learned how to shape, chill, and coat the truffles. Tips on melting chocolate and achieving the best texture were shared. Variations can add new flavors and make them festive. Lastly, we covered storage options to keep your treats fresh. Enjoy making these delightful truffles and impressing your friends!

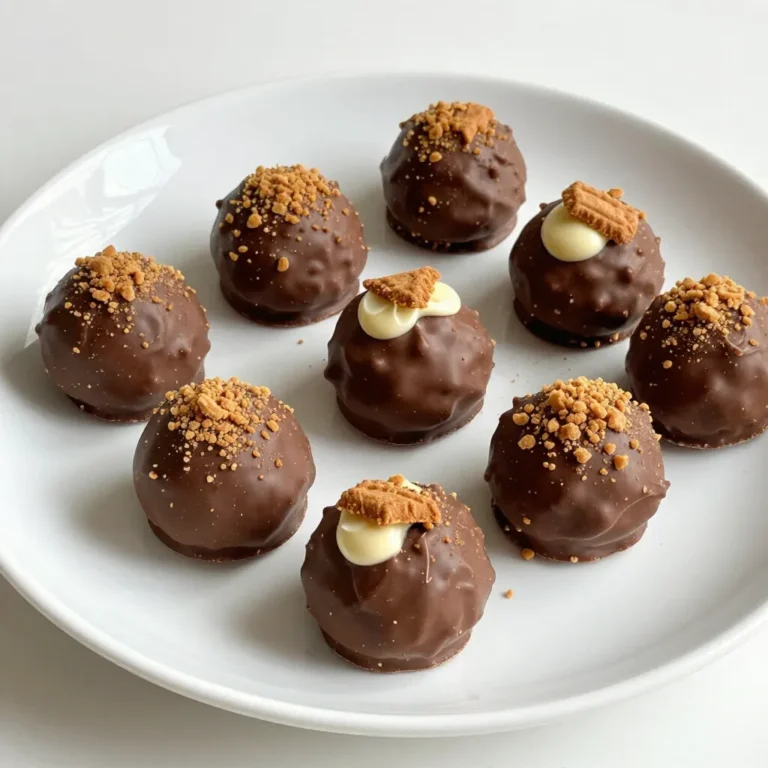
Biscoff Cookie Truffles Indulgent and Easy Treat

To create the Keto Chicken Spinach Tomato Skillet, you need a few key ingredients. Each one adds unique flavors and keeps the dish low in carbs. - 1 lb boneless, skinless chicken thighs, cut into bite-sized pieces - 2 cups fresh spinach, washed and trimmed - 1 cup cherry tomatoes, halved - 2 tablespoons olive oil - 3 cloves garlic, minced - 1 teaspoon dried oregano - 1 teaspoon smoked paprika - Salt and pepper, to taste - ¼ cup heavy cream - ½ cup grated Parmesan cheese - Fresh basil leaves for garnish (optional) Each ingredient plays a vital role. The chicken thighs provide protein, while spinach offers nutrients and color. Cherry tomatoes add sweetness and juiciness. Olive oil is great for cooking and flavor. Garlic gives a nice aroma and taste. The spices, like oregano and smoked paprika, enhance the overall flavor. Heavy cream and Parmesan cheese create a rich, creamy sauce. If you want a fresh touch, use basil leaves as a garnish. Using fresh ingredients makes a big difference in taste. Always choose the best quality for a delicious meal. {{ingredient_image_2}} First, heat a large skillet over medium heat. Add two tablespoons of olive oil and let it warm up. Once hot, add one pound of boneless, skinless chicken thighs, cut into bite-sized pieces. Season with salt, pepper, one teaspoon of dried oregano, and one teaspoon of smoked paprika. Cook the chicken for about seven to ten minutes, stirring every few minutes. The chicken should turn golden brown and be fully cooked. After the chicken is cooked, add three cloves of minced garlic to the skillet. Sauté for one to two minutes. You want the garlic to smell great, but don't let it burn. Next, toss in one cup of halved cherry tomatoes. Cook them for about three to four minutes, stirring occasionally. The tomatoes should soften and release their juices. Now, lower the heat to a gentle simmer. Pour in a quarter cup of heavy cream and stir well. Let it simmer for two to three minutes, allowing the cream to thicken slightly. Then, gently fold in two cups of fresh spinach. Cook just until the spinach wilts, which takes about one to two minutes. Finally, take the skillet off the heat and stir in half a cup of grated Parmesan cheese. Mix until the cheese melts and creates a creamy sauce. Taste the dish and adjust the seasoning with more salt and pepper if needed. Choosing the right chicken cuts matters. I prefer boneless, skinless chicken thighs. They stay tender and juicy. Chicken breasts can dry out easy. Adjust the seasoning for personal taste. Start with salt, pepper, oregano, and smoked paprika. You can always add more later. For sautéing, use medium heat to avoid burning. Keep stirring the chicken to brown it well. When you add garlic, watch it closely. Garlic burns fast and can make the dish bitter. To avoid overcooking spinach, add it last. It wilts quickly, so just cook it for 1-2 minutes. Serving the dish in the skillet looks great. It adds a rustic touch. Just place it right on the table. For extra flair, garnish with fresh basil leaves. They add a pop of color and a fresh flavor. Enjoy your meal! Pro Tips Perfect Chicken: Make sure to pat the chicken dry with paper towels before seasoning to get a nice golden brown crust. Garlic Timing: Add the garlic right after the chicken is cooked to prevent it from burning, which can create a bitter flavor. Spinach Secrets: To retain its vibrant color and nutrients, add the spinach at the end of cooking and just wilt it. Cheese Tips: For a creamier sauce, use freshly grated Parmesan cheese instead of pre-grated for better melting. {{image_4}} You can change the protein in this dish. Try chicken breast or shrimp instead of chicken thighs. Both options keep the meal light and tasty. You can also swap in low-carb veggies. Zucchini and bell peppers fit well and add nice color. Want to boost the flavor? Add more spices or herbs. Basil and thyme work great with this dish. You can also pour in a splash of white wine for a richer taste. This will create a lovely depth in your sauce. To make this meal even heartier, pair it with cauliflower rice or zucchini noodles. Both options are low-carb and fill you up. A fresh salad on the side adds a crunchy contrast and brightens the plate. Enjoy these simple yet tasty ways to elevate your Keto Chicken Spinach Tomato Skillet! To keep your keto chicken spinach tomato skillet fresh, store it in the fridge. Place the cooled skillet dish in an airtight container. This keeps out moisture and prevents odors. Use glass containers for best results, as they are easy to clean and do not stain. When ready to eat, you can safely reheat the skillet dish. Use the stovetop for even warming. Heat on low and stir often. This helps to maintain the creaminess. You can also use a microwave, but be sure to cover it. This keeps the moisture in and prevents drying out. Yes, you can freeze this dish! To do this, let it cool completely. Then, portion it into freezer-safe bags or containers. This way, you can enjoy it later. When you're ready to eat, thaw it overnight in the fridge. Reheat it gently on low heat for the best flavor. Yes, this recipe works great for meal prep. You can cook it ahead and store it in portions. Here are some tips: - Let the dish cool completely before storing. - Use airtight containers to keep it fresh. - It can last in the fridge for 3-4 days. - Reheat gently on the stove or in the microwave. Absolutely! To make it dairy-free, you can swap out the heavy cream and cheese. Here are some options: - Use coconut cream for a rich texture. - Nutritional yeast can replace Parmesan cheese. - Almond or cashew milk works well instead of cream. - These swaps keep the dish creamy and tasty. This dish pairs well with many sides. Here are some ideas: - Serve with cauliflower rice for a low-carb option. - Zucchini noodles add a fresh touch. - A side salad with greens and vinaigrette works well. - Roasted Brussels sprouts or asparagus make a great match. - Choose sides that keep the meal keto-friendly and delicious. This dish of chicken, spinach, and tomatoes combines rich flavors and easy steps. You learned how to cook the chicken, add garlic and tomatoes, and finish with cream. Mastering tips for seasoning and presentation will elevate your meal. You can vary ingredients for more options and store leftovers properly. Enjoy your cooking and get creative with these ideas! Let this recipe inspire your next meal for a tasty experience.

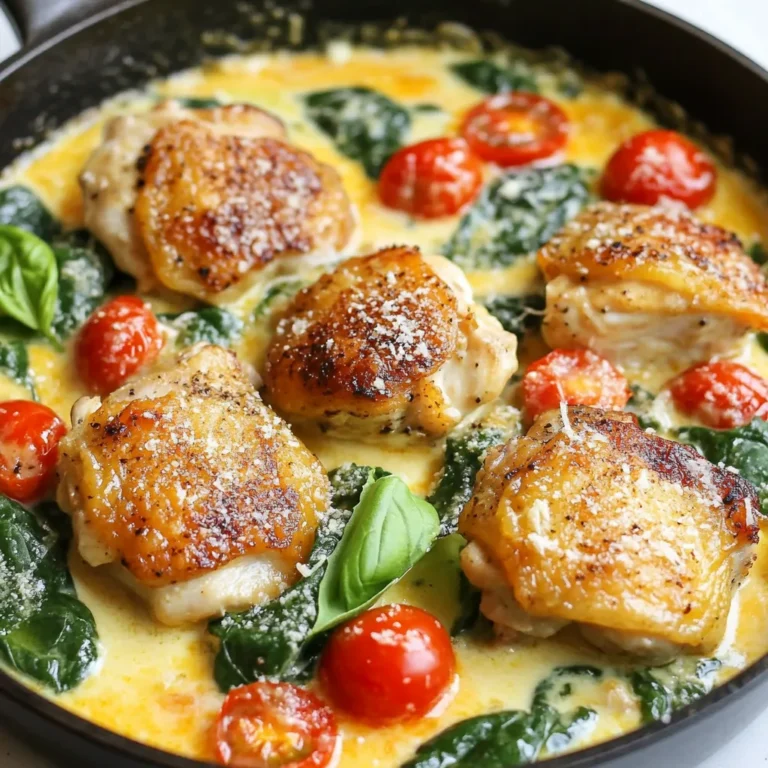
Keto Chicken Spinach Tomato Skillet Quick and Easy Meal

PREV 1 … 42 43 44 … 47 NEXT
snack joy kitchen

explore

DessertsDinnerAppetizersDrinks

Our Policies

  • Cookie Policy
  • Copyright Policy
  • Disclaimer
  • GDPR Policy
  • Terms Of Use
Back to Top
  • About
  • Contact Us
  • Privacy Policy
© 2026 snack joy kitchen