FREE DINNER EBOOK! Get your copy!
  • Cookie Policy
  • GDPR Policy
  • Disclaimer
  • Terms Of Use
  • Visit my other site: Fun Cookie Recipes
snack joy kitchen
  • Home
  • Dinner
  • Desserts
  • Drinks
  • Appetizers
  • Contact
  • About
  • Privacy Policy
  • Home
  • Dinner
  • Desserts
  • Drinks
  • Appetizers
  • Contact
  • About
  • Privacy Policy
  • Cookie Policy
  • GDPR Policy
  • Disclaimer
  • Terms Of Use
Visit my other site: Fun Cookie Recipes

HOME / CATEGORIES /

Latest

- 8 oz rice noodles - 1 cup shredded red cabbage - 1 cup shredded carrots - 1 red bell pepper, thinly sliced - 1 cucumber, julienned - 1/2 cup fresh cilantro, chopped - 1/4 cup green onions, thinly sliced - 1/2 cup unsalted peanuts, roughly chopped - 1 tablespoon sesame oil For the Peanut Sauce: - 1/2 cup creamy peanut butter - 2 tablespoons soy sauce - 2 tablespoons maple syrup - 1 tablespoon lime juice - 1 tablespoon sesame oil - 1 teaspoon freshly grated ginger - 1 teaspoon sriracha (adjust according to your spice preference) - 2-3 tablespoons water (to adjust consistency) - You can swap fresh vegetables for others like bell peppers or snap peas. - For nut-free options, use sunbutter or tahini in place of peanut butter. - To make it gluten-free, choose gluten-free soy sauce or tamari. - Each serving has about 400 calories. - It contains 15g of protein, 18g of fat, and 50g of carbs. - The fresh veggies offer vitamins and fiber, boosting health and digestion. {{ingredient_image_2}} Start by boiling a large pot of water. Make sure it’s at a rolling boil. Add the rice noodles to the water. Cook them based on the package instructions. Usually, this takes about 4 to 6 minutes. Check for doneness; they should be al dente. Once cooked, drain the noodles in a colander. Rinse them under cold running water. This stops the cooking process and cools them down quickly. Set the noodles aside in a large bowl. Next, gather your fresh vegetables. Chop the red cabbage into thin strips. Shred the carrots and slice the red bell pepper. Julien the cucumber into thin sticks. In a large mixing bowl, combine the cabbage, carrots, bell pepper, cucumber, cilantro, and green onions. Toss everything gently to mix. For the best flavor, try to use fresh vegetables. They add crunch and color to your salad. Now it's time to make the peanut sauce. In a medium bowl, add the creamy peanut butter, soy sauce, maple syrup, lime juice, and sesame oil. Grate some fresh ginger and add it in. If you like some heat, add sriracha. Whisk the mixture until smooth and creamy. If the sauce is too thick, add water, one tablespoon at a time. Keep whisking until you get the right consistency. You want it pourable but not runny. To make this Thai Peanut Noodle Salad shine, focus on texture. Use fresh, crisp veggies. Shredded cabbage and carrots add crunch. Slice bell peppers thinly for a nice bite. Rinse the noodles in cold water. This keeps them firm and prevents clumping. Balancing flavors is key. The sauce needs salt, sweetness, and tang. Adjust the soy sauce and maple syrup to your taste. A squeeze of lime adds brightness. Don't forget the sriracha for a spicy kick. Start with a little and add more if you like it hot. Presentation makes your dish pop. Serve the salad in a large, shallow bowl. Top it with extra cilantro and sesame seeds for color. You can also use clear bowls to show off the vibrant layers. Pair this salad with grilled chicken or shrimp for a hearty meal. It also goes well with spring rolls or a light soup. These sides complement the salad's flavors perfectly. You can prepare this salad in advance. Cook the noodles and chop the veggies a day before. Keep each component separate until you are ready to serve. This keeps the salad fresh and crisp. Store leftovers in an airtight container. Eat within 2 to 3 days for the best flavor. If you want to keep the crunch, store the sauce separately. Just mix it in when you're ready to enjoy your meal. Pro Tips Use Fresh Veggies: Always opt for fresh, crisp vegetables to enhance the crunch and flavor of your salad. Adjust the Spice: Feel free to modify the amount of sriracha in the peanut sauce to suit your spice tolerance. Perfect Noodle Texture: Rinse the noodles under cold water immediately after cooking to stop the cooking process and prevent sticking. Garnish for Flavor: Adding extra peanuts and cilantro on top not only enhances the presentation but also adds layers of flavor to the dish. {{image_4}} You can add proteins to make your salad more filling. Great options include chicken, tofu, or shrimp. - Chicken: Cook chicken breast in a pan until it's golden. Slice it thin and toss it in. - Tofu: Press tofu to remove water, then cut it into cubes. Sauté until golden brown. - Shrimp: Cook shrimp in a pan with a bit of oil until they turn pink. Each protein gives a different texture and taste. Choose one based on your preference! You can adjust the spice level of the sauce to fit your taste. Start with the sriracha and add more if you like heat. - Mild: Use less sriracha or leave it out. - Medium: Add the one teaspoon of sriracha. - Hot: Add extra sriracha or include crushed red pepper flakes. For different flavors, try adding lime zest or a splash of rice vinegar. These add a nice kick without too much heat! Using seasonal vegetables can make your salad even more vibrant. Fresh veggies change with the seasons. - Spring: Add snap peas or radishes for crunch. - Summer: Toss in cherry tomatoes or zucchini for freshness. - Fall: Use roasted sweet potatoes or butternut squash for warmth. You can also switch up the dressing. Instead of peanut sauce, try a light vinaigrette or a sesame dressing. This keeps the dish exciting all year long! To keep your Thai Peanut Noodle Salad fresh, store leftovers in an airtight container. This helps prevent drying out and keeps flavors intact. You can enjoy the salad for up to three days in the fridge. After that, the veggies might lose their crunch. You can freeze Thai Peanut Noodle Salad, but it may change texture. The noodles might become mushy after thawing. To freeze, place the salad in a freezer-safe container. When ready to eat, thaw it overnight in the fridge. For best results, serve it cold. If you want to reheat the salad, do so carefully. Use the microwave on low power for about 30 seconds. Stir and check the temperature. Avoid high heat to keep the veggies crisp. After reheating, top it with fresh peanuts and a drizzle of sesame oil for flavor. The best noodles for Thai Peanut Noodle Salad are rice noodles. They cook quickly and give the salad a nice, soft texture. You can use thin vermicelli or wider rice noodles, depending on your taste. Both work well with the rich peanut sauce and fresh veggies. Yes, you can easily make this salad vegan. Use soy sauce or tamari as a substitute for any non-vegan ingredients. The peanut sauce is already vegan-friendly. Just make sure to check the labels on your sauces and noodles. The peanut sauce lasts about one week in the fridge. Store it in an airtight container to keep it fresh. If it thickens, just add a little water and mix well before using. Absolutely! To make this salad gluten-free, use gluten-free soy sauce or tamari. Rice noodles are naturally gluten-free, making them a great choice for this dish. Always check labels for gluten-free assurance. You can serve the salad warm, but it’s best chilled. The cold noodles and fresh veggies create a nice contrast with the warm sauce. If you prefer it warm, just toss everything together right after cooking the noodles. This article covered how to make a delicious Thai Peanut Noodle Salad. We discussed the key ingredients, possible substitutions, and the nutrition benefits. I shared simple steps for cooking and preparing the salad, along with tips for perfect flavor and texture. You also learned about storage and how to modify the recipe based on your taste. Enjoy making this salad! Experiment with different flavors and ingredients. You'll find a version you love. Make it your own and savor every bite!

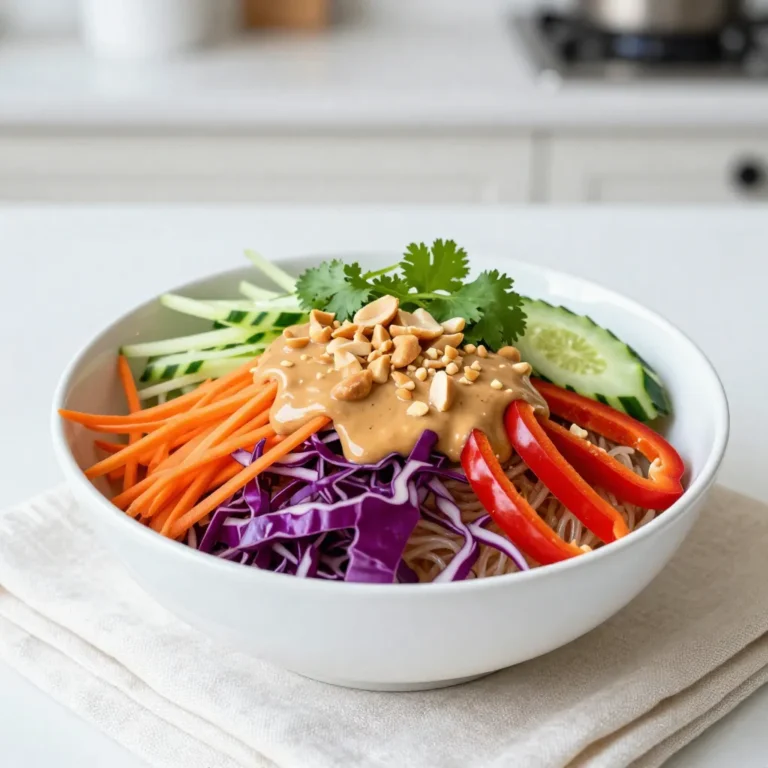
Thai Peanut Noodle Salad Fresh and Flavorful Dish

- 1 pack of rice paper wrappers - 1 cup red cabbage, finely sliced - 1 cup carrots, cut into thin julienne strips - 1 cup assorted bell peppers (red, yellow, and green), thinly sliced - 1 cup cucumber, cut into julienne strips - 1 ripe avocado, sliced - 1 cup fresh mint leaves - 1 cup fresh cilantro leaves - 1/4 cup sesame seeds (for garnish) Rice paper wrappers are the base for these spring rolls. They are thin and soften quickly in water. Fresh vegetables make the rolls colorful and tasty. I love using red cabbage for its crunch and vibrant color. Carrots bring sweetness, while bell peppers add a nice crunch. Cucumber provides a refreshing bite. Avocado gives a creamy texture that balances the other flavors. Fresh herbs like mint and cilantro add a burst of fresh taste. Finally, sesame seeds add a lovely crunch on top. - 1/4 cup creamy peanut butter - 2 tablespoons soy sauce (or tamari for a gluten-free option) - 2 tablespoons freshly squeezed lime juice - 1 tablespoon honey or agave syrup - Water (to thin out the sauce) For the dipping sauce, I use creamy peanut butter as a rich base. Soy sauce or tamari adds a salty kick. Fresh lime juice gives a zesty note. Honey or agave syrup adds a touch of sweetness to balance the flavors. You can thin the sauce with water to get the right texture. This sauce pairs perfectly with the fresh spring rolls. {{ingredient_image_2}} Start by washing all your veggies. Use cool water to keep them fresh. For slicing, take your time. Thin strips work best for spring rolls. Use a sharp knife for clean cuts. Slice the red cabbage into thin strips. Julienne the carrots into small sticks. Slice the bell peppers and cucumber thinly. Cut the avocado into even slices. Place each veggie in separate bowls. This makes it easy to grab what you need. To soften the rice paper, use warm water. In a large bowl, fill it with water. Soak one wrapper for about 10 to 15 seconds. You want it soft but not mushy. Lift it carefully and lay it flat. A clean, dry surface works best for this step. Start assembling on the lower third of the rice paper. First, add a handful of red cabbage. Next, place a few sticks of carrot. Then, add slices of bell pepper and cucumber. Put a slice of avocado on top. Finally, add mint and cilantro leaves for flavor. Layering this way gives a nice mix of taste in every bite. When rolling, be gentle to avoid tearing. Fold the sides over the filling first. Start from the bottom and roll it up. Tuck the filling in as you go. Don’t roll too tightly; this helps prevent tears. Once rolled, it should stay closed. Repeat this for the remaining wrappers and fillings. To make the dipping sauce, grab a small bowl. Mix together peanut butter, soy sauce, lime juice, and honey. Use a whisk to blend until smooth. If it's too thick, add a bit of water. Whisk again until the sauce is creamy and easy to dip into. For serving, arrange the spring rolls on a platter. Sprinkle sesame seeds on top for extra crunch. Serve the dipping sauce in a small bowl on the side. This makes for a pretty presentation. You can also garnish with extra herbs for color. Enjoy these spring rolls as a fresh snack or light meal! To roll your spring rolls well, avoid common mistakes. The rice paper can rip if you roll too tightly. If you overfill, it’s hard to roll them. Take your time and use small amounts of filling. I recommend practicing with a damp cloth. This helps you learn how to roll without tearing. You can also watch videos online to see the technique in action. Use seasonal vegetables for the best taste. Fresh bell peppers, cucumbers, and carrots really shine in spring rolls. You can also add radishes or snap peas for extra crunch. If you have allergies, swap out any item. Try cooked chicken, tofu, or even fruits like mango. These choices keep your rolls tasty and safe. To prep in advance, wash and slice your veggies a day before. Store them in airtight containers in the fridge. This keeps them fresh and ready to use. When you make the spring rolls, keep them covered with a damp cloth. This prevents them from drying out. You can also store extra rolls in a container lined with parchment paper. Pro Tips Fresh Ingredients Matter: Use the freshest vegetables and herbs you can find for the best flavor and crunch in your spring rolls. Water Temperature: Ensure the water for softening the rice paper is warm, not hot, to prevent tearing while rolling. Customizable Fillings: Feel free to switch up the fillings based on seasonal vegetables or personal preferences for a unique twist each time. Serving Suggestions: Pair these spring rolls with a variety of dipping sauces, such as sweet chili sauce or hoisin, to enhance the flavors. {{image_4}} You can add protein to your rainbow veggie spring rolls for more flavor and fullness. Tofu is a great option. It absorbs flavors well. Firm tofu holds its shape nicely. Just cube it and marinate it if you wish. Shrimp is another tasty choice. Cook the shrimp briefly before adding it to the rolls. The sweetness of shrimp pairs well with the fresh veggies and herbs. You can even mix proteins! Try adding both tofu and shrimp for a delightful twist. Spices and sauces can elevate your spring rolls. Try adding a sprinkle of chili flakes for some heat. A dash of garlic powder can also enhance the flavor. For a unique twist, consider using hoisin sauce instead of peanut sauce. This sweet and savory sauce gives a different taste. You can also add fresh ginger to the dipping sauce for a refreshing kick. Experiment with flavors to make each roll unique! You can modify this recipe for different diets. To make it gluten-free, simply swap soy sauce for tamari. It tastes just as good and keeps the flavor intact. If you prefer vegan options, use agave syrup instead of honey. For those on low-carb diets, consider omitting the rice paper. Instead, wrap the veggies in large lettuce leaves. This keeps it fresh and crunchy while cutting down on carbs! To keep your spring rolls fresh, store them in an airtight container. Use parchment paper between layers to prevent sticking. This helps maintain their crunch. Keep them in the fridge for up to three days. Avoid stacking them too tightly, as this may cause them to tear. If you have leftover dipping sauce, store it in a sealed jar. The sauce lasts in the fridge for about one week. When you want to use it again, just stir it well. You may need to add a little water to thin it out. You can freeze spring rolls for later. First, wrap each roll in plastic wrap. Place the wrapped rolls in a freezer-safe bag. They can stay in the freezer for up to three months. To reheat, let them thaw in the fridge overnight. Then, warm them in a dry pan for a few minutes. Expect them to lose some crunch, but they will still taste great! Rainbow veggie spring rolls stay fresh for about 2 days in the fridge. Store them in an airtight container. To keep them from sticking, place parchment paper between the rolls. Do not freeze them, as the rice paper can become tough. Yes, you can use different wrappers for spring rolls. Some options include rice paper, wheat tortillas, or even lettuce leaves. Each wrapper gives a unique taste and texture. Rice paper is the most common choice, but feel free to experiment. You can dip your spring rolls in many sauces. Here are a few tasty options: - Sweet chili sauce - Soy sauce - Hoisin sauce - Spicy sriracha - Coconut aminos for a soy-free choice Yes, spring rolls are a healthy choice. They are packed with fresh vegetables like red cabbage, carrots, and bell peppers. These veggies provide vitamins and minerals. The rice paper is low in calories too. Adding avocado gives healthy fats, making them a balanced snack. You can make spring rolls ahead of time. Prepare them up to 4 hours before serving. Keep them in the fridge in an airtight container. If you make the filling in advance, store it separate from the rice paper to keep everything fresh. This guide covers making fresh and flavorful spring rolls. You learned how to select the best ingredients, prepare vegetables, and create delicious dipping sauces. We explored tips to perfect your rolling technique and storage methods to keep your rolls fresh. Remember, spring rolls are versatile. You can adjust them to fit your tastes and dietary needs. Have fun experimenting with flavors and making your own unique rolls! Enjoy every bite as you share this delicious dish with friends and family.

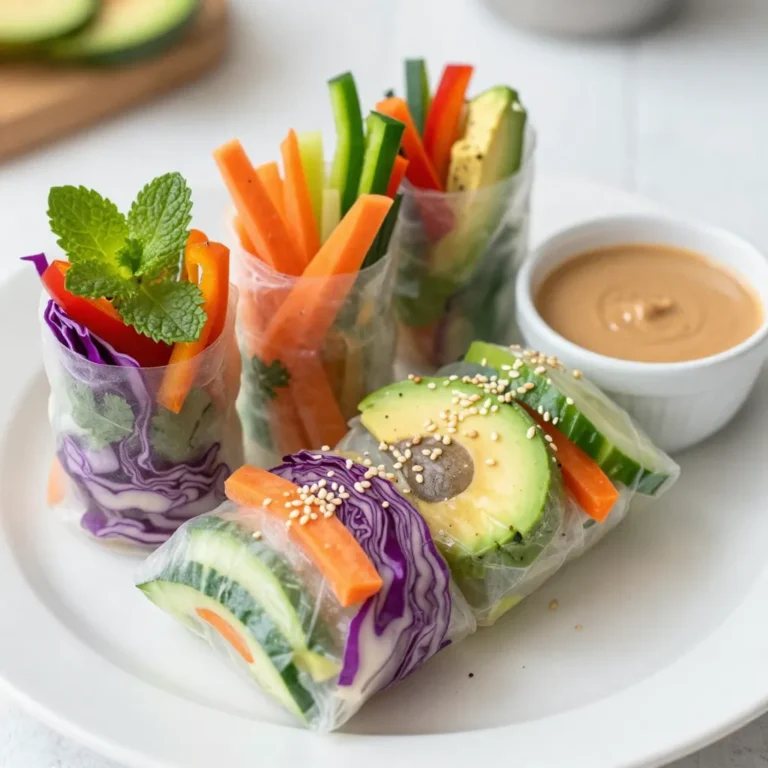
Rainbow Veggie Spring Rolls Flavorful and Fresh Delight

- 4 large carrots, peeled and chopped - 2 medium potatoes, peeled and diced - 1 medium onion, chopped - 2 cloves garlic, minced - 4 cups vegetable broth - 1 teaspoon ground cumin - 1 teaspoon ground coriander - 1 tablespoon olive oil - Salt and pepper, to taste - Fresh parsley, for garnish When I cook, I love to use fresh ingredients. Each one adds its own flavor. For this vegan carrot potato soup, you need four large carrots. These will give the soup a sweet and earthy taste. Next, grab two medium potatoes. They add creaminess and body to the soup. A medium onion adds depth to the flavor. It becomes soft and sweet when sautéed. You can also use garlic to enhance the aroma. Just two cloves will do, minced well. They bring a nice kick. Don’t forget about the broth! Four cups of vegetable broth make it warm and comforting. Ground cumin and coriander add a lovely spice blend to the mix. Just one teaspoon of each will brighten the soup. You’ll need one tablespoon of olive oil for sautéing. Salt and pepper round out the flavors. Lastly, fresh parsley makes for a beautiful garnish. It adds a pop of color and freshness. Each ingredient plays a vital role in making this soup simple and flavorful. {{ingredient_image_2}} - Heat 1 tablespoon of olive oil in a large pot over medium heat. - Add 1 medium onion, chopped finely. Sauté for about 5 minutes until soft. - Stir in 2 cloves of minced garlic and cook for another minute. - Add 4 large carrots, peeled and chopped into bite-sized pieces. - Mix in 2 medium potatoes, peeled and diced into cubes. Stir well to combine. - Sprinkle 1 teaspoon of ground cumin and 1 teaspoon of ground coriander over the vegetables. - Toast the spices by stirring for 1-2 minutes. This brings out their flavors. - Pour in 4 cups of vegetable broth. Make sure all veggies are submerged. - Increase the heat to bring the pot to a boil. Then, reduce to a gentle simmer. - Cover the pot and let it simmer for 20-25 minutes, until the carrots and potatoes are tender. - Use an immersion blender to puree the soup until smooth. - If you don’t have one, let the soup cool. Then blend it in batches. - Return the soup to the pot. Season with salt and freshly ground black pepper. - If the soup is too thick, stir in more broth or water to adjust the consistency. - Heat through for another 5 minutes, stirring occasionally to prevent sticking. To boost the flavor of your soup, consider adding these spices: - Ginger: A small piece can add warmth. - Turmeric: This gives a lovely color and health benefits. - Smoked Paprika: Adds depth and a touch of smokiness. To make your soup creamier, try one of these methods: - Coconut Milk: Stir in a can for a rich taste. - Cashews: Soak them, blend, and mix for a creamy texture. Using an immersion blender offers many benefits: - Easy Cleanup: Blend right in the pot without any mess. - Quick Blending: You can control the texture easily. For even cooking, follow these tips: - Cut Vegetables Evenly: This helps them cook at the same rate. - Stir Often: This prevents sticking and burning. If you need alternatives for broth, consider: - Water with Seasoning: Use herbs or spices for flavor. - Mushroom Broth: Adds a hearty taste. For oil-free cooking, try these options: - Vegetable Broth: Use it to sauté instead of oil. - Water: A little can help cook the onions without fat. Pro Tips Use Fresh Ingredients: Fresh carrots and potatoes will enhance the flavor and texture of the soup, making it more vibrant and delicious. Adjusting Consistency: If the soup is too thick for your preference, gradually add more vegetable broth or water until you reach your desired consistency. Spice Variations: Feel free to experiment with other spices such as smoked paprika or turmeric for an added depth of flavor and color. Garnishing: For a gourmet touch, garnish the soup with toasted seeds or nuts in addition to parsley, adding both texture and nutritional value. {{image_4}} You can easily make this soup gluten-free. Just check the vegetable broth label to ensure it is gluten-free. Most brands are safe, but it’s always good to verify. All the other ingredients in this recipe, like carrots and potatoes, are naturally gluten-free. If you want to skip the oil, no problem! You can sauté the onions in water or vegetable broth. Start by adding a small amount of liquid to your pot, and let it heat. Stir often to keep the onions from sticking. Once they are soft and translucent, you can add garlic and proceed with the recipe. Want to boost the nutrition? You can add leafy greens like spinach or kale. Just chop them up and toss them in during the last few minutes of cooking. They will wilt nicely and add great flavor and color to your soup. Other veggies like zucchini or bell peppers work well too! To store leftovers, cool the soup first. Then, transfer it to an airtight container. Place it in the fridge. The soup stays fresh for up to five days. When you're ready to eat, check for any off smells or changes in color. Freezing soup is simple. Let it cool completely before freezing. Use freezer-safe containers or bags. Leave some space at the top as the soup expands. It can last up to three months in the freezer. Label the containers with the date. This helps you keep track of freshness. Reheat the soup gently to keep it tasty. You can use a saucepan over low heat. Stir often to prevent sticking. If the soup is too thick, add a splash of broth or water. You can also use a microwave. Heat in short bursts, stirring in between to warm it evenly. Enjoy your warm, flavorful soup! You can store vegan carrot potato soup in the fridge for about 5 days. Make sure to use an airtight container to keep it fresh. If you want to keep it longer, freezing is a great option! Yes, you can make this soup in advance. It tastes even better the next day as the flavors develop. Just let it cool, then store it in the fridge. Reheat it gently when you are ready to enjoy. Absolutely! You can cook this soup in a slow cooker. Just add all the ingredients and set it on low for 6-8 hours. It will be ready when the veggies are soft and full of flavor. This soup is packed with nutrients. Carrots provide beta-carotene, which is great for your eyes. Potatoes are a good source of vitamin C and potassium. The spices add flavor without extra calories. Overall, it's a healthy, filling meal! This vegan carrot and potato soup is easy to make and delicious. You learned about the key ingredients, step-by-step cooking, and helpful tips. You discovered how to store leftovers and even variations to try. The soup is healthy and packed with flavor. It’s perfect for any meal or occasion. With the right techniques, you can impress anyone with this dish. I hope you enjoy making it as much as I do!

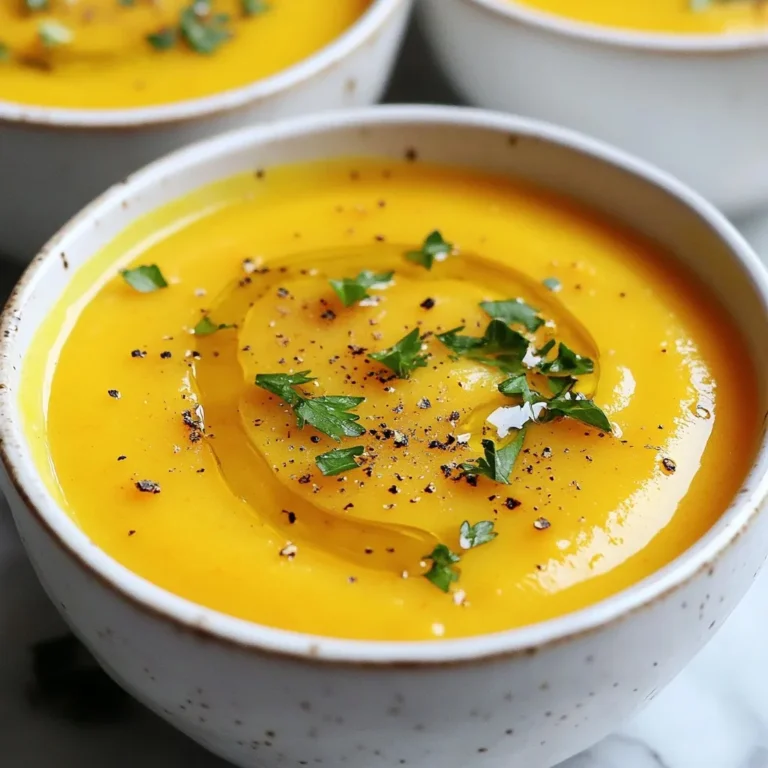
Vegan Carrot Potato Soup Simple and Flavorful Recipe

- 1 cup ditalini pasta - 2 tablespoons olive oil - 1 medium onion, finely diced - 3 cloves garlic, minced - 2 medium carrots, peeled and diced - 2 celery stalks, diced - 4 cups vegetable broth - 1 cup heavy cream (substitute coconut cream for a vegan alternative) - 1 cup frozen peas - 1 teaspoon dried thyme - Salt and freshly ground black pepper, to taste - Fresh parsley, finely chopped (for garnish) To make this soup vegan, simply swap heavy cream for coconut cream. You can also use vegetable broth to keep it plant-based. For gluten-free options, replace ditalini pasta with gluten-free pasta. Check labels to ensure your chosen pasta is truly gluten-free. When choosing fresh produce, look for vibrant colors and firm textures. For onions, pick ones with shiny skins. Carrots should feel crisp, and celery should be bright green. For broth, I recommend using low-sodium vegetable broth. This allows you to control the salt level. Always check for the freshest ingredients to enhance the soup's flavor. {{ingredient_image_2}} Start by warming two tablespoons of olive oil in a large pot over medium heat. When the oil is hot, add one medium onion, finely diced. Sauté the onion for about five minutes until it becomes soft and clear. Next, add three cloves of minced garlic, two diced carrots, and two diced celery stalks. Cook these together for another five minutes, stirring often, until the veggies begin to soften. Pour in four cups of vegetable broth and bring it to a rolling boil. Once boiling, add one cup of ditalini pasta and one teaspoon of dried thyme. Lower the heat and let it simmer gently. Cook the pasta according to the package instructions, usually about 8-10 minutes, until it is al dente. After the pasta is ready, stir in one cup of heavy cream or coconut cream for a vegan option, along with one cup of frozen peas. Allow the soup to simmer for another five minutes. This lets the flavors blend well. Season your soup with salt and freshly ground black pepper to your taste. If you want a thinner soup, add a bit more broth or cream. Remove the pot from the heat and let the soup sit for a few minutes. This resting time helps the flavors develop. Serve the soup in bowls using a ladle, and add a sprinkle of freshly chopped parsley on top. - Sauté the onion for exactly five minutes for the best texture. - Keep an eye on the pasta; start checking it at 8 minutes. - Simmer the soup with cream and peas for five minutes to lock in the taste. - The onion should look soft and clear, not brown. - The carrots and celery should be tender but still have a bit of crunch. - The pasta should be firm but not hard. You want it al dente, which means it should have a slight bite. - The soup should look creamy and thick once you add the cream, with bright green peas standing out. To boost flavor, use fresh herbs. Thyme adds warmth, while parsley adds brightness. You can also try adding a squeeze of lemon for a zing. If you love spice, a pinch of red pepper flakes can wake up the soup. Always taste as you go; adjust salt and pepper to your liking. If your soup is too thick, add a splash of broth or cream. Stir well to combine. If it’s too thin, cook it a bit longer. The ditalini pasta will soak up some liquid as it sits. A gentle simmer helps thicken the soup nicely. When reheating, do it slowly over low heat. This keeps the cream from separating. Stir often to make sure it heats evenly. Serve the soup hot in rustic bowls. A sprinkle of fresh parsley and a drizzle of olive oil elevate the dish. Pair it with crusty bread for a cozy meal. Pro Tips Cook Pasta Al Dente: Ensure your ditalini pasta is cooked just until it's al dente. It will continue to soften in the soup, providing the perfect texture. Flavor Boost with Herbs: Add fresh herbs like basil or dill right before serving for an extra layer of flavor. Thicker Soup Option: For a creamier soup, blend a portion of the soup and mix it back in. This adds body without additional calories. Storage Tips: Store any leftover soup in an airtight container in the fridge for up to 3 days. Reheat gently on the stove to maintain creaminess. {{image_4}} You can easily change this soup by adding different vegetables. Try using spinach or kale for a green boost. Zucchini or bell peppers also work well. If you want more protein, add cooked chicken or beans. This makes the soup heartier and fills you up. Switch up the herbs to make new flavors. Basil or oregano can add a nice twist. You could also use a pinch of red pepper flakes for some heat. Experimenting with herbs can change the whole dish. Just remember to start with small amounts and taste as you go. To make this soup a one-pot meal, add cooked grains like rice or quinoa. You can also add more broth and veggies, making it thicker. This way, you get a filling meal with less cleanup. It’s perfect for busy nights when you want comfort food fast. To store leftover soup, start by letting it cool down. Once it cools, pour it into an airtight container. Make sure to leave some space at the top. This allows room for expansion when it freezes. Seal the container tightly and place it in the fridge. The soup will stay fresh for about 3 to 4 days. If you want to keep it longer, consider freezing it. When freezing, use freezer-safe containers or bags. Divide the soup into smaller portions. This makes it easier to thaw only what you need. Label each container with the date and contents. Cozy Creamy Ditalini Soup can last up to 3 months in the freezer. To keep the flavors fresh, avoid using metal containers, as they can affect the taste. To reheat, take the soup out of the fridge or freezer. If frozen, let it thaw overnight in the fridge. You can also use the microwave for a quick thaw. When reheating on the stove, pour the soup into a pot. Heat on low to medium heat, stirring often. This prevents sticking and ensures even heating. If the soup seems thick, add a splash of broth or cream. Taste and adjust the seasoning if needed before serving. You can easily make this soup vegan by swapping the heavy cream for coconut cream. It gives the soup a rich, creamy texture without any dairy. Also, use vegetable broth to keep it plant-based. This simple change keeps the flavors while making it suitable for vegans. If you can't find ditalini pasta, you can use small shells or elbow macaroni. Both options work well and will soak up the soup's flavors nicely. You could even use a gluten-free pasta if you need to avoid gluten. Just make sure to adjust the cooking time as needed. Cozy Creamy Ditalini Soup will stay fresh in the fridge for about 3 to 4 days. Be sure to store it in an airtight container. When you're ready to enjoy it, just reheat it on the stove or in the microwave until it’s hot. Yes, this soup is perfect for meal prep! You can cook it ahead of time and store it in the fridge. Just remember to keep the pasta in the soup, as it can get soggy after a few days. If you're prepping in advance, consider cooking the pasta separately and adding it just before serving. This blog post showed you how to make Cozy Creamy Ditalini Soup. We discussed the best ingredients, cooking steps, and tips for flavor. You learned how to store leftovers and adjust recipes to fit your needs. Remember, you can customize this soup with different veggies or spices. I hope you feel excited to try this recipe. It's a warm and comforting dish you'll love! Enjoy every bite.

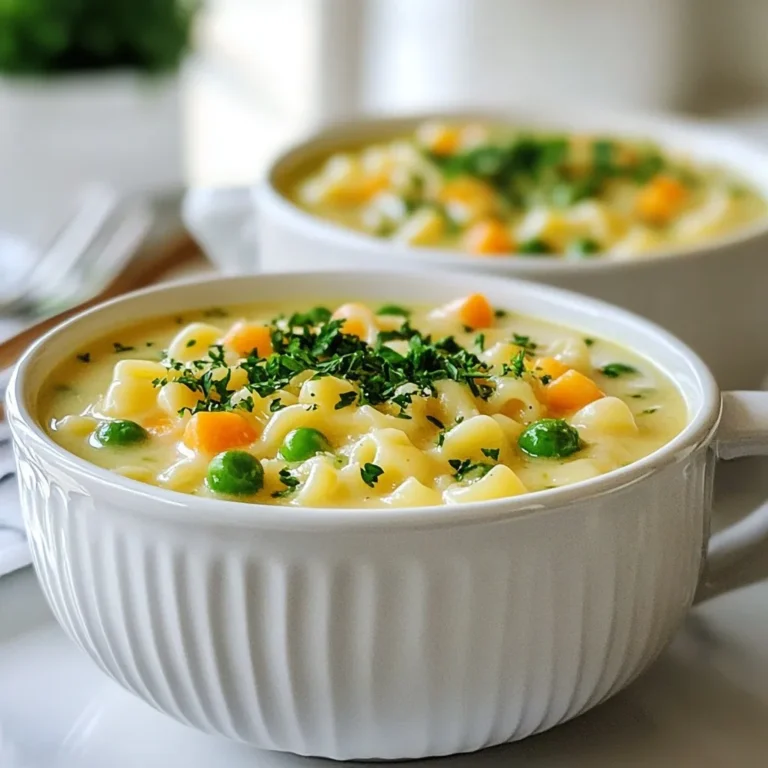
Cozy Creamy Ditalini Soup Simple and Tasty Recipe

- 1 pound sirloin steak, cut into bite-sized cubes - 4 tablespoons unsalted butter - 4 cloves of garlic, finely minced - 1 teaspoon fresh thyme leaves (or ½ teaspoon dried thyme) - Olive oil, salt, and pepper When making garlic butter steak bites, the main ingredients matter. The sirloin steak offers a tender and juicy bite. I recommend cutting it into bite-sized cubes for quick cooking. The unsalted butter adds richness, while the minced garlic brings a strong aroma. Fresh thyme adds a touch of earthiness. Don’t forget the olive oil, salt, and pepper for flavor! - Fresh parsley, finely chopped Garnishing with fresh parsley adds color and brightness. It also enhances the dish’s flavor, making it more appealing. A simple sprinkle can elevate your steak bites from good to great. - Large skillet - Cutting board - Knife - Cooking utensils You will need a few kitchen tools to make this dish. A large skillet helps sear the steak bites evenly. A cutting board and knife are essential for prep work. Finally, some cooking utensils will help you mix and serve. Having these tools ready makes the cooking process smooth and enjoyable. {{ingredient_image_2}} Start by cutting your sirloin steak into bite-sized cubes. Season these cubes with salt and freshly cracked black pepper. Make sure to coat each piece well. This step adds flavor, so don't skip it! After seasoning, let the steak rest for about 10 minutes. This waiting time helps the salt work its magic and flavors the meat deeply. Next, grab a large skillet and place it over medium-high heat. Pour in 1 tablespoon of olive oil. Watch for the oil to shimmer. This means it’s ready for cooking. You want that perfect heat to sear the steak bites nicely. Carefully add the seasoned steak bites to the skillet. Make sure they sit in a single layer. If you overcrowd the pan, they won’t sear well. Cook the steak bites for about 3 to 4 minutes on each side. This timing helps achieve a perfect medium-rare doneness. When they are done, remove the steak from the skillet and set them aside on a plate. Without cleaning the skillet, reduce the heat to medium. Add 4 tablespoons of unsalted butter and 4 cloves of minced garlic to the pan. Stir consistently to keep the garlic from burning. After about a minute, add 1 teaspoon of fresh thyme leaves. This will infuse a lovely flavor into the garlic butter. Once the garlic is fragrant and golden, return the cooked steak bites to the skillet. Toss the steak in the garlic butter mixture. This ensures each piece is well coated and heated through, which should take about 2 more minutes. Now, remove the skillet from the heat. Transfer the garlic butter steak bites to a serving platter. For a pop of color, garnish the dish with fresh, chopped parsley. This not only adds flavor but also makes the dish look inviting! To get your steak bites just right, timing is key. For medium-rare, sear them for about 3-4 minutes on each side. If you like your steak more done, add a minute or two. Remember, letting the steak rest for about 10 minutes after cooking is crucial. This helps the juices stay in the meat, making each bite tender and juicy. Want to kick up the flavor? Try adding a pinch of smoked paprika or a sprinkle of crushed red pepper. You can also use fresh rosemary instead of thyme for a different taste. For butter, feel free to use garlic-infused or herb-infused varieties. This can add a new twist to your steak bites and make them even more exciting. How you serve the steak bites can make a big difference. Rustic wooden boards give a cozy feel, while clean white plates add a modern touch. You can drizzle leftover garlic butter over the steak bites for extra flavor. For fun, serve them with toothpicks on the side. This makes it easy for guests to enjoy these tasty bites! Pro Tips Choose the Right Cut: For the best flavor and tenderness, select a well-marbled sirloin steak. The fat will render during cooking, enhancing the overall taste. Let it Rest: Always let your steak bites rest for a few minutes after cooking. This allows the juices to redistribute, resulting in a juicier bite. Control the Heat: Cooking over medium-high heat will give you a nice sear without overcooking the inside. Keep an eye on the steak bites to prevent them from becoming tough. Enhance the Flavor: For added depth of flavor, consider marinating the steak cubes in a mixture of olive oil, garlic, and herbs for at least 30 minutes before cooking. {{image_4}} You can switch up your steak cuts for more flavor. Ribeye is a great choice. It has rich marbling that adds taste. Filet mignon is another option. It’s tender and melts in your mouth. Both cuts work well for steak bites. Feel free to experiment with your favorites! Adding herbs or spices can change the flavor game. Try rosemary for a fragrant touch. Paprika adds a nice smokiness. You can even mix in some mushrooms or bell peppers. These add texture and taste. Sauté them in the garlic butter for more depth. The options are endless! Want a low-carb or paleo-friendly meal? Choose a leaner steak and skip the butter. Use olive oil instead for cooking. This keeps it light and healthy. For gluten-free needs, this recipe is already safe. Just make sure all ingredients are gluten-free. Enjoy your tasty bites without worry! To keep your garlic butter steak bites fresh, use airtight containers. Glass or plastic containers work well. Store them in the fridge for up to three days. This helps keep the flavors locked in. When it's time to enjoy your leftovers, use a skillet. Heat the skillet on medium heat and add a little oil or butter. This keeps the steak juicy. You can also use a microwave. Just be careful not to overcook them. Heat in short bursts to keep them tender. If you want to save some for later, freezing is a great option. First, let the steak bites cool down. Then, place them in a freezer-safe bag. Remove as much air as possible. For best results, defrost them in the fridge overnight before reheating. This way, they stay flavorful and delicious. To check if your steak bites are cooked, look for these signs: - Color: It should be brown on the outside and pink inside for medium-rare. - Texture: Press the steak; it should feel firm but still have some give. - Temperature: Use a meat thermometer. Aim for 130°F for medium-rare. Cooking time matters. For medium-rare, cook about 3-4 minutes on each side. Adjust time for your preferred doneness. Yes, you can use frozen steak! Just follow these steps: - Thaw: Ensure the steak is fully thawed before cooking. The best way is to leave it in the fridge overnight. - Cook: If you're short on time, you can thaw it in cold water for about an hour. Be sure to season it well before cooking. Cooking frozen steak can lead to uneven cooking. So, always thaw for best results. These steak bites taste great with several sides: - Mashed Potatoes: Creamy and buttery, they balance the flavors. - Roasted Vegetables: Carrots, broccoli, or asparagus add color and nutrition. - Garlic Bread: Perfect for soaking up the garlic butter sauce. - Salad: A fresh side salad can lighten the meal. Choose sides that match the rich flavors of the steak for a complete meal. Burnt garlic can ruin your dish. Here are tips to avoid that: - Control Heat: Keep your pan at medium heat when adding garlic. - Stir Often: Move the garlic around in the pan to prevent it from sitting too long. - Timing: Add garlic after the steak bites are cooked. This way, it only cooks for a short time. Golden garlic adds flavor, but burnt garlic tastes bitter. Yes, you can prep these steak bites ahead. Here’s how: - Cook: Prepare the steak bites and garlic butter as usual. - Store: Let them cool, then place in an airtight container in the fridge. They can last up to three days. - Reheat: When ready, warm in a skillet over low heat. Add a little butter or oil to keep them moist. This method saves time on busy days while keeping flavors intact. You've learned how to make delicious Garlic Butter Steak Bites. We covered the key ingredients, kitchen tools, and simple steps. Remember to let the steak rest for best flavor. Explore variations to keep meals fresh and fun. Store leftovers properly to enjoy later, and use the reheating tips to maintain taste. With these easy recipes and tricks, you can impress anyone at your table. Enjoy your cooking journey!

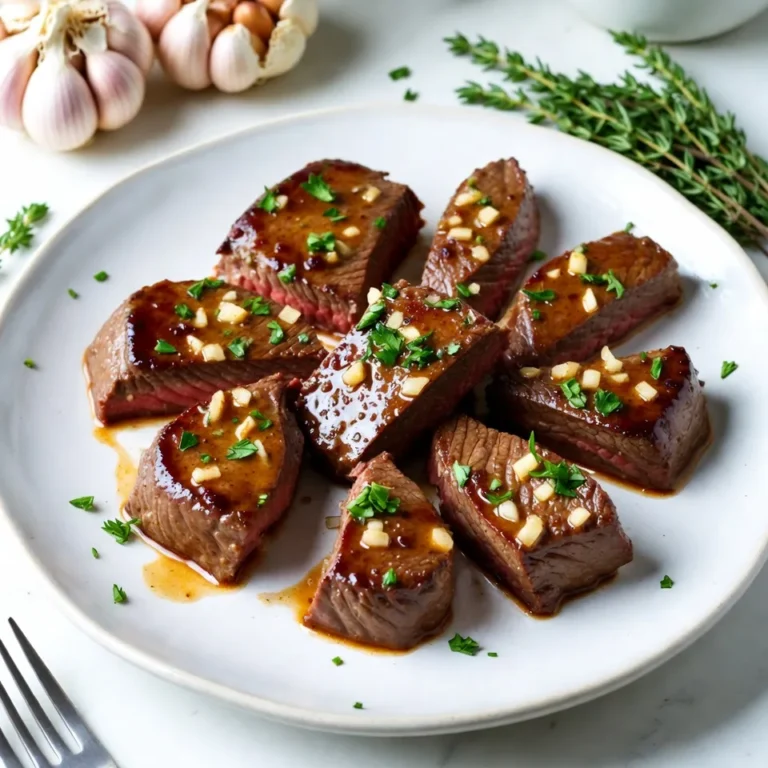
Savory Garlic Butter Steak Bites Easy and Flavorful Treat

- 1 lb ground beef (or lamb) - 1/2 cup gluten-free or regular breadcrumbs - 1/4 cup finely grated Parmesan cheese - 1/4 cup fresh parsley, finely chopped - 1 small onion, finely diced - 2 cloves garlic, minced or pressed - 1 tsp dried oregano - 1/2 tsp sea salt - 1/2 tsp freshly ground black pepper - 1 large egg, lightly beaten - 1 cup low-sodium chicken broth - 1/4 cup freshly squeezed lemon juice - Zest of 1 lemon - 2 tbsp extra virgin olive oil - 1 tbsp cornstarch (optional, for thickening) - Lemon slices and extra parsley for garnish You can swap ground beef for ground lamb. This adds a rich flavor. Use gluten-free breadcrumbs to make this dish gluten-free. Fresh herbs can replace dried oregano. Try fresh mint or dill for a twist. For a creamy sauce, blend in a bit of yogurt. You can use vegetable broth instead of chicken broth for a vegetarian option. Fresh ingredients are key in Greek cooking. They enhance flavors and aromas. Fresh herbs like parsley and oregano add bright notes. Quality meat makes the meatballs juicy and tender. Fresh lemon juice brings a zesty punch to the sauce. Using seasonally sourced items makes the dish more vibrant. They also improve texture and taste, making every bite delicious. {{ingredient_image_2}} Start by gathering your ingredients. In a large bowl, mix the ground beef or lamb, breadcrumbs, and Parmesan cheese. Add the chopped parsley, diced onion, and minced garlic. Sprinkle in the oregano, sea salt, and black pepper. Finally, pour in the beaten egg. Use your hands to mix everything well. Make sure it feels sticky. This stickiness helps the meatballs hold together when you shape them. Next, preheat your oven to 400°F (200°C). Now, it’s time to shape the meatballs. Take a small amount of the mixture and roll it into a ball about one inch wide. Make sure they are even in size. This helps them cook evenly. Place the meatballs on a baking sheet lined with parchment paper. Keep them spaced apart to allow for browning. Bake the meatballs for about 20 minutes. They should turn golden brown and reach an internal temperature of 160°F (70°C). While the meatballs bake, heat olive oil in a large skillet over medium heat. Pour in the chicken broth, followed by the lemon juice and lemon zest. Stir this mixture gently and bring it to a simmer. Let the flavors blend together. If you want a thicker sauce, mix cornstarch with cold water in a small bowl. Whisk this into your sauce. Keep stirring until it reaches your desired thickness. Once the meatballs are ready, carefully add them to the skillet with the lemon sauce. Cook them in the sauce for another 5 minutes on medium-low heat. Spoon the sauce over the meatballs as they cook. This helps them soak in the bright lemon flavor. Remove the skillet from the heat. Serve the meatballs right away, garnished with lemon slices and fresh parsley. This adds color and makes your dish look even more inviting. To make the best meatballs, mix your ingredients well. Use your hands for this. This helps the meatballs stick together. Shape them into even balls, about one inch wide. Uniform size helps them cook evenly. Bake at 400°F for about 20 minutes. Check that the inside reaches 160°F. This ensures they are safe to eat and not dry. The lemon sauce shines in this dish. Start with good chicken broth and fresh lemon juice. Squeeze the lemons yourself for the best taste. Add lemon zest for a strong flavor boost. If you want a thicker sauce, mix cornstarch with cold water. Stir this mixture into the sauce until it thickens. This gives a rich, creamy texture that coats the meatballs well. Serving is key to impressing your guests. Use a large platter for the meatballs. Drizzle some lemon sauce over them for shine. Add lemon slices around the meatballs. This looks fresh and bright. Top with fresh parsley for a pop of color. This simple touch makes your dish look gourmet. Pro Tips Choose the Right Meat: Using ground lamb instead of beef adds a richer flavor and a more traditional Greek taste to your meatballs. Don’t Overmix: Mixing the meatball ingredients just until combined helps to maintain a tender texture; overmixing can lead to tough meatballs. Let the Sauce Simmer: Allowing the lemon sauce to simmer gently enhances the flavors; be careful not to boil it vigorously, as it may reduce too quickly. Garnish Generously: A sprinkle of fresh parsley and lemon slices not only adds a pop of color but also enhances the dish's aromatic appeal. {{image_4}} You can use either lamb or beef for these meatballs. Lamb adds a rich flavor. It pairs well with lemon. Beef offers a milder taste. Both meats create juicy, tender meatballs. I suggest trying lamb for a more authentic Greek taste. It gives a unique twist to the dish. If you need a gluten-free option, substitute breadcrumbs with gluten-free ones. You can also use ground oats or crushed rice cakes. They hold the meatballs together well. Always check the labels to be sure they are gluten-free. This way, everyone can enjoy the meal. You can enhance the lemon sauce with extra flavors. Try adding capers for a briny touch. Fresh dill or mint brings an herbaceous note. A pinch of red pepper flakes adds a nice kick. You can also mix in some honey for sweetness. These additions make the sauce more complex and fun. After you enjoy your Greek meatballs, store leftovers properly. Place them in an airtight container. This keeps them fresh for up to three days in the fridge. If you have extra lemon sauce, store it in a separate container. This way, your meatballs stay juicy and flavorful. When it's time to reheat your meatballs, do it gently. Place them in a skillet over low heat. Add a splash of chicken broth or lemon sauce to keep them moist. Stir them often until warmed through. This helps the flavors come back to life. You can freeze Greek meatballs for quick meals later. Let them cool completely before freezing. Arrange the meatballs in a single layer on a baking sheet. Freeze them for about two hours. Then, transfer them to a freezer bag. They can stay in the freezer for up to three months. When ready to eat, thaw in the fridge overnight before reheating. Yes, you can make Greek meatballs ahead of time. Form the meatballs and place them on a tray. Cover them and chill them in the fridge. You can bake them later or freeze them for up to three months. This helps save time when you’re ready to serve dinner. Greek meatballs in lemon sauce pair well with many sides. Here are some great options: - Rice pilaf - Couscous - Greek salad - Roasted vegetables - Pita bread These sides add color and flavor to your meal. To adjust the recipe, simply change the amount of meat and ingredients. For example, if you want to serve eight, double the meat and other ingredients. If you want fewer, cut the amounts in half. Keep the ratios the same for the best results. Yes, you can make a vegetarian version! Use lentils or chickpeas instead of meat. Add breadcrumbs, spices, and egg or a flaxseed mix for binding. You can still use the lemon sauce to keep the dish bright and flavorful. This way, everyone can enjoy the meal. We explored the tasty world of Greek meatballs in lemon sauce. I covered the key ingredients, from fresh items to helpful substitutes. You learned how to prepare, shape, and bake the meatballs, and to make a zesty lemon sauce. I shared tips for perfect cooking and vibrant presentation. You also saw variations in protein options and storage tips. In conclusion, these meatballs are not just a dish; they are a flavor journey. Fresh ingredients and simple steps will lead to a dish you’ll love preparing again and again. Enjoy your cooking adventure!

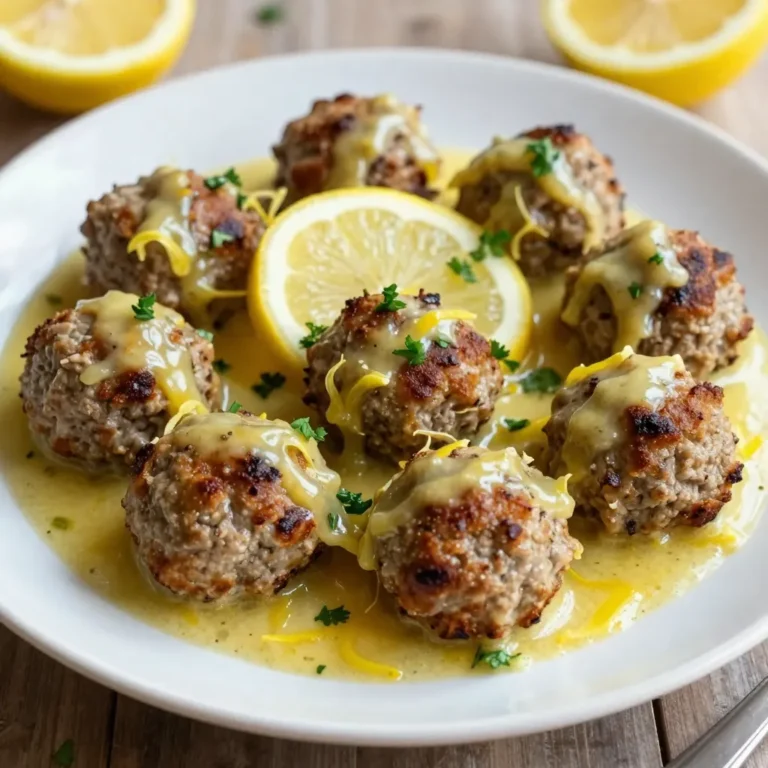
Savory Greek Meatballs in Lemon Sauce Delight

- 2 cups baby carrots, peeled - 2 cups green beans, trimmed - 3 tablespoons honey - 2 tablespoons unsalted butter - 1 tablespoon olive oil - Salt and pepper to taste - 1 teaspoon fresh thyme leaves (or ½ teaspoon dried thyme) - Zest of 1 lemon These ingredients make a bright and tasty side dish. The carrots bring sweetness, while the green beans add crunch. Honey provides a sticky glaze that makes everything shine. Butter and olive oil give the dish a rich flavor. Fresh thyme adds a hint of earthiness. Lastly, lemon zest brightens the taste and leaves a lasting impression. Each element works together to create a delicious balance. {{ingredient_image_2}} Start by boiling a large pot of salted water. Add 2 cups of peeled baby carrots. Cook them for about 5 minutes. The carrots should begin to soften, but stay firm. After 5 minutes, add 2 cups of trimmed green beans to the pot. Cook for another 3 to 4 minutes. Both the carrots and green beans should be bright in color and tender yet crisp. Drain the veggies in a colander. Quickly plunge them into a bowl of ice water. This stops the cooking. Let them cool for a few minutes, then drain again. In a large skillet, melt 2 tablespoons of unsalted butter and 1 tablespoon of olive oil over medium heat. This mix adds flavor and richness to your dish. Add the blanched carrots and green beans to the skillet. Sauté them for 2 to 3 minutes. This warms them up and allows the flavors to combine. Drizzle 3 tablespoons of honey over the vegetables. Sprinkle in salt, pepper, and 1 teaspoon of fresh thyme leaves. Stir well to coat the veggies evenly in the glaze. Continue to cook for another 2 to 3 minutes. This lets the glaze caramelize slightly, giving the dish a rich and sweet flavor. Right before serving, add the zest of 1 lemon. This brightens the dish and adds a fresh note. Mix everything together well. - Choosing the Right Vegetables Use fresh, vibrant baby carrots and green beans. Look for bright colors and firm textures. This choice makes your dish visually appealing and tasty. - Adjusting Sweetness Honey can vary in sweetness. Start with three tablespoons, then taste. If you want it sweeter, add a bit more. Remember, balance is key. - Adding a Crunch Factor For added texture, try adding chopped nuts. Almonds or walnuts work well. Toast them lightly in a pan for extra flavor. This gives your dish a nice crunch. These tips will help elevate your honey glazed carrots and green beans. Enjoy experimenting with flavors! Pro Tips Blanching Vegetables: Blanching the carrots and green beans not only helps to retain their vibrant colors but also ensures they maintain a crisp texture. Make sure to plunge them into ice water immediately after boiling. Choosing Honey: Opt for a high-quality, raw honey for the best flavor. Different types of honey can impart unique tastes, so feel free to experiment with varieties like clover or wildflower. Add Extra Flavor: For an added depth of flavor, consider incorporating a splash of balsamic vinegar or a sprinkle of crushed red pepper flakes along with the honey glaze. Serving Suggestions: These honey-glazed carrots and green beans pair beautifully with roasted meats or as part of a festive holiday spread. Garnishing with toasted nuts can also add a delightful crunch. {{image_4}} Variation 1: Adding Garlic You can easily add garlic to boost the flavor. Just mince 2-3 cloves and sauté them with the butter and olive oil. The garlic gives a nice depth to the honey glaze. It pairs well with the sweetness of the honey. You will love this savory twist! Variation 2: Using Different Herbs Switching herbs can change the taste of your dish. Try rosemary for a strong, earthy flavor. You can also use parsley for a fresh, bright note. Just chop a tablespoon of fresh herbs before adding them. This tweak makes your carrots and beans even more special! Alternative Sweeteners If you want a different sweet taste, use maple syrup instead of honey. It will give a rich, unique flavor. Adjust the amount to your liking. Start with 2 tablespoons and add more if needed. Different Types of Vegetables You can swap out baby carrots and green beans for other veggies. Asparagus and peas work great too. These swaps keep your dish fresh and exciting. Just remember to cook them until tender. Enjoy the new flavors that come with these changes! Refrigeration Tips Store leftover honey glazed carrots and green beans in an airtight container. Keep them in the fridge. They stay fresh for about three days. To avoid sogginess, do not cover them tightly while they cool. Freezing Guidance You can freeze these veggies, but they might lose some crunch. Place them in a freezer-safe bag. Press out extra air before sealing. They will last up to three months in the freezer. When ready to eat, thaw them overnight in the fridge. Best Methods for Reheating The best way to reheat honey glazed carrots and green beans is on the stove. Heat a pan over medium heat. Add a splash of water to keep them moist. Stir often until they are hot. You can also use a microwave. Place them in a bowl and cover with a damp paper towel. Heat in short bursts, stirring in between. Avoiding Sogginess To avoid sogginess, do not overheat. If they start to get mushy, that means they are done. Be mindful of the time, especially if using a microwave. You can serve honey glazed carrots and green beans with many dishes. They pair well with roasted chicken or grilled fish. Try them with steak for a hearty meal. You can also add them to a buffet or holiday dinner. Their sweet and savory flavor adds a nice touch. You can store honey glazed carrots and green beans in the fridge for up to four days. Keep them in an airtight container to maintain freshness. If you want to store them longer, consider freezing them. They can last in the freezer for up to three months. Yes, you can make this recipe ahead of time. Prepare the carrots and green beans and store them in the fridge. You can sauté and glaze them right before serving. This way, you save time and still enjoy a fresh taste. This post covered how to make honey glazed carrots and green beans. We listed the key ingredients, shared simple cooking steps, and discussed tips for the best results. Variations can spice up the dish, while storage info ensures freshness later. Embrace this tasty recipe at your next meal. It’s easy, delicious, and sure to impress. Enjoy cooking and experimenting with different flavors!

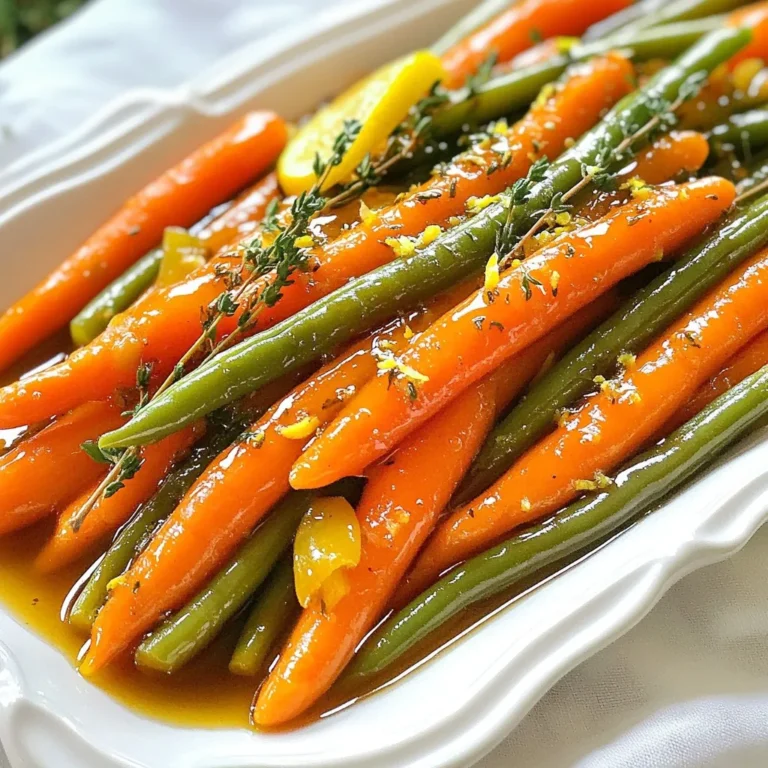
Honey Glazed Carrots and Green Beans Delight Recipe

To make Poblano Chicken Tortilla Soup, gather these key ingredients: - 2 large poblano peppers, roasted and diced - 1 lb boneless, skinless chicken breasts, cut into bite-sized pieces - 1 medium onion, finely chopped - 3 cloves garlic, minced - 1 can (14 oz) diced tomatoes with juices - 4 cups chicken broth (preferably low-sodium) - 2 teaspoons ground cumin - 1 teaspoon smoked paprika - 1 teaspoon chili powder - Salt and pepper, to taste - 1 tablespoon olive oil - 1 cup corn kernels (fresh or frozen) - 1 cup black beans, rinsed and drained These ingredients work together to create a rich and tasty soup. Adding garnishes can enhance your soup's look and taste. Here are some great options: - Fresh cilantro, chopped - Tortilla strips for crunch - Lime wedges for a zesty kick These toppings let you customize each bowl to your liking. Sometimes, you might not have all the ingredients on hand. Here are some easy swaps: - Use rotisserie chicken for quick prep. - Swap black beans with kidney beans or chickpeas. - If you lack fresh poblano peppers, try canned ones or even bell peppers. These substitutions keep the soup tasty while making it easier to prepare. {{ingredient_image_2}} Roasting poblano peppers brings out their deep, smoky flavor. Start by preheating your oven to 450°F (230°C). Place the peppers on a baking sheet in a single layer. Roast them for about 20 minutes. You want the skin to get charred and blistered. Once done, remove them from the oven. Put the peppers in a bowl and cover it with plastic wrap. This traps steam and helps loosen the skin. After 10 minutes, when they cool, peel off the charred skin, remove the stem and seeds, and chop them up. Next, heat 1 tablespoon of olive oil in a large pot over medium heat. When the oil shimmers, add a finely chopped onion. Sauté it for about 3-4 minutes. You want it to turn translucent. Then, stir in 3 minced garlic cloves. Cook for another minute. The garlic should be fragrant but not browned. This step builds the base for your soup's flavor. Now it’s time to cook the chicken. Add 1 pound of cut chicken breasts to the pot. Sprinkle in 2 teaspoons of ground cumin, 1 teaspoon of smoked paprika, and 1 teaspoon of chili powder. Season with salt and pepper to taste. Cook for 5-7 minutes. Stir occasionally until the chicken pieces are browned and fully cooked through. Once the chicken is done, it’s time to combine everything. Stir in the roasted poblano peppers, 1 can of diced tomatoes with their juices, 4 cups of chicken broth, 1 cup of corn kernels, and 1 cup of black beans. Bring this mixture to a boil. Then, reduce the heat to a simmer. Let the soup cook for about 20 minutes. Stir occasionally to blend those delicious flavors. After 20 minutes, taste the soup. Adjust the seasoning as needed. You might want more salt, pepper, or chili powder. This step is key to making sure your soup hits the right flavor notes. Ladle the hot soup into bowls. Garnish with chopped fresh cilantro. Top each bowl with crispy tortilla strips for crunch. Serve with lime wedges on the side. Squeezing lime over the soup gives it a fresh kick. For a fun touch, use colorful bowls and place extra cilantro and tortilla strips on the table. This allows guests to customize their own bowls. Enjoy your flavorful and hearty dish! Roasting poblano peppers brings out their rich flavor. Preheat your oven to 450°F (230°C). Place your peppers on a baking sheet. Roast them for about 20 minutes. Look for the charred skin. After roasting, put the peppers in a bowl and cover with plastic wrap. This traps steam and makes peeling easier. Wait 10 minutes before handling. Peel off the skin, then remove the stem and seeds. Chop the roasted peppers into small pieces. This adds great depth to your soup. To cook chicken right, cut it into bite-sized pieces. This helps it cook evenly. Use boneless, skinless chicken breasts. Heat olive oil in your pot over medium heat. Add the chicken and season it well. Use cumin, smoked paprika, chili powder, salt, and pepper. Cook for 5-7 minutes, stirring often. Look for a nice golden brown color. This gives the chicken a great taste and texture. Spices are key to making this soup pop. Ground cumin gives warmth. Smoked paprika adds a touch of smokiness. Chili powder boosts the heat. Use these wisely to match your taste. Always taste the soup before serving. You can add more spices if needed. A little extra chili powder can really enhance the flavor. Serve your soup hot in colorful bowls. Garnish with fresh cilantro and crispy tortilla strips. This adds texture and looks great. Squeeze lime over each bowl for a zesty kick. If you have leftovers, let the soup cool first. Store it in airtight containers in the fridge. It can last for 3-4 days. For longer storage, freeze it in portions. Reheat gently on the stove for best taste. Pro Tips Roasting Poblano Peppers: For enhanced flavor, roast the peppers until they are charred. This will give your soup a smoky depth. Seasoning the Chicken: Make sure to season the chicken well with the spices before cooking to ensure every bite is flavorful. Adjusting Spice Levels: Taste the soup towards the end of cooking and adjust the spices according to your heat preference. Serving Suggestions: Serve with fresh lime wedges and extra cilantro for added brightness and freshness to the dish. {{image_4}} If you want a meat-free version, try bean and corn tortilla soup. Use the same base of roasted poblano peppers. Swap out chicken for a mix of black beans and kidney beans. Here’s how to make it: - Ingredients: - 2 large poblano peppers, roasted and diced - 1 can (15 oz) black beans, rinsed and drained - 1 can (15 oz) kidney beans, rinsed and drained - 1 medium onion, finely chopped - 3 cloves garlic, minced - 1 can (14 oz) diced tomatoes with juices - 4 cups vegetable broth - 2 teaspoons ground cumin - 1 teaspoon smoked paprika - Salt and pepper, to taste - 1 tablespoon olive oil - 1 cup corn kernels (fresh or frozen) - Fresh cilantro, chopped (for garnish) - Tortilla strips (for topping) - Lime wedges (for serving) This soup is rich and filling with lots of flavor. If you like heat, add jalapeños. They give the soup a nice kick. Here’s how to include them: - Ingredients: - 2 large poblano peppers, roasted and diced - 1-2 jalapeños, diced (adjust to taste) - 1 lb boneless, skinless chicken breasts, cut into bite-sized pieces - 1 medium onion, finely chopped - 3 cloves garlic, minced - 1 can (14 oz) diced tomatoes with juices - 4 cups chicken broth - 2 teaspoons ground cumin - 1 teaspoon smoked paprika - 1 teaspoon chili powder - Salt and pepper, to taste - 1 tablespoon olive oil - 1 cup corn kernels (fresh or frozen) - 1 cup black beans, rinsed and drained - Fresh cilantro, chopped (for garnish) - Tortilla strips (for topping) - Lime wedges (for serving) Start by sautéing the jalapeños with the onions. This adds depth to the soup. For a creamy twist, make a creamy poblano chicken tortilla soup. This version is rich and smooth. - Ingredients: - 2 large poblano peppers, roasted and diced - 1 lb boneless, skinless chicken breasts, cut into bite-sized pieces - 1 medium onion, finely chopped - 3 cloves garlic, minced - 1 can (14 oz) diced tomatoes with juices - 4 cups chicken broth - 2 teaspoons ground cumin - 1 teaspoon smoked paprika - 1 cup heavy cream or coconut milk - Salt and pepper, to taste - 1 tablespoon olive oil - 1 cup corn kernels (fresh or frozen) - 1 cup black beans, rinsed and drained - Fresh cilantro, chopped (for garnish) - Tortilla strips (for topping) - Lime wedges (for serving) Add the cream at the end of cooking. Stir gently to keep it smooth. This soup is perfect for a cozy night in. You should store any leftover Poblano Chicken Tortilla Soup in an airtight container. Allow the soup to cool to room temperature before sealing it. Properly stored, it lasts for up to four days in the fridge. Make sure to label the container with the date so you can track freshness. If you want to freeze the soup, let it cool completely first. Pour the soup into freezer-safe bags or containers. Remove as much air as possible before sealing. The soup can be frozen for up to three months. When you're ready to enjoy it, just thaw it in the fridge overnight. When reheating, do it slowly on the stove or in the microwave. If using the stove, add a splash of water or broth to prevent drying. Heat until the soup is hot throughout. Stir it well while reheating for even heat distribution. Enjoy your comforting bowl of soup! You can enjoy Poblano Chicken Tortilla Soup with many tasty sides. Some great options include: - Cornbread: Soft and sweet, it pairs well with the soup's heat. - Tortilla Chips: Crunchy chips add texture and fun. - Guacamole: Creamy avocado dip balances the soup's spices. - Fresh Salad: A light salad with lime dressing cools the palate. While fresh poblano peppers taste best, you can use canned ones. Canned peppers often lack some flavor and texture but still work in a pinch. Be sure to drain them well before adding to the soup. This soup lasts about 3 to 4 days in the fridge. Make sure to store it in an airtight container. Reheat it on the stove or in the microwave before serving. Yes, you can make this soup ahead of time. It tastes even better the next day as flavors meld. Just store it in the fridge and reheat when you are ready to enjoy. I recommend using boneless, skinless chicken breasts. They cook quickly and stay juicy. If you prefer dark meat, boneless thighs can also work well. Absolutely! You can make this soup in a slow cooker. Simply add all the ingredients to the cooker and cook on low for 6 to 8 hours. This method allows the flavors to blend nicely. Poblano Chicken Tortilla Soup is a tasty dish with simple steps. We covered essential ingredients, cooking methods, and variations. I hope you feel ready to make your own delicious soup. Remember, this recipe is flexible, so have fun with it! Use the tips for great results, and don't skip the garnishes. Your soup's flavor will shine. Enjoy making it for friends and family!

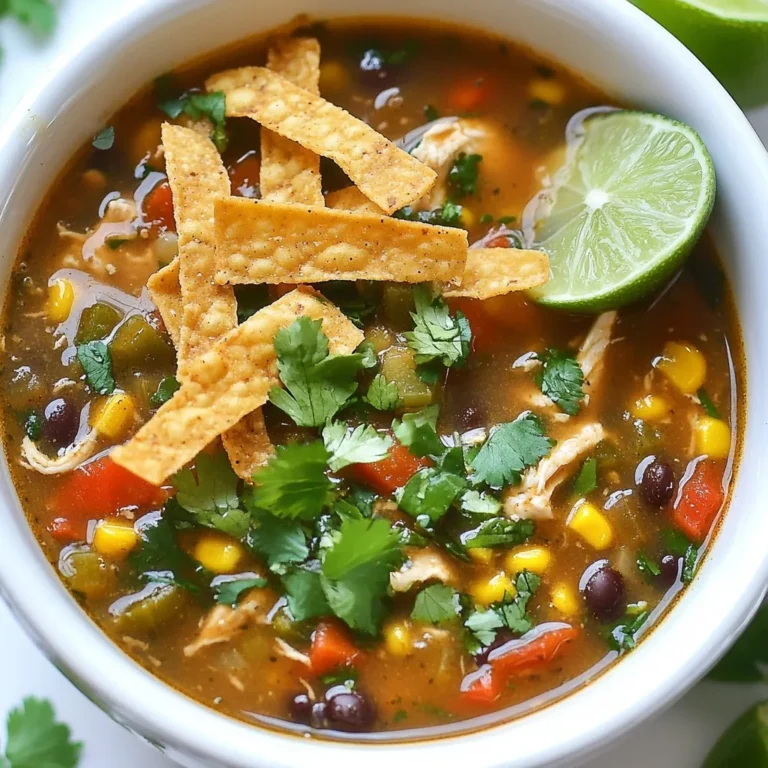
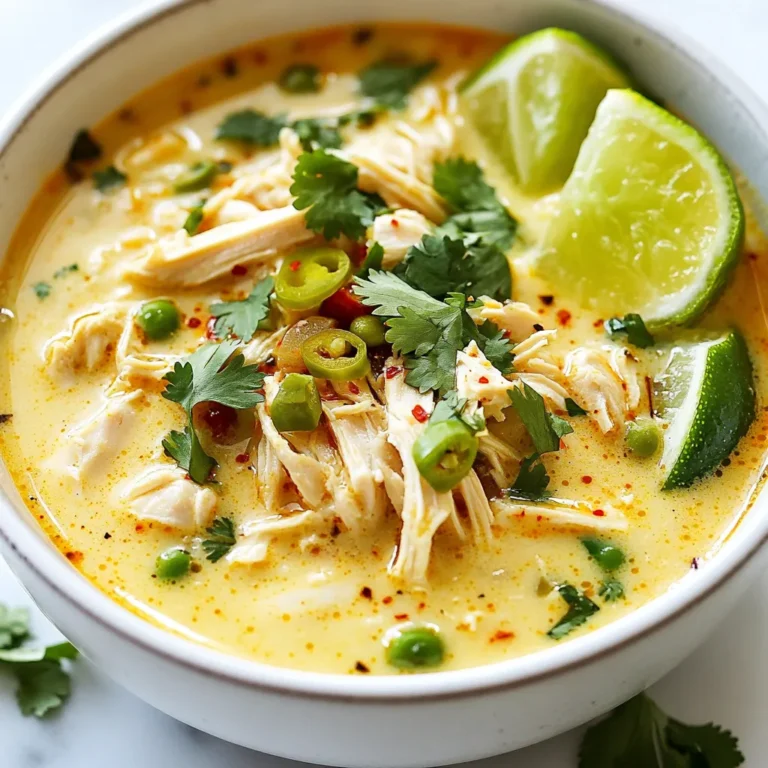
Poblano Chicken Tortilla Soup Flavorful and Hearty Dish

For these tasty apple cinnamon rolls, you need: - 2 cups all-purpose flour - 1/2 cup granulated sugar - 1/2 teaspoon salt - 1 tablespoon baking powder - 1/2 teaspoon baking soda - 1/4 cup unsalted butter, softened - 3/4 cup buttermilk - 1 cup apples, peeled and chopped - 2 teaspoons ground cinnamon - 1/4 teaspoon freshly grated nutmeg - 1/4 cup packed brown sugar - 1 cup powdered sugar (for glaze) - 2 tablespoons milk (for glaze) These ingredients work together to create soft, fluffy rolls with a sweet, spiced flavor. To make your rolls even better, consider adding: - A pinch of vanilla extract - Chopped nuts like walnuts or pecans - Raisins for extra sweetness Adding these extras can bring new textures and tastes to your rolls. You might not have all the ingredients on hand. Here are some swaps: - Use whole wheat flour instead of all-purpose for a nuttier flavor. - Milk can replace buttermilk; just add a splash of vinegar for tang. - Substitute any tart apple, like Honeycrisp, for Granny Smith. These substitutions help you adapt the recipe to what you have, without losing flavor. {{ingredient_image_2}} To start, preheat your oven to 375°F (190°C). Grease a 9-inch round baking pan with butter or non-stick spray. This helps the rolls come out easily later. In a large bowl, whisk together the flour, sugar, salt, baking powder, and baking soda. This step is key for even rising. Next, add the softened butter into the dry mix. Use a fork or pastry cutter to blend it until the mix looks like coarse crumbs. Pour in the buttermilk and mix it until a soft dough forms. Now, take the dough and place it on a lightly floured surface. Knead it gently for about 1 minute. You want it smooth, but don't overdo it. Over-kneading can make your rolls tough. After that, roll the dough into a rectangle that is about 12x8 inches and 1/4 inch thick. If it sticks, just add a bit more flour to your surface. In a small bowl, mix together the brown sugar, ground cinnamon, and freshly grated nutmeg. This mixture will give your rolls a warm, spicy flavor. Once mixed, evenly sprinkle this mixture over the dough. Now, take your chopped apples and spread them on top of the sugar mix. Make sure they are spread out well. This way, every bite has that sweet apple goodness. Starting from the long edge, carefully roll the dough into a tight log. Use a sharp knife to slice the log into 1-inch thick pieces. You should get about 8 rolls. Place these rolls upright in your greased baking pan. They should fit snugly but not be squished. Cover them with a clean kitchen towel and let them rise in a warm spot for about 30 minutes. You want them to puff up a bit. After they rise, pop the pan in the preheated oven. Bake for 20-25 minutes, or until the tops are golden brown. While they bake, prepare the glaze. In a small bowl, whisk the powdered sugar and milk until smooth. Once the rolls are done, let them cool for about 10 minutes. Then, drizzle the glaze generously over the warm rolls. Enjoy the sweet, warm treat! When making apple cinnamon rolls, avoid over-kneading the dough. This can make the rolls tough. Also, ensure your apples are evenly chopped to prevent uneven cooking. Lastly, don’t rush the rising time. Letting the rolls rise properly leads to lighter, fluffier rolls. To achieve flaky rolls, keep your butter cold before mixing it in. Use a pastry cutter or fork to blend it into the dry ingredients. This creates small pockets of butter that help the rolls rise and get that lovely flaky texture. Roll your dough to the right thickness, about 1/4 inch. This thickness helps create those perfect layers. Keep your rolls soft by covering them with a kitchen towel while they rise. This keeps moisture in. After baking, let them cool slightly before adding the glaze. The glaze adds moisture and a touch of sweetness. Store any leftovers in an airtight container to maintain softness. If possible, reheat them briefly in the oven for the best taste. Pro Tips Use Fresh Apples: For the best flavor and texture, opt for fresh, tart apples like Granny Smith. This adds a delightful zing to your rolls. Don't Over-Knead: When kneading the dough, stop as soon as it becomes smooth. Over-kneading can lead to tough rolls, so be gentle! Let Them Rise: Allow the rolls to rise in a warm spot for the best results. This helps them become fluffy and light after baking. Adjust Glaze Consistency: If your glaze is too thick, add a splash more milk; if it's too thin, mix in a bit more powdered sugar until you reach your desired consistency. {{image_4}} You can easily add nuts or raisins to your apple cinnamon rolls. Chopped walnuts or pecans work great. They add a nice crunch and flavor. If you prefer raisins, use golden or regular ones. Mix them with the apple filling. It gives your rolls new taste and texture. Just use about half a cup of nuts or raisins. This simple change makes your rolls even more delightful. You can also turn these apple cinnamon rolls into pumpkin rolls. Use pumpkin puree in place of some apples. About one cup of pumpkin puree adds a rich flavor. Mix it with the cinnamon and nutmeg for a warm spice blend. The dough can stay the same. Bake as usual, and you will enjoy an autumn treat any time of year! If you need gluten-free options, you can still enjoy these rolls. Use gluten-free all-purpose flour instead of regular flour. Many brands offer good blends that work well in baking. The rest of the ingredients stay the same. Just follow the same steps, and you will have tasty gluten-free apple cinnamon rolls. They will be soft and yummy, just like the original recipe! To store your apple cinnamon rolls, let them cool first. Once cooled, place them in an airtight container. This keeps them fresh for up to three days. If you want to keep them longer, consider freezing. When you're ready to enjoy your rolls again, preheat your oven to 350°F (175°C). Wrap the rolls in foil to keep them moist. Heat for about 10-15 minutes, or until warm. You can also use a microwave. Heat each roll for about 15-20 seconds. Enjoy that fresh-baked taste! To freeze pre-baked rolls, let them cool completely. Place them in a freezer-safe bag or container. Be sure to remove as much air as possible. They will keep well for up to two months. When you want to eat them, thaw in the fridge overnight. Reheat as mentioned above for the best flavor. You can tell the rolls are fully baked when they are golden brown on top. You should also insert a toothpick in the center. If it comes out clean, your rolls are done. They should feel firm but soft to the touch. The edges should pull away slightly from the pan. Yes, you can use other types of apples. While Granny Smith apples are tart and work well, you can try Honeycrisp or Fuji for a sweeter taste. Each apple adds its own flavor and texture. Just make sure the apples are firm and fresh. This way, they hold up during baking and provide a nice bite. To make the glaze thicker, add more powdered sugar. Start with one tablespoon at a time. If you want it thinner, add a little milk. Mix well after each addition. You want a pourable yet thick glaze that will coat the rolls nicely. Adjust until you reach your desired consistency for the perfect finish. Yes, you can make the dough ahead of time. After mixing the ingredients, wrap the dough tightly in plastic wrap. Refrigerate it for up to 24 hours. When you're ready to bake, let the dough sit at room temperature for about 30 minutes. This makes it easier to roll out and shape into rolls. You now know how to make delicious apple cinnamon rolls. We covered key ingredients, step-by-step instructions, and helpful tips. You learned about fun variations and how to store your rolls. Keep experimenting with flavors and techniques. Enjoy baking, and share your creations with friends! Happy baking!

Apple Cinnamon Rolls Delicious and Easy Recipe

- 1.5 lbs boneless skinless chicken breasts - 2 cans (15 oz each) white beans (cannellini or great northern) - 1 can (15 oz) sweet corn - 1 medium onion, finely chopped - 3 cloves garlic, minced - 1 can (4 oz) diced green chilies, with juices - 1 teaspoon ground cumin - 1 teaspoon chili powder - 1 teaspoon smoked paprika - Salt and freshly cracked pepper, to taste - 1 cup heavy cream or coconut cream - 1/2 cup fresh cilantro, chopped, for garnish - 1 lime, cut into wedges for serving This chili recipe shines with its simple yet tasty ingredients. You start with boneless skinless chicken breasts, which cook to a tender finish. The white beans add creaminess and protein. Sweet corn brings a natural sweetness that balances the dish. Onions and garlic give the chili a rich flavor. They add depth when cooked down. The diced green chilies bring a mild heat and extra flavor. Ground spices like cumin, chili powder, and smoked paprika create warmth and complexity. Adjust salt and pepper to fit your taste. For a creamier texture, you can add heavy cream or coconut cream. Both options work well. Fresh cilantro adds a pop of color and flavor when you serve. Lime wedges provide a bright, zesty kick, which brightens the dish. This mix of ingredients makes the chili both comforting and exciting. It is perfect for any meal. {{ingredient_image_2}} To start, place the boneless skinless chicken breasts at the bottom of your crockpot. This layer keeps the chicken moist as it cooks. Next, chop your onion finely and mince the garlic. Layer these over the chicken. Then, add the drained white beans, sweet corn, and diced green chilies on top. This colorful mix adds great texture and flavor. For seasoning, sprinkle ground cumin, chili powder, and smoked paprika over the layers. Don't forget to add salt and cracked pepper to taste. This step is key for maximum flavor in your chili. Now, secure the lid on your crockpot. Set it to cook on low for 6-7 hours or on high for 3-4 hours. The longer cooking time lets the chicken become very tender. This is important, as letting flavors meld makes your chili taste better. When the cooking time is up, carefully remove the chicken from the crockpot. Use two forks to shred the chicken into bite-sized pieces. Return the shredded chicken to the pot and mix well. Next, add the heavy cream or coconut cream. This will make your chili rich and creamy. Let it simmer on low for another 30 minutes. Taste your chili and adjust the seasoning if needed. Add more salt, pepper, or spices to suit your taste. Finally, ladle the creamy white chicken chili into bowls. Garnish with fresh chopped cilantro and serve with lime wedges. Enjoy the savory comfort of this dish! - Choosing the right beans: I recommend using cannellini or great northern beans. They have a creamy texture that blends well in chili. Rinse them well to remove extra sodium and keep your chili light. - Ways to enhance creaminess: For an extra creamy finish, use heavy cream or coconut cream. Adding this at the end makes the chili rich and smooth. Both options bring great flavor and texture. - Overcooking the chicken: Cook the chicken just right to keep it juicy. If you cook too long, it can dry out. Stick to the time and check for doneness. - Incorrect seasoning balance: Always taste your chili before serving. Adjust salt, pepper, and spices to get the right flavor. A little tweak can make a big difference. - Ideal accompaniments: Serve your chili with warm bread or fluffy rice. Both options soak up the chili's creamy goodness and make a complete meal. - Creative presentation ideas: Use rustic bowls for a cozy feel. Garnish with cilantro and a sprinkle of smoked paprika. A lime wedge adds a pop of color and flavor. Pro Tips Choose the Right Beans: Using a mix of white beans can add depth to the texture and flavor. Great northern, cannellini, or even navy beans work wonderfully. Enhance the Flavor: For an extra kick, add a dash of cayenne pepper or some diced jalapeños along with the green chilies. This will elevate the chili's overall profile. Make It Ahead: This chili tastes even better the next day as the flavors continue to meld. Consider making a larger batch and storing leftovers in the fridge for a quick meal later. Garnish Creatively: Besides cilantro and lime, consider topping with avocado slices, crushed tortilla chips, or a dollop of sour cream for added creaminess and crunch. {{image_4}} You can make this chili more colorful and healthy. Try adding bell peppers or zucchini. Cut them into small pieces and mix them in. They add a nice crunch and flavor. You can also add greens like spinach or kale. Just toss them in during the last 30 minutes of cooking. This way, they stay bright and fresh. If you need a dairy-free chili, swap the heavy cream for coconut cream. It gives a nice, rich taste without dairy. For those on low-carb or keto diets, you can skip the corn. Use more beans or add in cauliflower rice. This keeps it filling without the carbs. Want some heat? Add sliced jalapeños to your chili. They bring a spicy kick that many love. You can also get creative with seasonings. Try adding fresh herbs like cilantro or parsley. A dash of lime juice brightens the entire dish. Mix and match to find your favorite flavor combinations! To keep your chili fresh, cool it down first. Then, place it in an airtight container. Store it in the fridge for up to three days. If you want to keep it longer, freeze it. Pour the chili into freezer-safe bags. Squeeze out the air and seal them tight. Your chili can last in the freezer for about three months. When you want to eat it, just thaw it overnight in the fridge. You can reheat your chili in two easy ways. The microwave is quick and simple. Place your chili in a bowl and cover it with a lid. Heat it for one to two minutes, stirring halfway. For stovetop reheating, pour the chili into a pot. Heat it over medium heat, stirring often. To keep the creaminess, add a splash of cream while warming. This helps your chili stay rich and smooth. In the fridge, your chili stays good for about three days. Check for signs of spoilage before eating. If you see mold or if it smells off, throw it away. Always trust your senses. If it looks or smells strange, it is best not to eat it. Yes, you can use frozen chicken. Just add extra cooking time. When you use frozen chicken, set your crockpot on high for about 5-6 hours. This helps the chicken cook through evenly. Make sure to check that the chicken reaches 165°F for safety. To add spice, use diced jalapeños or more green chilies. You can also mix in a teaspoon of cayenne pepper. If you like heat, try adding hot sauce at the end. Adjust the spice level to fit your taste. Yes, you can create a vegetarian version. Replace chicken with more beans or use tofu. Use vegetable broth instead of chicken broth. For creaminess, stick with coconut cream or a thick dairy-free yogurt. Absolutely! This chili tastes great when made ahead. Cook it, let it cool, and store it in the fridge. You can reheat it on the stove or in the crockpot later. The flavors will deepen and taste even better. You can top your chili with shredded cheese, sour cream, or sliced avocado. Fresh cilantro adds a nice touch, too. A squeeze of lime brings out the flavors. Get creative with your toppings! Your white chicken chili can last about 3-4 days in the fridge. Store it in an airtight container for best results. Always check for signs of spoilage before eating. Yes! This chili freezes well. Let it cool completely, then place it in freezer-safe containers. It can last up to 3 months in the freezer. When ready to eat, thaw it in the fridge overnight. White chicken chili pairs well with cornbread or tortilla chips. You can also serve it with rice or a fresh salad. These sides balance the meal and add more texture. Yes, this chili is gluten-free! All the ingredients are safe for a gluten-free diet. Just check your broth and any toppings to ensure they are gluten-free. Crockpot white chicken chili is a tasty, easy meal that anyone can make. I shared the main ingredients like chicken, beans, and seasonings. I explained how to prepare and cook your chili perfectly, along with tips to avoid common mistakes. You can even add veggies or modify the recipe to fit your diet. Storing leftovers is simple, and reheating keeps the flavors vibrant. Enjoy your homemade chili on colder days and serve it with your favorite sides! Let your taste buds explore this delightful dish.

Crockpot White Chicken Chili Savory Comfort Dish

PREV 1 … 39 40 41 … 47 NEXT
snack joy kitchen

explore

DessertsDinnerAppetizersDrinks

Our Policies

  • Cookie Policy
  • Copyright Policy
  • Disclaimer
  • GDPR Policy
  • Terms Of Use
Back to Top
  • About
  • Contact Us
  • Privacy Policy
© 2026 snack joy kitchen