FREE DINNER EBOOK! Get your copy!
  • Cookie Policy
  • GDPR Policy
  • Disclaimer
  • Terms Of Use
  • Visit my other site: Fun Cookie Recipes
snack joy kitchen
  • Home
  • Dinner
  • Desserts
  • Drinks
  • Appetizers
  • Contact
  • About
  • Privacy Policy
  • Home
  • Dinner
  • Desserts
  • Drinks
  • Appetizers
  • Contact
  • About
  • Privacy Policy
  • Cookie Policy
  • GDPR Policy
  • Disclaimer
  • Terms Of Use
Visit my other site: Fun Cookie Recipes

HOME / CATEGORIES /

Latest

To make a delicious Double Chocolate Zucchini Bread, gather these simple ingredients: - 1 ½ cups all-purpose flour - ½ cup unsweetened cocoa powder - 1 teaspoon baking soda - ½ teaspoon baking powder - ½ teaspoon salt - ½ cup granulated sugar - ½ cup packed brown sugar - 2 large eggs, room temperature - 1 teaspoon pure vanilla extract - ¾ cup vegetable oil - 1 ½ cups grated zucchini (from about 1 medium zucchini) - 1 cup semi-sweet or dark chocolate chips - ½ cup chopped walnuts (optional) Each ingredient plays a key role in creating the perfect texture and flavor. The all-purpose flour gives the bread structure. Cocoa powder adds that rich chocolate taste. Baking soda and baking powder help it rise, while salt enhances all the flavors. The sugars sweeten the bread and keep it moist. Eggs bind the ingredients together, and the vanilla extract adds a warm note. Vegetable oil contributes to the moisture, making each slice tender. Grated zucchini not only adds health benefits but also keeps the bread moist. Finally, the chocolate chips bring a delightful richness, while the walnuts add a nice crunch if you choose to include them. Gather these ingredients, and you’re ready to whip up a mouthwatering treat! {{ingredient_image_2}} - Preheat the oven to 350°F (175°C) and prepare the loaf pan. - Combine the dry ingredients and set aside. Start by preheating your oven. This step ensures your bread bakes evenly. Grease a 9x5-inch loaf pan or line it with parchment paper. This makes the bread easier to remove later. In a medium bowl, whisk together the flour, cocoa powder, baking soda, baking powder, and salt. Mix these well so they blend into one. - Mix the sugars and wet ingredients until smooth. - Incorporate the vegetable oil and grated zucchini. - Combine wet and dry ingredients, being cautious not to overmix. In a large bowl, beat the granulated sugar and brown sugar with eggs and vanilla. Whisk until it is smooth and creamy. Slowly add the vegetable oil while whisking. This step helps create a rich texture. Next, fold in the grated zucchini. Make sure it is spread out evenly. Then, add the dry mixture into the wet one. Stir just until you no longer see dry flour. Be careful not to overmix, as this can make the bread tough. - Fold in chocolate chips and walnuts. - Transfer to the pan and bake, checking for doneness. - Cool before slicing. Now, gently fold in the chocolate chips and walnuts if you choose to use them. This adds texture and flavor. Pour the batter into your prepared loaf pan. Spread it evenly. Bake it in the oven for 50 to 60 minutes. To check if it's done, insert a toothpick into the center. It should come out clean or with a few moist crumbs. Once baked, let the bread cool in the pan for about 10 minutes. After that, place it on a wire rack to cool completely before slicing. Enjoy the deliciousness! - Grated zucchini keeps the bread moist. Use fresh zucchini for the best results. - To check if the bread is done, insert a toothpick in the center. It should come out clean or with a few moist crumbs. - Try different chocolate chips, like dark, milk, or white chocolate. Each adds a unique taste. - Add spices like cinnamon or nutmeg. They give warmth and depth to the flavor. - Serve slices with whipped cream or a scoop of vanilla ice cream. This adds a creamy touch. - A light dusting of powdered sugar makes it look fancy and inviting. It’s a simple trick that impresses! Pro Tips Grate the Zucchini Finely: Use the fine side of a box grater to ensure the zucchini integrates seamlessly into the batter, adding moisture without making the bread soggy. Room Temperature Ingredients: Make sure your eggs are at room temperature for better emulsification, resulting in a smoother batter and a more tender loaf. Don't Overmix: Mix the batter just until combined to prevent the bread from becoming tough; a few lumps are perfectly fine! Cool Completely Before Slicing: Allowing the bread to cool fully on a wire rack helps it firm up and makes slicing easier, ensuring clean cuts. {{image_4}} You can make Double Chocolate Zucchini Bread healthier. Here are two easy swaps: - Substitute whole wheat flour for all-purpose flour. It adds more fiber and nutrients. - Use a sugar alternative for a low-sugar option. This helps reduce calories without losing sweetness. You can get creative with flavors in this bread. Consider these ideas: - Add different nuts like pecans or almonds. They add crunch and flavor. - Incorporate dried fruits such as cranberries or cherries. They bring a nice sweetness. You can adapt this recipe for specific diets. Here are some options: - Make it gluten-free with gluten-free flour. This keeps the texture soft and moist. - For a vegan version, use flax eggs and plant-based oil. This keeps the bread rich and tasty. You can keep your Double Chocolate Zucchini Bread fresh for a few days. Store it in an airtight container at room temperature. It will stay good for up to 3 days. This way, you can enjoy a slice whenever you like! If you want to save some for later, freezing works great. Wrap the bread tightly in plastic wrap, then in foil. It can last for up to 3 months in the freezer. When you are ready to eat it, simply take it out and thaw it in the refrigerator. This keeps it moist and tasty. Always check your bread before eating. If you see any discoloration or notice any off smells, it’s best to discard it. Keeping an eye on these signs ensures you enjoy only the best treats! How do I ensure my Double Chocolate Zucchini Bread stays moist? To keep your bread moist, use fresh grated zucchini. Zucchini adds moisture. Also, don't overbake. Check with a toothpick for doneness. If it comes out with a few crumbs, it's done. Can I use frozen zucchini for this recipe? Yes, you can use frozen zucchini. Just thaw it first and squeeze out excess water. This helps keep the bread from getting too wet and soggy. What can I substitute for eggs if making it vegan? You can use flax eggs as a substitute. Mix one tablespoon of ground flaxseed with two and a half tablespoons of water. Let it sit for five minutes to thicken. This works great in baking. How can I enhance the chocolate flavor in this recipe? To boost the chocolate taste, consider adding more cocoa powder or chocolate chips. You can also add espresso powder. Just a little can deepen the chocolate flavor without adding coffee taste. How should I slice and serve the bread for optimal presentation? Slice the bread when it’s cool. Arrange the slices on a wooden board. Dust the top with powdered sugar for a nice touch. For extra flair, serve with whipped cream or ice cream. A mint sprig adds color, too! This blog post covered the tasty Double Chocolate Zucchini Bread. We explored the key ingredients, easy steps to make it, and helpful tips. You learned about fun flavors and healthy twists. Storing tips kept your bread fresh longer. Now, you’re ready to bake this delicious treat! Enjoy sharing it with family and friends. Your baking journey can be even more fun with this recipe. Happy baking!

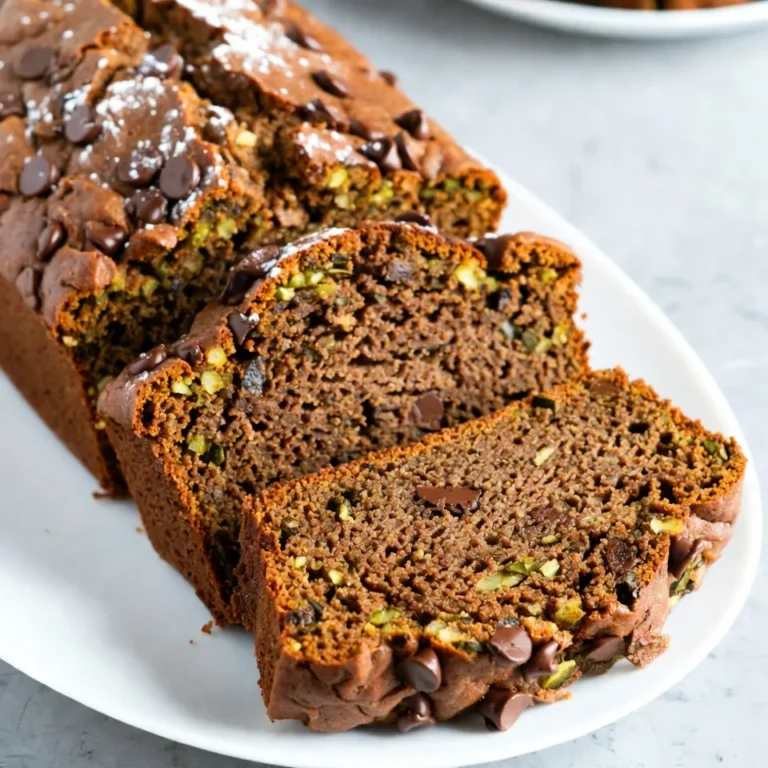
Double Chocolate Zucchini Bread Irresistible Treat

- 1 lb ground chicken - 1 tablespoon sesame oil - 2 cloves garlic, minced - 1 tablespoon fresh ginger, grated - 1 red bell pepper, finely diced - 1 cup shredded carrots - 1/4 cup green onions, finely chopped - 1/4 cup fresh cilantro, roughly chopped - 1/4 cup unsalted peanuts, coarsely chopped - 2 tablespoons soy sauce - 2 tablespoons creamy peanut butter - 1 tablespoon fresh lime juice - 1 teaspoon honey - Salt and black pepper to taste - 1 head of butter lettuce or iceberg lettuce, leaves separated for serving If you need swaps, here are some great options: - Ground turkey or beef can replace ground chicken. - Use olive oil instead of sesame oil for a different flavor. - You can swap red bell pepper for yellow or green. - For a nut-free version, try sunflower seed butter in place of peanut butter. - Instead of soy sauce, use tamari for a gluten-free option. When choosing fresh ingredients, look for these signs: - Select chicken that is pink and firm. - Choose garlic that is plump and dry. - Pick ginger with a smooth skin and a strong scent. - Look for bell peppers that are shiny and firm. - For lettuce, choose leaves that are crisp and vibrant. Using fresh ingredients makes a big difference in taste. It’s worth the extra effort! {{ingredient_image_2}} To make Thai peanut chicken lettuce wraps, gather all your ingredients first. This helps speed up cooking. You need ground chicken, sesame oil, garlic, ginger, and fresh veggies. Having everything ready makes the cooking fun and easy. 1. Heat 1 tablespoon of sesame oil in a large skillet over medium heat. Wait about 30 seconds for it to warm. 2. Add 2 cloves of minced garlic and 1 tablespoon of grated ginger to the skillet. Sauté these for about 1 minute. You want to smell the flavors, but don’t let the garlic burn. 3. Now, add 1 pound of ground chicken. Use a spatula to break it apart as it cooks. Cook until it’s browned, which takes about 7-8 minutes. 4. Toss in 1 finely diced red bell pepper and 1 cup of shredded carrots. Cook for another 3-4 minutes. Stir often until the veggies soften but keep their color. 5. In a small bowl, mix 2 tablespoons of soy sauce, 2 tablespoons of creamy peanut butter, 1 tablespoon of fresh lime juice, and 1 teaspoon of honey. Stir until smooth. 6. Pour this sauce over the chicken and veggies in the skillet. Stir well to coat everything. Let it simmer for a few minutes to blend the flavors. 7. Season with salt and black pepper to taste. Then, take the skillet off the heat. 8. Gently fold in 1/4 cup of chopped green onions, 1/4 cup of chopped cilantro, and 1/4 cup of coarsely chopped peanuts. Mix well for extra flavor and crunch. 9. To serve, take individual lettuce leaves. Spoon a good amount of the chicken mix into each leaf. Wrap them up like tacos and enjoy! For a better cooking experience, look for video guides online. These can show you how to chop veggies and cook chicken properly. You can also find tips on plating the wraps nicely. A well-arranged plate makes your meal more fun to eat. To boost the taste of Thai peanut chicken lettuce wraps, try these tips: - Add chili flakes for some heat. - Use fresh herbs like mint or basil for a fresh twist. - Drizzle extra lime juice before serving for brightness. - Mix in a splash of fish sauce to deepen the umami flavor. These simple changes can take your wraps to the next level. Here are some mistakes to avoid when making your wraps: - Don’t overcook the chicken. It should be just done, not dry. - Avoid burning the garlic. Sauté it gently to keep the flavor. - Don’t skip the sauce. It adds moisture and flavor. - Use the right lettuce. Butter or iceberg lettuce works best for wraps. These tips will help you create better wraps every time. For the best experience, serve your wraps with these ideas: - Arrange them on a platter for a colorful presentation. - Add lime wedges for extra tang. - Garnish with extra peanuts and cilantro for crunch and flavor. - Serve with a side of rice or a light salad to complete the meal. These serving tips make your dish look great and taste even better. Pro Tips Use Fresh Ingredients: Fresh garlic, ginger, and vegetables will enhance the flavor and texture of your wraps. Customize Your Filling: Feel free to add other vegetables like water chestnuts or snap peas for extra crunch. Make It Spicy: If you like heat, add some chopped chili peppers or a dash of sriracha to the sauce for an extra kick. Perfect Your Wrap: To prevent tearing, choose larger, sturdier leaves from the lettuce head and ensure they are dry before filling. {{image_4}} You can easily swap ground chicken for ground turkey. Turkey has less fat and is still tasty. If you prefer a plant-based option, use tofu. Crumble firm tofu and cook it just like ground chicken. This choice is great for vegetarians and packs protein too. These wraps can be served in many ways. For a filling meal, pair them with jasmine rice or quinoa. You can also make a salad by mixing the chicken mix with greens. This gives a fresh crunch and makes it lighter. Want more heat? Add red pepper flakes or sriracha to the sauce. Start with a small amount and taste. You can always add more if you like it spicy! If you want less spice, skip the heat or use sweet chili sauce instead. To keep your Thai Peanut Chicken Lettuce Wraps fresh, store them in an airtight container. Place any leftover chicken mixture in the container, and keep the lettuce leaves separate. This way, the lettuce stays crisp. Store everything in the fridge. Use the wraps within three days for the best taste. When you're ready to enjoy your leftovers, simply heat the chicken mixture in a skillet. Warm it over medium heat for about five minutes. Stir occasionally to ensure even heating. You can also microwave it for about one to two minutes. Just cover it with a lid to keep moisture in. If you want to save some for later, you can freeze the chicken mixture. Place it in a freezer-safe bag or container. Make sure to remove as much air as possible. This helps prevent freezer burn. The mixture can last up to three months in the freezer. Just thaw it overnight in the fridge before reheating. Yes, you can make these wraps ahead of time. Cook the chicken and veggies and store them in the fridge. Just keep the lettuce leaves separate. When you’re ready to eat, spoon the filling into the lettuce. This keeps them fresh and crunchy. If you need a substitute for peanut butter, try almond butter or sunflower seed butter. Both give a similar texture and taste. You can also use tahini for a nut-free option. Adjust the amount based on your taste. Yes, you can easily make this recipe vegetarian. Use firm tofu instead of chicken. Crumble the tofu and cook it the same way as the chicken. You can also add mushrooms for extra flavor and texture. Store the chicken filling in an airtight container in the fridge. Keep the lettuce leaves separate. They will stay fresh for about 3 days. Reheat the filling before serving. Enjoy your wraps again! These wraps are great on their own. You can also serve them with rice or quinoa for a full meal. Adding a side of fresh fruit or a light salad works well too. Absolutely! Feel free to add any veggies you like. Chopped cucumbers, bean sprouts, or shredded cabbage add great crunch and flavor. Mix and match based on your preference. Expect a mix of sweet, salty, and nutty flavors. The lime juice adds a nice tang, while the peanut butter gives creaminess. It’s a delightful combination that makes each bite enjoyable. This blog post explored all you need to know for making Thai Peanut Chicken Lettuce Wraps. We covered essential ingredients and their substitutes, along with tips for picking fresh options. You learned step-by-step cooking instructions and key mistakes to avoid. Various serving styles and healthier swaps were also highlighted. Finally, we discussed storage tips and answered common questions. Embrace these ideas, and you'll create tasty, fun meals that anyone can enjoy.

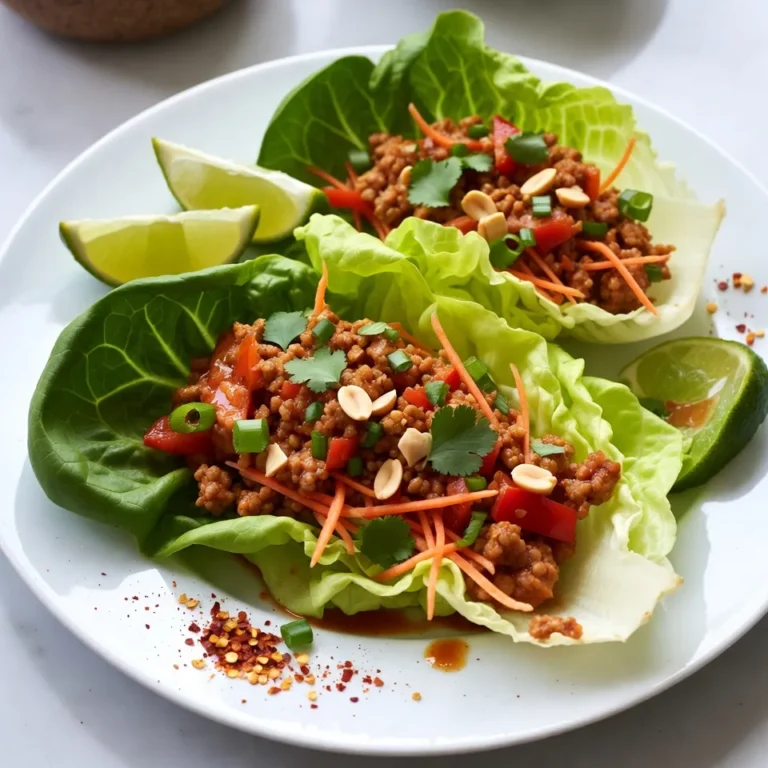
Thai Peanut Chicken Lettuce Wraps Easy Delicious Meal

- 1 ½ cups all-purpose flour - 1 cup granulated sugar - ½ cup unsweetened shredded coconut - 2 teaspoons baking powder - ½ teaspoon baking soda - ¼ teaspoon salt - ½ cup unsalted butter, softened to room temperature - 2 large eggs - ½ cup coconut milk (canned or carton) - Zest of 1 lime (about 1 tablespoon) - 2 tablespoons fresh lime juice - 1 teaspoon vanilla extract - 1 cup powdered sugar - 3 tablespoons fresh lime juice - Zest of 1 lime - 2 tablespoons unsweetened shredded coconut for garnish The ingredients for Coconut Lime Sheet Cake create a bright, tropical flavor. The dry ingredients mix well to form a soft base. The all-purpose flour gives the cake its structure. Granulated sugar adds sweetness, while shredded coconut offers texture and flavor. Baking powder and baking soda help the cake rise, and salt enhances the taste. For the wet ingredients, unsalted butter gives richness and moisture. Eggs bind the mix and add fluffiness. Coconut milk keeps the cake moist with a hint of coconut. The lime zest and juice bring a fresh zing. Vanilla extract rounds out the flavors and adds warmth. The lime glaze is the finishing touch. It combines powdered sugar with fresh lime juice for sweetness and tang. Lime zest adds even more flavor and a nice look. Sprinkling shredded coconut on top gives the cake a lovely, textured finish. Each ingredient plays a vital role in making this cake a delightful treat. {{ingredient_image_2}} - Preheat your oven to 350°F (175°C). - Grease a 9x13 inch baking dish with butter and dust it with flour. This helps with easy removal later. - In a large bowl, combine 1 ½ cups all-purpose flour, 1 cup granulated sugar, ½ cup unsweetened shredded coconut, 2 teaspoons baking powder, ½ teaspoon baking soda, and ¼ teaspoon salt. Whisk these dry ingredients together well. - In another bowl, cream ½ cup softened unsalted butter with an electric mixer. Mix until it looks light and fluffy, about 2-3 minutes. - Add 2 large eggs one at a time, mixing well after each addition. - Slowly mix in ½ cup coconut milk, the zest of 1 lime, 2 tablespoons fresh lime juice, and 1 teaspoon vanilla extract. Make sure everything is combined smoothly. - Gradually add the dry mix to the wet mix. Use a spatula or wooden spoon to fold them together. Be careful not to overmix. - Pour the batter into your prepared baking dish. Spread it evenly with a spatula. - Bake the cake for 25-30 minutes. Check if it’s done by inserting a toothpick in the center. It should come out clean or with a few moist crumbs. - While the cake bakes, make the lime glaze. In a bowl, whisk together 1 cup powdered sugar, 3 tablespoons fresh lime juice, and the zest of 1 lime until smooth. - After the cake cools for about 10 minutes, pour the lime glaze evenly over it. Let some soak in for extra flavor. - Sprinkle 2 tablespoons of unsweetened shredded coconut on top for a nice look and taste. - Allow the cake to cool completely before slicing into squares. Enjoy your Coconut Lime Bliss Cake! - For the best results, mix the butter until it's light and fluffy. This step adds air to the cake. - When adding eggs, mix one at a time. This helps the batter stay smooth. - When you combine wet and dry ingredients, be careful not to overmix. This keeps the cake soft. - To check for doneness, insert a toothpick into the center of the cake. If it comes out clean, your cake is ready. - Want more zing? Add extra lime zest to the batter. This makes your cake taste even fresher. - To boost the coconut flavor, use coconut cream instead of coconut milk. This gives a richer taste. - For a beautiful presentation, serve the cake on a colorful platter. - Add lime wedges or mint leaves for a pop of color. - You can also customize toppings. Try adding fresh berries or a sprinkle of nuts for extra crunch. Pro Tips Use Fresh Ingredients: Whenever possible, use fresh lime juice and zest to enhance the cake's flavor. Fresh ingredients make a noticeable difference in taste! Don't Overmix: When combining the wet and dry ingredients, mix just until combined. Overmixing can lead to a dense cake instead of a light and fluffy texture. Let It Cool: Allow the cake to cool for at least 10 minutes before glazing. This helps the glaze adhere better and soak into the cake for added flavor. Storage Tips: Store any leftover cake in an airtight container at room temperature for up to 3 days. You can also refrigerate it for up to a week for extended freshness. {{image_4}} You can change some ingredients if needed. If you want to replace coconut milk, use almond milk or soy milk. Both options will still keep your cake moist and tasty. For flour, you can try using whole wheat flour. This adds fiber and a nutty flavor. Make sure to adjust the amount slightly. Whole wheat flour may need a bit more liquid to stay fluffy. Want to mix it up? Try adding other citrus fruits! Lemon or orange zest can add a new twist. The bright flavors will still pair well with coconut. You can also add nuts or chocolate chips. Chopped walnuts or pecans give a nice crunch. If you love chocolate, dark chocolate chips are a great choice. Just fold them into the batter before baking. If you need gluten-free options, use a gluten-free flour blend. These blends work well in most recipes. Just make sure to check if it has xanthan gum, which helps with texture. For vegan alternatives, replace eggs with flax eggs. Mix one tablespoon of ground flaxseed with three tablespoons of water. Let it sit for a few minutes until it thickens. You can also use plant-based butter instead of regular butter. With these easy swaps, you can enjoy this cake no matter your diet! To keep your Coconut Lime Sheet Cake fresh, store it in the fridge. Place the cake in an airtight container. This helps trap moisture and keeps the cake soft. You can also cover it with plastic wrap or aluminum foil. Make sure the wrap is snug to prevent air from getting in. If you want to keep the cake for a long time, freezing is the way to go. First, let the cake cool completely. Then, wrap it tightly in plastic wrap. After that, place it in a freezer-safe bag or container. This keeps the cake safe from freezer burn. When you want to eat it, thaw it in the fridge overnight. If you want it warm, you can heat it in the oven at 350°F for about 10 minutes. When stored correctly, your Coconut Lime Sheet Cake can last about one week in the fridge. If frozen, it can stay good for up to three months. Just make sure to check for any signs of freezer burn before you enjoy it! To check if the cake is done, insert a toothpick into the center. If it comes out clean or with a few moist crumbs, the cake is ready. This method helps you avoid overbaking. Remember, every oven is different, so keep an eye on the time. Check around 25 minutes into baking to stay aware. Yes, you can use fresh coconut in this recipe. Fresh coconut adds a wonderful texture and flavor. However, you need to shred it finely. The amount should stay the same as the shredded coconut in the recipe. Just keep in mind that fresh coconut may add more moisture to the cake. You can make the cake a day ahead. Bake it and let it cool completely. Then, cover it with plastic wrap or foil. Store it in a cool place or refrigerate it. Make the lime glaze fresh when you are ready to serve. This keeps the glaze from soaking into the cake. Coconut Lime Sheet Cake pairs well with fresh fruit. Try serving it with slices of lime or berries. A scoop of vanilla ice cream also makes a great addition. You can also add whipped cream for a creamy touch. These options enhance the cake's tropical flavors. You learned about making a Coconut Lime Sheet Cake, from ingredients to storage tips. Each step leads to a moist, zesty cake that delights your taste buds. Remember, proper mixing and checking doneness are key to success. You can customize flavors and even adapt the recipe for dietary needs. Whether it's for a special event or just a weekday treat, this cake brings joy. Enjoy baking and sharing this delicious dessert with friends and family. Happy baking!

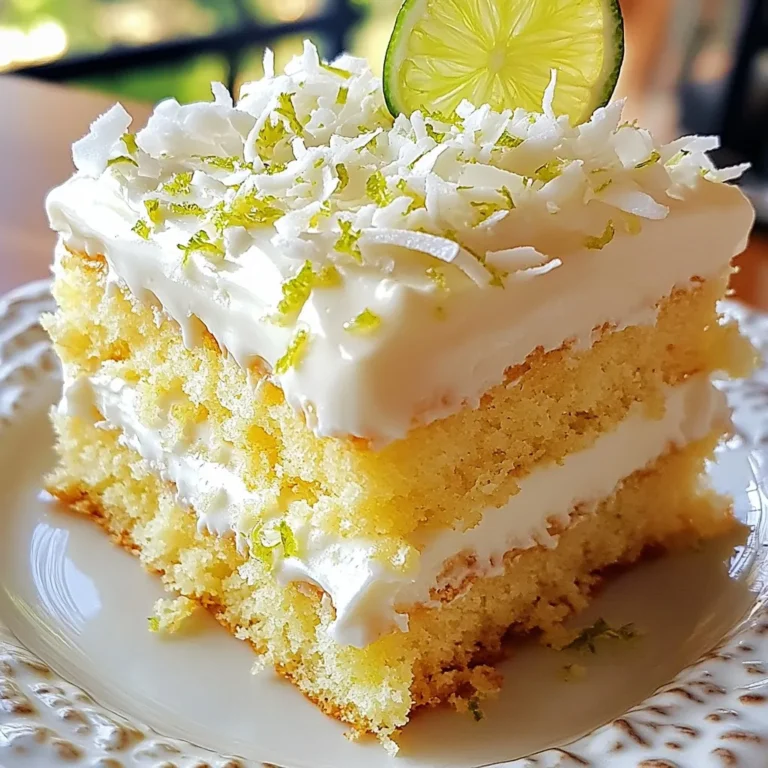
Coconut Lime Sheet Cake Fresh and Flavorful Delight

- 1 cup fresh pineapple chunks - 1 ripe banana - 1 cup coconut milk (or your choice of non-dairy milk) - ½ cup Greek yogurt (or dairy-free yogurt alternative) - 2 tablespoons unsweetened shredded coconut - 1 tablespoon honey or maple syrup (optional, for sweetness) - Ice cubes (approximately 1 cup; adjust based on your preferred smoothie thickness) You can add a few extra ingredients for more flavor. Consider these options: - A handful of spinach or kale for a green boost. - A pinch of cinnamon for warmth. - A splash of vanilla extract for sweetness. - Fresh mint leaves for a refreshing twist. These additions can enhance the taste and nutrition of your smoothie. If you have specific dietary needs, substitute as follows: - Use almond milk or oat milk if you're dairy-free. - Swap Greek yogurt with silken tofu for a vegan option. - Use agave syrup instead of honey for a vegan sweetener. - Replace fresh pineapple with canned pineapple in juice for convenience. These substitutions keep your smoothie tasty and cater to your dietary choices. {{ingredient_image_2}} First, gather all your ingredients. You need fresh pineapple chunks, a ripe banana, coconut milk, Greek yogurt, and shredded coconut. If you want extra sweetness, have honey or maple syrup ready. Also, get some ice cubes for that chilly touch. Make sure to cut the pineapple and banana into small pieces for easier blending. Now, it’s time to blend! In your high-speed blender, add the fresh pineapple chunks and banana. Pour in the coconut milk to create a creamy base. Next, spoon in the Greek yogurt. This will give your smoothie a rich texture. If you want it sweeter, drizzle in honey or maple syrup now. Finally, sprinkle in the shredded coconut and add the ice cubes. Blend everything on high until it’s smooth and creamy. After blending, check the consistency. If it’s too thick, add a little more coconut milk and blend again. Taste your smoothie. If you want it sweeter, mix in more honey or maple syrup. Adjust it until it fits your taste. Enjoy your tropical pineapple coconut smoothie! When picking a pineapple, look for a sweet scent. A ripe pineapple feels firm but gives slightly when pressed. The color should be bright and golden. Green or brown spots can mean it is not fresh. Check the leaves; they should be green and healthy. For a smooth and creamy texture, use ripe fruit. Bananas add creaminess and natural sweetness. Blend on high to break down ice and fruit. If your smoothie is too thick, add a splash of coconut milk. For a thicker smoothie, use fewer ice cubes. To boost flavor, try adding fresh mint or lime juice. A pinch of cinnamon adds warmth and depth. You can also mix in spinach for a healthy twist. For a tropical kick, add mango or passion fruit. Always taste-test and adjust flavors as needed. Pro Tips Use Frozen Fruits: For an even creamier and colder smoothie, consider using frozen pineapple and banana. This eliminates the need for ice cubes and makes blending easier. Add a Boost of Nutrition: Enhance your smoothie’s nutritional profile by adding a handful of spinach or kale. The flavors will be masked by the tropical fruits, and you’ll get an extra dose of vitamins. Experiment with Toppings: Make your smoothie more visually appealing and flavorful by adding toppings like chia seeds, sliced almonds, or a dollop of nut butter before serving. Perfect the Consistency: If your smoothie ends up too thick, gradually add more coconut milk until you reach your desired consistency. Remember, you can always add more liquid, but it’s hard to fix a smoothie that’s too thin! {{image_4}} You can change the fruit in your smoothie. Try adding mango, strawberries, or blueberries. Mango gives a sweet twist. Berries add a nice tart flavor. Just keep the same amount of fruit. This way, your smoothie stays creamy and delicious. If you want a dairy-free option, use almond or oat milk instead of coconut milk. For yogurt, choose a dairy-free yogurt. Options include coconut yogurt or almond yogurt. These swaps keep the taste great while meeting your needs. Making this smoothie vegan is easy! Skip the honey and use maple syrup for sweetness. Ensure your yogurt and milk are plant-based. This way, you can enjoy a tasty treat that fits your lifestyle. If you have extra smoothie, store it in a clean jar. Seal it tightly and place it in the fridge. Consume within one day for the best taste. Smoothies can lose flavor and texture over time. Always shake or stir before drinking. You can freeze leftover smoothies for later enjoyment. Pour your smoothie into ice cube trays or freezer-safe bags. This way, you can blend it again when you want it. Smoothie cubes are great for quick, refreshing drinks. Just blend with a bit of fresh milk or juice. To keep your ingredients fresh, store them properly. Pineapples and bananas should sit at room temperature. After cutting, keep pineapple chunks in an airtight container in the fridge. Coconut milk lasts long but check expiration dates. Greek yogurt should always stay cold and sealed. Freshness matters for the best smoothie flavor! Pineapple is rich in vitamin C, which helps boost your immune system. It also has bromelain, an enzyme that helps with digestion. Coconut adds healthy fats and keeps you feeling full. It also provides fiber, which is great for gut health. Together, these fruits help hydrate your body and give you energy. Yes, you can make this smoothie ahead of time. Blend it, then store it in the fridge for up to 24 hours. Just remember to shake or stir it well before enjoying. If you want to keep it fresh longer, freeze the smoothie in ice cube trays. This way, you can blend a fresh portion anytime you like! To thicken your smoothie without ice, use frozen fruit like banana chunks. You can also add more Greek yogurt or a scoop of nut butter. Oats work well too! Just blend in a small amount until you reach your desired thickness. This keeps your smoothie creamy and helps control the temperature. This blog post covered how to make a delicious smoothie using fresh ingredients. We explored essential ingredients, optional flavor boosters, and helpful substitutions. You learned step-by-step instructions on preparing, blending, and adjusting your smoothie. I shared tips on choosing fresh pineapples and perfecting the texture. Additionally, we discussed tasty variations and proper storage methods. Experiment with flavors to find your favorite mix. Smoothies can be fun and healthy!

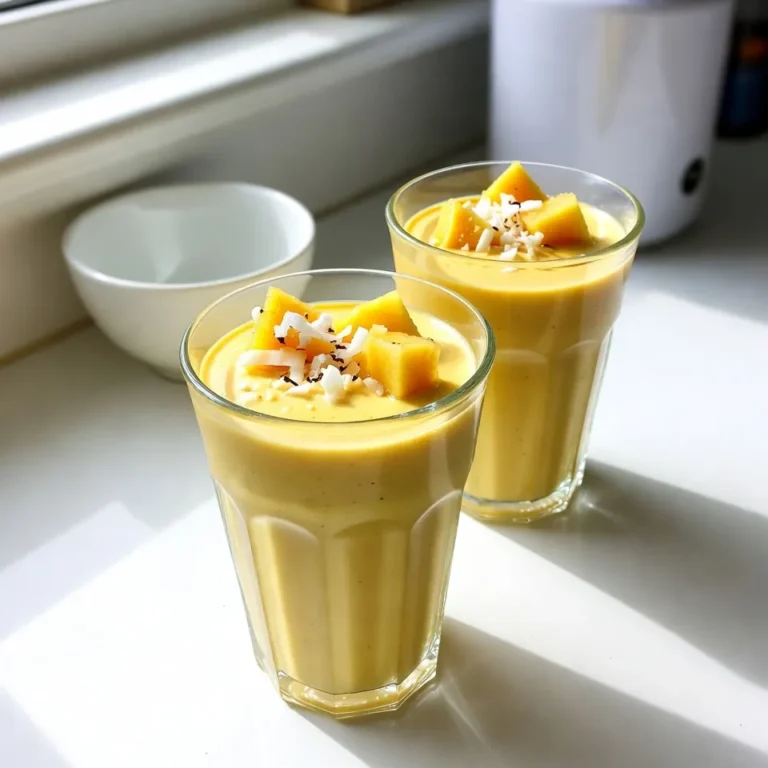
Tropical Pineapple Coconut Smoothie Refreshing Delight

To make spicy mango shrimp tacos, gather these key ingredients: - 1 pound large shrimp, peeled and deveined - 1 ripe mango, diced into small cubes - 1 small red onion, finely chopped - 1 jalapeño, minced (adjust according to heat preference) - 2 cloves garlic, minced - 1 tablespoon fresh lime juice - 1 teaspoon chili powder - 1 teaspoon ground cumin - 1 tablespoon olive oil - Salt and freshly ground black pepper to taste - 8 small corn or flour tortillas - Fresh cilantro, chopped, for garnish - Lime wedges, for serving You can add a few optional ingredients to boost flavor: - Avocado slices for creaminess - Crumbled feta or queso fresco for a salty touch - Sliced radishes for crunch - A dollop of sour cream for a cooling effect Choosing fresh ingredients makes a big difference: - Shrimp: Look for shrimp that smell fresh and have a firm texture. Avoid any with a strong fishy scent. - Mango: Pick ripe mangoes that feel slightly soft when gently squeezed. They should have a sweet aroma. - Jalapeño: Choose firm jalapeños that are bright green in color. They should feel heavy for their size. - Onion and Garlic: Select onions that are firm and dry. Garlic should be plump and without any sprouting. - Cilantro: Fresh cilantro should be bright green, with no wilting or yellowing. These tips will help you create the best spicy mango shrimp tacos. Enjoy the vibrant flavors and fresh ingredients! {{ingredient_image_2}} First, grab a medium bowl. Add the peeled and deveined shrimp. Sprinkle in chili powder and ground cumin. Add the minced garlic and fresh lime juice too. Season with a pinch of salt and pepper. Toss the shrimp well. Make sure they are fully coated in spices. Let them sit for 15 minutes. This helps the shrimp soak up the flavors. While the shrimp marinates, prepare the mango salsa. Take a separate bowl. Mix together the diced mango, finely chopped red onion, and minced jalapeño. If you like more heat, add more jalapeño. Add a pinch of salt and a bit of lime juice. Stir gently until mixed. Set aside. This salsa adds freshness to your tacos. Now it’s time to cook the shrimp. Heat a large skillet over medium-high heat. Add olive oil when the skillet is hot. Once the oil shimmers, add the marinated shrimp in a single layer. Cook the shrimp for about 2-3 minutes per side. They will turn pink and opaque when done. Remove from heat and set aside. Next, warm the tortillas. You can use a dry skillet for this. Heat each tortilla for about 30 seconds on each side until soft. Alternatively, wrap them in foil and heat in a 350°F oven for about 10 minutes. Warm tortillas make the tacos more enjoyable. Time to put it all together! Take a warm tortilla and place a few cooked shrimp on one half. Top the shrimp with a generous scoop of mango salsa. Don’t forget to sprinkle freshly chopped cilantro on top. This adds color and flavor to your tacos. Present the tacos on a nice platter. Add lime wedges on the side. Encourage everyone to squeeze lime over their tacos before eating. This adds a zesty kick that brightens each bite. Enjoy your spicy mango shrimp tacos! To cook shrimp just right, heat a pan on medium-high heat. Add olive oil until it shimmers. Place shrimp in a single layer to avoid steaming. Cook them for 2 to 3 minutes on each side. Look for that bright pink color and opaque texture. This shows they are done. Don’t overcook them. Overcooked shrimp can turn rubbery and tough. If you like heat, add more jalapeño to the salsa. You can also sprinkle extra chili powder on the shrimp. If you prefer milder flavors, use less jalapeño. A pinch of sugar can help balance the heat too. Always taste your salsa before serving. Adjust it until it suits your palate. To make your mango salsa even better, try adding lime zest. This gives a fresh burst of flavor. You can also mix in diced bell peppers for crunch and color. Fresh herbs like mint or basil can add a unique twist. Taste and adjust the salt and lime juice for balance. Let the salsa sit for a few minutes before serving. This allows all the flavors to blend well. Pro Tips Fresh Shrimp is Key: Always opt for fresh or high-quality frozen shrimp for the best texture and flavor in your tacos. Adjust the Heat: Feel free to customize the spiciness by adding more or less jalapeño, or even using a different pepper variety. Perfectly Warm Tortillas: Warming the tortillas enhances their flavor and makes them more pliable for easier folding and eating. Garnish with Citrus: Adding a squeeze of fresh lime juice right before serving brightens the flavors and adds a delicious zing. {{image_4}} You can swap shrimp for other proteins. Chicken is a great choice. Grilled fish adds a nice taste. Tofu works well for a vegetarian option. Beef can also make a tasty taco. Each protein will change the flavor, so choose what you like best. Mango salsa is fantastic, but you can get creative. Pineapple adds sweetness and brightness. Peach salsa brings a juicy twist. Avocado salsa gives a creamy texture. You can mix fruits like kiwi or papaya for fun flavors. Each salsa will add its own flair to your tacos. If you need gluten-free options, use corn tortillas. They are sturdy and tasty. You can also try lettuce wraps for a fresh, low-carb choice. Just make sure the salsa and seasonings are gluten-free too. Enjoy your tacos without worry! To keep your leftover ingredients fresh, place them in separate air-tight containers. Store the marinated shrimp in the fridge for up to 2 days. The mango salsa should also last for 2 days but may lose some crunch. Always check for freshness before using them again. Assembled tacos do not store well. They can become soggy quickly. If you have leftovers, keep the shrimp, salsa, and tortillas separate. Wrap each tortilla in foil and store them in the fridge. Use them within 1 day for the best taste. To reheat the shrimp, place them in a skillet over medium heat. Cook for about 2 minutes until warm. For tortillas, warm them in a dry skillet for 30 seconds on each side. This keeps them soft and tasty. Avoid microwaving, as it can make them tough. Yes, you can use frozen shrimp. Just thaw them before marinating. Place the shrimp in cold water for about 15-20 minutes. This method keeps the shrimp safe and fresh. Frozen shrimp can taste just as good as fresh when cooked well. I recommend using corn or flour tortillas. Corn tortillas offer a nice, authentic flavor. They also hold up well with juicy shrimp and salsa. Flour tortillas are soft and chewy, perfect for wrapping around the filling. Choose whichever you prefer! You can prepare the shrimp and mango salsa ahead of time. Marinate the shrimp and store it in the fridge for up to an hour. You can also make the mango salsa a few hours in advance. Just keep it covered in the fridge. Warm the tortillas just before serving. Pair these tacos with a cold beer or a fruity cocktail. A light lager or a refreshing mojito complements the spice well. For a non-alcoholic option, try a mango or lime soda. These drinks enhance the flavors of the tacos and keep things fun! This blog post covered all you need for tasty spicy mango shrimp tacos. We discussed essential and optional ingredients, plus tips for picking fresh ones. I shared step-by-step instructions and helpful tips for cooking shrimp just right. You also learned about fun variations and storage advice. In the end, making these tacos at home is easy and fun. You can customize them to fit your taste. Enjoy your cooking adventure!

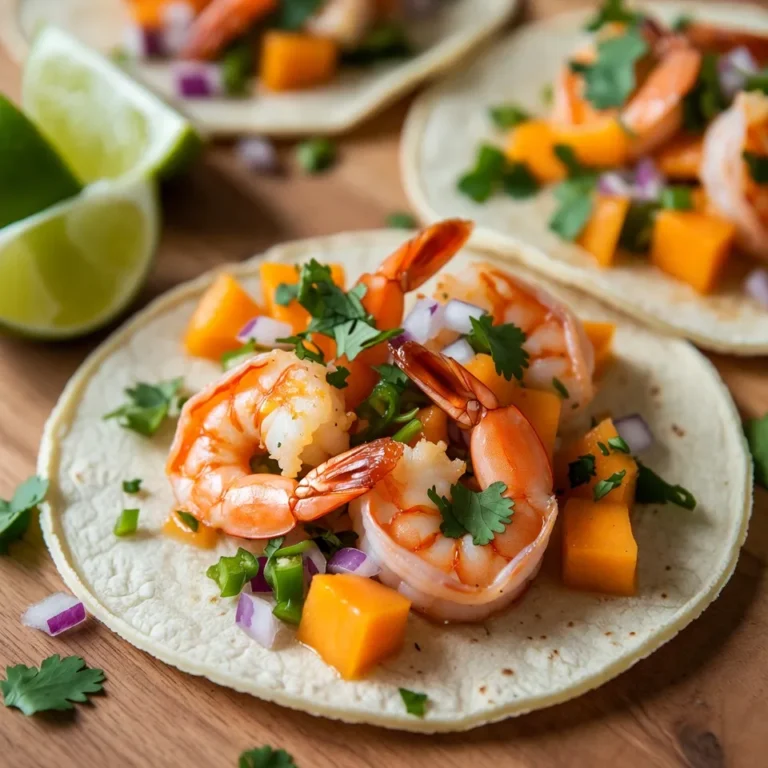
Spicy Mango Shrimp Tacos Flavorful and Simple Recipe

- 2 lbs beef chuck, cut into 1-inch cubes - 1 large onion, finely chopped - 3 cloves garlic, minced - 1 tablespoon ginger, freshly grated - 1 can (14 oz) diced tomatoes, undrained - 1 cup coconut milk - 2 tablespoons curry powder - 1 tablespoon garam masala - 1 teaspoon turmeric powder - 1 teaspoon ground cumin - 1 teaspoon ground coriander - 1/2 teaspoon chili powder (or adjust to taste for heat) - Salt and freshly ground black pepper to taste - 2 tablespoons vegetable oil (such as canola or sunflower) - Fresh cilantro leaves for garnish To make a truly authentic Indian beef curry, use a mix of spices. The key spices are curry powder, garam masala, turmeric, cumin, coriander, and chili powder. Each spice brings its own unique flavor. Curry powder adds warmth, while garam masala gives depth. Turmeric lends a golden hue. Cumin and coriander provide earthiness, and chili powder can add heat. Adjust the chili powder to your taste. This spice blend creates the rich, bold flavors that define Indian cuisine. Garnishes make your dish pop. Fresh cilantro leaves are a must for color and flavor. You can add a wedge of lime for a zesty kick. Serve the curry with warm naan or fluffy basmati rice. These sides are perfect for scooping up the curry. For extra flavor, consider a dollop of yogurt on top. This helps balance the spices and adds creaminess to each bite. {{ingredient_image_2}} Start by heating vegetable oil in a large skillet over medium-high heat. Once the oil is hot, add your chopped onion. Sauté the onion for about 5 minutes. You want it to become translucent and a little golden. Next, add minced garlic and freshly grated ginger. Cook this mix for 1-2 minutes. The aroma will fill your kitchen. It’s a sign you’re on the right track! Now it’s time to add the beef cubes to the skillet. Sear the beef for about 5-7 minutes. You want it to brown on all sides. As the beef cooks, season it with salt and pepper. This step helps enhance the beef's flavor. Once browned, transfer the mixture to your slow cooker. In your slow cooker, pour in the undrained diced tomatoes and creamy coconut milk. Sprinkle in the curry powder, garam masala, turmeric, cumin, coriander, and chili powder. Stir everything well to mix all the spices and ingredients. Cover your slow cooker with its lid. Set it to cook on low for 7-8 hours or high for 4-5 hours. This slow cooking is key! The beef will become tender and soak up those rich spices. Before serving, taste the curry. Adjust the seasoning if needed. If you want a thicker sauce, mash a few pieces of beef with a fork. Serve the curry hot. Add fresh cilantro leaves on top for color and flavor. Enjoy this hearty meal! To change the heat level, you can control the chili powder. Start with 1/2 teaspoon. If you like it spicier, add more. You can also swap chili powder for fresh chilies. Remove the seeds for less heat. Taste as you go to find the right balance. Use beef chuck for the best results. This cut has good fat, which adds flavor. Searing the beef before slow cooking helps lock in juices. Cook the beef on low for 7-8 hours. The longer it cooks, the more tender it becomes. If you are short on time, cooking on high for 4-5 hours works too. If you want a thicker sauce, you can mash some beef pieces. Use a fork to break them up. This adds body to the curry. Another method is to add a cornstarch slurry. Mix 1 tablespoon of cornstarch with 2 tablespoons of water. Stir it in during the last hour of cooking. Pro Tips Marinate for Depth: Consider marinating the beef in yogurt and spices for a few hours or overnight. This will tenderize the meat and infuse it with deeper flavors. Layering Spices: Add spices at different stages of cooking. For instance, adding a pinch of garam masala just before serving can enhance the aroma and flavor of the dish. Adjust Heat Levels: Control the spice level by adjusting the amount of chili powder. Start with less and add more to suit your heat preference. Thicker Sauce Tip: If you prefer a thicker sauce, blend a portion of the curry before serving or mash some of the beef pieces to achieve the desired consistency. {{image_4}} You can swap out beef for other meats. Lamb works great in this curry. It has a rich taste that blends well with spices. Chicken is another good choice. Use boneless chicken thighs for juicy bites. Just cut the meat into similar sizes. Cook the curry the same way. Adjust the cooking time if needed. Chicken cooks faster than beef, so check it after 3 hours on high. If you want a meat-free dish, try chickpeas or tofu. Chickpeas add protein and fiber. Use one can of drained chickpeas. Add them to the slow cooker just like the beef. Tofu absorbs flavor well. Use firm tofu, cut into cubes. Sauté it in oil before adding to the slow cooker. This gives it a nice texture. Both options work well with the spices. Coconut milk gives a creamy taste to the curry. If you want to change it, try yogurt or cashew cream. Yogurt adds a tangy flavor. Mix it in at the end of cooking. This keeps it creamy without curdling. Cashew cream offers a nutty twist. Blend soaked cashews with water until smooth. Stir it in right before serving. Each option adds a unique taste to your curry. You can store leftover Slow Cooker Indian Beef Curry in the fridge. Place it in an airtight container. It will stay fresh for about 3 to 4 days. Make sure it cools to room temperature before sealing it up. Always label the container with the date, so you know when to use it. If you want to keep it longer, freezing is a great option. Transfer the cooled curry to a freezer-safe container. Leave some space at the top for expansion. You can freeze it for up to 3 months. When you're ready to eat, just take it out and let it thaw in the fridge overnight. Reheating is easy! You can do it on the stove or in the microwave. If using the stove, heat it in a pot over medium heat. Stir it often to avoid sticking. If you use the microwave, cover the bowl to keep moisture in. Heat in 1-minute intervals, stirring in between, until it’s hot. Always check the temperature before serving to ensure it's heated evenly. To make your Slow Cooker Indian Beef Curry spicier, add more chili powder. Start with an extra half teaspoon. Taste as you go. You can also use fresh green chilies. Slice them and add to the curry. For a deeper heat, try adding cayenne pepper. Just a pinch can enhance the spice. Yes, you can use frozen beef. Just remember to thaw it before cooking. Slow cooking frozen beef can take longer. It can also lead to uneven cooking. Ideally, defrost it in the fridge overnight. This step ensures your beef cooks evenly and remains tender. Several side dishes go well with Indian Beef Curry. Here are some favorites: - Warm naan bread for scooping up the curry. - Fluffy basmati rice to absorb the sauce. - Raita, a yogurt-based dish, to cool the spice. - Steamed vegetables for added color and nutrition. - A fresh salad with cucumber and tomatoes for crunch. These sides will enhance your meal and provide balance to the curry’s rich flavors. This blog post covered the key ingredients and steps for making Slow Cooker Indian Beef Curry. We looked at spice blends, cooking methods, and helpful tips to ensure great results. You can switch meats or make a vegetarian version too. Remember to store your curry properly for later enjoyment. With clear instructions and flavorful options, you can create a dish that impresses everyone. Dive in and make your kitchen the place for this delightful meal. Enjoy the process and savor the rewards!

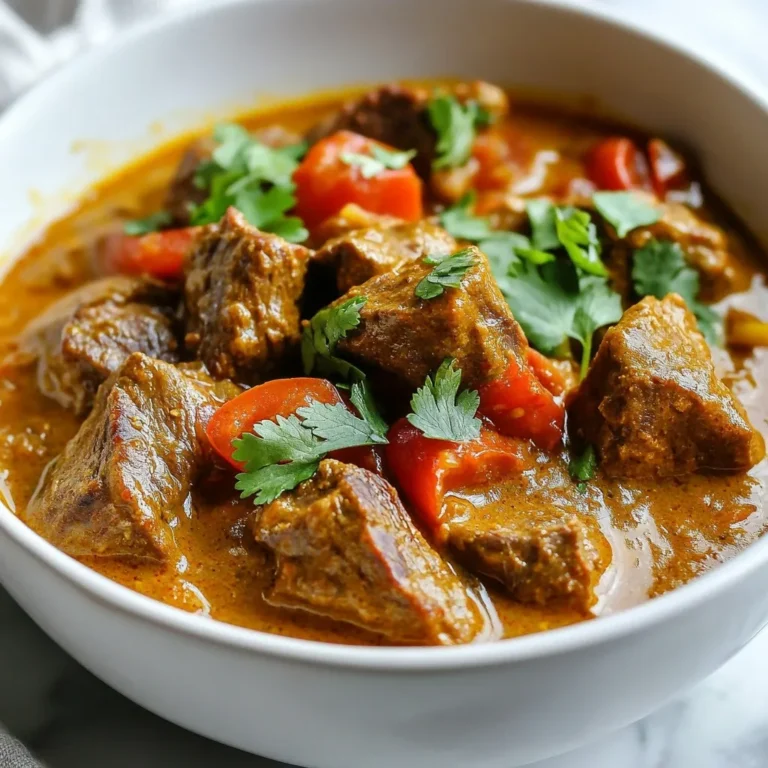
Savory Slow Cooker Indian Beef Curry Recipe

To make a tasty Mediterranean quinoa salad, you need these main ingredients: - 1 cup quinoa, thoroughly rinsed - 2 cups vegetable broth for cooking - 1 cup cherry tomatoes, halved for sweetness - 1 cucumber, diced into bite-sized pieces - 1 red bell pepper, diced for crunch - 1/2 red onion, finely chopped for a bit of zing - 1/2 cup Kalamata olives, pitted and sliced for a salty bite - 1/4 cup feta cheese, crumbled for creaminess - 1/4 cup fresh parsley, chopped for brightness - 1/4 cup extra virgin olive oil for rich flavor - 2 tablespoons fresh lemon juice for a zesty kick - 1 teaspoon dried oregano for the Mediterranean touch - Salt and pepper to taste These ingredients create a mix of flavors and textures. The quinoa gives your salad a hearty base. The fresh veggies add crunch and sweetness. Feta cheese brings creaminess, while olives offer saltiness. To make the salad even better, consider these optional add-ins: - Avocado for creaminess - Chickpeas for protein - Spinach for extra greens - Artichoke hearts for a unique taste These add-ins can boost the nutrition and flavor of your dish. Feel free to mix and match based on what you have at home. Presentation matters! Here are some toppings to make your salad look great: - Extra parsley, chopped for color - Whole Kalamata olives for a classy touch - Crumbled feta cheese on top for visual appeal - Drizzle of olive oil for shine These toppings not only enhance the look but also add flavor. A beautiful dish makes every meal feel special. Enjoy your Mediterranean quinoa salad! {{ingredient_image_2}} To start, you must rinse the quinoa. This step helps remove any bitter taste. Next, add 1 cup of rinsed quinoa to a medium saucepan with 2 cups of vegetable broth. Place it on medium-high heat and bring the mixture to a boil. Once it bubbles, lower the heat to low. Cover the pot and let it simmer for about 15 minutes. After the liquid absorbs, take it off the heat. Keep it covered for another 5 minutes. Finally, fluff the quinoa gently with a fork. This makes it light and fluffy. While the quinoa cooks, you can prepare the vegetables. Grab a large mixing bowl. Toss in 1 cup of halved cherry tomatoes, 1 diced cucumber, and 1 diced red bell pepper. Add 1/2 finely chopped red onion and 1/2 cup of sliced Kalamata olives. Finally, sprinkle in 1/4 cup of crumbled feta cheese. This colorful mix adds both flavor and crunch to your salad. Now, let’s make the dressing. In a small bowl, whisk together 1/4 cup of extra virgin olive oil and 2 tablespoons of fresh lemon juice. Add 1 teaspoon of dried oregano and a pinch of salt and pepper. Whisk until it combines well. This dressing will bring all the flavors together beautifully. Once your quinoa has cooled slightly, add it to the vegetable medley. Drizzle the dressing over the top and gently toss everything together. Make sure each piece gets a nice coating. Finally, fold in 1/4 cup of chopped parsley for a fresh touch. To achieve the perfect fluffy quinoa, rinse it well. This removes any bitter coating. Use two cups of vegetable broth for one cup of quinoa. Bring it to a boil first, then lower the heat. Cover it and let it simmer for about fifteen minutes. When the liquid is gone, let it sit for five more minutes. Finally, fluff it gently with a fork to separate the grains. The Mediterranean Quinoa Salad shines with vibrant flavors. Pair sweet cherry tomatoes with crunchy cucumber for freshness. Add red bell pepper for a delightful crunch. Kalamata olives bring a salty bite, while feta cheese adds creaminess. For extra zest, use fresh lemon juice and dried oregano. Mixing these flavors creates a well-rounded dish you will love. Serve this salad in a large, beautiful bowl. Garnish it with chopped parsley and whole Kalamata olives on top. For a complete meal, pair it with warm pita bread. This makes the dish more enjoyable and adds a nice touch. Refrigerate it for at least thirty minutes before serving. This enhances the flavors, making every bite a delight. Pro Tips Use High-Quality Olive Oil: A good extra virgin olive oil enhances the flavor of your dish, making it richer and more aromatic. Chill Before Serving: Allowing the salad to chill for at least 30 minutes helps the flavors meld together, providing a more delicious experience. Customize Your Veggies: Feel free to swap out vegetables according to your preference or seasonality, like adding bell peppers or zucchini for extra crunch. Fresh Herbs Matter: Using fresh parsley instead of dried adds a burst of flavor and a pop of color, elevating the overall presentation. {{image_4}} You can boost this salad by adding protein. Grilled chicken or shrimp works well. You can also use chickpeas or lentils for a plant-based option. Just mix them in after cooking your quinoa. This makes the salad filling and satisfying. Seasonal veggies can change the flavor. In summer, add zucchini or bell peppers. In fall, try roasted butternut squash or sweet potatoes. This keeps the dish fresh and exciting. You can mix and match based on what's available. Always aim for bright colors to make your salad pop. To make this salad vegan, skip the feta cheese. Use avocado instead for creaminess. You can also add hemp seeds or sunflower seeds for texture. These swaps keep the dish tasty while fitting a vegan diet. Don't forget to check your broth; make sure it's vegetable-based! To store your leftover Mediterranean quinoa salad, place it in an airtight container. This helps keep it fresh and tasty. Make sure to seal it well. You can store it in the fridge for up to three days. If you want to keep it longer, consider freezing it. However, the texture may change slightly after freezing. To keep your salad ingredients fresh, store them separately if possible. For example, keep the quinoa and dressing apart from the veggies. This prevents sogginess. You can also store chopped veggies in a sealed bag with a paper towel. The towel absorbs extra moisture and keeps them crisp. Always use fresh ingredients to enhance the salad's flavor and look. You typically do not need to heat this salad. It tastes best cold. If you prefer your quinoa warm, you can reheat it gently. Place the quinoa in a pot over low heat. Add a splash of water to avoid drying it out. Stir often until warm. Do not reheat the veggies or dressing, as they lose their crunch and flavor. Yes, you can make this salad ahead of time. It tastes even better after resting. Prepare the salad and store it in the fridge for up to 24 hours. The flavors blend nicely, making each bite more delicious. Just remember to give it a gentle toss before serving. If you want to skip feta cheese, try using goat cheese or a dairy-free option. Crumbled tofu also works well for a vegan choice. These alternatives can give a similar creamy texture and flavor. You can even use nutritional yeast for a cheesy taste without dairy. Yes, this recipe is gluten-free. Quinoa is a naturally gluten-free grain. It’s a great choice for those with gluten sensitivities or celiac disease. Just make sure your vegetable broth is also gluten-free to keep the salad safe for everyone. The salad lasts about 3 to 5 days in the fridge. Store it in an airtight container to keep it fresh. If you notice any excess moisture, gently drain it before serving. This keeps the salad crisp and enjoyable for days. Mediterranean Quinoa Salad is simple and full of flavor. We covered key ingredients, cooking tips, and tasty variations. You can customize it with your favorite add-ins and toppings. Remember, store leftovers properly for fresh meals later. I hope you feel inspired to make this dish. It combines healthy foods with vibrant flavors. Enjoy making and sharing this salad with family and friends. You’ll love its endless possibilities!

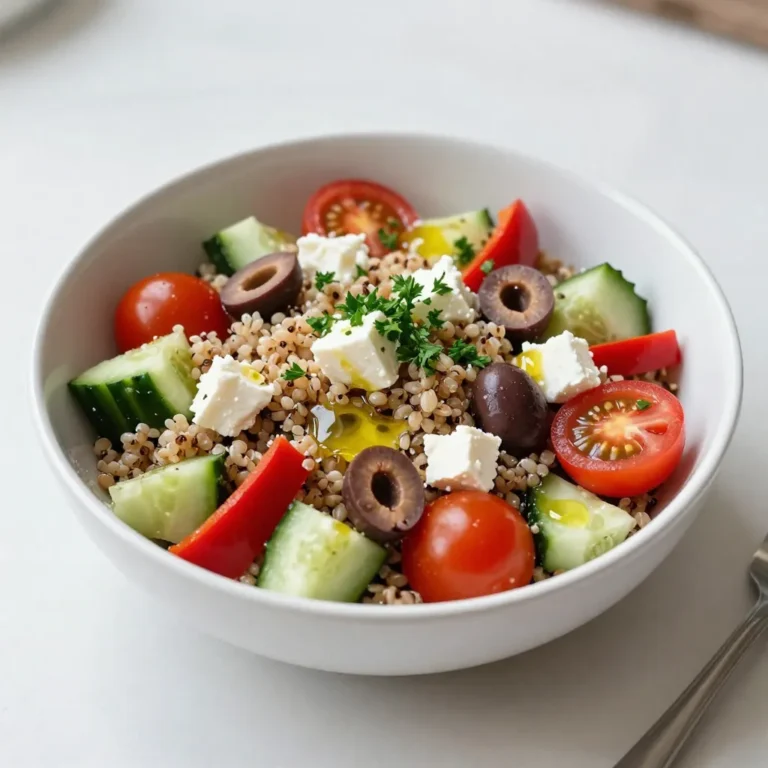
Mediterranean Quinoa Salad Fresh and Flavorful Dish

- 2 lbs boneless, skinless chicken thighs, cut into bite-sized chunks - 1 large onion, finely chopped - 4 cloves garlic, minced - 1 tablespoon fresh ginger, grated - 1 tablespoon ground cumin - 1 tablespoon ground coriander - 1 tablespoon garam masala - 1 teaspoon turmeric - 1 teaspoon paprika - 1 teaspoon red chili powder (adjust to your spice preference) - Salt, to taste - Fresh cilantro leaves, for garnish - Cooked basmati rice, for serving - 1 can (13.5 oz) full-fat coconut milk - 1 cup plain yogurt (preferably whole milk) In this dish, I focus on simple yet bold flavors. The chicken thighs bring rich taste and stay juicy. I like using a large onion, as it adds sweetness. Garlic and ginger create a warm, fragrant base. The spices play a key role. Ground cumin and coriander bring earthiness. Garam masala adds warmth and depth. I use turmeric for its bright color and health benefits. Paprika gives a touch of sweetness, while red chili powder lets you control the heat. For serving, I love to garnish with fresh cilantro. It brightens the dish and adds freshness. Pairing it with fluffy basmati rice balances the rich korma. The coconut milk and yogurt make the sauce creamy and smooth. This recipe is both simple and flavorful, perfect for any dinner. Just gather these ingredients, and you’re ready to cook! {{ingredient_image_2}} First, I heat the vegetable oil in a large skillet. I set the heat to medium. I add the finely chopped onion and sauté until it turns golden brown. This takes about 5-7 minutes. I stir the onions to avoid burning. Next, I add the minced garlic and freshly grated ginger. I stir for 1-2 minutes until the mixture smells amazing. Now, I carefully transfer the aromatic onion mixture to the slow cooker. I add the chicken chunks next. Then, I pour in the full-fat coconut milk and plain yogurt. I sprinkle all the spices: ground cumin, ground coriander, garam masala, turmeric, paprika, and red chili powder. I season with salt to taste and gently stir everything together. I want to make sure the chicken is well-coated in the flavorful mix. For cooking, I cover the slow cooker with its lid. I set it to low heat for 6-7 hours or high heat for about 3-4 hours. I choose low heat for tender chicken. I check when the chicken is juicy and fully cooked. After it’s done, I give the korma a gentle stir. This helps mix the sauce well. I taste it and adjust the seasoning if needed. To make the best chicken korma, start with spice levels. You can change the spice to fit your taste. If you like it mild, use less red chili powder. If you want it spicy, add more. Taste as you go to find your perfect level. For creamy consistency, use full-fat coconut milk and whole milk yogurt. This gives the dish a rich texture. Make sure to stir well before serving. It helps mix all the flavors and keeps it smooth. When serving, pair the korma with fluffy basmati rice. It soaks up the sauce nicely. You can place the korma in a wide bowl to show off its color. Garnish with fresh cilantro. It adds a bright touch. A slice of lime on the side gives a nice pop of flavor. If your slow cooker is crowded, keep the chicken in a single layer. This helps it cook evenly. If you have too much food, cook in batches to avoid steaming. For best results, don’t lift the lid too often. Each time you do, heat escapes and cooking time increases. Trust the process and let it cook! Pro Tips Marinate for More Flavor: For an even richer taste, marinate the chicken in the yogurt and spices for a few hours or overnight before cooking. This allows the flavors to deeply penetrate the meat. Adjust the Spice Level: Customize the heat of your korma by varying the amount of red chili powder. Start with less, and add more gradually to suit your personal preference. Vegetable Variations: Feel free to add vegetables like peas, carrots, or bell peppers to the slow cooker for added nutrition and color. Just add them in the last hour of cooking to prevent overcooking. Serving Suggestions: Pair your chicken korma with naan bread or poppadoms for a complete meal. They are perfect for scooping up the delicious sauce! {{image_4}} You can switch the chicken for different proteins. Boneless chicken breast works well. It stays juicy and cooks nicely. If you want a vegetarian dish, try chickpeas or tofu. Both options soak up the rich flavors. You can change the spice level to fit your taste. For a mild korma, use less red chili powder. I suggest starting with half a teaspoon. If you like heat, add more chili powder for a spicy kick. You can also mix in fresh herbs like cilantro or mint for extra flavor. If you need a coconut milk alternative, try almond milk or soy milk. They make the dish lighter but still tasty. For yogurt, you can use low-fat or dairy-free options like coconut yogurt. These swaps keep the creamy texture while meeting different dietary needs. To store your chicken korma, let it cool first. Place it in an airtight container. This keeps it fresh and tasty. In the fridge, your korma lasts about 3 to 4 days. Always check for any signs of spoilage before eating. Freezing chicken korma is easy. Use a freezer-safe container or bag. Make sure to leave some space for expansion. Your korma can stay frozen for up to 3 months. When ready to eat, take it out and thaw it overnight in the fridge. Reheat it in a pot or microwave until it's hot throughout. To enjoy your stored korma, reheat it gently. This helps keep the flavors rich. You can add a splash of coconut milk or yogurt if it seems too thick. Serve it over fresh basmati rice. It pairs well with naan bread or a fresh salad for a balanced meal. Slow Cooker Chicken Korma takes about 6-7 hours on low heat. If you choose high heat, it cooks in about 3-4 hours. Both methods allow the chicken to become tender and juicy. I often recommend the low setting for deeper flavor development, but high heat works well in a pinch. Yes, you can use other meats for this korma. Boneless chicken breast works well if you prefer leaner meat. For a different twist, try lamb or beef. Keep in mind that cooking times may change slightly based on the meat you choose. If you want a vegetarian option, chickpeas or tofu can substitute the chicken. Serve Slow Cooker Chicken Korma with fluffy basmati rice. The rice soaks up the rich sauce and balances the flavors. You can also add naan bread for dipping. Fresh cilantro on top adds color and flavor. For a refreshing side, consider a cucumber salad or yogurt raita. You now know how to make Slow Cooker Chicken Korma step by step. We covered the key ingredients, spices, and cooking methods. Remember to adjust flavors to your taste and try different proteins if desired. Store leftovers correctly for tasty meals later. Slow Cooker Chicken Korma is easy, flavorful, and perfect for any meal. Enjoy experimenting with this beloved dish!

Slow Cooker Chicken Korma Simple and Flavorful Meal

- 1 cup blanched almonds, finely chopped - 1/2 cup honey - 1 teaspoon ground cinnamon - 1/4 teaspoon ground nutmeg - 1/2 cup unsalted butter, melted - 10 sheets of phyllo dough - 1/2 cup powdered sugar (for dusting) - 1/4 cup sesame seeds (optional) - Tips for selecting quality almonds: Look for blanched almonds with a crisp look. They should be fresh, with no dark spots or signs of rancidity. Use whole almonds that you can chop yourself for better flavor. - Alternatives for honey or phyllo dough: If you need a honey substitute, try maple syrup or agave nectar. For phyllo dough, thin egg roll wrappers can work well. Just keep an eye on cooking times. - Importance of fresh spices: Fresh spices make a big difference. Ground spices lose flavor over time. Buy whole spices and grind them before use for the best taste. {{ingredient_image_2}} 1. First, preheat your oven to 350°F (175°C). This helps the cigars cook evenly. 2. Line a large baking sheet with parchment paper. This will prevent the cigars from sticking. 3. In a bowl, mix these ingredients for the filling: - 1 cup blanched almonds, finely chopped - 1/2 cup honey - 1 teaspoon ground cinnamon - 1/4 teaspoon ground nutmeg Stir the mixture well and set it aside for about 10 minutes. This allows the flavors to blend. 4. Take one sheet of phyllo dough. Use a pastry brush to coat it lightly with melted unsalted butter. 5. Place another sheet on top and brush it again with melted butter. This creates a rich, flaky layer. 6. Carefully cut the stacked phyllo into long strips, about 3 inches wide. These strips will form the base of your cigars. 1. At one end of each phyllo strip, place about 2 tablespoons of the almond mixture. 2. Fold the sides over the filling. Then, roll it tightly from that end to make a neat cigar shape. 3. Make sure the filling stays secure inside the roll. 4. Place each cigar seam-side down on the prepared baking sheet. Leave some space between each one for even cooking. 5. Brush the tops of the cigars with any leftover melted butter. This gives them a golden finish. If you want, sprinkle sesame seeds on top for added flavor. 1. Bake the cigars in your preheated oven for 20-25 minutes. Watch them closely to avoid burning. 2. When they turn golden brown and crispy, take them out of the oven. 3. Let the cigars cool slightly on the baking sheet. This helps them firm up. 4. Just before serving, dust the cigars generously with powdered sugar. This adds a sweet touch. 5. For a beautiful presentation, arrange the cigars on a serving platter. You can sprinkle more powdered sugar on top and place whole almonds around them. Serve with a small dish of honey for drizzling. Enjoy your delightful Moroccan honey almond cigars! - Issues with phyllo dough and how to handle it Phyllo dough can dry out quickly. Keep sheets covered with a damp towel while working. If it tears, don't worry! Just layer two sheets together, and you'll still get that lovely crisp. - Preventing leaks in rolled cigars When rolling, make sure to fold the sides over the filling tightly. This holds the filling in place. If you see any openings, you can seal them with a bit of melted butter. - Ensuring even baking for the best texture Space your cigars evenly on the baking sheet. This helps them bake evenly. Rotate the baking sheet halfway through to avoid hot spots in your oven. - Recommended garnishes to elevate the dish A sprinkle of powdered sugar gives a sweet finish. You can also add toasted almond slices or a drizzle of honey on top for a rich look. - Pairing suggestions (beverages or sides) Serve these cigars with mint tea for a traditional touch. You can also pair them with coffee or sweet wine for an adult treat. - Creative ways to serve the cigars at gatherings Arrange the cigars on a colorful platter. Add some fresh mint leaves or orange slices around them for a pop of color. You can even make a small honey dip on the side for extra indulgence. Pro Tips Keep Phyllo Dough Covered: Phyllo dough dries out quickly, so keep it covered with a damp cloth while you work to prevent it from becoming brittle. Customize the Filling: Experiment with different nuts or spices in the filling to create unique flavor combinations that suit your taste. Monitor Baking Time: Every oven is different, so keep an eye on the cigars as they bake to ensure they achieve a perfect golden brown color without burning. Serve Warm: These cigars are best enjoyed warm, so consider baking them just before serving for the ultimate crispy texture. {{image_4}} You can switch nuts in this recipe. Try walnuts, pecans, or pistachios. Each nut brings its own flavor. This change keeps the recipe fresh and fun. You might even mix a few nuts together for a unique taste. Dried fruits add sweetness too. Consider using raisins, apricots, or figs. Chop them finely and add them to the almond mix. If you love chocolate, add small chocolate chips for a twist. This will make the cigars even more indulgent. Spices can change the whole dish. Try adding cardamom for warmth or ginger for zing. You can also reduce the cinnamon if you prefer a milder taste. Adjusting spices allows you to create a flavor you love. You can make these cigars gluten-free. Use gluten-free phyllo dough. Many stores sell this option, so check the label. The rest of the recipe stays the same, and you can enjoy a tasty treat. For vegan versions, swap out butter and honey. Use coconut oil instead of butter. Maple syrup or agave nectar works well as a honey replacement. These changes keep the flavor great while fitting your diet. If you're watching sugar, you can reduce it. Use less honey or try a sugar substitute like stevia. This keeps the cigars sweet but lighter. You can still enjoy every bite without the guilt. To keep your Moroccan honey almond cigars fresh, you have a few options. If you plan to eat them within a few days, refrigerate them. Place them in an airtight container to keep them from drying out. - Use a glass or plastic container with a tight seal. - You can also wrap them in plastic wrap before placing them in the container. If you want to save them for longer, freezing is a great choice. Just follow these steps: - Allow the cigars to cool completely first. - Wrap each cigar tightly in plastic wrap, then place them in a freezer bag. - Remove as much air as possible before sealing. For the best taste and texture, try to eat the leftovers within two weeks. When it's time to enjoy your leftovers, reheating them properly is key. The safest way to reheat them is in the oven. Here's how: - Preheat your oven to 350°F (175°C). - Place the cigars on a baking sheet and cover them with aluminum foil. This keeps them moist while they heat. To maintain their crispiness, avoid using a microwave. Microwaving can make them soggy. If you want to crisp them up, remove the foil for the last few minutes of heating. This allows the outside to regain its crunch. By following these guidelines, your Moroccan honey almond cigars will taste almost as good as fresh! What is the history or cultural significance of Moroccan Honey Almond Cigars? Moroccan Honey Almond Cigars are a traditional treat in Moroccan culture. They symbolize celebration and hospitality. Often served during special occasions, these sweets reflect the rich flavors of Moroccan cuisine. The use of honey and almonds shows the importance of these ingredients in local dishes. Each bite offers a taste of Morocco's vibrant culinary heritage. Can I make these cigars ahead of time? Yes, you can prepare these cigars in advance. Assemble them and keep them in the fridge for up to a day. This way, you save time on the day of your event. Just bake them before serving. They will still taste fresh and delicious. Where to buy pre-made Moroccan Honey Almond Cigars? You can find pre-made Moroccan Honey Almond Cigars in specialty stores or local bakeries. Check Middle Eastern or Mediterranean shops in your area. Some online retailers also offer them. Just ensure you read reviews to find quality options. What to do if the phyllo dough is dry? If your phyllo dough feels dry, it may have been exposed to air. To fix this, cover it with a damp cloth. This keeps it moist while you work. If the dough tears, don't worry. You can patch it up with melted butter. Solutions for uneven baking results To achieve even baking, place your cigars in the center of the oven. Rotate the baking sheet halfway through cooking. If some are browning faster, cover them with foil. This helps achieve a uniform golden color. Tips for correcting overly sweet or bland cigars If your cigars taste too sweet, consider reducing the honey next time. You can balance sweetness with a pinch of salt in the almond mixture. To enhance bland flavors, add more spices like cinnamon or nutmeg. These tweaks will elevate your dish. In this article, we explored how to make delicious Moroccan Honey Almond Cigars. We covered ingredients, including blanched almonds, honey, and phyllo dough. You learned how to prepare, assemble, and bake them. I shared tips to avoid common mistakes and suggested variations for dietary needs. Storing leftovers and reheating methods help keep them tasty. Experiment with flavors and present them creatively. Enjoy making these treats and impress your friends and family!

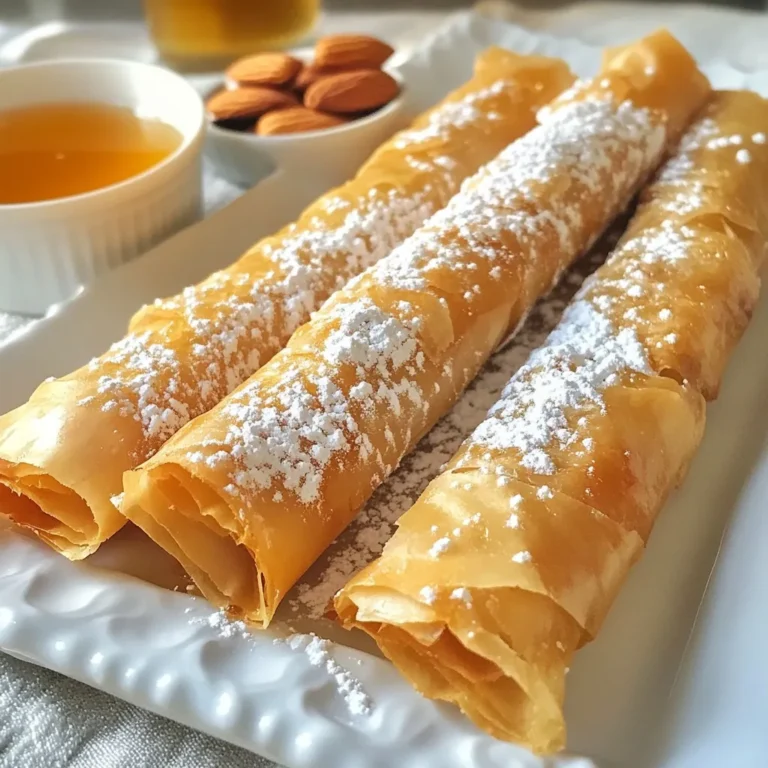
Moroccan Honey Almond Cigars Delightful Sweet Treat

- 1 lb Impossible Burger or your favorite plant-based ground meat - 1 cup cooked quinoa - 1/2 cup finely chopped onion - 1/2 cup finely chopped bell pepper - 2 cloves garlic, minced - 1/2 cup grated carrots The main ingredients for this vegan meatloaf create the base of flavor and texture. Impossible Burger gives it a hearty feel. Quinoa adds protein and a chewy texture. The chopped veggies, like onion and bell pepper, bring sweetness and crunch. Garlic adds a nice kick, while grated carrots boost moisture and natural sweetness. - 1/4 cup ground flaxseed mixed with 1/4 cup water (flax egg) - 1/4 cup gluten-free breadcrumbs or regular breadcrumbs - 2 tablespoons soy sauce or tamari - 1 tablespoon maple syrup Binding agents help hold the meatloaf together. The flax egg works great as a binder and adds healthy fats. Breadcrumbs give the loaf structure. Soy sauce adds umami flavor, while maple syrup brings a touch of sweetness. This combo enhances the taste and keeps the loaf moist. - 1 teaspoon dried thyme - 1 teaspoon smoked paprika - 1 teaspoon black pepper - Salt to taste Spices make this dish special. Dried thyme adds earthiness, while smoked paprika gives a smoky touch. Black pepper brings warmth, and salt enhances all flavors. Together, they create a well-rounded flavor profile. Adjust these spices to suit your taste. Enjoy exploring different combinations! {{ingredient_image_2}} First, preheat your oven to 350°F (175°C). This sets the stage for our meatloaf to bake evenly. Next, line a loaf pan with parchment paper. Let the paper hang over the edges. This step helps when you need to lift the loaf out later. In a large bowl, combine the main ingredients. Add 1 lb of Impossible Burger, 1 cup of cooked quinoa, 1/2 cup of finely chopped onion, 1/2 cup of finely chopped bell pepper, 2 cloves of minced garlic, and 1/2 cup of grated carrots. Now, pour in the flax egg mixture, made from 1/4 cup of ground flaxseed mixed with 1/4 cup of water. This helps bind everything together. Next, incorporate 1/4 cup of gluten-free breadcrumbs, 2 tablespoons of soy sauce, 1 tablespoon of maple syrup, 1 teaspoon of dried thyme, 1 teaspoon of smoked paprika, and 1 teaspoon of black pepper. Add salt to taste. Mix all the ingredients well. You can use your hands or a spatula. This ensures that every slice has great flavor. Now, transfer the mixture to your prepared loaf pan. Press it down firmly to shape it into a loaf. If you want, spread 1/4 cup of ketchup on top for a delicious glaze. Place the loaf in the oven and bake for 45-50 minutes. It should set, firm up, and turn golden-brown on top. Once baked, remove the loaf from the oven. Let it cool in the pan for about 10 minutes. This cooling time makes slicing easier. After that, slice your meatloaf and serve it warm. Enjoy your tasty vegan creation! To get the best texture in your vegan meatloaf, use binding agents. The flax egg mixture is key. It helps hold everything together, making the loaf firm and sliceable. Without it, your meatloaf may fall apart. When mixing, do it well. Grab your hands or a spatula and mix until everything is combined. This ensures even flavor in each bite. You want every slice to taste as good as the last. Garnishing makes a big difference. Fresh herbs like parsley add color and flavor. Just sprinkle some on top before serving. It's simple but elevates the dish. Pair this meatloaf with sides for a full meal. Mashed potatoes, steamed veggies, or a crisp salad work great. They balance the hearty flavors and add freshness to your plate. Feel free to adjust spice levels to your liking. If you love heat, add some chili flakes or hot sauce. If you prefer milder flavors, cut back on the black pepper. You can also substitute ingredients based on what you have. No quinoa? Use rice or bulgur instead. Lacking certain veggies? Use what you find in your fridge. This recipe is flexible and can match your taste and pantry. Pro Tips Flax Egg Alternatives: If you don't have flaxseed, you can substitute with chia seeds in the same ratio for a similar binding effect. Moisture Control: To keep your meatloaf moist, avoid overmixing the ingredients; just combine until they're uniformly mixed. Flavor Boost: For added depth in flavor, consider adding a splash of balsamic vinegar or a teaspoon of Worcestershire sauce (vegan version) to the mixture. Make Ahead: This meatloaf can be assembled a day in advance and stored in the fridge, making it a convenient option for meal prep. {{image_4}} You can easily make this dish gluten-free. Just swap regular breadcrumbs with gluten-free ones. This small change keeps the meatloaf tasty while making it safe for gluten-free diets. To give your meatloaf a flavor boost, try adding fresh herbs like parsley or basil. You can also mix in spices such as cumin or oregano for extra depth. For the glaze, think outside the box! Use BBQ sauce, teriyaki sauce, or even a mix of ketchup and mustard. These options create new flavor profiles and keep every bite exciting. Want to amp up the health benefits? You can boost protein by adding legumes, like black beans or lentils. These not only increase protein but also add fiber. Also, don’t hesitate to sneak in more vegetables! Chopped spinach, zucchini, or mushrooms can blend right into the mix, making the dish even heartier and more nutritious. To keep your leftover Vegan Impossible Meatloaf fresh, wrap it well. You can use plastic wrap or place it in an airtight container. This helps keep out air and moisture. Store it in the fridge. It will stay good for about 3 to 4 days. If you want to enjoy it later, be sure to check for any signs of spoilage before eating. If you want to freeze portions, slice the meatloaf first. This way, you can take out only what you need. Wrap each slice in plastic wrap. Then, place the wrapped slices in a freezer bag. Make sure to squeeze out as much air as you can. This helps prevent freezer burn. Your Vegan Impossible Meatloaf can last in the freezer for up to 3 months. When you’re ready to eat, you can thaw it overnight in the fridge. For quick reheating, use the microwave or an oven. If using an oven, preheat it to 350°F (175°C) and heat for about 15-20 minutes. Enjoy your meal! You can use other plant-based ground meats. Brands like Beyond Meat or Gardein work well. If you want a homemade option, try using lentils or chickpeas. Just mash them up and mix them in. This gives the meatloaf a nice texture. Yes, you can make this recipe soy-free. Instead of soy sauce, use coconut aminos. It has a similar taste and is soy-free. You can also skip the soy sauce entirely and add extra spices for flavor. To check if the meatloaf is done, look for a firm texture. It should be golden-brown on top. You can also use a food thermometer. The inside should reach 165°F. Let it cool for a bit before slicing. This helps it hold its shape. This recipe combines tasty ingredients and simple steps to create a satisfying dish. We used the Impossible Burger, quinoa, and fresh veggies to build flavor. The flax egg and breadcrumbs help the mixture hold together. Remember to preheat your oven and prepare your pan for easy baking. Try different spices or herbs to make it your own. Store leftovers correctly, and enjoy them later. Whether you are gluten-free or seek new flavors, there's an option for you. Dive into this plant-based meatloaf, and make your plate happier and healthier!

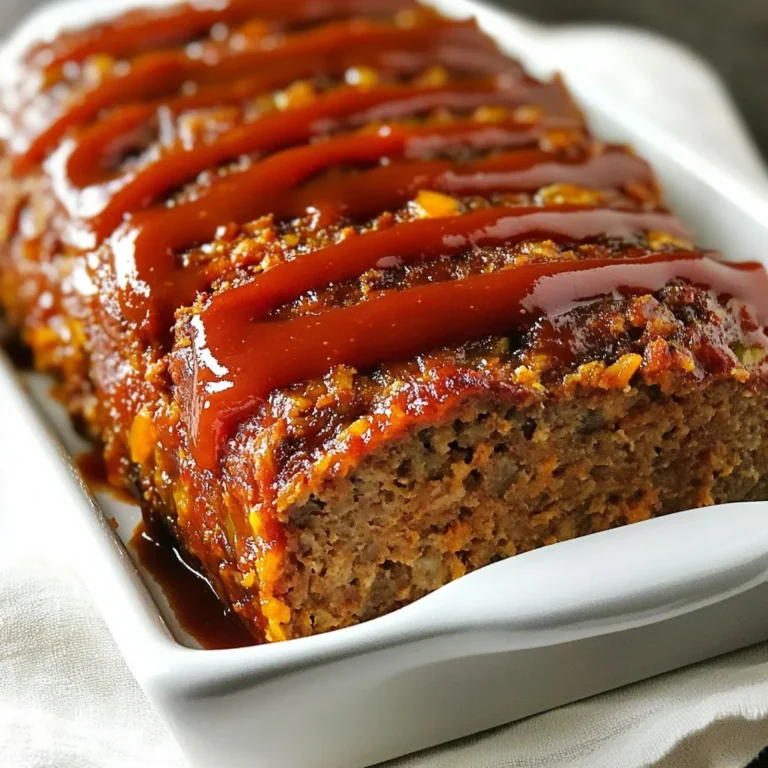
Vegan Impossible Meatloaf Flavorful and Hearty Dish

PREV 1 … 38 39 40 … 47 NEXT
snack joy kitchen

explore

DessertsDinnerAppetizersDrinks

Our Policies

  • Cookie Policy
  • Copyright Policy
  • Disclaimer
  • GDPR Policy
  • Terms Of Use
Back to Top
  • About
  • Contact Us
  • Privacy Policy
© 2026 snack joy kitchen