FREE DINNER EBOOK! Get your copy!
  • Cookie Policy
  • GDPR Policy
  • Disclaimer
  • Terms Of Use
  • Visit my other site: Fun Cookie Recipes
snack joy kitchen
  • Home
  • Dinner
  • Desserts
  • Drinks
  • Appetizers
  • Contact
  • About
  • Privacy Policy
  • Home
  • Dinner
  • Desserts
  • Drinks
  • Appetizers
  • Contact
  • About
  • Privacy Policy
  • Cookie Policy
  • GDPR Policy
  • Disclaimer
  • Terms Of Use
Visit my other site: Fun Cookie Recipes

HOME / CATEGORIES /

Latest

- 2 tablespoons olive oil - 1 medium onion, finely chopped - 2 medium carrots, peeled and diced - 2 celery stalks, diced - 3 cloves garlic, minced - 1 teaspoon ground cumin - 1 teaspoon smoked paprika - 1/2 teaspoon turmeric - 1 pound boneless, skinless chicken thighs, cut into bite-sized pieces - 1 cup dried green or brown lentils, thoroughly rinsed - 6 cups chicken broth or stock - 1 can (14 ounces) diced tomatoes, including the juices - 2 cups fresh spinach or kale, chopped into bite-sized pieces - Salt and freshly ground black pepper to taste - Fresh lemon juice (optional, for garnish) - Fresh parsley or cilantro, finely chopped (for garnish) Each ingredient plays a key role in building flavor. The olive oil creates a rich base. The onion, carrots, and celery add sweetness and crunch. Garlic adds depth, while spices like cumin and smoked paprika bring warmth. The chicken adds protein, and lentils provide fiber and texture. Broth and tomatoes make it hearty and delicious. Finally, greens add freshness and color. {{ingredient_image_2}} Start by heating the olive oil in a large pot on medium heat. Add the chopped onion, carrots, and celery. Cook these vegetables for about 5-7 minutes. You want them to soften and smell great. Stir them often. Look for a light golden color and a tender feel. This step builds a strong base for your soup. Next, add minced garlic, ground cumin, smoked paprika, and turmeric. Stir these spices into the pot. Cook for another minute. This will wake up the flavors and fill your kitchen with a lovely aroma. The spices blend well with the sautéed vegetables, creating a rich flavor. Now, add the chicken thighs cut into bite-sized pieces. Cook them for about 5 minutes. Stir often to brown all sides. A good sear adds depth to the flavor. Make sure the chicken is not pink when you finish. This step is key for a delicious soup. After browning the chicken, add the rinsed lentils, chicken broth, and diced tomatoes with juices. Stir everything together. Increase the heat until it boils, then lower it to a simmer. Cover the pot and let it cook for 25-30 minutes. Check the lentils for tenderness. They should be soft but not mushy. Once the lentils are ready, stir in the chopped spinach or kale. Cook for another 5 minutes. This will wilt the greens and keep their bright color. It also adds nutrition and a fresh taste to your soup. Finally, taste the soup. Add salt and freshly ground black pepper to your liking. Serve the soup hot. A splash of fresh lemon juice brightens the flavors. Garnish with parsley or cilantro for a pop of color. Enjoy your hearty chicken lentil soup! Seasoning is key to making great soup. It can bring all the flavors together. Use salt and pepper to enhance taste. Try adding a pinch of cayenne for heat. If you want depth, add more cumin or smoked paprika. These spices work well with chicken and lentils. A heavy pot, like a Dutch oven, is best for soup. It holds heat well and cooks evenly. Keep the heat medium to avoid burning. If it starts to bubble too much, lower the heat. Slow cooking helps flavors blend nicely. You can make this soup ahead of time. It tastes even better the next day! Store it in the fridge for up to three days. To freeze, let it cool completely, then place it in containers. When ready to eat, thaw it overnight in the fridge. Reheat on the stove or in the microwave. Pro Tips Fresh Herbs Matter: Using fresh parsley or cilantro for garnish not only adds a pop of color but also enhances the flavor profile of the soup. Customize Your Greens: Feel free to substitute spinach or kale with other greens like Swiss chard or collard greens, depending on your preference and what's available. Perfectly Cooked Lentils: Keep an eye on the lentils while they cook; they should be tender but retain their shape. Overcooking can lead to a mushy texture. Enhance with Acidity: A splash of fresh lemon juice just before serving brightens the flavors and balances the richness of the soup. {{image_4}} You can change the protein in Chicken Lentil Soup easily. If you want a meatless option, use tofu. It absorbs flavors well. You can also try turkey instead of chicken. Ground turkey works great too. For a unique taste, add some cooked sausage. Each protein gives a different flavor and texture. Adding more veggies makes this soup even better. Zucchini adds a nice crunch and mild taste. Bell peppers bring a sweet flavor and vibrant color. You could also add carrots for more sweetness. Consider throwing in some peas or corn for extra texture. These veggies not only enhance taste but also boost nutrition. You can change the spice blend to suit your taste. Try adding curry powder for a warm flavor. If you like heat, jalapeño or cayenne pepper adds a kick. Italian seasoning gives a fresh twist. Experiment with herbs like thyme or rosemary for a different aroma. Adjusting spices can create a whole new experience in each bowl. Your Chicken Lentil Soup stays fresh in the fridge for about 4 to 5 days. Store it in an airtight container. This keeps it safe and tasty. Before you eat it again, check for any off smells or changes in texture. To freeze your soup, let it cool first. Pour it into freezer-safe bags or containers. Remove as much air as you can. Label with the date. It can last up to 3 months in the freezer. When you want to eat it, thaw the soup overnight in the fridge. You can reheat your soup on the stovetop or in the microwave. For the stovetop, warm it over low heat. Stir often until it's hot. If using the microwave, place it in a bowl. Heat for 2-3 minutes, stirring halfway through. Both methods work well, but stovetop gives better flavor. You can use turkey or tofu instead of chicken. They both work well. If you prefer a vegetarian option, try chickpeas or lentils. Each substitute gives a unique taste. Adjust cooking times if needed, especially for tofu. Yes, you can use canned lentils. They save time and are already cooked. Drain and rinse them before adding to the soup. This will help reduce the sodium content. Add them in the last 10 minutes of cooking to heat through. To make this soup gluten-free, use gluten-free broth. Most chicken broths are gluten-free, but check the label. Avoid adding any gluten-containing ingredients. This way, everyone can enjoy it safely. Yes, this soup is great for meal prepping. It stores well in the fridge for up to five days. You can also freeze it for up to three months. Just leave out the greens until reheating. Absolutely! You can add zucchini, bell peppers, or corn. Just chop them small and add them when you sauté the other veggies. This adds color and boosts nutrition. Be creative with your choices! You learned how to make a tasty Chicken Lentil Soup. We covered the key ingredients, step-by-step instructions, and helpful tips. You explored ways to customize the soup with different proteins and veggies. Plus, you got solid storage advice. With these insights, you can create a warm, nutritious meal that fits your taste. Enjoy the process of making this soup and share it with others!

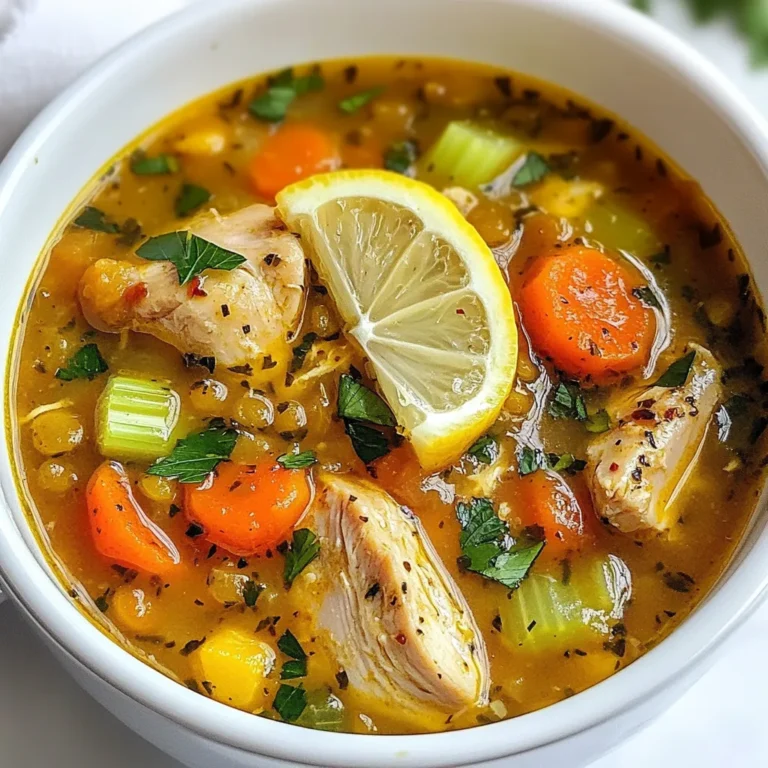
Chicken Lentil Soup Hearty and Nourishing Recipe

- Chicken and seasoning details: - 2 boneless, skinless chicken breasts, thinly sliced - 2 tablespoons Cajun seasoning - Cream and broth specifics: - 1 cup heavy cream - 1 cup low-sodium chicken broth - Pasta type and cheese information: - 8 ounces of fettuccine or linguine pasta - 1 cup freshly grated Parmesan cheese This dish shines with its rich flavors and creamy texture. The chicken, seasoned with Cajun spices, gives a bold kick. The heavy cream and chicken broth create a smooth sauce that hugs the pasta. You can use fettuccine for a classic feel or linguine for a fun twist. Don’t forget the Parmesan! It adds a salty, nutty flavor that pairs perfectly with the sauce. Fresh parsley on top not only looks good but gives a fresh taste. Each ingredient plays a role in making this dish special. {{ingredient_image_2}} To start, fill a large pot with water and add salt. You want it to taste like the ocean. Bring the water to a rolling boil. Add 8 ounces of fettuccine or linguine pasta. Cook according to the package directions until it's al dente, which means it should still have a slight bite. This usually takes about 8 to 10 minutes. Once done, drain the pasta in a colander and set it aside. Next, take 2 boneless, skinless chicken breasts and slice them thinly. Place the chicken in a bowl and sprinkle 2 tablespoons of Cajun seasoning over it. Toss the chicken to coat it well. Heat 3 tablespoons of olive oil in a large skillet over medium-high heat. Add the chicken in a single layer. Cook for about 5 to 7 minutes. Stir occasionally until the chicken turns golden brown and is cooked through. Once finished, remove the chicken and set it aside on a plate. In the same skillet, add 1 tablespoon of olive oil. When it heats up, add 3 cloves of finely minced garlic and 1 sliced bell pepper. Sauté for about 3 to 4 minutes. Stir frequently until the vegetables are tender and smell great. Freshness matters here, as it enhances the dish's flavor. Now, it's time to make the sauce. Gradually pour in 1 cup of low-sodium chicken broth while stirring. Bring this to a gentle simmer. Then, lower the heat and add 1 cup of heavy cream. Mix well and cook for 2 to 3 minutes. This will help the sauce thicken and become creamy. If you want it thicker, let it cook a bit longer. Once your sauce is ready, add the cooked pasta and the sautéed chicken back into the skillet. Toss everything together gently. Make sure each piece of pasta is coated with the creamy Cajun sauce. Stir in 1 cup of freshly grated Parmesan cheese. This will add a rich flavor. Taste and adjust seasoning with salt and black pepper if needed. When you're ready to serve, take the skillet off the heat. Let it sit for a minute to let the sauce thicken a bit more. Serve the creamy Cajun chicken pasta hot. Garnish with freshly chopped parsley for a pop of color and freshness. This adds both flavor and a nice presentation. Enjoy your meal! - Use boneless, skinless chicken breasts for quick cooking. - Season the chicken well with Cajun spices for bold flavor. - Cook the chicken over medium-high heat for a nice sear. - To keep chicken juicy, avoid cooking it too long. - Remove the chicken from heat when it’s golden and cooked through. - Start with low-sodium chicken broth to control salt levels. - Gradually add heavy cream to achieve the desired thickness. - Stir the sauce gently to mix in all the flavors. - Taste the sauce, then adjust salt and pepper to your liking. - For extra creaminess, you can add more cheese at the end. - Experiment with spices like smoked paprika or cayenne for heat. - Add fresh herbs like thyme or oregano for a fresh twist. - Serve with garlic bread or a simple salad for a complete meal. - Pair with a light white wine to complement the dish. - For a crunchy side, roasted vegetables work well too. Pro Tips Perfect Pasta Cooking: Always add salt to your boiling water before cooking pasta. This enhances the flavor of the pasta itself and helps it absorb the sauce better. Customize Cajun Spice: Adjust the amount of Cajun seasoning to your spice preference. For a milder flavor, reduce the amount, or for extra heat, add a pinch of cayenne pepper. Extra Creaminess: For an even creamier sauce, consider adding a splash of cream cheese or mascarpone cheese when mixing in the heavy cream. Freshness Matters: Use freshly grated Parmesan cheese instead of pre-grated for better flavor and creaminess in the sauce. It melts smoother and adds a richer taste. {{image_4}} You can switch up the protein in your creamy Cajun chicken pasta. Here are a few ideas: - Alternatives to chicken: Try shrimp or salmon for a seafood twist. Both cook quickly and add great flavor. You can also use turkey for a leaner option. Each brings its own unique taste to the dish. - Vegetarian substitutes: If you want a meat-free meal, use mushrooms or tofu. Both options absorb flavors well. You can sauté them just like the chicken. This keeps the same creamy texture and adds a hearty feel. Using different pasta can change the dish's feel. Here are some tasty swaps: - Alternative types of pasta: Fettuccine and linguine work great, but you can also use penne or rigatoni. These shapes hold the sauce well. Whole wheat or gluten-free pasta are good options for healthier choices. - Cooking adaptations for different pastas: Different pasta shapes may require slight changes in cooking time. Follow package directions for best results. Keep an eye on the pasta to get that perfect al dente bite. You can easily make the sauce your own. Here’s how: - Adding spice levels: If you like heat, add more Cajun seasoning or a pinch of cayenne. Start small, then taste as you go. You can also use hot sauce for a kick without changing the base flavor. - Incorporating additional vegetables: Feel free to add more veggies like spinach, zucchini, or cherry tomatoes. These not only add color but also boost nutrition. Sauté them with the garlic and bell pepper for a delicious mix. To keep your creamy Cajun chicken pasta fresh, let it cool down before storage. Place it in a shallow container to speed up cooling. Use airtight containers for the best results. This keeps the flavors locked in and helps prevent spoilage. When reheating, aim to keep that creamy texture intact. The stovetop is your best friend here. Heat it gently in a skillet over low heat. Stir often to avoid sticking. If you use the microwave, cover the bowl to trap moisture. Heat in short bursts and stir in between to ensure even warming. You can freeze creamy Cajun chicken pasta for long-term storage. Make sure it cools completely before putting it in freezer bags. Squeeze out any air to avoid freezer burn. When you’re ready to eat, thaw it in the fridge overnight. Reheat it gently as noted to bring back its creamy goodness. Yes, you can prep this dish ahead of time. Cook the pasta, chicken, and sauce separately. Store them in airtight containers. When you are ready to eat, just combine them. Heat gently on the stovetop or in the microwave. This method keeps flavors fresh. You can use half-and-half or whole milk for a lighter version. Coconut milk also works well for a dairy-free option. If you want a rich taste, try a blend of Greek yogurt and milk. These alternatives reduce calories while still adding creaminess. To make it milder, use less Cajun seasoning. You can also add more cream or a splash of milk. For a spicier kick, include extra Cajun seasoning or a pinch of cayenne pepper. Always taste as you go. Adjust slowly to find your perfect heat level. Yes, Creamy Cajun Chicken Pasta is great for meal prep. The flavors meld well when stored. Portion it into containers for easy lunches or dinners. It lasts in the fridge for up to four days. Just reheat and enjoy! Serve the pasta hot, garnished with fresh parsley. Pair it with a side salad or garlic bread for a complete meal. You can also add a sprinkle of extra Parmesan on top for added flavor. Enjoy your delicious creation! This blog post covered how to make a Creamy Cajun Chicken Pasta. We discussed key ingredients like chicken, cream, and pasta. I shared easy steps for cooking chicken and pasta, and how to create a creamy sauce. You learned tips for serving and storage, plus ideas for variations. Now you have the tools to create a delicious meal. Enjoy trying different flavors and make it your own! Happy cooking!

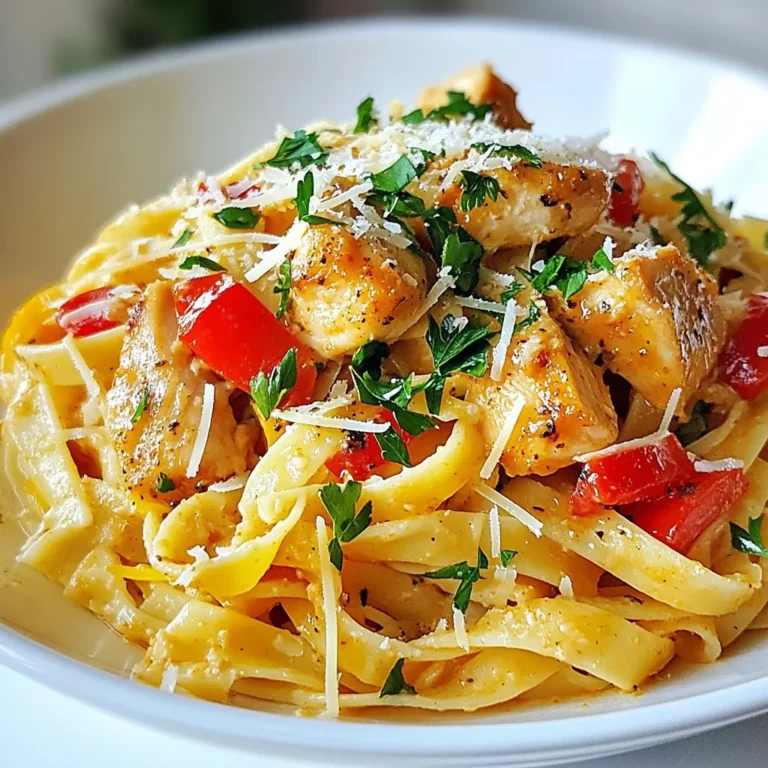
Creamy Cajun Chicken Pasta to Savor Tonight

- 4 boneless, skinless chicken breasts - 2 tablespoons olive oil - 2 teaspoons chili powder - 1 teaspoon ground cumin - 1 teaspoon garlic powder - 1 teaspoon onion powder - 1 teaspoon smoked paprika - Sea salt and freshly cracked black pepper, to taste - 1 red bell pepper, thinly sliced - 1 yellow bell pepper, thinly sliced - 1 green bell pepper, thinly sliced - 1 large red onion, thinly sliced - Fresh lime wedges, for serving - Fresh cilantro, roughly chopped, for garnish When measuring your ingredients, precision matters. Use a standard measuring spoon or cup. - Olive oil: 2 tablespoons - Spices: Use teaspoons for dry spices. - Peppers and onion: Slice them thin for even cooking. To make your dish pop, add some fresh lime wedges. A squeeze of lime gives a nice tang. You can also sprinkle chopped cilantro on top for a fresh taste. Both add color and flavor. {{ingredient_image_2}} 1. Preheat your oven to 425°F (220°C). This sets the stage for perfect cooking. 2. Line a large baking sheet with parchment paper. This makes cleanup easy. 3. In a small bowl, mix 2 tablespoons of olive oil with 2 teaspoons of chili powder, 1 teaspoon of ground cumin, 1 teaspoon of garlic powder, 1 teaspoon of onion powder, and 1 teaspoon of smoked paprika. Add sea salt and pepper to taste. Whisk until blended. 4. Take 4 chicken breasts and put them in a big mixing bowl. Pour the marinade over the chicken. Toss until each piece is well coated. 5. Place the marinated chicken on the lined baking sheet. Leave space between each piece for even cooking. 6. Slice 1 red bell pepper, 1 yellow bell pepper, 1 green bell pepper, and 1 large red onion. Scatter these colorful veggies around the chicken on the sheet pan. 7. Drizzle any leftover marinade over the veggies. This adds more flavor to them. 8. Bake in the preheated oven for 25-30 minutes. The chicken should reach 165°F (75°C) and the veggies should be tender. 9. Once done, take the sheet pan out of the oven. Let the chicken rest for 5 minutes to keep it juicy. 10. Slice the chicken into strips. Serve it with the colorful roasted veggies. 11. Add fresh lime wedges for a zesty kick. Sprinkle chopped cilantro on top for a nice finish. This simple process gives you a tasty meal with bright flavors. Enjoy! To keep your chicken juicy, start with fresh, high-quality breasts. Use a meat thermometer to check for doneness. The chicken should reach 165°F (75°C). Let it rest for five minutes after baking. This helps the juices settle inside the meat. Cutting too soon can dry it out. Marinating the chicken is key for flavor and moisture. Mix olive oil with spices like chili powder and cumin. Coat the chicken well, so each piece absorbs the flavors. Let it marinate for at least 30 minutes. For the best taste, marinate overnight in the fridge. Chicken breasts can vary in thickness. Thicker pieces may need more time to cook. If your chicken is very thick, bake for 30 to 35 minutes. For thinner pieces, check for doneness at 25 minutes. Always use a thermometer for the best results. Pro Tips Marinate Longer: For even more flavor, consider marinating the chicken for at least 30 minutes or up to 2 hours in the refrigerator before cooking. Use Fresh Vegetables: Choosing fresh, seasonal vegetables will enhance the flavor and texture of your fajitas, making them even more vibrant. Experiment with Spices: Feel free to adjust the spice levels or add additional spices like cayenne pepper or oregano to customize the flavor profile to your liking. Serve with Toppings: Enhance your fajitas with toppings such as avocado, sour cream, or salsa for a delicious and personalized meal experience. {{image_4}} You can switch the chicken for other proteins. Try using shrimp or beef. For shrimp, cook it for less time. It cooks fast and will stay tender. If you choose beef, use thin strips of flank steak. Adjust the cooking time to ensure it cooks fully but remains juicy. For a tasty vegetarian option, use hearty veggies or plant-based proteins. You can replace the chicken with firm tofu or tempeh. Cut them into bite-sized pieces and marinate just like the chicken. Add mushrooms and zucchini for more texture and flavor. This way, you keep the spirit of fajitas alive without meat. To amp up the flavor, add more spices. Consider including cayenne for heat or smoked paprika for depth. You can also mix in lime zest for a fresh twist. Try adding fresh herbs like oregano or thyme. These little changes make your dish unique and exciting. After your meal, let the fajita chicken cool down. Then, slice the chicken and mix it with the veggies. Transfer everything to an airtight container. Proper storage helps keep the flavors fresh. You can store leftovers in the fridge for up to three days. Make sure the container is sealed tight to avoid drying out. If you want to save some for later, freezing works great. Place the chicken and veggies in a freezer-safe bag. Remove as much air as you can before sealing. Label the bag with the date. You can freeze it for up to three months. When you're ready to eat, just thaw it in the fridge overnight. To reheat, you can use an oven or a microwave. For the oven, preheat it to 350°F (175°C). Place the chicken and veggies on a baking sheet and cover with foil. Heat for about 15-20 minutes, or until warm. If using a microwave, put the food on a microwave-safe plate. Heat in short bursts of 1-2 minutes, stirring in between. Make sure it’s heated all the way through. Enjoy your tasty leftovers! Yes, you can use frozen chicken. However, it is best to thaw it first. Thawing ensures even cooking. This way, the chicken absorbs the marinade well. If you must cook it frozen, add extra time to the baking. Always check the chicken’s internal temp. It should reach 165°F (75°C) for safety. You can serve Sheet Pan Fajita Chicken with many sides. Some great options include: - Warm tortillas for wrapping - Rice or quinoa for a hearty base - Fresh guacamole for creaminess - Salsa for a zesty kick - A simple green salad for crunch Mix and match these sides to make your meal even better! To add more heat to your dish, try these tips: - Use more chili powder in the marinade. - Add sliced jalapeños or serrano peppers. - Serve with a spicy salsa or hot sauce. - Sprinkle crushed red pepper flakes over the veggies. Experiment with these suggestions to find your perfect level of spice! You now have a clear guide on creating delicious Sheet Pan Fajita Chicken. We covered the key ingredients, the step-by-step instructions for cooking, and helpful tips for juicy results. You can also explore tasty variations and easy storage methods. Remember, each step matters in making your dish great. With simple swaps and some creativity, you can make this meal fit your tastes. Embrace the process and enjoy your cooking journey.

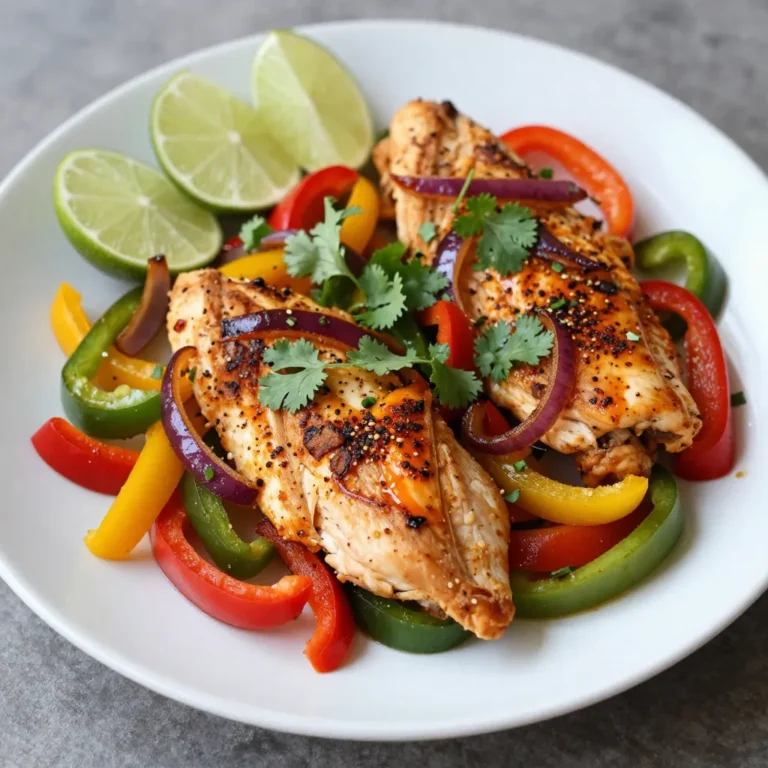
Savory Sheet Pan Fajita Chicken Simple and Flavorful

To make Lemon Herb Grilled Shrimp Skewers, you will need: - 1 lb large shrimp, peeled and deveined - 3 tablespoons extra virgin olive oil - 2 tablespoons freshly squeezed lemon juice - Zest of 1 bright lemon - 2 garlic cloves, finely minced - 1 teaspoon dried oregano - 1 teaspoon dried thyme - Salt and freshly ground black pepper to taste - Skewers (wooden or metal) - Fresh parsley, finely chopped (for garnish) These ingredients come together to create a bright and fresh dish that is easy to make. You can add a few optional ingredients to boost the flavor: - A pinch of red pepper flakes for heat - A splash of white wine for depth - Fresh herbs like basil or cilantro for a twist These additions can make your skewers even more exciting. This recipe serves about four people. If you want to serve more, simply double the ingredients. You can also adjust the shrimp amount based on your guests' appetites. Each skewer holds about two to three shrimp, so plan accordingly. Enjoy your meal! {{ingredient_image_2}} If you use wooden skewers, soak them in water for at least 30 minutes. This step helps stop them from burning on the grill. It also keeps the skewers strong while cooking. In a bowl, mix together the olive oil, lemon juice, and lemon zest. Add the minced garlic, oregano, and thyme next. Finally, sprinkle in salt and pepper. Whisk everything together until it is well mixed. This marinade adds a bright flavor to the shrimp. Add the peeled and deveined shrimp to the marinade. Gently toss the shrimp to coat them completely. Let them sit in the marinade for at least 15 minutes. This short time helps the shrimp soak up the tasty flavors. While the shrimp is marinating, preheat your grill to medium-high heat. This temperature is key for grilling. It allows the shrimp to cook quickly and evenly while getting that nice char. Once the shrimp have marinated, thread them onto the skewers. Leave a bit of space between each shrimp. This helps them cook well. Place the skewers on the hot grill. Grill for about 2-3 minutes on each side. Look for the shrimp to turn pink and opaque, which shows they are done. After grilling, take the skewers off the grill. Place them on a serving platter. For a nice touch, sprinkle freshly chopped parsley over the shrimp. This adds color and enhances the taste. Enjoy your Lemon Herb Grilled Shrimp Skewers with a side salad or grilled veggies! When picking shrimp, look for large ones. They should be firm and moist. A fresh shrimp has a slight ocean smell, not a strong fishy scent. Check for a shiny shell without spots. If buying frozen, ensure they are individually quick-frozen (IQF). This keeps them fresher and easier to use. Preheat your grill to medium-high heat. This step is key for a good sear. Use a grill brush to clean the grates. For wooden skewers, soak them in water for 30 minutes. This prevents burning. When placing shrimp on the grill, leave space between them. This helps them cook evenly. The marinade makes a big difference. Use fresh herbs when possible for a bright taste. Lemon juice and zest bring zest to the shrimp. Garlic adds a punch of flavor. You can also mix in a pinch of red pepper flakes for heat. Experiment with different herbs like basil or cilantro for unique twists. Pro Tips Soak Wooden Skewers: If using wooden skewers, soak them in water for at least 30 minutes to prevent burning on the grill. Marinate for Flavor: Allow the shrimp to marinate for at least 15 minutes to enhance their flavor and juiciness. Grill at the Right Temperature: Preheat your grill to medium-high heat for the best char and cooking results. Check for Doneness: Grill shrimp until they are pink and opaque, which usually takes about 2-3 minutes per side. {{image_4}} To add a kick, mix in some heat. You can use red pepper flakes or hot sauce. Just a pinch of red pepper flakes in the marinade works well. If you want more heat, try a few dashes of your favorite hot sauce. This adds a nice balance to the lemon flavor. Adding colorful veggies can enhance your shrimp skewers. Bell peppers, zucchini, and cherry tomatoes are great choices. Cut them into chunks and add them to your skewers. This not only adds flavor but also makes the dish look amazing. The veggies will soak up the marinade, adding extra taste. Switching herbs can change the whole dish. Try fresh basil, cilantro, or dill. Each herb brings its own flavor profile. For example, basil adds a sweet taste, while cilantro gives a fresh kick. Just chop the herbs finely and mix them into your marinade. This allows you to create a new twist on the classic recipe. To keep your shrimp skewers fresh, let them cool down first. Place them in an airtight container. This prevents air from drying them out. Store the container in the fridge. Use the skewers within two days for the best taste. To reheat shrimp skewers, use a microwave or a skillet. If using a microwave, place them on a plate. Cover with a damp paper towel to keep moisture. Heat on medium power for about 30 seconds. Check if they are warm. If not, heat in 15-second bursts until hot. For the skillet, heat on medium-low. Add a dash of olive oil and gently warm the skewers. This keeps them juicy and tasty. You can freeze leftover skewers for later meals. Wrap each skewer tightly in plastic wrap. This helps prevent freezer burn. Then, place them in a freezer-safe bag or container. Label with the date. They can last up to three months in the freezer. When ready to eat, thaw in the fridge overnight before reheating. Yes, you can use frozen shrimp! Just make sure to thaw them first. Place the shrimp in a bowl of cold water for about 15-20 minutes. Once thawed, peel and devein them if needed. This way, you still get that fresh taste. The best grill temperature for shrimp skewers is medium-high heat. Aim for around 400°F to 450°F. This helps to cook the shrimp quickly while giving them a nice char. For the best flavor, marinate shrimp for at least 15 minutes. You can let them sit for up to 30 minutes for even more taste. Avoid marinating for too long, as the acid in lemon juice can make the shrimp tough. Yes, you can use an oven! Preheat it to 400°F. Place the skewers on a baking sheet and bake for about 8-10 minutes. Flip them halfway through for even cooking. These shrimp skewers pair well with a fresh side salad or grilled veggies. You can also serve them with rice or quinoa for a heartier meal. A wedge of lemon adds a nice touch too! We explored all you need for perfect grilled shrimp skewers. You learned about key ingredients, step-by-step instructions, and helpful tips. Don't forget the exciting variations to try. Proper storage can keep leftovers fresh too. Whether you use fresh or frozen shrimp, follow the tips for the best flavor and grilling. Get creative and enjoy this dish at your next meal. Grilled shrimp skewers can impress everyone. Make this recipe your own and have fun cooking!

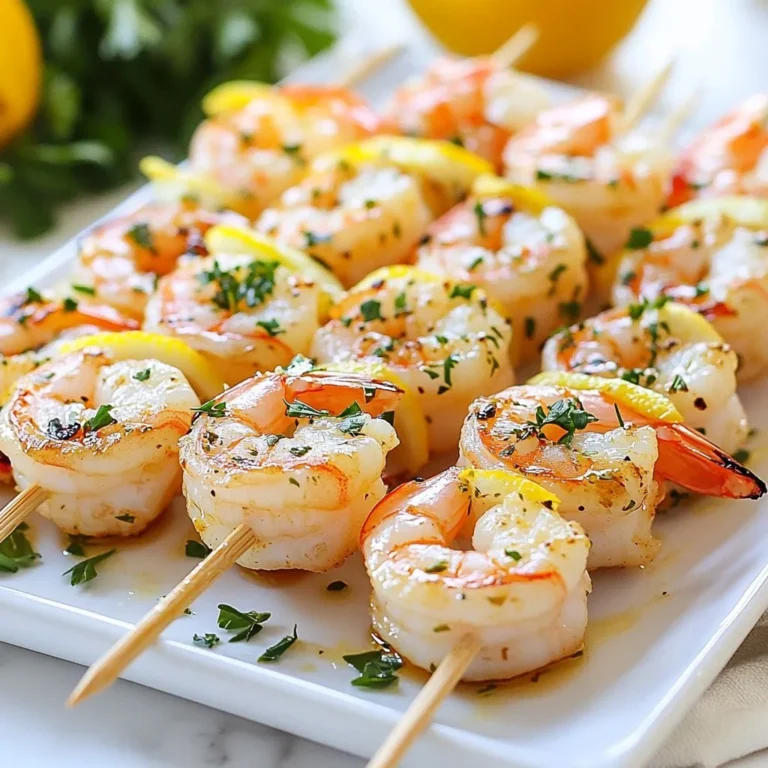
Lemon Herb Grilled Shrimp Skewers Tasty and Simple Dish

To make Melt In Your Mouth Chicken, you need: - 4 boneless, skinless chicken breasts - 1 cup buttermilk - 1 tablespoon garlic powder - 1 tablespoon onion powder - 1 teaspoon smoked paprika - 1 teaspoon salt - ½ teaspoon black pepper These ingredients create a great base for juicy and flavorful chicken. For the marinade, you will use: - 1 cup buttermilk - 1 tablespoon garlic powder - 1 tablespoon onion powder - 1 teaspoon smoked paprika - 1 teaspoon salt - ½ teaspoon black pepper This mix makes the chicken tender and full of taste. The buttermilk helps to break down the meat fibers, resulting in a soft bite. The coating for the chicken includes: - 1 cup all-purpose flour - ½ cup panko breadcrumbs - 1 teaspoon dried thyme - ½ teaspoon cayenne pepper (optional) - ¼ cup unsalted butter, melted The flour and breadcrumbs give the chicken a crunchy crust. Thyme adds a hint of earthiness, while cayenne brings a touch of heat if you like it spicy. The melted butter helps everything stick and adds flavor. {{ingredient_image_2}} To start, you need to marinate the chicken. In a large bowl, mix the buttermilk, garlic powder, onion powder, smoked paprika, salt, and black pepper. Whisk it all together until it blends well. Then, add the chicken breasts, making sure each piece gets coated. Cover the bowl with plastic wrap and place it in the fridge. Let it sit for at least 2 hours, or even overnight. This makes the chicken extra tender and packed with flavor. Next, let's prepare the coating. Grab a shallow dish or large plate. Combine the all-purpose flour, panko breadcrumbs, dried thyme, and cayenne pepper (if you want some heat). Mix it well. This blend will give the chicken that nice, crunchy texture you’ll love. Ensure every ingredient is evenly spread throughout the mixture. Now it’s time to bake the chicken. Preheat your oven to 400°F (200°C). Line a baking sheet with parchment paper to help with cleanup. After marinating, take the chicken out of the buttermilk. Let any extra marinade drip off. Then, dredge each piece in the flour mixture, making sure it’s coated well all over. Shake off any excess flour. Place the coated chicken on the lined baking sheet, leaving space between each piece. Brush melted butter over the chicken to help it brown nicely. Bake for 20-25 minutes. The chicken should look golden brown and be fully cooked. You can check the internal temperature; it should be 165°F (74°C) for safety. After baking, let the chicken rest for about 5 minutes. This helps keep it juicy. Finally, sprinkle freshly chopped parsley on top for color and flavor before serving. To make your chicken tender, marinate it in buttermilk. Buttermilk softens the meat and adds flavor. Aim for at least two hours of marinating time. For the best results, let the chicken sit overnight. This allows the spices to soak in and makes every bite juicy. Always use boneless, skinless chicken breasts for even cooking. For a crispy coating, mix flour with panko breadcrumbs. Panko adds extra crunch and texture. Don't forget to season your flour mix with thyme and cayenne for flavor. Dredge the marinated chicken well but shake off excess coating. This helps avoid clumps and ensures a nice even layer. A brush of melted butter before baking gives a golden finish. If you prefer, you can fry the chicken for a different taste. Heat oil in a pan and cook the chicken until golden brown. This takes about five minutes on each side. Another method is grilling. Preheat your grill and cook each side for about six to eight minutes. Always check the internal temperature. It should reach 165°F for safety. Pro Tips Marinate Longer for Flavor: If possible, let the chicken marinate overnight. This allows for deeper flavor penetration, resulting in a more tender and flavorful dish. Use a Meat Thermometer: To ensure your chicken is perfectly cooked, use a meat thermometer. The internal temperature should reach 165°F (74°C) for safe consumption. Perfect the Coating: For an extra crispy texture, consider double-dipping the chicken in the buttermilk and flour mixture. This creates a thicker coating that crisps up beautifully in the oven. Let it Rest: Always allow the chicken to rest for a few minutes after baking. This helps to lock in the juices, ensuring each bite is moist and flavorful. {{image_4}} To make a spicy version, add cayenne pepper to the flour mix. You can increase the amount to suit your taste. This adds heat and flavor. You can also use hot sauce in the buttermilk marinade. The spicy blend gives a kick to every bite. Serve with a cooling ranch dip to balance the spice. For a fresh twist, use herbs in the marinade and coating. Try adding rosemary or oregano to the buttermilk. You can also mix fresh herbs into the flour and panko. This adds depth and a lovely aroma to the chicken. You will enjoy the burst of flavor with each piece. If you need a gluten-free option, swap all-purpose flour for gluten-free flour. Use gluten-free breadcrumbs instead of panko. This keeps the crispy texture while being safe for those with gluten issues. You can still enjoy this dish without worry. Pair it with a gluten-free side for a full meal. To keep your melt in your mouth chicken fresh, store it in an airtight container. Make sure it cools to room temperature first. This helps stop bacteria from growing. You can keep it in the fridge for up to three days. If you want it to last longer, consider freezing it. When you're ready to enjoy your leftovers, reheating is key. The best way is in the oven. Preheat it to 350°F (175°C). Place the chicken on a baking sheet and cover it with foil. Heat for about 15-20 minutes until it's warm. This keeps the chicken moist and avoids drying it out. You can also use a microwave. Just place it in a microwave-safe dish and cover it. Heat for 1-2 minutes. Check that it’s hot all the way through. To freeze, wrap each chicken piece in plastic wrap. Then place them in a freezer bag. Remove as much air as possible before sealing. This helps prevent freezer burn. You can freeze the chicken for up to three months. When you’re ready to eat, thaw it in the fridge overnight before reheating. This keeps the texture and flavor just right. You can tell if the chicken is done by checking its temperature. Use a meat thermometer to see if it reaches 165°F (74°C) in the thickest part. If you don’t have a thermometer, cut into the chicken. The meat should be white and the juices should run clear. No pink should be visible. Yes, you can use chicken thighs! They are juicy and full of flavor. Adjust the cooking time, as thighs may take a bit longer to cook. Follow the same steps in the recipe, but check for doneness with the same methods. You can serve many sides with this dish. Here are some tasty options: - Creamy garlic mashed potatoes - Crisp garden salad - Steamed green beans - Roasted vegetables - Fluffy rice or quinoa These sides will complement the flavors of the chicken nicely. To make Melt In Your Mouth Chicken, use the right ingredients and follow each step. Marinate the chicken well and prepare your coating for the best flavor and texture. Remember the tips to keep your chicken tender and crispy. You can get creative with spicy or herb-infused versions and adapt for gluten-free diets. Store leftovers properly and reheat for the best taste. By trying these ideas, you'll impress everyone with your cooking skills and enjoy a delicious meal.

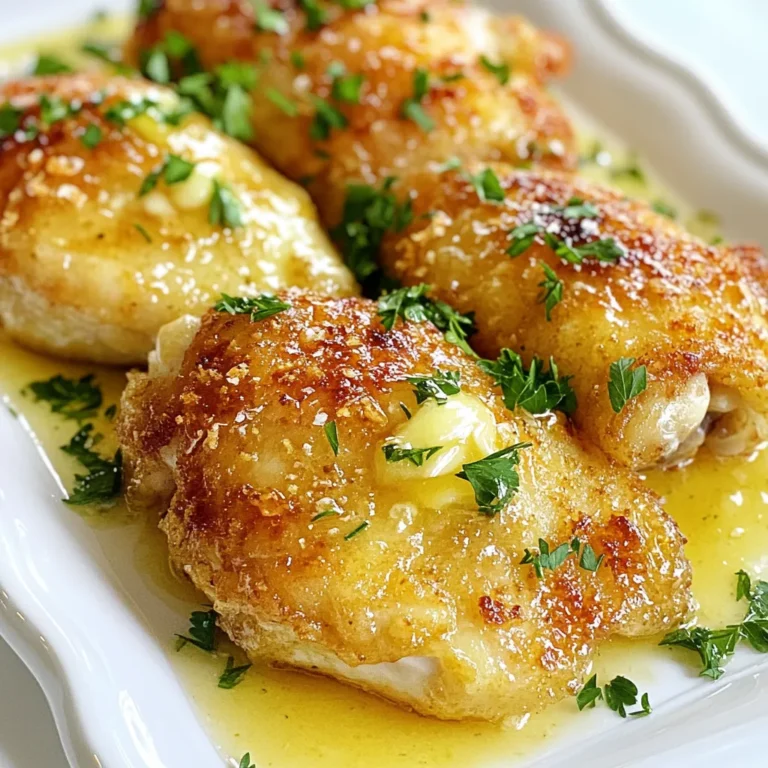
Melt In Your Mouth Chicken Easy Recipe to Savor

To make Santa Hat Cheesecake Bites, you will need the following ingredients: - 1 cup cream cheese, softened to room temperature - 1/4 cup granulated sugar - 1 teaspoon pure vanilla extract - 1 cup whipped cream, homemade or store-bought - 1 box of mini graham cracker crusts (6-8 crusts) - 6-8 ripe strawberries with their green tops intact - Red decorating frosting - A pinch of powdered sugar These ingredients work together to create a festive and delicious treat. The cream cheese forms the base, giving it a rich flavor. The sugar adds sweetness, while the vanilla extract contributes a lovely aroma. Whipped cream lightens the filling, making it airy and fluffy. Mini graham cracker crusts provide a crunchy base that holds everything together. The strawberries not only add a pop of color but also mimic Santa's hat. The red decorating frosting is perfect for that extra detail, and a light dusting of powdered sugar gives a snowy finish. Each ingredient plays a crucial role in this fun holiday recipe. {{ingredient_image_2}} To start, you need to mix some key ingredients. In a mixing bowl, combine: - 1 cup cream cheese, softened - 1/4 cup granulated sugar - 1 teaspoon pure vanilla extract Use an electric mixer to beat these together until smooth. You want a creamy texture with no lumps. Once that’s done, it’s time to fold in the whipped cream. Add 1 cup of whipped cream to the bowl. Gently fold it in with a rubber spatula. Be sure to keep that light, airy feel. This is what makes your cheesecake filling fluffy and delightful. Now it’s time to fill the crusts. Grab your mini graham cracker crusts. Using a small spoon or piping bag, fill each crust with the cheesecake mixture. Stop just short of the edge to leave room for toppings. Next, let’s add the strawberries. Rinse 6-8 ripe strawberries and dry them well. Make sure their green tops stay on. If they are too tall, trim them a bit for a better fit. Place one strawberry on top of each cheesecake bite, with the pointed end facing up. This makes it look like a Santa hat. Now for the fun part—decorating! Take your red decorating frosting and pipe a small circle at the base of each strawberry. This looks like the fluffy trim of Santa’s hat. To add a snowy effect, dust a pinch of powdered sugar over the tops of the strawberries. This makes them look extra festive and fun! Once you have decorated all the bites, cover them with plastic wrap. Chill the cheesecake bites in the fridge for at least 30 minutes. This helps the flavors meld and firms them up for serving. To make a perfect cheesecake filling, avoid lumps. Start with room temperature cream cheese. When you mix the cheese, sugar, and vanilla, use a medium speed. Beat until smooth, about one minute. If you mix too long, you can add too much air. This can cause cracks later. Next, gently fold in the whipped cream with a spatula. Be careful here. Too much mixing will make it dense. You want it light and airy. The goal is a fluffy filling that melts in your mouth. For variety, try different toppings. You can use blueberries or raspberries instead of strawberries. If you want a different look, add chocolate shavings or crushed nuts. These can add flavor and texture. You can also get creative with your presentation. Place the cheesecake bites on a colorful platter. Scatter mint leaves around them for a fresh look. Edible gold stars can add a festive touch too. These small details make your dish pop. Presentation matters at parties. Arrange the bites close together for a neat look. You can also use mini cupcake liners for an extra touch. This makes serving easy and fun. Pair these bites with hot cocoa or coffee. The rich flavors work well together. You can also serve with a fruit punch for a refreshing twist. These suggestions will make your dessert table shine. Pro Tips Use Room Temperature Cream Cheese: Allow the cream cheese to soften completely before mixing. This helps achieve a smooth and creamy cheesecake filling without lumps. Don’t Over-Mix the Whipped Cream: Gently fold in the whipped cream to keep the mixture light and airy, ensuring a fluffy texture that is essential for cheesecake bites. Choose the Right Strawberries: Select ripe strawberries with intact green tops, as they will best resemble Santa hats. Look for strawberries that have a nice shape and are firm to the touch. Chill for Best Results: Allow the cheesecake bites to chill for at least 30 minutes before serving. This helps the flavors meld together and firms up the cheesecake, making it easier to eat. {{image_4}} You can change the flavor of your cheesecake bites. Try adding chocolate or peppermint. Just mix in cocoa powder for chocolate. For peppermint, add a few drops of extract. You can also swap the strawberries for other fruits. Raspberries or blueberries can add a fun twist. They will still look festive and taste amazing. If you want a different crust, consider using crushed cookies. Oreo or gingersnap cookies work great. You can also make a homemade crust with almond flour for a gluten-free option. This adds a nutty flavor and keeps it safe for those with gluten issues. You can make these bites in two sizes: mini or standard. If you go for mini, the cook time stays the same. For standard sizes, you might need a bit longer in the fridge to set. Plan on serving sizes based on your event. Mini bites are great for parties, while standard sizes can be a fun dessert option. To keep your Santa Hat Cheesecake Bites fresh, store them in the fridge. Place them in an airtight container. This helps prevent drying out. They will stay good for about 3 to 5 days. Make sure to eat them within this time for the best taste. Yes, you can freeze cheesecake bites! Wrap each bite in plastic wrap and then place them in a freezer-safe bag. They will last for about a month in the freezer. To enjoy them later, thaw in the fridge overnight. This keeps the taste and texture just right. Yes, you can use low-fat cream cheese. However, it may change the texture and taste. Low-fat cream cheese can make the bites less creamy and rich. The cheesecake might feel a bit denser. If you want a lighter option, low-fat works, but full-fat gives the best flavor. To make these cheesecake bites gluten-free, you can swap the mini graham cracker crusts. Look for gluten-free graham crackers or use crushed gluten-free cookies. Another option is to make a crust using ground almonds or oats. Both choices keep the festive spirit without gluten. You can make these bites a day ahead. Just prepare them and chill them in the fridge. This helps the flavors blend well. If you want, add the toppings just before serving to keep them fresh and pretty. In this post, I shared how to make delicious cheesecake bites. We covered key ingredients like cream cheese and strawberries. I outlined simple steps for mixing and assembling. Tips and variations let you customize your dessert. Remember to store leftovers properly and consider gluten-free options. In closing, these cheesecake bites are fun to make and share. Enjoy experimenting with flavors and toppings!

Santa Hat Cheesecake Bites Festive and Fun Treat

- 1 cup cornmeal - 1 cup all-purpose flour - 1 tablespoon baking powder - 1/2 teaspoon salt - 1/4 teaspoon black pepper - 1 cup buttermilk (or milk with 1 tablespoon vinegar) - 1 large egg - 1/4 cup honey - 1/4 cup unsalted butter, melted - 1 cup shredded sharp cheddar cheese - 1-2 jalapeños, deseeded and finely chopped - 1/2 cup corn kernels If you don't have buttermilk, you can make your own. Just mix milk with vinegar. This will mimic the tang of buttermilk. If you need a gluten-free option, use a gluten-free flour blend instead of all-purpose flour. You can replace sharp cheddar with another cheese like pepper jack for extra spice. For a sweeter muffin, add more honey or use sugar instead. You will need the following tools: - A mixing bowl to combine ingredients - A whisk for blending wet ingredients - A spatula for folding in cheese and jalapeños - A muffin tin for baking - Muffin liners or cooking spray for easy removal - An oven for baking the muffins - A toothpick to check if muffins are done These tools will help you create perfect muffins with ease. Happy baking! {{ingredient_image_2}} Start by preheating your oven to 375°F (190°C). This step is key. While the oven heats, prepare your muffin tin. You can grease it with cooking spray or butter. If you want easy removal, use muffin liners. In a large bowl, combine the cornmeal, all-purpose flour, baking powder, salt, and black pepper. Use a whisk to blend everything well. Make sure there are no clumps. This helps the muffins rise evenly. In another bowl, whisk together the buttermilk, egg, honey, and melted butter. Mix until it is smooth with no lumps. This mixture adds moisture and flavor to your muffins. Now, pour the wet mixture into the dry ingredients. Use a spatula to fold them together gently. Be careful not to over-mix. A few lumps are okay. Next, fold in the shredded sharp cheddar cheese, finely chopped jalapeños, and corn kernels. Make sure everything is evenly mixed. Scoop the batter into the muffin tin. Fill each cup about 3/4 full. This gives the muffins room to rise. Bake in your preheated oven for 18-20 minutes. They are ready when the tops are golden brown. A toothpick should come out clean when inserted in the center. After baking, let the muffins cool in the pan for 5 minutes. Then, move them to a wire rack to cool completely. Enjoy the warmth and flavor! To get soft and fluffy muffins, mix the dry and wet ingredients carefully. Over-mixing can make the muffins tough. A few lumps in the batter are okay. This helps keep the texture light. Use fresh corn for a sweet bite. If you prefer more heat, add more jalapeños. They bring a nice kick to each muffin. Bake them until golden brown. Check with a toothpick; it should come out clean. Once you cool the muffins, store them in an airtight container. This keeps them fresh. You can keep them at room temperature for up to three days. For longer storage, wrap them tightly in plastic wrap and put them in the freezer. They can last for up to three months. When you are ready to eat them, just thaw and warm them up. These muffins taste great on their own, but you can jazz them up! Serve them warm with butter that melts right in. For a fun twist, add a sprinkle of cheddar cheese on top. A slice of jalapeño also makes a lovely garnish. Pair them with soup or chili for a hearty meal. They also work well as a side for BBQs or picnics. Enjoy the burst of flavor! Pro Tips Use Fresh Corn: For the best flavor, use fresh corn kernels when they are in season. If using frozen, make sure they are thawed and drained well to avoid excess moisture. Adjust the Heat: If you prefer a milder muffin, be sure to deseed the jalapeños thoroughly. For more heat, leave some seeds in or add a pinch of cayenne pepper to the batter. Let Them Cool: Allow the muffins to cool slightly before serving. This helps them set and enhances their flavor as they continue to bake in residual heat. Storage Tips: Store leftover muffins in an airtight container at room temperature for up to 2 days, or freeze them for up to 3 months. Reheat in the oven for the best texture. {{image_4}} You can switch up the cheese in these muffins. Instead of sharp cheddar, try pepper jack for an extra kick. Mozzarella will give a melt-in-your-mouth texture. Crumbled feta adds a tangy twist. Each cheese brings a new flavor to your cornbread muffins. You can make these muffins sweet by adding sugar or maple syrup. This will create a lovely contrast to the spicy jalapeños. For a savory version, skip the sweetener and add herbs like chives or thyme. Experiment to find the taste you love best! Feel free to add more ingredients! Fresh herbs can brighten up the flavor. Diced bell peppers or cooked bacon bits can add more depth. You can also mix in cooked sausage for a heartier muffin. Just remember to keep the balance of flavors in mind! To keep your Cheddar Jalapeño Cornbread Muffins fresh, store them in an airtight container. Place parchment paper between layers to avoid sticking. Keep the container at room temperature for up to three days. If you want them to last longer, refrigerate them. Just remember to eat them within a week for the best taste. Reheating is easy! Simply preheat your oven to 350°F (175°C). Wrap each muffin in foil to keep them moist. Heat for about 10-15 minutes. If you're in a hurry, use a microwave. Heat each muffin for 15-20 seconds. Just be careful not to overheat them, or they may dry out. Freezing muffins is a great option for longer storage. Let them cool completely before freezing. Wrap each muffin in plastic wrap, then place them in a freezer bag. They can last up to three months in the freezer. When you're ready to eat, thaw them overnight in the fridge. For a quick option, microwave them for about 30 seconds. Enjoy your muffins warm! Yes, you can make these muffins ahead of time. They stay fresh for a few days in an airtight container. You can also freeze them. Just wrap each muffin in plastic wrap and place them in a freezer bag. When you're ready to enjoy them, let them thaw at room temperature. These muffins pair well with many dishes. Try serving them with chili, soups, or grilled meats. They also taste great with a side of butter or honey. You can even serve them at breakfast with eggs or bacon. The spice level depends on the jalapeños you use. If you like it mild, use one jalapeño and remove the seeds. For a spicier kick, add two jalapeños with seeds. You can always adjust the amount to suit your taste. Yes, you can use regular milk. To mimic buttermilk, add one tablespoon of vinegar to a cup of milk. Stir and let it sit for about five minutes. This will give you a similar tangy flavor. To reheat, place the muffins on a baking sheet in a preheated oven at 350°F (175°C) for about 5-10 minutes. You can also microwave them for about 15-20 seconds. Just be careful not to overheat, or they may become dry. You now know how to make Cheddar Jalapeño Cornbread Muffins. We covered each step, from preparing the oven to perfecting the texture. You have tips for storing leftovers and enjoy various mix-ins. Remember, these muffins can be sweet or savory based on your choice. Use this guide to impress your friends with your baking skills. Now, gather your ingredients and start baking! Enjoy the process and the delicious results!

Savory Cheddar Jalapeño Cornbread Muffins Recipe

Here is what you need to make this tasty dish: - 2 cups all-purpose flour - 2 tablespoons baking powder - 1/2 teaspoon fine sea salt - 1/4 cup granulated sugar - 2 large eggs - 1 1/2 cups whole milk - 1/4 cup unsalted butter, melted and slightly cooled - 2 cups fresh or frozen blueberries - 1 teaspoon pure vanilla extract - 1 teaspoon ground cinnamon (optional) - Maple syrup, for drizzling before serving These simple ingredients come together to create a warm, fluffy, and fruity pancake casserole. The flour gives it structure, while the baking powder helps it rise. The eggs and milk add moisture and richness. Blueberries bring sweetness and a burst of flavor. You can also add cinnamon for extra warmth. Don’t forget the maple syrup! It adds the perfect touch when you serve this dish. {{ingredient_image_2}} - Preheat the oven to 350°F (175°C). - Grease a 9x13-inch baking dish with butter or spray. - Combine 2 cups of flour, 2 tablespoons of baking powder, 1/2 teaspoon of salt, and 1/4 cup of sugar. - Whisk these ingredients together until evenly mixed. - In a new bowl, beat 2 large eggs until frothy. - Add 1 1/2 cups of milk, 1/4 cup of melted butter, and 1 teaspoon of vanilla. - Mix well until all ingredients are fully combined. - Pour the wet mixture into the dry ingredients. - Stir gently until just combined. A few lumps are okay. - Fold in 2 cups of blueberries carefully. - Reserve a small handful for the top later. - Transfer the batter to the greased baking dish. - Spread it evenly and sprinkle the reserved blueberries on top. - Bake for 30-35 minutes until golden brown. Check with a toothpick for doneness. - Do not overmix batter. Mixing too much can make the pancakes tough. Stir until just combined. A few lumps are okay! - Ensure the butter isn't too hot. Hot butter can cook the eggs and change the texture. Let it cool slightly before using. - Serve warm with maple syrup. The syrup adds sweetness and flavor, making each bite better. - Garnish with powdered sugar and extra blueberries. This adds a nice look and extra burst of flavor. - Use a decorative platter for serving. A pretty dish makes the meal feel special. - Add fresh berries for a pop of color. Bright berries make the dish more appealing and fun. Pro Tips Use Fresh Blueberries: If possible, opt for fresh blueberries for the best flavor and texture. If using frozen, do not thaw them before adding to the batter to prevent excess moisture. Check for Doneness: To ensure your casserole is perfectly cooked, insert a toothpick into the center. It should come out clean when ready, but be careful not to overbake. Customize Your Toppings: Feel free to add other toppings like chopped nuts, chocolate chips, or a sprinkle of powdered sugar for added texture and flavor. Make Ahead: Prepare the batter the night before and refrigerate. Just pour it into the baking dish and bake in the morning for a quick and easy breakfast. {{image_4}} You can switch up the fruit in this dish. Try using raspberries or strawberries. They add a sweet and tart flavor. You can also mix different seasonal berries for a colorful twist. If you need gluten-free options, replace all-purpose flour with gluten-free flour. This keeps the dish tasty for everyone. For dairy-free folks, use almond milk or coconut milk. You can also swap butter for a dairy-free alternative. To add some crunch, sprinkle in your favorite nuts. Walnuts or pecans work great. For a fresh twist, add lemon zest. It brightens the dish and pairs well with blueberries. After enjoying your Blueberry Pancake Casserole, store any leftovers in an airtight container. This helps keep it fresh. You can refrigerate the casserole for up to 3 days. This way, you can savor it again! When you're ready to enjoy leftovers, warm them up in the microwave or oven. If you want to make it extra tasty, consider topping it with fresh syrup before serving. This gives it a delightful, fresh flavor. If you want to make this dish ahead of time, you can freeze it before baking. Wrap it well in plastic wrap and then foil. Store it in the freezer for up to 2 months. When you are ready to bake, just let it thaw overnight in the fridge before cooking. This makes meal prep simple and fun! Yes, you can prepare it the night before and bake it in the morning. This makes serving easy and fun. Just cover the dish and store it in the fridge overnight. In the morning, take it out, let it sit at room temperature for a bit, and then pop it in the oven. A toothpick inserted in the center should come out clean. This tells you that the batter is cooked through. If it comes out wet, give it a few more minutes. Watch the top for a golden color; that’s a good sign too! Yes, frozen blueberries work well in this recipe. They save time and add great flavor. Just fold them in gently so they don't break apart. You might want to thaw them first to avoid extra moisture in the batter. It’s best served warm with maple syrup drizzled on top. The syrup adds sweetness and complements the blueberries. You can also add a sprinkle of powdered sugar for a nice touch. Serve it right from the dish for a casual feel. This recipe yields 8 servings. It’s perfect for a family breakfast or brunch with friends. If you have leftovers, they make a great snack or quick meal later! This blueberry pancake casserole is a tasty and simple dish. We covered ingredients, step-by-step instructions, and tips to make it great. Remember, you can swap berries and adjust for diets. Proper storage ensures leftovers last longer. Feel free to make it ahead of time. Enjoy warm with syrup for a delightful breakfast! Your family will love it.

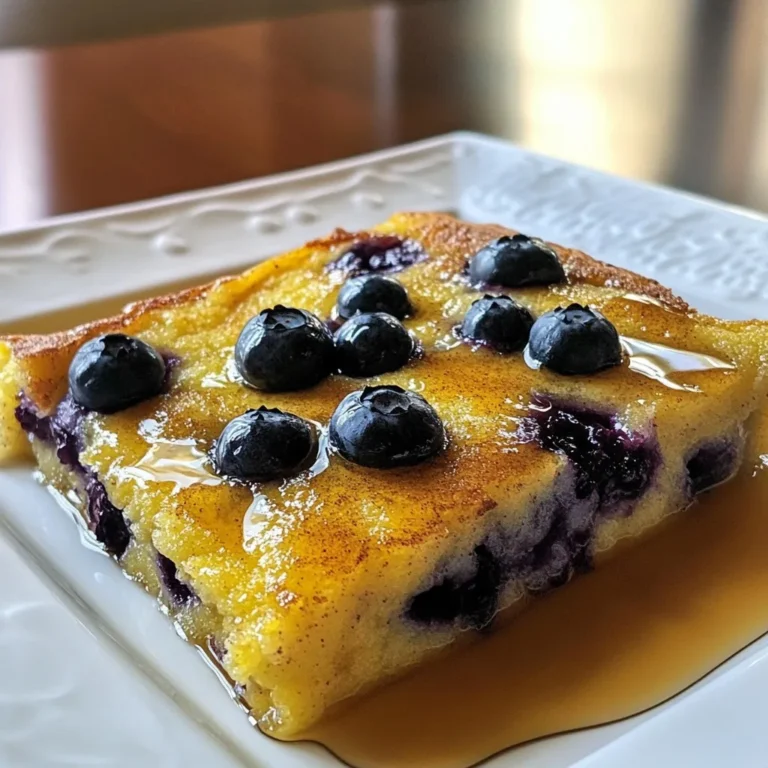
Blueberry Pancake Casserole Irresistible Breakfast Dish

- 2 boneless, skinless chicken breasts - 4 large whole wheat tortillas, warm - 1 cup romaine lettuce, finely chopped - 1 cup cherry tomatoes, halved - 1/2 cup cucumber, thinly sliced - 2 tablespoons extra virgin olive oil - 2 teaspoons smoked paprika - 1 teaspoon cayenne pepper - 1 teaspoon garlic powder - 1 teaspoon onion powder - Salt and freshly cracked black pepper - 1/2 cup creamy Greek yogurt - 2 tablespoons tahini - Juice of 1 fresh lemon The main ingredients form the heart of your wrap. Chicken breasts provide protein and flavor. Whole wheat tortillas keep it healthy and filling. Fresh vegetables add color and crunch. The marinade components are key for taste. Extra virgin olive oil adds richness. Smoked paprika brings depth. Cayenne pepper adds heat, while garlic and onion powders offer aroma and sweetness. Salt and pepper enhance all the flavors. The dressing elements complete your wrap. Greek yogurt gives creaminess. Tahini adds a nutty twist. Fresh lemon juice brightens everything up. Together, these ingredients create a balanced and tasty meal. {{ingredient_image_2}} - Preparing the Marinade In a bowl, mix 2 tablespoons of extra virgin olive oil, 2 teaspoons of smoked paprika, 1 teaspoon of cayenne pepper, 1 teaspoon of garlic powder, 1 teaspoon of onion powder, salt, and pepper. Whisk it until smooth. This mix adds a rich flavor to your chicken. - Marinating Duration Place 2 boneless, skinless chicken breasts in the marinade. Make sure they are well-coated. Cover the bowl and let it sit for at least 30 minutes. For even better taste, marinate overnight in the fridge. This makes the chicken juicier and tastier. - Preheating the Grill Heat your grill or grill pan over medium-high heat. Wait until it is hot and ready for cooking. This step is key to getting nice grill marks and a great flavor. - Cooking Time and Temperature Place the marinated chicken on the grill. Cook for about 6-7 minutes on each side. You want the chicken to reach an internal temperature of 165°F (75°C). When it's done, let the chicken rest for 5 minutes before slicing it into strips. This helps keep it moist. - Preparing the Dressing In a small bowl, mix 1/2 cup of creamy Greek yogurt, 2 tablespoons of tahini, and the juice of 1 fresh lemon. Whisk until smooth. Season it with salt and pepper to taste. This dressing adds a tangy flavor to your wrap. - Layering Ingredients Take 4 warm whole wheat tortillas and lay them flat. Spread a spoonful of the yogurt-tahini dressing in the center of each tortilla. Next, add chopped romaine lettuce, thinly sliced cucumbers, halved cherry tomatoes, and the sliced grilled chicken on top. Layer them evenly for a fresh taste. - Wrapping it Up To wrap, fold in the sides of the tortilla first. Then, starting from the bottom, roll it tightly upwards. This keeps all the yummy fillings secure. Enjoy making your spicy grilled chicken wrap! Ensuring Proper Heat Start by preheating your grill. You want it hot, around medium-high heat. Use a grill thermometer if needed. This helps the chicken cook evenly and get nice grill marks. If the grill is too cool, the chicken may dry out. Checking Chicken Doneness To know if the chicken is ready, use a meat thermometer. The inside should reach 165°F (75°C). If you do not have a thermometer, cut into the chicken. It should be white all the way through, not pink. Serving Suggestions Serve your wraps on a colorful platter. This makes them look fun and inviting. You can add a side of fresh fruit or a light salad to complement the meal. Garnishing Ideas Garnish with fresh cilantro leaves. They add a pop of color and flavor. You can also sprinkle some extra smoked paprika on top for a nice touch. Keeping Wraps Fresh To keep wraps fresh, wrap them tightly in plastic wrap. Store them in the fridge. They stay good for 2-3 days. Avoid stacking them, as this can make them soggy. Reheating Instructions When ready to eat, take them out of the fridge. Unwrap and place them in a skillet over low heat. Heat for about 5 minutes on each side. This keeps them warm and crispy. You can also use the microwave, but this may make them soft. Pro Tips Marinate Longer for Flavor: For the best flavor, consider marinating the chicken overnight. This allows the spices to penetrate deeply, resulting in a more flavorful dish. Watch the Grill Temperature: Ensure your grill is at medium-high heat before placing the chicken on it. This helps achieve a nice char while keeping the chicken juicy inside. Customize Your Veggies: Feel free to add or substitute veggies based on your preferences. Roasted bell peppers or shredded carrots can add extra flavor and color to your wrap. Use Fresh Herbs: Fresh cilantro not only garnishes the wrap beautifully but also adds a burst of freshness. Experiment with other herbs like parsley or mint for different flavor profiles. {{image_4}} You can easily swap chicken for turkey or tofu. Turkey has a similar texture and flavor. It will still absorb the marinade well. Tofu is a great option for a plant-based meal. Just press it to remove extra water. Marinate it just like the chicken. Grill it until golden brown, and you will have a tasty wrap. If you want a twist on the yogurt sauce, try these ideas: - Herbed Yogurt Sauce: Add fresh herbs like dill or parsley. This makes the sauce even fresher. - Spicy Yogurt Sauce: Mix in some sriracha or chili flakes for heat. This will give your dressing a spicy kick. You can also try other tangy dressings. A zesty vinaigrette or ranch dressing works well too. Just pick one that complements the chicken. Add more crunch with different vegetables. Here are great options: - Bell Peppers: Thinly sliced for a sweet crunch. - Radishes: They add a nice bite and color. - Carrots: Shredded carrots boost flavor and texture. Think about the seasons when choosing veggies. In summer, use fresh zucchini or corn. In fall, roasted squash or sweet potatoes can add warmth. More veggies make your wrap even more colorful and fun! - Estimated Calories per Serving: About 400 calories This wrap packs a flavorful punch with a reasonable calorie count. If you watch your intake, this dish fits well into a balanced meal. - Protein: 30 grams - Fats: 18 grams - Carbohydrates: 35 grams The chicken provides a rich source of protein, helping with muscle growth and repair. Whole wheat tortillas add fiber, aiding digestion. - Chicken: High in protein and low in fat. - Olive Oil: Contains healthy fats and antioxidants. - Vegetables: Fresh vegetables supply vitamins and minerals. - Greek Yogurt: Rich in protein and probiotics for gut health. - Tahini: Packed with healthy fats and calcium. This wrap is not only tasty but also offers many health benefits. Each ingredient plays a role in making it a nutritious choice. You get protein, healthy fats, and plenty of vitamins from the veggies. Enjoy your flavorful and healthy meal! This recipe can be as spicy as you want! The cayenne pepper gives it heat. You can adjust the spice level by adding less cayenne or more if you love heat. If you want more flavor without adding heat, try smoked paprika instead. It adds great taste without making it too spicy. Yes, you can make this wrap ahead! I suggest preparing the chicken and dressing in advance. Marinate the chicken and grill it earlier in the day. You can store it in the fridge. Just assemble the wrap when you're ready to eat. This keeps the veggies crisp and fresh. These wraps are great with many sides! You can serve them with a fresh salad or some crunchy chips. A small bowl of salsa or guacamole adds a nice touch. You might also try some sweet corn or a fruit salad for a colorful plate. Absolutely! If you don’t have whole wheat tortillas, you can use any type you like. Flour tortillas are soft and easy to roll. Corn tortillas add a nice taste, too! You can even try lettuce leaves for a low-carb option. This blog post covered a delicious wrap recipe. We discussed key ingredients, including chicken, tortillas, and fresh veggies. You learned how to marinate and grill chicken, then assemble your wrap. I shared grilling tips, presentation advice, and ways to store leftovers. You also discovered variations for proteins, dressings, and vegetables to keep it exciting. Enjoy trying this recipe to elevate your meals. Don't hesitate to experiment and find your favorite twist!

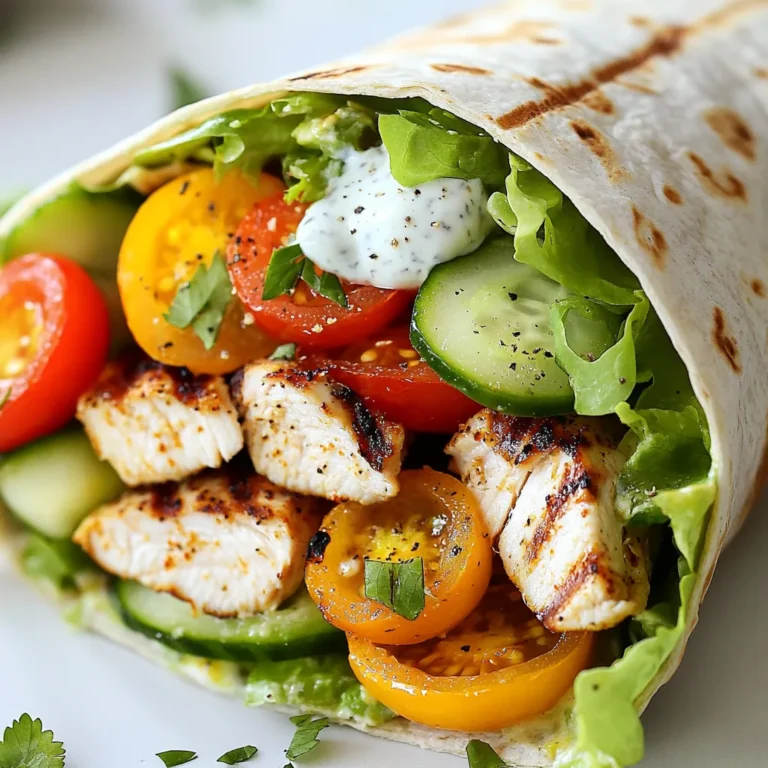
Spicy Grilled Chicken Wrap Easy and Flavorful Recipe

To make these tasty truffles, gather the following items: - 8 oz dark chocolate, finely chopped - 4 oz white chocolate, finely chopped - 1 cup heavy cream - 1 cup fresh raspberries, pureed - 2 tablespoons raspberry extract - 1 tablespoon unsweetened cocoa powder - 1 tablespoon powdered sugar - Fresh raspberries for garnishing - Cocoa powder for dusting You will need a few tools to make these truffles: - A saucepan - A mixing bowl - A whisk or spoon - A small scoop or spoon for shaping - Parchment paper for the tray You can change some ingredients if needed: - Use semi-sweet chocolate instead of dark chocolate for a sweeter taste. - If you cannot find fresh raspberries, use frozen ones. Just thaw and puree them. - For a dairy-free option, try coconut cream in place of heavy cream. - You can swap raspberry extract for another flavor, like vanilla, if you prefer. {{ingredient_image_2}} To start, I heat one cup of heavy cream with one cup of raspberry puree. I stir gently so it warms up, but I avoid boiling it. After the mixture is warm, I take it off the heat. I then add eight ounces of finely chopped dark chocolate to the warm cream. I let it sit for two minutes without stirring. This helps the chocolate melt perfectly. After two minutes, I stir it until it is smooth. I set the ganache aside to cool at room temperature for about 30 minutes. While the ganache cools, I prepare the white chocolate mixture. In a separate bowl, I combine four ounces of finely chopped white chocolate with two tablespoons of raspberry extract. Once the dark chocolate ganache has cooled, I scoop out half of it. I gently fold this into the white chocolate mixture. This creates a beautiful marbled effect. I mix it carefully to keep the colors swirled together. Next, I transfer the truffle mix to the refrigerator. I chill it for 1 to 2 hours until it is firm enough to scoop. Once it is ready, I use a small scoop or spoon to form individual truffles. I alternate between the dark chocolate ganache and the raspberry-white chocolate mix to create fun shapes. After forming the truffles, I roll each one gently between my palms. This smooths them out nicely. Then, I place them on a parchment-lined plate. For the final touch, I roll half of the truffles in unsweetened cocoa powder. The rest get a dusting of powdered sugar for sweetness. To make them look even better, I add a fresh raspberry on top of each truffle. These steps turn simple ingredients into delightful treats! When making dark and white chocolate raspberry truffles, a few mistakes can spoil your fun. Here are some to watch for: - Overheating the cream: Heating the cream too much can cause it to boil. This will ruin the smooth texture. Heat it gently until warm. - Not letting chocolate melt enough: After adding dark chocolate to the cream, let it sit. This helps it melt fully. Stir too soon, and it can become grainy. - Skipping cooling time: If you don't let the ganache cool, it will be too soft to scoop. Be patient, and let it rest for 30 minutes. A smooth finish makes your truffles look great. Here are some tips to help: - Use high-quality chocolate: Good chocolate melts better. It will create a silkier texture in your truffles. - Stir gently: When mixing the chocolate and cream, stir slowly. This prevents air bubbles and keeps it smooth. - Chill properly: After forming your truffles, chill them well. This helps set the chocolate and keeps the shape. Presentation is key to impressing your guests. Here are ideas to make your truffles shine: - Use a nice platter: Choose a decorative plate or tray. This adds elegance to your display. - Mix your coatings: Alternate between cocoa powder and powdered sugar. This creates visual interest. - Add fresh raspberries: Scatter fresh raspberries around the truffles. They add color and a touch of freshness. By following these tips, your dark and white chocolate raspberry truffles will not only taste amazing but also look stunning! Pro Tips Chill for Better Texture: Ensure that the truffle mixture is properly chilled before scooping. This will make it easier to handle and shape the truffles without them becoming too sticky. Quality Chocolate Matters: Use high-quality chocolate for both the dark and white chocolate components. The better the chocolate, the richer and more decadent your truffles will taste. Experiment with Flavors: Feel free to add a splash of different extracts or flavored liqueurs to the ganache for a unique twist. Try orange or almond extract for a delightful variation. Stay Organized: Set up a truffle-making station with all your tools and ingredients prepped. This will streamline the process and make it more enjoyable to create these sweet treats. {{image_4}} You can change the taste of your truffles with fun add-ins. Try a splash of vanilla extract or a pinch of sea salt. Citrus zest, like orange or lemon, gives a fresh pop. You can also add a dash of almond extract for a nutty twist. Each add-in will bring new flavors to your truffles. Mix and match to find your favorite. The outside of your truffles can be just as fun as the inside. Instead of cocoa powder, roll them in finely chopped nuts or shredded coconut. You can also use crushed cookies for a crunchy bite. To make them sparkle, dip them in melted chocolate and let it harden. Each coating adds a new texture and taste. You can easily make these truffles vegan or dairy-free. Use dark chocolate that is dairy-free and coconut cream instead of heavy cream. Replace raspberry extract with homemade fruit puree. This way, you can enjoy rich flavors without dairy. You won’t lose taste, and your friends will love them too! To keep your dark and white chocolate raspberry truffles fresh, store them in an airtight container. Place parchment paper between layers to avoid sticking. Keep the container in a cool, dry place, away from direct sunlight. When stored correctly, these truffles can last up to one week at room temperature. If you want them to stay fresh longer, refrigerate them. In the fridge, they can last for about two weeks. If you want to save your truffles for later, freezing works great! Place them in a single layer on a baking sheet and freeze until solid. Then, transfer them to an airtight container. Frozen truffles can last up to three months. When ready to enjoy, let them thaw in the fridge for a few hours before serving. To make truffles less sweet, adjust the chocolate types. Use more dark chocolate and less white chocolate. Dark chocolate has less sugar than white chocolate. You can also add a pinch of salt. Salt can balance sweetness nicely. If you want even more control, you can reduce the raspberry puree slightly. This gives a stronger chocolate taste. For truffles, use high-quality chocolate. Dark chocolate should have at least 70% cocoa. This gives a rich flavor. For white chocolate, choose one with real cocoa butter. Avoid chocolate with too much sugar or fillers. The better the chocolate, the better your truffles will taste. You can also mix different chocolates for unique flavors. Yes, you can use frozen raspberries. Just make sure to thaw them first. Drain extra liquid before pureeing. This helps keep the truffle mixture from getting too wet. Frozen raspberries can still give great flavor. They are a good choice if fresh raspberries are not available. In this article, we explored the basics of making truffles. You learned about key ingredients, needed tools, and possible substitutes. We provided clear steps for preparation, forming, and finishing your truffles. I shared tips for a smooth finish and ways to present them nicely. You also discovered flavor variations, storage tips, and answers to common questions. Making truffles is fun and allows for creativity. Enjoy making these sweets for yourself or to share!

Dark & White Chocolate Raspberry Truffles Delight

PREV 1 … 33 34 35 … 47 NEXT
snack joy kitchen

explore

DessertsDinnerAppetizersDrinks

Our Policies

  • Cookie Policy
  • Copyright Policy
  • Disclaimer
  • GDPR Policy
  • Terms Of Use
Back to Top
  • About
  • Contact Us
  • Privacy Policy
© 2026 snack joy kitchen