FREE DINNER EBOOK! Get your copy!
  • Cookie Policy
  • GDPR Policy
  • Disclaimer
  • Terms Of Use
  • Visit my other site: Fun Cookie Recipes
snack joy kitchen
  • Home
  • Dinner
  • Desserts
  • Drinks
  • Appetizers
  • Contact
  • About
  • Privacy Policy
  • Home
  • Dinner
  • Desserts
  • Drinks
  • Appetizers
  • Contact
  • About
  • Privacy Policy
  • Cookie Policy
  • GDPR Policy
  • Disclaimer
  • Terms Of Use
Visit my other site: Fun Cookie Recipes

HOME / CATEGORIES /

Latest

- 1 pound Italian sausage (choose between mild or spicy based on your preference) - 1 medium onion, finely diced - 3 cloves garlic, minced - 3 medium carrots, diced into small pieces - 2 celery stalks, diced - 6 cups chicken broth (preferably low-sodium for better flavor control) - 1 (14.5 oz) can diced tomatoes, undrained to add extra flavor - 1 (15 oz) can cannellini beans, rinsed thoroughly and drained - 1 cup ditalini pasta - 1 cup heavy cream for creaminess - 1 teaspoon Italian seasoning blend - Salt and freshly cracked pepper to taste - Fresh parsley, chopped (for garnish) - Grated Parmesan cheese (for serving) When I make Creamy Sausage Ditalini Soup, I like to pick the right sausage. You can choose mild or spicy based on your taste. The sausage adds a rich flavor that makes the soup hearty. Next, I add fresh vegetables. I use one medium onion, three small carrots, and two celery stalks. These veggies give the soup a nice base. I also add three cloves of garlic for a tasty kick. For the liquids, I use six cups of chicken broth. I prefer low-sodium broth to control the salt. I also add one can of diced tomatoes and one can of cannellini beans. The tomatoes add a pop of flavor, while the beans add protein and creaminess. To finish the soup, I stir in one cup of ditalini pasta and one cup of heavy cream. The pasta makes the soup filling, and the cream gives it a smooth texture. I season with a teaspoon of Italian seasoning, salt, and pepper to taste. Lastly, I garnish the soup with fresh parsley and grated Parmesan cheese. These toppings enhance the dish and make it look beautiful. Enjoy making this flavorful and hearty soup! {{ingredient_image_2}} 1. Cooking the sausage to perfection Start by heating a splash of olive oil in a large pot. Use medium heat. Once the oil shimmers, add 1 pound of Italian sausage. I like to break it apart with a wooden spoon. Cook it until it turns brown and crispy. This step adds great flavor. Once done, transfer the sausage to a plate and set it aside. 2. Sautéing the vegetables to enhance flavor In the same pot, add the diced onion, carrots, and celery. You should have 1 medium onion, 3 diced carrots, and 2 diced celery stalks. Sauté these veggies for about 5 minutes. Stir them often. The onion should become translucent and the veggies should soften. 3. Adding liquids and essential ingredients Next, stir in 3 cloves of minced garlic. Cook it for 1 minute. You will smell a lovely aroma. Carefully pour in 6 cups of chicken broth. I prefer low-sodium for better control. Then, add 1 can of undrained diced tomatoes and 1 can of rinsed cannellini beans. Stir everything well to mix the flavors. 4. Simmering the soup for the right texture Increase the heat to bring the mixture to a gentle boil. Once it starts boiling, add 1 cup of ditalini pasta. Stir it well into the soup. Lower the heat and let it simmer for about 10 to 12 minutes. The pasta should be tender but still al dente. Return the cooked sausage to the pot. Then stir in 1 cup of heavy cream. Add 1 teaspoon of Italian seasoning, salt, and freshly cracked pepper to taste. Heat through for another 3 to 5 minutes. Enjoy the rich, creamy aroma! How to select the best sausage Choose high-quality Italian sausage. Look for fresh meat with a good fat content. Decide if you want mild or spicy based on your taste. Check for herbs and spices in the mix. They add rich flavor to the soup. Timing for perfect pasta Add ditalini pasta when the soup boils. Cook it for about 10 to 12 minutes. Aim for al dente texture; it should have a slight bite. This keeps it from getting mushy in the soup. Ensuring the right consistency with cream Add heavy cream at the end of cooking. This keeps the cream from curdling. Stir it in gently to blend with the soup. Adjust the amount for your desired creaminess. Best garnishes for Creamy Sausage Ditalini Soup Top each bowl with chopped fresh parsley. Add a sprinkle of grated Parmesan cheese for extra flavor. These garnishes make the dish look fresh and inviting. Recommended bread pairing Serve with crusty bread or garlic bread. The bread soaks up the tasty broth well. It’s perfect for a complete meal experience. How to store leftovers Let the soup cool to room temperature. Transfer it to an airtight container. Store it in the fridge for up to three days. Reheat on the stove for the best taste. Pro Tips Use Fresh Herbs: Adding fresh parsley or basil just before serving enhances the flavor profile and adds a vibrant touch to your soup. Customize the Spice Level: If you love heat, consider adding red pepper flakes or using spicy Italian sausage for an extra kick. Make it Ahead: This soup tastes even better the next day! Make it ahead of time and store it in the refrigerator for an easy meal. Perfect Pasta Texture: To prevent the ditalini from becoming mushy, add it to the soup only during the last 10-12 minutes of cooking. {{image_4}} - Using turkey or chicken sausage: Swap Italian sausage for turkey or chicken sausage. This change lowers fat while keeping flavor. Choose mild or spicy to suit your taste. - Vegetarian-friendly options: For a vegetarian soup, skip the meat. Use plant-based sausage or mushrooms for a umami flavor. Add more beans or lentils for protein. - Different pasta types and their effects on the recipe: If you can’t find ditalini, use small shells or elbows. Each pasta type will add its own texture. Just adjust cooking time to ensure they stay al dente. - Adding spices for a kick: Spice up your soup with red pepper flakes or smoked paprika. These will add heat and depth. Start with a pinch and adjust to your liking. - Incorporating seasonal vegetables: Use seasonal veggies like zucchini or spinach. Adding them boosts nutrition and flavor. Toss them in during the last few minutes of cooking. - Alternative cream options for dietary preferences: If you want a lighter soup, use half-and-half or coconut cream. Each will change the flavor but keep the creaminess. Adjust the amount based on your preference. To store leftover soup, let it cool first. Pour the soup into a container with a tight lid. This keeps it fresh and safe. You can store it in the fridge for up to three days. If you want to keep it longer, consider freezing it instead. Always check for signs of spoilage before eating. When freezing soup, use freezer-safe containers. Leave some space at the top for expansion. This prevents the container from cracking. You can freeze the soup for up to three months. To reheat, thaw it in the fridge overnight. Then, heat it in a pot over low heat. Stir it well to blend the flavors again. For the best taste, add a splash of cream just before serving. This makes it creamy and delicious! Yes, you can make this soup ahead. It tastes even better the next day. Just cool it and store in the fridge. When ready to eat, reheat on the stove until warm. If your soup is too thick, add more chicken broth or water. Stir it in slowly until you reach your desired consistency. Heat it gently after adding liquid. Yes, you can make a dairy-free version. Use coconut milk instead of heavy cream. You can also skip the cheese or use a dairy-free cheese. This will keep the rich flavor while catering to dietary needs. Absolutely! Brown the sausage first, then add all ingredients to the slow cooker. Cook on low for 6-8 hours or on high for 3-4 hours. Add the cream during the final 30 minutes of cooking. This method makes the soup very easy and convenient! This blog post laid out how to make Creamy Sausage Ditalini Soup. We explored the ingredients, from sausage choices to fresh veggies. The step-by-step instructions ensured your soup turns out great. Cooking tips helped you perfect timing and texture. Variations offered tasty options for every diet. Lastly, storage info kept your leftovers fresh. Making this soup is rewarding and easy. Enjoy all the flavors your kitchen can create!

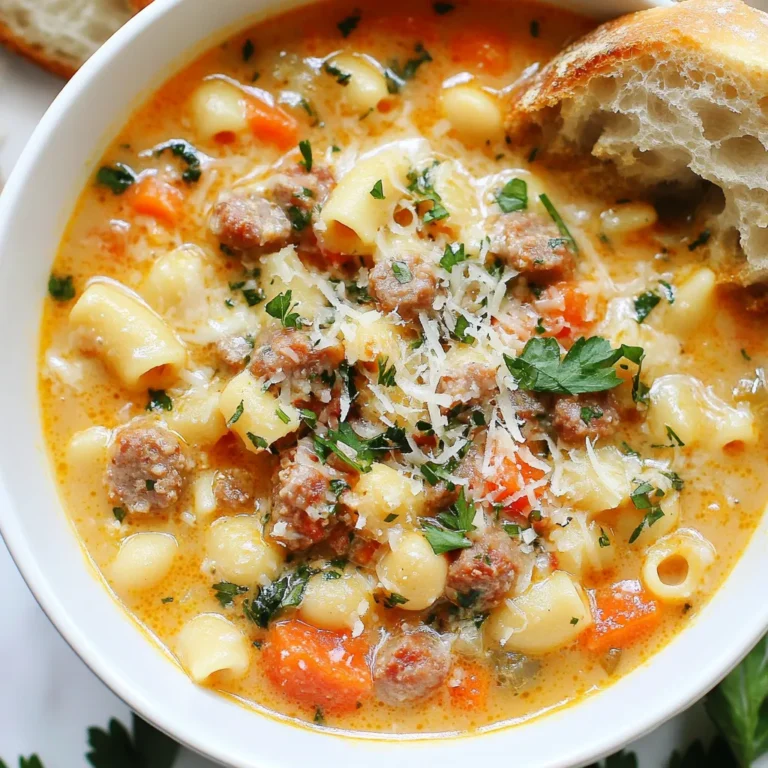
Creamy Sausage Ditalini Soup Hearty and Flavorful Dish

- 1 cup fresh spinach, finely chopped - 1 cup canned artichoke hearts, drained and finely chopped - 1 cup cream cheese, softened to room temperature - 1 cup shredded mozzarella cheese - 1/2 cup grated Parmesan cheese - 1/4 cup sour cream - 1 tablespoon garlic powder - 1 teaspoon onion powder - 1/2 teaspoon freshly ground black pepper - 1 package of pre-made puff pastry, thawed - 1 large egg (for egg wash) - Fresh parsley, finely chopped for garnish Creating Cheesy Spinach Artichoke Dip Bites is simple and fun. You will need fresh spinach and artichokes for that classic taste. The cheese makes these bites rich and creamy. Cream cheese, mozzarella, and Parmesan come together for a cheesy delight. Sour cream adds a nice tang to the mix. Garlic powder and onion powder give a burst of flavor. Don’t forget the black pepper for a hint of spice. Puff pastry is the secret to a flaky crust. It puffs up beautifully in the oven. You will also need an egg for the wash. This gives the bites a golden color. Fresh parsley adds a pop of green right before serving. With these ingredients, you are set to impress your guests. Enjoy making these bites as a tasty snack or appetizer! {{ingredient_image_2}} 1. Preheat the oven to 400°F (200°C). This helps the bites cook evenly. 2. In a large bowl, mix together: - 1 cup fresh spinach, finely chopped - 1 cup canned artichoke hearts, drained and finely chopped - 1 cup cream cheese, softened - 1 cup shredded mozzarella cheese - 1/2 cup grated Parmesan cheese - 1/4 cup sour cream - 1 tablespoon garlic powder - 1 teaspoon onion powder - 1/2 teaspoon freshly ground black pepper Stir until smooth and creamy. Make sure all flavors blend well. 1. Lightly flour your workspace. Roll out the puff pastry to thin it slightly. 2. Cut the pastry into 3-inch squares. Use a sharp knife for clean edges. 3. Place about 1 tablespoon of the filling in the center of each square. Don’t overfill, or they will leak. 1. Fold each pastry corner over the filling. Pinch the edges tightly to seal them. 2. In a small bowl, whisk 1 large egg until frothy. Brush the egg wash over the tops of the bites. This gives them a nice golden color. 3. Arrange the bites on a baking sheet lined with parchment paper. Make sure to space them about an inch apart. 4. Bake in the preheated oven for 15-20 minutes. Look for a puffed-up, golden-brown finish. 5. Let the bites cool for about 5 minutes on the tray. This helps them firm up. Enjoy your Cheesy Spinach Artichoke Dip Bites warm and fresh! To get the best texture for your Cheesy Spinach Artichoke Dip Bites, keep the puff pastry cold. When the pastry is cool, it puffs up better in the oven. If it warms up too much, it won't rise as well. Also, make sure not to overfill each pastry. If you do, the filling might leak out while baking. A tablespoon of filling is just right. You can have fun with flavors by trying different kinds of cheese. Cheddar cheese, for example, adds a nice sharpness. You can also change the seasoning to fit your taste. If you like it spicy, add some crushed red pepper. A little twist can make a big difference in flavor! To make your bites look even more appealing, sprinkle fresh parsley on top before serving. It adds a pop of color and freshness. Serve the bites on a nice platter, maybe with some dips on the side. Creamy ranch or zesty marinara works great! This not only looks good but also makes it more fun to eat. Pro Tips Use Fresh Ingredients: Fresh spinach and artichokes will enhance the flavor and texture of your dip bites compared to canned alternatives. Don't Overfill: To prevent leaks during baking, make sure to fill each pastry square with just enough filling to comfortably close it. Egg Wash for Shine: Applying an egg wash will give your pastry bites a beautiful golden color and glossy finish. Allow to Cool Slightly: Letting the bites cool for a few minutes before serving will help the filling set and make them easier to handle. {{image_4}} You can change the recipe to fit your taste. Use frozen spinach instead of fresh. This swap saves time and is just as tasty. You can also try different cheese varieties. Feta adds a nice tang. Gouda brings a rich flavor to the bites. Want some heat? Add crushed red pepper to the filling. A little spice makes it exciting! You can also mix in chopped sun-dried tomatoes. They give a sweet and tangy kick. These additions make each bite unique and full of flavor. For a fun twist, create mini versions of these bites. They make great bite-sized snacks for parties. You can also serve them with different dipping sauces. Try ranch, marinara, or spicy aioli. These sauces enhance the flavors and make your snack even more enjoyable. After enjoying your cheesy spinach artichoke dip bites, store any leftovers. Place them in an airtight container. They can stay fresh for up to 3 days in the fridge. Just make sure the container seals tight to keep them tasty. Want to save some for later? You can freeze uncooked bites for up to a month. Simply bake them straight from the freezer when you're ready. If you have cooked bites left, store them in a freezer-safe bag. This way, you can enjoy them later without losing flavor. To bring back the crispy texture, reheat in the oven. Set it to 350°F and warm the bites for 10 to 15 minutes. This will help the pastry stay nice and flaky. If you're in a hurry, you can use the microwave. Just keep in mind that it might make the bites a bit softer. Yes, you can prepare these bites in advance. Just mix the filling and fill the pastry squares. Place them in the fridge if you plan to bake them soon. You can also freeze them to bake later. This way, you save time when you want to serve them. Creamy ranch, marinara, or a spicy aioli make excellent choices. These dips enhance the flavors of the bites. You can also try a zesty salsa or a garlic dip for a twist. Mixing and matching makes it fun for guests. Absolutely! Just make sure to roll it out thinly. This helps the bites bake evenly. Homemade pastry can give your bites a unique touch. It’s a great way to impress your friends and family with your skills. These Cheesy Spinach Artichoke Dip Bites are simple and tasty. You learned how to prepare a delicious filling with fresh ingredients, creamy cheeses, and spices. We also covered tips for perfect texture and creative variations. Enjoy these bites as snacks or appetizers. They freeze well and reheat easily. Try different cheeses or serve with your favorite dips. Explore your options and make these bites your own. Enjoy the tasty results and impress your friends!

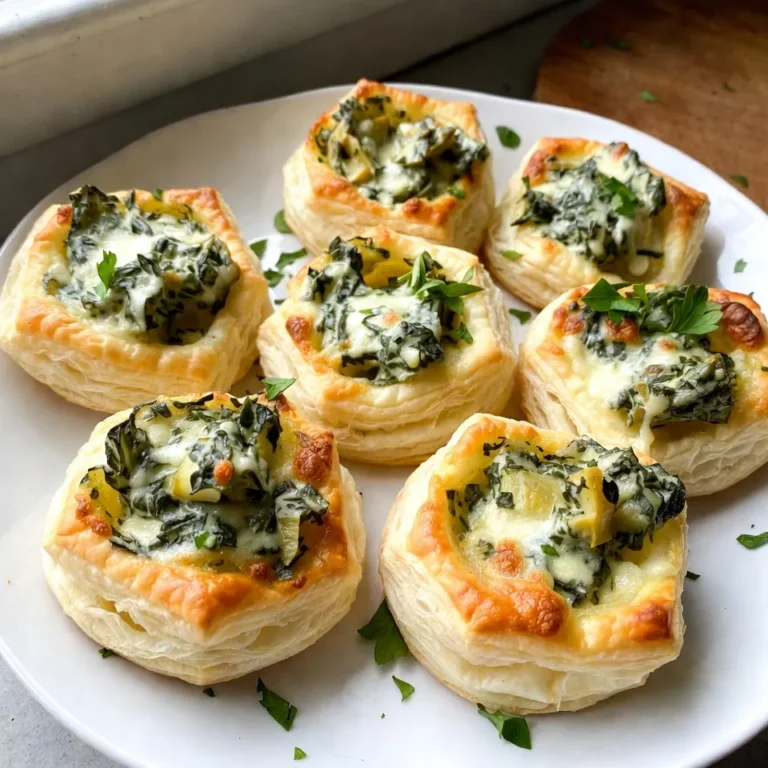
Cheesy Spinach Artichoke Dip Bites Savory Snack Recipe

- 1 pound ground beef - ½ pound ground pork (optional) - 1 small onion, finely chopped - 2 cloves garlic, minced To start making Swedish meatballs, you need quality meat. Ground beef is the main base. If you want, add ground pork for extra flavor. Finely chopped onion and minced garlic give the meatballs a nice taste. - ¾ cup breadcrumbs - 1 large egg - ½ cup milk Binding ingredients help hold the meatballs together. Breadcrumbs give them texture. The egg acts as a binder, while milk keeps them moist. These three ingredients are key for tender meatballs. - 1 teaspoon ground allspice - 1 teaspoon ground nutmeg - Salt and freshly ground black pepper to taste Seasonings make your meatballs special. Ground allspice and nutmeg add warmth and depth. Salt and pepper balance all the flavors. Adjust the seasoning to your taste for the best results. {{ingredient_image_2}} To start, mix your meatball base. Grab a large bowl. Add 1 pound of ground beef. If you want, add ½ pound of ground pork. This adds flavor. Next, add 1 small finely chopped onion. Then, add 2 cloves of minced garlic. Don’t forget ¾ cup of breadcrumbs and ½ cup of milk. Now, crack in 1 large egg. For flavor, sprinkle in 1 teaspoon of ground allspice and nutmeg. Season with salt and black pepper. Mix gently until combined. Be careful not to overmix. This keeps your meatballs tender and juicy. Now it’s time to shape the meatballs. Use your hands to form small balls. Each should be about 1 inch in size. They should look round and smooth. Place them on a baking sheet or plate. This helps keep them organized as you work. Heat a large skillet over medium heat. Add 2 tablespoons of olive oil. Wait until the oil is hot. Now, add the meatballs in batches. Make sure not to crowd the pan. This lets them brown evenly. Sear the meatballs for 5-7 minutes. Turn them often to brown on all sides. Once they are brown, transfer them to a plate. Set them aside while you make the sauce. To make tender meatballs, do not overmix the ingredients. Mix just until combined. Overmixing makes them tough. A good mix keeps them soft and juicy. For the best flavor, use a mix of meats. I suggest 1 pound of ground beef and ½ pound of ground pork. This blend adds depth to the taste. Pork gives a nice fat content, making the meatballs rich. To get the sauce thick, slowly whisk in the heavy cream. This helps keep the sauce smooth. If it seems too thin, use a cornstarch slurry to thicken it. Mix 1 tablespoon of cornstarch with 2 tablespoons of cold water. Add it to the sauce and stir well. Adjust the seasoning for balance. Taste the sauce and add salt or pepper as needed. The sauce should enhance the flavors without being too salty. Traditionally, serve Swedish meatballs with creamy mashed potatoes. This classic combo brings comfort. You might also try serving them with lingonberry sauce for a sweet touch. For side dishes, consider steamed vegetables or a fresh salad. These add color and crunch. You can also serve them on a bed of noodles for a different twist. Whatever you choose, enjoy the blend of rich flavors! Pro Tips Use Fresh Herbs: Adding fresh herbs like parsley or dill to your meatball mixture enhances the flavor and brings a fresh element to the dish. Don’t Overmix: When combining the ingredients for the meatballs, be careful not to overmix. This helps keep the meatballs tender and prevents them from becoming tough. Adjust the Sauce Consistency: If you prefer a thinner sauce, you can add a bit more beef broth after thickening with cornstarch. Adjust to your taste! Serve with Lingonberry Sauce: For an authentic Swedish experience, serve your meatballs with extra lingonberry sauce on the side for a sweet and tangy contrast. {{image_4}} You can easily change the flavor of your Swedish meatballs. Try using different spices. Instead of allspice, use cinnamon or cardamom for a warm twist. You can also mix in some garlic powder or onion powder for added depth. For the sauce, you can swap lingonberry jam with another berry jam. Raspberry or cranberry jam works well too. This gives the sauce a unique taste while keeping it sweet and tangy. If you want a lighter option, consider using ground turkey or chicken. These meats are leaner but still flavorful. Adjust the spices to match the lighter taste. For a vegan version, try using lentils or chickpeas. Mash them and mix with breadcrumbs and spices to form meatballs. This gives you a tasty plant-based alternative. You can serve Swedish meatballs in many fun ways. Mixing them with pasta or rice makes a hearty meal. The creamy sauce coats the pasta nicely, adding flavor. Another option is to serve them as a meatball sub. Use a crusty roll and load it up with meatballs and sauce. Top with cheese and let it melt for a delicious twist. Enjoy experimenting with these variations! To keep your leftover meatballs fresh, store them in the fridge. Place them in an airtight container. This method helps keep them safe for up to three days. If you want to save them longer, freezing is a great option. Use a freezer-safe container or a resealable bag. Make sure to remove as much air as possible before sealing. When reheating meatballs, the best method is to use the stovetop. Place them in a skillet over low heat with a splash of broth or water. This helps prevent them from drying out. You can also use the microwave. Cover the meatballs with a damp paper towel to keep moisture in. Stir occasionally for even heating. For the sauce, heat it separately to maintain its creamy texture. Refrigerated meatballs last about three days. If you freeze them, they can last for three months. Always check for signs of spoilage. If the meatballs smell off, have a change in color, or feel slimy, do not eat them. Trust your senses to keep your meals safe and tasty! What traditional spices are used? Swedish meatballs often use ground allspice and nutmeg. These spices give the meatballs their warm, cozy flavor. You can also add salt and pepper to enhance the taste. Can I make Swedish meatballs ahead of time? Yes, you can prepare the meatballs ahead. Shape them and store in the fridge for one day. You can also freeze them for up to three months. Just cook them when you are ready to serve. What can I use instead of lingonberry jam? If you can't find lingonberry jam, you can use other berry jams. Raspberry or cranberry jam works well. These jams provide a similar sweet and tart flavor. Is it necessary to use ground pork? No, it is not necessary to use ground pork. If you prefer, you can use only ground beef. The meatballs will still be tasty and tender with just beef. Can I bake Swedish meatballs instead of frying? You can bake Swedish meatballs! Preheat your oven to 400°F. Place the meatballs on a baking sheet and bake for about 20 minutes. This method is easier and cuts down on oil. How do I know when the meatballs are fully cooked? To check if the meatballs are done, use a meat thermometer. They should reach an internal temperature of 160°F. If you don’t have a thermometer, cut one in half. It should be no longer pink inside. We explored how to make delicious Swedish meatballs, from key ingredients to cooking tips. I shared steps for a perfect mixture, shaping, and cooking, ensuring juicy meatballs every time. Remember, the right seasoning and sauce can elevate your dish. Whether you serve them with pasta or a side dish, these meatballs are sure to impress. Store leftovers properly to enjoy later. Now, it’s time to enjoy your homemade meatballs and impress your family and friends!

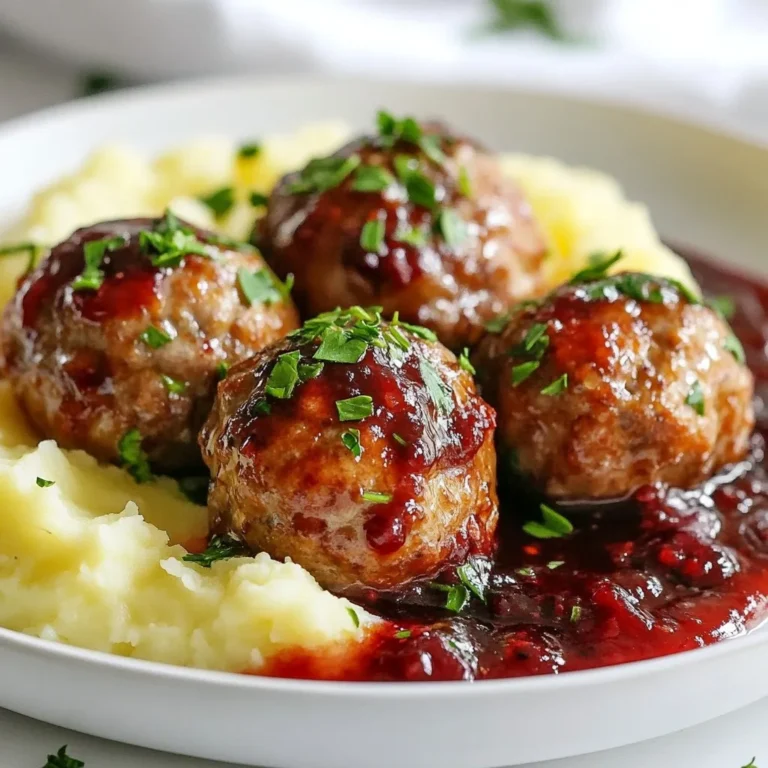
Swedish Meatballs Flavorful and Simple Recipe Guide

To make these tasty cupcakes, gather these key ingredients: - 1 ½ cups all-purpose flour - 1 cup granulated sugar - ½ cup unsalted butter, softened - 2 large eggs - 1 cup brewed coffee, cooled - ¼ cup milk - 1 teaspoon vanilla extract - 1 tablespoon baking powder - ½ teaspoon salt - ½ cup caramel sauce (plus extra for drizzling) - 1 cup heavy cream, chilled - 2 tablespoons powdered sugar - 1 teaspoon espresso powder These ingredients create a rich and flavorful base. The coffee and caramel give the cupcakes their famous taste. While the main ingredients shine, you can add a few extras for more flavor: - Chocolate chips for a sweet touch - Nuts like pecans or walnuts for crunch - Flavored syrups like hazelnut or mocha for depth These optional items let you personalize your cupcakes. Mix and match to find your favorite combo! To make the baking easy, gather these tools: - Muffin pan - Cupcake liners - Mixing bowls - Electric mixer - Whisk - Measuring cups and spoons - Toothpick for testing Having the right tools helps everything go smoothly. You’ll be ready to bake these delicious treats in no time! {{ingredient_image_2}} Start by preheating your oven to 350°F (175°C). This heat helps the cupcakes rise just right. Next, take a muffin pan and line it with 12 cupcake liners. This step makes it easy to remove the cupcakes after baking. In a large bowl, add ½ cup of softened unsalted butter and 1 cup of granulated sugar. Beat them together with an electric mixer for about 2-3 minutes. The mixture should look light and fluffy. Add 2 large eggs, one at a time. Make sure to mix well each time. Then, pour in 1 teaspoon of vanilla extract. In another bowl, whisk together 1½ cups of all-purpose flour, 1 tablespoon of baking powder, 1 teaspoon of espresso powder, and ½ teaspoon of salt. Slowly mix this dry mix into the butter-sugar-egg blend. Alternate this with 1 cup of brewed coffee and ¼ cup of milk. Start and end with the dry mix. Be careful not to overmix! Finally, gently fold in ½ cup of caramel sauce. This adds sweet swirls to your batter. Now, use a spoon or a scoop to fill each cupcake liner about two-thirds full. This gives the cupcakes room to rise. Place the muffin pan in the oven and bake for 18-20 minutes. To check if they are done, insert a toothpick into the center. If it comes out clean, the cupcakes are ready! Once baked, let them cool in the pan for 5 minutes. Then, transfer them to a wire rack to cool completely before frosting. To get the best caramel macchiato flavor, use strong brewed coffee. The coffee should be cooled to room temperature before adding it to the batter. This way, it blends well without cooking the eggs. The combination of vanilla extract and caramel sauce adds a rich sweetness. Use high-quality caramel for a more intense flavor. If you want a coffee kick, add a bit more espresso powder to the batter. Fluffy cupcakes rely on good mixing. Make sure your butter is softened to room temperature. This helps it mix well with sugar. Beat the butter and sugar until light and fluffy. This usually takes about 2-3 minutes. Add eggs one at a time, mixing well after each one. Be gentle when mixing in the dry ingredients. Overmixing can make the cupcakes dense. Fold the caramel sauce in gently for those beautiful swirls. Whipped cream is a simple and tasty frosting. Chill your heavy cream before whipping it. This helps it whip faster and hold peaks better. Add powdered sugar gradually while whipping to avoid clumps. Once the cupcakes are cool, top each with a generous dollop of whipped cream. A drizzle of caramel sauce on top adds a lovely finish. For extra flair, sprinkle cocoa powder or place coffee beans around the cupcakes on your serving platter. Pro Tips Use Fresh Coffee: For the best flavor, use freshly brewed coffee that has cooled to room temperature. This enhances the richness of the cupcakes. Chill Your Cream: Ensure your heavy cream is well chilled before whipping. This helps achieve the perfect fluffy texture for your whipped cream topping. Don't Overmix: When combining the wet and dry ingredients, mix just until combined. Overmixing can lead to dense cupcakes. Perfect Caramel Drizzle: Warm the caramel sauce slightly before drizzling for a smoother flow and an elegant finish to your cupcakes. {{image_4}} You can make these cupcakes gluten-free. Use a gluten-free flour mix instead of all-purpose flour. Look for a blend that includes xanthan gum for better structure. This change keeps the cupcakes light and fluffy. You can still enjoy the rich coffee flavor. Just be sure to check that all other ingredients are gluten-free. To make vegan caramel macchiato cupcakes, replace the eggs with flax eggs. Mix one tablespoon of flaxseed meal with three tablespoons of water. Let it sit for five minutes to thicken. Use plant-based butter or coconut oil instead of regular butter. Substitute milk with almond or oat milk. For whipped cream, try coconut cream or a store-bought vegan whip. This way, everyone can enjoy these tasty treats. If you want to switch up the frosting, there are great options. Cream cheese frosting adds a tangy flavor. Just mix cream cheese with powdered sugar and vanilla. For a chocolate twist, use chocolate ganache. Melt chocolate with heavy cream and let it cool. Drizzle it on top for a rich finish. You can also use a simple buttercream. Mix butter, powdered sugar, and a splash of coffee for an easy, sweet topping. To keep your caramel macchiato cupcakes fresh, store them correctly. First, let them cool completely. Place them in an airtight container to prevent drying. You can stack them, but use parchment paper between layers. This helps avoid squishing the frosting. Keep them at room temperature for up to three days. If your kitchen is warm, consider refrigerating them. You can freeze caramel macchiato cupcakes for later enjoyment. First, cool them completely after baking. Wrap each cupcake in plastic wrap tightly. Then, place them in a freezer-safe bag or container. Label the bag with the date. They can stay in the freezer for up to three months. When you’re ready to enjoy, thaw them in the fridge overnight. Frost them after they thaw for the best taste. To maintain freshness, avoid exposing cupcakes to air. This can lead to dryness. If you choose to refrigerate them, use an airtight container. You can also add a slice of bread to the container. This keeps them moist by absorbing excess air. Always check for signs of spoilage before eating. If they look or smell funny, toss them out. Yes, you can use instant coffee. Just mix it with hot water as per package directions. This method gives you a quick coffee fix without brewing. However, brewed coffee adds a richer taste. I recommend sticking with brewed for the best flavor. These cupcakes stay fresh for about 3 days at room temperature. Store them in an airtight container. If you want to keep them longer, refrigerate them for up to a week. Just remember, the whipped cream topping may not hold up well past a day or two. To reheat leftover cupcakes, use the microwave. Heat them for about 10-15 seconds. This warms them up without drying them out. If you want a warm treat, add a dollop of whipped cream after microwaving. Enjoy the soft, sweet taste! Caramel macchiato cupcakes blend rich flavors in a fun, sweet treat. You learned about the key ingredients and the equipment needed for success. I shared some tips for perfecting flavor, texture, and appearance. You can even explore gluten-free and vegan options to suit your needs. Storing these cupcakes right will keep them fresh and tasty. Embrace your baking journey, and enjoy sharing these cupcakes with friends and family! Your homemade treats will impress all who taste them.

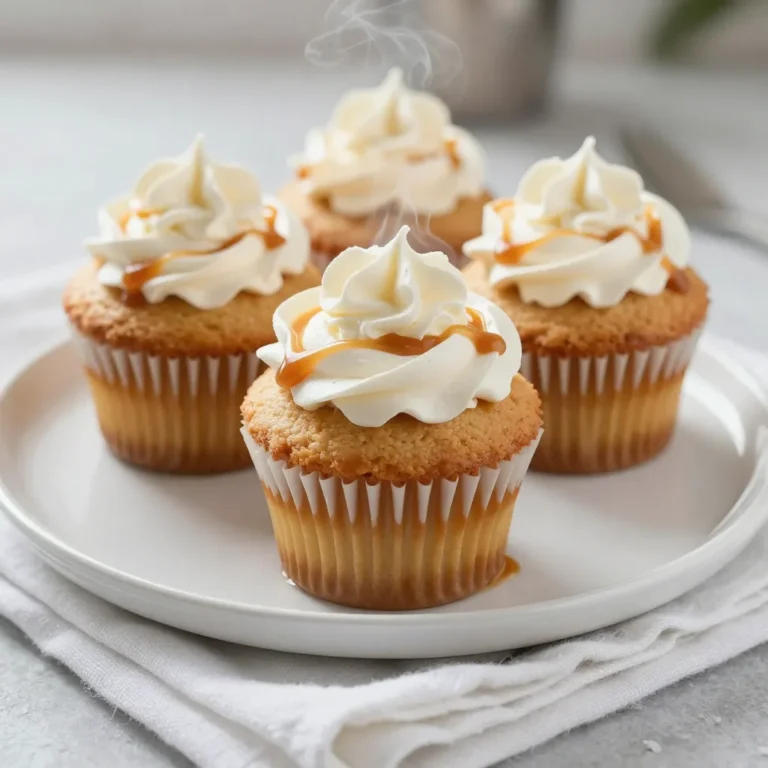
Caramel Macchiato Cupcakes Tasty and Simple Treat

To make Lemon Garlic Shrimp Scampi, gather these fresh ingredients: - 1 pound large shrimp, peeled and deveined - 4 tablespoons unsalted butter, divided - 2 tablespoons extra virgin olive oil - 4 cloves garlic, minced - Zest and juice of 2 fresh lemons - 1/4 teaspoon red pepper flakes (adjust for desired spice level) - Sea salt and freshly cracked black pepper to taste - 8 ounces linguine or spaghetti - Fresh parsley, finely chopped (for garnish) - Grated Parmesan cheese (optional, for serving) If you don't have some items, here are helpful swaps: - Shrimp: Use scallops or chicken for a different protein. - Butter: Substitute with a vegan butter or olive oil for dairy-free. - Olive Oil: Any neutral oil like canola works well. - Pasta: Swap linguine for spaghetti, or use gluten-free pasta. - Red Pepper Flakes: Try cayenne pepper for more heat. Choosing the right shrimp is key for great taste. Here are my tips: - Look for firmness: Fresh shrimp should feel firm to touch. - Check the smell: It should smell like the sea, not fishy. - Color matters: Bright, clear color indicates freshness. - Size counts: Large shrimp cook well and have good flavor. - Buy from a trusted source: Local markets often have the freshest options. {{ingredient_image_2}} Start by boiling water in a large pot. Make sure to add salt to the water. Once it boils, add 8 ounces of linguine or spaghetti. Cook it according to the package instructions. You want the pasta to be al dente, which means it should still have a little bite. Before you drain, save 1/2 cup of the starchy pasta water. This water helps make the sauce creamy. After saving the water, drain the pasta and set it aside. Grab a big skillet and place it on medium heat. Add 2 tablespoons of unsalted butter and 2 tablespoons of olive oil. Let this melt until it bubbles. Next, toss in 4 cloves of minced garlic. Stir it around for about 1 minute. You want it to smell great but do not let it burn. Burnt garlic can ruin the dish with a bitter taste. Now it’s time for the shrimp! Add 1 pound of peeled and deveined shrimp to the skillet. Sprinkle in 1/4 teaspoon of red pepper flakes, sea salt, and black pepper. Cook the shrimp for 2-3 minutes on each side. They will turn pink and opaque when done. Once cooked, pour in the zest and juice of 2 fresh lemons. Stir it well to mix the flavors. If it looks dry, add a bit of the reserved pasta water. This gives it a silky texture. To get the best shrimp, start with fresh or frozen shrimp. If using frozen, thaw them in cold water. Peel and devein them for the best taste. When cooking, avoid overcooking. Shrimp cooks fast, only 2-3 minutes per side is enough. Perfect shrimp should be pink and opaque. If they turn rubbery, they are overcooked. Red pepper flakes add heat, but you can adjust them. If you want less spice, use half the amount. For more heat, add extra flakes. You can also add a pinch of cayenne for a different flavor. Always taste and adjust as you go. This way, you get the perfect balance for your taste. Fresh herbs brighten the dish. Parsley is a great choice for garnish. Add it right before serving for the best flavor. You can also try fresh basil or thyme. Just chop them finely and mix them in with the lemon juice. This adds a nice touch and makes your dish pop! Pro Tips Use Fresh Ingredients: Fresh shrimp and lemons significantly enhance the flavor of your scampi. Opt for wild-caught shrimp if available for the best taste. Don't Overcook the Shrimp: Cook the shrimp just until they turn pink and opaque. Overcooking can make them tough and rubbery. Adjust Spice Level: Feel free to modify the amount of red pepper flakes to suit your taste preferences. For a milder dish, reduce the quantity or omit it altogether. Reserve Pasta Water: The starchy pasta water helps to bind the sauce and pasta together, creating a silky texture. Always reserve some before draining your pasta. {{image_4}} You can boost nutrition and flavor by adding veggies. Spinach is a great choice. It wilts quickly and adds a fresh taste. Asparagus works well too. Cut it into small pieces and sauté with the garlic. Both options make the dish colorful and healthy. If you want a gluten-free meal, try zoodles. Zoodles are spiralized zucchini that look like noodles. They cook fast and soak up flavors. Sauté them briefly before adding the shrimp. This option keeps the dish light and fresh. While linguine is a classic choice, feel free to experiment. Spaghetti pairs nicely with shrimp too. For a twist, try fettuccine or penne. Each pasta type has its own charm. Just remember to adjust cooking times based on the shape. Enjoy trying different types! To keep your Lemon Garlic Shrimp Scampi fresh, place it in an airtight container. Make sure it cools to room temperature before sealing. Store it in the fridge for up to three days. This keeps the shrimp safe and tasty. When you’re ready to enjoy leftovers, reheat them gently. Use a skillet on medium heat. Add a splash of water or more lemon juice to keep it moist. Stir often until everything warms up. Avoid cooking too long; you do not want rubbery shrimp. You can freeze this dish for up to two months. Place it in a freezer-safe container. Be sure to leave some space at the top for expansion. When ready to eat, thaw it in the fridge overnight. Then, reheat as mentioned above. Enjoy your tasty meal later! Yes, you can use frozen shrimp. Just make sure to thaw them first. Place the shrimp in cold water for about 15-20 minutes. After thawing, pat them dry with a paper towel. This helps them cook evenly and prevents excess water in the dish. To make this dish dairy-free, swap the butter for a plant-based alternative. You can use olive oil or coconut oil for sautéing. This keeps the rich flavor while making it suitable for those who avoid dairy. Lemon Garlic Shrimp Scampi pairs well with several sides. Here are some tasty options: - Garlic bread for dipping in the sauce - A fresh garden salad for crunch - Steamed vegetables like broccoli or asparagus - Rice or quinoa to soak up the sauce These sides enhance your meal and make it even more satisfying. Enjoy exploring different pairings! We covered all the key points for making delicious Lemon Garlic Shrimp Scampi. You learned about the best ingredients to use and useful substitutes. I shared tips for cooking steps, ensuring perfect shrimp texture, and adding your favorite spices. You can even make this dish your own by trying variations. In closing, I hope you feel ready to create a tasty meal. Each step leads to a delightful dish. Enjoy the process and savor every bite!

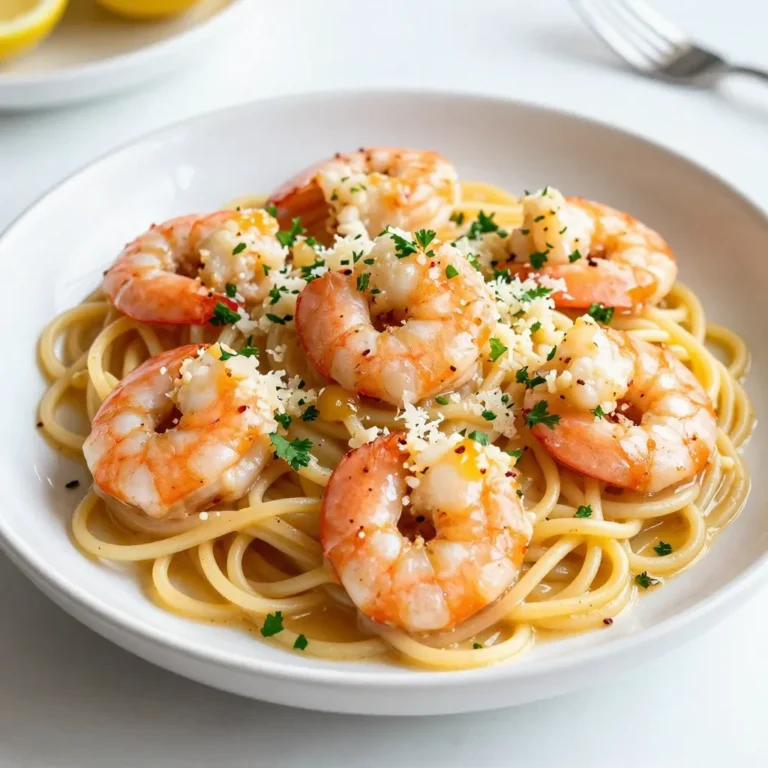
Lemon Garlic Shrimp Scampi Simple and Flavorful Recipe

To make a simple stove top meatloaf, you will need these ingredients: - 1 pound ground beef - 1 cup seasoned breadcrumbs - 1/2 cup whole milk - 1/2 cup onion, finely chopped - 2 cloves garlic, minced - 1 large egg, beaten - 2 tablespoons Worcestershire sauce - 1 tablespoon mustard (yellow or Dijon) - 1 teaspoon salt - 1/2 teaspoon freshly ground black pepper - 1/2 teaspoon dried thyme - 1/2 cup ketchup (for topping) - Fresh parsley, chopped (for garnish) Each ingredient plays a key role in making the meatloaf tasty and moist. Ground beef gives it a hearty flavor. Breadcrumbs help hold it together. Milk adds moisture. Onions and garlic give a nice aroma and taste. The egg binds it all. Worcestershire sauce and mustard enhance the flavor. Salt and pepper bring out the best in the meat. Thyme adds a touch of earthiness. Finally, the ketchup not only tops the meatloaf but also adds a sweet and tangy glaze. Make sure to gather all these items before you start cooking. Having everything ready helps the process run smooth. {{ingredient_image_2}} In a large mixing bowl, combine the following ingredients: - 1 pound ground beef - 1 cup seasoned breadcrumbs - 1/2 cup whole milk - 1/2 cup onion, finely chopped - 2 cloves garlic, minced - 1 large egg, beaten - 2 tablespoons Worcestershire sauce - 1 tablespoon mustard (yellow or Dijon) - 1 teaspoon salt - 1/2 teaspoon freshly ground black pepper - 1/2 teaspoon dried thyme Use your hands or a fork to mix everything well. This step is key. You want to avoid any dry spots. If you don’t mix well, the meatloaf may not cook evenly. Once your mixture is ready, shape it into a loaf. Place the loaf on a large plate. Heat a large skillet over medium heat. Add a small drizzle of oil to prevent sticking. Carefully place the meatloaf in the skillet. Cover it with a lid. Cook for about 30 to 35 minutes. Turn the meatloaf halfway through. This ensures even cooking and browning. After about 20 minutes of cooking, spread ketchup over the top. This adds a nice glaze and flavor. Keep cooking until the meatloaf's internal temperature hits 160°F (71°C). Use a meat thermometer to check doneness. Once done, transfer the meatloaf to a cutting board. Let it rest for 5 to 10 minutes. This step helps the juices stay in the meat, giving you a tasty slice. Before serving, garnish with fresh parsley. It adds color and freshness. Enjoy your meal with sides like mashed potatoes or steamed veggies! Resting your meatloaf is very important. Letting it rest for 5-10 minutes helps the juices stay inside. This makes each slice juicy and tasty. If you skip this step, the meatloaf can dry out. Choose a heavy skillet for cooking. A cast iron skillet is great. It heats evenly and gives a nice crust. If you don’t have one, use a non-stick skillet. Just add a little oil to prevent sticking. You can easily boost the flavor of your meatloaf by adding herbs. Fresh parsley, thyme, or even rosemary can change the taste. Just chop them finely and mix them into the meat. If you want to switch up your diet, that's easy too. You can use ground turkey or chicken instead of beef. These options are leaner and still taste good. You can even try a meatless version with lentils or mushrooms for a unique twist! Pro Tips Use Lean Beef: Opt for 80/20 ground beef for a balance of flavor and moisture without being too greasy. Add Vegetables: Incorporate finely grated carrots or zucchini into the meat mixture for added moisture and nutrition. Experiment with Glazes: Try different toppings like BBQ sauce or a mixture of honey and mustard for a unique flavor twist. Resting Time is Key: Allowing the meatloaf to rest before slicing helps retain its juices for a more tender bite. {{image_4}} You can switch out ground beef for other meats. Ground turkey or chicken works well. These options are lighter and can taste great. Just keep in mind that they may cook faster. Check the meat’s internal temperature to make sure it’s safe to eat. Adding cheese can create a rich flavor. Try cheddar or mozzarella for a gooey bite. You can also sneak in some veggies. Finely chopped bell peppers or spinach add color and nutrients. Mix them into the meatloaf for a tasty twist. Experiment with spices too. Oregano or paprika can spice things up. Meatloaf pairs well with many sides. Mashed potatoes are a classic choice. You can also serve it with steamed broccoli or green beans. A fresh salad adds a nice crunch. For a heartier meal, consider buttered corn or roasted carrots. These sides enhance the comfort of meatloaf and make it a full meal. After enjoying your meatloaf, store any leftovers in the fridge. Use an airtight container for best results. This keeps the meatloaf fresh for about three to four days. If you want to keep it longer, freezing is a great option. Wrap the meatloaf tightly in plastic wrap or aluminum foil. Then, place it in a freezer-safe bag. It can stay good for up to three months in the freezer. When it's time to enjoy your leftovers, you can reheat them easily. The best way is to use the oven. Preheat it to 350°F (175°C). Place your meatloaf in a baking dish and cover it with foil. Heat for about 20-25 minutes or until it's warmed through. If you're short on time, the microwave works too. Just slice the meatloaf and heat for 1-2 minutes. Make sure it gets hot all the way through. Enjoy your comforting meal without losing flavor! Cooking meatloaf on the stovetop takes about 30-35 minutes. You want the meatloaf to reach an internal temperature of 160°F (71°C). Use a meat thermometer to check this. The time may vary based on your heat level and meatloaf size, so keep an eye on it. Yes, you can make meatloaf ahead of time. Prepare the meat mixture and shape it into a loaf. Cover it and store it in the fridge for up to 24 hours. When you’re ready, cook it as usual. This saves time on busy days. If you need a substitute for breadcrumbs, try crushed crackers or oats. For a gluten-free option, use gluten-free breadcrumbs or ground almonds. These options will help keep your meatloaf moist while catering to dietary needs. This blog post covered everything you need for a great meatloaf. We discussed the key ingredients, step-by-step instructions, and helpful tips for success. You learned about different meat options and flavor enhancements to make your dish unique. Remember to rest your meatloaf before slicing for the best texture. Store any leftovers properly to enjoy later. With these insights, you can confidently create a delicious meatloaf that suits your taste and needs. Enjoy your cooking!

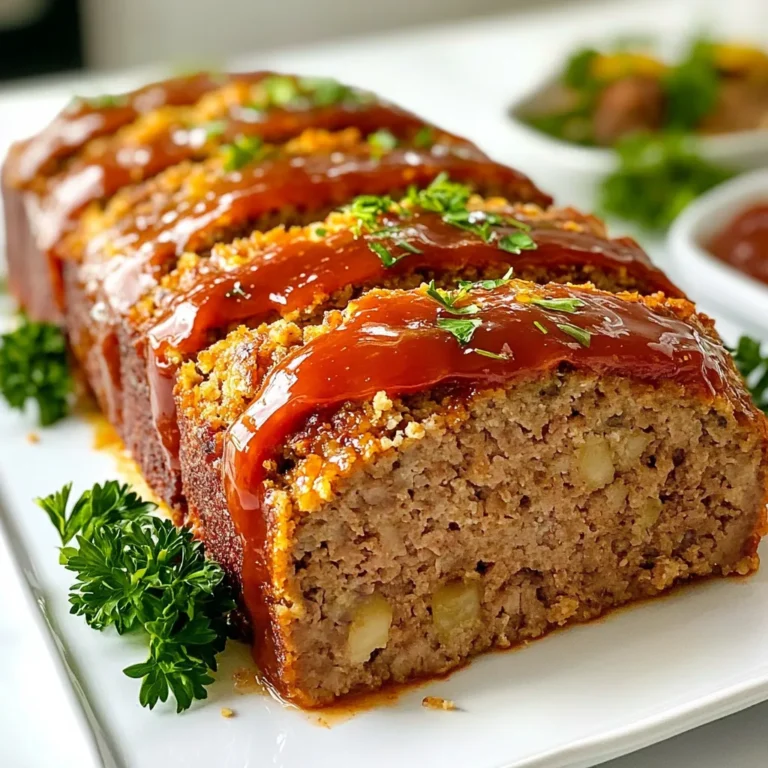
Simple Stove Top Meatloaf Comforting and Easy Recipe

- 4 cups of lime sherbet - 2 liters of lemon-lime soda (like Sprite or 7Up) - 1 cup of cranberry juice - 1/2 cup of pineapple juice - 1 teaspoon of freshly squeezed lime juice - Fresh mint leaves for garnish - Lime slices for garnish The main stars of Grinch Punch are lime sherbet and lemon-lime soda. The sherbet adds a creamy base. The soda gives a fun fizz. Cranberry juice brings a sweet-tart flavor. Pineapple juice adds a tropical twist. Finally, lime juice boosts the taste. - Gummy candies - Fresh mint leaves For extra fun, add gummy candies. They make the punch playful and colorful. Fresh mint leaves also enhance the drink’s look and flavor. These extras make your Grinch Punch even more festive. {{ingredient_image_2}} 1. Start by scooping 4 cups of lime sherbet. Place it right in the center of your large punch bowl. This bright green sherbet makes your drink fun and festive. 2. Next, grab a separate pitcher. Mix 1 cup of cranberry juice, 1/2 cup of pineapple juice, and 1 teaspoon of freshly squeezed lime juice. Stir until all juices blend well together. 3. Slowly pour the juice mixture over the scooped lime sherbet. Let the juices flow around the sherbet without fully melting it. This keeps the punch creamy and delicious. 4. Now, gently add 2 liters of lemon-lime soda to the punch bowl. The soda brings a nice fizz. Stir lightly to mix but be careful not to lose that sparkle! 5. For a fun twist, add red and green gummy candies on top. You can let them float or place them right on the surface. They add a playful touch! 6. Just before serving, add fresh mint leaves and a slice of lime to each glass. This makes your punch look nice and adds extra flavor. When you mix Grinch Punch, gentle stirring is key. This helps keep the fizz from the soda. If you stir too hard, the bubbles will fade away. You want a punch that is both fizzy and creamy. To keep the carbonation, pour the soda slowly. This way, you maintain that bubbly texture. It’s all about balance. You want to combine flavors without losing the fun fizz. Get creative with your glassware! Use colorful cups or clear glasses. This makes the green and red hues pop. It adds to the festive feel of your drink. For garnishing, think whimsical! Add fresh mint leaves and lime slices to each glass. You can also float gummy candies on top. This makes your punch look fun and tasty. It’s all about making each sip a delight! Pro Tips Chill the Ingredients: For an extra refreshing punch, chill the juices and soda before mixing them. This way, the punch stays cold longer without needing too much ice, which can dilute the flavors. Experiment with Flavors: Feel free to mix in other fruit juices like orange or grapefruit for a unique twist. This can change the flavor profile and make it even more festive! Presentation Matters: Use fun and colorful cups or glasses to serve the punch. Adding whimsical straws or even festive drink stirrers can enhance the overall presentation. Garnish Wisely: Besides mint and lime slices, consider adding edible flowers or fruit skewers for garnishing. This not only adds to the visual appeal but also enhances the flavor with every sip! {{image_4}} You can make Grinch Punch without alcohol and still keep it fun. Here are some ideas: - Alternative juices and sweeteners: Swap cranberry juice for apple or grape juice. Use honey or agave for sweetness if you want less sugar. - Different sherbet flavors: Try raspberry or lemon sherbet instead of lime. Each flavor can give a new twist to the punch. If you want to add a little cheer, consider these options: - Adding vodka or rum: A splash of vodka makes the punch a bit stronger. Rum adds a sweet and warm flavor. Start with one cup and taste. - Flavor pairings with alcohol: Pair the vodka with a splash of orange juice for a fruity boost. Rum goes well with ginger ale for added spice. If you have leftover Grinch Punch, you can store it in the fridge. Pour any extra punch into a large pitcher. Cover it with a lid or plastic wrap. This will keep it fresh for a day or two. However, the punch may lose some fizz. To keep it bubbly, only store the punch without the soda. To keep the ingredients fresh, avoid mixing in the soda until you're ready to serve. Store the sherbet in the freezer. Keep the juices in the fridge. This way, everything stays tasty for your next gathering. If you want to make Grinch Punch ahead of time, it’s simple. Prepare the juice mixture first. Mix the cranberry, pineapple, and lime juices together. You can store this juice blend in the fridge. This keeps it fresh and cold. Add the sherbet just before serving for the best texture. If you add the soda too early, it will lose its fizz. You want that fun, fizzy feeling when your guests take a sip. For a pop of color, keep your gummy candies in a separate bowl. Add them to the punch right before serving. This keeps the punch looking festive and fun. Grinch Punch is a fun, festive drink perfect for holiday gatherings. It features a bright green color, thanks to lime sherbet. The drink combines different flavors like sweet and tangy. You mix lime sherbet with lemon-lime soda, cranberry juice, and pineapple juice. This mix creates a bubbly and creamy delight that everyone will love. You can also add gummy candies for a playful touch. Yes, you can prepare Grinch Punch ahead of time! To do this, mix the juices and keep them in the fridge. Wait until you are ready to serve to add the lime sherbet and soda. This keeps the punch fizzy and fresh. When serving, you can scoop the sherbet into a punch bowl and pour over the juice mix. Then, add the soda for that fun fizz right before serving. If lime sherbet isn't your favorite, you can easily swap it out. Try using lemon sherbet for a similar taste, or even rainbow sherbet for a colorful twist. You can also use vanilla ice cream for a creamy base. This gives you a different flavor while keeping the drink festive. Just remember, the key is to have something that mixes well with the juices! Grinch Punch combines vibrant flavors, festive colors, and easy preparation. You just mix lime sherbet, various juices, and soda for a fun drink. Don't forget to add gummy candies and fresh mint for flair. Whether you choose a non-alcoholic or boozy version, this punch will impress everyone. Store leftovers properly to keep them fresh. Making it ahead saves time and boosts the fun. Enjoy this delightful drink at your next gathering, and spread holiday cheer!

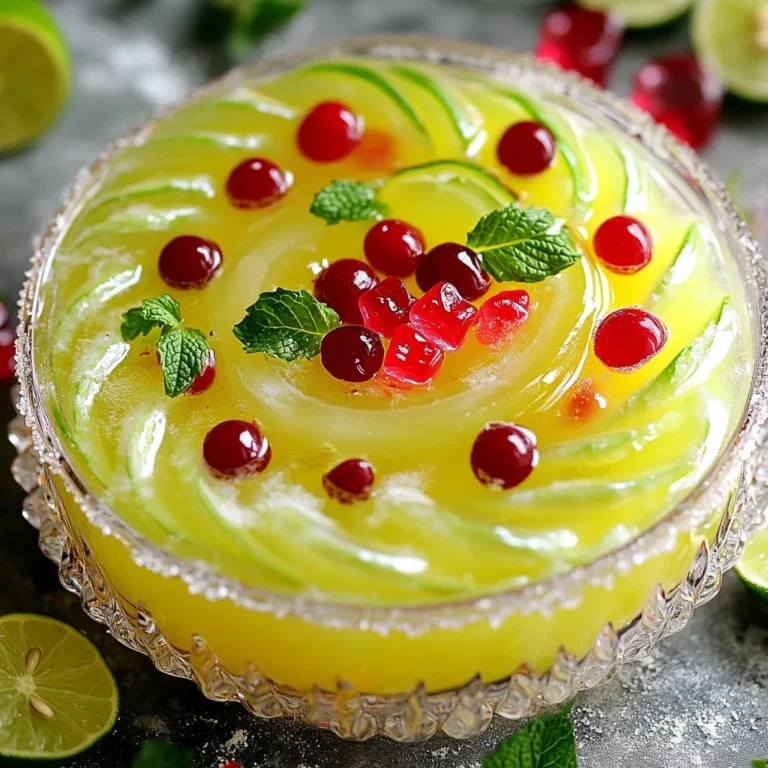
Grinch Punch Festive Drink for Holiday Cheer

- 2 boneless, skinless chicken breasts - 8 oz penne pasta - 1 cup cherry tomatoes, halved - 1/2 cup fresh basil, chopped - 2 cloves garlic, minced - 1/4 cup balsamic glaze - 1 tablespoon olive oil - 1/2 teaspoon salt - 1/2 teaspoon black pepper - 1/4 cup grated Parmesan cheese - Optional: 1/4 teaspoon red pepper flakes for a spicy kick Tips for selecting fresh tomatoes When you pick tomatoes, look for ones that feel firm and heavy. The skin should be smooth and shiny. Smell the stem end; a strong, sweet smell means they are ripe. Choose cherry tomatoes that are bright and colorful. Importance of using fresh basil Fresh basil adds a bright flavor to the dish. It is best to use basil that is vibrant and fragrant. Dried basil will not give the same fresh taste. You can tear the leaves by hand to release more oils and flavors. Alternatives for chicken You can use turkey or tofu if you want to avoid chicken. Both options will still taste great. Just adjust cooking times as needed. Gluten-free pasta options If you need gluten-free pasta, look for penne made from rice or quinoa. These can be cooked just like regular pasta. They will soak up the flavors well. {{ingredient_image_2}} To start, fill a large pot with water. Add a good amount of salt. This step makes your pasta taste great. Bring the water to a boil over high heat. Once boiling, add 8 ounces of penne pasta. Cook it according to the package instructions. You want it to be al dente. This means it should be firm but not hard. Usually, this takes about 10-12 minutes. When done, drain the pasta and set it aside in a large bowl. While the pasta cooks, let’s prepare the chicken. Take 2 boneless, skinless chicken breasts. Season them with salt and black pepper. For some heat, add a pinch of red pepper flakes. This will make your chicken tasty. Heat 1 tablespoon of olive oil in a skillet over medium heat. Once the oil is hot, add the seasoned chicken. Cook for about 6-7 minutes on each side. You want the chicken to be golden brown and reach 165°F inside. After cooking, remove the chicken and let it rest for a few minutes. Then, slice it into thin strips. Now, let’s make the sauce. In the same skillet, lower the heat a bit. Add 2 minced garlic cloves. Sauté the garlic for about 30 seconds. Stir it constantly to avoid burning. You want it fragrant, not brown. Next, add 1 cup of halved cherry tomatoes to the skillet. Cook them for 3-4 minutes until they soften. Then, stir in 1/2 cup of chopped fresh basil. Finally, add the cooked penne pasta and 1/4 cup of balsamic glaze. Gently toss everything together until well mixed. Time to serve! Use deep bowls for a nice look. Spoon the pasta mixture into each bowl. Arrange the sliced chicken on top. Finish with a sprinkle of 1/4 cup of grated Parmesan cheese. For an extra touch, drizzle more balsamic glaze around the edge. Garnish with fresh basil leaves to make it pop. Enjoy your beautiful bruschetta chicken pasta! To make juicy chicken, start with good seasoning. Use salt and pepper. If you want heat, add a pinch of red pepper flakes. Make sure to cook the chicken until it reaches 165°F (75°C). This is the safe temperature for chicken. I check doneness with a meat thermometer. This tool is very helpful for beginners. Let the chicken rest for a few minutes after cooking. This keeps the juices inside. Slice it thinly before adding it to the pasta. This way, each bite has great flavor. To make the dish pop, you can add more herbs. Fresh oregano or thyme works well. They add a nice touch to the overall taste. You can also consider a squeeze of lemon juice. This adds brightness to the dish. Adjust the acidity of the balsamic glaze too. If it feels too sweet, add a splash of vinegar. This balances the flavors. Remember to taste as you go. Your taste buds are your best friend in the kitchen! Meal prep can cut down cooking time. You can cook the chicken and pasta ahead. Store them in the fridge until you are ready to eat. You can also use pre-cooked chicken. This can save you time when making dinner. If you want a quick fix, grab rotisserie chicken. It’s already cooked and adds great flavor. Use it in place of raw chicken for an easy meal. Just mix it into the pasta at the end. Enjoy your meal without the fuss! Pro Tips Perfect Pasta Cooking: Always salt your pasta water generously. It should taste like the sea, which enhances the pasta's flavor as it cooks. Chicken Searing Secrets: For a golden-brown crust on your chicken, make sure the skillet is hot and don't overcrowd the pan. This allows for better searing. Fresh Herbs Usage: Add fresh basil at the end of cooking to retain its vibrant flavor and color. Cooking it too long can diminish its freshness. Balsamic Glaze Tips: If you don't have balsamic glaze, you can reduce balsamic vinegar in a saucepan until it thickens. This creates a similar sweet-tart flavor. {{image_4}} You can easily make a vegetarian bruschetta pasta. Simply swap the chicken for your favorite veggies or tofu. Zucchini, bell peppers, and mushrooms work great. Cut the veggies into small pieces. Cook them in the skillet until tender. Tofu adds protein and absorbs flavors well. Cook it until golden. Adjust cooking times as needed. Veggies may take less time than chicken. Taste as you go to ensure they are cooked just right. For a creamy twist, add cream or cheese sauces to your dish. A rich Alfredo or a light cream sauce pairs nicely. You can also mix in a bit of cream cheese for extra richness. To make a simple creamy sauce, combine heavy cream, grated Parmesan, and a pinch of garlic powder. Heat it gently until smooth. Pour this over the pasta and mix well for a delightful creamy texture. If you love heat, try adding jalapeños or other spicy peppers. Fresh jalapeños can give a nice bite. You can also use crushed red pepper flakes for a subtler heat. Start with a small amount, then taste. Balance the spice with the fresh flavors of tomatoes and basil. Adding a touch of honey can also help mellow the heat while enhancing the sweetness. To keep your Bruschetta Chicken Pasta fresh, use airtight containers. Glass containers work great as they do not stain. Plastic containers are also good if they seal tightly. Store the pasta in the fridge for up to three days. The flavors will blend well, making it even tastier on the second day. When reheating pasta, avoid drying it out. You can use the microwave for quick reheating. Add a splash of water and cover the dish with a damp paper towel. This helps keep moisture in. For stovetop reheating, add a little olive oil or broth to a pan. Heat on low while stirring gently. This will keep the pasta fresh-tasting. You can freeze portions of Bruschetta Chicken Pasta for later meals. Let the pasta cool completely before freezing. Use freezer-safe containers or bags and label them with the date. When ready to eat, thaw the pasta overnight in the fridge. Reheat gently in a pan or microwave, adding a bit of water or oil to keep it moist. Enjoy the flavors even after freezing! Making Bruschetta Chicken Pasta is quick and easy. It takes about 30 minutes total. Here’s the timing breakdown: - Prep Time: 15 minutes - Cook Time: 15 minutes In just half an hour, you’ll have a delicious meal ready to enjoy. Yes, you can use many kinds of pasta. While penne works great, feel free to try: - Fusilli - Farfalle - Spaghetti Each type adds a different twist to the dish. Choose what you love! Bruschetta Chicken Pasta pairs well with several side dishes. Consider these ideas: - Garlic bread for a crunchy bite - A fresh green salad for a light touch - Roasted vegetables for extra flavor These sides will make your meal even better. You can prep Bruschetta Chicken Pasta ahead. Here are some meal prep tips: - Cook the pasta and chicken in advance. - Store them separately in the fridge. - Combine and heat when you’re ready to serve. This way, you’ll save time on busy days! This blog post guides you on making Bruschetta Chicken Pasta. We discussed key ingredients, like chicken and fresh basil, and their importance. I shared step-by-step cooking tips, ensuring a flavorful dish. You learned variations for different diets and how to store leftovers. In the end, this recipe is versatile and easy to make. Whether you want it spicy or creamy, there’s a version for you. Hopefully, you feel inspired to try this dish. It’s a great way to enjoy fresh flavors, and your taste buds will thank you!

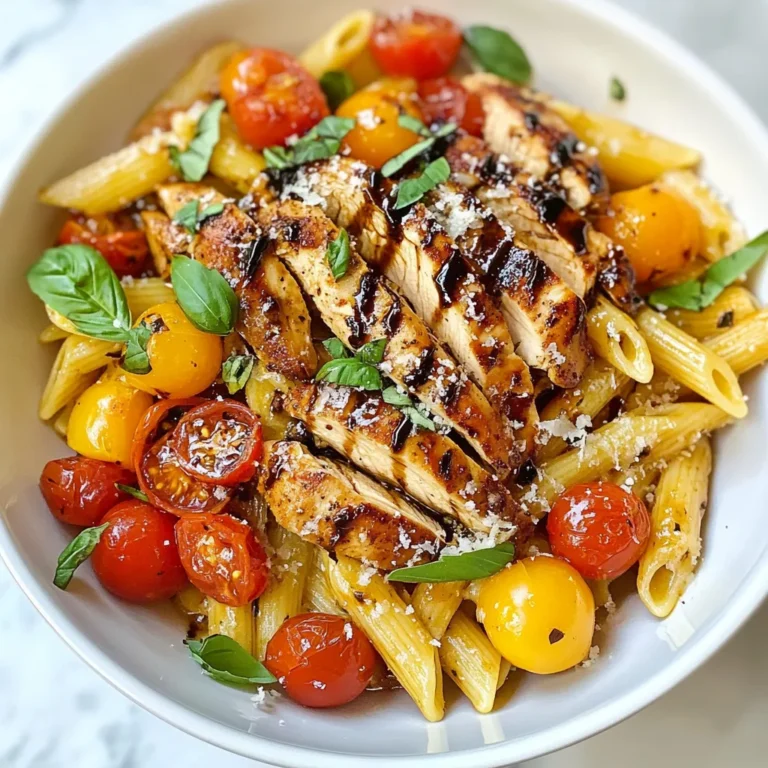
Bruschetta Chicken Pasta Flavorful and Easy Recipe

You can use either fresh or canned peaches for this recipe. Fresh peaches give a bright flavor. They also add a nice texture. You will need about 4 cups of fresh peaches, sliced. If you choose canned peaches, use 2 cans in syrup. Drain some syrup but keep a bit for extra sweetness. Canned peaches are handy and save time. The sweetness of your dump cake depends on the peaches. If you use fresh peaches, add 1 cup of granulated sugar. For canned peaches, taste them first. If they are sweet enough, reduce the sugar. You can cut back to 3/4 cup or even 1/2 cup. You want to find the right balance for your taste. Want to make your dump cake even better? Add a teaspoon of ground cinnamon. This spice gives warmth and depth. You can also add 1/2 teaspoon of vanilla extract for a sweet note. If you use canned peaches, consider using the peach juice instead of water. It adds more peach flavor to the cake. Try these simple tricks to make it shine! {{ingredient_image_2}} Start by washing your fresh peaches. Slice them into thin pieces. If you use canned peaches, drain some syrup but keep a little for taste. In a bowl, mix the peaches with sugar and cinnamon. Toss them gently to coat. This mix adds sweetness and spice. Pour the peach mix into a greased 9x13 inch baking dish. Spread it out evenly. Next, take the box of yellow cake mix. Open it and sprinkle it evenly over the peaches. Do not mix or stir. Just cover the peaches completely. This layer gives your cake its nice texture. Now, melt the unsalted butter in a bowl. Drizzle the melted butter over the cake mix. Try to cover all parts for a rich flavor. Now it’s time for the oven. Pour the water or peach juice over the cake mix and butter. Avoid stirring again. This will help the cake bake well. Place the baking dish in the preheated oven set to 350°F (175°C). Bake for 45-50 minutes. Look for a golden brown top and bubbling edges. When done, take it out and let it cool for about 10 minutes. This step helps it set. Now you are ready to serve! To get the best texture for your peach cobbler dump cake, keep a few things in mind. First, use fresh peaches if possible. They give a nice bite and juicy flavor. If using canned peaches, drain them well. This keeps the cake from getting soggy. When you layer the cake mix, do not stir it. Just sprinkle it on top of the peaches. This helps create a nice crust while baking. Lastly, make sure to drizzle the melted butter evenly. This adds richness and helps with texture. You can switch up the flavors in your peach cobbler dump cake easily. Try adding some berries along with the peaches. Blueberries or raspberries add a nice twist. You can also mix in spices like nutmeg or cardamom for a warm flavor. If you like a bit of tartness, add some lemon zest. This brightens up the dish. For a richer taste, try using brown sugar instead of white sugar. Each of these changes can make your dessert even more delicious! Serving your peach cobbler dump cake is just as fun as making it. For the best experience, serve it warm. A scoop of vanilla ice cream or whipped cream on top adds creaminess. You can also garnish it with fresh peach slices for a pretty look. If you want a bit of crunch, sprinkle some crushed nuts on top. This adds texture and flavor. Pair it with a cup of coffee or sweet tea for a perfect dessert moment. Enjoy every bite! Pro Tips Choose Ripe Peaches: For the best flavor and sweetness, select peaches that are slightly soft to the touch and fragrant. This will enhance the overall taste of your dump cake. Adjust Sweetness: If using canned peaches, taste the syrup before adding sugar. You may find that the syrup provides enough sweetness, allowing you to reduce or eliminate the added sugar. Experiment with Flavors: Feel free to add a splash of almond extract or a sprinkle of nutmeg for a unique twist. These flavors can complement the peaches beautifully. Serve Warm: This dessert is best enjoyed warm. Let it cool for a few minutes after baking, then serve with a scoop of ice cream or whipped cream for a delightful treat. {{image_4}} You can make this dessert gluten-free. Just swap the yellow cake mix for a gluten-free version. Most brands offer good taste and texture. Follow the same steps to assemble the cake. The result will still be delicious and satisfying. Feel free to get creative with the fruit. You can use apples, blueberries, or even cherries. Adjust the sugar based on the fruit you choose. For example, if you use tart cherries, you may want more sugar. This change can bring new flavors and excitement to your dessert. Nuts can add a nice crunch. Chopped pecans or walnuts work well. Sprinkle them on top of the cake mix before baking. You can also try spices like nutmeg or ginger for a unique twist. Just a pinch can change the whole flavor profile. Enjoy experimenting and finding your perfect mix! To store leftovers, let the cake cool first. Cover the dish with plastic wrap or foil. You can also transfer the cake to an airtight container. Keep it in the fridge for up to three days. This helps maintain its flavor and texture. When you are ready to enjoy the cake again, preheat your oven to 350°F (175°C). Slice a portion of the cake and place it in an oven-safe dish. Heat it for about 15 minutes. You can also microwave a slice for 30 seconds to 1 minute. Add a scoop of ice cream on top for extra delight! If you want to freeze the cake, let it cool completely. Wrap it tightly in plastic wrap and then in foil. This keeps the cake fresh in the freezer for up to three months. When you are ready to serve it, thaw it in the fridge overnight. Reheat it in the oven before serving for the best taste. Yes, you can use frozen peaches. Just thaw and drain them first. This helps avoid extra liquid in the cake. Using frozen peaches can work well, especially when fresh ones are out of season. They will provide that sweet and juicy flavor you want. The dump cake is done when the top is golden brown and bubbly. You can check with a toothpick. Insert it into the center, and it should come out clean. Be sure to watch for the bubbling around the edges. This means the cake is ready to enjoy. You can prepare the dump cake a day in advance. Just assemble the layers in the dish and cover it with plastic wrap. Store it in the fridge. When you’re ready to bake, let it sit at room temperature for about 30 minutes. This way, it bakes evenly. Enjoy it fresh from the oven for the best taste! This blog post covers how to make a delicious peach cobbler dump cake. We explored fresh versus canned peaches, sweetener choices, and ways to boost flavor. I shared easy steps for prepping, layering, and baking. You learned tips for texture and serving ideas, plus variations like gluten-free options and different fruits. Finally, we discussed storage and answered common questions. Now you are ready to create your own tasty dessert! Enjoy every bite of your cobbler, and don’t hesitate to get creative with the recipe!

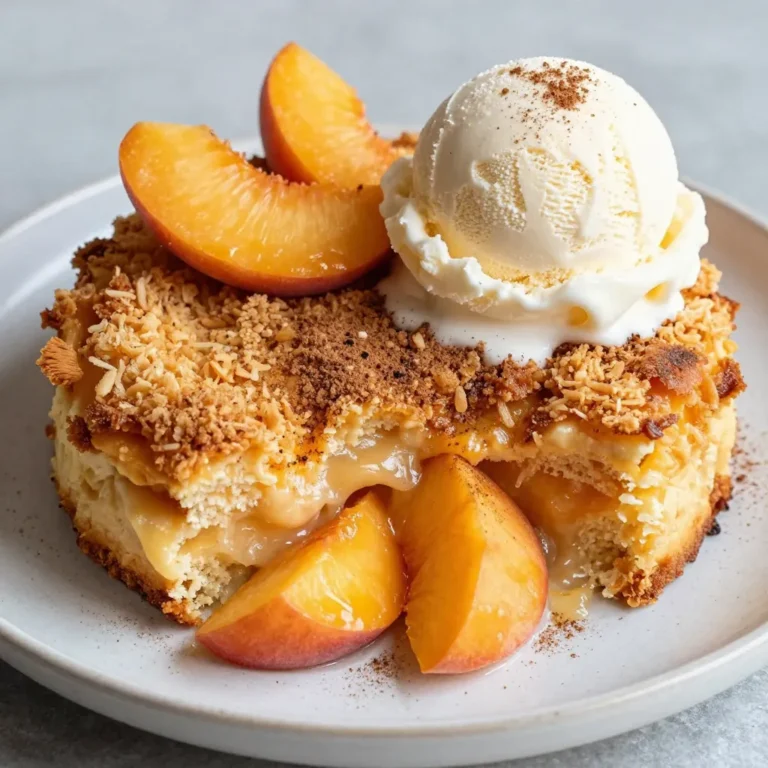
Peach Cobbler Dump Cake Delightful and Simple Recipe

- 1 loaf of brioche bread, cut into 1-inch cubes - 4 large eggs - 2 cups whole milk - 1/2 cup heavy cream Brioche bread gives this casserole a soft and sweet base. The eggs hold everything together. Whole milk and heavy cream add richness and creaminess. - 1/2 cup packed brown sugar - 1 teaspoon pure vanilla extract - 2 teaspoons ground cinnamon - 1/4 teaspoon ground nutmeg - 1/4 teaspoon salt Brown sugar adds sweetness and depth. Vanilla extract brings a warm flavor. Cinnamon and nutmeg give that classic apple pie taste. Salt balances the sweetness and enhances the flavors. - 2 cups apples, peeled, cored, and diced (about 2-3 medium apples) - 1 tablespoon fresh lemon juice - 1 cup pecans, chopped (optional) - Powdered sugar for dusting - Maple syrup for serving Fresh apples keep the dish bright and fruity. Lemon juice stops apples from browning and adds zest. Pecans add a tasty crunch. Dusting with powdered sugar makes it look special, while maple syrup adds sweetness when served. {{ingredient_image_2}} 1. Preheat your oven to 350°F (175°C). This step is important for even cooking. 2. Lightly grease a 9x13-inch baking dish with butter or non-stick spray. This keeps the casserole from sticking. 3. In a large bowl, whisk together the eggs, whole milk, heavy cream, brown sugar, vanilla extract, ground cinnamon, ground nutmeg, and salt. Mix until smooth and creamy. 1. In a separate bowl, toss the diced apples with fresh lemon juice. This keeps the apples bright and adds a nice taste. 2. Gently fold the cubed brioche bread and the lemon-coated apples into the egg mixture. Make sure the bread is well coated. If you want a crunch, fold in the chopped pecans at this stage. 1. Transfer the mixture into the prepared baking dish. Spread it out evenly for best baking results. 2. Cover the dish with aluminum foil. Place it in the preheated oven and bake for 30 minutes. 3. After 30 minutes, carefully remove the foil. Bake for another 15-20 minutes until the top is golden brown. The center should feel firm when you lightly press it. To get the best flavor and texture, coat the bread evenly. This ensures every bite is tasty. Mix the bread and egg mixture well. Cover all the pieces to soak up the flavors. Also, let the casserole rest for 5-10 minutes before serving. This resting time helps it hold its shape when you slice it. When serving, place the casserole warm on a plate or dish. For a special touch, dust the top with powdered sugar. You can also add a dollop of whipped cream or a scoop of vanilla ice cream. Drizzle warm maple syrup on top for extra sweetness. This makes each bite even more enjoyable. Pro Tips Use Day-Old Brioche: Stale bread absorbs the custard mixture better, resulting in a creamier texture. If your brioche is fresh, consider toasting the cubes lightly before adding them to the mixture. Mix Up the Apples: Combine different varieties of apples for a more complex flavor profile. Sweet apples like Fuji or Gala pair well with tart ones like Granny Smith. Make Ahead of Time: Prepare the casserole the night before and refrigerate it. This not only saves time in the morning but also allows the flavors to meld beautifully. Experiment with Toppings: Try adding various toppings such as caramel sauce, chopped nuts, or even a sprinkle of oats before baking for added texture and flavor. {{image_4}} You can change the bread type in this dish. Try challah or sourdough for a twist. These breads add their own unique flavors. If you need a dairy-free option, use almond milk or oat milk. They work well in the egg mixture. You can also swap heavy cream with coconut cream for richness. Adding spices makes this dish even better. Mix in some ginger or allspice for extra warmth. You can also use different extracts, like almond or maple. Seasonal fruits are great too. In fall, use pears or in summer, try peaches. Each fruit brings its own charm to the casserole. For gluten-free folks, use gluten-free bread. It holds up well in the egg mix. If you want a nut-free option, leave out the pecans. You can use seeds like sunflower seeds for a nice crunch. This way, everyone can enjoy this tasty dish without worry. To store leftovers in the fridge, let the casserole cool. Once cool, cover it tightly with plastic wrap or aluminum foil. You can also use an airtight container. Make sure to keep it in the fridge for up to 3 days. This will help keep it fresh and tasty. For freezing, slice the casserole into portions. Wrap each slice in plastic wrap, then place them in a freezer bag. Remove as much air as possible to avoid freezer burn. The casserole can be frozen for up to 3 months. When ready to eat, thaw in the fridge overnight. Reheat in the oven at 350°F until hot, about 15-20 minutes. The shelf life for this casserole is about 3 days in the fridge after baking. If you freeze it, it can last up to 3 months. Always check for any signs of spoilage before eating. You can prepare this casserole the night before. Just follow the steps to mix the ingredients. Pour everything into the baking dish and cover it tightly. Place it in the fridge overnight. In the morning, bake it straight from the fridge. You might need to add a few extra minutes to the baking time to ensure it's hot and bubbly. Yes, you can make this dish dairy-free. Use almond milk or oat milk instead of whole milk. Replace heavy cream with coconut cream or a dairy-free alternative. Check the bread too; many brands offer dairy-free brioche. This way, you can enjoy the flavors without dairy. For this recipe, use apples that are sweet and tart. Good options are Granny Smith, Honeycrisp, or Fuji. These apples hold their shape well when baked. They also add a nice balance to the sweet custard. Aim for 2 to 3 medium apples for the best flavor. Absolutely! You can mix in berries, peaches, or pears. Just remember to adjust the sweetness if you use very sweet fruits. Fresh fruit adds a fun twist and extra flavor to your dish. Store any leftover casserole in an airtight container in the fridge. It will stay fresh for about 3 to 4 days. To reheat, pop it in the oven at 350°F until warmed through. You can also microwave it, but the oven keeps the texture nice. Yes, you can freeze this casserole. Prepare it, but do not bake it. Wrap it well in plastic wrap and foil. It will keep in the freezer for up to 2 months. When you're ready to eat, thaw it in the fridge overnight and bake it as usual. Definitely! This casserole is perfect for brunch. It’s easy to serve, and everyone loves it. Pair it with fresh fruit or a savory dish like bacon or sausage for a well-rounded meal. To avoid sogginess, use stale bread if possible. Stale bread absorbs the egg mixture better. Also, don’t skip the resting time before baking. This helps the bread soak up the mixture evenly. Yes, you can make a gluten-free version. Look for gluten-free brioche or bread. Most gluten-free breads will work well. Just make sure to check the texture, as it can vary with gluten-free options. This blog post gave you all you need for a delicious apple bread casserole. We covered key ingredients like brioche bread, eggs, and apples. You learned the step-by-step guide to prepare, combine, and bake everything. I shared tips for the best results and exciting variations. Enjoy exploring your own flavors and serving ideas. With good storage tips, your casserole will always taste fresh. Dive into this recipe and make it your own! Enjoy your cooking adventure.

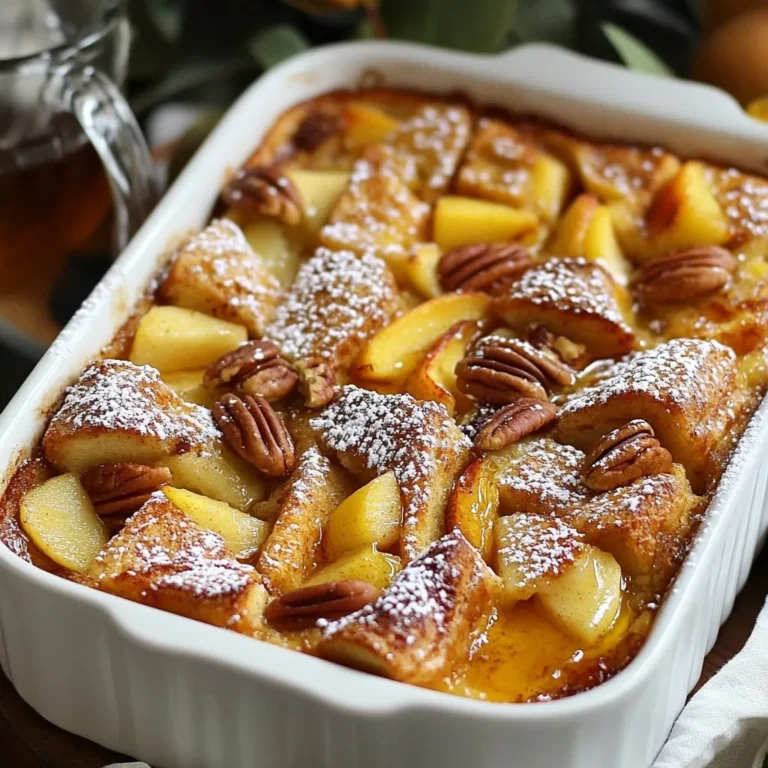
Apple Pie French Toast Casserole Tasty and Simple Dish

PREV 1 … 31 32 33 … 47 NEXT
snack joy kitchen

explore

DessertsDinnerAppetizersDrinks

Our Policies

  • Cookie Policy
  • Copyright Policy
  • Disclaimer
  • GDPR Policy
  • Terms Of Use
Back to Top
  • About
  • Contact Us
  • Privacy Policy
© 2026 snack joy kitchen