FREE DINNER EBOOK! Get your copy!
  • Cookie Policy
  • GDPR Policy
  • Disclaimer
  • Terms Of Use
  • Visit my other site: Fun Cookie Recipes
snack joy kitchen
  • Home
  • Dinner
  • Desserts
  • Drinks
  • Appetizers
  • Contact
  • About
  • Privacy Policy
  • Home
  • Dinner
  • Desserts
  • Drinks
  • Appetizers
  • Contact
  • About
  • Privacy Policy
  • Cookie Policy
  • GDPR Policy
  • Disclaimer
  • Terms Of Use
Visit my other site: Fun Cookie Recipes

HOME / CATEGORIES /

Latest

To make Gingerbread Crinkle Cookies, you need some simple ingredients. Each one plays a key role in the flavor and texture of these delightful treats. Here’s your shopping list: - 2 cups all-purpose flour - 1/4 cup unsweetened cocoa powder - 1 teaspoon baking soda - 1/2 teaspoon salt - 2 teaspoons ground ginger - 1 teaspoon ground cinnamon - 1/2 teaspoon ground nutmeg - 1/2 cup unsalted butter, softened to room temperature - 1 cup packed brown sugar, light or dark - 1/4 cup unsulfured molasses - 1 large egg - 1 teaspoon pure vanilla extract - 1 cup powdered sugar (for rolling) Each ingredient contributes to the cookie's rich flavor. The spices like ginger and cinnamon give warmth. Cocoa powder adds a deep, chocolatey taste. The molasses adds sweetness and a hint of chewiness. Using unsalted butter helps control the saltiness in your cookies. Make sure to gather everything before you start baking. This way, you won’t miss an essential part of your recipe! Happy baking! {{ingredient_image_2}} Start by preheating your oven to 350°F (175°C). This step is key for even baking. Next, grab a baking sheet and line it with parchment paper. This helps the cookies not stick and makes clean up easy. In a medium bowl, combine 2 cups of all-purpose flour, 1/4 cup of unsweetened cocoa powder, 1 teaspoon of baking soda, 1/2 teaspoon of salt, 2 teaspoons of ground ginger, 1 teaspoon of ground cinnamon, and 1/2 teaspoon of ground nutmeg. Use a whisk to mix these ingredients well. This blend gives the cookies their rich flavor. In a large bowl, use an electric mixer to cream together 1/2 cup of softened unsalted butter and 1 cup of packed brown sugar. Mix at medium speed for 3-5 minutes until the mixture is light and fluffy. This step adds air, making your cookies soft. Now it’s time to add in 1/4 cup of unsulfured molasses, 1 large egg, and 1 teaspoon of pure vanilla extract. Beat this mixture until everything is smooth. Scrape the bowl's sides to mix well. This ensures every bite is full of flavor. Gradually add the dry mix to the wet mix. Use low speed on your mixer to combine them. Mix until you no longer see dry flour. This is the dough that will become your cookies. Cover the bowl with plastic wrap and refrigerate the dough for at least 30 minutes. Chilling the dough helps it firm up. This makes it easier to shape later. After chilling, take the dough out. Scoop tablespoon-sized portions and roll them into balls with your hands. Then, roll each ball in 1 cup of powdered sugar. Make sure they are well-coated for a snowy look. Place the sugar-coated dough balls on the prepared baking sheet, spacing them about 2 inches apart. Bake in the preheated oven for 10-12 minutes. The edges should be set, but the centers can stay soft. They will continue to cook as they cool. Once baked, take the baking sheet out of the oven. Let the cookies cool on the sheet for about 5 minutes. This makes them easier to move. After that, transfer them to a wire rack to cool completely. Enjoy the delightful smell as they cool! To get the perfect crinkle on your cookies, you need to coat them well in powdered sugar. This sugar layer helps create those beautiful cracks. When the cookies bake, the sugar melts and forms a nice texture. Make sure you roll the dough balls in the sugar generously. Let your cookies cool on the baking sheet for about 5 minutes. This cooling time is key. It allows the edges to set while keeping the centers soft. After that, move them to a wire rack. This step helps them firm up without becoming dry. For the best results, use a heavy baking sheet. It helps the cookies bake evenly. Lining the sheet with parchment paper is also a must. It prevents sticking and makes clean-up a breeze. An electric mixer will save you time while creaming the butter and sugar. Pro Tips Chill the Dough: Refrigerating the dough for at least 30 minutes helps to firm it up, making it easier to roll into balls and ensuring better shape during baking. Quality Ingredients: Using high-quality spices and unsulfured molasses will enhance the flavor profile of your cookies, making them more aromatic and flavorful. Watch the Baking Time: Keep an eye on your cookies as they bake; removing them when the centers are slightly underbaked will result in a soft and chewy texture. Presentation Matters: For a festive touch, dust your cookies with additional powdered sugar just before serving, or serve them with a cinnamon stick or rosemary sprig for added charm. {{image_4}} You can change the spices in your gingerbread crinkle cookies. Try adding allspice for warmth or cloves for a bold taste. Cardamom gives a unique twist too. Adjusting spices lets you create your own flavor profile. Adding chocolate chips or nuts can enhance your cookies. Dark or milk chocolate gives a rich flavor that pairs well with ginger. Chopped pecans or walnuts add crunch and depth. Mix in one cup for a delightful surprise in each bite. You can make these cookies gluten-free and vegan. Substitute all-purpose flour with almond or oat flour. Use flaxseed meal mixed with water instead of egg. Replace butter with coconut oil or vegan butter. These swaps allow everyone to enjoy gingerbread crinkle cookies. To keep your Gingerbread Crinkle Cookies fresh, store them in an airtight container. Place a piece of parchment paper between layers to avoid sticking. Keep the cookies at room temperature for up to one week. If the cookies dry out, add a slice of bread to the container. This helps keep them soft and moist. Avoid storing them in the fridge, as this can make them hard. To freeze your cookies, let them cool completely. Place them in a single layer on a baking sheet. Freeze for about one hour. Once frozen, transfer them to a freezer-safe bag. Remove as much air as possible before sealing. You can freeze the cookies for up to three months. When you're ready to enjoy them, simply thaw at room temperature. If you want your cookies warm, preheat your oven to 300°F (150°C). Place the cookies on a baking sheet and heat for about 5-7 minutes. This warms them up and brings back that fresh-baked taste. You can also microwave them for 10-15 seconds, but be careful not to overdo it. This can make them tough. Enjoy your cookies just like they were baked! To get the best crinkle, coat the dough balls well in powdered sugar. This sugar layer helps the cookies crack as they bake. Place the dough balls on a baking sheet with space between them. Bake until the edges are firm but the center is soft. This contrast leads to a nice crinkle. Yes, you can swap brown sugar for white sugar. However, brown sugar adds moisture and flavor. If you use white sugar, your cookies may be less chewy. Consider using a mix of both for a balanced taste. Store leftover cookies in an airtight container. This keeps them fresh and soft. If you live in a humid area, add a piece of bread to help maintain moisture. Always keep the container sealed to prevent drying out. These cookies can last up to one week at room temperature. If you want them to last longer, store them in the fridge. They can stay fresh for up to two weeks when stored properly. You can use honey or maple syrup as a substitute for molasses. However, the flavor will change slightly. Molasses gives a rich, deep taste that honey or syrup cannot fully replicate. If using honey or syrup, reduce the sugar slightly to balance sweetness. You now know how to make delicious cookies with a crinkle effect. We covered the ingredients, step-by-step instructions, and tips to enhance texture. Remember to chill the dough for the best results. You can also try different spices and add-ins to make them your own. Proper storage can keep your cookies fresh longer. Enjoy baking and sharing these treats!

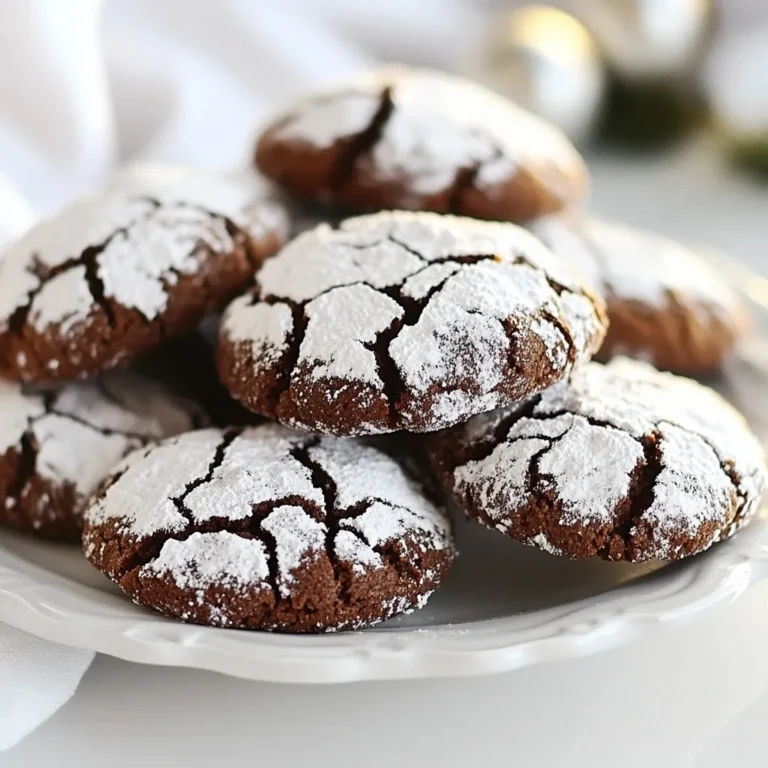
Gingerbread Crinkle Cookies Festive and Delightful Treat

- 1 pound sirloin steak, cut into bite-sized cubes - 4 tablespoons unsalted butter - 4 cloves of garlic, finely minced - 1 teaspoon fresh thyme leaves (or ½ teaspoon dried thyme) - Olive oil, salt, and pepper When making garlic butter steak bites, the main ingredients matter. The sirloin steak offers a tender and juicy bite. I recommend cutting it into bite-sized cubes for quick cooking. The unsalted butter adds richness, while the minced garlic brings a strong aroma. Fresh thyme adds a touch of earthiness. Don’t forget the olive oil, salt, and pepper for flavor! - Fresh parsley, finely chopped Garnishing with fresh parsley adds color and brightness. It also enhances the dish’s flavor, making it more appealing. A simple sprinkle can elevate your steak bites from good to great. - Large skillet - Cutting board - Knife - Cooking utensils You will need a few kitchen tools to make this dish. A large skillet helps sear the steak bites evenly. A cutting board and knife are essential for prep work. Finally, some cooking utensils will help you mix and serve. Having these tools ready makes the cooking process smooth and enjoyable. {{ingredient_image_2}} Start by cutting your sirloin steak into bite-sized cubes. Season these cubes with salt and freshly cracked black pepper. Make sure to coat each piece well. This step adds flavor, so don't skip it! After seasoning, let the steak rest for about 10 minutes. This waiting time helps the salt work its magic and flavors the meat deeply. Next, grab a large skillet and place it over medium-high heat. Pour in 1 tablespoon of olive oil. Watch for the oil to shimmer. This means it’s ready for cooking. You want that perfect heat to sear the steak bites nicely. Carefully add the seasoned steak bites to the skillet. Make sure they sit in a single layer. If you overcrowd the pan, they won’t sear well. Cook the steak bites for about 3 to 4 minutes on each side. This timing helps achieve a perfect medium-rare doneness. When they are done, remove the steak from the skillet and set them aside on a plate. Without cleaning the skillet, reduce the heat to medium. Add 4 tablespoons of unsalted butter and 4 cloves of minced garlic to the pan. Stir consistently to keep the garlic from burning. After about a minute, add 1 teaspoon of fresh thyme leaves. This will infuse a lovely flavor into the garlic butter. Once the garlic is fragrant and golden, return the cooked steak bites to the skillet. Toss the steak in the garlic butter mixture. This ensures each piece is well coated and heated through, which should take about 2 more minutes. Now, remove the skillet from the heat. Transfer the garlic butter steak bites to a serving platter. For a pop of color, garnish the dish with fresh, chopped parsley. This not only adds flavor but also makes the dish look inviting! To get your steak bites just right, timing is key. For medium-rare, sear them for about 3-4 minutes on each side. If you like your steak more done, add a minute or two. Remember, letting the steak rest for about 10 minutes after cooking is crucial. This helps the juices stay in the meat, making each bite tender and juicy. Want to kick up the flavor? Try adding a pinch of smoked paprika or a sprinkle of crushed red pepper. You can also use fresh rosemary instead of thyme for a different taste. For butter, feel free to use garlic-infused or herb-infused varieties. This can add a new twist to your steak bites and make them even more exciting. How you serve the steak bites can make a big difference. Rustic wooden boards give a cozy feel, while clean white plates add a modern touch. You can drizzle leftover garlic butter over the steak bites for extra flavor. For fun, serve them with toothpicks on the side. This makes it easy for guests to enjoy these tasty bites! Pro Tips Choose the Right Cut: For the best flavor and tenderness, select a well-marbled sirloin steak. The fat will render during cooking, enhancing the overall taste. Let it Rest: Always let your steak bites rest for a few minutes after cooking. This allows the juices to redistribute, resulting in a juicier bite. Control the Heat: Cooking over medium-high heat will give you a nice sear without overcooking the inside. Keep an eye on the steak bites to prevent them from becoming tough. Enhance the Flavor: For added depth of flavor, consider marinating the steak cubes in a mixture of olive oil, garlic, and herbs for at least 30 minutes before cooking. {{image_4}} You can switch up your steak cuts for more flavor. Ribeye is a great choice. It has rich marbling that adds taste. Filet mignon is another option. It’s tender and melts in your mouth. Both cuts work well for steak bites. Feel free to experiment with your favorites! Adding herbs or spices can change the flavor game. Try rosemary for a fragrant touch. Paprika adds a nice smokiness. You can even mix in some mushrooms or bell peppers. These add texture and taste. Sauté them in the garlic butter for more depth. The options are endless! Want a low-carb or paleo-friendly meal? Choose a leaner steak and skip the butter. Use olive oil instead for cooking. This keeps it light and healthy. For gluten-free needs, this recipe is already safe. Just make sure all ingredients are gluten-free. Enjoy your tasty bites without worry! To keep your garlic butter steak bites fresh, use airtight containers. Glass or plastic containers work well. Store them in the fridge for up to three days. This helps keep the flavors locked in. When it's time to enjoy your leftovers, use a skillet. Heat the skillet on medium heat and add a little oil or butter. This keeps the steak juicy. You can also use a microwave. Just be careful not to overcook them. Heat in short bursts to keep them tender. If you want to save some for later, freezing is a great option. First, let the steak bites cool down. Then, place them in a freezer-safe bag. Remove as much air as possible. For best results, defrost them in the fridge overnight before reheating. This way, they stay flavorful and delicious. To check if your steak bites are cooked, look for these signs: - Color: It should be brown on the outside and pink inside for medium-rare. - Texture: Press the steak; it should feel firm but still have some give. - Temperature: Use a meat thermometer. Aim for 130°F for medium-rare. Cooking time matters. For medium-rare, cook about 3-4 minutes on each side. Adjust time for your preferred doneness. Yes, you can use frozen steak! Just follow these steps: - Thaw: Ensure the steak is fully thawed before cooking. The best way is to leave it in the fridge overnight. - Cook: If you're short on time, you can thaw it in cold water for about an hour. Be sure to season it well before cooking. Cooking frozen steak can lead to uneven cooking. So, always thaw for best results. These steak bites taste great with several sides: - Mashed Potatoes: Creamy and buttery, they balance the flavors. - Roasted Vegetables: Carrots, broccoli, or asparagus add color and nutrition. - Garlic Bread: Perfect for soaking up the garlic butter sauce. - Salad: A fresh side salad can lighten the meal. Choose sides that match the rich flavors of the steak for a complete meal. Burnt garlic can ruin your dish. Here are tips to avoid that: - Control Heat: Keep your pan at medium heat when adding garlic. - Stir Often: Move the garlic around in the pan to prevent it from sitting too long. - Timing: Add garlic after the steak bites are cooked. This way, it only cooks for a short time. Golden garlic adds flavor, but burnt garlic tastes bitter. Yes, you can prep these steak bites ahead. Here’s how: - Cook: Prepare the steak bites and garlic butter as usual. - Store: Let them cool, then place in an airtight container in the fridge. They can last up to three days. - Reheat: When ready, warm in a skillet over low heat. Add a little butter or oil to keep them moist. This method saves time on busy days while keeping flavors intact. You've learned how to make delicious Garlic Butter Steak Bites. We covered the key ingredients, kitchen tools, and simple steps. Remember to let the steak rest for best flavor. Explore variations to keep meals fresh and fun. Store leftovers properly to enjoy later, and use the reheating tips to maintain taste. With these easy recipes and tricks, you can impress anyone at your table. Enjoy your cooking journey!

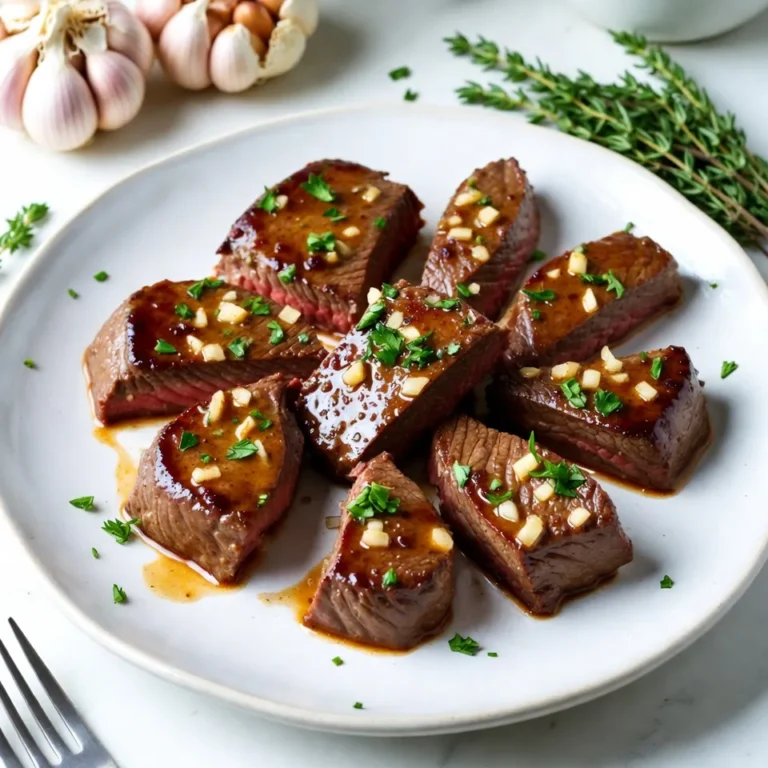
Savory Garlic Butter Steak Bites Easy and Flavorful Treat

For this easy chicken lo mein, you need: - 8 oz lo mein noodles - 1 lb boneless, skinless chicken breast, thinly sliced - 1 cup broccoli florets - 1 bell pepper, sliced (red or green) - 1 cup snap peas - 3 cloves garlic, minced - 2 tablespoons fresh ginger, minced - 3 tablespoons soy sauce - 2 tablespoons oyster sauce (or vegetarian alternative) - 1 tablespoon sesame oil - 2 tablespoons vegetable oil - Salt and pepper to taste - Green onions, chopped (for garnish) You can swap out some ingredients for what you have on hand: - Noodles: Use spaghetti or rice noodles if you can't find lo mein. - Chicken: Swap chicken for shrimp, tofu, or beef. - Veggies: Use any veggies you like, such as carrots or zucchini. - Soy Sauce: Coconut aminos can replace soy sauce for a soy-free option. - Oyster Sauce: Use hoisin sauce for a sweeter flavor. Garnish makes your dish pop! Here are some great options: - Green Onions: Chopped green onions add freshness. - Cilantro: Fresh cilantro can brighten the dish. - Sesame Seeds: A sprinkle of toasted sesame seeds adds crunch. - Chili Flakes: If you like heat, add chili flakes on top. These ingredients and tips will help you create a delicious chicken lo mein that suits your taste! {{ingredient_image_2}} To start, boil a large pot of water. Once the water is bubbling, add the 8 oz of lo mein noodles. Cook them according to the package instructions. You want them tender but still firm to the bite. After cooking, drain the noodles in a colander. Set them aside so excess water can drain off. Next, heat 1 tablespoon of vegetable oil in a large skillet over medium-high heat. Once hot, add the 1 lb of thinly sliced chicken breast. Season the chicken with salt and pepper. Sauté the chicken for 5 to 7 minutes until fully cooked. Look for a golden-brown color. After cooking, take the chicken out and place it on a plate. Now, with the same skillet, add the remaining tablespoon of vegetable oil. Toss in 3 cloves of minced garlic and 2 tablespoons of minced ginger. Stir quickly to avoid burning. Add 1 cup of broccoli florets, 1 sliced bell pepper, and 1 cup of snap peas. Stir-fry the veggies for about 3 to 4 minutes. They should stay tender-crisp and bright. Return the cooked chicken to the skillet with the vegetables. Then, add the drained lo mein noodles. Pour in 3 tablespoons of soy sauce, 2 tablespoons of oyster sauce, and 1 tablespoon of sesame oil. Use tongs to gently toss everything for 2 to 3 minutes. Ensure all ingredients are mixed well and heated through. Scoop the chicken lo mein into serving bowls. For a beautiful touch, garnish each bowl with chopped green onions. They add a fresh look and flavor. For extra crunch, sprinkle some toasted sesame seeds on top or serve with pickled vegetables. Enjoy your delicious meal! To cook chicken well, start with thin slices. Thin slices cook faster and stay juicy. Heat oil in your skillet until hot. Add the chicken and don’t crowd the pan. This helps it brown evenly. Cook for about 5-7 minutes. Look for a golden color. Use a meat thermometer to check for doneness. The chicken should reach 165°F. Remove the chicken and let it rest a bit. This keeps it tender. For great vegetables, use high heat. This keeps them crisp and colorful. Start with garlic and ginger. Sauté them briefly, just until fragrant. Add your vegetables quickly. Broccoli, bell pepper, and snap peas work well. Stir them often for even cooking. Aim for about 3-4 minutes until they're tender-crisp. They should still have a bright color. This step adds flavor and keeps the dish fresh. Adjusting sauce levels can change your dish. Start with the base amounts in the recipe. You can add more soy or oyster sauce for extra flavor. If you like it spicy, include some chili paste. Taste as you go. This helps you find the right balance. Remember, you can always add more, but it’s hard to take away! Enjoy experimenting to make it your own. Pro Tips Prep Your Ingredients: Before you start cooking, have all your ingredients prepped and ready to go. This will streamline the cooking process and ensure you don’t miss any steps. Use High Heat: When stir-frying, make sure your skillet or wok is hot. High heat helps to quickly cook the ingredients, preserving their color and crunch. Customize Your Veggies: Feel free to swap out or add your favorite vegetables based on what you have on hand. Carrots, mushrooms, or baby corn all work great in lo mein. Leftover Storage: If you have leftovers, store them in an airtight container in the fridge. Reheat in a skillet for the best texture rather than using a microwave. {{image_4}} For a vegetarian or vegan chicken lo mein, simply swap the chicken for tofu. Tofu adds great protein and can soak up the flavors well. Use firm or extra-firm tofu for the best texture. Press the tofu to remove excess water, then cube it and sauté until golden. For the sauces, make sure to use a vegan oyster sauce or skip it entirely. You can also add more veggies like mushrooms or zucchini for extra flavor and nutrition. If you want to change the protein, there are many options. Shrimp and beef both work nicely in this dish. For shrimp, cook them quickly until they turn pink. For beef, thinly slice sirloin or flank steak and sauté until browned. You can also use cooked chicken leftovers if you have any. This recipe is flexible and lets you use what you have at home. You can mix up the vegetables to suit your taste. Try using bok choy, carrots, or baby corn for a colorful dish. Snow peas can be a great addition for that sweet crunch. You can even add some spinach or kale at the end for a boost of greens. The key is to keep the veggies bright and crisp, enhancing both flavor and texture in your chicken lo mein. To store leftover chicken lo mein, let it cool first. Place it in an airtight container. This helps keep it fresh. You can store it in the fridge for up to three days. Make sure to label the container with the date. This way, you know when to eat it. Reheating chicken lo mein is simple. You can use a microwave or a skillet. If using a microwave, place it in a safe bowl. Cover it with a damp paper towel to keep it moist. Heat for 1-2 minutes, stirring halfway through. If using a skillet, add a splash of water. Heat over medium-low heat, stirring often, until hot. This keeps the noodles from drying out. Freezing chicken lo mein is a great way to save it for later. Place the cooled dish in a freezer-safe container. Make sure to leave some space for expansion. It can last up to three months in the freezer. When you're ready to eat, transfer it to the fridge to thaw overnight. Reheat it as mentioned above for the best taste. Yes, you can use other types of noodles. Egg noodles or rice noodles work well too. Just cook them according to the package. Adjust the cooking time to keep them firm. This way, they won't turn mushy in your dish. To add heat, try adding red pepper flakes. Sriracha sauce is also a great choice. You can add these during cooking or at the end. Start with a small amount, then taste. Adjust to your spice level. Fresh jalapeños or chili oil also work well. For a gluten-free dish, swap the soy sauce with tamari. Tamari gives a similar taste without gluten. Choose gluten-free noodles like rice noodles or zucchini noodles. Always check labels to ensure no gluten is present. This way, everyone can enjoy your Chicken Lo Mein! This article covered the key steps for making Chicken Lo Mein. We explored each ingredient, from essential items to tasty herb garnishes. I shared tips for cooking the noodles and chicken perfectly. You learned how to sauté vegetables and combine everything for great flavor. Feel free to customize the dish with different proteins or veggies. Store leftovers well, so you can enjoy them later. Remember, this meal is adaptable and fun to make! Enjoy creating your own delicious version of Chicken Lo Mein.

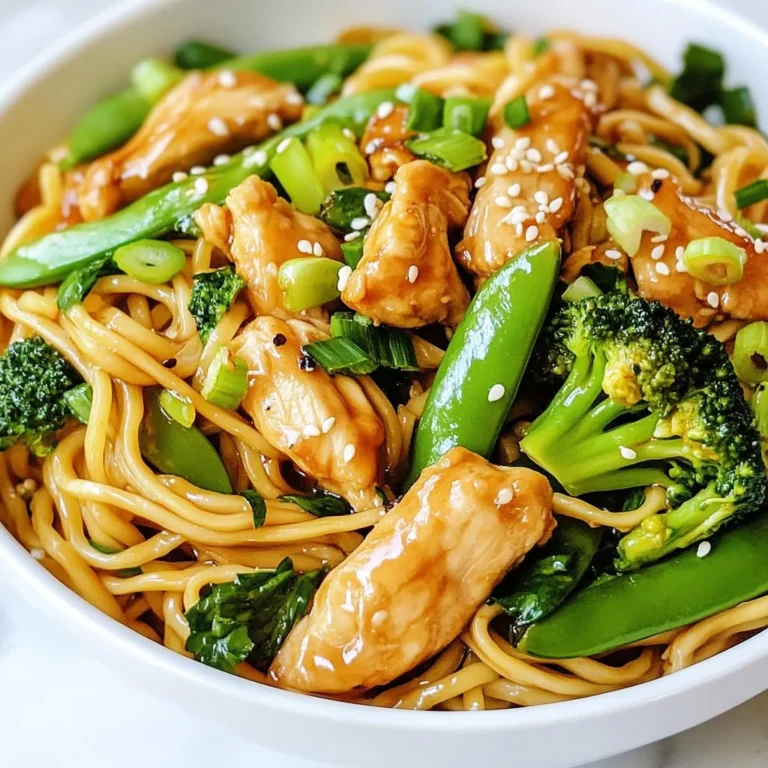
Easy Chicken Lo Mein Flavorful and Quick Dinner Recipe

To make the best white chocolate raspberry scones, gather these items: - 2 cups all-purpose flour - 1/4 cup granulated sugar - 1 tablespoon baking powder - 1/2 teaspoon baking soda - 1/4 teaspoon salt - 1/2 cup unsalted butter, chilled and diced into small cubes - 3/4 cup heavy cream - 1 teaspoon vanilla extract - 1/2 cup white chocolate chips - 1 cup fresh raspberries, lightly tossed in flour - 1 egg, beaten (for egg wash) - Optional: extra granulated sugar for sprinkling on top You can swap some ingredients if needed. Here are a few simple options: - Use whole wheat flour for a healthier twist. - Replace heavy cream with milk or a plant-based milk for a lighter texture. - If you don’t have white chocolate chips, try dark or milk chocolate instead. - For a dairy-free option, use vegan butter and coconut cream. - If fresh raspberries are unavailable, frozen ones work too; just thaw and drain them first. Fresh raspberries bring flavor and color to your scones. Here are tips to select the best ones: - Look for berries with a deep red color and a plump shape. - Check for any signs of mold or squished berries; they should be firm to the touch. - Smell the raspberries; they should have a sweet, fruity aroma. - Buy them in small containers to avoid damage during transport. - Use them within a few days for the best taste, or store them in the fridge. {{ingredient_image_2}} Start by preheating your oven to 400°F (200°C). This ensures the scones bake evenly. While the oven heats, line a baking sheet with parchment paper. This step keeps the scones from sticking. It's a simple trick that makes cleanup easier. In a large bowl, whisk together the dry ingredients. Combine 2 cups of all-purpose flour, 1/4 cup of granulated sugar, 1 tablespoon of baking powder, 1/2 teaspoon of baking soda, and 1/4 teaspoon of salt. Mix these well until they are evenly blended. This mixture serves as the base for your scones. Next, add in 1/2 cup of chilled, diced unsalted butter. Use a pastry cutter or your fingers to mix it into the dry ingredients. You want the butter to form small crumbs. This makes the scones flaky. In a separate bowl, whisk together 3/4 cup of heavy cream and 1 teaspoon of vanilla extract. Slowly pour this creamy mix into the dry ingredients. Stir gently until the dough comes together. Avoid overmixing, as this can make the scones tough. Finally, fold in 1/2 cup of white chocolate chips and 1 cup of fresh raspberries that you lightly tossed in flour. Be gentle so the raspberries do not break apart. To get the best texture in your scones, start with cold butter. The butter should be firm and diced into small cubes. This helps create light, flaky layers. Mix the butter into the flour until you see pea-sized bits. Don't overmix the dough when adding cream; it should come together but still be a bit rough. This makes your scones tender, not tough. One mistake is overworking the dough. When you mix too much, the scones can become hard. Another error is not measuring your flour correctly. Too much flour makes the dough dry. Always spoon the flour into your measuring cup, then level it off. Lastly, don’t skip the egg wash. It gives your scones a nice golden color. For even baking, make sure your oven is preheated. This ensures the scones cook through without burning. Use parchment paper on your baking sheet; it helps prevent sticking. Space the scones evenly on the sheet, so they have room to expand. If you bake in batches, keep the second batch in the fridge until you are ready. This keeps them cold and helps maintain texture. Pro Tips Chill Your Ingredients: Keeping your butter and cream cold will help create flaky layers in your scones. Don’t Overmix: Mix the dough until just combined. Overmixing can result in tough scones. Use Fresh Raspberries: Fresh raspberries add vibrant flavor. If using frozen, make sure to toss them in flour to prevent them from sinking. Experiment with Flavors: Try adding lemon zest or almond extract for a different twist on these scones! {{image_4}} You can switch up the raspberries for other fruits. Strawberries, blueberries, or blackberries work well. Just be sure to toss them in flour first. This helps them stay whole in the dough. Each fruit brings its own flavor. Strawberries add a sweet touch, while blueberries give a fresh burst. You can also mix fruits for a fun twist! If white chocolate isn’t your thing, you have options. Dark chocolate chips are a great substitute. They add a rich flavor that pairs nicely with the tartness of the fruit. Milk chocolate can also work if you want a sweeter taste. You can even try chocolate chunks for a more rustic feel. Each option changes the scone's taste and makes it your own. You can jazz up your heavy cream for extra flavor. Try using almond extract instead of vanilla for a nutty twist. Coconut cream adds a tropical vibe that delights the senses. You can even steep herbs like rosemary or mint in the cream for a unique touch. Each variation brings a new layer of flavor to your scones. Get creative and find your favorite! To store leftover scones, let them cool completely. Place them in an airtight container. This keeps them fresh for up to two days. If you want to keep them longer, consider freezing. For freezing, wrap each scone in plastic wrap. Place the wrapped scones in a freezer bag. They can last up to three months in the freezer. When ready to eat, thaw them in the fridge overnight. To reheat scones, preheat your oven to 350°F (175°C). Place the scones on a baking sheet. Heat for about 10 minutes. This warms them up and restores their crispy edges. You can also microwave them for about 20 seconds for a quick option. Yes, you can make these scones ahead of time. You can prepare the dough and shape it into wedges or rounds. Then, wrap the shaped scones tightly in plastic wrap. Store them in the fridge for up to 24 hours. When you’re ready to bake, just brush them with egg wash, sprinkle sugar, and bake as directed. These scones pair well with many items. Here are some tasty ideas: - Freshly brewed coffee or tea - Whipped cream for a creamy touch - A dollop of clotted cream for richness - A light fruit salad to balance sweetness Serving these with a light drink or cream enhances their flavors. To keep your scones moist, follow these tips: - Use cold butter. This keeps the scones flaky. - Don’t overmix the dough. Mix just until combined. - Add enough cream. The dough should feel moist but not sticky. - Bake at the right temperature. A hot oven helps them rise well. These steps help ensure your scones are tender and delicious. In this blog post, we explored the key ingredients and steps for making delicious white chocolate raspberry scones. We discussed how to choose fresh raspberries and shared tips for baking success. We also covered fun variations and storage tips to keep your scones tasty. Making scones can be simple and enjoyable with the right knowledge. Remember to experiment with flavors and prevent common mistakes for the best results. Happy baking!

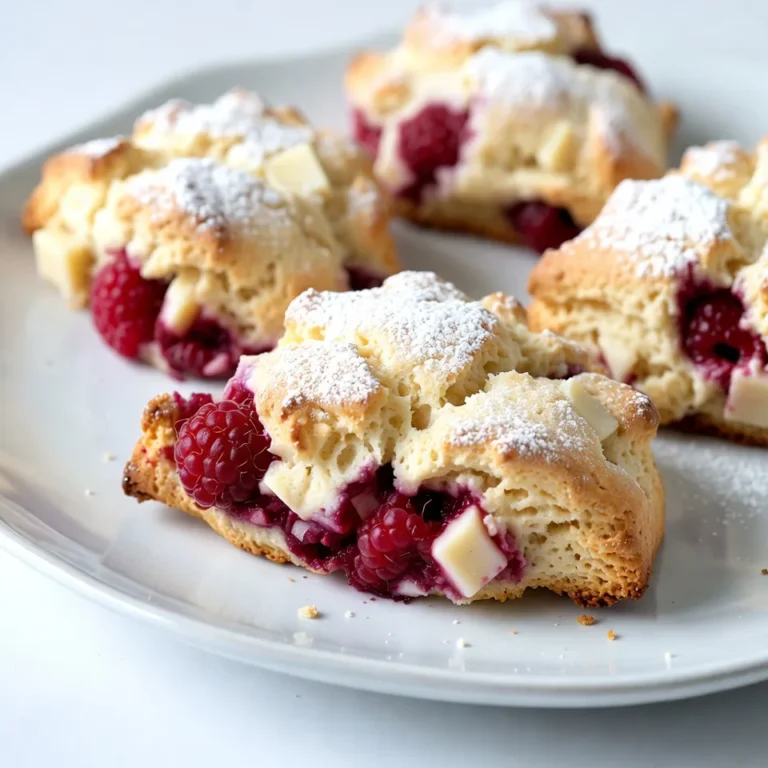
White Chocolate Raspberry Scones Tasty and Easy Recipe

To make creamy mushroom stroganoff, you will need: - 300g wide egg noodles (or your preferred pasta) - 400g mixed mushrooms (like button, cremini, or portobello), sliced - 1 medium onion, finely chopped - 2 cloves garlic, minced - 1 tablespoon olive oil - 1 tablespoon vegan butter or regular butter - 1 cup vegetable broth - 1 cup sour cream (or cashew cream for a vegan option) - 1 tablespoon soy sauce - 1 teaspoon Dijon mustard - 1 teaspoon paprika - Salt and freshly ground black pepper to taste - Fresh parsley, chopped (for garnish) If you want to make this dish suit your diet: - Use gluten-free pasta instead of egg noodles for a gluten-free option. - Swap sour cream with cashew cream if you prefer a vegan choice. - Replace soy sauce with tamari for a gluten-free alternative. - Use coconut oil instead of vegan butter for a dairy-free version. While wide egg noodles are classic, you have options: - Fettuccine gives a nice, rich feel. - Penne can hold the sauce well. - Spaghetti offers a fun twist. - Try zoodles (zucchini noodles) for a low-carb option. Each of these pasta types pairs well with the creamy mushroom sauce. Choose what you like best! {{ingredient_image_2}} Start by filling a large pot with water. Add a lot of salt to the water. Bring it to a boil over high heat. Once boiling, add 300g of wide egg noodles. Cook them according to the package directions until they are al dente. When they are ready, drain the noodles in a colander. If you want, toss them with a bit of olive oil to keep them from sticking. In a large skillet, heat 1 tablespoon of olive oil and 1 tablespoon of vegan butter or regular butter over medium heat. Watch for it to shimmer. Add 1 medium onion that is finely chopped. Sauté it for 3-4 minutes until it is soft and clear. Then, add 2 cloves of minced garlic. Cook for another minute, stirring often so it does not burn. Now, add 400g of sliced mixed mushrooms to the skillet. You can use button, cremini, or portobello mushrooms. Cook them for 5-7 minutes until they are tender and brown. They will give off moisture, which adds flavor. Next, pour in 1 cup of vegetable broth and 1 tablespoon of soy sauce. Stir in 1 teaspoon of Dijon mustard and 1 teaspoon of paprika. Allow the mixture to simmer for 5 minutes. This helps the flavors come together. Lower the heat to a gentle simmer. Add 1 cup of sour cream or cashew cream for a vegan option. Mix it well until it is fully combined. Warm the sauce gently, but do not let it boil. Taste the sauce. Add salt and freshly ground black pepper to your liking. Now, add the drained noodles to the skillet. Toss them gently in the sauce to coat them well. Heat everything together for 2-3 minutes. When you are ready to serve, plate the creamy stroganoff into bowls. Garnish each bowl with chopped fresh parsley. This adds color and a fresh taste. Enjoy your rich and cozy meal! To get the best mushrooms, start with fresh ones. Slice them evenly for uniform cooking. Heat your skillet before adding oil. This helps the mushrooms brown nicely. Cook them in batches if your skillet is small. Overcrowding makes them steam instead of brown. Aim for a golden color, which brings out their flavor. For a rich and creamy sauce, start with sour cream. If you want a vegan option, use cashew cream. Stir it in slowly to avoid curdling. Keep the heat low when mixing in the cream. This ensures a smooth texture. You can also mix in a little broth to thin it out if needed. Season as you go for the best results. Use salt and freshly ground black pepper to enhance flavors. A splash of soy sauce adds depth. Don’t forget to taste the sauce before serving. Adjust seasoning if it feels flat. A pinch of paprika can add warmth, while fresh parsley gives a nice finish. Pro Tips Use Fresh Mushrooms: Fresh mushrooms will give your stroganoff a better texture and flavor compared to canned varieties. Always opt for a mix of different mushrooms for depth of flavor. Adjust Creaminess: If you prefer a creamier sauce, feel free to increase the amount of sour cream or cashew cream. You can also add a splash of heavy cream if you're not keeping it vegan. Season Gradually: Taste your sauce as you go! Adding salt and pepper incrementally allows you to achieve the perfect seasoning without overpowering the dish. Garnish for Flavor: Don’t skip the parsley garnish! It not only adds a pop of color but also enhances the overall flavor profile of the dish. {{image_4}} You can make a vegan version easily. Just swap sour cream for cashew cream. This keeps the dish creamy and rich without dairy. Use vegetable broth to ensure all flavors stay plant-based. The mushrooms provide a hearty taste that everyone will love. To make this dish gluten-free, choose gluten-free pasta. There are many great options that mimic regular noodles. You can also use zucchini noodles for a lighter twist. The sauce remains the same, keeping that rich flavor intact. Want to add protein? Tofu and seitan are both great choices. Dice the tofu and pan-fry it until golden. This adds a nice texture to the dish. Seitan can also add a meaty bite, enhancing the overall flavor. Both options make your meal filling and satisfying. To keep your creamy mushroom stroganoff fresh, let it cool first. Transfer it to an airtight container. Store it in the fridge for up to three days. Make sure the lid seals well to prevent any odors from other foods. When it's time to enjoy your leftovers, take them out of the fridge. Place the stroganoff in a skillet over medium heat. Stir gently as it warms up. You can add a splash of vegetable broth or water if it seems too thick. Heat it until it’s hot throughout, usually about 5 to 7 minutes. You can freeze this dish for later! Place cooled stroganoff in a freezer-safe container. It can last up to three months in the freezer. To thaw, move it to the fridge for a few hours or overnight. Reheat it as described above after thawing. This way, you can enjoy a delicious meal anytime! Yes, you can use dried mushrooms in this recipe. Dried mushrooms have a strong flavor. To use them, soak them in warm water for about 20 minutes. Drain them and chop them before adding to the dish. This gives your stroganoff a rich taste. If you need a substitute for sour cream, try cashew cream. Blend soaked cashews with water until smooth. You can also use Greek yogurt for a tangy touch. Both options work well and keep the dish creamy. Absolutely! Creamy mushroom stroganoff is great for meal prep. You can cook a big batch and store it in the fridge for up to five days. Make sure to keep the noodles and sauce separate until you're ready to eat. This keeps everything fresh. To boost the flavor, add more herbs like thyme or rosemary. A splash of white wine can also add depth. For a spicy kick, toss in some crushed red pepper flakes. Each of these adds a unique twist to your stroganoff. This blog post explored a tasty mushroom noodle dish. We covered ingredients, cooking steps, and storage tips. You learned how to pick pasta and modify the recipe for different diets. I shared ways to make it vegan or gluten-free and how to cook mushrooms just right. Remember, cooking should be fun. Don’t hesitate to try your own twists. Enjoy your meal and share the joy!

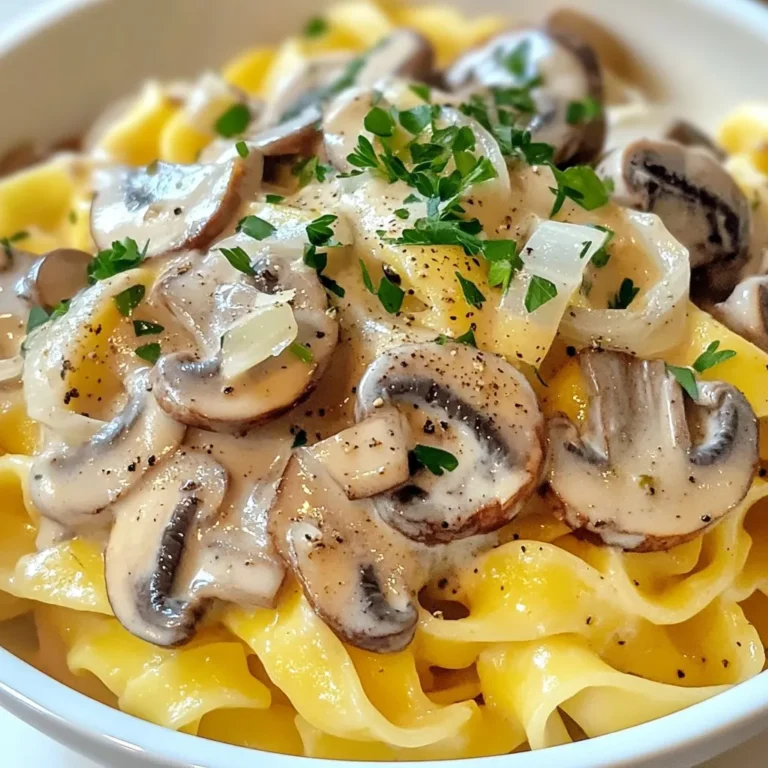
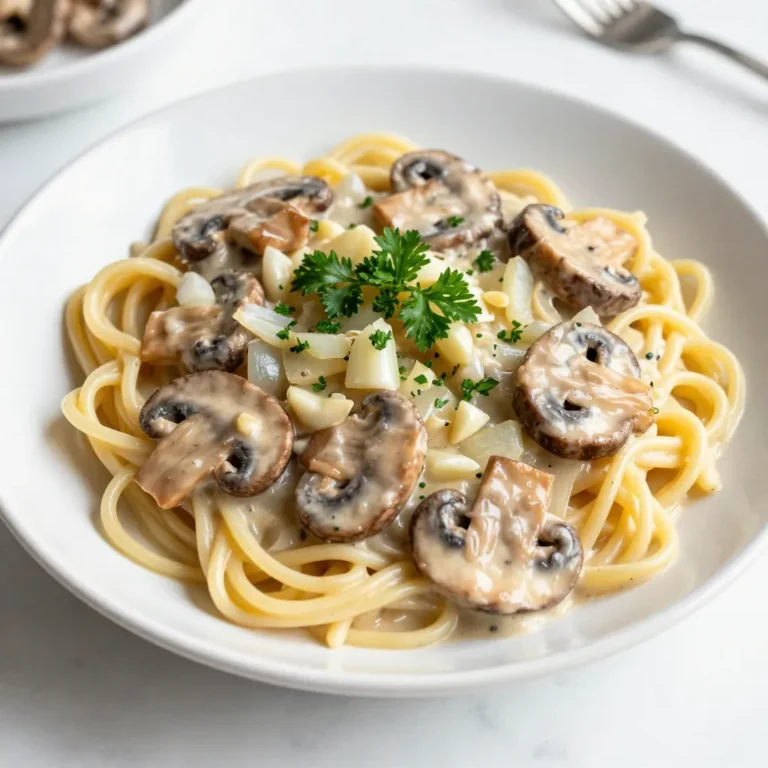
Creamy Mushroom Stroganoff Rich and Cozy Recipe

To make a Butterfinger Lush Dessert, you need specific ingredients. Each one plays a key role in making this treat delicious. Here’s what you’ll need: - 1 cup crushed Butterfinger candy bars (about 3 bars) - 1 ½ cups graham cracker crumbs - ½ cup unsalted butter, melted - 1 (8 oz) package cream cheese, softened - 1 cup powdered sugar - 1 (12 oz) container whipped topping (like Cool Whip), thawed - 1 (3.4 oz) package instant vanilla pudding mix - 2 cups cold milk - Additional crushed Butterfinger for garnish Each ingredient adds flavor and texture. The crushed Butterfinger candy bars give a sweet crunch. Graham cracker crumbs form the base. The melted butter helps bind the crust. Cream cheese adds creaminess, while powdered sugar sweetens the mix. Whipped topping makes it light. Instant vanilla pudding adds richness. Finally, the extra Butterfinger on top makes it look and taste great! {{ingredient_image_2}} To start, gather your graham cracker crumbs and melted butter. In a medium mixing bowl, combine these two ingredients. Mix them well until all the crumbs are coated in butter. Then, press this mixture firmly into a greased 9x13-inch baking dish. Make sure it is even and compact. This forms a solid base for your dessert. Next, take your softened cream cheese and place it in a large bowl. Using an electric mixer, beat the cream cheese until it is smooth. Slowly add the powdered sugar while mixing. Keep mixing until everything is well combined. Now, gently fold in one cup of thawed whipped topping. This will make the cream cheese layer light and fluffy. Spread this mixture evenly over the crust using a spatula. In another bowl, whisk the instant vanilla pudding mix with two cups of cold milk. Keep whisking for about two minutes or until it thickens. Once thick, carefully spread this pudding layer over the cream cheese layer. Use a spatula to smooth it out evenly. Now, take the remaining whipped topping and carefully spread it over the pudding layer. Ensure it covers the entire surface. This adds a nice, creamy top to your dessert. Finally, sprinkle the crushed Butterfinger candy bars evenly over the top. This adds a fun crunch and sweet flavor. Cover the baking dish tightly with plastic wrap and refrigerate it for at least four hours, or overnight for the best results. This chilling time helps the dessert set and lets the flavors blend beautifully. What are the benefits of overnight chilling? Chilling overnight makes the dessert taste better. The layers blend well, and the flavors mix nicely. It also helps the dessert set firmly, making it easier to cut. How can I speed up the chilling process? If you need a faster chill, use a freezer. Place the dessert in the freezer for about 1 to 2 hours. Just keep an eye on it. You don’t want it to freeze solid! What are the suggested serving styles? Cut the dessert into squares and place each on a nice plate. This way, it looks lovely for guests. You can also serve it in cups for a fun twist! How can I add chocolate syrup for elegance? Drizzle chocolate syrup on the plate before adding the dessert. This adds a nice touch. Top with a dollop of whipped topping and a sprinkle of crushed Butterfinger for a great look. What happens if I overmix the cream cheese? Overmixing can make the cream cheese too runny. This can ruin the fluffy texture you want. Mix it just until smooth and creamy for the best result. Why is it important to allow layers to set properly? If you skip the setting time, the layers won’t hold together well. This can lead to a messy dessert. Allow each layer to set before adding the next to keep it neat and tasty. Pro Tips Chill for Best Results: Allow the dessert to chill overnight for optimal texture and flavor melding. Use Fresh Ingredients: Ensure your cream cheese and whipped topping are fresh for the best taste and texture. Customize Your Toppings: Feel free to add nuts or different candy bar pieces for a unique twist on the flavor. Serve with Style: Drizzle chocolate syrup and add extra whipped topping for a beautiful presentation. {{image_4}} You can easily make Butterfinger Lush Dessert a bit healthier. Start by using low-fat cream cheese. This swap cuts fat but keeps the creamy texture. You can also use sugar-free pudding mix. This change reduces sugar without sacrificing flavor. Both options let you enjoy this treat with less guilt. If you want to add more flavor, try mixing in peanut butter. Just blend a bit of creamy peanut butter into the cream cheese layer. This gives a rich taste that pairs well with Butterfinger. You can also use other candy bars as toppings. Snickers or Milky Way would add fun twists. Feel free to experiment and find your favorite combo. Serving this dessert in individual cups is a fun idea. Each person gets their own portion, making it easy to share. You can also layer the dessert in a trifle dish. This method shows off the layers beautifully and makes a stunning centerpiece. No matter how you serve it, this dessert will impress your guests. To keep your Butterfinger Lush Dessert fresh, store it in the fridge. Use airtight containers to prevent it from absorbing other smells. Make sure the dessert is covered tightly with plastic wrap if you don’t have a container. This helps keep the layers nice and creamy. You can freeze Butterfinger Lush Dessert, but it’s best to do this before adding the topping. Wrap the dessert well in plastic wrap and then in foil. This will keep it fresh for up to two months. When you’re ready to enjoy it, thaw it in the fridge overnight. Avoid thawing at room temperature, as this can make it soggy. In the fridge, this dessert can last about 4 to 5 days. Always check for signs that it has gone bad. If you see any mold or it smells off, it’s best to throw it away. If the layers start to separate, that’s another sign it might be time to say goodbye. Enjoy this treat while it’s at its best! Yes, you can make this dessert in advance. I recommend prepping it the night before. This gives time for flavors to blend and layers to set. The total prep time is about 20 minutes. After that, chill for at least 4 hours. If you want the best taste, let it sit overnight. If you don’t have graham crackers, you can use vanilla wafers or digestive biscuits. Both options give a sweet and crunchy base. Just crush them the same way you would graham crackers. You could also try crushed pretzels for a salty twist. To keep your dessert firm, ensure the crust is compact. Press it down well in the dish. Use a good quality whipped topping; this keeps moisture in check. Also, let it chill completely before serving. This helps all the layers bond nicely. Absolutely! You can switch the vanilla pudding for chocolate or butterscotch. Each flavor adds a unique twist to your dessert. For a fun mix, try adding peanut butter pudding for a richer taste. Enjoy experimenting with flavors and find your favorite! This Butterfinger Lush Dessert is a fun treat that's easy to make. We covered the key ingredients, step-by-step instructions, and helpful tips. Remember to chill it overnight for the best flavor. You can add your twist with variations like using peanut butter or serving in cups. Proper storage keeps it fresh, while knowing the signs of spoilage is essential. With these tips, you’re set to impress everyone with your dessert. Enjoy your creation and share it with friends!

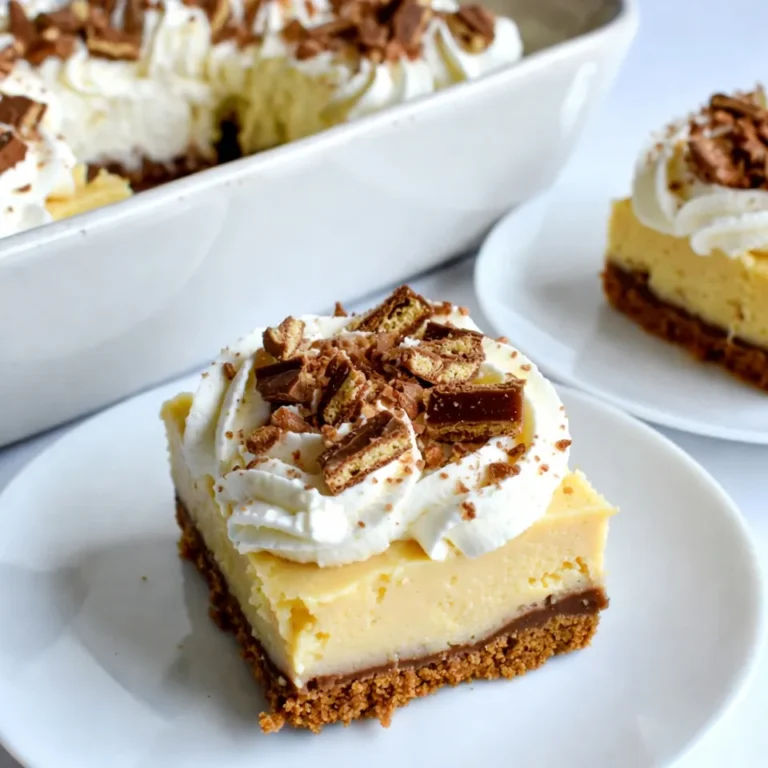
Butterfinger Lush Dessert Delightful No-Bake Treat

- 4 salmon fillets (approx. 6 ounces each) - 1/4 cup honey - 3 tablespoons low-sodium soy sauce - 4 cloves garlic, finely minced - 1 tablespoon fresh ginger, grated - 1 tablespoon olive oil - Salt and black pepper, to taste - 2 green onions, thinly sliced (for garnish) - Sesame seeds, toasted (for garnish) Salmon is rich in omega-3 fatty acids. This is great for heart health. The honey gives a sweet touch. It balances well with the salty soy sauce. Garlic adds depth and flavor, making it fragrant. Fresh ginger brightens the dish and adds a spicy kick. Low-sodium soy sauce keeps it healthy. It still provides that umami taste we love. Olive oil helps cook the salmon while adding richness. Green onions and sesame seeds add color and crunch. They make the dish visually appealing and tasty. If you're allergic to fish, try chicken or tofu instead. Both absorb flavors well. For the honey, maple syrup is a good choice for a similar sweetness. Use tamari if you need a gluten-free option. You can replace garlic with shallots for a milder flavor. If ginger is not available, ground ginger works too, but use less. Always check for allergies to any ingredient before cooking. This way, you can enjoy the meal safely! {{ingredient_image_2}} To make the marinade, grab a medium bowl. In that bowl, whisk together the honey, low-sodium soy sauce, garlic, and ginger. This mix gives your salmon a sweet and savory flavor. Whisk until the ingredients blend well and the mixture is smooth. This step is key for a great glaze. Next, take your salmon fillets. Place them in a shallow dish. Make sure they sit in a single layer. Pour the marinade over the salmon, coating each fillet well. Cover the dish and put it in the fridge. Let it marinate for at least 30 minutes. If you have more time, let it sit for up to 1 hour. The longer it sits, the better the taste. Now, preheat your oven to 400°F (200°C). This ensures it reaches the right heat while the salmon marinates. In an oven-safe skillet, heat olive oil over medium-high heat. Once the oil shimmers, take the salmon out of the marinade. Place the fillets skin-side down in the skillet. Sear them for about 3-4 minutes. You want the skin crispy and golden. After this, gently flip the salmon using a spatula. Pour the reserved marinade over the top. Transfer the skillet to the oven and bake for 8-10 minutes. The salmon is ready when it flakes easily with a fork. For a nice glaze, switch your oven to broil for the last 2-3 minutes. This step helps caramelize the glaze, making it shiny and tasty. Watch it closely to prevent burning. Once done, remove the skillet from the oven. Garnish your salmon with sliced green onions and toasted sesame seeds. Enjoy your delicious dish! To make salmon just right, focus on the cooking time. Salmon needs about 12 to 14 minutes total. First, sear it for 3 to 4 minutes on medium-high heat. Then, bake it for 8 to 10 minutes. The salmon should flake easily with a fork when it’s done. Use a meat thermometer to check for doneness. The ideal temperature is 145°F (63°C). Marinating is key to great flavor. Use a shallow dish for the salmon fillets. Make sure they are in a single layer. Pour the marinade over them so they are well coated. Allow the salmon to marinate for at least 30 minutes. For a stronger taste, let it marinate for up to 1 hour. Keep it in the fridge during this time. Using the right tools makes cooking easier. You will need an oven-safe skillet for this recipe. A spatula is important for flipping the salmon without breaking it. Use a whisk for mixing the marinade well. A meat thermometer helps check if the salmon is cooked through. Having these tools ready will make your cooking experience smoother and more fun. Pro Tips Marinate Longer for Flavor: Allow the salmon to marinate for up to 1 hour for a more intense and flavorful glaze. Use Fresh Ingredients: Fresh garlic and ginger enhance the overall taste of the dish, making it more aromatic and delicious. Check Salmon Doneness: The salmon is perfectly cooked when it flakes easily with a fork and is opaque in the center. Broil for Extra Caramelization: Broiling for the last few minutes can add a beautiful glaze, but watch closely to prevent burning. {{image_4}} You can easily change the taste of honey garlic glazed salmon. Here are some ideas: - Add citrus juice: Squeeze fresh lemon or lime juice into the marinade. - Use herbs: Add fresh herbs like cilantro or basil for a fresh twist. - Spice it up: Mix in red pepper flakes or chili paste for heat. These tweaks can make this dish even more exciting and fun. Not in the mood for salmon? Try these options: - Chicken breast: Use the same marinade for juicy grilled chicken. - Tofu: Marinate and bake firm tofu for a plant-based option. - Shrimp: Cook shrimp in the same glaze for a quick seafood dish. These proteins soak up the flavors well, making them great substitutes. How you plate your dish can make it more delightful. Here are some fun ideas: - Serve on rice: Place the salmon over fluffy jasmine rice. - Wrap in lettuce: Use large lettuce leaves as a wrap for a fresh bite. - Top with slaw: Add a crunchy slaw for texture and color. These serving methods can elevate your meal and impress your guests. To store leftovers, let the salmon cool down first. Place the salmon in an airtight container. Make sure to keep some of the glaze if you want extra flavor. Leftover salmon will stay fresh in the fridge for up to three days. If you have extra garlic or ginger, you can add them to the glaze for more taste when you reheat. To reheat the salmon, use an oven for the best results. Preheat your oven to 300°F (150°C). Place the salmon on a baking sheet. Drizzle a little extra glaze over it to keep it moist. Heat for about 10-15 minutes, or until it is warm all the way through. You can also use a microwave, but be careful not to overcook it. Heat in short bursts of 30 seconds. If you want to freeze the salmon, do it as soon as it cools. Wrap each fillet tightly in plastic wrap and then in foil. It can stay in the freezer for up to three months. To thaw, move the salmon to the fridge a day before you want to eat it. This slow thawing helps keep its flavor and texture. Always avoid refreezing thawed salmon for best quality. Yes, you can use frozen salmon. Just thaw it in the fridge overnight. This keeps it safe and tasty. Once thawed, follow the same steps to marinate and cook. The flavor will still shine through! You know the salmon is done when it flakes easily with a fork. The flesh should change from translucent to opaque. You can also check the internal temperature; it should reach 145°F (63°C). If you’re unsure, cut a small piece to see. Many sides go well with this dish. Here are a few to try: - Steamed broccoli - Garlic mashed potatoes - Jasmine rice - Quinoa salad - Roasted asparagus These sides bring balance and add color to your plate. Yes, grilling works great! Just preheat your grill to medium-high heat. Marinate the salmon as usual. Place the fillets skin-side down on the grill. Cook for about 5-6 minutes, then flip and grill for another 4-5 minutes. Brush with the marinade for extra flavor. Enjoy that smoky taste! This blog post covered everything about making Honey Garlic Glazed Salmon. We explored the ingredients and shared tips for marinating and cooking it perfectly. You learned about variations and how to store leftovers well. Remember, cooking salmon can be easy and fun with the right methods. Try different flavors and proteins to keep it fresh. Enjoy your cooking journey, and don’t hesitate to get creative!

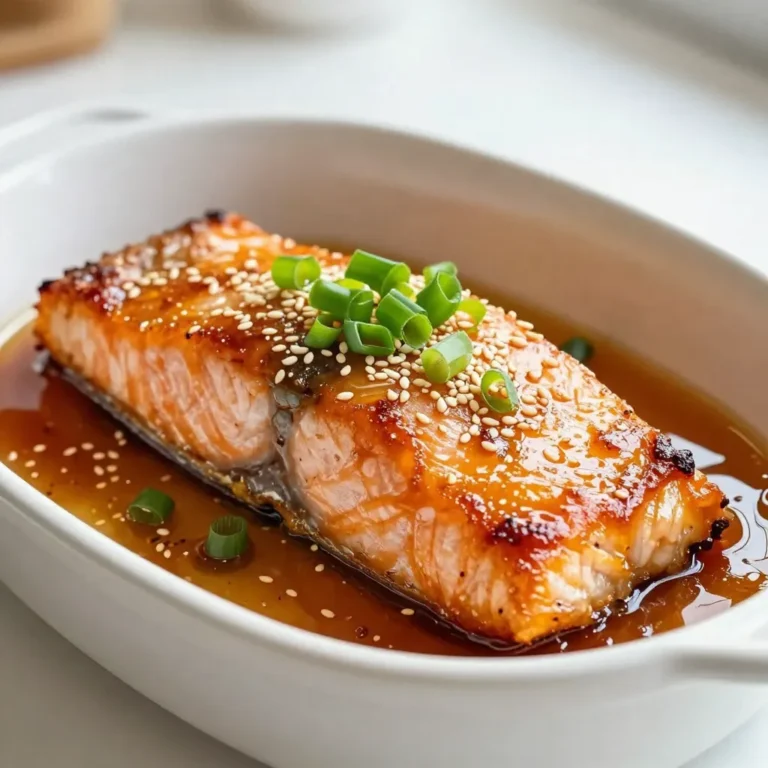
Honey Garlic Glazed Salmon Flavorful and Easy Recipe

To make a delicious S'mores Chocolate Pie, gather these key ingredients: - Pre-made graham cracker pie crust - 1 cup milk chocolate chips - 1 cup heavy cream - 1/2 cup granulated sugar - 2 large eggs - 1 teaspoon vanilla extract - 1 cup mini marshmallows - 1/2 cup crushed graham crackers (for topping) - 1/4 cup chocolate shavings (for garnish) These ingredients work together to create a rich and creamy chocolate filling, topped with toasted marshmallows and crunchy graham crackers. Each bite offers a delightful blend of flavors and textures. The pre-made graham cracker crust saves you time and gives the pie the classic S'mores taste. Using milk chocolate chips ensures the filling is sweet and smooth. The heavy cream adds a luxurious creaminess, making this dessert truly irresistible. Gathering these ingredients is the first step to crafting your perfect S'mores Chocolate Pie. Enjoy the process and get ready for a treat that everyone will love! {{ingredient_image_2}} Set your oven to 350°F (175°C). This is the first step to warm up your kitchen for baking. A hot oven helps the pie bake evenly. In a medium pan, mix heavy cream and milk chocolate chips over low heat. Stir constantly with a spatula until the chocolate melts and the mix is smooth. This step is vital for a creamy filling. Remove the pan from heat to avoid burning the chocolate. In a large bowl, whisk together granulated sugar, eggs, and vanilla extract. You want the mixture to be well combined and slightly frothy. Slowly pour the warm chocolate mix into this bowl, stirring all the time. This combines the flavors and creates a rich filling. Carefully pour the chocolate mixture into the prepared graham cracker pie crust. Use a spatula to spread it evenly. This ensures every bite is delicious. Place the pie in your preheated oven. Bake for 25-30 minutes. The edges should set, but the center should still be a bit fudgy. This texture is key for a perfect S'mores pie. Once baked, take the pie out and sprinkle mini marshmallows on top. Return the pie to the oven and switch to broil. Watch it closely for 1-2 minutes, until the marshmallows turn golden brown. This gives the pie a toasted look. Let the pie cool at room temperature for about 30 minutes. This cooling time helps it firm up while keeping a gooey center. After cooling, sprinkle crushed graham crackers on top for extra crunch. Add chocolate shavings for decoration. Now, slice the pie and serve it either at room temperature or chilled. Enjoy your delicious S'mores Chocolate Pie! To create a creamy filling, avoid scorching the chocolate. Heat the heavy cream on low. Stir the chocolate chips in until they melt. This keeps the mixture smooth. If you see lumps, keep stirring. Remove it from heat as soon as it’s smooth. This will help you get that perfect creamy texture. When broiling marshmallows, keep a close watch. Place the pie on the top rack of your oven. Broil for just 1-2 minutes. The marshmallows can burn quickly. If you see them turning dark, take the pie out. You want them golden, not charred, for a sweet finish. Serve your S'mores Chocolate Pie with a dollop of whipped cream. This adds a nice lightness. A drizzle of chocolate sauce on top makes it even better. The contrast of flavors brings joy with every bite. Enjoy this treat at room temperature or chilled for the best experience. Pro Tips Use High-Quality Chocolate: For the best flavor, opt for high-quality milk chocolate chips. The chocolate's richness will significantly enhance the overall taste of your pie. Monitor the Broiling: When broiling the marshmallows, keep a close eye on them. They can go from perfectly toasted to burnt in just a few seconds, so be ready to pull them out at the right moment. Chill for Better Slicing: If you prefer clean slices, refrigerate the pie for a couple of hours before serving. This will help the filling firm up even more and make slicing easier. Add a Layer of Flavor: Consider adding a pinch of sea salt to the chocolate mixture for a delicious contrast to the sweetness of the marshmallows and graham crackers. {{image_4}} For a gluten-free S'mores Chocolate Pie, choose a gluten-free graham cracker crust. You can find pre-made options in stores. If you prefer to make your own, crush gluten-free cookies like almond or coconut cookies. Mix them with melted butter to form a crust. Press the mixture firmly into your pie dish. This will give you that classic graham cracker taste without gluten. Want to jazz up your pie? Try adding peanut butter to the chocolate filling. Simply mix in half a cup of creamy peanut butter while melting the chocolate. It adds a rich, nutty flavor that pairs wonderfully with the chocolate. You can also use flavored chocolate, like caramel or hazelnut. Just swap the milk chocolate chips for your favorite flavored ones. This small change can create a whole new dessert experience. Looking for a lighter version? You can substitute heavy cream with coconut cream or Greek yogurt. This swap keeps the pie creamy while cutting down on fat. You can also use a sugar substitute like stevia or monk fruit instead of granulated sugar. This helps lower the sugar content. Lastly, consider using egg whites instead of whole eggs. This will help reduce calories while still giving you a great texture. Enjoy your healthier treat without losing flavor! To keep your S'mores Chocolate Pie fresh, store it in the fridge. Wrap it tightly with plastic wrap or aluminum foil. This helps lock in moisture and keeps the flavors intact. You can also place leftovers in an airtight container. The pie will last for about 3 to 4 days in the fridge. To enjoy your pie warm, reheat it in the oven. Set the oven to 350°F (175°C). Place the pie on a baking sheet and heat for about 10 minutes. This warms the chocolate filling and slightly melts the marshmallows. Avoid the microwave, as it can make the crust soggy. You can freeze S'mores Chocolate Pie for later enjoyment. First, let it cool completely. Wrap it in plastic wrap, then in foil to prevent freezer burn. It can last up to 2 months in the freezer. When you're ready to eat it, transfer it to the fridge overnight to thaw. After thawing, you can reheat it in the oven for the best taste. Yes, you can use dark chocolate. It will make the pie richer and less sweet. Dark chocolate has a bold flavor that pairs well with marshmallows. If you prefer a sweeter pie, consider adding a bit more sugar. The pie lasts about four days in the fridge. Make sure to cover it well to keep it fresh. Check for any signs of spoilage before serving. If it looks or smells off, it’s best to toss it. Absolutely! You can make this pie a day ahead. Just store it in the fridge after it cools. This helps the flavors blend well. If you plan to add toppings, wait until just before serving. You can serve whipped cream or vanilla ice cream alongside. Fresh berries add a nice touch, too. A drizzle of chocolate sauce on top makes it even more delightful. These pairings enhance the overall experience of the pie. Check for a set edge and a slightly soft center. The filling should look a bit fudgy. If the edges are firm and the center jiggles a little, it’s good to go. Just remember to watch the marshmallows closely when broiling! You now have all the steps to make a delicious S’mores Chocolate Pie. From the tasty ingredients to tips for storing leftovers, each part is important. Bake at 350°F, create a creamy filling, and enjoy golden marshmallows on top. Try out variations for gluten-free options or add new flavors. Remember, this pie can be made in advance and stored easily. I hope you feel excited to create this treat and share it with others. Enjoy every bite!

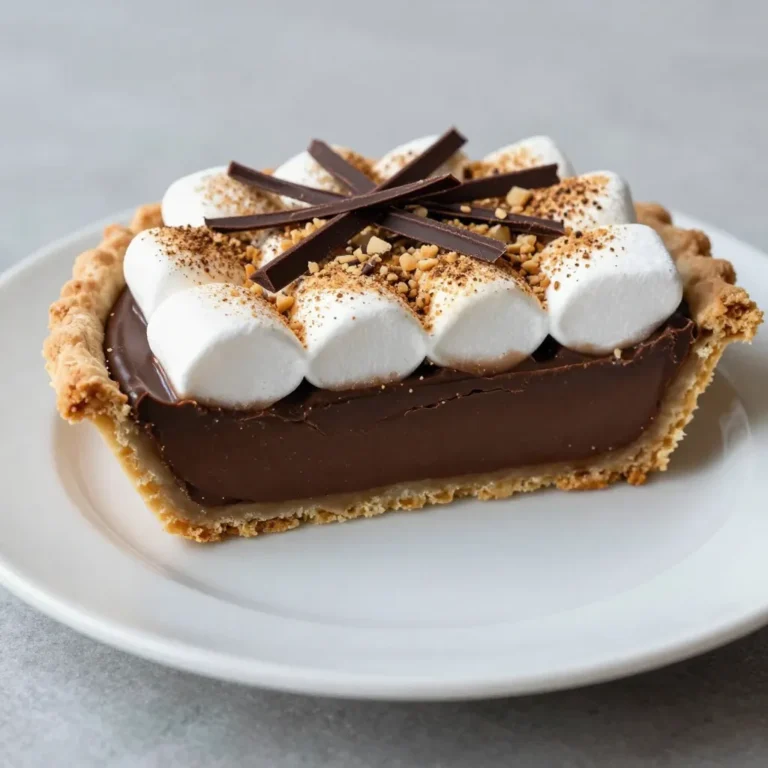
S’mores Chocolate Pie Irresistible Dessert Delight

- 2 cups fresh mushrooms (cremini or button), sliced into thin pieces - 1 medium onion, finely chopped - 3 cloves garlic, minced or pressed - 1 cup vegetable broth (low-sodium preferred) - 1 cup sour cream or plant-based yogurt (such as coconut or almond-based) - 2 tablespoons extra-virgin olive oil - 2 tablespoons soy sauce (or tamari for gluten-free) - 1 tablespoon Dijon mustard - 1 teaspoon smoked paprika for a hint of depth - Salt and freshly cracked black pepper to taste - 8 ounces egg noodles or your preferred pasta type (e.g., fettuccine or gluten-free) - Fresh parsley, chopped for a vibrant garnish In this creamy mushroom stroganoff, the fresh mushrooms shine. I love using cremini or button mushrooms for their rich flavor. The onion and garlic add a sweet base, while the vegetable broth brings depth. The sauce gets its creaminess from sour cream or plant-based yogurt. Dijon mustard and smoked paprika add a unique twist. Don’t forget the salt and pepper to finish the dish. For pasta, I prefer egg noodles. They hold the sauce well and create a nice texture. If you need a gluten-free option, use gluten-free pasta. This dish is all about balance, and these ingredients come together for a truly rich experience. {{ingredient_image_2}} Start by boiling water in a large pot. Add salt to the water for flavor. Once it boils, add your egg noodles. Cook them according to the package instructions. For the best texture, aim for al dente, which means they should be firm but not hard. This usually takes about 7-10 minutes. After cooking, drain the noodles in a colander. Keep them warm while you prepare the sauce. In a spacious skillet, pour in two tablespoons of extra-virgin olive oil. Heat it over medium heat. Once hot, add one medium, finely chopped onion. Sauté the onion for about 3-4 minutes. You want it soft and translucent. Next, add three cloves of minced garlic. Cook for another minute until you smell the garlic. Now, it’s time for the mushrooms. Add two cups of sliced fresh mushrooms. Cook them for about 5-7 minutes. Stir often to get them golden brown and release their moisture. Once the mushrooms are perfect, add one cup of vegetable broth to the skillet. Then, pour in two tablespoons of soy sauce and one tablespoon of Dijon mustard. Sprinkle in one teaspoon of smoked paprika for depth. Stir well to mix the flavors. Let this simmer for about 5 minutes to deepen the taste. Reduce the heat to low and slowly add one cup of sour cream. Stir continuously until the sauce is creamy and smooth. Taste it and add salt and freshly cracked black pepper as needed. Finally, gently fold in the cooked noodles. Ensure each noodle is coated with the rich sauce. If it’s too thick, add a splash of water or more broth to reach your desired creaminess. To get the best texture for your mushrooms, always start with fresh ones. Slice them thinly. This helps them cook evenly. Sauté them until they turn golden brown. This adds flavor and keeps them firm. To enhance the sauce flavor, use low-sodium vegetable broth. It adds depth without too much salt. Don't skip the Dijon mustard and smoked paprika. These give the sauce a nice kick. For plating, use wide, shallow bowls. This makes the stroganoff look fancy. Add a sprinkle of smoked paprika on top for color. A side of crusty bread or a fresh salad pairs well. It balances the meal and adds crunch. One common mistake is overcooking the noodles. Aim for al dente, which keeps them firm. Check the package for cooking times. Another mistake is not seasoning to taste. Always taste your sauce before serving. Add salt and pepper as needed. It makes a big difference! Pro Tips Use Fresh Mushrooms: Fresh mushrooms will provide the best flavor and texture. If possible, opt for a mix of cremini and button mushrooms for a richer taste. Adjust Creaminess: If you prefer a lighter sauce, feel free to replace half of the sour cream with vegetable broth. This will keep the dish creamy but less heavy. Season Gradually: Always taste as you go! Adjust the seasoning with salt and pepper gradually, as different broths and soy sauces can vary in saltiness. Perfect Pasta Pairing: For a more substantial meal, consider using whole wheat or gluten-free noodles. They add extra fiber and nutrients to your dish. {{image_4}} You can easily adjust this creamy mushroom stroganoff for different diets. For a vegan option, swap the sour cream with plant-based yogurt. Coconut or almond-based yogurt works great. Use gluten-free noodles for a gluten-free version. Instead of soy sauce, try tamari. This keeps the dish safe for those with gluten sensitivities. Want to add more flavor? Consider using fresh herbs like thyme or rosemary. These herbs can brighten the dish. You can also add spices like cayenne for some heat. For added protein, try incorporating cooked chicken or tofu. This can make the meal heartier and more filling. You can change how you serve this dish. Instead of noodles, serve the stroganoff over rice. This gives a different texture and taste. Another option is to turn it into a creamy mushroom soup. Just thin the sauce with more vegetable broth. Serve it hot in bowls with crusty bread on the side. To store leftover stroganoff, let it cool first. Transfer it to an airtight container. This helps keep flavors fresh. Place it in the fridge within two hours of cooking. It can stay fresh for about three to four days. When you’re ready to eat, reheating is simple. Put the stroganoff in a skillet. Add a splash of vegetable broth or water to keep it creamy. Heat it over low to medium heat, stirring often. You can also use the microwave. Heat in short bursts, stirring in between. Yes, you can freeze creamy mushroom stroganoff. This is a great way to save extra servings. Use a freezer-safe container and leave some space at the top. The sauce may thicken when frozen, but that's okay. For thawing, move the container to the fridge overnight. This helps it defrost slowly. Once thawed, reheat as mentioned before. If it seems too thick, add a bit of broth to restore creaminess. In the fridge, creamy mushroom stroganoff lasts about three to four days. If you freeze it, it can last for two to three months. Watch for signs of spoilage. If it smells off or has a strange color, discard it. Mold is also a clear sign that it’s time to let go. Always trust your senses to keep food safe. Mushroom stroganoff comes from Russia. The dish is a twist on beef stroganoff. The first recipes appeared in the 19th century. They used beef, but cooks swapped meat for mushrooms over time. This change made it a great option for vegetarians. Today, many people enjoy mushroom stroganoff around the world. It has become a comfort food for many. Yes, you can use many types of mushrooms! Button mushrooms are common, but cremini and portobello work well too. Each type adds its unique flavor. Shiitake mushrooms offer a rich taste, while oyster mushrooms add a delicate touch. Mixing different mushrooms can give your stroganoff a fun twist. Play around with flavors to find your favorite mix! To make a dairy-free version, swap sour cream with plant-based yogurt. Coconut or almond yogurt works best. You can also use cashew cream for a rich texture. Check that your broth and soy sauce are dairy-free too. This way, you keep all the creaminess without dairy. Enjoy the same great taste, but in a lighter way! Mushroom stroganoff is a rich and tasty dish you can easily make. We covered the ingredients, cooking steps, and tips for success. You learned how to choose pasta and creamy sauces. Remember to avoid common mistakes, like overcooking noodles. Don't forget about variations, including vegan and gluten-free options. Finally, store leftovers properly for future meals. Enjoy cooking this delicious dish and share it with friends and family!

Creamy Mushroom Stroganoff Rich and Flavorful Dish

To make Lemon Chicken Orzo Soup, gather these fresh and tasty ingredients: - 1 tablespoon olive oil - 1 medium onion, finely chopped - 2 cloves garlic, minced - 2 medium carrots, peeled and diced - 2 celery stalks, diced - Zest of 1 lemon and the juice of the same lemon - 6 cups low-sodium chicken broth - 1 cup uncooked orzo pasta - 2 cups cooked chicken, shredded (a rotisserie chicken is perfect) - 2 cups fresh spinach, roughly chopped - 1 teaspoon dried thyme - 1 teaspoon dried oregano - Salt and black pepper to taste - Fresh parsley, finely chopped (for garnish) You will need a few handy tools to make this soup: - A large pot - A cutting board - A sharp knife - A stirring spoon - Measuring cups and spoons - A ladle for serving If you are missing some items, don’t worry. Here are some easy swaps: - Use vegetable broth instead of chicken broth for a vegetarian option. - Swap orzo with rice or quinoa for a different texture. - Any cooked chicken works; just make sure it is shredded. - For a different green, try kale or Swiss chard instead of spinach. - If you prefer, use dried herbs like basil or rosemary in place of thyme and oregano. {{ingredient_image_2}} 1. Start by heating the olive oil in a large pot over medium heat. 2. Add the finely chopped onion and sauté for about 3-4 minutes. The onion should become soft and clear. 3. Next, stir in the minced garlic and cook for one more minute. You want the garlic to smell great. 4. Toss in the diced carrots and celery. Sauté these for about 5 minutes until they soften. 5. Pour in the chicken broth. Add the lemon zest, thyme, and oregano. Stir and bring it to a gentle boil. 6. When the soup boils, add the uncooked orzo pasta. Cook for 8-10 minutes, stirring often to avoid sticking. 7. Reduce the heat. Gently fold in the shredded chicken and spinach. Let it warm for 2-3 minutes. 8. Squeeze the fresh lemon juice into the soup. Season with salt and black pepper to taste. 9. Finally, remove the pot from the heat. Let the soup rest for a few minutes before serving. - Use fresh ingredients for the best flavor. Fresh spinach and good quality chicken make a big difference. - Don’t skip the lemon juice. It brightens the soup and enhances all the flavors. - Stir the soup often while cooking the orzo. This helps prevent the pasta from sticking to the bottom. - Taste your soup before serving. Adjust the seasoning to your liking for a perfect finish. - Prepare all your ingredients before you start cooking. This makes the process smoother and faster. - Chop the vegetables while the oil heats. This saves you time and keeps things moving. - Use a rotisserie chicken to save time on shredding. It adds great flavor and cuts down on prep work. - Keep an eye on the orzo. It cooks quickly, so check it a minute or two before the time is up. To boost flavor in your Lemon Chicken Orzo Soup, use fresh herbs. Fresh thyme and parsley add a pop of taste. You can also add a pinch of red pepper flakes for heat. If you want a richer broth, use homemade chicken stock or roast the chicken. Roasting adds depth and flavor. For a zesty kick, use extra lemon juice or even lemon slices. They give the soup a bright taste. Making this soup ahead is easy. You can cook and store it for later. First, prepare the soup as directed. Let it cool completely before storing. Use an airtight container and place it in the fridge for up to three days. If you want to keep it longer, freeze it for up to three months. Just remember to leave out the spinach and orzo. Add them fresh when you reheat. This keeps the texture nice. Pair this soup with crusty bread or a light salad. A fresh garden salad with a lemon vinaigrette complements the soup well. If you want something warm, try a grilled cheese sandwich. The gooey cheese pairs perfectly with the soup. You can also serve it with a side of roasted vegetables for added nutrition. These sides make your meal more filling and enjoyable. Pro Tips Fresh Ingredients: Always use fresh vegetables and herbs to enhance the flavor of your soup. Chicken Broth Choice: Opt for low-sodium chicken broth to control salt levels and adjust seasoning to taste. Customize Your Greens: Feel free to substitute spinach with kale or Swiss chard for a different flavor profile. Leftover Storage: Store leftover soup in an airtight container in the fridge for up to 3 days, but add fresh orzo when reheating to maintain texture. {{image_4}} You can switch up the chicken in this soup. Try turkey or pork instead. Both meats work well and add their own flavor. If you want a meat-free option, use beans or lentils. They are great sources of protein and keep the soup filling. Making this soup gluten-free is easy! Just replace orzo with rice or gluten-free pasta. For a vegetarian twist, skip the chicken and use vegetable broth instead. You can add extra veggies like zucchini or bell peppers for more flavor and nutrients. This soup can change with the seasons. In the fall, add pumpkin or squash for a warm, cozy feel. In the summer, use fresh tomatoes and corn for a bright taste. You can also explore regional flavors. For a Mediterranean twist, add olives and feta cheese. These changes keep the soup fun and exciting! To store leftover lemon chicken orzo soup, let it cool first. Transfer the soup to an airtight container. Seal it tightly to keep out air and moisture. Place it in the fridge. It will stay fresh for 3 to 4 days. For long-term storage, freezing is a great option. Use freezer-safe containers or bags. Portion out the soup for easier thawing. Make sure to leave some space in the container. This allows for expansion as it freezes. The soup will stay good in the freezer for about 3 months. When you're ready to eat, thaw the soup in the fridge overnight. Heat it on the stove over medium heat. Stir it gently to avoid sticking. If the soup seems thick, add a splash of broth or water. This helps bring back its original texture. Enjoy your warm, tasty soup! Orzo is a small pasta shaped like rice. It cooks quickly and adds great texture to soups. In Lemon Chicken Orzo Soup, orzo absorbs the flavors of the broth. It makes the soup hearty and filling. You can also use orzo in salads or casseroles. Just remember to cook it until tender, so it remains soft. Yes, you can use different types of broth. Chicken broth adds a rich flavor, but vegetable broth works too. If you want a lighter taste, try using low-sodium broth. This will let the lemon shine through. You can even blend broths. Mixing chicken and vegetable broth gives a nice depth to the soup. To make a low-sodium version, start with low-sodium chicken broth. Limit added salt throughout cooking. Use fresh herbs for flavor instead. Adding lemon juice and zest also brightens the taste without extra salt. You can even skip the salt entirely if you prefer. This way, you enjoy a tasty soup that is heart-healthy. To sum up, we’ve explored all the parts that make a great soup. We discussed the key ingredients and kitchen tools you need. I shared essential cooking steps, tips, and tricks to boost flavor. We also looked at variations and storage info for leftovers. Remember, you can adapt recipes to fit your taste. Enjoy your cooking journey and create your best soup today!

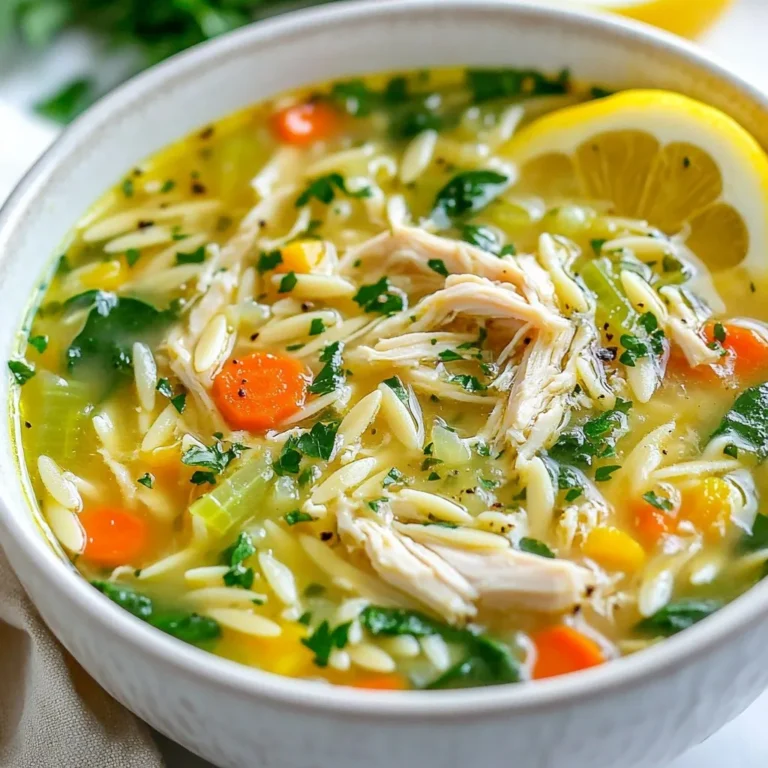
Lemon Chicken Orzo Soup Delicious and Nourishing Meal

PREV 1 … 30 31 32 … 47 NEXT
snack joy kitchen

explore

DessertsDinnerAppetizersDrinks

Our Policies

  • Cookie Policy
  • Copyright Policy
  • Disclaimer
  • GDPR Policy
  • Terms Of Use
Back to Top
  • About
  • Contact Us
  • Privacy Policy
© 2026 snack joy kitchen