FREE DINNER EBOOK! Get your copy!
  • Cookie Policy
  • GDPR Policy
  • Disclaimer
  • Terms Of Use
  • Visit my other site: Fun Cookie Recipes
snack joy kitchen
  • Home
  • Dinner
  • Desserts
  • Drinks
  • Appetizers
  • Contact
  • About
  • Privacy Policy
  • Home
  • Dinner
  • Desserts
  • Drinks
  • Appetizers
  • Contact
  • About
  • Privacy Policy
  • Cookie Policy
  • GDPR Policy
  • Disclaimer
  • Terms Of Use
Visit my other site: Fun Cookie Recipes

HOME / CATEGORIES /

Latest

- 1 cup long-grain rice (such as basmati or jasmine) - 8 cups vegetable broth - 4 large eggs - 1/2 cup freshly squeezed lemon juice (about 3 to 4 lemons) - 1 cup carrots, diced - 1 cup celery, diced - 1 medium onion, finely chopped The main ingredients in Greek Lemon Rice Soup create a fresh and hearty dish. Long-grain rice, like basmati or jasmine, gives a light texture. Vegetable broth serves as a rich base, adding flavor without meat. Eggs make the soup creamy and smooth when mixed with lemon juice. You’ll want to use fresh carrots, celery, and onion for a vibrant taste. These veggies add sweetness and depth. The lemon juice gives the soup its zesty kick, making each spoonful refreshing. - Fresh dill or parsley for garnish - Salt and black pepper to taste - Extra-virgin olive oil While the main ingredients shine, optional ingredients add personal flair. Fresh dill or parsley makes the soup look pretty and bright. A pinch of salt and pepper helps to bring all the flavors together. Don’t forget the extra-virgin olive oil! It adds a lovely richness and depth to your soup. Feel free to mix and match these ingredients to suit your taste. This flexibility makes Greek Lemon Rice Soup a fun dish to make. {{ingredient_image_2}} Sautéing vegetables Start by heating 2 tablespoons of extra-virgin olive oil in a large pot over medium heat. Add 1 medium chopped onion, 1 cup diced carrots, and 1 cup diced celery. Cook the veggies for about 5 to 7 minutes. You want them soft and fragrant. Stir often so they cook evenly. Rinsing the rice While the vegetables are cooking, rinse 1 cup of long-grain rice under cold water. Keep rinsing until the water runs clear. This step helps remove excess starch, making your soup less thick. Once rinsed, add the rice to the pot. Stir for about 1 minute to coat the rice in the oil and mix with the veggies. Cooking the rice and broth Carefully pour in 8 cups of vegetable broth. Stir gently to mix. Increase the heat to bring it to a boil. Once it boils, reduce the heat to low. Cover the pot and let it simmer for 15 to 20 minutes. The rice will become tender and soak up the broth. Whisking the eggs and lemon In a separate bowl, whisk together 4 large eggs, 1/2 cup of freshly squeezed lemon juice, and the zest of 1 lemon. Mix until it’s creamy and well combined. This will give your soup a tangy, rich flavor. Tempering the egg mixture After the rice is cooked, take the pot off the heat. To temper the egg mixture, ladle about 1 cup of warm broth into the bowl with the eggs. Whisk the eggs while adding the broth slowly. This warms the eggs and keeps them from scrambling. Adjusting seasoning and serving Now, stir the tempered egg mixture back into the pot with the soup. Keep the heat low to avoid curdling the eggs. Stir until the soup thickens a bit. Taste it and add salt and freshly cracked black pepper as needed. Serve the soup hot in bowls, garnished with freshly chopped dill or parsley for color and flavor. - How to avoid a thick soup Rinse the rice well under cold water. This step removes excess starch. Starch makes the soup thick. A clear water rinse helps keep your soup light and brothy. - Best practices for tempering eggs Whisk the eggs with lemon juice in a bowl. Gradually add warm broth while whisking. This keeps the eggs from scrambling when you add them to the soup. Stir slowly and keep the heat low to avoid curdling. - Ideal garnishes for Greek Lemon Rice Soup Fresh dill or parsley adds color and flavor. Sprinkle them on top right before serving. You can also add a slice of lemon for a pop of brightness. - Pairing options with the soup Serve this soup with crusty bread or a light salad. A side of grilled chicken or fish complements the soup's flavors well. Enjoying it with olives can also enhance your meal. Pro Tips Rinse the Rice: Rinsing the rice under cold water until the water runs clear removes excess starch, preventing the soup from becoming too thick and ensuring a lighter texture. Tempering the Eggs: To avoid scrambling the eggs when adding them to the hot soup, temper them by gradually adding warm broth while whisking continuously. Season Gradually: Always taste and adjust the seasoning at the end of cooking. This helps to enhance the flavors without over-salting the dish. Garnish for Freshness: Adding freshly chopped dill or parsley just before serving not only elevates the presentation but also adds a burst of fresh flavor to the soup. {{image_4}} You can change the rice for different flavors. Long-grain rice works best. However, you can try: - Arborio rice: This rice gives a creamy texture. - Brown rice: It adds a nutty flavor and more fiber, but takes longer to cook. If you want a vegetarian or vegan soup, skip the eggs. You can replace them with: - Silken tofu: Blend it until smooth for creaminess. - Cashew cream: Blend soaked cashews with water for a rich texture. Adding spices or herbs can elevate your soup. Here are some ideas: - Thyme: This herb pairs well with lemon. - Oregano: A classic Greek flavor that adds depth. You can also customize with vegetables. Some tasty options include: - Spinach: Stir in fresh spinach just before serving for color and nutrition. - Peas: Add them for a pop of sweetness and color. These variations let you make the soup your own while keeping it delicious. Enjoy experimenting! You can store leftover Greek Lemon Rice Soup in the fridge. Use an airtight container. Make sure the soup cools down before sealing it. This helps keep it fresh. The soup stays good for about 3-4 days. When you want to eat it again, heat it on the stove or in the microwave. Stir well to mix the flavors. If you want to keep the soup longer, freezing is a great option. First, let the soup cool completely. Pour it into freezer-safe containers or heavy-duty freezer bags. Leave some space at the top, as soup expands when frozen. Seal the containers tightly to avoid freezer burn. To thaw, move the soup to the fridge overnight. You can also use the microwave on a low setting. When you reheat, add a bit of broth or water. This helps keep the texture smooth. Avoid boiling, as it can change the eggs. With these steps, your soup will taste fresh and flavorful even after freezing! What can I do if my soup is too thick? If your soup is too thick, you can add more broth or water. Start with a little at a time. Stir well and check the texture. The rice absorbs a lot of liquid, so this simple fix works great. Can I use chicken broth instead of vegetable broth? Yes, you can use chicken broth if you prefer. It will add a richer flavor to the soup. Just keep in mind that it may change the taste slightly. Is Greek Lemon Rice Soup healthy? Greek Lemon Rice Soup is quite healthy. It has fresh veggies and lean protein from eggs. The lemon adds vitamin C, which is good for your immune system. How many calories per serving? Each serving has roughly 200-250 calories. This can vary based on the exact ingredients you use. Always check your specific ingredients for accurate numbers. What are the origins of Greek Lemon Rice Soup? Greek Lemon Rice Soup, also known as Avgolemono, has deep roots in Greek cuisine. It blends flavors from Mediterranean cooking. It’s a comfort food enjoyed across Greece and beyond. Is this soup traditionally served on specific occasions? Yes, this soup is often served at family gatherings and holidays. It’s popular during Easter and other festive meals. Its light yet filling nature makes it a favorite among many. This article explored the key aspects of making Greek Lemon Rice Soup. We covered essential ingredients, preparation steps, and helpful tips. You learned about ingredient variations, storage, and common questions people ask. In my experience, this soup offers warm comfort and is easy to adapt. Whether you stick to the classic recipe or customize it, it’s a crowd-pleaser. Enjoy making this dish, and share it with family and friends!

Greek Lemon Rice Soup Flavorful and Simple Recipe

- 1 and 1/2 cups gingerbread cookie crumbs - 1/4 cup unsalted butter, melted - 16 oz cream cheese, softened - 1 cup granulated sugar - 1 teaspoon vanilla extract - 3 large eggs, at room temperature - 1 teaspoon ground ginger - 1 teaspoon ground cinnamon - 1/4 teaspoon ground nutmeg - 1/4 teaspoon ground cloves - 1 cup sour cream, at room temperature - 1 tablespoon all-purpose flour For a rich and tasty gingerbread cheesecake, you need gingerbread cookie crumbs. These crumbs give the crust a warm and spicy flavor. Next, cream cheese and sour cream create a smooth and creamy filling. The spices, like ground ginger, cinnamon, nutmeg, and cloves, add a festive touch. Each spice brings out the best in this dessert. - Whipped cream - Fresh mint leaves or cranberries For a beautiful finish, consider adding whipped cream. It adds lightness and sweetness. Fresh mint leaves or cranberries make the dessert pop with color. They also add a hint of freshness that balances the rich cheesecake. - 9-inch springform pan - Electric mixer - Mixing bowls You will need a 9-inch springform pan to bake and serve the cheesecake. An electric mixer helps you blend the ingredients smoothly. Mixing bowls are essential for combining all the tasty components. This setup makes the process easy and fun. {{ingredient_image_2}} 1. Preheat the oven: Start by setting your oven to 325°F (163°C). This ensures your crust bakes evenly. 2. Mix gingerbread crumbs and butter: In a medium bowl, combine 1 and 1/2 cups of gingerbread cookie crumbs with 1/4 cup of melted butter. Stir until it looks like wet sand. 3. Press into the springform pan: Firmly press the mixture into the bottom of a 9-inch springform pan. Make sure it’s even and compact. Bake for 10 minutes, then let it cool completely. 1. Beat cream cheese until smooth: In a large bowl, use an electric mixer to beat 16 oz of softened cream cheese at medium speed. Keep mixing until it’s smooth and creamy. 2. Gradually add sugar: Slowly add 1 cup of granulated sugar to the cream cheese. Mix until the sugar is fully blended and the mixture is smooth. 3. Mix in flavorings and spices: Add 1 teaspoon of vanilla extract, 1 teaspoon of ground ginger, 1 teaspoon of ground cinnamon, 1/4 teaspoon of ground nutmeg, and 1/4 teaspoon of ground cloves. Stir well until all the spices are evenly mixed in. 1. Incorporate eggs and fold in sour cream: Add 3 large eggs, one at a time, to the cream cheese mixture. Mix on low speed just until blended, then gently fold in 1 cup of sour cream and 1 tablespoon of all-purpose flour. Be careful not to overmix. 2. Pouring filling over crust: Pour the creamy filling over your cooled gingerbread crust in the springform pan. Spread it evenly. 3. Checking for doneness: Bake in the preheated oven for 50-60 minutes. The edges should be set, but the center should still have a slight wobble when shaken gently. This means it’s just right! Using room temperature ingredients is key. Cold cream cheese will not blend well. Let it sit out for about 30 minutes before starting. This helps create a smooth filling. Overmixing can ruin the creamy texture. Mix just until combined and smooth. Cooling the cheesecake in the oven helps avoid cracks. After baking, turn off the heat and crack the door open. Let it sit for one hour to cool slowly. Chill the cheesecake in the fridge for at least four hours. For the best taste, chill it overnight. For serving, place the cheesecake on a festive platter. Add a dollop of whipped cream on each slice. Garnish with fresh mint leaves or cranberries. This adds a nice pop of color and flavor. A sprinkle of ground ginger or cinnamon on top makes it even more special. Pro Tips Use Room Temperature Ingredients: Ensure that your cream cheese, eggs, and sour cream are at room temperature before mixing. This helps create a smooth batter and prevents lumps in your cheesecake. Don’t Overmix the Batter: When incorporating the eggs, mix just until combined. Overmixing can introduce too much air into the batter, which may cause cracks during baking. Check for Doneness: The cheesecake is done when the edges are set, but the center still has a slight wobble. It will continue to firm up as it cools. Chill Overnight for Best Flavor: Although you can chill the cheesecake for a minimum of 4 hours, letting it sit overnight allows the flavors to meld and enhances the overall taste. {{image_4}} To make a vegan version, use these substitutes: - Cream cheese: Try cashew cream or coconut cream. - Sour cream: Use coconut yogurt or silken tofu blended smooth. - Eggs: Replace each egg with 1/4 cup of unsweetened applesauce. These swaps keep the cheesecake creamy and rich, just like the original. To make a gluten-free crust, follow these tips: - Use gluten-free gingerbread cookies for crumbs. - Check labels to ensure your cookies are certified gluten-free. - Mix crumbs with melted vegan butter or coconut oil for binding. This way, everyone can enjoy the dessert without worry. You can add fun twists to your cheesecake: - Chocolate notes: Fold in melted dark chocolate for a rich flavor. - Caramel notes: Swirl caramel sauce into the filling before baking. - Alternative spices: Try adding cardamom or allspice for unique tastes. These variations can surprise your guests and make your dessert stand out! You can store leftover gingerbread cheesecake in the refrigerator. First, cover the cheesecake with plastic wrap or aluminum foil. This will keep it fresh and prevent it from absorbing other smells. It should last about 3 to 5 days in the fridge. If you want to save gingerbread cheesecake for later, freezing is a great option. To freeze, slice the cheesecake and wrap each piece tightly in plastic wrap. Then, place the slices in a freezer-safe bag or container. This will help avoid freezer burn. Gingerbread cheesecake can stay in the freezer for up to 2 months. When you're ready to enjoy it, take out a slice and let it thaw in the fridge overnight. This slow thawing keeps the texture smooth and creamy. To keep your cheesecake fresh, always cover it well. Use plastic wrap or a tight container to seal it. This prevents it from drying out and losing flavor. If you notice any ice crystals, it's a sign the cheesecake wasn't sealed properly. Always check for freshness before serving. Yes, you can use other cookies to make the crust. Some great choices are gingersnaps or graham crackers. You can also try chocolate cookies for a rich twist. Just crush the cookies well and mix them with melted butter. Press this mixture into the pan like you would with gingerbread crumbs. Each crust adds a unique flavor to the cheesecake. Homemade cheesecake lasts about 4 to 5 days in the fridge. Store it in an airtight container to keep it fresh. If you want to keep it longer, you can freeze it. Wrap it tightly in plastic wrap and then in foil. In the freezer, it can last up to 2 months. When ready to eat, thaw it slowly in the fridge overnight. You can serve gingerbread cheesecake with many delightful sides. Whipped cream pairs well, adding a light touch. A drizzle of caramel or chocolate sauce also enhances the flavor. For drinks, try spiced chai tea or hot cocoa. Fresh fruit, like cranberries or pomegranate seeds, adds a nice pop of color and flavor. You can create a delicious gingerbread cheesecake using simple ingredients and steps. Start by making a crust with gingerbread cookie crumbs and butter. Mix cream cheese, spices, and sugar for the filling. Follow suggested tips to get the texture and flavor just right. You can even explore variations for vegan or gluten-free options. In the end, enjoy this festive treat. Share it with friends and family, or keep it for yourself. Your gingerbread cheesecake will surely impress!

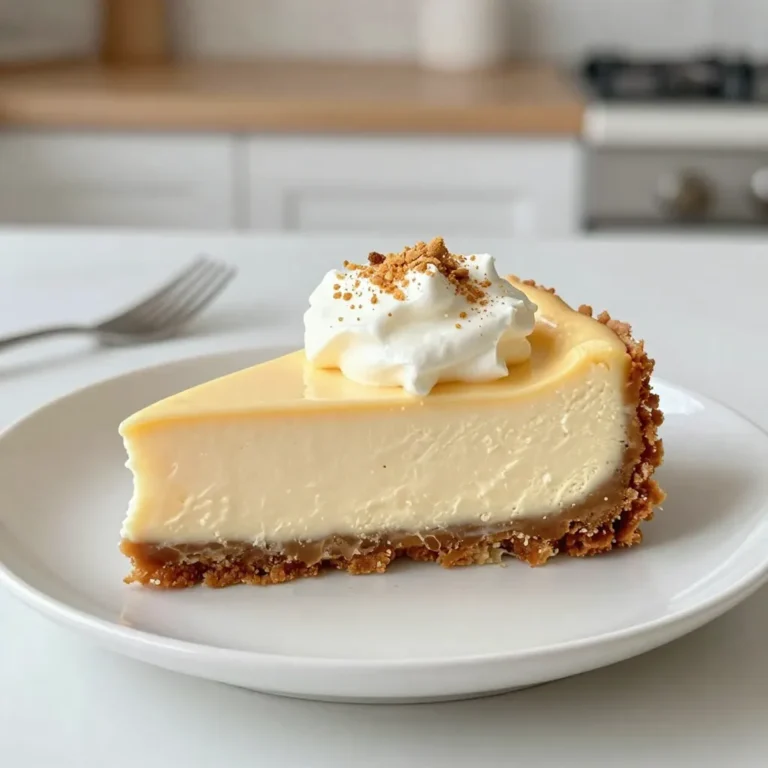
Gingerbread Cheesecake Delightful Holiday Dessert

To create a hearty Shepherd’s Pie Casserole, you need these key ingredients: - 1 lb ground beef or lamb - 1 large onion, finely diced - 2 medium carrots, peeled and diced - 2 cloves garlic, minced - 1 cup frozen peas, thawed - 2 tablespoons tomato paste - 1 tablespoon Worcestershire sauce - 1 teaspoon dried thyme - 1 teaspoon dried rosemary - Salt and freshly ground black pepper, to taste - 4 cups creamy mashed potatoes (prepared with butter and milk for richness) - 1 cup shredded sharp cheddar cheese - Fresh flat-leaf parsley, chopped, for garnish These ingredients bring rich flavors and a cozy feel to the dish. The ground meat provides protein, while the veggies add color and texture. The creamy mashed potatoes and cheese create a delightful topping. Feel free to play with the recipe! Here are some add-ins and swaps you can try: - Swap the ground beef for turkey or chicken for a leaner option. - Add corn or bell peppers for extra veggies. - Use vegetable broth instead of Worcestershire sauce for a vegetarian twist. - If you don't have cheddar cheese, use mozzarella or gouda for a different flavor. These options allow you to customize your casserole to your taste. You can make it your own while keeping it delicious. This dish can fit various dietary needs: - For a gluten-free version, check your Worcestershire sauce for gluten. - You can use dairy-free butter and plant-based milk for lactose-free mashed potatoes. - To make it vegetarian, use lentils or mushrooms instead of meat. These modifications help everyone enjoy this comfort food. It’s about making the dish work for you and your loved ones. {{ingredient_image_2}} First, gather all your ingredients. You will need: - 1 lb ground beef or lamb - 1 large onion, finely diced - 2 medium carrots, peeled and diced - 2 cloves garlic, minced - 1 cup frozen peas, thawed - 2 tablespoons tomato paste - 1 tablespoon Worcestershire sauce - 1 teaspoon dried thyme - 1 teaspoon dried rosemary - Salt and freshly ground black pepper, to taste - 4 cups creamy mashed potatoes - 1 cup shredded sharp cheddar cheese - Fresh flat-leaf parsley, chopped, for garnish Next, prep the vegetables. Dice the onion and carrots. Mince the garlic. This step adds flavor to your dish. Heat a large skillet on medium. Add the ground beef or lamb. Cook until it turns brown. Use a spatula to break it apart. If there is excess fat, drain it carefully. Once the meat is ready, add the diced onion, carrots, and minced garlic. Sauté this mix for about 5-7 minutes. You want the veggies to be tender and fragrant. Then, stir in the thawed peas. Add the tomato paste, Worcestershire sauce, dried thyme, dried rosemary, and season with salt and pepper. Stir well and let it cook for another 3-5 minutes. This helps all the flavors come together. Now, it’s time to assemble. Carefully transfer the meat and veggie mix into a greased 9x13 inch casserole dish. Spread it evenly across the bottom. Next, take your creamy mashed potatoes and spoon them over the meat mixture. Use a spatula to create a smooth top layer. Sprinkle the shredded sharp cheddar cheese on top. It will melt and add great flavor. Now, place the casserole in a preheated oven at 400°F (200°C). Bake for 20-25 minutes. Look for a golden brown color on the cheese. Let it cool for a few minutes when it’s done. Garnish with chopped parsley before serving. Enjoy your hearty Shepherd’s Pie Casserole! To make the best mashed potatoes, start with starchy potatoes. I recommend Russets or Yukon Golds. Peel and chop them into equal pieces. Boil them until tender, about 15-20 minutes. Drain the potatoes and return them to the pot. Add butter and milk for creaminess. Mash until smooth and fluffy. Season with salt and pepper to taste. For extra flavor, you can mix in garlic or herbs. For a perfect cheese topping, use sharp cheddar cheese. It adds great flavor and melts well. After spreading your mashed potatoes over the meat mix, sprinkle cheese evenly on top. This helps it melt and brown nicely. Bake the casserole until the cheese is bubbly and golden. Keep an eye on it to avoid burning. If needed, broil for a minute to enhance the color. One common mistake is not seasoning enough. Always taste your meat and veggie mix. Adjust the salt and pepper to make it flavorful. Another mistake is over-mashing the potatoes. This can make them gluey. Mash gently to keep them light and fluffy. Finally, don’t skip the cooling time after baking. Letting it rest helps the layers set. This way, you'll serve perfect slices every time. Pro Tips Use Fresh Herbs: Fresh herbs like thyme and rosemary can elevate the flavor profile of your Shepherd’s Pie. Consider using them in addition to or instead of dried herbs for a more vibrant taste. Customize Your Veggies: Feel free to add or substitute vegetables based on your preference. Bell peppers, corn, or green beans can be great additions for extra flavor and nutrition. Make Ahead: This casserole can be prepared in advance and stored in the refrigerator. Just bake it when you're ready to serve for a quick and satisfying meal. Perfect Your Mashed Potatoes: For the creamiest mashed potatoes, use starchy potatoes like Russets or Yukon Golds. Adding cream cheese or sour cream can also enhance the richness. {{image_4}} You can easily make a vegetarian version of Shepherd’s Pie Casserole. Replace the meat with cooked lentils or chopped mushrooms. Use hearty vegetables like zucchini and bell peppers for great texture. Add more frozen peas for sweetness. Use vegetable broth instead of meat juices for flavor. This dish still delivers that warm, cozy feel. To make this dish gluten-free, swap the Worcestershire sauce for a gluten-free brand. Check the labels on the tomato paste as well, as some may contain gluten. You can use almond flour or gluten-free breadcrumbs to add a crispy layer on top. This keeps the dish tasty for everyone. Enhancing flavors is easy! Add a splash of red wine while cooking the meat for depth. You can also mix in some fresh herbs like parsley or basil for brightness. Try stirring in some cheese into the meat mixture for extra creaminess. A dash of hot sauce or smoked paprika can add a kick to your casserole. You can store your Shepherd’s Pie Casserole in the fridge. Let it cool first. Place it in an airtight container. It will stay fresh for up to 3 days. When ready to eat, just reheat it. Freezing this dish is easy and great for meal prep. First, let it cool completely. Cover it tightly with plastic wrap, then aluminum foil. This helps prevent freezer burn. It can last for up to 3 months in the freezer. When you're ready to eat it, thaw it overnight in the fridge before reheating. To reheat, you have a few options. You can use the oven, microwave, or stovetop. For the oven, set it to 350°F (175°C). Heat for about 20-25 minutes, or until it's hot. If using a microwave, heat in short bursts. Stir in between to avoid cold spots. For stovetop, warm on low heat in a skillet. Add a splash of broth if it seems dry. Enjoy every bite of your tasty casserole! Cooking Shepherd's Pie Casserole takes about 45 minutes. This includes 15 minutes of prep time and 25 minutes of baking. You want to ensure the cheese melts and turns golden brown. Yes, you can use other meats. Ground turkey or chicken works well. For a richer taste, try lamb. Each meat brings its own flavor to the dish. I love serving Shepherd’s Pie Casserole with crusty bread or a fresh garden salad. These sides balance the dish's richness and add freshness. You can also pair it with steamed vegetables for a healthy touch. Absolutely! You can prepare it a day ahead. Just assemble the casserole and store it in the fridge. Bake it when you’re ready to serve. This makes dinner planning easier and keeps flavors strong. Shepherd’s Pie Casserole is a hearty dish that is simple to make. We covered key ingredients, prep steps, and tips for great taste. You saw how to adapt the recipe for diets, add delicious flavors, and store leftovers. This dish is fun to personalize and share with family. Enjoy your cooking adventure, and create a meal that warms your heart!

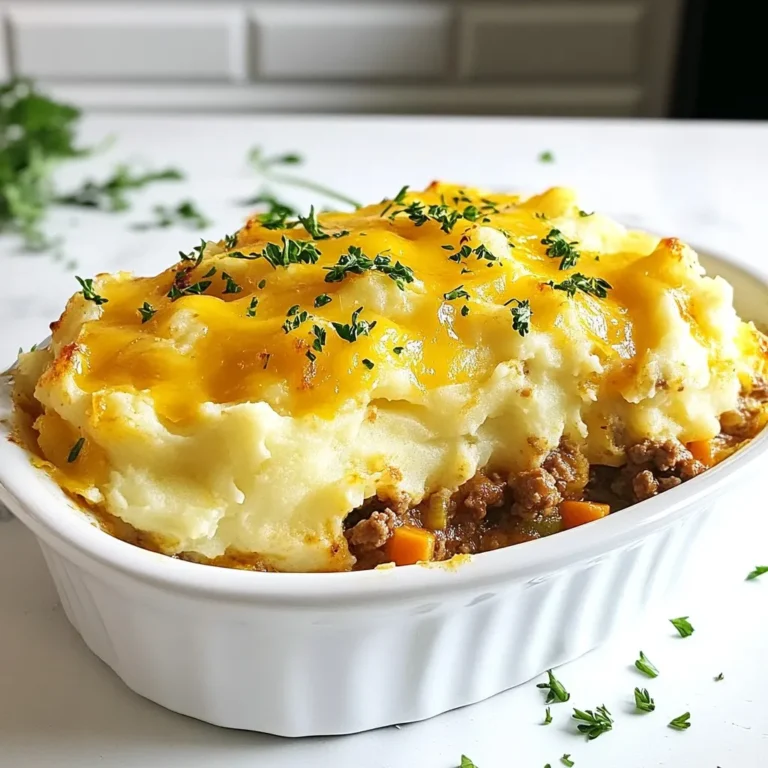
Shepherd’s Pie Casserole Flavorful Comfort Food Delight

- 2 boneless chicken breasts, cut into bite-sized pieces - 1 cup fresh pineapple, diced into small chunks - 1 bell pepper (red or yellow), sliced into thin strips - 1 medium onion, chopped into medium pieces - 2 cloves garlic, minced finely - 1 tablespoon fresh ginger, grated The main ingredients create a mix of flavors. The chicken gives protein and a nice texture. Pineapple adds a sweet and juicy touch. Bell pepper brings color and crunch. Onion offers a savory base. Garlic and ginger enhance the dish with warmth. - 3 tablespoons low-sodium soy sauce - 2 tablespoons honey, preferably raw - 1 tablespoon cornstarch - 1 cup chicken broth The marinade is key to flavor. Soy sauce adds umami. Honey brings sweetness that balances the saltiness. Cornstarch helps thicken the sauce later. Chicken broth gives depth and moisture. - 2 cups jasmine rice - 2 tablespoons vegetable oil - Salt and freshly ground black pepper to taste - Fresh cilantro leaves for garnish - Lime wedges for an extra zesty serving The rice serves as a perfect base for the chicken. Jasmine rice has a lovely aroma and fluffiness. Vegetable oil ensures the chicken cooks well. Salt and pepper round out the taste. Fresh cilantro adds brightness, while lime juice lifts the whole dish. {{ingredient_image_2}} First, mix the marinade ingredients. In a bowl, whisk together the soy sauce, honey, minced garlic, grated ginger, and a bit of salt and pepper. This blend gives the chicken a sweet and tangy flavor. Next, add the bite-sized chicken pieces. Make sure they are well-coated in the marinade. Cover the bowl and place it in the refrigerator for at least 30 minutes. This step is key for infusing the chicken with flavor. While the chicken marinates, rinse the jasmine rice. Rinse it under cold running water, swirling gently until the water runs clear. This helps remove excess starch, making the rice fluffier. In a pot, combine the rinsed rice with 3 cups of water. Bring it to a boil over high heat. Once it boils, cover the pot, reduce the heat, and let it simmer for 18-20 minutes. After cooking, let it sit, covered, for another 5 minutes. This allows the rice to steam and become perfect. Now, heat the vegetable oil in a large skillet over medium-high heat. Once the oil is hot, add the marinated chicken in a single layer. Cook the chicken for about 5-7 minutes, turning it occasionally. The goal is to achieve a golden color and to ensure it is cooked through. Once done, transfer the chicken to a plate and set it aside. In the same skillet, add the chopped onion and bell pepper. Sauté for about 3-4 minutes until they soften. Then, add the diced pineapple. Continue to stir-fry everything for another 2-3 minutes. You want the pineapple to caramelize slightly and get warm. This adds a nice sweetness to the dish. In a small bowl, mix the cornstarch with chicken broth until dissolved. Pour this mixture over the sautéed vegetables and pineapple in the skillet. Stir constantly for about 2-3 minutes. This helps thicken the sauce and ensures it coats all the vegetables evenly. Finally, return the cooked chicken to the skillet. Gently toss everything together to combine. Cook for another minute until all ingredients are heated through. This step blends all the flavors beautifully, making every bite a delight. What spices can I add for more flavor? You can use a pinch of red pepper flakes for heat. A dash of smoked paprika gives a nice touch too. For a warm flavor, try adding a bit of cumin. What are some sweetener alternatives? If you want to change the sweetness, use maple syrup or agave nectar. Both can add a unique taste to the dish. How should I marinate the chicken? Mix the marinade well, ensuring every piece gets coated. Let it sit in the fridge for at least 30 minutes. This time allows the flavors to soak in deeply. How can I make perfect rice? Rinse the jasmine rice until the water runs clear. This removes extra starch and helps prevent clumping. Cook with the right water ratio for fluffier rice. What are some garnishing ideas? Sprinkle fresh cilantro on top for color and flavor. You can also add lime wedges on the side for a zesty kick. How can I serve this dish for family or guests? Serve the rice on plates first, then top with the pineapple chicken. This makes it look appealing and ready to enjoy! Pro Tips Marinating Time: The longer you marinate the chicken, the more flavorful it will be. For best results, marinate for at least 1-2 hours or overnight if you have the time. Choosing Pineapple: Fresh pineapple will provide the best sweetness and texture. If using canned, ensure it’s packed in juice, not syrup, for a healthier option. Vegetable Variations: Feel free to add other vegetables like snap peas or carrots for added color and nutrition. Just ensure they are cut into similar sizes for even cooking. Perfect Rice: To enhance the flavor of jasmine rice, consider cooking it in chicken broth instead of water for an extra depth of taste. {{image_4}} You can swap chicken for shrimp or tofu. Both options work well and add unique flavors. Shrimp cooks fast, so add it last during the stir-fry. Just sauté it until it turns pink. For tofu, press it first to remove excess water. Cut it into cubes and fry until golden. This adds a nice texture. Feel free to mix in other vegetables. Broccoli, snap peas, or carrots could add great crunch and color. If you like heat, add chili peppers. Slice them thinly and toss them in with the onions. This will make your dish spicy and exciting. If you want a change from jasmine rice, use quinoa or brown rice. Quinoa cooks fast and adds protein. For brown rice, it takes longer to cook, about 30 to 40 minutes. Rinse both grains well before cooking. Follow their package directions for the best results. To store your pineapple chicken with rice, choose airtight containers. Glass containers work well. They keep food fresh and safe. You can also use plastic containers. Just ensure they seal tightly. Refrigerate your leftovers within two hours of cooking. This helps prevent bacteria growth. You can keep the dish in the fridge for up to three days. If you want to save it longer, freeze it. It can last up to three months in the freezer. When reheating, use the microwave or stovetop. The microwave is quick but can dry out the rice. Add a splash of water to keep it moist. A stovetop works well too. Heat on low and stir often to avoid burning. To keep rice fluffy, use a fork to fluff it up before serving. This helps separate the grains. You can also add a bit of water while reheating to bring back moisture. In the fridge, leftover pineapple chicken with rice lasts about three days. Check for signs of spoilage before eating. If it smells off or looks discolored, throw it away. Signs of spoilage include a sour smell, slimy texture, or mold. Always trust your senses. If in doubt, it’s best to discard the food. Enjoy your delicious meal safely! You should marinate the chicken for at least 30 minutes. This time allows the flavors to soak in. For even better taste, you can marinate it for up to 2 hours. Just keep it in the fridge while it soaks. The more time it has, the better it will taste. You can use canned pineapple, but it will change the dish a bit. Canned pineapple is softer and sweeter than fresh. Fresh pineapple adds a nice crunch and bright flavor. If you use canned, rinse it first to remove extra syrup. This step helps reduce sweetness. Pineapple chicken goes well with jasmine rice. You can also serve it with steamed vegetables. A fresh salad adds a nice touch too. For a tropical feel, try coconut rice. The flavors will blend beautifully together, creating a balanced meal. Yes, you can make this dish ahead of time. Cook the chicken and vegetables, then store them in the fridge. Reheat when you are ready to eat. Just make sure to cook the rice fresh. It tastes best when made right before serving. This dish is great for meal prep. You can portion it into containers for easy lunches. Store the chicken and rice separately to keep the rice fluffy. It will last in the fridge for up to four days. You can also freeze portions for later use. To add heat, you can add red pepper flakes or diced jalapeños. Mixing in some sriracha or hot sauce works well too. If you like a smoky flavor, try adding chipotle powder. Adjust the spice to your taste, and enjoy a kick in every bite! This recipe combines tasty chicken, fresh pineapple, and colorful veggies. You learned how to marinate chicken and cook jasmine rice perfectly. We also explored many variations, cooking tips, and storage methods. Don’t forget to try different proteins and spices to suit your taste. With these easy steps, you can enjoy a delicious meal any day. Dive into this recipe, and make it your own!

Pineapple Chicken with Rice Savory Flavor Delight

- 8 oz fettuccine pasta - 1 lb large shrimp, peeled and deveined - 2 tablespoons Cajun seasoning - 3 tablespoons olive oil - 3 cloves garlic, minced - 1 cup heavy cream - 1/2 cup grated Parmesan cheese - 1/4 cup fresh parsley, chopped - Salt and pepper to taste - Lemon wedges for garnish In this dish, the fettuccine pasta forms a rich base. I love using large shrimp because they add a nice bite. The Cajun seasoning gives the shrimp a bold flavor. This spice mix often includes paprika, cayenne, and garlic powder. The olive oil helps sear the shrimp and adds a nice depth. Garlic brings warmth to the dish. Heavy cream makes the sauce creamy and rich. Parmesan cheese adds a savory touch. Fresh parsley not only brightens the dish, but it also adds color. Salt and pepper enhance all the flavors. Lemon wedges offer a zesty finish when squeezed over the pasta. When you gather these ingredients, you're ready to create a meal that impresses. Each ingredient plays a key role in making this Cajun shrimp Alfredo pasta a delight. {{ingredient_image_2}} To start, fill a large pot with water and bring it to a boil. Add a pinch of salt to the water. Once it boils, toss in 8 oz of fettuccine pasta. Cook the pasta for about 8 to 10 minutes until it's al dente. After cooking, drain the pasta, but save about 1/2 cup of the pasta water. Set the pasta aside for later. Next, grab a mixing bowl and add 1 lb of peeled and deveined shrimp. Sprinkle 2 tablespoons of Cajun seasoning over the shrimp. Toss the shrimp well until they're all coated in the spice mix. This step adds that bold flavor we love. Now, heat 2 tablespoons of olive oil in a large skillet over medium-high heat. Once the oil is hot, carefully add the seasoned shrimp to the skillet. Cook the shrimp for about 2 to 3 minutes on each side. They should turn a vibrant pink and become opaque. Once cooked, take the shrimp out and set them on a plate. In the same skillet, lower the heat to medium. Add the last tablespoon of olive oil. Next, add 3 cloves of minced garlic and sauté for about 1 minute. Stir it often to avoid burning. When the garlic is fragrant, slowly pour in 1 cup of heavy cream. Keep stirring as you let it gently simmer. Once it simmers, start mixing in 1/2 cup of grated Parmesan cheese. Stir until the cheese melts into a smooth sauce. If the sauce is too thick, use the reserved pasta water to reach your desired creaminess. Now it's time to combine the shrimp and pasta with the sauce. Add the cooked shrimp back into the skillet. Gently fold in the cooked fettuccine, making sure everything is well mixed and coated in the sauce. Taste the dish and adjust the seasoning with salt and pepper as needed. Just before serving, toss in some chopped parsley for freshness. Plate the Cajun shrimp Alfredo pasta right away. For a zesty kick, garnish each plate with lemon wedges. Squeeze the lemon over the dish just before you dig in. Enjoy the vibrant flavors! To cook shrimp that are tender and juicy, start with fresh shrimp. Fresh shrimp taste better than frozen. If you use frozen shrimp, let them thaw in the fridge overnight. Make sure to season the shrimp well with Cajun seasoning before cooking. This adds great flavor. Cook them quickly on medium-high heat. Aim for about 2-3 minutes on each side. When they turn pink and opaque, they are done. Overcooking shrimp makes them tough. Remove them from the heat as soon as they are cooked. The sauce should be creamy but not too thick. To adjust the thickness, add reserved pasta water gradually. This water contains starch from the pasta, which helps the sauce cling better. If your sauce is too thin, let it simmer for a minute to thicken. Stir frequently to prevent burning. Make sure to mix in the Parmesan cheese until it melts smoothly. This will give the sauce a rich texture. Want to boost the flavor? Try adding a pinch of cayenne pepper for extra heat. You can also mix in some fresh herbs like thyme or basil for a fresh taste. A squeeze of lemon juice brightens the dish and adds a nice zing. If you like a smoky flavor, consider adding smoked paprika. Each of these tweaks can make your dish even more delicious. Experiment with these options to find your favorite combination! Pro Tips Boost the Flavor: Consider marinating the shrimp in Cajun seasoning for at least 30 minutes before cooking to enhance the flavor. Perfect Pasta: To ensure your fettuccine is perfectly cooked, aim for al dente, which means it should be firm to the bite. Cheese Choices: For a richer flavor, try using a mix of Parmesan and Pecorino Romano cheese in your sauce. Fresh Herbs: Always use fresh parsley for garnish, as it adds a vibrant color and fresh taste to the dish. {{image_4}} You can change the shrimp and pasta in this dish. If you want a different protein, try chicken or even tofu. Both can soak up the Cajun flavor well. For pasta, you can use penne, spaghetti, or even zoodles if you want a veggie twist. Just remember to cook any pasta according to package instructions for the best texture. Need gluten-free options? You can use gluten-free pasta made from rice or corn. They cook similarly and taste good too. For a dairy-free version, swap heavy cream for coconut cream. Nutritional yeast can replace Parmesan cheese for a cheesy flavor without dairy. These changes keep it tasty while meeting your needs. Adding veggies can make your Cajun shrimp Alfredo pasta even better. You can toss in some bell peppers, spinach, or mushrooms. They add color and nutrients. Simply sauté them with the garlic before adding the cream. You can also add cherry tomatoes or peas for a fresh taste. This way, you get a balanced meal full of flavor and health. To store leftovers, place the Cajun shrimp Alfredo pasta in an airtight container. This keeps it fresh for about three days. Make sure the pasta cools down before sealing it. If you want to keep it for longer, consider freezing it. When reheating, I recommend using the stove. Heat a skillet on low and add a splash of water or cream. This helps bring back the creamy texture. Stir gently as you heat the dish, so it warms evenly. Avoid using a microwave if you can; it can make the pasta dry. If you want to freeze the dish, do it right after cooking. Use a freezer-safe container and leave some space at the top. This allows for expansion. When you’re ready to eat, let it thaw in the fridge overnight. Reheat gently on the stove, adding a bit of liquid if needed. Making Cajun Shrimp Alfredo Pasta takes about 30 minutes. You will spend 10 minutes prepping. Cooking the dish takes 20 minutes. This quick meal is perfect for busy nights and impresses your family. Yes, you can use frozen shrimp. Just remember to thaw them first. Place the shrimp in a bowl of cold water for about 15-20 minutes. Once thawed, peel and devein them if needed. This makes prep simple and fast. This dish pairs well with simple sides. Consider a green salad for freshness. Garlic bread adds a nice touch. Steamed vegetables are also a good choice. These sides balance the meal and enhance your dinner. Cajun Shrimp Alfredo Pasta has a mild to medium spice level. The Cajun seasoning adds flavor without being too hot. If you prefer it spicier, add more seasoning. You can also include hot sauce for an extra kick. Adjust the spice to suit your taste buds! Cajun Shrimp Alfredo Pasta combines rich flavors and simple steps. You learned about key ingredients like fettuccine, shrimp, and Cajun seasoning. I shared easy cooking instructions and helpful tips for great results. Consider variations to suit your taste, whether using different proteins or adding veggies. Store leftovers correctly for future meals. This dish is versatile and sure to impress anyone. Enjoy your cooking adventure and savor each delicious bite.

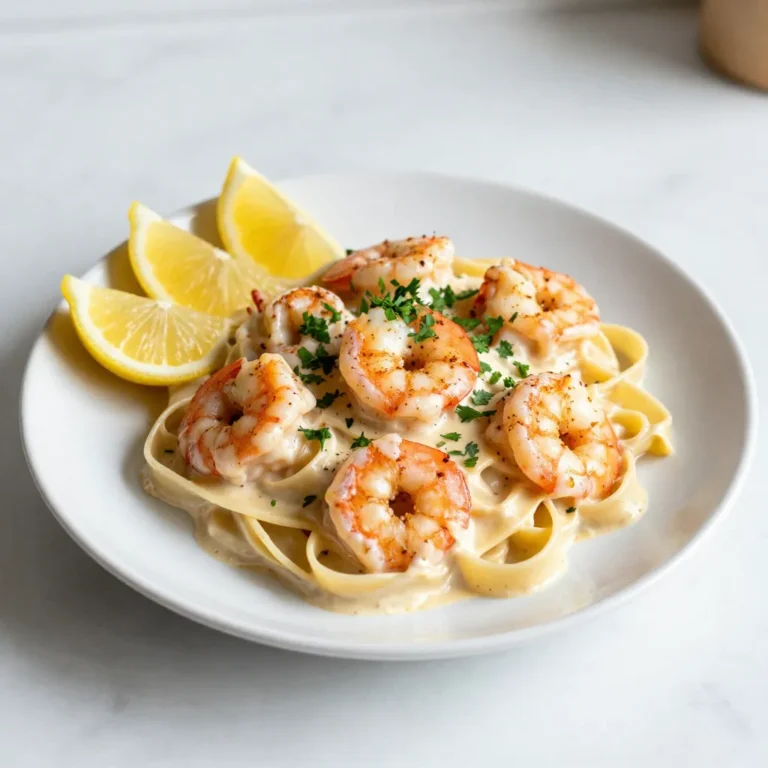
Cajun Shrimp Alfredo Pasta Flavorful and Easy Recipe

- 1 lb ground beef - 8 oz egg noodles - 2 tablespoons vegetable oil - 1 medium onion, finely chopped - 3 garlic cloves, minced - 1 inch ginger, grated - 2 green bell peppers, sliced - 1 cup broccoli florets - 1 cup snap peas - 3 tablespoons soy sauce - 1 tablespoon hoisin sauce - 1 tablespoon sesame oil - 1 tablespoon brown sugar - 1 teaspoon crushed red pepper flakes (optional) You will start your dish with ground beef and egg noodles. The beef adds rich flavor. The noodles give a nice, chewy texture. Next, you need fresh vegetables. I love using bell peppers, broccoli, and snap peas. They add color and crunch. For the sauce, soy sauce packs a salty punch. Hoisin sauce brings sweetness. Sesame oil adds a nutty flavor, while brown sugar balances it all. If you like heat, add crushed red pepper flakes. This mix of ingredients makes your Mongolian ground beef noodles truly delicious! {{ingredient_image_2}} To start, boil water in a large pot. Once it’s bubbling, add the egg noodles. Cook them according to the package instructions until they are al dente. This usually takes around 7-8 minutes. After cooking, drain the noodles well and set them aside. This step helps keep the noodles from becoming too soggy later. Next, grab a large skillet or wok and heat 2 tablespoons of vegetable oil over medium-high heat. Once the oil is hot, add 1 medium onion, finely chopped. Sauté the onion for about 2-3 minutes until it turns translucent. Then, add 3 minced garlic cloves and 1 inch of grated ginger. Cook for 1 more minute. This will make your kitchen smell amazing! Now, push the onion mixture to one side of the skillet. Add 1 pound of ground beef to the other side. Cook the beef for 5-7 minutes. Use a spatula to break it apart as it cooks. You want it to brown nicely and be fully cooked. Once it’s brown, mix it with the onion. After the beef is cooked, add 2 sliced green bell peppers, 1 cup of broccoli florets, and 1 cup of snap peas to the skillet. Stir everything together. Cook for about 4-5 minutes. This keeps the veggies tender yet crisp. You want them to stay colorful and bright! In a small bowl, whisk together 3 tablespoons of soy sauce, 1 tablespoon of hoisin sauce, 1 tablespoon of sesame oil, and 1 tablespoon of brown sugar. If you like spice, add 1 teaspoon of crushed red pepper flakes. Once combined, pour the sauce over the beef and veggies in the skillet. Stir well to coat everything evenly. Now it’s time to bring it all together! Add the drained egg noodles to the skillet. Toss everything gently to mix. Cook for another 2 minutes. This allows the noodles to soak up all the flavors from the sauce. After that, remove the skillet from heat. Taste the dish and add more soy sauce if you want extra flavor. Now you're ready to serve this tasty meal! Get the seasoning right for great taste. Use soy sauce and hoisin sauce to add depth. Brown sugar adds sweetness, while crushed red pepper gives a kick. Adjust these to your liking. Taste as you cook. This helps ensure a balanced flavor in your dish. Use a large skillet or a wok. These tools help you cook evenly and quickly. Heat the oil well before adding ingredients. This ensures the beef browns nicely. Make sure to keep stirring to avoid burning. It helps the flavors mix well. Serve your noodles in big, deep bowls. This adds a nice touch. Top with chopped green onions and sesame seeds. These add color and crunch. For extra flair, place a few snap peas on top. It makes your dish look inviting and fresh. Enjoy your meal! Pro Tips Use High Heat: Cooking at a higher temperature helps to brown the beef quickly while keeping it juicy. This also enhances the flavors of the other ingredients. Vegetable Variety: Feel free to mix and match your favorite vegetables. Carrots, mushrooms, or bok choy can add different textures and flavors to the dish. Prep Ahead: Chop your vegetables and measure out your sauces ahead of time to streamline your cooking process and make it more efficient. Adjust Spice Levels: Customize the heat by adjusting the amount of crushed red pepper flakes based on your preference. You can always add more spice later! {{image_4}} You can easily switch the ground beef for chicken or turkey. Both options cook well and keep the dish light. If you want a plant-based choice, try tofu. Tofu absorbs flavors well and offers a nice texture. Just crumble it into the mix when you add the vegetables. Feel free to mix up the vegetables. Carrots, zucchini, or bell peppers add a nice crunch. You can also use mushrooms for an earthy flavor. Spinach or kale can boost nutrients and color. Just remember to cook harder veggies longer than softer ones. Want to change the taste? Try adding more hoisin sauce for sweetness. A splash of rice vinegar can add a nice tang. If you like spicy, increase the red pepper flakes. You can even use different soy sauces for unique flavors. Experiment and find your perfect balance! To store leftovers, let the Mongolian ground beef noodles cool down. Place them in an airtight container. This helps keep the flavors fresh. Store in the fridge for up to three days. When you want to eat, just take it out and enjoy! If you want to freeze the noodles, pack them in a freezer-safe bag. Remove as much air as you can. Label the bag with the date. You can freeze them for up to three months. To reheat, let them thaw overnight in the fridge. To keep the noodles tasty, use a skillet or microwave. If using a skillet, add a little water or broth. Heat on low and stir often. If using a microwave, cover the bowl with a lid or wrap. This keeps moisture in. Heat until warm, stirring halfway. Enjoy your meal just like the first time! Mongolian Ground Beef Noodles is a tasty dish with roots in Asian cuisine. It features ground beef, egg noodles, and fresh veggies. The mix of soy sauce and hoisin sauce adds bold flavors. This dish is quick to cook and perfect for busy nights. Many people love it for its rich taste and colorful look. Yes, you can make this dish gluten-free! Here are some options: - Use gluten-free egg noodles or rice noodles. - Swap regular soy sauce for tamari or gluten-free soy sauce. - Check hoisin sauce for gluten-free labels. These changes will keep the dish tasty and safe for those who avoid gluten. Making Mongolian Ground Beef Noodles is quick and easy. Here’s a breakdown: - Prep time: 10 minutes - Cook time: 20 minutes - Total time: 30 minutes You can enjoy a delicious meal in just half an hour! In this post, we explored making Mongolian Ground Beef Noodles, focusing on key ingredients like beef, egg noodles, and flavorful sauces. I shared step-by-step instructions, tips for the best flavors, and ways to customize this dish. Remember, the balance of seasonings is crucial for taste. With the right techniques and a bit of creativity, you can make a delightful meal that suits your preferences. Enjoy experimenting and sharing your version of this tasty dish!

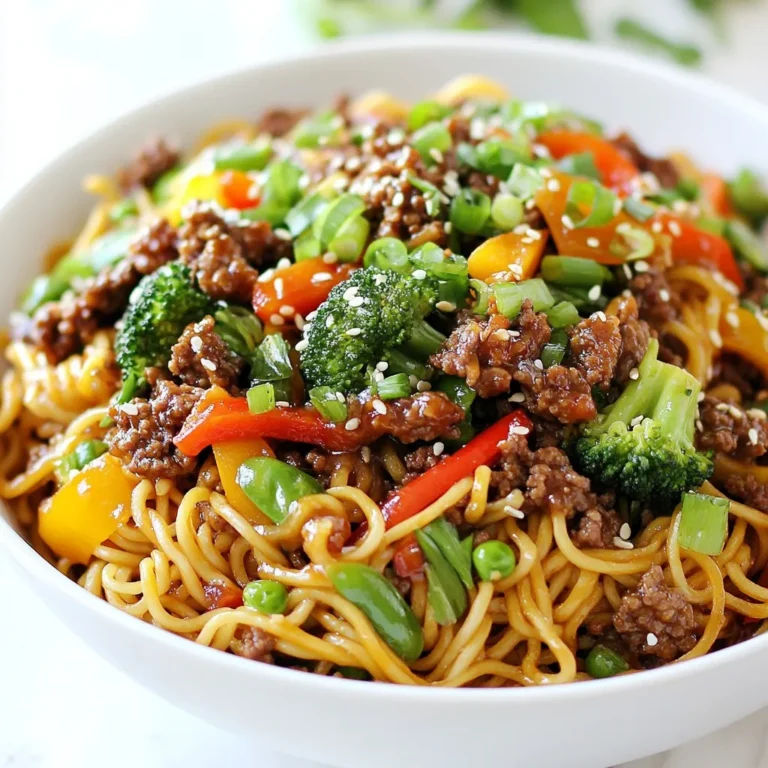
Mongolian Ground Beef Noodles Easy and Flavorful Meal

- 2 pounds baby potatoes - 1/2 cup sour cream - 1/4 cup cream cheese - 1 cup shredded sharp cheddar cheese - 1/2 cup cooked bacon bits (or green onions for vegetarian) - 1/4 cup green onions - 1 teaspoon garlic powder - 1 teaspoon onion powder - Salt and black pepper - Olive oil These ingredients make loaded smashed potatoes a true comfort dish. Baby potatoes are key, as they are small and tender. The sour cream and cream cheese create a rich and creamy topping. Cheddar cheese adds that tasty, cheesy flavor we all love. If you want a vegetarian twist, use green onions instead of bacon bits. Garlic powder and onion powder add depth and flavor. Don't forget the salt and pepper; they bring everything together. Finally, a drizzle of olive oil helps to crisp up the potatoes in the oven. With these ingredients, you can create a dish that warms hearts and makes smiles! {{ingredient_image_2}} Start with 2 pounds of baby potatoes. Place them in a large pot. Cover the potatoes with water, adding a good pinch of salt. Bring the pot to a boil and cook for 15-20 minutes. Check if they are fork-tender. Drain the potatoes and let them cool for a bit. While the potatoes cool, preheat your oven to 425°F (220°C). This makes sure the oven is hot when you bake the potatoes. Line a baking sheet with parchment paper for easy cleanup. When the potatoes cool enough to handle, place them on the sheet. Use a potato masher or a sturdy glass to smash each potato to about 1/2 inch thick. In a medium bowl, mix 1/2 cup of sour cream, 1/4 cup of softened cream cheese, 1 teaspoon of garlic powder, and 1 teaspoon of onion powder. Add half of the shredded cheddar cheese. Mix well until creamy and smooth. Drizzle a bit of olive oil over the smashed potatoes. Season them with salt and pepper to your taste. Spoon the creamy cheese mixture over each potato, making sure they are well covered. If you like bacon, sprinkle 1/2 cup of cooked bacon bits on top. For a vegetarian option, use chopped green onions instead. Top each potato with the rest of the shredded cheddar cheese, for that melty goodness. Place the baking sheet in the hot oven. Bake for 15-20 minutes. You want the cheese to melt and bubble. The edges of the potatoes should be golden and crisp. Once baked, take the potatoes out of the oven. Sprinkle sliced green onions on top. This adds color and a nice flavor to balance the richness. Let the loaded smashed potatoes cool for a few minutes. Serve them warm. They work great as a side dish or a fun appetizer for gatherings! To make the best smashed potatoes, choose small baby potatoes. They have a tender texture and cook evenly. Boil them in salted water for great flavor. Once they are fork-tender, let them cool for a few minutes. This helps prevent burns when you smash them. Use a potato masher or a sturdy glass to flatten each potato gently. Aim for about half an inch thick, so they get crispy edges while baking. Feel free to mix up the cheese! Sharp cheddar adds a bold taste, but you can try other types. Monterey Jack gives a creamy texture, while pepper jack adds spice. For a fun twist, use crumbled feta or goat cheese. These options bring unique flavors to your loaded smashed potatoes. Each cheese melts differently, so experiment and find your favorite combo. Want a lighter version? Replace sour cream with Greek yogurt. It adds creaminess and protein. You can also skip the bacon and use more green onions or roasted vegetables for flavor. Instead of cream cheese, try using silken tofu blended until smooth. These swaps keep the dish tasty while cutting down on calories. Enjoy good food without the extra guilt! Pro Tips Choose the Right Potatoes: For the best texture, use waxy baby potatoes as they hold their shape well when boiled and smashed. Make It Extra Cheesy: For an even cheesier experience, mix in some grated Parmesan cheese along with the cheddar. Customize Your Toppings: Feel free to add other toppings like sautéed mushrooms or jalapeños for a spicy kick! Perfectly Crispy Edges: To achieve crispy edges, ensure the smashed potatoes are evenly coated with olive oil before baking. {{image_4}} For a vegetarian twist, skip the bacon bits. Instead, use chopped green onions. They add a nice crunch and fresh flavor. You can also add diced tomatoes or bell peppers for extra color and taste. This version keeps all the cheesy goodness while being meat-free. It’s a great choice for family gatherings or potlucks. Want some heat? Add diced jalapeños or a dash of hot sauce to the cheese mix. You could also sprinkle crushed red pepper flakes on top before baking. This spicy version gives a fun kick to every bite. It’s perfect for spice lovers or anyone looking to mix things up. Get creative with toppings! You can add cooked chili for a hearty version. Try sour cream with fresh herbs or even guacamole for a twist. You could also top them with BBQ pulled pork for a savory treat. The choice is yours. These potatoes are a blank canvas ready for your favorite flavors. After enjoying your loaded smashed potatoes, let them cool. Transfer them to an airtight container. Store them in the fridge for up to three days. If you want to keep them longer, freezing is a good option. To reheat, preheat your oven to 350°F (175°C). Place the leftover potatoes on a baking sheet. Cover them with foil to keep them moist. Heat for about 15-20 minutes. Check that they are warm in the center. You can also use the microwave for quick reheating. Just place a potato on a microwave-safe plate. Heat for 1-2 minutes until warm. You can freeze these tasty treats too! First, let them cool completely. Spread them on a baking sheet and freeze until solid. This prevents them from sticking together. Once frozen, transfer them to a freezer-safe bag or container. They can last for up to three months. When ready to eat, thaw them overnight in the fridge before reheating. Enjoy your loaded smashed potatoes anytime! Yes, you can use other potatoes. Red potatoes or Yukon Gold work well. These types give a nice flavor and texture. Just keep the cooking time the same. To make this dish dairy-free, swap the cream cheese and sour cream for vegan options. You can use cashew cream or coconut yogurt. For cheese, look for dairy-free shreds. You can serve these potatoes with grilled chicken or roasted veggies. They also pair well with a fresh salad. Add a dipping sauce for extra fun. Leftovers last about three to four days in the fridge. Store them in an airtight container. Reheat in the oven for best results. Yes, you can prep this dish ahead. Boil and smash the potatoes, then store them. Add toppings just before baking for fresh taste. This blog post shared a simple recipe for Loaded Smashed Potatoes and tips to enhance it. You learned how to boil, smash, and bake potatoes, along with tasty topping ideas. Remember, you can use different cheeses or healthful swaps to suit your taste. The variations add fun twists, and storage tips keep leftovers fresh. Now that you have the skills, enjoy making this dish your way! Your kitchen adventures will delight everyone at your table.

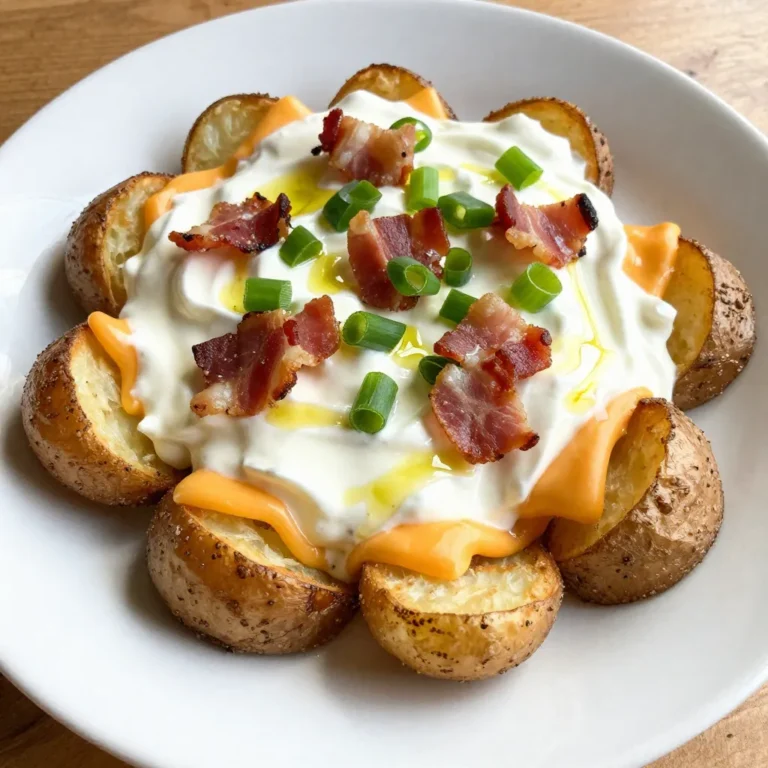
Loaded Smashed Potatoes Irresistible Comfort Food Recipe

To make tasty firecracker chicken meatballs, you need: - 1 pound ground chicken - 1/2 cup breadcrumbs - 1/4 cup green onions, finely chopped - 1 tablespoon garlic, minced - 1 tablespoon ginger, minced - 1 tablespoon low-sodium soy sauce - 1 tablespoon sesame oil - 1 teaspoon red pepper flakes - 1/4 cup sweet chili sauce - 1/4 cup hot sauce (adjust for heat) - Salt and pepper to taste These ingredients combine perfectly to create juicy meatballs with a spicy kick. To add a burst of flavor and color, consider these garnishes: - Sesame seeds - Fresh cilantro, roughly chopped These toppings make the dish look great and add freshness. If you have dietary needs, you can easily adjust the recipe. - Use ground turkey for a leaner option. - Substitute gluten-free breadcrumbs if needed. - For a vegan version, try using ground chickpeas or lentils. These swaps keep the dish delicious while catering to your needs. {{ingredient_image_2}} Start by preheating your oven to 400°F (200°C). This ensures even cooking. Next, grab a large bowl. In it, mix together the ground chicken, breadcrumbs, and chopped green onions. Add the minced garlic and ginger for flavor. Don’t forget the low-sodium soy sauce and sesame oil. These ingredients bring depth to your meatballs. Now, sprinkle in the red pepper flakes for heat. Add a pinch of salt and pepper to taste. Use your hands to mix the ingredients gently. Be careful not to overmix, as that can make the meatballs tough. A light hand keeps them tender and juicy. Once your mixture is ready, wash your hands and start forming the meatballs. Make them about 1 inch in diameter. This size helps them cook evenly. Place each meatball on a lined baking sheet, making sure they don’t touch. Bake these meatballs for about 20 minutes. They should be firm to the touch and slightly golden brown. This step locks in the flavors and gives the meatballs a nice texture. While the meatballs bake, let’s make the firecracker sauce. In a small bowl, whisk together the sweet chili sauce and hot sauce. Mix until they are well combined. This sauce adds a kick to your meatballs. When the meatballs finish baking, take them out of the oven. Transfer them to a large bowl and pour the firecracker sauce over them. Gently toss to coat each meatball in the sauce. Return them to the baking sheet and bake for another 5 minutes. This final bake allows the sauce to set and caramelize. After that, let them cool for a couple of minutes. Before serving, top them with sesame seeds and chopped cilantro. This adds a fresh touch and a pop of color. Enjoy your Firecracker Chicken Meatballs! To keep your meatballs tender, don’t overmix the ingredients. Use your hands to mix until just combined. This helps keep the meatballs light and juicy. Also, use fresh ground chicken for the best taste. It has more moisture, which helps with tenderness. If you want more heat, add extra red pepper flakes or hot sauce. Start with a small amount, then taste. You can always add more, but it’s harder to take heat away. On the other hand, if you prefer less spice, reduce the hot sauce or use sweet chili sauce alone. Baking your meatballs is easier and cleaner than frying. It also helps them cook evenly. Frying can add a nice crust, but it requires more oil and attention. If you want that crispy texture, consider a quick pan-sear before baking. Both methods can be tasty; choose what fits your time and taste! Pro Tips Mix Gently: When combining the ingredients for the meatballs, mix them just until combined to avoid a dense texture. A gentle touch ensures they remain tender and juicy. Adjust the Heat: Feel free to modify the amount of red pepper flakes and hot sauce to suit your spice preference. Start with less and add more as needed to find your perfect level of heat. Bake Twice: Baking the meatballs twice allows the sauce to caramelize and intensify in flavor, giving you that delicious, sticky coating that enhances the overall taste. Garnish for Freshness: Adding fresh cilantro and sesame seeds just before serving not only adds visual appeal but also a fresh burst of flavor that balances the spiciness of the dish. {{image_4}} You can swap chicken for turkey or pork. Both meats work well with the same spices. Turkey gives a leaner option, while pork adds a rich flavor. Use the same amount, one pound, for either meat. The cooking time stays the same too. Just watch for doneness. You want them firm and golden. To make these meatballs gluten-free, use gluten-free breadcrumbs. You can also grind oats for a great substitute. For a Paleo option, skip the breadcrumbs. Instead, use almond flour or crushed nuts. This adds taste and keeps the meatballs tender. The flavor remains bold and delicious. For a vegetarian twist, replace meat with cooked lentils or chickpeas. Mash them up and mix with the other ingredients. You could also use a plant-based meat substitute. Just ensure it is firm enough to hold shape. The sauce will still shine through, giving you that spicy kick. Don't forget to garnish with sesame seeds and cilantro for extra flair! To keep your leftover meatballs fresh, place them in an airtight container. You can keep them in the fridge for up to three days. Make sure they cool down before sealing the container. This helps to keep them juicy and tasty. When you’re ready to eat your leftover meatballs, use the oven for reheating. Preheat the oven to 350°F (175°C). Place the meatballs on a baking sheet and cover them with foil. Heat for about 10-15 minutes. This keeps them moist and delicious. You can also use a microwave for quick heating. Just cover the meatballs and heat for 1-2 minutes, checking often. You can freeze meatballs for later use. First, let them cool completely. Then, place them in a single layer on a baking sheet. Freeze them for about 1-2 hours. Once frozen, transfer them to a freezer-safe bag. Make sure to remove excess air. These meatballs can stay fresh for up to three months. When you're ready to eat them, thaw in the fridge overnight before reheating. Enjoy the spicy goodness anytime! You can serve these meatballs with rice or noodles. They pair well with stir-fried veggies. A fresh salad adds crunch and balance. You might try a side of steamed broccoli. For a fun twist, serve them in sliders with mini buns. The options are endless! Yes, you can make the sauce early. Just mix the sweet chili sauce and hot sauce together. Store it in the fridge in a sealed container. This way, the flavors blend nicely. When you’re ready, just heat it up and toss it with your meatballs. To add more heat, increase the red pepper flakes in the mix. You can also use extra hot sauce in the firecracker sauce. Another option is to add chopped fresh chili peppers. Always taste as you go to get the heat just right for you! Firecracker Chicken Meatballs offer a fun twist on dinner. We covered key ingredients and optional garnishes. You learned how to prep the mixture, form, and bake the meatballs. The firecracker sauce is easy to make. Remember tips for tender meatballs and spice control. Explore variations with turkey, pork, or vegetarian options. Store and reheat leftovers for great taste. With these steps, you can create a delicious meal and impress anyone at your table. Enjoy your cooking adventure!

Firecracker Chicken Meatballs Tasty and Quick Recipe

- 1 lb skinless salmon fillet, cut into 1-inch bite-sized cubes - 3 tablespoons honey - 3 tablespoons soy sauce (low sodium recommended) - 2 cloves garlic, finely minced - 1 tablespoon fresh ginger, grated - 1 tablespoon sesame oil - 2 green onions, thinly sliced (white and green parts separated) - Sesame seeds for garnish - Salt and freshly cracked black pepper to taste - Additional garnishes - Side dish pairings When you make honey garlic salmon bites, use fresh and high-quality ingredients. The skinless salmon fillet is the star of the dish. It cooks quickly and absorbs flavors well. The honey adds sweetness, while soy sauce brings umami. Garlic and ginger give a nice kick. Sesame oil adds a rich, nutty flavor. Green onions add crunch and color. Sesame seeds are great for garnish. Optional ingredients can enhance your dish. Fresh herbs like cilantro or parsley can add freshness. You might consider serving these bites with a side like rice or a green salad. This adds balance to your meal and brightens the plate. Remember, the quality of your ingredients matters. Fresh, flavorful items lead to the best results. Enjoy the process of gathering your ingredients. It sets the stage for a delicious meal! {{ingredient_image_2}} To start, grab a medium bowl. Add 3 tablespoons of honey, 3 tablespoons of low-sodium soy sauce, 2 minced garlic cloves, 1 tablespoon of grated ginger, and 1 tablespoon of sesame oil. Whisk these ingredients together until they blend smoothly. This marinade gives the salmon a sweet and savory kick. Marinating is key. It lets the salmon soak up all those yummy flavors. I suggest marinating for at least 15 minutes at room temperature. If you have time, you can refrigerate it for up to 1 hour. This will make each bite even tastier. Next, heat a non-stick skillet or cast-iron pan over medium-high heat. Let it get nice and hot. Once ready, gently add the marinated salmon pieces. Make sure they sit in a single layer without crowding. This helps them cook evenly. Sear each side for about 2-3 minutes. You want the salmon to be fully cooked and have a nice golden color. Keep an eye on it to avoid overcooking. After searing, take the reserved marinade and pour it into the skillet. Stir gently and cook for an extra 1-2 minutes. This will thicken the sauce and coat the salmon bites. Now, season with salt and freshly cracked black pepper to taste. Adjust to your liking. Once done, remove the skillet from the heat. Garnish the salmon bites with thinly sliced green onions and a sprinkle of sesame seeds. Serve them hot and enjoy! To get the best salmon bites, cook them for about 2-3 minutes on each side. This time gives a nice sear while keeping the inside tender. Watch closely to avoid overcooking. Overcooked salmon can become dry and tough. If you see the salmon turning opaque and flaking easily with a fork, it's ready. To make the flavor pop, try adding spices like paprika or cayenne pepper for some heat. You can also mix in a bit of lime juice for a zesty twist. When serving, drizzle extra sauce over the salmon bites. This adds moisture and boosts the taste even more. For a beautiful plate, arrange the salmon bites on a colorful platter. Use leafy greens like arugula or spinach as a base. These greens add color and freshness. Garnish with sliced green onions and sesame seeds for a nice touch. To serve, use toothpicks or skewers for easy eating. This makes it fun for guests! Pro Tips Marination Magic: Allow the salmon to marinate longer, up to 1 hour, for deeper flavor infusion. Cooking Temperature: Ensure your skillet is hot enough before adding the salmon to achieve a perfect sear. Use Fresh Ingredients: Fresh garlic and ginger will elevate the flavor of the marinade significantly. Garnish for Appeal: Adding fresh herbs or microgreens as a garnish can enhance both presentation and flavor. {{image_4}} You can switch out honey for maple syrup. Maple syrup gives a nice sweet touch. If you want a less sweet dish, try using agave nectar. For soy sauce, use coconut aminos or tamari. Both work well for a different flavor. You can also change the garlic and ginger. Try shallots for a mild taste. Use lemongrass for a fresh twist. Fresh herbs like cilantro or basil add a unique flavor too. You can grill the salmon bites for a smoky flavor. Just preheat your grill and use skewers to hold the salmon. Cook each side for 2-3 minutes. Baking is another simple method. Preheat your oven to 400°F (200°C). Place the salmon bites on a baking sheet and bake for about 10-12 minutes. This method keeps the salmon tender and juicy. These salmon bites are great as appetizers. Serve them with toothpicks for easy eating. They also work well as a main dish. Pair them with rice or quinoa for a healthy meal. For sides, try a fresh salad or steamed veggies. You can also serve them with a dipping sauce, like a spicy mayo or a tangy vinaigrette. Enjoy mixing and matching to find your favorite combo! To store leftovers in the fridge, place the salmon bites in an airtight container. This keeps them fresh for about 2-3 days. Make sure to let them cool first. If you have any sauce left, store it in a separate container. This will help keep the bites from getting soggy. For long-term storage, you can freeze the salmon bites. First, let them cool completely. Then, place them in a single layer on a baking sheet. Freeze them for about 1-2 hours until solid. After that, transfer the bites to a freezer bag or airtight container. They will stay good in the freezer for up to 3 months. Remember to label the bags with the date. To reheat the salmon bites, you can use an oven or a skillet. For the oven, preheat it to 350°F. Place the bites on a baking sheet and heat for about 10-12 minutes. If using a skillet, add a little oil over medium heat. Reheat for 3-4 minutes on each side until warm. This helps keep them juicy and tasty. Avoid using a microwave, as it can make the salmon rubbery. Yes, you can use frozen salmon. Just make sure to thaw it properly. To thaw, place the salmon in the fridge for several hours or overnight. If you're in a hurry, you can seal it in a plastic bag and submerge it in cold water for about an hour. This method helps retain the salmon's texture and flavor. To check if the salmon is cooked, look for its color and texture. Cooked salmon should be opaque and flake easily with a fork. If the salmon is still pink in the middle, it needs more time. The internal temperature should reach 145°F (63°C). A meat thermometer can help you ensure it's done. These salmon bites pair well with many sides. Here are some options: - Steamed rice or quinoa - Roasted vegetables like broccoli or asparagus - A fresh salad with mixed greens - Crispy potatoes or sweet potato fries - Noodles tossed in sesame oil and veggies Serving with these sides enhances the meal and balances the flavors. Enjoy! This blog post guided you through making delicious honey garlic salmon bites. You learned about key ingredients, how to prepare, cook, and present your dish. We covered useful tips to ensure your salmon is perfectly cooked. Remember, you can customize the recipe with different flavors and cooking methods. Enjoy experimenting with this dish and impressing others with your skills. Happy cooking!

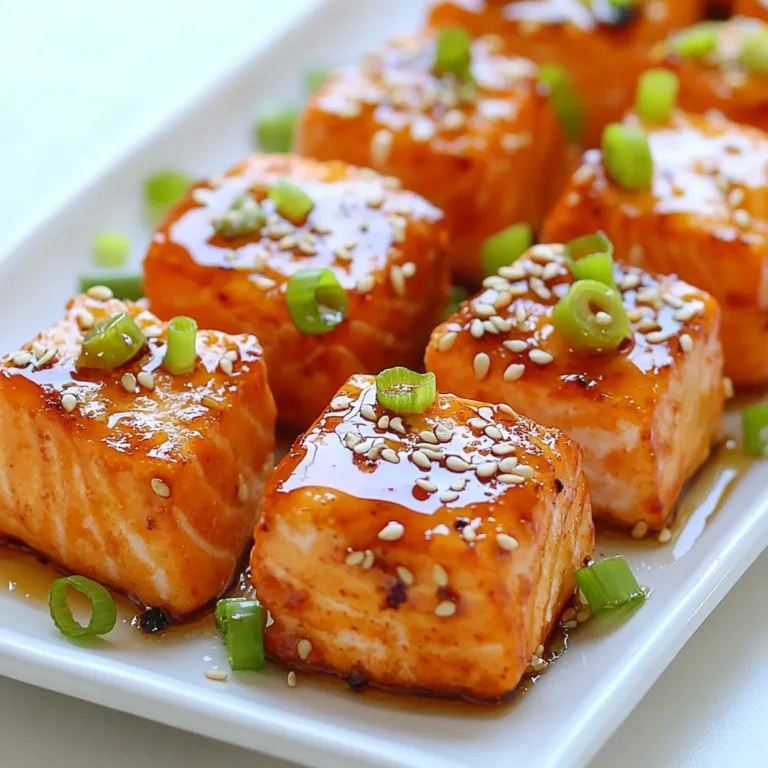
Honey Garlic Salmon Bites Simple and Flavorful Treat

- 1 and 1/2 cups all-purpose flour - 1/2 cup unsweetened cocoa powder - 1 teaspoon baking powder - 1/2 teaspoon baking soda - 1/4 teaspoon salt - 1/2 cup unsalted butter, softened to room temperature - 1 cup granulated sugar - 1 large egg - 2 teaspoons pure vanilla extract - 1 tablespoon red food coloring - 1/2 cup powdered sugar (for dusting and coating) To help you measure ingredients easily: - 1 cup = 240 ml - 1/2 cup = 120 ml - 1 tablespoon = 15 ml - 1 teaspoon = 5 ml - 1 cup of all-purpose flour = about 120 grams - 1 cup of granulated sugar = about 200 grams - 1 cup of unsweetened cocoa powder = about 100 grams If you're missing some items, here are swaps: - Use coconut oil for unsalted butter. - Replace red food coloring with beet juice for natural color. - Use gluten-free flour mix instead of all-purpose flour. - Swap granulated sugar with coconut sugar for a healthier option. - Use egg substitute like applesauce for a vegan version. These swaps keep the cookies tasty while fitting your needs. Feel free to experiment with flavors and textures! {{ingredient_image_2}} - Preheating the Oven First, preheat your oven to 350°F (175°C). This ensures that your cookies bake evenly. - Preparing the Baking Sheet Line a baking sheet with parchment paper. This helps prevent sticking and makes cleanup easy. - Creaming Butter and Sugar In a large bowl, cream together 1/2 cup unsalted butter and 1 cup granulated sugar. Use an electric mixer on medium speed. Beat until the mixture is light and fluffy, about 3 to 4 minutes. - Incorporating Wet and Dry Ingredients Add 1 large egg, 2 teaspoons pure vanilla extract, and 1 tablespoon red food coloring to the butter-sugar mix. Blend on low speed until all the ingredients are combined. Next, sift together 1 and 1/2 cups all-purpose flour, 1/2 cup cocoa powder, 1 teaspoon baking powder, 1/2 teaspoon baking soda, and 1/4 teaspoon salt in another bowl. Gradually mix in the dry ingredients. Be gentle to keep the dough soft. - Chilling the Dough Cover the dough with plastic wrap and chill it in the fridge for 30 minutes. This step makes the dough easier to handle. - Rolling and Coating Cookies After chilling, use a cookie scoop or your hands to roll the dough into 1-inch balls. Roll each ball in 1/2 cup powdered sugar until coated well. This gives the cookies their crinkle look. - Baking Time and Temperature Place the coated dough balls on the prepared baking sheet, spacing them about 2 inches apart. Bake in the preheated oven for 10 to 12 minutes. The edges should look set, but the centers can stay soft. Let the cookies cool on the baking sheet for 5 minutes before moving them to a wire rack. To get the right texture for your Red Velvet Crinkle Cookies, you need to chill the dough. Chilling makes the dough firm. This helps the cookies hold their shape while baking. Aim for a soft, slightly sticky dough. If the dough is too dry, your cookies may turn out tough. Remember, gentle mixing is key. Overmixing can lead to dense cookies. One common mistake is skipping the chilling step. This can cause your cookies to spread too much. Also, avoid using too much flour. Measuring flour incorrectly can lead to dry cookies. Use the spoon-and-level method when measuring. Finally, don’t forget to coat your dough balls in powdered sugar. This gives them their signature crinkle look! For a stunning presentation, serve your cookies on a colorful platter. A decorative box also works great. Just before serving, dust them lightly with more powdered sugar. This adds a nice touch. Consider pairing these cookies with a glass of milk or coffee. They are even better when shared with friends! Pro Tips Chill the Dough: Chilling the dough for at least 30 minutes helps to firm it up, making it easier to roll and shape while preventing excessive spreading during baking. Use Quality Ingredients: Using high-quality cocoa powder and pure vanilla extract will enhance the flavor of your cookies, giving them a rich and delightful taste. Don’t Overbake: Keep an eye on the cookies while baking; they should be set at the edges but still soft in the center. This ensures a chewy texture that everyone loves. Dust Generously: Coat the dough balls thoroughly in powdered sugar before baking to achieve the classic crinkle appearance and a sweet contrast to the rich cookie. {{image_4}} To make gluten-free red velvet crinkle cookies, swap the all-purpose flour with a gluten-free blend. Look for a blend that includes xanthan gum. This will help the cookies hold their shape and texture. You can find these blends in most grocery stores. The other ingredients can stay the same. Just follow the same steps, and you'll enjoy delicious cookies without gluten. You can add fun flavors to your red velvet crinkle cookies. Consider mixing in chocolate chips for a tasty twist. Use semi-sweet or white chocolate chips to enhance the cookie's sweetness and richness. You can also add nuts like pecans or walnuts for extra crunch. These additions will surprise your friends and family with a new flavor in every bite. Red velvet crinkle cookies are perfect for any holiday. For Valentine's Day, use heart-shaped cookie cutters. You can even sprinkle some edible glitter on top for a festive look. For Christmas, add a dash of peppermint extract to the dough. You could also color the powdered sugar with green or red food coloring. These small changes can make your cookies fit the season while keeping the same delightful taste. To keep your red velvet crinkle cookies fresh, store them in an airtight container. Place a piece of parchment paper between layers to avoid sticking. This method helps keep them soft. You can enjoy cookies for up to a week at room temperature. If you want to keep them longer, refrigeration is a good option. Just remember to seal them well. Freezing cookies is easy. First, let the cookies cool completely. Then, place them in a single layer on a baking sheet and freeze for about an hour. This step prevents them from sticking together. Once frozen, transfer the cookies to a freezer-safe bag. You can freeze them for up to three months. To defrost, leave them at room temperature for about 30 minutes before enjoying. These cookies shine at any gathering. Serve them on a pretty platter for a festive look. Dust some extra powdered sugar on top for a touch of elegance. Pair them with milk or coffee for a tasty treat. You can also stack them in a decorative box for a lovely gift. Enjoy sharing these delightful cookies with friends and family! To stop your cookies from spreading, chill the dough before baking. After mixing, wrap the dough in plastic wrap. Place it in the fridge for about 30 minutes. This cools the butter, helping the cookies keep their shape. Also, make sure you space the dough balls correctly on the baking sheet. Leave about 2 inches between each ball. You can use liquid food coloring, but it may change the cookie's texture. Liquid food coloring has more water content. This extra moisture can make the dough too wet. If you use it, you might need to add a bit more flour to balance it out. Gel food coloring is thicker and gives a richer color without changing the dough much. If your dough feels too sticky, add a bit more flour. Start with one tablespoon at a time. Mix it in until the dough becomes manageable. Another option is to chill the dough longer. Cool dough helps it firm up. This makes it easier to roll into balls without sticking to your hands. You now have a solid understanding of making delicious cookies. We covered all the key steps, from gathering ingredients to storage tips. You learned about ingredient swaps, preparation, and baking methods. Plus, I shared common mistakes and fun variations. Remember, practice makes perfect. Don't hesitate to experiment with flavors or decorations. Enjoy your baking journey, and share these treats with friends and family! They will love your results.

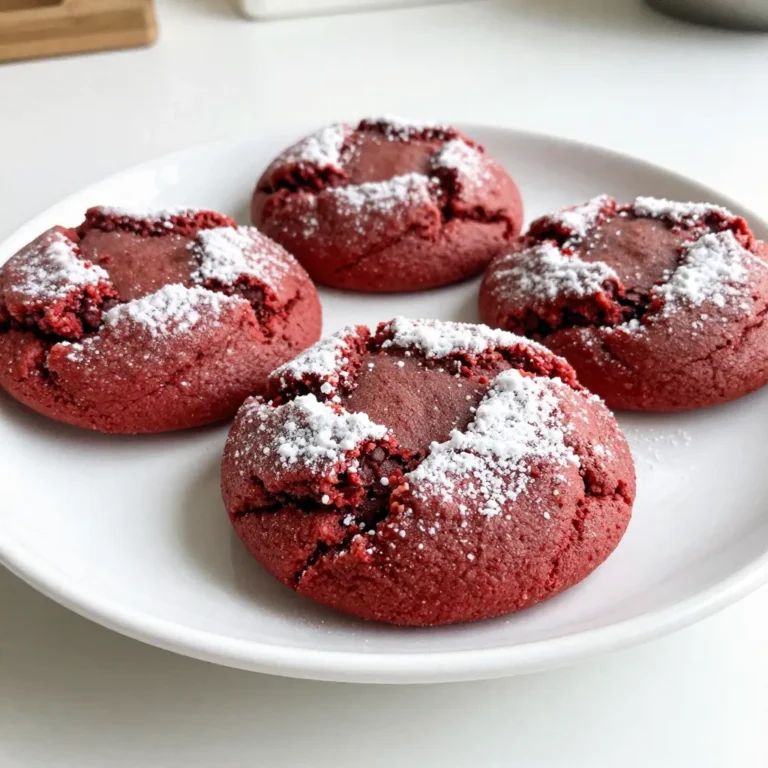
Red Velvet Crinkle Cookies Delightful and Easy Recipe

PREV 1 … 29 30 31 … 47 NEXT
snack joy kitchen

explore

DessertsDinnerAppetizersDrinks

Our Policies

  • Cookie Policy
  • Copyright Policy
  • Disclaimer
  • GDPR Policy
  • Terms Of Use
Back to Top
  • About
  • Contact Us
  • Privacy Policy
© 2026 snack joy kitchen