FREE DINNER EBOOK! Get your copy!
  • Cookie Policy
  • GDPR Policy
  • Disclaimer
  • Terms Of Use
  • Visit my other site: Fun Cookie Recipes
snack joy kitchen
  • Home
  • Dinner
  • Desserts
  • Drinks
  • Appetizers
  • Contact
  • About
  • Privacy Policy
  • Home
  • Dinner
  • Desserts
  • Drinks
  • Appetizers
  • Contact
  • About
  • Privacy Policy
  • Cookie Policy
  • GDPR Policy
  • Disclaimer
  • Terms Of Use
Visit my other site: Fun Cookie Recipes

HOME / CATEGORIES /

Latest

- 2 medium zucchinis, cut into fry-like shapes - 1 cup breadcrumbs (panko or regular) - 1/2 cup finely grated Parmesan cheese - 1 teaspoon garlic powder - 1 teaspoon onion powder - 1 teaspoon smoked paprika - 1/2 teaspoon salt - 1/4 teaspoon freshly ground black pepper - 2 large eggs - 1 tablespoon olive oil (for drizzling) - Fresh parsley, chopped (for garnish) For this recipe, you want fresh zucchinis. Choose medium-sized zucchinis for the best taste and crunch. Cutting them into fry-like shapes helps them cook evenly. The coating is key to making these fries crispy. You can use either panko or regular breadcrumbs. Panko gives extra crunch, while regular breadcrumbs work well too. Parmesan cheese adds a rich, savory flavor. You’ll also need a mix of spices to boost taste. Garlic powder and onion powder bring depth. Smoked paprika adds a lovely hint of smokiness. Salt and pepper are must-haves to enhance all the flavors. The egg wash helps the coating stick. Beaten eggs create a smooth mix to dip your zucchini. Olive oil helps the fries crisp up in the oven. Finally, fresh parsley adds a pop of color and freshness when serving. Enjoy making these easy and tasty Parmesan crusted zucchini fries! {{ingredient_image_2}} - Preheat your oven to 425°F (220°C). - Line a baking sheet with parchment paper. Start by setting your oven to the right temperature. This step ensures even cooking. Lining the baking sheet helps the fries not stick and makes cleanup easy. - Combine breadcrumbs with Parmesan cheese and seasonings. In a bowl, mix the breadcrumbs and Parmesan cheese together. Add garlic powder, onion powder, smoked paprika, salt, and black pepper. Stir well so all the flavors blend smoothly. This mixture adds a tasty crunch to your fries. - Beat eggs to create an egg wash. - Dip zucchini fries in the egg and coat with the breadcrumb mixture. Crack the eggs into another bowl and beat them until smooth. Then, take each zucchini fry and dip it in the egg wash. Make sure to let the extra egg drip off. After that, roll the fry in your breadcrumb mix. Press gently to ensure it sticks well. This step is key for a crispy finish. - Lay fries on the baking sheet and drizzle with olive oil. - Bake for 20-25 minutes, flipping halfway. Place the coated zucchini fries on the baking sheet in a single layer. Make sure they don’t touch. Drizzle a little olive oil over them for extra flavor. Bake in the oven for about 20 to 25 minutes. Flip them halfway through to get that perfect golden color on both sides. - Garnish with parsley and serve with dipping sauces. Once they are baked and crispy, take the fries out. Sprinkle fresh, chopped parsley on top for a pop of color. Serve these tasty fries warm with your favorite dipping sauces like marinara or ranch. Enjoy your delicious snack! To get the best crunch from your zucchini fries, choose panko breadcrumbs. Panko gives a light and airy texture. Also, spread the fries out evenly on the baking sheet. If they touch, they won’t crisp up well. You can boost the taste by adding extra spices. Italian herbs work great. A little lemon zest adds a fresh kick. Mix these into your breadcrumb blend for a tasty twist. These zucchini fries are great with dipping sauces. Marinara or ranch dressing are my favorites. You can serve them as a side dish or an appetizer for parties. They are sure to impress your guests! Pro Tips Choose the Right Breadcrumbs: Use panko breadcrumbs for an extra crunchy texture, or regular breadcrumbs for a more classic approach. Don't Overcrowd the Baking Sheet: Make sure the zucchini fries are in a single layer and not touching to ensure they crisp up nicely. Experiment with Seasonings: Feel free to add your favorite herbs or spices to the breadcrumb mixture for a personalized flavor twist. Serve Immediately: Enjoy the fries fresh out of the oven for the best texture. They tend to lose their crispness if left to sit. {{image_4}} You can switch up the cheese for fun. Try using Romano or Pecorino instead of Parmesan. Both will give a unique taste. If you want a gooey texture, add some shredded mozzarella. It melts nicely and adds creaminess to your fries. Zucchini is great, but you can explore other veggies. Carrots, eggplant, or sweet potatoes work well too. Just remember to cut them into fry shapes. The cooking time may change based on how thick the pieces are. Thinner cuts cook faster, so keep an eye on them! If you're vegan, you can still enjoy these fries. Instead of eggs, use a flaxseed or chia seed mix. Combine one tablespoon of flaxseed or chia with three tablespoons of water. Let it sit for a few minutes to thicken. For flavor, swap in nutritional yeast for the Parmesan in the breadcrumb mix. It gives a cheesy taste without dairy! To keep your Parmesan crusted zucchini fries fresh, cool them completely. After cooling, place them in an airtight container. Store them in the refrigerator for up to three days. This way, you can enjoy your tasty snack later! When you're ready to enjoy your leftovers, the oven is your best friend. Reheat the fries in the oven to keep them crispy. Set the temperature to 375°F (190°C) and bake for about 10 minutes. If you want a faster option, use an air fryer. It quickly reheats the fries without making them soggy. Just a few minutes will do! You can freeze uncooked coated fries for later use. Lay them out on a baking sheet first. Once they are frozen solid, transfer them to a freezer bag. You can also freeze cooked fries. Place them in a single layer on a sheet to freeze. After they are frozen, move them to a bag for storage. This gives you a quick snack option whenever you want! Use medium-sized zucchinis for the best texture. They hold their shape well when baked. Thinner zucchinis can become mushy, while larger ones may have more seeds. Yes, use gluten-free breadcrumbs for an alternative. This swap keeps the flavor and texture. Many brands offer tasty gluten-free options that work great in this recipe. Add cayenne pepper or chili powder to the breadcrumb mixture. Start with a small amount and taste as you go. This way, you can control the heat level. They are a healthier alternative to traditional fries, especially when baked. Zucchini is low in calories and high in vitamins. Baked fries use less oil than fried ones, making them a smart snack choice. Yes, adjust cooking time to suit your air fryer settings for crispy results. Generally, air frying takes less time. Check for crispiness around 10 to 15 minutes, flipping halfway through. In this post, we covered how to make tasty Parmesan Crusted Zucchini Fries. We discussed the key ingredients, including zucchinis and a crispy coating. You learned step-by-step instructions for baking the fries to perfect crispiness. We also shared tips for variations, storage, and answers to common questions. Zucchini fries are a fun and healthy snack. They are easy to make and full of flavor. Enjoy your cooking and have fun trying new ideas!

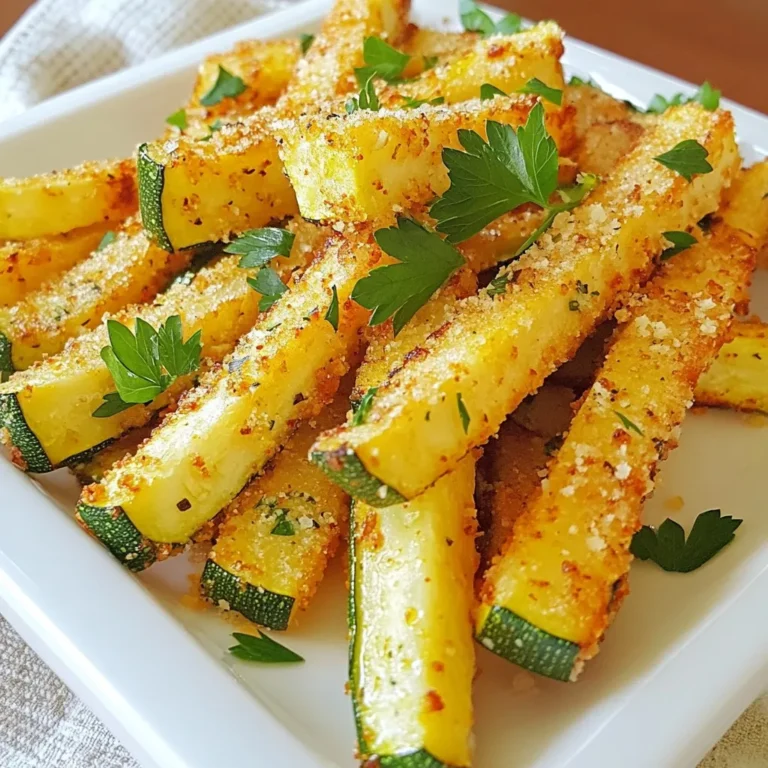
Parmesan Crusted Zucchini Fries Crispy and Tasty Snack

- 1 cup unsalted butter - 2 cups granulated sugar - 4 large eggs - 1 teaspoon vanilla extract - 1 cup all-purpose flour - 1 cup unsweetened cocoa powder - 1 teaspoon baking powder - ½ teaspoon salt - 1 cup crushed pretzels - 1 cup chocolate chips - 1 cup caramel sauce - Flaky sea salt for topping When you gather your ingredients, focus on quality. Use fresh butter and eggs for the best taste. The granulated sugar adds sweetness while the cocoa powder gives that rich chocolate flavor. Pretzels bring a nice crunch and saltiness that makes the brownies even better. You can use any type of chocolate chips, but semi-sweet works great. If you want to make your own caramel sauce, it’s simple, and it adds a personal touch. Just remember, flaky sea salt is key. It enhances the sweetness and adds flavor depth. As you prepare to bake, set everything out. This helps you stay organized and makes the process smooth. Keep in mind, the fun part of these brownies is their unique mix of flavors. The salty pretzels, sweet caramel, and rich chocolate create a treat that is hard to resist. Enjoy the process of mixing these delightful ingredients! {{ingredient_image_2}} First, preheat your oven to 350°F (175°C). This step is key to get nice, even baking. While the oven warms up, take a 9x13 inch baking pan and grease it well. You can use butter or cooking spray. You want the brownies to come out easily after baking. Next, melt 1 cup of unsalted butter in a medium saucepan over low heat. Once melted, set it aside to cool a bit. This cooling helps keep the eggs from cooking when added. In a large bowl, mix the melted butter with 2 cups of granulated sugar. Whisk until smooth. Now, add 4 large eggs one at a time, mixing well after each addition. Then, pour in 1 teaspoon of vanilla extract and whisk again until creamy. In another bowl, sift together 1 cup of all-purpose flour, 1 cup of unsweetened cocoa powder, 1 teaspoon of baking powder, and ½ teaspoon of salt. This helps avoid lumps. Slowly add the dry mix to the wet mixture. Stir gently until just combined. Be careful not to overmix. Lastly, fold in 1 cup of crushed pretzels and 1 cup of chocolate chips. This adds great texture and flavor. Now, pour the brownie batter into your greased pan. Spread it out evenly. Bake for about 25-30 minutes. To check if they are done, insert a toothpick in the center. It should come out with a few moist crumbs, not wet batter. While the brownies bake, prepare your caramel. If you are making it from scratch, do that now. If you are using store-bought caramel, warm it slightly in the microwave for easier drizzling. After baking, remove the brownies from the oven. While they are still warm, drizzle a generous amount of caramel sauce over the top. Next, sprinkle flaky sea salt evenly over the caramel. This salt enhances the sweet flavor. Let the brownies cool in the pan for at least 1 hour. This cooling time helps them hold their shape. After cooling, slice them into squares and serve. Enjoy your delicious creation! - Ensuring the right oven temperature: Always preheat your oven to 350°F (175°C). A hot oven makes brownies rise well. Use an oven thermometer to check the heat. This way, you avoid undercooked or burnt treats. - How to achieve the perfect brownie texture: Mix wet and dry ingredients carefully. Overmixing makes brownies tough. You want a smooth batter, but some lumps are okay. Bake until a toothpick comes out with a few moist crumbs. This means they are just right. - Quality of chocolate and alternatives: Use high-quality chocolate chips. They melt better and taste richer. Dark or semi-sweet chocolate works great. If you're in a pinch, try cocoa powder instead for a simple, rich flavor. - Gluten-free options for brownies: To make these brownies gluten-free, swap all-purpose flour for a gluten-free blend. Look for a brand that mimics regular flour. This keeps the texture without gluten, so everyone can enjoy them. - Serving suggestions with plating ideas: Serve brownies on a colorful platter. Drizzle extra caramel sauce over the top for a shiny finish. You can also place whole pretzels on the side for a fun touch. - Optional garnishes to enhance appeal: Sprinkle flaky sea salt on top for a pop of flavor. Add a scoop of vanilla ice cream for a creamy contrast. This makes your dessert even more special and appealing! Pro Tips Temperature Matters: Ensure that the butter is melted but not too hot when mixing with the eggs to avoid scrambling them. Don’t Overmix: Mix the batter just until combined to keep the brownies light and fudgy. Overmixing can lead to denser brownies. Cool Before Cutting: Allow the brownies to cool completely in the pan for at least an hour before slicing to maintain their shape and texture. Garnish Wisely: For a stunning presentation, garnish with whole pretzels and a drizzle of extra caramel just before serving. {{image_4}} You can change the toppings to make your brownies even more fun. Try adding nuts like walnuts or pecans for crunch. You can also use candies like M&Ms or Reese's Pieces for a sweet twist. Flavored chocolate can add a unique touch. Use dark chocolate, white chocolate, or even mint chocolate. Each type gives a new flavor that pairs well with caramel and pretzels. If you want to make vegan brownies, swap the eggs with flax eggs. Mix one tablespoon of flaxseed meal with three tablespoons of water for each egg. Use a plant-based butter to replace the unsalted butter. For low-sugar options, try using coconut sugar or a sugar substitute. These alternatives can still give you that sweet taste without the extra calories. Just make sure to check the amounts, as some substitutes are sweeter than regular sugar. Seasonal ingredients can make your brownies special. In winter, add crushed peppermint candies for a festive touch. You can also use pumpkin spice in the fall for a warm flavor. These little changes can make a big difference in taste and presentation. Store your salted caramel pretzel brownies at room temperature for the best taste. Use an airtight container to keep them fresh. You can place parchment paper between layers to avoid sticking. If you prefer, you can refrigerate them. This method will keep them good for a longer time. - Room Temperature: Best for 3-4 days. - Refrigeration: Can last up to a week. To serve, let them sit out for a bit to soften. This way, they taste better. Freezing is a great option if you want to save some brownies for later. Here’s how to do it: 1. Cool Completely: Make sure the brownies are fully cool before freezing. 2. Wrap Well: Wrap them tightly in plastic wrap. Then, place the wrapped brownies in a freezer-safe bag or container. 3. Label and Date: Write the date on the bag. To thaw, remove the brownies from the freezer. Let them sit at room temperature for 1-2 hours. You can also warm them in the microwave for a few seconds if you want a warm treat. - Room Temperature: 3-4 days - Refrigerated: Up to 1 week - Frozen: 2-3 months These brownies stay fresh for a good while if stored correctly. Enjoy them any time you crave a sweet treat! Can I make these brownies ahead of time? Yes, you can make these brownies in advance. They keep well for about three days at room temperature. Just store them in an airtight container. If you want to store them longer, refrigerate them for up to a week. Let them come to room temperature before serving. What should I do if my brownies are too fudgy? If your brownies turn out too fudgy, it might be due to underbaking. Make sure to check them with a toothpick. The toothpick should come out with a few moist crumbs, not wet batter. You can also try adding a bit more flour next time to help with texture. How can I make homemade caramel sauce for this recipe? To make homemade caramel sauce, heat 1 cup of sugar in a pan over medium heat. Stir until melted and golden brown. Remove from heat and add 6 tablespoons of butter and 1/2 cup of cream. Stir until smooth. Let it cool slightly before drizzling on the brownies. This sauce adds a rich flavor to your treats. This article covered how to make delicious salted caramel pretzel brownies. We explored the key ingredients, detailed steps for baking, and valuable tips for success. I shared fun variations to try, along with storage tips to keep your brownies fresh. These brownies are great for sharing and special occasions. Enjoying sweet and salty flavors offers a fun twist for your taste buds. With this guide, you can confidently bake and impress your friends and family. Dive in and make these tasty treats today!

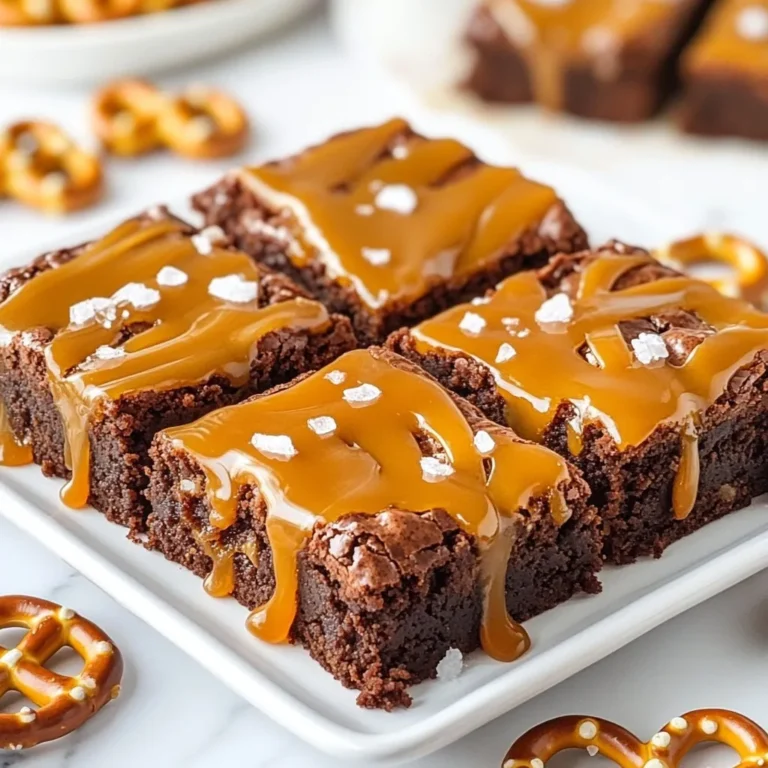
Salted Caramel Pretzel Brownies Irresistible Delight

- 2 large red bell peppers - 3 cloves of garlic, peeled - 1 tablespoon of extra virgin olive oil - 1 cup of rich heavy cream - 1/2 cup of freshly grated Parmesan cheese The main ingredients bring the flavor to this dish. Red bell peppers make the sauce sweet and rich. Roasting the peppers enhances their natural sugars. Garlic adds a nice, savory touch. Olive oil helps to blend all the flavors smoothly. Heavy cream brings a creamy texture that coats the pasta. Parmesan cheese adds a salty kick and depth. - Sea salt and black pepper - 1 teaspoon of dried Italian seasoning - Fresh basil leaves Seasoning is key! Sea salt and black pepper bring out the natural flavors. Italian seasoning adds a warm, herbal note. Fresh basil leaves not only look nice but also boost freshness. They add an aromatic touch that lifts the dish. - 300g of your favorite pasta (penne or fettuccine work beautifully) Choosing the right pasta matters. Penne holds sauce well in its tubes. Fettuccine has a flat surface that catches the sauce nicely. You can use other pasta types too, like spaghetti or rigatoni. Just be sure to cook it al dente for the best texture. {{ingredient_image_2}} - Preheat your oven to 400°F (200°C). - Gather your baking sheet, red bell peppers, and garlic cloves. - Drizzle olive oil over the peppers and garlic. - Season them with sea salt and black pepper. - Roast in the oven for 25-30 minutes until tender and charred. - Let the roasted peppers and garlic cool for a few minutes. - Peel the skin off the peppers and remove the seeds. - Place the peppers and garlic in a blender with heavy cream, Parmesan cheese, and Italian seasoning. - Blend until smooth, and taste the sauce. Adjust seasoning if needed. - Cook your pasta according to the package instructions until al dente. - Before draining, save about 1 cup of the pasta water. This helps adjust the sauce later. - In a large bowl, mix the drained pasta with the roasted red pepper sauce. - Toss gently to coat the pasta well. - Add reserved pasta water gradually to achieve your desired creaminess. - Serve the pasta hot, garnished with fresh basil leaves. - Sprinkle more Parmesan cheese on top if you like it extra cheesy. To get the best flavor, roast your red bell peppers right. Aim for a good char on the skin. This adds a smoky taste to your sauce. Place them on a baking sheet with garlic. Drizzle with olive oil and sprinkle salt. Roast them at 400°F for 25-30 minutes. Look for tender peppers with dark spots. After roasting, let them cool a bit. The skin will peel off easily then. You can make your sauce even better with extra herbs. Try adding fresh thyme or oregano. A pinch of red pepper flakes adds heat if you like spice. For a silkier sauce, blend it longer. Use a high-speed blender for best results. If the sauce is too thick, add some reserved pasta water. This will help it coat the pasta nicely. If you’re in a hurry, use pre-roasted peppers. They save time and still taste great! You can find them in jars at the store. Cook your pasta while the sauce blends. This way, everything finishes at the same time. Reserve that pasta water before draining. It's your secret weapon to adjust the sauce! Pro Tips Quality Ingredients: Always use fresh, high-quality red bell peppers for the best flavor in your sauce. Adjusting Consistency: If your sauce is too thick, gradually add more reserved pasta water until you achieve your desired creaminess. Cheese Selection: Experiment with different cheeses like Pecorino Romano or a sharp cheddar for a unique twist on flavor. Garnish Ideas: In addition to basil, try adding toasted pine nuts or red pepper flakes for extra texture and flavor. {{image_4}} You can add grilled chicken or shrimp to this dish for extra protein. Both options enhance the flavor and make the meal heartier. Simply grill or sauté your chicken or shrimp until cooked through and toss them into the pasta before serving. If you prefer a vegetarian option, chickpeas or lentils work well. They provide protein and pair nicely with the creamy sauce. You can also use tofu for a plant-based twist. Just pan-fry it until golden and mix it in. To lighten the dish, consider using light cream or Greek yogurt. Both options create a creamy texture while cutting calories. Greek yogurt adds a tangy flavor that complements the sweetness of the peppers. For pasta, choose whole grain or gluten-free options. Whole grain pasta adds fiber and nutrients, while gluten-free pasta caters to those with gluten sensitivities. Both types work beautifully with the sauce. Want to spice things up? Add red pepper flakes for a kick. Start with a pinch and adjust to your taste. This small change can elevate the dish significantly. You can also incorporate sun-dried tomatoes or fresh spinach. Sun-dried tomatoes add a rich, tangy taste, while spinach brings a vibrant color and extra vitamins. Both can be mixed in with the pasta for added depth. After enjoying your creamy roasted red pepper pasta, store any leftovers in an airtight container. This helps keep the pasta fresh. Let it cool to room temperature before sealing it up. When reheating, use a skillet over low heat. Add a splash of water or cream to keep it creamy. Stir gently and watch it heat evenly. To freeze this delicious pasta, let it cool completely first. Place it in a freezer-safe container. You can also use freezer bags for easy storage. When you're ready to eat, thaw it overnight in the fridge. Reheat in a skillet, adding a bit of water or cream. This keeps the sauce from getting too thick. In the fridge, your creamy roasted red pepper pasta stays fresh for about 3 to 4 days. In the freezer, it can last up to 2 months. Just remember to label your containers with the date. This way, you can enjoy this tasty dish whenever you want! Yes, you can! Try using yellow or orange bell peppers for a sweeter taste. If you want some heat, use poblano or jalapeño peppers. Each type adds a unique flavor. Just remember to roast them the same way. To make this dish vegan, swap heavy cream for coconut cream or cashew cream. You can also use nutritional yeast instead of Parmesan cheese. It gives a cheesy flavor without dairy. Use vegan pasta to keep it fully plant-based. Dairy-free cheese works great if you want a vegan option. Look for brands made from nuts or soy. Nutritional yeast is also a fantastic choice. It adds a cheesy taste while being dairy-free. To make more servings, simply double the ingredients. Cook the pasta in batches if you have a small pot. You may need to adjust the cooking time slightly. Keep tasting the sauce for the right flavor. Yes, you can use half-and-half or sour cream if you want a different taste. For a lighter option, consider Greek yogurt. Just remember that each type of cream will change the flavor a bit. This blog post covered how to make a delicious roasted red pepper pasta. We explored the main ingredients, from red bell peppers to heavy cream. I shared step-by-step instructions and tips to enhance your dish. You learned about different pasta options and variations to customize your meal. Now, you have a tasty recipe that’s easy to follow. Enjoy creating this flavorful dish! Cook with joy and make it your own.

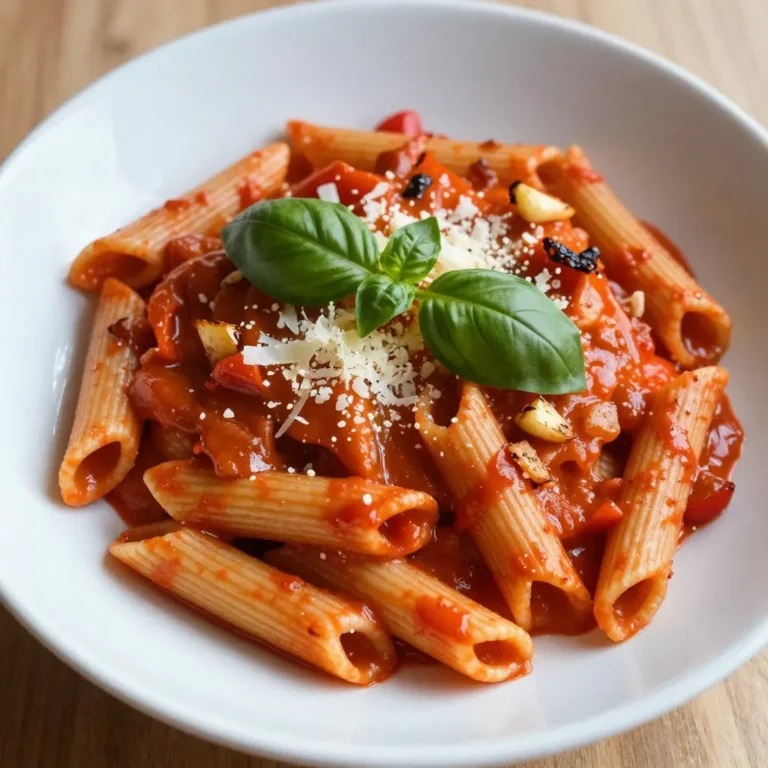
Creamy Roasted Red Pepper Pasta Flavorful Dinner Idea

- 2 cups all-purpose flour - 1 cup apple cider (preferably fresh) - 1/2 cup unsweetened applesauce - 3/4 cup brown sugar, firmly packed - 1/4 cup granulated sugar - 1/2 cup vegetable oil (or melted coconut oil for a twist) - 1 large egg, at room temperature - 1 teaspoon vanilla extract - 1 tablespoon baking powder - 1 teaspoon ground cinnamon - 1/2 teaspoon ground nutmeg - 1/2 teaspoon salt - 1/2 cup chopped walnuts or pecans (optional for added crunch) - 1/2 cup shredded apple (about 1 medium apple, like Granny Smith or Honeycrisp) You can swap all-purpose flour with whole wheat flour for a healthier muffin. Instead of apple cider, use fresh juice or a mix of apple juice and water. If you need a vegan option, use flaxseed eggs instead of a regular egg. You can also try almond or coconut milk in place of vegetable oil for a different taste. For nuts, feel free to use pumpkin seeds or leave them out if you prefer a nut-free muffin. Each muffin has around 180 calories. They contain 4 grams of protein, 6 grams of fat, and 30 grams of carbs. You also get about 1.5 grams of fiber and a small amount of sugar from the apple cider and sugars. These muffins give you quick energy and some key vitamins from the apples and spices. Enjoy them as a sweet snack or breakfast treat! {{ingredient_image_2}} First, preheat your oven to 375°F (190°C). This step gets the oven ready for baking. Next, grab a 12-cup muffin pan. Line it with paper liners or lightly grease it. This helps the muffins come out easily later. In a big bowl, sift together the flour, baking powder, cinnamon, nutmeg, and salt. Use a whisk to mix them well. This step blends the flavors evenly. It also helps the muffins rise nicely. In another bowl, mix the brown sugar, granulated sugar, and oil. Whisk them until smooth. Then, add the egg and keep mixing. Next, pour in the apple cider, applesauce, and vanilla extract. Whisk again until everything is well combined. Now, slowly pour the wet mixture into the dry ingredients. Use a spatula to stir gently. Mix just until the flour disappears. It’s okay if you see some lumps. Overmixing can make the muffins tough. With a ladle or ice cream scoop, fill each muffin cup about two-thirds full. This helps them bake evenly. Place the muffin pan in your preheated oven. Bake for 15-20 minutes. Check for doneness by poking a toothpick into the center of a muffin. If it comes out clean, they’re ready. Once baked, let the muffins cool in the pan for about 5-7 minutes. After, move them to a wire rack to cool completely. Serve them warm, maybe with a sprinkle of powdered sugar or a drizzle of honey. Arranging them on a wooden platter adds a nice touch for any gathering. To make sure your apple cider muffins stay moist, use fresh apple cider. Fresh cider adds great flavor and keeps your muffins soft. Also, add unsweetened applesauce to the batter. It helps with moisture and adds natural sweetness. Don't overmix the batter; stir just until combined. This keeps the muffins light and fluffy. One common mistake is not preheating the oven. Always preheat your oven to 375°F (190°C) before baking. This helps the muffins rise properly. Another mistake is overfilling the muffin cups. Fill them only two-thirds full for the best rise. Lastly, check the muffins a minute or two early. Ovens vary, and you want them baked, not dry. Adding spices can make a big difference. Ground cinnamon and nutmeg are must-haves for these muffins. They add warmth and depth. You can also try adding a pinch of ginger for a slight kick. If you want a sweeter touch, consider adding a bit of vanilla extract. It pairs well with the apple flavor. Pro Tips Use Fresh Apple Cider: For the best flavor, use fresh, unpasteurized apple cider. This will give your muffins a vibrant and authentic apple taste. Room Temperature Ingredients: Ensure your egg and apple cider are at room temperature before mixing. This helps create a smoother batter and better rise. Don’t Overmix: When combining the wet and dry ingredients, mix just until combined. Overmixing can lead to dense muffins, so keep it gentle! Customize Your Nuts: Feel free to experiment with different nuts or omit them entirely. Almonds or hazelnuts can add a unique twist to the flavor profile. {{image_4}} You can switch apple cider for other fruit juices. Try using orange juice for a citrus twist. You can also use cranberry juice for a tart flavor. Just remember to adjust the sugar. Some juices are sweeter, so you might need less sugar. Each juice brings its own taste, adding fun to your muffins. To make gluten-free muffins, replace all-purpose flour with a gluten-free blend. Many stores sell good mixes. Choose one that works for baking. You may want to add an extra tablespoon of apple cider to keep them moist. This small change helps the muffins stay soft and tasty. Herbs and spices can change your muffins' flavor. Try adding a pinch of ginger for warmth. You could also mix in some cardamom for a unique taste. If you love herbs, consider adding fresh thyme. Just a little can bring a new depth. Don’t be afraid to experiment! Each new herb or spice can create a new favorite muffin. After baking your apple cider muffins, let them cool completely. This step is key to keeping them fresh. Store the muffins in an airtight container at room temperature. They stay good for up to three days. If you want to keep them longer, consider freezing them. To freeze your muffins, first ensure they are fully cool. Wrap each muffin tightly in plastic wrap or aluminum foil. Then, place them in a freezer-safe bag or container. This method keeps them fresh for about three months. When you're ready to enjoy them, just take out the muffins and let them thaw at room temperature. If you want to warm up your muffins, there are easy ways to do it. For the oven, preheat it to 350°F (175°C). Place the muffins on a baking sheet and heat for about 10 minutes. If you prefer the microwave, heat each muffin for about 15-20 seconds. Check them to make sure they are warm. Enjoy your muffins fresh and flavorful! Yes, you can use store-bought apple cider. Fresh cider has a strong flavor. But store-bought works well too. Look for a brand without added sugars. This keeps your muffins sweet and tasty. These muffins last up to four days at room temperature. Store them in an airtight container. This keeps them moist and fresh. You can also freeze them for up to three months. Just wrap them well in plastic wrap. You can replace eggs with applesauce. Use 1/4 cup of applesauce for each egg. This keeps muffins moist and adds flavor. You can also try mashed bananas or flaxseed meal mixed with water. Absolutely! You can add chocolate chips or dried fruit. Just mix in about 1/2 cup before baking. This adds a fun twist to your muffins. Experiment with different flavors to find your favorite. We explored the key ingredients, steps, and tips for making tasty muffins. You learned about alternatives, nutrition, and how to store them. Remember to avoid common baking mistakes for moist results. Try different fruit juices and spices to make your muffins unique. Enjoy experimenting with flavors, and don't hesitate to ask questions. Your muffins can impress everyone with just a little practice and care. Happy baking!

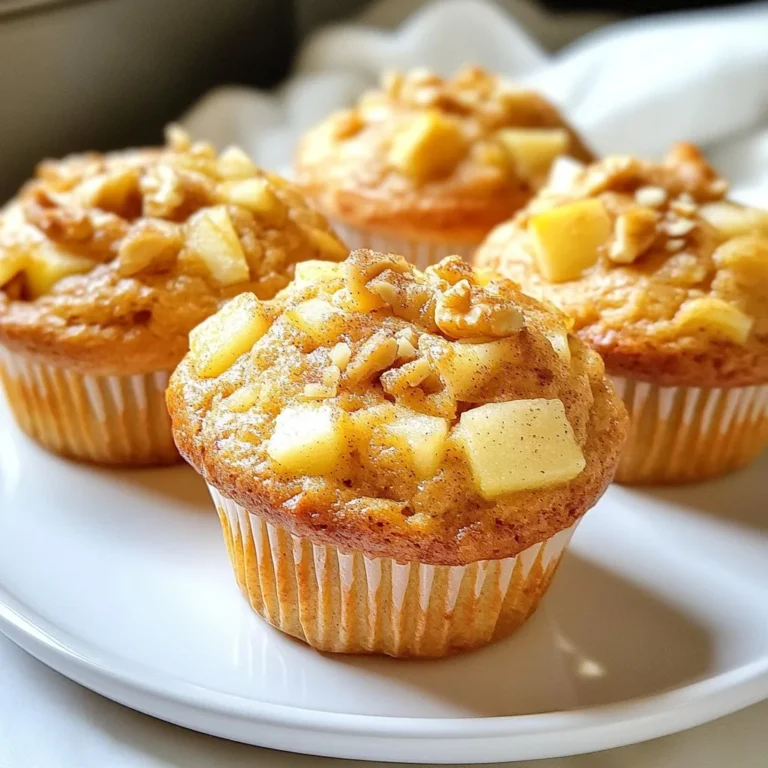
Apple Cider Muffins Fresh and Flavorful Recipe

- 8 oz of your favorite pasta (like spaghetti or fusilli) - 2 ripe avocados (halved and pitted) - 1 cup of fresh basil leaves (packed) - 1 cup of fresh spinach leaves (packed) - 1 clove of garlic (peeled) - 2 tablespoons of freshly squeezed lime juice - 1 tablespoon of extra virgin olive oil - Salt and freshly ground black pepper, to taste - 1 cup of cherry tomatoes (halved, for garnish) - A handful of toasted pine nuts or chopped walnuts (for garnish) - 1 tablespoon of nutritional yeast (for a cheesy flavor) I always choose ripe avocados. They should feel soft but not mushy. Fresh herbs are vital too. Basil and spinach should be bright and fragrant. Use fresh lime juice for the best taste. It brings out the green goddess flavor. If you want a cheesy taste, pick good-quality nutritional yeast. For nuts, toasted pine nuts add a lovely crunch. You can also use walnuts. They give a great texture. Remember, using high-quality ingredients makes the dish shine. It enhances the flavors and makes every bite special. {{ingredient_image_2}} First, take a large pot and fill it with water. Add a generous amount of salt. Bring the water to a rolling boil. Once boiling, toss in 8 ounces of your favorite pasta, like spaghetti or fusilli. Cook according to the package instructions until it is al dente. This usually takes about 8 to 10 minutes. When done, drain the pasta in a colander. Remember to save about 1 cup of the starchy pasta water. This water will help the sauce stick later. Now, let's make the Green Goddess sauce. Grab a food processor and add two ripe avocados, halved and pitted. Next, add one cup of fresh basil leaves and one cup of fresh spinach leaves. Toss in one peeled garlic clove and two tablespoons of fresh lime juice. Don’t forget to add one tablespoon of extra virgin olive oil. If you want a cheesy flavor, include one tablespoon of nutritional yeast. Blend everything until smooth. If the sauce is too thick, slowly add some reserved pasta water until you reach the right consistency. Taste it and add salt and freshly ground black pepper as needed. Return your drained pasta to the pot. Pour the vibrant Green Goddess sauce over the pasta. Toss the pasta gently. Make sure each piece is evenly coated with the sauce. If the sauce doesn't cling well, add more reserved pasta water. This will help the sauce stick to the pasta perfectly. Now it’s time to serve! Portion the pasta into serving bowls. Top each bowl with halved cherry tomatoes for a bright touch. For an extra crunch, sprinkle on some toasted pine nuts or chopped walnuts. Before serving, you can drizzle a little extra fresh lime juice on top for added flavor. For a fancy touch, place a sprig of fresh basil on each bowl and add a lime wedge on the side. Enjoy your vibrant and fresh dish! To get a smooth sauce, use ripe avocados. They blend easily, giving a creamy texture. If your sauce is too thick, add some reserved pasta water. Start with a small amount and blend again. This method helps you control the thickness. Keep blending until it looks good and creamy. Seasoning is key for a tasty dish. Always taste your sauce before serving. Add salt and pepper to boost the flavors. If you like a bit of zest, add more lime juice. Nutritional yeast can add a cheesy flavor too. Experiment with these seasonings until the taste is just right for you. Cooking pasta al dente means it should be firm when bitten. Start with boiling salted water. Add the pasta and follow the package instructions. Check it a minute before the time is up. The pasta should be tender but still hold its shape. Drain it quickly and don’t rinse. This keeps the starch, helping the sauce stick better. Pro Tips Use Ripe Avocados: Ensure your avocados are perfectly ripe for a creamy and flavorful sauce. They should yield slightly to gentle pressure when squeezed. Fresh Ingredients Matter: Use fresh herbs and spinach for the best flavor. The freshness will elevate the taste of the Green Goddess sauce. Adjust the Texture: If your sauce is too thick, slowly add the reserved pasta water until you reach your desired creaminess. This water is starchy and helps the sauce cling to the pasta. Garnishing for Flavor: Don't skip the toppings! The cherry tomatoes and nuts add not only color but also texture and flavor contrast to the dish. {{image_4}} This dish shines as a vegan delight. The main ingredients are already vegan-friendly. Use pasta made from wheat or rice. The creamy sauce comes from ripe avocados and greens. If you want a cheesy taste, add nutritional yeast. It gives a nice depth without dairy. Feel free to load up on fresh herbs and veggies. They add flavor and nutrition, keeping it fresh and tasty. For a gluten-free version, choose gluten-free pasta. Options include brown rice pasta or quinoa pasta. Both cook well and taste great with the sauce. Make sure to check the package for cooking times. This dish keeps its vibrant flavors, even with gluten-free pasta. You won’t miss a thing! Adding protein can make this dish heartier. Grilled chicken or shrimp works well. Cook the protein separately and toss it with the pasta. You can also use chickpeas or tofu for a plant-based option. This adds texture and flavor, making each bite satisfying. The creamy sauce pairs nicely with any added protein. After enjoying your Avocado Lime Green Goddess Pasta, store any leftovers in an airtight container. Make sure the pasta and sauce cool down before sealing. This helps keep the dish fresh. You can store it in the fridge for up to three days. If you plan to eat it later, try to separate the pasta from the sauce. This avoids sogginess and keeps flavors bright. When you’re ready to enjoy the leftovers, reheating correctly is key. You can reheat the pasta in a skillet over low heat. Add a splash of water or a bit of olive oil to help loosen the sauce. Stir gently until heated through. If using a microwave, place the pasta in a bowl and cover it with a damp paper towel. Heat it in short bursts, stirring in between, until warm. This keeps the pasta from drying out. If you want to save the Green Goddess sauce, freezing is a great option. Pour the sauce into ice cube trays or freezer-safe containers. This allows you to thaw just what you need later. To use, remove the desired amount and let it thaw in the fridge overnight. You can also warm it gently in a pot over low heat. Avoid freezing the pasta, as it changes texture when thawed. Yes, you can use any pasta you like. Spaghetti, fusilli, or penne work great. Just make sure to cook it until it's al dente. This gives the pasta a nice bite. You can even try whole wheat or gluten-free pasta for a healthier option. The key is to pair it with the creamy sauce for a tasty meal. If you don’t have nutritional yeast, you can use grated cheese. Parmesan or pecorino adds a rich flavor. You can also skip it if you want a lighter dish. Adding a bit more salt can help enhance the taste. Don’t worry; the sauce will still be creamy and delicious! To add some heat, sprinkle in red pepper flakes or cayenne pepper. You can also mix in some sliced jalapeños for a fresh kick. Adding a dash of hot sauce is another quick fix. Start by adding a little, then taste and adjust. This way, you control the spice level to your liking. The Green Goddess sauce lasts about three days in the fridge. Store it in an airtight container to keep it fresh. If you notice it thickening, just add a splash of water or lime juice before serving. This keeps the flavor bright and the texture smooth. In this post, we explored the essential and optional ingredients needed for our dish. We walked through step-by-step instructions for cooking pasta and preparing the Green Goddess sauce. I shared tips for perfect texture and flavor. We also looked at variations for different diets and how to store leftovers properly. This recipe is flexible and fun. You can make it your own and enjoy every bite. Now, it’s your turn to create something delicious!

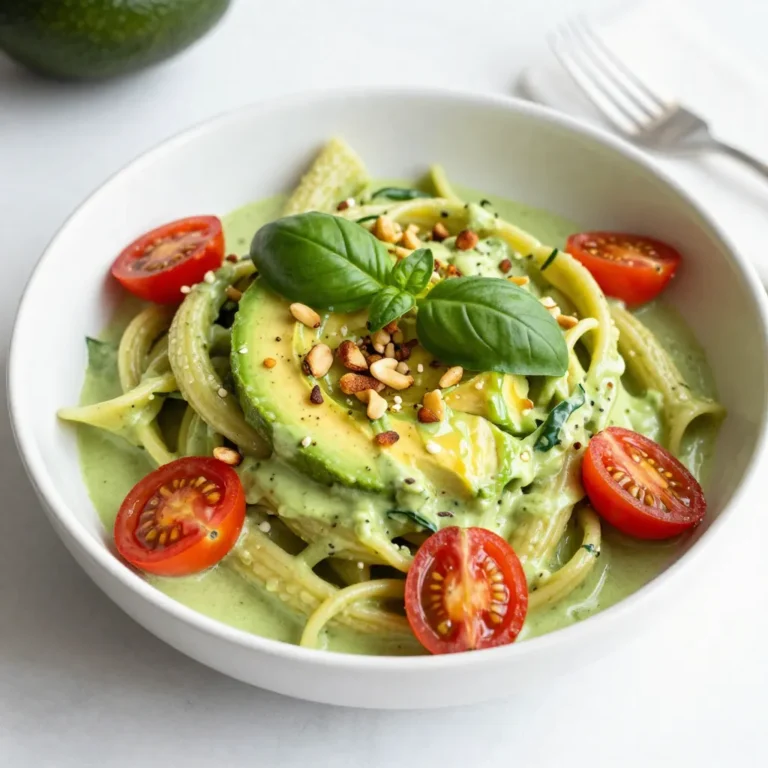
Avocado Lime Green Goddess Pasta Vibrant and Fresh Dish

- 6 large eggs - 1 cup Gruyère cheese, finely grated - 2 large onions, thinly sliced - 1 tablespoon extra virgin olive oil - 1 tablespoon unsalted butter - ½ teaspoon fine sea salt - ¼ teaspoon freshly ground black pepper - ¼ teaspoon dried thyme (or ½ teaspoon fresh thyme, chopped) - Fresh chives for garnish (optional) Using fresh eggs makes a big difference. They add richness and flavor. Fresh eggs also help the frittata rise well. Choosing the right Gruyère cheese is key. Look for a good-quality cheese with a nutty, rich taste. You want it finely grated for even melting. Quality olive oil and butter enhance the dish. Extra virgin olive oil brings a fruity note, while butter adds creaminess. Always pick the best you can find. If you can't find Gruyère, use Swiss or mozzarella cheese. Both melt well and taste great. You can swap herbs too. Basil, parsley, or oregano work nicely. They add a different twist to the frittata. For vegan options, try plant-based eggs and cheese. There are many products on the market that taste good and work well in this recipe. {{ingredient_image_2}} - In a large skillet, mix olive oil and butter. - Heat over medium until the butter melts and bubbles. - Add the thinly sliced onions, spreading them out. - Cook slowly, stirring often for even cooking. - Watch for a deep golden-brown color, about 20-25 minutes. - If they brown too fast, lower the heat to avoid burning. - Properly caramelized onions should be soft and sweet. - Crack the large eggs into a mixing bowl. - Add sea salt, black pepper, and thyme. - Whisk until the mix is uniform and slightly frothy. - The right consistency is smooth and well-blended. - Pour the egg mixture carefully over the onions. - Ensure the eggs cover the onions evenly. - Sprinkle the grated Gruyère cheese over the top. - Keep the skillet on the stovetop. - Cook for about 5 minutes without stirring. - Look for edges that set but a jiggly center. - Preheat the oven's broiler to high. - Transfer the skillet to the broiler for 2-3 minutes. - The frittata is done when it is puffed and golden. - Remove the skillet and let it cool for a few minutes. - Slice into wedges and, if you like, garnish with chives. To caramelize onions well, keep a close eye on the heat. Use medium heat to cook them slowly. If the heat is too high, you risk burning them. Stir them often to ensure even cooking. You want them golden brown and sweet, not charred. This process takes time, about 20-25 minutes. If they start to brown too fast, lower the heat. This way, you avoid any bitter taste. Choose a good skillet for your frittata. A non-stick skillet works best. It helps the frittata cook evenly and slide out easily. Mix your ingredients well before cooking. This ensures even flavor throughout. Whisk the eggs until they are frothy and combined. You want each bite to have that rich taste of cheese and onion. Pair your frittata with a fresh salad or crusty bread. These sides complement the rich flavors nicely. For drinks, consider a light white wine or fresh juice. They balance the dish's richness well. To make it look nice, sprinkle some fresh chives on top. This adds color and a fresh taste. Enjoy your meal! Pro Tips Use Low Heat for Caramelizing: Cooking onions slowly over low to medium heat allows their natural sugars to develop fully, resulting in a rich and sweet flavor without burning. Choose the Right Cheese: Gruyère cheese melts beautifully and adds a nutty flavor. For variety, consider mixing in a bit of sharp cheddar for an extra kick. Don't Overcrowd the Skillet: If your skillet is too crowded with onions, they will steam instead of caramelize. Use a large enough skillet to ensure even cooking. Check for Doneness: The frittata is perfectly cooked when the edges are set but the center is slightly jiggly. It will continue to cook once removed from the oven. {{image_4}} You can boost your frittata with tasty add-ins. Adding vegetables enhances flavor and nutrition. Here are some great choices: - Spinach for a fresh touch. - Bell peppers for sweetness. - Zucchini for a mild flavor. - Mushrooms for a savory depth. You can also mix in meats. Cooked bacon adds a salty crunch. Sausage gives a hearty feel. Ham adds a nice, smoky flavor. You can easily adapt this frittata for various diets. For a low-carb version, skip starchy veggies. Focus on leafy greens and meats. This keeps carbs low while adding protein. If you need a dairy-free option, swap the Gruyère. Use dairy-free cheese or nutritional yeast. This keeps it flavorful without dairy. For the eggs, you can try a chickpea flour mix. This creates a similar texture and taste. You can cook your frittata in different ways. The stovetop method is quick and easy. You start cooking on medium heat. Finish under the broiler for a perfect top. If you want mini frittatas, use muffin tins. This makes single servings. Pour the egg mixture into each tin. Bake until they puff up and are golden. It's a fun way to serve frittatas at parties. To keep your frittata fresh, store it in the fridge. Place leftovers in an airtight container. This helps keep it moist and tasty. It’s best to eat it within three days. If you want to freeze it, slice the frittata first. Wrap each slice in plastic wrap. Then, place the slices in a freezer-safe bag. This way, you can enjoy a piece whenever you like! When you are ready to eat your frittata, reheating it well is key. The best way is to use the oven. Preheat your oven to 350°F (175°C). Place the frittata on a baking sheet. Heat it for about 10-15 minutes. This keeps the texture nice and soft. If you’re in a hurry, you can use a microwave. Heat it for 30 seconds at a time until warm. But be careful; microwaving too long can make it rubbery and dry. Your caramelized onion Gruyère frittata lasts about three days in the fridge. After that, it may start to lose flavor and texture. Look for signs of spoilage. If it smells off or has a slimy texture, it’s time to toss it. Always trust your senses! Keeping track of time and smell can help you enjoy this dish at its best. A frittata is an Italian egg dish. It is like an omelet but cooked slowly. You can add many ingredients, like veggies, meats, and cheese. Frittatas are great for breakfast, lunch, or dinner. They are easy to make and perfect for using leftovers. You can serve them warm or cold. This dish is also good for a crowd. Slice it into wedges for easy sharing. Yes, you can use many cheese types in a frittata. If you want a strong taste, try aged cheddar or feta. For a milder flavor, use mozzarella or Monterey Jack. Goat cheese adds creaminess and tang. You can mix different cheeses for more complexity. Just make sure to adjust the amount based on the cheese you choose. Absolutely! You can make this frittata ahead and save time. Cook it fully, then let it cool. Store it in the fridge for up to three days. To reheat, use the oven or microwave. If you want to freeze it, wrap it well and enjoy it within three months. When ready to eat, thaw it in the fridge overnight. Then, reheat until warm. This way, you have a tasty meal ready any time! This blog post covered the essential ingredients for a great frittata, like fresh eggs and Gruyère cheese. I shared step-by-step instructions, tips for perfect results, and variations to try. You can customize your frittata based on your diet or taste. In the end, a frittata is not just a meal; it’s a way to get creative in the kitchen. Experiment with flavors, enjoy the cooking process, and savor the results. Your creativity will shine through every bite.

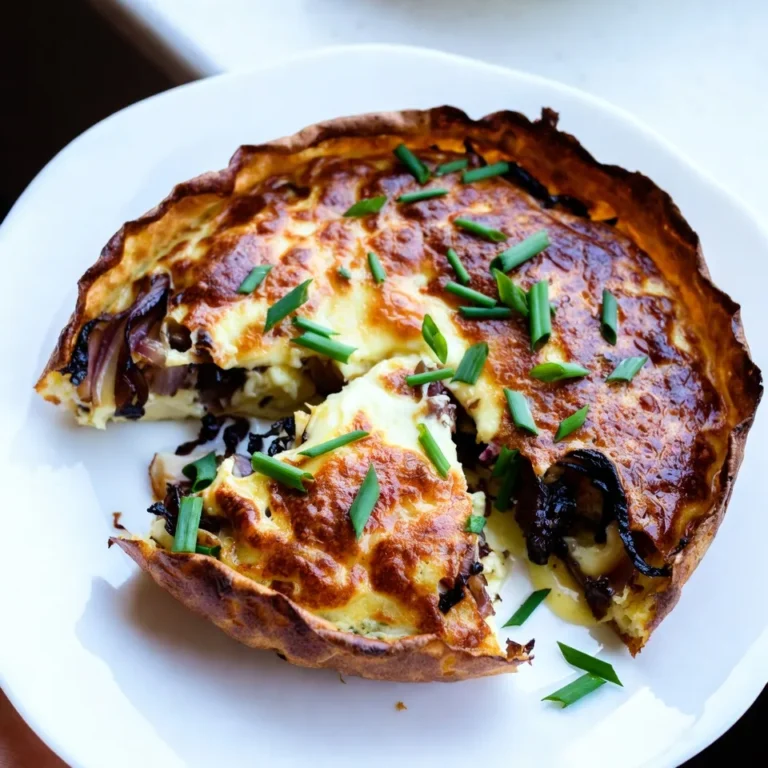
Caramelized Onion Gruyère Frittata Flavorful Delight

To make Keto Garlic Butter Meatballs, you need to gather some key ingredients. Here’s a clear list: - 1 pound ground beef - 1/4 cup almond flour - 1/4 cup grated Parmesan cheese - 1 large egg - 3 cloves garlic, minced - 1 teaspoon dried oregano - 1 teaspoon onion powder - 1/2 teaspoon salt - 1/4 teaspoon black pepper - 1/4 cup fresh parsley, chopped - 1/2 cup unsalted butter - 1 tablespoon olive oil - 1 teaspoon lemon juice Let’s break down these ingredients. The ground beef gives the meatballs their rich flavor. I recommend using beef with 20% fat for juiciness. Almond flour acts as a low-carb binder. It keeps everything together without adding carbs. Grated Parmesan cheese enhances the flavor and adds a nice texture. The egg is essential for binding. Fresh garlic brings a punch of taste. Dried oregano and onion powder add depth. The salt and black pepper season the meatballs perfectly. Fresh parsley not only adds color but also freshness. Unsalted butter makes the sauce rich and delicious. Olive oil is great for frying. Finally, lemon juice brightens the dish and balances the flavors. Having these ingredients ready makes the cooking process smooth. The mix of flavors will really shine in your finished dish. {{ingredient_image_2}} First, grab a large mixing bowl. Add the ground beef, almond flour, and grated Parmesan cheese. Next, crack in one large egg. Then, add the minced garlic, dried oregano, onion powder, salt, and black pepper. Use your hands or a spatula to mix everything well. Make sure all the ingredients blend evenly. This mixture will form the base of your meatballs. Now, preheat your oven to 400°F (200°C). Line a baking sheet with parchment paper. This will help keep the meatballs from sticking. Take the meat mixture and shape it into small balls, about one inch wide. Place the meatballs on the baking sheet. Make sure to leave some space between each one. This helps them cook evenly. Heat the olive oil in a large skillet over medium heat. Once the oil is hot, add the meatballs in batches. Avoid overcrowding the pan to get a nice brown on all sides. Sear the meatballs for about 5 to 7 minutes. When they turn golden brown, transfer them back to the baking sheet. In the same skillet, lower the heat to a gentle simmer. Add the unsalted butter and let it melt completely. Once it starts to bubble, stir in the lemon juice. Gently swirl the pan to mix everything well. Carefully add the browned meatballs back into the skillet. Cook for an additional 5 minutes. Turn the meatballs occasionally to ensure they soak up the rich garlic butter flavor. Finally, remove the skillet from the heat and garnish with freshly chopped parsley before serving. Keto Garlic Butter Meatballs are not just tasty; they fit great for a keto diet. Here is the breakdown of the nutrients in one serving (about 4 meatballs): - Calories: 380 - Protein: 25g - Fat: 30g - Carbohydrates: 4g These meatballs provide a good balance of protein and fat while keeping carbs low. This is key for anyone on a keto diet. These meatballs are perfect for a low-carb lifestyle. They use almond flour instead of bread crumbs. This keeps the carb count low while still providing a nice texture. The combination of ground beef and cheese adds healthy fats. This helps you feel full without loading up on carbs. Using fresh garlic and herbs makes them tasty without adding carbs. Plus, with only 4 grams of carbs per serving, you can enjoy these meatballs while staying in your keto goals. Pro Tips Use Fresh Ingredients: Always opt for fresh garlic and herbs to enhance the flavor of your meatballs. Fresh ingredients can significantly elevate the taste compared to dried or pre-packaged options. Don’t Overmix: When combining the ingredients, be careful not to overmix the meat mixture, as this can lead to tough meatballs. Mix just until everything is combined. Experiment with Spices: Feel free to add your favorite spices or herbs to the mixture, such as basil or thyme, to customize the flavor profile of your meatballs. Rest Before Serving: Allow the meatballs to rest for a few minutes after cooking. This will help the juices redistribute, making them more flavorful and juicy when served. {{image_4}} To make great meatballs, you need the right fat content. I recommend using ground beef with an 80/20 fat ratio. This mix keeps your meatballs juicy and flavorful. When mixing, be gentle. Over-mixing can lead to tough meatballs. Use your hands or a spatula to combine the ingredients just until mixed. You can boost flavor with extra herbs and spices. Try adding fresh basil or thyme for a new twist. A pinch of red pepper flakes can add a nice kick. You can also experiment with smoked paprika for a deeper taste. Don’t hesitate to get creative; cooking is all about personal touch! You can choose between baking and frying your meatballs. Baking is simple and creates a crisp outer layer without extra fat. Preheat your oven to 400°F (200°C) for best results. If you prefer frying, use a little olive oil. This method gives a nice brown crust. Just be careful not to crowd the pan to get that perfect sear. You can switch up the protein in these meatballs. Ground turkey, chicken, or pork work great. Each option gives a new flavor and texture. Ground turkey is leaner but still tasty. Chicken offers a mild flavor, while pork adds a rich, juicy bite. Choose what you love best or what you have on hand. Adding cheese or veggies can elevate your meatballs. Mix in shredded cheese for extra creaminess. Try mozzarella for a melty surprise or cheddar for a sharp kick. You can also add finely chopped veggies like bell peppers or spinach. These will add color and nutrition without extra carbs. Experiment with your favorites to make these meatballs uniquely yours. If you need dairy-free or egg-free options, you can easily adjust this recipe. For a dairy-free version, skip the cheese and use a nut or seed-based alternative. To bind the meatballs without eggs, use flaxseed meal or chia seeds mixed with water. This keeps the meatballs firm and delicious. Making these changes allows everyone to enjoy this dish, no matter their diet. To store leftovers, let the meatballs cool first. Place them in an airtight container. Keep them in the fridge for up to four days. Make sure to seal the container tightly to prevent drying out. You can also layer them with parchment paper for better freshness. Yes, you can freeze the meatballs. They freeze well and are great for meal prep. Place cooled meatballs in a single layer on a baking sheet. Freeze them for about one hour. Then, transfer them to a freezer bag. They last for up to three months in the freezer. For a keto-friendly side, consider these options: - Spiralized zucchini noodles - Cauliflower rice - A fresh mixed green salad - Roasted broccoli or asparagus These sides complement the meatballs and keep your meal low in carbs. Reheating meatballs can be easy. Use these methods: - Microwave: Place meatballs on a plate and cover them. Heat for 1-2 minutes, checking often. - Oven: Preheat to 350°F (175°C). Place meatballs on a baking sheet and heat for 10-15 minutes. - Skillet: Add meatballs to a skillet over low heat. Stir until warmed through. These methods keep the meatballs juicy and delicious. In this post, we covered how to make delicious Keto Garlic Butter Meatballs. I shared the right ingredients, simple steps for preparation, and tips for perfecting your dish. You learned about different protein options and ways to adapt the recipe for various diets. Remember, experimenting with flavors can enhance your meal. Enjoy cooking and savoring these meatballs, whether for a family dinner or meal prep. With practice, you’ll master this easy and tasty recipe in no time.

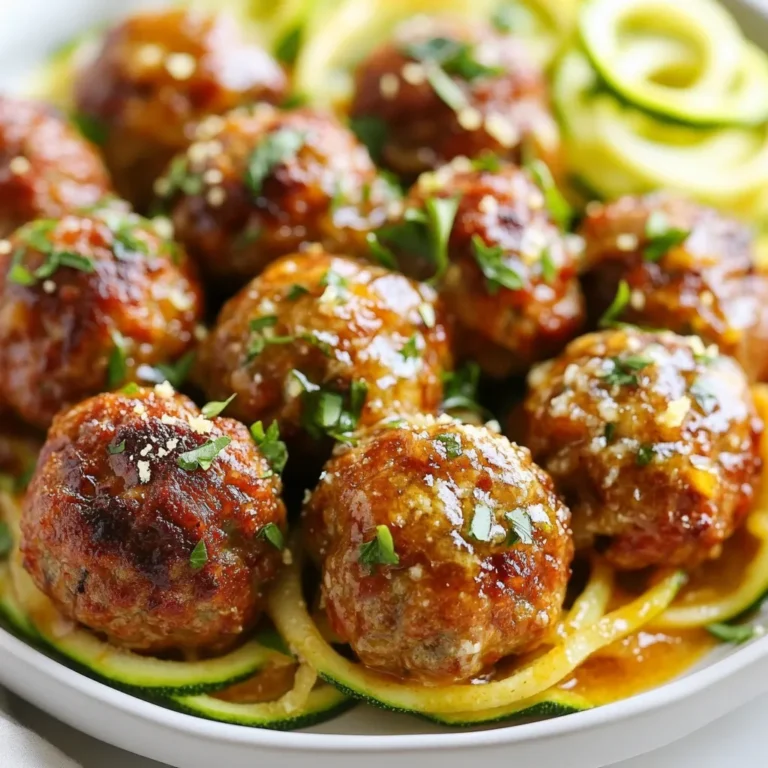
Keto Garlic Butter Meatballs Flavorful Low-Carb Dish

- 4 large eggs - 1 cup granulated sugar - 1 teaspoon vanilla extract - 1 cup all-purpose flour - 1/3 cup unsweetened cocoa powder - 1 teaspoon baking powder - 1/2 teaspoon salt - 1/2 cup unsalted butter, melted - 1 cup heavy cream - 1 cup dark chocolate, chopped (at least 60% cocoa) - 1/2 cup caramel sauce - 1/2 cup crushed praline pecans (store-bought or homemade) - Powdered sugar for dusting - Fresh mint leaves for garnish - Extra chocolate shavings for decoration - For a gluten-free option, use a gluten-free all-purpose flour blend. - Replace eggs with flax eggs (1 tablespoon ground flaxseed mixed with 2.5 tablespoons water per egg) for a vegan version. - Use coconut cream instead of heavy cream for a dairy-free alternative. - If you want a nut-free dessert, skip the praline pecans and use crushed cookies instead. This list of ingredients keeps things simple, yet each adds to the rich flavor of the Yule log. The substitutions allow you to adapt this recipe to suit various dietary needs. Enjoy experimenting! {{ingredient_image_2}} Start by preheating your oven to 350°F (175°C). Grab a 15x10 inch jelly roll pan. Line it with parchment paper and lightly grease the paper. This step helps with easy removal later. In a large bowl, beat together 4 large eggs and 1 cup of granulated sugar. Use an electric mixer on high speed. Mix for about 5 to 7 minutes until the mixture is thick and pale. Then, stir in 1 teaspoon of vanilla extract. In another bowl, sift together 1 cup of all-purpose flour, 1/3 cup of unsweetened cocoa powder, 1 teaspoon of baking powder, and 1/2 teaspoon of salt. Gradually add the dry mix to the egg mixture. Fold gently with a spatula. This helps keep the cake light. Next, fold in 1/2 cup of melted unsalted butter until the batter is smooth. Pour the batter into your prepared pan. Spread it evenly with a spatula. Bake for 12 to 15 minutes. The cake should spring back when pressed gently. Once baked, prepare a clean kitchen towel. Generously dust it with powdered sugar. When the cake is done, invert it onto the towel. Carefully peel away the parchment paper. Roll the cake up tightly in the towel from one end. Let it cool completely while it stays rolled up. While the cake cools, make the chocolate filling. Heat 1 cup of heavy cream in a saucepan over medium heat. Heat it until it just begins to simmer, then take it off the heat. Add 1 cup of chopped dark chocolate. Stir until it melts and is smooth. Allow the mixture to cool slightly. Whisk until it holds soft peaks. Once the cake is cool, gently unroll it. Spread the chocolate ganache evenly over the cake. Leave a small border around the edges. Drizzle 1/2 cup of caramel sauce over the ganache. Then, sprinkle 1/2 cup of crushed praline pecans on top for texture. Carefully roll the cake back up, this time without the towel. Make sure to roll it tightly. Place the seam-side down on a serving platter. For the final touch, reheat any leftover ganache until it is pourable. Pour it generously over the Yule log, allowing it to cascade down the sides. Sprinkle more crushed praline pecans on top, then dust with powdered sugar. This gives the log a snowy look. When making a Chocolate Praline Yule Log, avoid overmixing the batter. Overmixing can lead to a tough cake. Also, ensure your oven is preheated. A cold oven can cause uneven baking. Remember to roll the cake while it is warm. This helps it hold its shape better. For a light and airy cake, beat the eggs and sugar well. This step is key to achieving volume. Use a fine sieve to sift the dry ingredients. This ensures no lumps remain in your batter. When folding in the melted butter, do it gently. This keeps your batter from deflating. To present your Yule log beautifully, use a rustic wooden board. Drizzle extra ganache over the top for a glossy finish. Sprinkle crushed praline pecans for texture and flair. Dust the log with powdered sugar to mimic fresh snow. Add fresh mint leaves for a pop of color. These small touches make your dessert shine at any holiday gathering! Pro Tips Use Room Temperature Eggs: For better volume and texture, ensure your eggs are at room temperature before whipping them with sugar. This helps to incorporate more air into the batter, resulting in a fluffier cake. Don’t Overmix the Batter: When combining your dry ingredients with the egg mixture, fold gently until just combined. Overmixing can lead to a dense cake, so be careful to maintain the lightness. Chill the Ganache: After preparing the chocolate ganache, let it cool slightly before spreading it on the cake. A thicker ganache will create a more defined layer and will be easier to roll without spilling out. Perfectly Dust with Powdered Sugar: To achieve a snowy effect, use a fine mesh sieve to dust powdered sugar over the Yule log. This technique creates an even distribution and a beautiful presentation. {{image_4}} You can make this Yule log even more special. Try adding different fillings. For a fruity twist, use raspberry jam or lemon curd. Nut butter can also add a nice touch. Spread almond or hazelnut butter for a richer taste. When it comes to toppings, think outside the box. Add fresh berries, candied citrus, or even a drizzle of white chocolate. These changes can make your dessert unique and fun. Many people want options that fit their diets. To make this dessert gluten-free, swap in a gluten-free flour blend. Be sure to check that the cocoa powder is also gluten-free. For a vegan version, use flax eggs instead of real eggs. Mix 1 tablespoon of ground flaxseed with 2.5 tablespoons of water for each egg. Replace the heavy cream with coconut cream and use dairy-free chocolate. These swaps keep the treat tasty for everyone! You can easily boost the flavor of your Yule log. Add spices like cinnamon or nutmeg for warmth. Just a pinch can change the whole dessert. You might also want to try flavor extracts. A few drops of almond or orange extract will give your log a new vibe. Mix in some coffee for a mocha touch. These small changes can make your Yule log even more delightful! Once you finish enjoying your Chocolate Praline Yule Log, store the leftovers. Wrap the log tightly in plastic wrap. This keeps the cake moist and fresh. You can also place it in an airtight container. Store it in the fridge for up to four days. If you want to keep it longer, consider freezing. To freeze your Yule Log, wrap it well in plastic wrap. Then, place it in a freezer bag. Remove as much air as possible to prevent freezer burn. You can freeze it for up to two months. When you’re ready to enjoy it, thaw the log in the fridge overnight. If you want to serve the Yule Log warm, you can gently reheat it. Preheat your oven to 300°F (150°C). Place the log on a baking sheet. Heat it for about 10 minutes, just until warm. Avoid overheating to keep the cake's texture. Serve it with a drizzle of fresh ganache for a delightful taste. It takes about two hours to make this dessert. This includes 30 minutes for prep and about 1.5 hours for baking and cooling. It’s a fun task that will reward you with a stunning treat! Yes! You can make this Yule log ahead of time. I recommend making it one day before serving. Just store it in the fridge, covered with plastic wrap. This will let the flavors meld nicely. To slice your Yule log, use a sharp, serrated knife. Warm the knife under hot water, then dry it off. This helps the knife glide through nicely. Make clean cuts with gentle pressure to avoid tearing. This blog post covered how to make a delicious Chocolate Praline Yule Log. I shared the key ingredients, step-by-step instructions, and helpful tips. You can customize your log with various fillings and dietary options. Remember to avoid common mistakes and consider presentation for a stunning look. Storage tips ensure your Yule Log stays fresh. Making this dessert can be fun and rewarding. Enjoy your baking journey and impress your friends and family with this delightful treat!

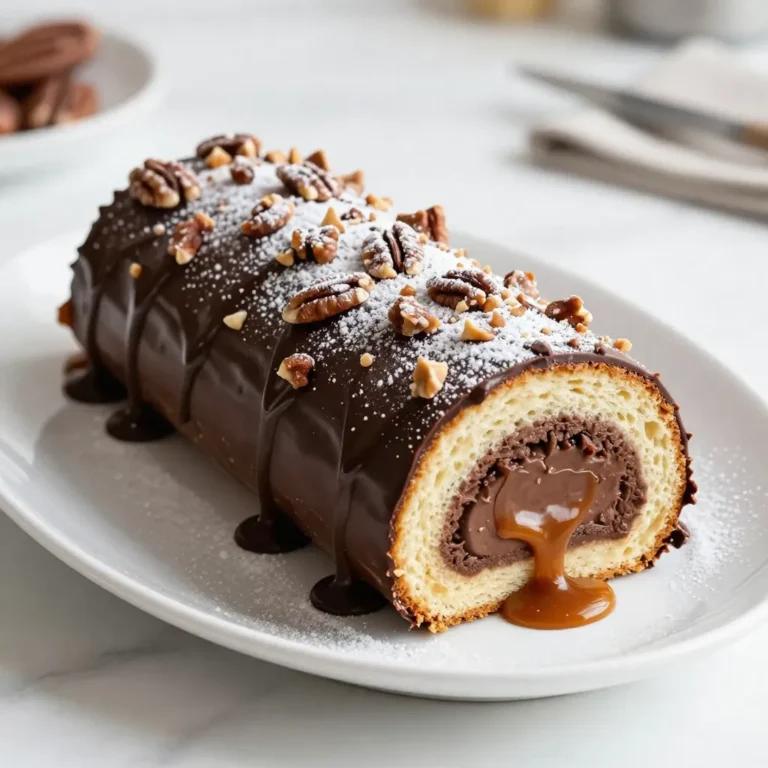
Chocolate Praline Yule Log Delightful Holiday Dessert

- 4 medium-sized beets, washed and scrubbed - 2 tablespoons olive oil - 1 teaspoon sea salt - 1 teaspoon black pepper - 1 tablespoon fresh thyme leaves (or 1 teaspoon dried thyme) - 2 cloves garlic, minced - Zest of 1 lemon - 2 tablespoons balsamic vinegar (optional) When it comes to beets, look for firm, smooth skin. Avoid beets with soft spots or wrinkles. Fresh herbs like thyme should be vibrant and fragrant. For olive oil, choose high-quality, extra virgin oil. This enhances the flavor of your dish. The lemon zest should come from a fresh lemon, as it adds a bright taste. No fresh thyme? You can use dried thyme instead. Just use less, as dried herbs are stronger. If you don’t have balsamic vinegar, you can skip it. Or, try apple cider vinegar for a different flavor. For a milder taste, swap garlic with shallots. {{ingredient_image_2}} First, set your oven to 400°F (200°C). This heat will help the beets roast evenly. Preheating is key for great results. It gets the cooking process started right. Next, wash the beets well to remove any dirt. After washing, cut each beet into 8 wedges. This size helps them cook evenly. Uniform pieces mean no undercooked or overcooked bits. In a large bowl, add the beet wedges. Pour in 2 tablespoons of olive oil. Then, sprinkle 1 teaspoon of sea salt and 1 teaspoon of black pepper on top. Add 1 tablespoon of fresh thyme leaves, 2 minced garlic cloves, and the zest of 1 lemon. Toss gently to coat each wedge. Make sure every piece is covered. This mix gives the beets a burst of flavor. Roasting beets is easy if you start at the right temperature. Preheat your oven to 400°F (200°C). This heat helps the beets cook evenly and develop a rich flavor. Cook the beets for 30 to 40 minutes. The exact time may vary based on the beet size. To check if they are done, insert a fork into a wedge. It should slide in easily. This tells you they are tender and ready to eat. Stirring your beets halfway through cooking is key. This simple step ensures all sides roast evenly. You want every bite to be sweet and tender. Pour out the beets onto a baking sheet and mix them around gently to get them coated in oil and spices. This makes a huge difference in their taste. Pro Tips Ensure Uniform Cuts: Cutting the beets into uniform wedges helps them roast evenly, preventing some pieces from becoming overcooked while others remain underdone. Flavor Infusion: Letting the beets marinate in the olive oil and seasonings for a few minutes before roasting enhances the flavor, allowing the herbs and spices to penetrate the beets. Check for Doneness: Use a fork or knife to test the tenderness of the beets halfway through the roasting time. They should be easily pierced when fully cooked. Presentation Matters: For an impressive presentation, serve the beets on a beautiful platter, topped with fresh herbs or crumbled cheese for added color and flavor contrast. {{image_4}} When picking beets, look for firm, smooth skin. Avoid beets with soft spots or wrinkles. Fresh beets feel heavy for their size. Check the greens, too. They should be bright and crisp. If the greens are wilted, the beets may not be fresh. You can boost beet flavor with simple seasonings. Olive oil adds richness while salt enhances sweetness. Black pepper gives a bit of spice. Fresh herbs, like thyme, bring a bright taste. Minced garlic adds depth. For a citrus kick, use lemon zest. If you want more tang, try a drizzle of balsamic vinegar. Serve your roasted beets on a colorful platter. Sprinkle fresh herbs on top for added color. Crumbled goat cheese or feta makes a tasty addition. For a fresh salad, place beets over arugula. This adds a peppery taste and brightens the dish. Enjoy your beautiful creation! You can change the taste of roasted beets by using different herbs. Thyme gives a nice earthy flavor. Try rosemary for a strong scent or dill for a fresh taste. Oregano also pairs well with beets. Just chop the herbs finely and mix them in with the oil and seasonings. Adding nuts or dried fruits makes your roasted beets even tastier. Walnuts or pecans add crunch and richness. If you prefer sweetness, toss in some dried cranberries or raisins. They balance the earthy flavor of the beets. Add them halfway through roasting to keep them fresh. You can turn roasted beets into a delicious salad. Start with a base of greens like spinach or arugula. Add the warm beets on top. Crumbled goat cheese or feta gives a nice tang. A sprinkle of nuts adds texture. Drizzle with a simple dressing of olive oil and vinegar for extra flavor. This salad is not just pretty; it’s healthy and filling too. Store any leftover roasted beets in an airtight container. Place them in the fridge. They stay fresh for about three to five days. Make sure they cool down before sealing the container. This helps avoid condensation and sogginess. To reheat roasted beets, preheat your oven to 350°F (175°C). Spread the beets on a baking sheet. Heat them for about 10 to 15 minutes. You can also use a microwave. Place them in a bowl and cover it. Heat for 1 to 2 minutes. Can you roast beets with skins on? Yes, you can roast beets with skins on. This helps keep the moisture inside. After roasting, the skins peel off easily. It saves time and adds flavor. Can you add other flavors when roasting beets? Absolutely! You can add herbs like rosemary or parsley. A splash of orange juice or honey can also add a nice touch. What dishes can I make with roasted beets? Roasted beets are great in salads. You can serve them warm or cold. They also pair well with cheese and grains. Feel free to experiment with these ideas! Roasted beets are versatile and delicious. Roasting beets is simple and rewarding. We explored the key ingredients, quality tips, and easy swaps. I laid out step-by-step instructions and cooking times for perfect tenderness. You also learned fun tips to select fresh beets and enhance flavors. Remember to try different herbs and add nuts for variety. Proper storage keeps your leftovers fresh and tasty. Enjoy your roasted beets, and don't hesitate to experiment with new ideas!

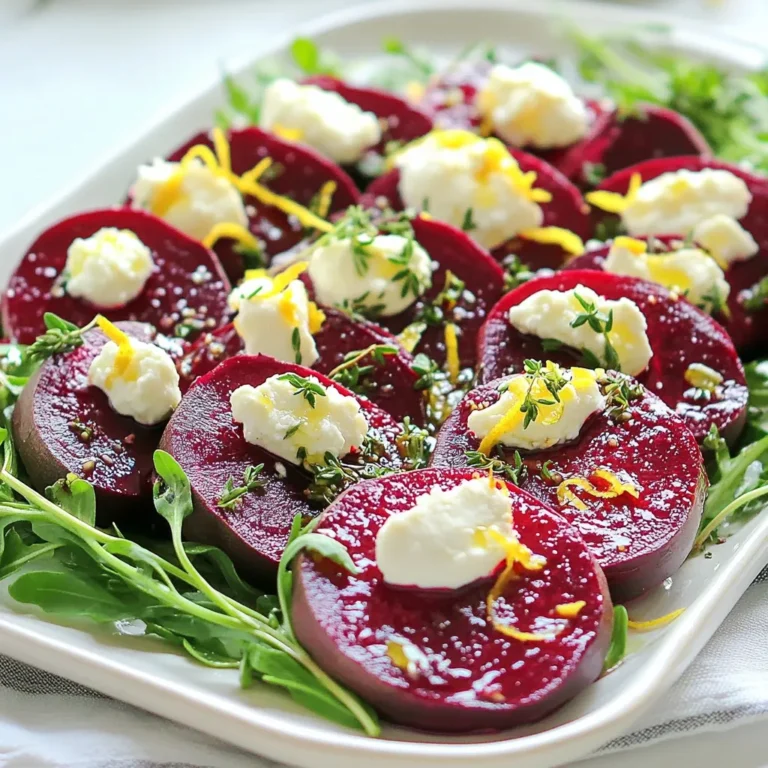
Simple Roasted Beets Flavorful and Easy Recipe

- 2 cups powdered sugar - 2 tablespoons cornstarch - 1/4 cup sweetened condensed milk - 1 teaspoon peppermint extract - 1/4 teaspoon vanilla extract - 1 cup dark chocolate chips (or semi-sweet) - 1 tablespoon coconut oil (or unsalted butter) These main ingredients create a smooth and rich filling. The powdered sugar gives sweetness and the cornstarch helps with texture. Sweetened condensed milk adds creaminess, while peppermint extract brings that iconic flavor. The chocolate chips and coconut oil coat the patties and add a tasty finish. - Crushed peppermint candies You can sprinkle these on top of your patties. They add a nice crunch and look festive. It's a simple way to make your treats more fun and eye-catching. - Large mixing bowl - Spatula - Parchment paper - Baking sheet - Microwave-safe bowl - Freezer Having the right tools makes this process easier. The mixing bowl and spatula help you combine everything well. Parchment paper keeps the patties from sticking, and the freezer firms them up nicely. The microwave-safe bowl is perfect for melting chocolate quickly. {{ingredient_image_2}} To start, gather your ingredients. You need powdered sugar, cornstarch, sweetened condensed milk, peppermint extract, and vanilla extract. First, sift the powdered sugar and cornstarch together in a large bowl. This step helps to remove lumps and makes your mixture smooth. Next, pour in the sweetened condensed milk, peppermint extract, and vanilla extract. Use a spatula to combine everything until you form a thick dough. If the dough is sticky, add more powdered sugar bit by bit. This will help it hold its shape better. Aim for a smooth and pliable dough that feels just right in your hands. Now it’s time to shape your peppermint mixture. Divide the dough into small pieces, about the size of a marble. Roll each piece into a ball. Then, flatten each ball into a disc. Aim for a size of about 1 inch in diameter and 1/4 inch thick. Press down firmly to make sure they are uniform. Once shaped, place the discs on a baking sheet lined with parchment paper. Make sure to leave enough space between them. Now, pop the baking sheet into the freezer for about 30 minutes. This will help your patties firm up nicely. While your patties chill, prepare the chocolate coating. In a microwave-safe bowl, mix dark chocolate chips with coconut oil or butter. Heat the mixture in the microwave, stirring every 30 seconds. Keep stirring until it melts into a smooth, velvety chocolate. Once the patties are firm, take them out of the freezer. Dip each patty into the melted chocolate. Make sure they are fully coated. Allow any excess chocolate to drip off. Place the chocolate-covered patties back on the parchment-lined baking sheet. If you like, sprinkle crushed peppermint candies on top before the chocolate hardens. This adds a fun crunch and a festive look! Let the patties sit at room temperature or chill them in the fridge to set the chocolate completely. To get the right texture for your peppermint patties, start by sifting the powdered sugar and cornstarch together. This step helps remove any lumps. When you mix in the sweetened condensed milk and extracts, the dough should be thick but not too sticky. If it is sticky, add more powdered sugar little by little. This helps you form nice, flat discs. Aim for a dough that holds its shape well when you press it. Melting chocolate can be tricky, but I have a simple method. Use a microwave-safe bowl for the dark chocolate chips and coconut oil (or butter). Heat them in short bursts of 30 seconds. Stir well between each round. This keeps the chocolate from burning. Once melted, the chocolate should be smooth and shiny. If it feels too thick, just add a bit more coconut oil for a better dip. For a stunning look, place your finished peppermint patties on a lovely platter. You can sprinkle crushed peppermint candies on top for extra flair. This not only adds color but also gives a nice crunch. If you want to gift some, wrapping them in colorful foil adds a special touch. Fresh mint leaves can also make your display pop! Pro Tips Tip for Consistency: Ensure your dough is not too sticky by gradually adding powdered sugar. This will help maintain the shape of your patties. Tip for Chocolate Coating: Make sure to stir the chocolate mixture well after each heating interval to avoid burning, ensuring a smooth coating. Tip for Festive Garnish: Crushed peppermint candies not only add a delightful crunch but also enhance the visual appeal of your patties. Tip for Storage: Keep your peppermint patties in an airtight container in the refrigerator to maintain their freshness and chocolate coating. {{image_4}} You can change up the flavor of your peppermint patties. For a fruity twist, use orange or raspberry extract instead of peppermint. These flavors give a fun spin to the classic recipe. You can also try adding a few drops of almond extract. This adds a nice nutty taste that pairs well with chocolate. While dark chocolate is great, you can use other types, too. Milk chocolate offers a sweeter taste, which many enjoy. White chocolate is another option and gives a pretty look. You can even mix different chocolates for a unique twist. Just melt them the same way you would with dark chocolate. You can make peppermint patties fit any season. During the holidays, add crushed candy canes on top for a festive touch. In spring, try adding a few drops of lemon juice for a fresh flavor. For summer, consider mixing in some coconut flakes. This creates a tropical vibe that makes your treats even more fun. Store homemade peppermint patties in an airtight container. Use parchment paper between layers to prevent sticking. Keep them in a cool, dry place, away from heat and moisture. This helps maintain their texture and flavor. Homemade peppermint patties last about two weeks at room temperature. For longer storage, place them in the fridge. They can stay fresh for up to a month when refrigerated. Always check for signs of spoilage, like a change in smell or texture, before eating. To freeze peppermint patties, first, let them cool completely. Place the patties in a single layer on a baking sheet. Freeze until solid, then transfer them to a freezer bag. They can last for up to three months in the freezer. When ready to enjoy, thaw them in the fridge or at room temperature. Yes, you can substitute some ingredients. For example, if you don't have sweetened condensed milk, you can use evaporated milk. Just add a little sugar to make it sweet. If you want to skip the cornstarch, it is fine, too. The patties will still taste great, but they may be a bit softer. You can replace coconut oil with unsalted butter. Both work well for melting chocolate. Use the same amount as the recipe calls for. This will give your chocolate a rich taste. To get a smooth coating, melt the chocolate slowly. Use a microwave on low heat. Stir every 30 seconds until it is silky. Avoid overheating, as this can cause the chocolate to seize. Make sure to dip each patty quickly to keep the coating even. You learned how to make delicious peppermint patties at home. We covered the main ingredients and optional ones that add fun twists. You now know the steps for mixing, shaping, and coating the patties in chocolate. Plus, I shared tips to perfect the texture and presentation. Try out the variations for seasonal treats. Remember to store your creations correctly for the best taste. With these insights, you can enjoy and share your homemade peppermint patties anytime. Happy cooking!

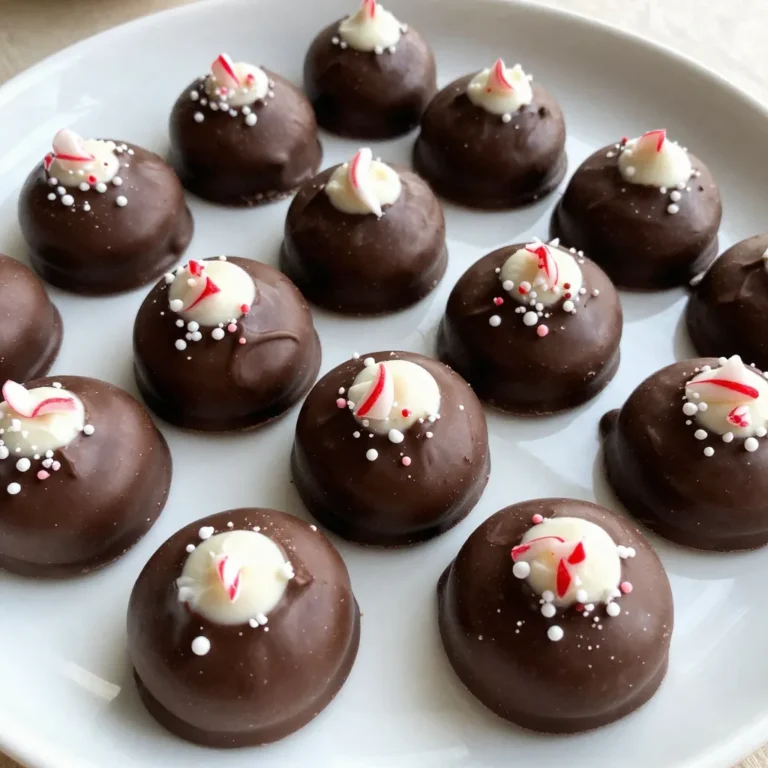
Homemade Peppermint Patties Easy and Tasty Treat

PREV 1 … 27 28 29 … 47 NEXT
snack joy kitchen

explore

DessertsDinnerAppetizersDrinks

Our Policies

  • Cookie Policy
  • Copyright Policy
  • Disclaimer
  • GDPR Policy
  • Terms Of Use
Back to Top
  • About
  • Contact Us
  • Privacy Policy
© 2026 snack joy kitchen