FREE DINNER EBOOK! Get your copy!
  • Cookie Policy
  • GDPR Policy
  • Disclaimer
  • Terms Of Use
  • Visit my other site: Fun Cookie Recipes
snack joy kitchen
  • Home
  • Dinner
  • Desserts
  • Drinks
  • Appetizers
  • Contact
  • About
  • Privacy Policy
  • Home
  • Dinner
  • Desserts
  • Drinks
  • Appetizers
  • Contact
  • About
  • Privacy Policy
  • Cookie Policy
  • GDPR Policy
  • Disclaimer
  • Terms Of Use
Visit my other site: Fun Cookie Recipes

HOME / CATEGORIES /

Latest

Start with 1 pound of fresh salmon fillet. Remove the skin and cut it into bite-sized cubes. Fresh salmon gives the best taste and texture. For the marinade, you will need: - 1/4 cup honey - 3 tablespoons low-sodium soy sauce - 2 cloves garlic, finely minced - 1 tablespoon fresh ginger, grated - 1 tablespoon olive oil - 1 teaspoon sesame oil These ingredients blend to create a sweet and savory flavor that enhances the salmon. To finish the dish, gather: - 1 tablespoon sesame seeds - 2 green onions, finely chopped - Salt and freshly ground black pepper to taste These garnishes add a nice crunch and fresh taste. They also make the dish look great when served. {{ingredient_image_2}} To start, gather your ingredients. In a medium bowl, mix the honey, low-sodium soy sauce, minced garlic, grated ginger, olive oil, and sesame oil. Use a whisk to blend them well. This marinade gives the salmon a sweet and savory flavor that you will love. Next, take your fresh salmon fillet and cut it into bite-sized cubes. Carefully add the salmon to the bowl with the marinade. Make sure each piece is coated well. Cover the bowl with plastic wrap and place it in the refrigerator. Let it marinate for 15 to 30 minutes. This step allows the salmon to soak up all the tasty flavors. Preheat your oven to 400°F (200°C). While it's heating, line a baking sheet with parchment paper. This will help prevent sticking. Arrange the marinated salmon bites in a single layer on the baking sheet. Drizzle any leftover marinade over the salmon for extra flavor. - Turning and Final Touches Bake the salmon bites for 12 to 15 minutes. Halfway through, gently turn the salmon cubes. This ensures even cooking and a beautiful golden color. Once done, take them out and let them cool for a few minutes. Before serving, sprinkle sesame seeds and chopped green onions on top. These add a nice crunch and fresh taste. Enjoy your honey garlic salmon bites warm or at room temperature! When picking salmon, look for bright, shiny skin. The fish should smell fresh, not fishy. Wild-caught salmon often has better flavor than farmed. If you can, choose sockeye or king salmon for richer taste. Ask your fishmonger for help if you're unsure. Fresh salmon makes a big difference in this recipe. To get the best texture, cut the salmon into even cubes. This helps them cook evenly. Marinate the salmon for at least 15 minutes but not more than 30 minutes. Over-marinating can make the fish mushy. Bake the bites until they are just cooked through. Keep an eye on them; they cook quickly. Want to boost the flavor? Add a dash of chili flakes for heat. You can also mix in a splash of rice vinegar for tang. For a smoky taste, try using smoked soy sauce. Fresh herbs like cilantro or basil can also brighten the dish. Don't forget to sprinkle sesame seeds and green onions before serving for extra crunch and color. Pro Tips Marinating Time: Allow the salmon to marinate for the full 30 minutes for maximum flavor infusion. This enhances the sweet and savory notes in the dish. Even Cooking: Make sure the salmon cubes are of uniform size to ensure even cooking and prevent some pieces from being overcooked while others remain undercooked. Check for Doneness: Salmon is perfectly cooked when it flakes easily with a fork and has an internal temperature of 145°F (63°C). Keep an eye on it during baking! Garnishing Tips: Add a squeeze of fresh lime juice just before serving for an extra zing. It balances the sweetness of the honey and enhances the overall flavor profile. {{image_4}} You can change the flavor of your honey garlic salmon bites. Try adding a splash of lime juice for a zesty twist. You can also mix in some chili flakes for a bit of heat. If you want a tropical vibe, use pineapple juice in the marinade. This adds sweetness and a fun flavor. You can even switch the honey for maple syrup for a unique taste. Each option brings a new taste experience while still being easy to make. If baking isn't your style, you can grill the salmon bites. Just preheat your grill to medium heat. Skewering the salmon makes it easy to turn while cooking. You can also pan-sear the salmon bites in a hot skillet. This gives them a nice crust and rich flavor. Cook them for about 3-4 minutes on each side. Both methods can add a smoky touch that pairs well with the honey garlic sauce. Think about how you want to serve your salmon bites. They shine as a starter at parties or casual dinners. You can serve them on toothpicks for easy eating. Pair them with a tangy dipping sauce like a spicy mayo or a cilantro dressing. For a full meal, serve them over rice or a fresh salad. Garnish with extra sesame seeds and chopped green onions to make them look great. These bites are sure to impress your guests! After enjoying your honey garlic salmon bites, let them cool to room temperature. Place any leftovers in an airtight container. Store them in the fridge for up to three days. If you want to keep them longer, freezing is a great option. To reheat your salmon bites, preheat your oven to 350°F (175°C). Arrange the salmon bites on a baking sheet. Heat them for about 10 minutes until they are warm. You can also use a microwave, but be careful not to overcook them. If you want to freeze your salmon bites, first let them cool completely. Place them in a single layer on a baking sheet and freeze for about an hour. Once frozen, transfer them to a freezer-safe bag or container. They can stay frozen for up to three months. When you're ready to eat, thaw in the fridge overnight before reheating. Yes, you can use frozen salmon. Just make sure to thaw it first. I recommend placing the frozen salmon in the fridge overnight. If you need it fast, you can run it under cold water. Once thawed, remove the skin and cut it into bite-sized cubes. You can check if the salmon is done by looking at its color. The salmon should turn from bright pink to a light opaque color. You can also use a fork to flake the fish. If it flakes easily, it's ready. The internal temperature should reach 145°F (63°C) for safety. Honey garlic salmon bites pair well with many sides. I suggest serving them with: - Steamed rice or quinoa - A fresh green salad - Grilled vegetables - Noodles tossed in sesame oil These options bring out the flavors of the salmon and make a great meal. In this post, we explored how to make delicious honey garlic salmon bites. We discussed the fresh salmon, marinade, and garnishes that create great flavors. I shared easy steps for preparing, marinating, and baking the salmon. You learned tips for choosing the best fish and achieving the perfect texture. I also offered variations and storage tips for leftovers. Enjoy experimenting with this recipe and making it your own!

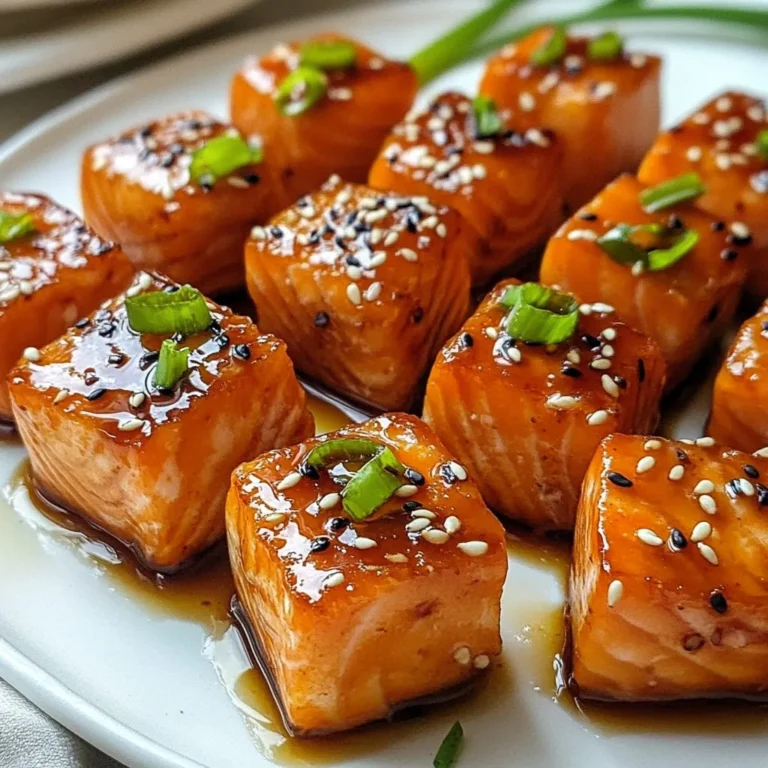
Honey Garlic Salmon Bites Tasty and Easy Appetizer

- 2 boneless, skinless chicken breasts - 1 cup sliced mushrooms (button or cremini) - 1/2 cup freshly grated Parmesan cheese - 3 cloves garlic, minced - 1/4 cup heavy cream - 2 tablespoons extra virgin olive oil - 1 tablespoon unsalted butter - 1 teaspoon dried thyme - Sea salt and freshly ground black pepper - Fresh parsley, chopped for garnish Gathering the right ingredients is key to making Parmesan Garlic Mushroom Chicken. Start with the chicken. Choose two boneless, skinless chicken breasts for best results. This cut cooks quickly and stays juicy. Next, get about one cup of mushrooms. You can use button or cremini varieties. Both add great flavor. For the cheesy goodness, grab half a cup of freshly grated Parmesan cheese. The fresher the cheese, the better the taste. Now, you’ll need three cloves of garlic. Mince them well for a strong flavor. Don’t forget the heavy cream; it’s a quarter cup for that rich, smooth sauce. You'll also need two tablespoons of extra virgin olive oil and one tablespoon of unsalted butter. This mix helps to sauté the chicken and mushrooms perfectly. Add one teaspoon of dried thyme for an herb kick. Lastly, season with sea salt and freshly ground black pepper to taste. For a touch of color and freshness, chop some parsley for garnish. This simple addition brightens the dish and makes it look lovely on the plate. With all these ingredients ready, you're set to create a delicious meal that’s sure to impress! {{ingredient_image_2}} First, season the chicken breasts. Use sea salt, black pepper, and dried thyme. Season both sides well. This step adds flavor and makes the chicken tasty. Proper seasoning is key to a great dish. It enhances the natural taste of the chicken. Next, heat olive oil in a large skillet. Set the heat to medium-high. Once the oil shimmers, add the chicken. Cook for 5-6 minutes on each side. Look for a golden brown color. The chicken should reach 165°F to be safe to eat. Once done, take it out and cover it. In the same skillet, lower the heat. Add unsalted butter until it melts. Then, toss in the sliced mushrooms. Sauté for about 5 minutes. Stir occasionally until they turn brown and tender. After that, add minced garlic. Cook for one more minute, but don’t let it burn. Now, pour in the heavy cream. Stir it well with the mushrooms. Gradually add freshly grated Parmesan cheese. Keep stirring until the cheese melts. This will give you a smooth and creamy sauce. Make sure there are no lumps in it. Return the seared chicken to the skillet. Nestle it in the rich mushroom sauce. Spoon the sauce over the chicken. Let it simmer for 2-3 minutes. This step allows all the flavors to mix nicely. Transfer the chicken to serving plates. Spoon more creamy mushroom sauce over the top. For a nice touch, sprinkle with fresh parsley. You can serve it on rice or mashed potatoes. These sides soak up the sauce and make it even better. To keep your chicken juicy, always season it well. Use sea salt, black pepper, and dried thyme. Pat the chicken dry before seasoning. This helps the spices stick better. Sear the chicken in a hot skillet for a nice brown crust. Cook it until it reaches 165°F. After cooking, let it rest for a few minutes. This allows the juices to redistribute and keeps the meat moist. To boost flavor, try adding lemon juice or zest. This brightens the dish and cuts through the creaminess. You can also add fresh herbs like basil or oregano. These herbs enhance the dish's taste. For a creamier sauce, balance it with a splash of white wine. This adds depth and a bit of acidity. If you want to swap heavy cream, use half-and-half or whole milk. This will lighten the dish while still keeping it creamy. For cheese, you can try Gruyère or mozzarella instead of Parmesan. These cheeses melt well and add a different flavor profile. Mixing cheeses can create a fun twist on the classic recipe. Pro Tips Choose the Right Mushrooms: Opt for a mix of button and cremini mushrooms for a depth of flavor and texture in your dish. Perfectly Sear the Chicken: Ensure your skillet is hot enough before adding the chicken to achieve a beautiful golden crust. Don’t Rush the Sauce: Allow the cream and Parmesan to meld slowly over low heat for a smooth, cohesive sauce. Garnish for a Pop: Always finish your dish with fresh herbs like parsley to enhance both the presentation and flavor. {{image_4}} You can switch chicken for turkey or pork. Both meats cook well and absorb flavors nicely. Turkey is leaner, while pork adds a bit more richness. For a vegetarian twist, use hearty ingredients like tofu or chickpeas. They soak up the sauce, making them tasty and filling. Mushrooms add depth to this dish. You can try different types, too. Shiitake, portobello, or oyster mushrooms all bring unique tastes. Mixing several varieties can boost the flavor profile even more. Experiment to find your favorite combo! Want to spice it up? Add spinach or sun-dried tomatoes. They add color and nutrition. For a touch of acidity, use white wine when you deglaze the skillet. It brightens up the sauce and balances the creaminess. These small tweaks can make your meal even better! After enjoying your Parmesan Garlic Mushroom Chicken, store the leftovers right. Place the chicken in an airtight container. Make sure the sauce covers the chicken well to keep it moist. Store it in the fridge within two hours of cooking. This helps keep it safe and fresh. Consume the leftovers within three days for the best taste. To reheat, use a skillet over medium heat. This method keeps the chicken juicy. Add a splash of water or broth if the sauce is too thick. Heat until the chicken reaches 165°F. You can also use a microwave. Cover the dish loosely to allow steam to escape. Heat in short bursts, checking frequently. Yes, you can freeze this dish! To freeze, let it cool completely first. Then, place it in a freezer-safe container or bag. Remove as much air as possible to prevent freezer burn. Label the container with the date. It can last up to three months in the freezer. To defrost, move it to the fridge overnight. Reheat it as mentioned above for the best results. To spice up your dish, add red pepper flakes or cayenne pepper. These spices bring heat without overwhelming the flavor. You can also try diced jalapeños for a fresh kick. Start with a small amount, then taste and adjust. This way, you control the spice level. Yes, you can use pre-cooked chicken. Just reduce the cooking time to about 5 minutes. You want to heat the chicken through without drying it out. Add it to the sauce once the mushrooms and garlic are ready. This keeps the flavor intact and makes it quick. For sides, I recommend rice or mashed potatoes. They soak up the rich sauce well. Steamed vegetables like green beans also add color and nutrients. A fresh salad can balance the meal with crunch and freshness. Choose what you love! You can prep some components ahead of time. Season and sear the chicken, then store it in the fridge. Slice the mushrooms and mince the garlic in advance, too. This saves time on busy nights. Just assemble and cook when you're ready! This blog post guides you through making a delicious Parmesan Garlic Mushroom Chicken. We covered the essential ingredients, step-by-step instructions, and helpful tips to ensure juicy chicken. You learned about variations and storage tips for leftovers too. Remember, feel free to customize the dish with different proteins or add spices for kick. This recipe not only satisfies your taste buds but is also fun to prepare. Enjoy cooking and savoring every bite!

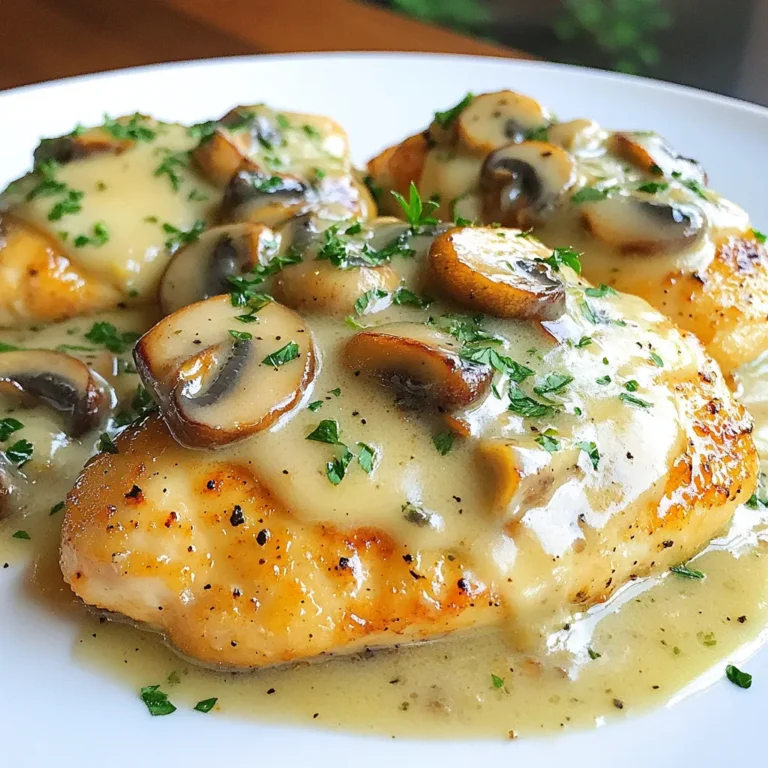
Parmesan Garlic Mushroom Chicken Easy Weeknight Meal

- 1 cup all-purpose flour - 1/2 cup unsweetened cocoa powder - 1 teaspoon baking powder - 1/2 teaspoon baking soda - 1/4 teaspoon salt - 1/2 cup granulated sugar - 1/2 cup packed brown sugar - 2 large eggs - 1/2 cup buttermilk (or regular milk plus 1 teaspoon of vinegar) - 1/3 cup vegetable oil - 1 teaspoon pure vanilla extract - 1 cup chocolate chips (mix of dark and milk chocolate) - 1/2 cup chopped walnuts or pecans (optional) These ingredients create a rich and chocolatey muffin that will please any chocoholic. The mix of cocoa powder and chocolate chips gives you layers of chocolate flavor. The buttermilk adds moisture and a slight tang. The nuts, if you choose to add them, give a nice crunch. You can easily swap ingredients to fit your needs. For example, use gluten-free flour for a gluten-free option or dairy-free milk for a dairy-free treat. Each ingredient plays a role in making the muffins soft, moist, and delicious. You can trust that these muffins will turn out great when you follow the recipe closely. Enjoy the process, and don’t forget to share these tasty treats! {{ingredient_image_2}} 1. Preheating the oven: Set your oven to 350°F (175°C). This helps the muffins bake evenly. 2. Preparing the muffin tin: Line your muffin tin with paper liners or grease it with non-stick spray. This keeps the muffins from sticking. 3. Mixing dry ingredients: In a large bowl, combine 1 cup of all-purpose flour, 1/2 cup of cocoa powder, 1 teaspoon of baking powder, 1/2 teaspoon of baking soda, and 1/4 teaspoon of salt. Whisk until there are no lumps. 1. Whisking the sugar and eggs: In a separate bowl, mix 1/2 cup of granulated sugar, 1/2 cup of brown sugar, and 2 large eggs. Whisk until smooth. 2. Adding buttermilk and oil: Pour in 1/2 cup of buttermilk and 1/3 cup of vegetable oil. Add 1 teaspoon of vanilla extract. Mix well until combined. 1. Combining dry and wet mixtures: Gradually add the dry mixture to the wet bowl. Stir gently until just combined. Do not overmix; a few lumps are fine. 2. Folding in chocolate and nuts: Carefully fold in 1 cup of chocolate chips and 1/2 cup of chopped walnuts or pecans if you want extra crunch. 1. Filling the muffin tin: Use a spoon or ice cream scoop to fill each muffin cup about 3/4 full. This allows space for the muffins to rise. 2. Baking and testing for doneness: Place the muffin tin in the oven. Bake for 18-20 minutes. Check doneness by inserting a toothpick. It should come out clean or with a few moist crumbs. To make the best muffins, avoid overmixing the batter. Mix until just combined. A few lumps are okay. This keeps your muffins soft and fluffy. Check for doneness by inserting a toothpick into the center. If it comes out clean or with a few moist crumbs, your muffins are ready. If wet batter sticks, bake for a few more minutes. Serve these muffins warm for the best taste. Warm muffins melt chocolate chips, creating a delightful experience. If you prefer, let them cool for a different texture. Consider decorating options like a dusting of powdered sugar. You can also drizzle melted chocolate on top for extra indulgence. Using a rustic wooden board adds charm to your presentation. Make sure you measure your ingredients accurately. This ensures the right balance for your muffins. Too much flour makes them dry, while too little will make them too wet. Properly grease or line your muffin tins. This prevents sticking and makes it easy to remove the muffins. Use paper liners or non-stick spray for the best results. Pro Tips Use Room Temperature Ingredients: Allow your eggs and buttermilk to sit at room temperature for about 30 minutes before mixing. This helps create a smoother batter and results in fluffier muffins. Don't Overmix: When combining the dry and wet ingredients, mix gently until just combined. Overmixing can lead to dense muffins, so it's okay to have a few lumps! Chocolate Chip Varieties: Experiment with different types of chocolate chips, such as white chocolate or peanut butter chips, to add unique flavors to your muffins. Storage Tips: Store leftover muffins in an airtight container at room temperature for up to 3 days, or freeze them for up to 3 months. Reheat in the microwave for a warm treat! {{image_4}} You can make your muffins even better by using different types of chocolate. Try adding dark chocolate chunks for a rich taste. You can also mix in white chocolate chips for a sweet twist. Using flavored extracts can boost the flavor. Almond or orange extracts add a fun surprise. If you need a gluten-free option, substitute the all-purpose flour with a gluten-free blend. Make sure it includes xanthan gum for the right texture. For a dairy-free version, use almond milk or coconut milk instead of buttermilk. You can also use dairy-free chocolate chips for a fully dairy-free muffin. Get creative with add-ins to make your muffins special. Chopped nuts like walnuts or pecans add crunch and flavor. Dried fruits, such as cranberries or cherries, bring a chewy texture. Instead of chocolate chips, try butterscotch or peanut butter chips for a new twist. To keep your muffins fresh, follow these tips: - Short-term storage: Place muffins in an airtight container at room temperature. They stay fresh for about 3 days. This way, they keep their soft texture and rich flavor. - Long-term storage: For longer storage, freeze your muffins. Wrap each muffin in plastic wrap, then place them in a freezer bag. They can last for up to 3 months in the freezer. This method preserves their taste and moisture. To enjoy your muffins warm, here are simple methods: - Microwave: Heat a muffin for about 15-20 seconds. This softens it and brings back the gooey chocolate. - Oven: Preheat your oven to 350°F (175°C). Place the muffins on a baking sheet and warm them for about 5-10 minutes. This method helps restore their fresh-baked texture. To make these muffins more chocolatey, you can add extra chocolate chips. Use a mix of dark and milk chocolate chips for depth. You can also add a bit more cocoa powder to the batter. Adding a chocolate drizzle on top after baking can enhance the chocolate flavor too. Yes, you can use regular milk instead of buttermilk. To mimic buttermilk, add 1 teaspoon of vinegar to the milk. Let it sit for a few minutes to thicken. This helps create moist muffins. You can check if your muffins are done by inserting a toothpick into the center. If it comes out clean or with a few moist crumbs, they are ready. Keep an eye on baking time, usually around 18-20 minutes. If you need an egg substitute, use 1/4 cup of unsweetened applesauce per egg. You can also use mashed banana or a flaxseed meal mixture. For the flaxseed option, mix 1 tablespoon of flaxseed meal with 3 tablespoons of water. Let it sit until it thickens. Chocolate muffins last about 3 days at room temperature. Store them in an airtight container to keep them fresh. You can freeze muffins for up to 3 months. Just wrap them tightly in plastic wrap before freezing. This blog post covered everything you need for perfect chocolate muffins. We discussed key ingredients, step-by-step instructions, and tips to ensure your muffins shine. Remember to avoid overmixing to keep them light and fluffy. Try different flavors or ingredients to suit your taste. Store them properly for the best life, and enjoy them warm or with fun toppings. By following these guidelines, you can create delicious muffins your friends and family will love. Happy baking!

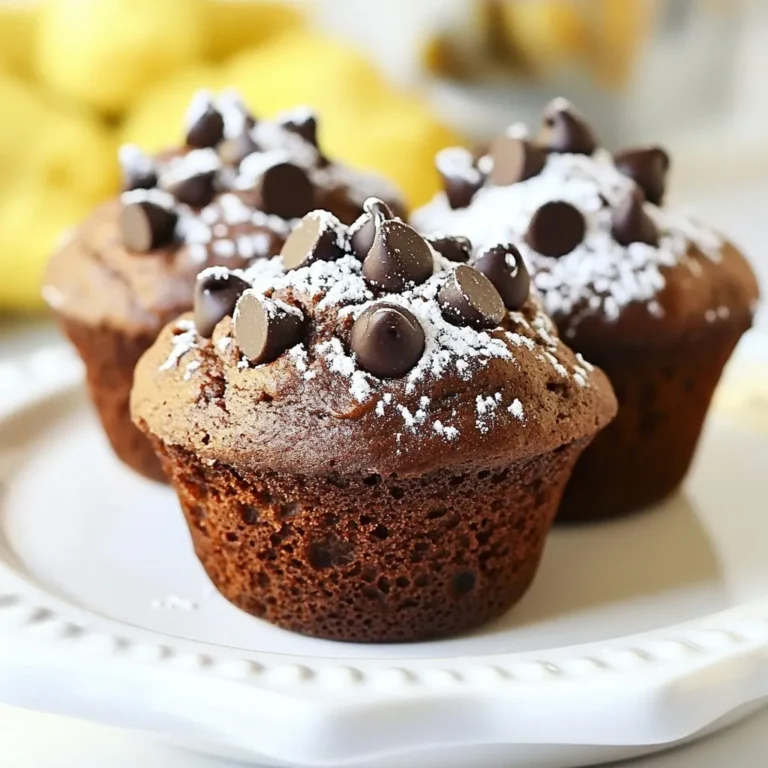
Triple Chocolate Muffins Irresistible and Decadent Treat

- 6 bone-in, skin-on chicken thighs - 4 cloves garlic, minced - 2 tablespoons fresh rosemary, finely chopped - 2 tablespoons fresh thyme, finely chopped - 1 tablespoon extra virgin olive oil - 1 teaspoon fresh lemon zest - Salt and freshly cracked black pepper, to taste - 1 lemon, sliced into thin rounds - Fresh parsley, chopped (for garnish) - Baking sheet - Parchment paper - Mixing bowl - Meat thermometer Gathering the right ingredients is key to making Garlic Herb Roasted Chicken Thighs. Start with six bone-in chicken thighs. The skin helps keep the meat juicy. You will also need four cloves of minced garlic. Fresh herbs add depth. I like using two tablespoons of rosemary and thyme each. Olive oil, lemon zest, salt, and black pepper round out the flavors. Don’t forget a lemon, sliced thin. It adds a bright note that pairs well with chicken. Finish with fresh parsley for garnish. For tools, use a baking sheet lined with parchment paper. This helps with cleanup. A mixing bowl will hold your herb paste. A meat thermometer is essential. It ensures your chicken reaches the right temperature. These ingredients and tools set you up for a tasty dish. {{ingredient_image_2}} Preheating is key for perfect chicken. Set your oven to 425°F (220°C). Wait until it reaches this temperature before you cook. This helps the chicken cook evenly and gives it a nice, crispy skin. In a small bowl, mix four minced garlic cloves, two tablespoons of chopped rosemary, and two tablespoons of chopped thyme. Add one tablespoon of olive oil, one teaspoon of lemon zest, salt, and pepper. Stir until it becomes a fragrant paste. This paste will give your chicken great flavor. Take six chicken thighs and dry them well with paper towels. Drying them helps achieve that crispy skin we all love. Next, rub the herb paste under the skin and on the surface of each thigh. Make sure every piece is covered in the tasty mix for the best flavor. Place the chicken thighs skin-side up on a baking sheet lined with parchment paper. This makes for an easy cleanup. Next, place lemon slices on top and around the chicken. The lemon will add moisture and flavor as the chicken cooks. Roast the chicken for about 35-40 minutes. Check the internal temperature using a meat thermometer. It should read 165°F (75°C). This ensures the chicken is safe to eat and perfectly cooked. Once done, take the chicken out of the oven. Let it rest for about five minutes. This helps the juices settle, making each bite juicy and tender. When ready to serve, sprinkle fresh parsley on top for a pop of color and freshness. To make your chicken skin crispy, start by drying the thighs well. Use paper towels to remove any moisture. Moisture will steam the skin, making it soggy. Next, rub the herb paste under the skin and on top. This helps flavor the meat while keeping the skin crispy. For an extra crunch, roast the thighs on a wire rack set over a baking sheet. This allows hot air to circulate, crisping all sides. If you want an even crispier finish, broil the chicken for the last few minutes. Watch closely to prevent burning. You can easily boost flavor by adding spices or marinades. Try paprika for a smoky taste or chili powder for some heat. A splash of balsamic vinegar or honey can add depth. Consider marinating the chicken for a few hours or overnight. This makes the meat even more flavorful and tender. Don’t forget about fresh herbs! You can mix in oregano or parsley for extra brightness. Lemon juice also adds a zesty kick. Experiment with your favorite spices to make this dish your own. Cooking times can vary with different ovens. If using a convection oven, reduce the temperature by 25°F (about 15°C). This helps cook the chicken evenly and faster. Start checking for doneness around 30 minutes. For traditional ovens, stick to the original time of 35-40 minutes. Always use a meat thermometer. The chicken is safe to eat at 165°F (75°C). Adjust the cooking time as needed based on your oven type for perfect results. Pro Tips Pat Dry for Crispy Skin: Make sure to pat the chicken thighs with paper towels before seasoning. This removes excess moisture, allowing the skin to crisp up beautifully in the oven. Use a Meat Thermometer: To ensure perfectly cooked chicken, use a meat thermometer to check that the internal temperature reaches 165°F (75°C). This guarantees moist, tender meat without any risk of undercooking. Let it Rest: Allow the chicken to rest for about 5 minutes after removing it from the oven. This step is crucial as it allows the juices to redistribute, resulting in a juicier and more flavorful bite. Experiment with Herbs: Feel free to customize the herb blend based on your preferences. Fresh sage, oregano, or even a hint of spicy paprika can elevate the flavor profile of the chicken. {{image_4}} Grilling chicken thighs adds a smoky flavor. Start by heating your grill to medium-high. While it warms, follow the same prep steps as the oven method. Once ready, place the chicken thighs skin-side down on the grill. Cook for about 6-7 minutes. Flip them over and grill for another 6-7 minutes. Ensure the internal temperature hits 165°F (75°C). You can also add lemon slices directly on the grill for a vibrant flavor. Feel free to swap herbs and oils based on your taste. Instead of rosemary and thyme, try sage or oregano. For the oil, avocado oil works well too. You can even use garlic powder if fresh garlic is not available. These small changes can create a whole new taste while keeping it delicious. Pair your garlic herb roasted chicken thighs with sides that complement their flavors. I recommend serving them with roasted vegetables, like carrots and broccoli. A fresh garden salad with a light vinaigrette adds a nice touch. For a heartier option, consider mashed potatoes or quinoa. These sides will round out your meal and make it more satisfying. Store leftover chicken in an airtight container. Keep it in the fridge for up to 3 days. Make sure to let it cool before sealing. This helps to keep it juicy and fresh. For longer storage, freeze cooked chicken thighs. Wrap each thigh in plastic wrap. Then, place them in a freezer-safe bag. Squeeze out as much air as you can. The chicken can last up to 3 months in the freezer. To reheat, avoid dry chicken. Use the oven or stovetop. Preheat the oven to 350°F (175°C). Place chicken in a dish with a splash of broth or water. Cover with foil to trap moisture. Heat for about 15-20 minutes. If using the stovetop, heat on low with a lid. This keeps the chicken moist and tasty. You can tell chicken thighs are done when they reach 165°F (75°C). Use a meat thermometer to check the thickest part of the thigh. The skin should look crispy and golden brown. If you cut into the thigh, the juices should run clear, not pink. Yes, you can use skinless chicken thighs. However, the skin adds flavor and helps keep the meat moist. If you choose skinless thighs, adjust the cooking time slightly. They may cook faster, so check for doneness early. Some great side dishes include: - Roasted vegetables like carrots and broccoli - Mashed potatoes or garlic mashed potatoes - A fresh garden salad with lemon vinaigrette - Quinoa or rice pilaf These sides will complement the chicken's flavors well. To lower the garlic flavor, use fewer cloves. You can also roast the garlic before mixing it into the herb paste. Roasted garlic has a milder, sweeter taste. Lastly, add more herbs to balance the flavors. Yes, this recipe is great for meal prep. Cook the chicken and let it cool. Store it in airtight containers in the fridge for up to three days. You can reheat it easily in the oven or microwave. Enjoy it with different sides for variety throughout the week. You’ve learned how to make delicious Garlic Herb Roasted Chicken thighs, step by step. Remember to use fresh herbs and a meat thermometer for the best results. You can also try grilling or swapping ingredients to create your own twist. Store leftovers carefully to enjoy them later. Cooking is fun and rewarding. Keep experimenting in the kitchen and enjoy great meals with your family. Your success is just a recipe away!

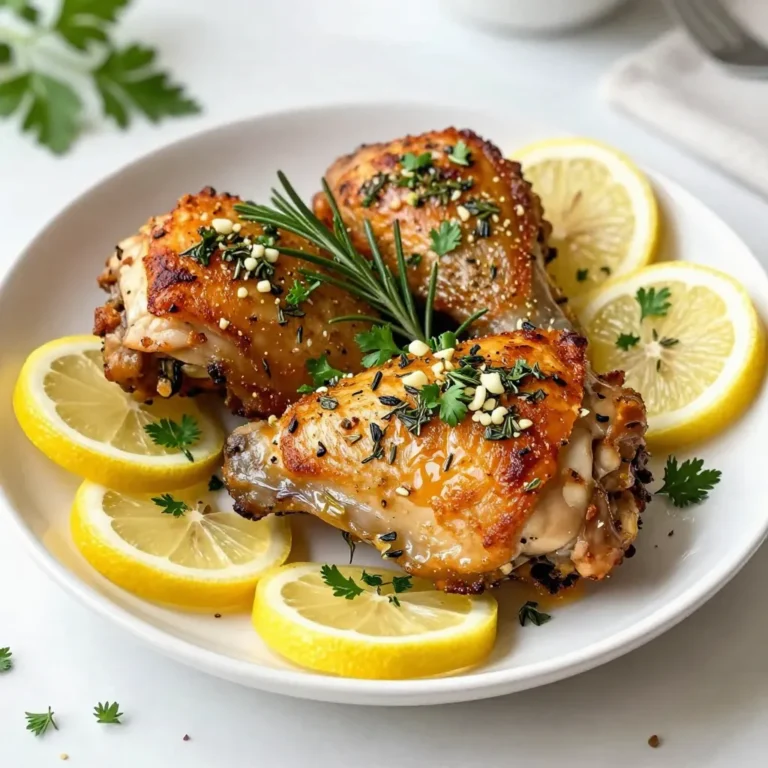
Garlic Herb Roasted Chicken Thighs Juicy and Tender

- 2 cups cooked chicken, shredded - 1 cup carrots, diced into small pieces - 1 cup peas (fresh or frozen) - 1 cup potatoes, peeled and diced - 1 cup onion, finely chopped - 2 cloves garlic, minced - 1/2 cup celery, diced - 1/3 cup all-purpose flour - 2 cups chicken broth (low-sodium preferred) - 1 cup milk (whole or 2%) - 2 tablespoons olive oil - 1 teaspoon dried thyme - 1/2 teaspoon black pepper - 1/2 teaspoon salt - 1 package of refrigerated pie crusts (contains 2 crusts) - 1 egg, beaten (for egg wash) The heart of any chicken pot pie lies in its ingredients. This dish shines with simple, wholesome foods. You start with cooked chicken. Shredded chicken works best. It adds great flavor and texture. Next, gather fresh vegetables to make your filling colorful and tasty. You will need carrots, peas, potatoes, onions, garlic, and celery. Each vegetable brings its own flavor. Dicing them small helps them cook evenly. For the sauce, you will use all-purpose flour, chicken broth, and milk. These three create a rich, creamy filling. The flour thickens the sauce. The broth and milk add depth and smoothness. Don’t forget your seasonings! Dried thyme, black pepper, and salt bring out the best in this dish. They pair well with the chicken and vegetables. Finally, you need pie crusts. Store-bought crusts save time, but feel free to make your own if you prefer. An egg wash gives the top a nice golden color when baked. With these ingredients, you are on your way to making a comforting chicken pot pie that will warm your heart and fill your belly! {{ingredient_image_2}} First, heat olive oil in a large skillet over medium heat. Add chopped onions, diced carrots, celery, and minced garlic. Sauté these vegetables until they are tender, which takes about 5-7 minutes. Stir often until the onions look clear. Next, add the diced potatoes to the skillet. Cook them for another 3-4 minutes to soften them a bit. Now, dust the veggies with all-purpose flour. Stir well to coat everything evenly. Cook for 1-2 minutes to remove the raw flour taste. Now, slowly whisk in the chicken broth and milk. Keep stirring until the mixture is smooth and thick. This should take about 5-7 minutes. Once thickened, fold in the shredded chicken, peas, dried thyme, salt, and black pepper. Mix well, then take the skillet off the heat. On a clean surface, unroll one pie crust and place it into a 9-inch pie dish. Press it gently into the corners. Pour the chicken filling into the crust. Spread it out evenly across the bottom. Next, unroll the second pie crust and lay it over the filling. Trim any excess dough hanging over the edge. Crimp the edges together to seal the pie. Use a sharp knife to cut several slits in the top crust. This lets steam escape while baking. Brush the top crust with the beaten egg. This helps it turn a nice golden color when baked. Preheat your oven to 425°F (220°C). Once hot, slide the pie into the oven. Bake it for 30-35 minutes. Look for a deep golden brown crust and bubbling filling. For a perfect crust, keep an eye on the time. If the edges brown too fast, cover them with foil. This stops them from burning while the rest cooks. - Choosing the best poultry I recommend using cooked chicken for a rich flavor. You can use rotisserie chicken for ease. Fresh or leftover chicken works too. Aim for skinless, boneless pieces for a tender bite. - Ensuring a flavorful filling Start with fresh vegetables for the best taste. Diced carrots, peas, and potatoes add color and texture. Use low-sodium chicken broth to keep the filling rich without being salty. This layer of flavor makes each bite special. - Techniques for a flaky crust Use cold pie crusts. This keeps the fat solid, leading to a flaky texture. Do not overwork the dough; handle it gently. Cut slits in the top crust to allow steam to escape. This helps avoid a soggy bottom. - Preparing filling in advance You can make the filling a day ahead. Store it in an airtight container in the fridge. This saves time and allows the flavors to meld. Just warm it up before filling the crust. - Freezing tips for the pie If you want to freeze the pie, assemble it first. Wrap it well in plastic wrap and foil. It can last up to three months in the freezer. Bake it straight from the freezer; just add extra time. This way, you’ll have a comforting meal ready when you need it! Pro Tips Use Leftover Chicken: This recipe is perfect for utilizing leftover roast chicken or rotisserie chicken, making it a quick and easy option for a weeknight dinner. Vegetable Variations: Feel free to customize the vegetable blend based on seasonal produce or personal preferences. Mushrooms, green beans, or corn can be great additions! Thickening the Filling: If you prefer a thicker filling, you can add a bit more flour or let the mixture simmer a little longer to evaporate some liquid. Freezing Tips: This pot pie freezes well! Assemble the pie, but do not bake it. Wrap it tightly and store it in the freezer for up to 3 months, baking it from frozen when you’re ready to enjoy. {{image_4}} You can easily change the protein in your pot pie. If you want a twist, use turkey instead of chicken. This works great, especially around holidays. Beef is another option. Use cooked beef to give a hearty flavor. For a lighter choice, try mushrooms or tofu. Both add a nice texture and absorb flavors well. These vegetarian options make pot pie fun for everyone. Adding herbs and spices can really boost the taste. Fresh thyme or rosemary gives a nice aroma. You can also use spices like paprika for warmth. Another great way to enhance flavor is using a flavored broth. Chicken broth adds depth, while vegetable broth works for veggies. Consider using cream in the filling for richness. It makes your pot pie even more creamy and delicious. When it comes to the crust, you have choices. You can make a homemade crust for a personal touch. This allows you to control the ingredients. If you want something quick, store-bought crusts save time. They can still give you that perfect golden finish. If you need a gluten-free option, look for gluten-free pie crusts. Many brands offer tasty alternatives that work well in pot pies. To store your chicken pot pie, let it cool first. This step keeps the crust from getting soggy. Wrap it tightly in plastic wrap or foil. You can also place it in an airtight container. Store it in the fridge for up to 3 days. This way, it stays fresh and tasty. You can freeze chicken pot pie both before and after baking. For freezing before baking, wrap it tightly in plastic wrap and then foil. This keeps out air and frost. You can freeze it for up to 3 months. To freeze after baking, let the pie cool completely. Wrap it in plastic wrap and foil as well. When you want to eat it, thaw it in the fridge overnight. Reheat it in the oven at 350°F (175°C) until hot, about 25-30 minutes. This way, it tastes fresh and delicious again. Yes, you can make chicken pot pie without a crust. Here are some great options: - Mashed potatoes on top for a comforting twist. - Biscuits can add a fluffy and soft texture. - Cornbread gives a sweet and hearty flavor. - Polenta adds a creamy touch to the dish. Each of these choices brings a unique taste and texture. You can customize your pot pie based on what you like best. To check if your pot pie is done, look for these signs: - The crust should be a deep golden brown. - The filling should be bubbling through the slits in the top. - A knife inserted in the center should come out hot. These signs show that your chicken pot pie is ready to enjoy. It means the inside is warm and the crust is perfectly cooked. Pairing sides with chicken pot pie can enhance your meal. Here are some tasty suggestions: - Mixed greens salad for a fresh crunch. - Steamed green beans for a tender bite. - Roasted carrots bring sweetness and color. - Mashed potatoes offer extra comfort. These sides balance the richness of the pot pie and create a complete meal. Enjoy your meal with these delightful additions! You learned how to make a classic chicken pot pie from scratch. We covered each step, from choosing the right ingredients to baking tips for a golden crust. You can even try variations like using turkey or a veggie version. Remember, storing leftovers properly will keep your pot pie fresh. Don’t hesitate to experiment with flavors and fillings. Enjoy your cooking journey, and soon, you’ll impress everyone with your homemade pot pie!

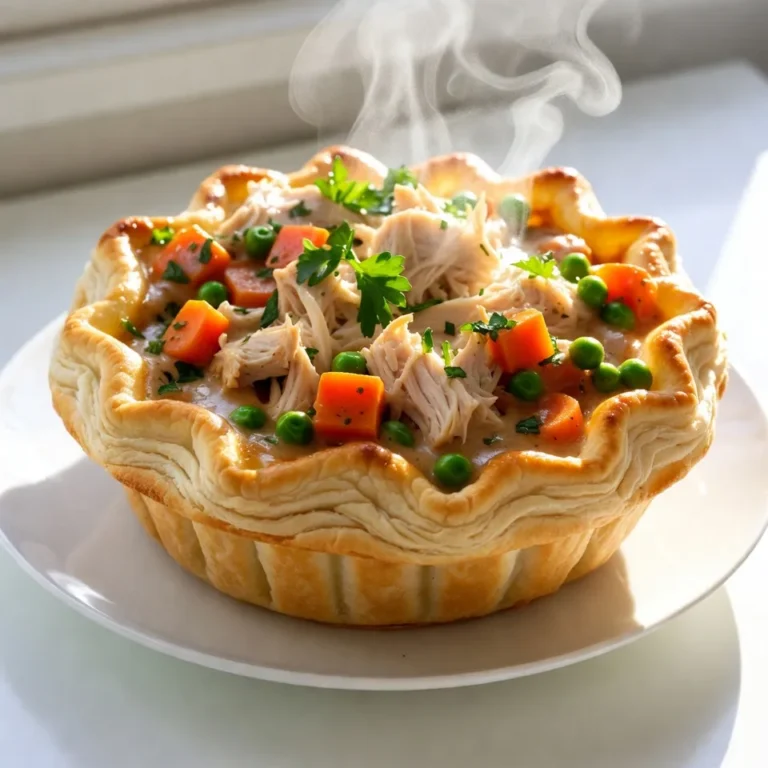
Classic Chicken Pot Pie Comforting and Hearty Dish

To make Greek Chicken Souvlaki Bowls, gather these main ingredients: - 1 lb boneless, skinless chicken breasts, cut into 1-inch cubes - 1 cup quinoa, thoroughly rinsed and drained - 1 cup cherry tomatoes, halved - 1 medium cucumber, diced - 1/2 medium red onion, thinly sliced - 1/2 cup Kalamata olives, pitted and sliced in half - 1/2 cup feta cheese, crumbled - Fresh parsley, chopped, for garnish - Tzatziki sauce, for drizzling and dipping For the chicken marinade, you will need: - 3 tablespoons extra virgin olive oil - Juice of 1 large lemon (about 3 tablespoons) - 2 cloves garlic, finely minced - 1 teaspoon dried oregano - 1 teaspoon smoked paprika - Sea salt and freshly ground black pepper, to taste These ingredients create a tasty marinade that makes the chicken flavorful and juicy. Fresh ingredients add color and crunch to your bowls. Here’s what you need: - Cherry tomatoes: Sweet and juicy, these add freshness. - Cucumber: Crisp and cool, perfect for balance. - Red onion: Adds a sharp bite and color. - Fresh parsley: Brightens the dish with its green hue. Using fresh produce enhances the taste and presentation of your Greek Chicken Souvlaki Bowls. {{ingredient_image_2}} Start by making the marinade. In a medium bowl, whisk together the olive oil, lemon juice, minced garlic, oregano, smoked paprika, sea salt, and black pepper. This mix adds a zesty flavor. Cut the chicken into 1-inch cubes and add them to the bowl. Make sure each piece gets coated well. Cover the bowl and put it in the fridge for at least 30 minutes. This helps the chicken soak up all the flavors. While the chicken marinates, rinse the quinoa. Use a fine mesh strainer and cold running water. This step removes any bitter taste. In a medium saucepan, add the rinsed quinoa and 2 cups of water or chicken broth. Bring it to a boil over medium-high heat. Once boiling, lower the heat and cover the pan. Let it simmer for about 15 minutes until all the liquid is gone. After that, let it sit for 5 minutes. Finally, fluff it with a fork for a light texture. Next, preheat your grill or grill pan on medium-high heat. If you use wooden skewers, soak them in water for about 15 minutes. This keeps them from burning. Thread the marinated chicken onto the skewers, leaving space between each piece. Place the skewers on the grill and cook for 5-7 minutes on each side. Look for no pink in the center, and check that the chicken hits 165°F (75°C). Once done, remove them from the grill and let them rest for a few minutes. Now, it's time to build your bowls. Start with a generous scoop of fluffy quinoa at the bottom. Next, add the grilled chicken skewers on top. Then, arrange halved cherry tomatoes, diced cucumber, thinly sliced red onion, and sliced Kalamata olives around the chicken. Top each bowl with crumbled feta cheese for a salty touch. Finally, drizzle tzatziki sauce on top and garnish with fresh parsley for a pop of color. To get juicy, tender chicken, marinate it well. Mix olive oil, lemon juice, garlic, oregano, and spices in a bowl. Soak the chicken cubes in this mixture for at least 30 minutes. This allows the flavors to soak in. If you have time, let it marinate longer for even more flavor. When grilling, cook the chicken until it reaches 165°F. This ensures it’s safe and tasty. Quinoa can be tricky, but it’s easy if you follow a few steps. Rinse the quinoa well under cold water. This removes any bitterness. Then, cook it in a pot with water or broth. Bring it to a boil, then lower the heat. Cover and let it simmer for about 15 minutes. After it absorbs all the liquid, let it sit covered for 5 more minutes. Fluff it with a fork for a light, airy texture. Presentation makes a meal more fun. Use colorful dishes to serve your Greek chicken souvlaki bowls. Start with a scoop of fluffy quinoa. Layer grilled chicken on top. Add bright cherry tomatoes, diced cucumbers, and red onions in sections. Sprinkle crumbled feta cheese for a salty kick. Drizzle tzatziki sauce over everything. Garnish with fresh parsley and a lemon wedge for extra zest. This makes your meal look and taste amazing! Pro Tips Marinate for Maximum Flavor: Letting the chicken marinate for at least 30 minutes allows the flavors to penetrate the meat, enhancing its taste. For even better results, marinate for a few hours or overnight if time permits. Perfectly Cooked Quinoa: Rinsing quinoa is essential to remove its natural coating, called saponin, which can make it taste bitter. Cooking it in chicken broth adds extra flavor, making it a delicious base for your bowl. Grilling Tips: Ensure your grill is preheated to medium-high heat before adding the skewers. This helps to achieve a nice sear and prevents sticking. Use a meat thermometer to check for doneness—165°F (75°C) is the safe zone for chicken. Presentation Matters: Take time to arrange each ingredient in separate sections within the bowl for a beautiful presentation. Consider adding vibrant garnishes like lemon wedges or extra parsley for a pop of color and freshness. {{image_4}} If you want to make a vegetarian version, use hearty veggies. Try using mushrooms, bell peppers, or zucchini. These will bring great flavors. You can also use marinated tofu. Cut it into cubes and grill just like the chicken. It absorbs the marinade well and gives a nice texture. For a gluten-free bowl, ensure your tzatziki is gluten-free. You can use quinoa, as it is naturally gluten-free. Couscous is not gluten-free, so skip that. Also, check the feta cheese label. Some brands may contain gluten. Spice up your bowl with extra flavors. Add fresh herbs like dill or mint for a fresh touch. A sprinkle of red pepper flakes can add heat. If you love citrus, add orange zest to the marinade. You can also switch the smoked paprika for regular paprika for a milder flavor. Mixing in more veggies, like roasted eggplant or spinach, can add depth too. You can store Greek Chicken Souvlaki Bowls in the fridge. Place leftovers in an airtight container. They will stay fresh for about three to four days. Make sure to keep the tzatziki sauce separate to prevent sogginess. If you want to freeze your bowls, do so after cooking. Let the chicken and quinoa cool completely. Place them in freezer-safe containers. They can last up to three months in the freezer. Avoid freezing fresh vegetables or tzatziki, as they don’t thaw well. To reheat, use the microwave or an oven. If using a microwave, place the food in a microwave-safe dish. Heat on medium power for two to three minutes. Stir halfway through for even heating. If using an oven, preheat it to 350°F (175°C). Cover the dish with foil and heat for about 15-20 minutes. Always check that the chicken reaches 165°F (75°C) before serving. Yes, you can! You can use shrimp, beef, or even tofu. Each protein will change the flavor. If you choose shrimp, cook them for a shorter time. Beef needs a little more cooking. Tofu can soak up the marinade well, too. These bowls are great on their own. But you can add a side salad or pita bread. A simple Greek salad pairs nicely. You might also try roasted veggies for extra color. Hummus with pita chips is a fun snack, too. Making tzatziki is simple! You need yogurt, cucumber, garlic, lemon juice, salt, and dill. Start with one cup of Greek yogurt. Grate half a cucumber and squeeze out extra water. Mix all ingredients together in a bowl. Adjust the salt and lemon to taste. Enjoy it with your bowls! Greek chicken souvlaki bowls are a tasty and fun meal. We covered the key ingredients, from the chicken to fresh produce. The marinade makes the chicken flavorful, and the step-by-step instructions help you grill it just right. Tips ensure you get tender chicken and perfect quinoa. You can also try veggie options or add unique flavors. Proper storage keeps your meal fresh, and the FAQs answer common questions. Enjoy making this healthy dish! It's a simple way to impress your friends and family.

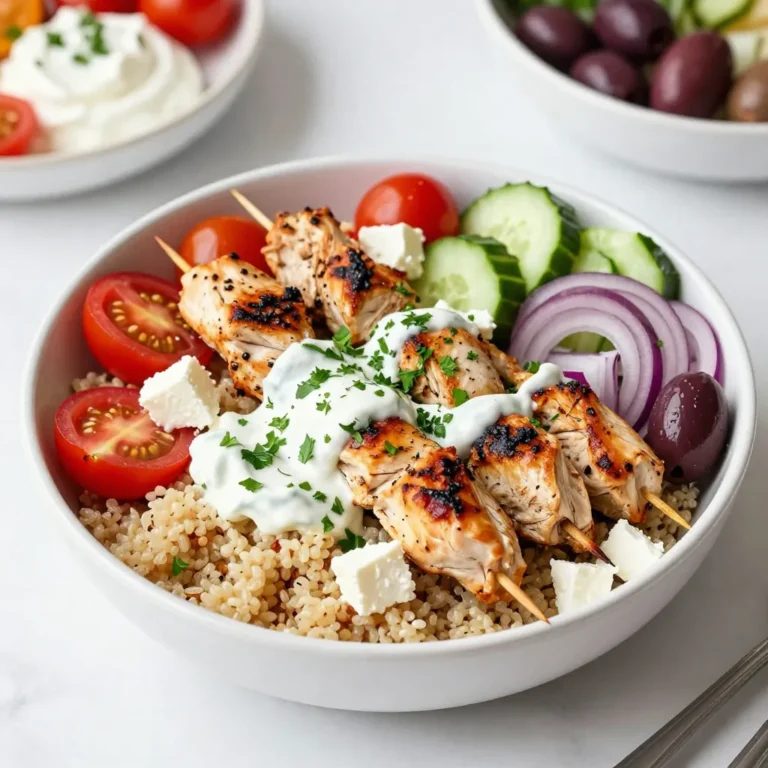
Greek Chicken Souvlaki Bowls Flavorful and Easy Meal

For this Keto Peppermint Bark, you need: - 1 cup sugar-free dark chocolate chips - 1 cup sugar-free white chocolate chips - 1 teaspoon peppermint extract - ¼ cup crushed sugar-free peppermint candies (or sugar-free candy canes) - A pinch of sea salt You can swap the sugar-free chocolate chips for regular ones if you don’t care about carbs. However, this change will add sugar and calories. If you want a creamier texture, consider using unsweetened baking chocolate. You can sweeten it with a keto-friendly sweetener. For the crushed candies, you can use crushed nuts like almonds or pecans for a crunch. This will change the flavor but can be just as tasty! Using high-quality ingredients makes your Keto Peppermint Bark shine. The type of chocolate you use impacts the taste. Look for good brands that use cocoa butter and have no added sugars. Fresh peppermint extract brings a strong flavor. Avoid old extracts as they lose potency. The crushed candies should be bright and crunchy. Stale candy won’t give the right crunch. When you use quality items, you elevate your dessert. It looks better, tastes better, and feels special. Plus, your hard work deserves the best! {{ingredient_image_2}} Start by grabbing an 8x8 inch baking dish. Line the dish with parchment paper. Leave some paper hanging over the edges. This step helps when you lift the bark out later. The parchment prevents sticking, making your life easier. Next, take 1 cup of sugar-free dark chocolate chips. Place them in a microwave-safe bowl. Heat the chips in the microwave in 30-second bursts. Stir the chocolate well after each interval. You want it to melt smoothly. Once melted, pour the chocolate into your lined dish. Use a spatula to spread it evenly on the bottom. Now, let it chill in the refrigerator for about 10 to 15 minutes. You want it to set and become firm. While the dark chocolate sets, repeat the process with the white chocolate. Use 1 cup of sugar-free white chocolate chips. Heat them in the microwave just like before, in 30-second intervals. Stir until creamy and smooth. After melting, mix in 1 teaspoon of peppermint extract. This gives your bark that fresh minty flavor. Carefully pour the white chocolate over the dark chocolate layer. Spread it evenly using a spatula. Now it’s time to add the fun part! Sprinkle ¼ cup of crushed sugar-free peppermint candies on top. Press them down gently to stick. Finally, add a pinch of sea salt to enhance the flavors. Return the dish to the fridge for another 30 to 60 minutes. Wait until both layers are fully set. When ready, lift the bark out using the parchment paper. Cut into squares or break into pieces. Enjoy your delicious Keto Peppermint Bark! For perfect texture, always melt your chocolate slowly. Use the microwave in 30-second bursts. Stir well after each burst until it is smooth. This helps prevent burning. If you overheat chocolate, it will seize and become grainy. You can also use a double boiler for more control. This method allows steam to gently warm the chocolate. One common mistake is not letting each layer set properly. If you pour white chocolate over warm dark chocolate, they can blend together. Make sure the dark layer is fully firm before adding the white layer. Also, don’t skip the salt sprinkle. It enhances the flavors and adds a nice touch. Lastly, be careful with the peppermint candies. Press them down lightly so they stick well. For serving, cut the bark into squares or break it into pieces. Arrange the pieces on a festive platter for a cheerful look. You can also place whole sugar-free peppermint candies around the edges for decoration. This makes your treat even more inviting. Share it with friends and family, or enjoy it during cozy gatherings. Pro Tips Use Quality Chocolate: Choose high-quality sugar-free chocolate chips for the best flavor and texture in your bark. Crush Peppermints Carefully: Use a zip-top bag and a rolling pin to crush the sugar-free peppermint candies without creating a mess. Make it Festive: Consider adding colorful sprinkles or edible glitter on top for a festive touch during the holidays. Store Properly: Keep the bark in an airtight container in a cool place to maintain its texture and prevent melting. {{image_4}} You can make your keto peppermint bark even richer by adding nut butters. Almond butter or peanut butter can add great flavor and creaminess. Just melt a few tablespoons of your chosen nut butter. When you pour the white chocolate over the dark chocolate, drizzle the nut butter on top. Use a knife to swirl it in for a fun look. This addition gives each bite a special twist. While peppermint is classic, you can switch up the flavor. Try using almond or vanilla extract instead. These flavors can give your bark a unique twist. Mix the extract into the melted white chocolate just like you do with peppermint. This small change can turn your bark into a completely different treat. It’s a fun way to experiment with your sweets. Toppings can change your bark's look and taste. Instead of crushed peppermint candies, use chopped nuts or sugar-free chocolate chips. You can also sprinkle some sea salt on top for a sweet and salty combo. Get creative! You can even use dried fruits like unsweetened coconut flakes or sugar-free dried cranberries. These toppings add texture and extra flavor that can impress your guests. To keep your keto peppermint bark fresh, store it in an airtight container. This helps keep moisture out and preserves the texture. You can use a glass jar or a plastic container. Make sure to separate layers of bark with parchment paper to prevent sticking. Avoid storing it in warm areas. Keep it cool and dry for the best results. When stored correctly, keto peppermint bark lasts for about two weeks. If you notice any changes in texture or smell, it’s best to toss it. Always check for any signs of spoilage before enjoying your treats. If you want to enjoy it longer, consider freezing it. Freezing is a great way to extend the life of your keto peppermint bark. Cut it into pieces before freezing. Place the pieces in a single layer on a baking sheet. Freeze them for about an hour. Once solid, transfer the pieces to an airtight container or freezer bag. Label the bag with the date. The bark can last up to three months in the freezer. When ready to eat, let it thaw in the fridge for a few hours before enjoying. Keto Peppermint Bark is a sweet treat that fits a low-carb diet. It uses sugar-free chocolate and peppermint flavors. This bark has two layers: dark chocolate and white chocolate. You can enjoy it without guilt during the holidays. It is perfect for sharing or as a festive snack. You can use regular chocolate, but it will add sugar. This changes the carb count. If you want to keep it keto-friendly, stick to sugar-free options. Regular chocolate may taste richer, but it won’t fit a low-carb plan. Always check labels for sugar content if you choose to swap. To make Keto Peppermint Bark dairy-free, use dairy-free chocolate chips. Brands offer great options that fit this diet. Look for coconut or almond milk-based chocolate. This keeps the bark creamy without dairy. Plus, it tastes just as good! We explored how to make keto peppermint bark using quality ingredients. I shared step-by-step instructions to guide your baking. Tips helped achieve the best texture and avoid mistakes. Variations offer fun ways to switch up flavors and toppings. Lastly, I provided storage tips to keep your treat fresh. Creating keto peppermint bark can be easy and fun. Enjoy making and sharing this tasty delight!

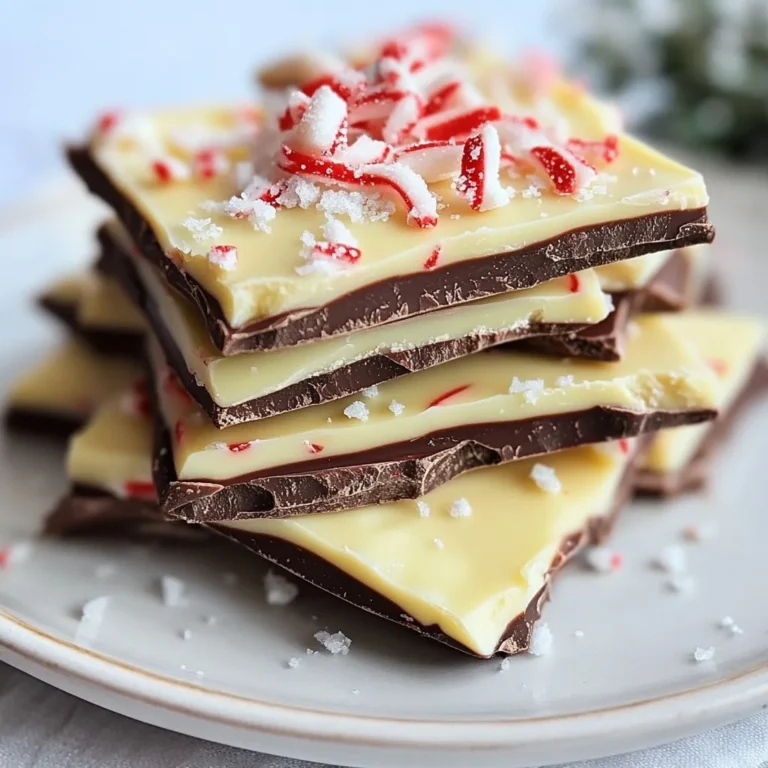
Keto Peppermint Bark Irresistible Holiday Treat

To make these tasty chocolate chip banana bread muffins, you need: - 2 ripe bananas, thoroughly mashed - 1/2 cup unsalted butter, melted and slightly cooled - 1/2 cup packed brown sugar - 1/4 cup granulated sugar - 2 large eggs, at room temperature - 1 teaspoon pure vanilla extract - 1 teaspoon baking soda - 1/2 teaspoon baking powder - 1/4 teaspoon sea salt - 1 1/2 cups all-purpose flour - 1/2 cup semi-sweet chocolate chips - 1/4 cup chopped walnuts (optional, for a crunch) These ingredients blend together to create a soft, moist muffin filled with flavor. If you lack an ingredient, don't worry! Here are some easy swaps: - Bananas: Use unsweetened applesauce for a different fruit flavor. - Butter: Coconut oil works well if you want a dairy-free option. - Sugar: You can use honey or maple syrup instead of brown and granulated sugar. - Eggs: Try using two tablespoons of ground flaxseed mixed with water for an egg alternative. - Flour: Whole wheat flour can replace all-purpose flour for added nutrition. These substitutes can help you make muffins even if you don't have everything on hand. These muffins are a treat, but they also provide some nutrition. Here’s a rough breakdown per muffin: - Calories: 180 - Protein: 3g - Carbs: 28g - Fat: 7g - Fiber: 1g - Sugar: 10g These numbers may vary based on your ingredient choices. Enjoy these muffins as a fun snack or breakfast option! {{ingredient_image_2}} Start by preheating your oven to 350°F (175°C). This ensures even baking. Next, prepare your muffin tin. You can use paper liners or lightly grease the cups with cooking spray. This helps the muffins come out easily after baking. In a large bowl, mash two ripe bananas until smooth. Add in half a cup of melted butter and mix them together well. Then, add half a cup of brown sugar and a quarter cup of granulated sugar. Stir until the sugars blend nicely. Now, crack in two large eggs, mixing one at a time. Finally, pour in one teaspoon of vanilla extract. Mix until the batter looks mostly smooth. In another bowl, sift together one and a half cups of all-purpose flour, one teaspoon of baking soda, half a teaspoon of baking powder, and a quarter teaspoon of sea salt. This step helps to aerate the flour. Slowly add the dry mix to the wet ingredients. Fold the batter gently with a spatula. You want to mix until just combined; avoid over-mixing. Now, fold in half a cup of semi-sweet chocolate chips and optional walnuts. Use a spoon or ice cream scoop to fill each muffin cup about three-quarters full. Place the muffin tin in the oven and bake for 18 to 20 minutes. Check with a toothpick; it should come out clean. Let the muffins cool for five minutes in the tin before transferring them to a wire rack. Enjoy the delightful treat! To get the best muffin texture, start with ripe bananas. They should be soft and sweet. Use a fork to mash them well. This helps blend the bananas into the batter smoothly. Mix the wet and dry ingredients gently. Over-mixing can lead to tough muffins. Aim for a batter that is just combined. A few lumps are okay; they will bake out. When mixing, add the dry ingredients slowly. This helps keep the batter light. Start with the banana and butter mixture. Add the sugars and eggs next, mixing well. Then, sift the dry ingredients into the bowl. Fold gently using a spatula or wooden spoon. Be careful not to stir too hard. The goal is to keep the air in the batter for a fluffy muffin. If your muffins sink in the middle, they may be under-baked. Always check with a toothpick. If it comes out wet, bake longer. If they are too dense, you might have over-mixed. Aim for a light touch. If they burn on top, lower the oven rack. You can also cover them with foil to prevent browning too fast. Use these tips to make perfect chocolate chip banana bread muffins every time! Pro Tips Use Overripe Bananas: The riper the bananas, the sweeter and more flavorful your muffins will be. Look for bananas with lots of brown spots for the best results. Don’t Overmix: When combining the wet and dry ingredients, mix just until combined. Overmixing can lead to dense muffins instead of light and fluffy ones. Experiment with Mix-ins: Feel free to customize your muffins by adding different mix-ins like dried fruits, nuts, or even peanut butter chips for a unique twist! Check for Doneness: Ovens can vary, so start checking your muffins a few minutes before the suggested baking time. They’re done when a toothpick inserted comes out clean. {{image_4}} You can easily change these muffins to fit your taste. Here are some fun add-ins: - Chopped nuts: Walnuts or pecans add a nice crunch. - Dried fruit: Raisins or cranberries bring a sweet chew. - Nut butter: Swirl in peanut or almond butter for creaminess. - Coconut flakes: Add a tropical twist with unsweetened coconut. - Zucchini: Grate some zucchini for moisture and health benefits. These options let you create a muffin that feels unique to you. You can enjoy these muffins gluten-free too! Here’s how: - Use gluten-free flour: Replace all-purpose flour with a gluten-free blend. - Check your baking powder: Ensure it is gluten-free. - Add xanthan gum: This helps mimic the texture of regular flour. This simple swap makes your muffins safe for those with gluten sensitivities. You can add extra flavors to boost your muffins. Here are some ideas: - Cinnamon: Add 1 teaspoon for warmth. - Nutmeg: A pinch can give a cozy taste. - Almond extract: Swap a bit for vanilla for a nutty flavor. - Coffee: Mix in a teaspoon of instant coffee for depth. These enhancements can take your muffins from good to great! To keep your muffins fresh, store them at room temperature. Place them in an airtight container. If you don't have one, wrap them in plastic wrap. This method keeps them soft and moist. You can also use a resealable bag for easier access. Try to eat them within three days for the best taste. Freezing muffins is easy and helps you save them for later. First, let the muffins cool completely. Then, wrap each muffin in plastic wrap. After that, place the wrapped muffins in a freezer-safe bag. Be sure to remove any extra air. They can last up to three months in the freezer. When you're ready to enjoy, simply thaw them at room temperature. To bring back the fresh taste, reheat your muffins. You can use an oven or a microwave. For the oven, preheat it to 350°F (175°C). Place the muffins on a baking sheet and heat for about 5-10 minutes. If using a microwave, heat each muffin for 15-20 seconds. This method warms them up quickly and keeps them soft. Enjoy your delightful treat warm! Yes, you can use frozen bananas. Just thaw them first. Once thawed, mash them well. The moisture from frozen bananas helps keep the muffins moist. This is a great way to use overripe bananas! Check the muffins after 18 minutes. Insert a toothpick into the center of a muffin. If it comes out clean, they are ready. If not, bake for another minute or two. This will help you avoid undercooked or overcooked muffins. You can use applesauce as a substitute. Use 1/4 cup of applesauce for each egg. This keeps the muffins moist and adds sweetness. You can also use flaxseed meal mixed with water. Mix 1 tablespoon of flaxseed meal with 2.5 tablespoons of water. Let it sit for a few minutes to thicken before adding it to the batter. This blog post covered how to make great banana muffins from scratch. We explored the right ingredients and how to mix them properly. I shared tips for perfect texture and ways to customize your muffins. You learned about storage and reheating to keep them fresh. Banana muffins can be a fun and tasty treat. By following these steps, you can create your perfect batch. Enjoy baking, and don’t be afraid to experiment!

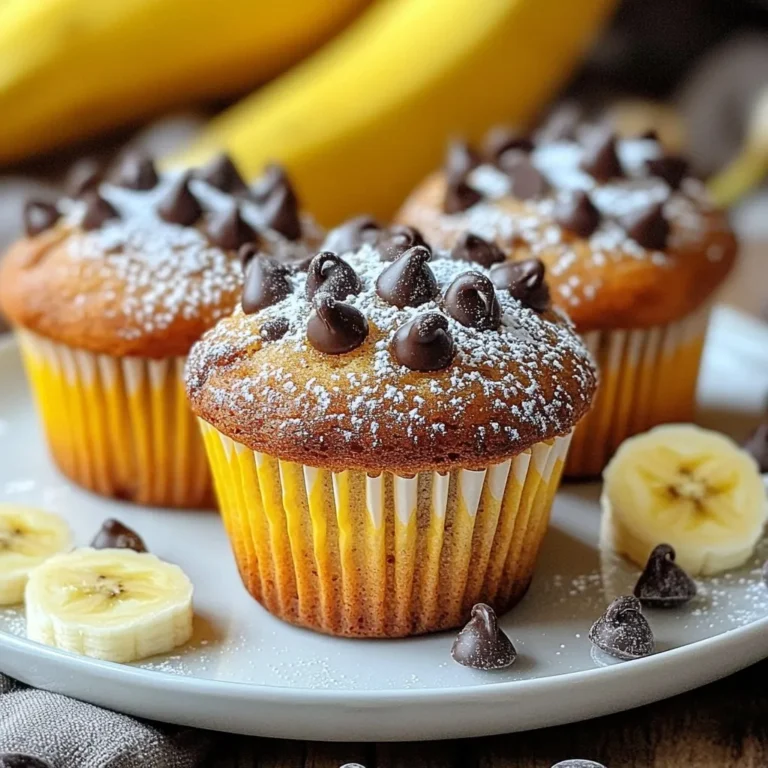
Chocolate Chip Banana Bread Muffins Delightful Treat

For the base of this casserole, use 2 cups of cooked chicken. Shred it into bite-sized pieces. You can use rotisserie chicken for ease. Cooking your chicken at home also works well. Next, gather your vegetables and spices. You need: - 1 cup frozen peas and carrots - 1 cup diced potatoes, cooked until tender - 1 small onion, finely diced - 2 cloves garlic, minced - 1 can (10.5 oz) cream of chicken soup - 1 cup chicken broth - 1 teaspoon dried thyme - 1/2 teaspoon black pepper - 1/4 teaspoon sea salt These add flavor and texture to the dish. The peas and carrots give color, while the onion and garlic add depth. For the topping, you will need: - 1 cup sharp cheddar cheese, shredded - 1 package (16 oz) refrigerated biscuit dough The cheese melts into a creamy layer, while the biscuit dough creates a fluffy crust. This combination makes the dish hearty and satisfying. {{ingredient_image_2}} Start by setting your oven to 375°F (190°C). This step is key to a well-cooked casserole. A hot oven ensures that the biscuits rise and become golden brown. In a large bowl, mix the following: - 2 cups cooked chicken, shredded - 1 cup frozen peas and carrots - 1 cup diced potatoes, pre-cooked until tender - 1 small onion, finely diced - 2 cloves garlic, minced - 1 can (10.5 oz) cream of chicken soup - 1 cup chicken broth - 1 teaspoon dried thyme - 1/2 teaspoon freshly ground black pepper - 1/4 teaspoon fine sea salt Stir all the ingredients well. Make sure everything is evenly coated with the soup and broth. This mixing helps blend the flavors. Grease a 9x13 inch casserole dish with cooking spray or butter. Pour the chicken mixture into the dish. Spread it evenly to ensure all parts cook well. Next, sprinkle 1 cup of shredded sharp cheddar cheese on top. This cheese will melt and create a delicious layer. Now, prepare the biscuit dough. Cut each biscuit into quarters. Scatter these pieces evenly on top of the cheese. Make sure to cover all areas for a fluffy, golden topping. Place the casserole in your preheated oven. Bake for 25-30 minutes. Watch for the biscuits to turn golden and for the filling to bubble around the edges. When it's ready, carefully take it out of the oven. Let it cool for 5-10 minutes. This cooling time helps the filling set, making it easier to serve. For this dish, I recommend using cooked chicken. You can use rotisserie chicken for ease. Shredded chicken from your own cooking works great too. Just make sure the chicken is tender and flavorful. You can swap the frozen peas and carrots for other veggies. Corn or green beans also work well. If you don’t have cream of chicken soup, try cream of mushroom as a tasty alternative. You can even use a homemade white sauce for a fresh twist. If you use frozen chicken, increase the bake time by 10-15 minutes. Always check the center with a thermometer. It should reach 165°F for safe eating. If your biscuits start to brown too quickly, cover the dish with foil to prevent burning. Pro Tips Use Rotisserie Chicken: For a quicker preparation, consider using store-bought rotisserie chicken. It saves time and adds extra flavor to your casserole. Customize Your Veggies: Feel free to swap out the peas and carrots for other vegetables like corn or green beans to suit your taste preferences. Cheese Variations: Experiment with different types of cheese, such as mozzarella or gouda, for a unique twist on the classic flavor profile. Make Ahead: You can prepare the filling in advance and store it in the refrigerator. Just add the biscuit topping right before baking for a fresh-out-of-the-oven experience. {{image_4}} You can change the taste by adding different veggies. Try corn or green beans. You can also use chopped bell peppers for a sweet crunch. Fresh vegetables can add flavor and color. Just make sure they cook well with the chicken. While cream of chicken soup is great, you can mix it up. Use cream of mushroom soup for a rich taste. If you love spice, try a spicy cheese soup. Each soup gives a unique flavor. It keeps the dish fun and exciting. If you want an extra special touch, make your own biscuit dough. It’s simple and can taste better than store-bought. Use flour, baking powder, butter, and milk. Roll it out and cut it into pieces. This dough will bake nicely and add a homemade touch to your casserole. Store your chicken pot pie casserole in an airtight container. Leftovers can last about 3-4 days in the fridge. Make sure to let it cool down first. This keeps the texture nice. To enjoy later, just scoop out what you want. You can freeze this casserole if you want to save some for later. Wrap it tightly in plastic wrap and then in foil. This prevents freezer burn. It can last up to 2-3 months in the freezer. When you are ready to eat it, just thaw it overnight in the fridge. To reheat, you have a few options. You can use the oven for the best results. Preheat your oven to 350°F (175°C). Place the casserole in a baking dish and cover it with foil. Bake for about 20-25 minutes. Check if it's warm throughout. You can also use the microwave for a quick fix. Heat it in short bursts, stirring in between, until hot. Enjoy every bite of your tasty dish! It takes about 25 to 30 minutes to bake this casserole. You want the biscuits to be golden brown. The filling should bubble at the edges. Check it often to avoid overcooking. Yes, you can prepare the casserole a day ahead. Just cover it and store it in the fridge. When you are ready to bake, add a few extra minutes to the cooking time. This helps it heat through well. You can serve a simple green salad or crusty bread with the casserole. A light fruit dish also pairs nicely. These sides balance the rich flavors of the casserole, making a complete meal. This blog post explored how to create a tasty chicken pot pie casserole. We covered key ingredients, step-by-step instructions, and helpful tips. You can adjust the recipe and store the leftovers with ease. My final thought is that with a few simple steps, you can enjoy a warm and hearty meal. Whether you stick to the classic or try a fun twist, this dish is sure to please. Enjoy making your own version!

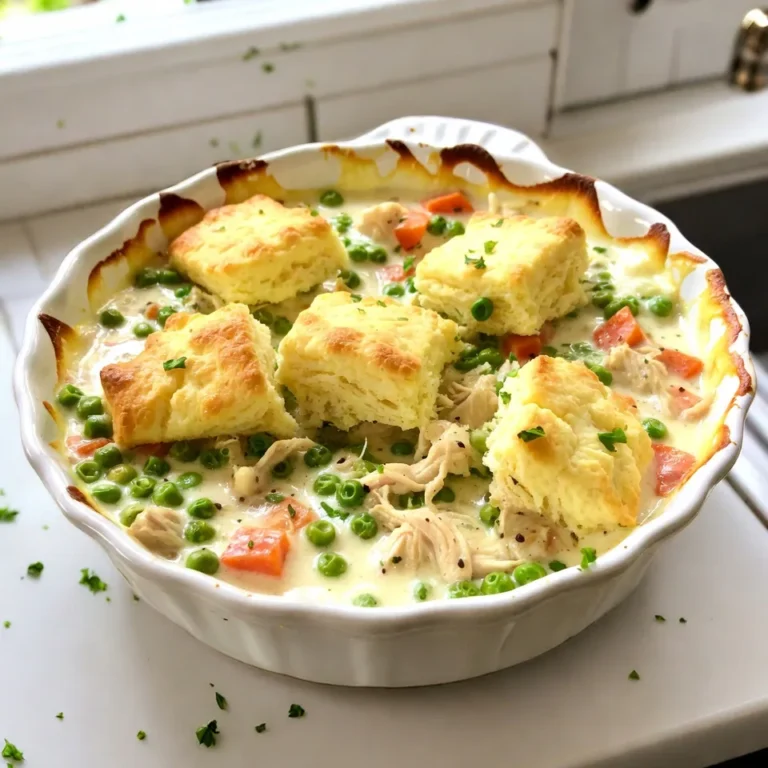
Classic Chicken Pot Pie Casserole Tasty and Simple Dish

To make Chocolate Chip Pumpkin Bread, you need simple and tasty ingredients. Here’s the list: - 1 cup canned pumpkin puree - 1/2 cup vegetable oil - 1 cup brown sugar, tightly packed - 1/2 cup granulated sugar - 2 large eggs - 1 teaspoon pure vanilla extract - 1 1/2 cups all-purpose flour - 1 teaspoon baking soda - 1/2 teaspoon baking powder - 1/2 teaspoon fine sea salt - 1 teaspoon ground cinnamon - 1/2 teaspoon ground nutmeg - 1/4 teaspoon ground ginger - 1 cup semi-sweet chocolate chips - Optional: 1/2 cup finely chopped nuts (walnuts or pecans) Using canned pumpkin puree makes this recipe easy. It adds moisture and flavor. The vegetable oil keeps the bread soft and tender. Both sugars give a lovely sweetness. Eggs add richness and help bind the ingredients. Vanilla extract provides a warm aroma. All-purpose flour gives structure to the bread. Baking soda and baking powder help it rise. Spices like cinnamon, nutmeg, and ginger bring warmth and depth. Semi-sweet chocolate chips add sweetness and a rich chocolate flavor. If you like, you can add nuts for extra crunch. Each ingredient plays an important role. Together, they create a delicious treat perfect for fall! {{ingredient_image_2}} First, heat your oven to 350°F (175°C). This step helps the bread bake evenly. Next, lightly grease a 9x5 inch loaf pan with vegetable oil. You can also line it with parchment paper. This makes removing the bread easier later. In a large mixing bowl, add 1 cup of canned pumpkin puree, 1/2 cup of vegetable oil, 1 cup of brown sugar, and 1/2 cup of granulated sugar. Use a whisk or electric mixer to blend these ingredients. Mix until the batter is smooth and uniform. This mix gives the bread its rich flavor. Now, add 2 large eggs one at a time. Make sure to mix well after each egg. This step ensures a good texture. Then, add 1 teaspoon of pure vanilla extract. Mix until everything is combined. The vanilla adds a lovely aroma. In a separate medium bowl, whisk together 1 1/2 cups of all-purpose flour, 1 teaspoon of baking soda, 1/2 teaspoon of baking powder, 1/2 teaspoon of fine sea salt, 1 teaspoon of ground cinnamon, 1/2 teaspoon of ground nutmeg, and 1/4 teaspoon of ground ginger. This helps blend the dry ingredients and avoid lumps. Carefully add the dry mixture to the wet ingredients. Use a spatula to fold gently. Mix until just combined; a few lumps are okay. Avoid overmixing, as this can make the bread tough. Pour the batter into your prepared loaf pan. Smooth the top with a spatula for even baking. Place it in the preheated oven. Bake for 55-65 minutes. Check doneness by inserting a toothpick in the center. If it comes out clean or with a few moist crumbs, your bread is ready. After baking, remove the bread from the oven. Let it cool in the pan for about 10 minutes. Then, transfer the loaf to a wire rack. Allow it to cool completely. This cooling step enhances the texture and flavor of your bread. To make your chocolate chip pumpkin bread moist, use a good amount of pumpkin puree. I recommend one cup. This helps create a soft texture. Pair this with half a cup of vegetable oil. The oil keeps the bread rich and prevents it from drying out. Together, these ingredients make a perfect balance for a moist loaf. You can add your favorite spices to make this bread your own. Besides cinnamon, try using nutmeg and ginger for warmth. You can also mix in nuts, like walnuts or pecans, for crunch. If you love a little spice, add a pinch of ground cloves. Each choice brings a new twist to this classic recipe. Serving your bread well makes it even more special. Slice it while warm for the best taste. A pat of buttery spread on top adds richness. For a pretty touch, dust the slices with powdered sugar. You can also sprinkle more chocolate chips on top before baking. This makes for a delightful crust and extra chocolatey bites. Pro Tips Use Fresh Spices: Ensure your ground spices like cinnamon, nutmeg, and ginger are fresh for the best flavor. Old spices can lose potency and affect the taste of your bread. Don’t Overmix: When combining wet and dry ingredients, mix until just combined. Overmixing can lead to a dense texture instead of a light and fluffy loaf. Check for Doneness: Use a toothpick to test for doneness. If it comes out clean or with a few moist crumbs, your bread is ready. Avoid opening the oven too soon to maintain temperature. Experiment with Add-ins: Feel free to add different mix-ins like dried cranberries, chocolate chunks, or even a swirl of cream cheese for a unique twist on this recipe. {{image_4}} To make chocolate chip pumpkin bread without nuts, simply skip the optional nuts. The bread will still be moist and tasty. You can add extra chocolate chips or even some seeds for a crunch. Sunflower seeds or pumpkin seeds work well. They add a nice texture without the nutty flavor. Chocolate chips come in many forms. You can use dark chocolate chips for a richer taste. They add a bittersweet flavor that balances the sweetness of the bread. If you prefer a lighter taste, try white chocolate chips. They create a sweet contrast with the spices in the bread. Mixing different types of chocolate can also add fun flavors. If you want to cut back on sugar, you can use less brown sugar or granulated sugar. You can also swap some of the oil for applesauce or Greek yogurt. This change keeps the bread moist while lowering the fat content. For a gluten-free option, use almond flour or a gluten-free blend instead of all-purpose flour. These small changes make the bread healthier without losing taste. Store your chocolate chip pumpkin bread at room temperature in an airtight container. This keeps it fresh for several days. If you live in a warm area, refrigeration is a good choice. It can help prevent spoilage. However, cold storage may dry out the bread a bit. To freeze your pumpkin bread, wrap it tightly in plastic wrap. Then, place it in a freezer-safe bag or container. This helps keep out air and moisture. You can freeze it for up to three months. When ready to enjoy, let it thaw in the fridge overnight. You can also warm slices in the microwave or toaster for a fresh taste. When stored properly, chocolate chip pumpkin bread stays fresh for about five days at room temperature. If you refrigerate it, it can last about a week. If frozen, it’s best to enjoy it within three months for the best flavor and texture. Proper storage helps maintain its moistness and rich taste. Yes, you can use fresh pumpkin! Start by roasting a pumpkin. Cut it in half and scoop out the seeds. Place the halves face down on a baking sheet. Roast at 400°F (200°C) for about 40 minutes. After it cools, scoop the flesh into a bowl and mash it until smooth. You need 1 cup of fresh pumpkin puree for the recipe. This option gives a great flavor and freshness. To check if your bread is done, use a toothpick. Insert it into the center of the loaf. If it comes out clean or with a few moist crumbs, the bread is ready. If you see wet batter, bake it a bit longer. The top should look golden brown, and the edges may pull away from the pan slightly. Yes, you can substitute the eggs for a vegan option. Use 1/4 cup of unsweetened applesauce for each egg. You can also use flaxseed meal. Mix 1 tablespoon of flaxseed meal with 2.5 tablespoons of water. Let it sit for about 5 minutes to thicken. Both options work well and keep the bread moist. Yes, you can make this recipe gluten-free. Use a 1:1 gluten-free flour blend instead of all-purpose flour. Brands like Bob's Red Mill or King Arthur Flour work great. Make sure to check that the baking soda and baking powder are gluten-free as well. This way, everyone can enjoy this tasty treat! You learned how to make delicious pumpkin bread with simple ingredients. Following the steps ensures your bread is moist and flavorful. Remember to personalize it with your favorite spices or nuts. Pay attention to storage tips to keep it fresh. This easy recipe lets you enjoy homemade goodness anytime. Now, it's time to bake and enjoy your tasty creation!

Chocolate Chip Pumpkin Bread Irresistible Fall Treat

PREV 1 … 25 26 27 … 47 NEXT
snack joy kitchen

explore

DessertsDinnerAppetizersDrinks

Our Policies

  • Cookie Policy
  • Copyright Policy
  • Disclaimer
  • GDPR Policy
  • Terms Of Use
Back to Top
  • About
  • Contact Us
  • Privacy Policy
© 2026 snack joy kitchen