FREE DINNER EBOOK! Get your copy!
  • Cookie Policy
  • GDPR Policy
  • Disclaimer
  • Terms Of Use
  • Visit my other site: Fun Cookie Recipes
snack joy kitchen
  • Home
  • Dinner
  • Desserts
  • Drinks
  • Appetizers
  • Contact
  • About
  • Privacy Policy
  • Home
  • Dinner
  • Desserts
  • Drinks
  • Appetizers
  • Contact
  • About
  • Privacy Policy
  • Cookie Policy
  • GDPR Policy
  • Disclaimer
  • Terms Of Use
Visit my other site: Fun Cookie Recipes

HOME / CATEGORIES /

Latest

- 2 lbs beef chuck, cubed into 1-inch pieces - 2 tablespoons olive oil - 1 large onion, chopped - 3 cloves garlic, finely minced - 4 medium carrots, sliced into rounds - 3 medium potatoes, peeled and diced - 1 cup green peas (fresh or frozen) - 4 cups beef broth (low-sodium recommended) - 2 tablespoons tomato paste - 1 teaspoon dried thyme - 1 teaspoon dried rosemary - 1 bay leaf - Salt and pepper to taste - 2 tablespoons cornstarch (optional, for thickening) - Fresh parsley, finely chopped (for garnish) Using good quality beef makes a big difference. I recommend beef chuck for its rich flavor. Choose meat that is bright red with some marbling. Fresh vegetables bring life to your stew. Look for firm, crisp carrots and smooth, blemish-free potatoes. Fresh herbs also add great taste, but dried herbs work too. If you can, use low-sodium beef broth. This way, you can control the salt in your dish. If you don't have beef chuck, try beef stew meat or brisket. For a veggie twist, swap beef with mushrooms or lentils. Olive oil is great, but you can use canola or avocado oil too. If you can't find fresh peas, frozen ones work just as well. For a thicker stew, you could use flour instead of cornstarch. Just mix it with water to make a slurry before adding it to the pot. {{ingredient_image_2}} First, set your Instant Pot to the sauté function. Pour in 2 tablespoons of olive oil. Once the oil is hot, add the cubed beef chuck in batches. Be careful not to crowd the pot. Brown the beef on all sides, which takes about 4 to 5 minutes for each batch. After browning, place the beef on a plate and set it aside. This step adds flavor and depth to your stew. Next, use the same pot to cook your aromatics. Add 1 large chopped onion to the pot. Sauté it for about 3 minutes until it becomes soft and clear. Then, add 3 cloves of finely minced garlic. Cook it for another minute until the garlic smells great. This mix makes your stew smell amazing and builds the base of flavor. Now, it's time to combine everything. Add the sliced carrots and diced potatoes to the pot with the onions and garlic. Stir them well to coat in the flavors. Return the browned beef to the pot, along with any juices. Pour in 4 cups of low-sodium beef broth. Make sure to scrape any tasty bits from the bottom. Stir in 2 tablespoons of tomato paste, 1 teaspoon each of dried thyme and rosemary, and 1 bay leaf. Season with salt and pepper to taste. Secure the Instant Pot lid, ensuring the steam vent is sealed. Cook on high pressure for 35 minutes. Once done, let it release pressure naturally for 10 minutes. Then, do a quick release for any remaining steam. This cooking method keeps the beef tender and the flavors rich. To get tender beef, choose chuck roast. It has the right fat and flavor. Cut it into 1-inch pieces. This helps it cook evenly. Always brown the beef first. This adds flavor and texture. Sauté it in batches. Overcrowding the pot can lead to steaming instead of browning. Different veggies need different cooking times. For carrots and potatoes, 35 minutes is perfect. However, if you add quick-cooking vegetables like peas, add them last. Stir them in for just 2-3 minutes. This keeps them bright and tender. Adjust the time based on what you like. Want a thicker stew? Use cornstarch. Mix it with cold water to form a slurry. After cooking, stir this into your stew. Switch to sauté mode to simmer it a bit longer. This will help it thicken nicely. If you prefer a thinner stew, just skip the cornstarch. The beef broth will keep it soupy and delicious. Pro Tips Choose the Right Cut: Using beef chuck is ideal for stew as it becomes tender and flavorful during cooking. Avoid lean cuts as they may dry out. Layer Flavors: Don’t skip browning the beef and sautéing the onions and garlic. This creates a rich base that enhances the overall flavor of the stew. Season Gradually: Taste your stew after cooking and adjust the seasoning. Adding salt gradually helps achieve the perfect flavor without over-salting. Let It Rest: For the best results, let the stew sit for about 15 minutes after cooking. This allows the flavors to meld and improves the final taste. {{image_4}} You can mix up the veggies in your beef stew. Try adding bell peppers for sweetness. Zucchini adds a nice texture without being too heavy. You can even toss in mushrooms for an earthy flavor. Just remember to cut your veggies into similar sizes. This way, they cook evenly. Want to change the flavor profile? Swap out thyme and rosemary for cumin and chili powder. This gives a warm, spicy kick. You can also use a splash of Worcestershire sauce for extra depth. Don't forget to taste as you go. Adjust the seasonings to match your taste. If you want a low-carb stew, replace potatoes with cauliflower. It cooks up soft and absorbs flavors well. You can also add more green beans or spinach for added nutrients. Use beef broth without added sugars. This keeps it hearty and satisfying without the carbs. To store leftovers, let the beef stew cool first. Transfer it to an airtight container. Keep it in the fridge for up to three days. This helps keep the flavors fresh. Label the container with the date. That way, you won't forget it. If you want to freeze the stew, use freezer-safe containers. Let the stew cool completely before packing it. This prevents ice crystals from forming. You can freeze it for up to three months. When you're ready to eat, thaw it overnight in the fridge. To reheat, use the stove or microwave. If using the stove, heat it on medium-low. Stir occasionally to avoid burning. For the microwave, heat in short bursts. Stir in between to ensure even heating. If the stew is too thick, add a splash of broth or water. This will help bring it back to life. Enjoy your warm, hearty meal! Yes, you can make this stew in a slow cooker. Start by browning the beef in a pan first. This step adds great flavor. Then, place the browned beef and all other ingredients into your slow cooker. Cook on low for 6 to 8 hours or on high for 3 to 4 hours. The result will be a warm and hearty stew, but it may not be as quick as the Instant Pot method. To make this stew without tomatoes, simply skip the tomato paste. You can add more broth to keep the stew flavorful. Another option is to use a splash of red wine for depth. Just remember to adjust the seasonings to match your taste. The other ingredients will still bring out the rich flavors of the beef and veggies. Beef stew pairs well with many sides. Here are some great options: - Crusty bread for dipping - Mashed potatoes for extra creaminess - Rice to soak up the sauce - A fresh green salad for crunch Choose one or mix a few to make your meal more filling and fun! In this article, I covered the key ingredients, step-by-step cooking, and helpful tips for beef stew. I shared how to choose quality items and recommended substitutes. You learned the best practices to ensure tender meat and sauce consistency. Finally, I highlighted variations and proper storage methods. Enjoy your cooking adventure, and feel free to experiment with flavors. You now have the tools to create your perfect beef stew!

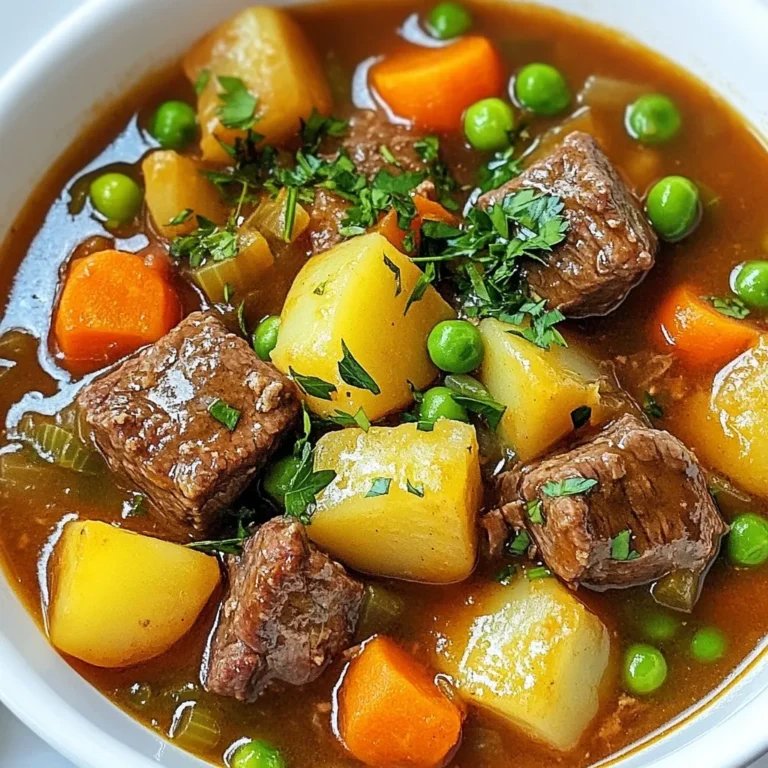
Instant Pot Beef Stew Flavorful and Hearty Meal

To make Mocha Dalgona Whipped Coffee, gather these simple ingredients: - 2 tablespoons instant coffee - 2 tablespoons unsweetened cocoa powder - 2 tablespoons granulated sugar - 2 tablespoons hot water - 1 cup milk (your choice of dairy or non-dairy) - Ice cubes (optional for a chilled version) - Extra cocoa powder or chocolate shavings for garnish If you want to switch things up, try these alternatives: - Use flavored instant coffee for a twist. - Replace granulated sugar with a sweetener of your choice. - Swap the cocoa powder for chocolate syrup for a richer flavor. - Use oat milk or almond milk for a dairy-free version. This recipe can fit various diets: - Vegan: Use plant-based milk and a vegan sweetener. - Gluten-Free: All ingredients are naturally gluten-free. Check labels for any hidden gluten. - Low-Sugar: Use a sugar substitute to lower the sugar content. Making Mocha Dalgona Whipped Coffee is fun and easy, and you can customize it to fit your needs! {{ingredient_image_2}} To whip up your Mocha Dalgona, start by gathering your ingredients. You need: - 2 tablespoons instant coffee - 2 tablespoons unsweetened cocoa powder - 2 tablespoons granulated sugar - 2 tablespoons hot water - 1 cup milk (dairy or non-dairy) - Ice cubes (optional) - Extra cocoa powder or chocolate shavings for garnish In a medium bowl, mix the instant coffee, cocoa powder, sugar, and hot water. Stir them well. This step is key for a smooth blend. Next, use a hand mixer or whisk to whip the mixture. Aim for high speed. Keep whipping for about 2 to 5 minutes. You want it to be light and fluffy with stiff peaks. Now, take a glass or mug and pour in your milk. If you want it warm, heat the milk first. If you prefer cold, add some ice cubes. Carefully spoon the whipped mocha mix over the milk. It should float, creating a pretty layered look. Before you dive in, you can stir the mix into the milk for a smooth drink. Or, keep it layered for a fluffy sip each time. For a final touch, sprinkle cocoa powder or add chocolate shavings on top. Whipping can be tricky. Here are some pro tips: - Use a clean bowl. Any grease can stop it from whipping well. - Make sure your hot water is very hot. This helps dissolve the coffee and cocoa. - If using a whisk, be prepared for a workout! But it’s worth it for the fluff. For a beautiful presentation, serve your Mocha Dalgona in clear glass mugs. This way, everyone can see the lovely layers. It looks fancy and fun! Adding a decorative straw can make sipping even more delightful. You can also pair it with a sweet snack, like cookies or brownies, for a treat. Enjoy your coffee masterpiece! When making Mocha Dalgona whipped coffee, some mistakes can spoil your drink. First, don’t skip the hot water. It helps dissolve the coffee and cocoa powder well. If you use cold water, you won’t get the right texture. Second, watch your whipping time. If you stop too soon, the mix will be runny. You want to whip until stiff peaks form. Lastly, don’t rush the layering. Pour the milk slowly before adding the mocha mix. To get the fluffiest whipped coffee, use a hand mixer if you can. It makes the process easier and faster. Whip the mix for about 2 to 5 minutes. You want it to look thick and creamy. Feel free to take breaks and check the texture. If you notice it’s not thick enough, keep whipping. Remember, patience is key! You can make your Mocha Dalgona just the way you like it. For a sweeter drink, add more sugar. Start with one extra tablespoon and taste it. If you want a richer chocolate flavor, increase the cocoa powder. You could also add a splash of vanilla or a pinch of cinnamon for more depth. These small changes can make a big difference in taste. Enjoy experimenting! Pro Tips Whipping Technique: Use a hand mixer for best results, as it helps achieve the desired fluffy texture quickly and efficiently. Ingredient Quality: Opt for high-quality instant coffee and cocoa powder to enhance the flavor of your whipped coffee. Milk Options: Experiment with different types of milk, such as almond, oat, or coconut milk, to find your perfect flavor combination. Layering Effect: For a visually stunning drink, pour the milk carefully before adding the whipped coffee to maintain distinct layers. {{image_4}} Iced Mocha Dalgona is a cool twist. To make it, follow these steps: - Prepare the whipped coffee as usual. - Use cold milk instead of hot. - Add ice cubes to your glass before pouring in the milk. - Spoon the whipped mixture on top of the cold milk. This gives you a refreshing drink on a hot day. The cold milk balances the rich, creamy coffee. You can easily make a vegan version. Just swap regular milk for your favorite non-dairy milk. Good choices include: - Almond milk - Oat milk - Soy milk All these options work well and keep the recipe creamy and delicious. Just remember to check that your cocoa powder is dairy-free. You can make your Mocha Dalgona even more special by adding flavors. Here are some ideas: - Vanilla: Add a splash of vanilla extract to the milk. - Cinnamon: Sprinkle in some ground cinnamon for warmth. - Mint: Add mint extract for a refreshing touch. These flavor infusions can make your drink unique. Feel free to experiment and find your favorite mix! If you have extra Mocha Dalgona whipped coffee, store it in a clean container. Use an airtight jar or a sealed bowl. Place it in the fridge. It stays fresh for up to two days. The whipped coffee may lose some fluffiness, but it will still taste great. To keep your mocha coffee fresh, avoid mixing it with milk until ready to drink. Store the whipped coffee and milk in separate containers. This helps maintain the texture and flavor. Always cover the containers tightly to prevent air from getting in. If you made your mocha coffee with hot milk, you can reheat it. Pour the milk back into a pot and warm it gently on low heat. Stir it often to prevent burning. Then, top it with the whipped coffee again. Enjoy it warm for a cozy treat! Dalgona coffee is a whipped coffee drink. It became popular in 2020. You mix equal parts instant coffee, sugar, and hot water. Then, you whip it until it becomes fluffy. The result is a creamy foam. You pour this foam over milk. It looks great and tastes amazing. No, regular coffee won't work here. Instant coffee dissolves easily in water. Regular coffee needs brewing, which won't create the same foam. Stick to instant coffee for the best results. It makes the whipped coffee light and airy. To make more servings, just multiply the ingredients. For two servings, use: - 4 tablespoons instant coffee - 4 tablespoons unsweetened cocoa powder - 4 tablespoons granulated sugar - 4 tablespoons hot water - 2 cups milk You can adjust these amounts based on how many servings you need. Just remember to keep the ratios the same! This blog post detailed how to make Dalgona coffee. We covered key ingredients, step-by-step instructions, and tips to avoid common mistakes. You learned about variations like iced mocha and vegan options. In conclusion, making Dalgona coffee is simple and fun. Explore new flavors and enjoy it your way. Now, you have the tools to impress friends and family with a delicious drink!

Mocha Dalgona Whipped Coffee Irresistible Delight

To make sweet potato sausage soup, you need these key ingredients: - 2 medium sweet potatoes, peeled and diced into bite-sized cubes - 1 pound Italian chicken sausage (or plant-based sausage), casings removed and crumbled - 1 large onion, diced finely - 2 cloves garlic, minced - 4 cups vegetable broth (low-sodium recommended) - 2 cups kale, chopped, stems removed - 1 can (15 oz) diced tomatoes, including their juices - 1 teaspoon smoked paprika - 1 teaspoon dried thyme, or 1 tablespoon fresh thyme if available - Salt and freshly ground black pepper to taste - 2 tablespoons olive oil for sautéing These ingredients work together to create a soup that is both tasty and filling. The sweet potatoes add a natural sweetness. The sausage gives it a hearty texture. The spices bring warmth and depth. You can change the soup to fit your taste. Here are some optional ingredients to consider: - Fresh parsley, roughly chopped, for garnish - Red pepper flakes for heat - Additional vegetables such as carrots or bell peppers - Beans for extra protein and fiber Feel free to mix and match based on what you have at home. This flexibility makes the soup fun to make and enjoy. Each serving of sweet potato sausage soup offers a healthy blend of nutrients. Here is the breakdown: - Calories: Approximately 300 - Protein: 20g - Carbohydrates: 40g - Fiber: 8g - Fat: 10g This soup is rich in vitamins and minerals, thanks to the sweet potatoes and kale. It's a well-rounded meal that satisfies your hunger while keeping you healthy. {{ingredient_image_2}} - Peel and dice 2 medium sweet potatoes into bite-sized cubes. - Dice 1 large onion finely. - Mince 2 cloves of garlic. - Chop 2 cups of kale, removing the stems. - Open 1 can of diced tomatoes (15 oz) and keep the juices. 1. In a large pot or Dutch oven, heat 2 tablespoons of olive oil over medium heat. 2. Add the diced onion, sautéing for 3-4 minutes until it softens. 3. Stir in the minced garlic and cook for 1 minute, allowing the aroma to fill the air. 4. Crumble the Italian chicken sausage into the pot. Cook for 6-8 minutes until it is browned. 5. Add the diced sweet potatoes, 1 teaspoon of smoked paprika, and 1 teaspoon of dried thyme. Mix well. 6. Pour in 4 cups of vegetable broth and add the can of diced tomatoes. Bring to a boil. 7. Once boiling, lower the heat. Cover and let it simmer for 15-20 minutes until sweet potatoes are tender. 8. Fold in the chopped kale and cook for another 5 minutes until it wilts. 9. Taste the soup and add salt and pepper as needed. - Preparation takes about 15 minutes. - Cooking the sausage and vegetables takes about 20 minutes. - Simmering the soup takes 15-20 minutes. - Total time is roughly 40 minutes. This simple method brings out the rich flavors in your sweet potato sausage soup. Enjoy each step as you craft this hearty meal! To make the best sweet potato sausage soup, start with fresh ingredients. Fresh sweet potatoes and herbs bring out great flavors. Use low-sodium broth to control the salt level. This keeps the soup healthy and tasty. Always sauté the onions until they are soft. This step adds depth to the soup's taste. Stir the sausage well to break it apart. This ensures even cooking and flavor. To boost the flavor, consider adding spices. Besides smoked paprika, try a pinch of cayenne for heat. A squeeze of lemon juice at the end brightens the flavors. Fresh herbs like basil or cilantro can add a fresh note. If you enjoy a little sweetness, maple syrup works well with sweet potatoes. Remember, taste as you go. Adjust seasoning to fit your palate. One common mistake is overcooking the sweet potatoes. They should be tender but not mushy. Avoid adding all the kale at once; it cooks down quickly. If you add too much at once, it may not wilt properly. Another mistake is skipping the sautéing step. This can lead to bland soup. Lastly, don't forget to taste it before serving. This ensures that all the flavors meld together nicely. Pro Tips Choose the Right Sausage: For a flavor boost, consider using spicy Italian sausage or add some chili flakes for heat. Texture Matters: Ensure your sweet potatoes are diced evenly for uniform cooking; this will enhance the soup's texture. Fresh Herbs for Flavor: Using fresh thyme instead of dried can elevate the soup’s flavor profile significantly. Make it Ahead: This soup tastes even better the next day as the flavors meld; make a big batch and enjoy leftovers! {{image_4}} You can switch the Italian chicken sausage for other types. Try turkey sausage for a leaner option. Pork sausage brings a rich flavor to the pot. You can even use spicy sausage for a kick. This gives you many ways to make the soup your own. To make this soup meat-free, use plant-based sausage. There are many great options in stores now. You can also skip the sausage and add more veggies. Use mushrooms for a hearty texture. Lentils or beans work well too, adding protein and fiber. Feel free to add other vegetables you have. Carrots and celery add nice crunch and color. Zucchini or bell peppers can also blend well. If you like greens, spinach or Swiss chard are tasty choices. Just chop them and add them when you stir in the kale. This soup is all about using what you love! After enjoying your soup, let it cool. Pour the soup into an airtight container. You can store it in the fridge for up to five days. Make sure to cover it well to keep it fresh. If you want to save some soup for later, freezing works great. Use freezer-safe containers or bags, leaving some space for expansion. The soup can last up to three months in the freezer. Remember to label each container with the date. To reheat, take the soup out of the fridge or freezer. If frozen, let it thaw overnight in the fridge. You can warm it on the stove over medium heat. Stir it often to heat evenly. If you want, add a splash of broth or water to keep it from getting too thick. Microwave reheating is also fine. Just heat in short bursts, stirring in between, until hot. Enjoy your warm, hearty soup! Yes, you can use other types. Orange-fleshed sweet potatoes work well here. You can also try purple sweet potatoes for a fun color. They have a different taste but will still taste great in the soup. To add spice, try these options: - Add red pepper flakes during cooking. - Stir in diced jalapeños or serrano peppers. - Use spicy Italian sausage instead of mild. Each option gives a nice kick without hiding the other flavors. Yes, this soup is gluten-free. The main ingredients, sweet potatoes, sausage, and broth, contain no gluten. Always check your broth label to ensure it’s gluten-free. This soup is safe for those with gluten intolerance. This soup pairs well with: - Crusty bread for dipping. - A simple green salad for freshness. - Grilled cheese sandwiches for comfort. Each option adds a nice touch to your meal and makes it more filling. We explored the key ingredients for Sweet Potato Sausage Soup and how to customize it. I shared preparation steps, cooking directions, and timing to make it easy for you. We covered tips to enhance flavors and avoid common mistakes. You learned about variations for different diets and how to store leftovers properly. In the end, this soup is versatile and packed with nutrition. Feel free to experiment and make it your own!

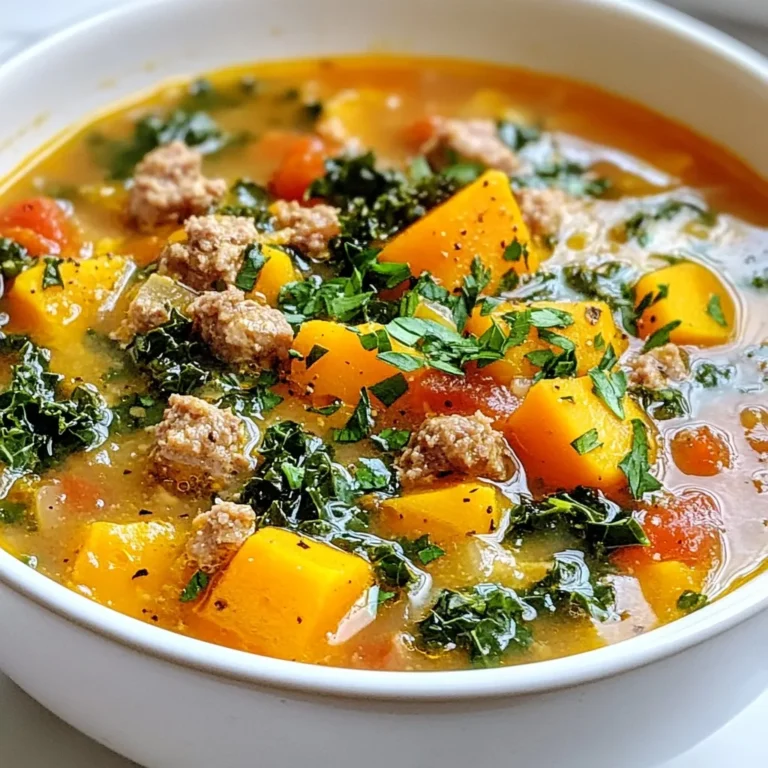
Sweet Potato Sausage Soup Healthy and Hearty Meal

- 1 can (14 oz) diced tomatoes - 1 can (15 oz) white beans (like cannellini or navy beans), drained and rinsed - 1 medium onion, diced - 3 cloves garlic, minced - 1 medium carrot, diced - 1 stalk celery, diced - 4 cups vegetable broth - 1 cup coconut milk (full fat for a creamier texture) - 2 tablespoons olive oil - 1 teaspoon dried thyme - 1 teaspoon smoked paprika - Salt and pepper to taste - Fresh basil leaves for garnish Using good ingredients makes a big difference in taste. I prefer fresh veggies whenever I can. They add bright flavors and great texture. If fresh isn’t an option, canned or frozen can work too. Just make sure to rinse canned beans to remove extra salt. If you need a gluten-free option, this recipe is already gluten-free! Just check your vegetable broth to ensure it fits your diet. For those who want to switch things up, try different beans. You could use black beans or chickpeas. They both add unique flavors and textures. You can also mix in other veggies like bell peppers or zucchini. This stew is very forgiving and lets you get creative! {{ingredient_image_2}} To start, heat the olive oil in a large pot over medium heat. Wait until it shimmers. Add the diced onion, carrot, and celery. Sauté for 5-7 minutes. Stir occasionally. You want the veggies to become tender and the onion to turn translucent. Next, when the vegetables soften, it's time for the garlic. Add the minced garlic and cook for 1-2 minutes. Stir constantly. This helps the garlic release its sweet aroma. Now, let’s talk about seasoning. Seasoning is key. Add salt and pepper at different points. This builds layers of flavor. Don’t wait until the end to season. It’s best to add a pinch during the sautéing process. Taste as you go. Now, pour in the diced tomatoes with their juices. Add the drained white beans, vegetable broth, thyme, and smoked paprika. Stir well to mix everything together. Bring this mixture to a boil. Once boiling, turn down the heat to low. Cover the pot with a lid. Let it simmer gently for about 20 minutes. This is when the flavors blend beautifully. After 20 minutes, remove the lid. Stir in the creamy coconut milk. It adds rich flavor and texture. Let the stew cook for another 5 minutes. Stir occasionally and taste again. Adjust seasoning if needed. To adjust seasoning, taste your stew as it cooks. Add salt and pepper slowly. This will help you find the right balance. If you want more depth, add a splash of balsamic vinegar. It works wonders in brightening flavors. For creaminess without extra calories, choose light coconut milk or blend some beans into the stew. This adds thickness and keeps it healthy. You can also use a potato masher to break down some beans for a smooth texture. To garnish, fresh basil leaves are my go-to. They add a burst of color and flavor. You can also sprinkle some nutritional yeast on top for a cheesy taste. Use a heavy pot like a Dutch oven. It heats evenly and holds heat well. A good pot helps avoid burning your stew. Common mistakes include cooking the garlic too long. Garlic burns quickly, so add it after the veggies soften. Also, don’t skip the simmering step. It allows flavors to blend and makes your stew rich. If you want to cook other dishes, start the stew first. It takes about 30 minutes. You can prepare salads or bread while it simmers. This way, everything comes together nicely at mealtime. Pro Tips Use Fresh Herbs: Adding fresh basil at the end enhances the flavor and aroma of the stew, giving it a vibrant finish. Adjust Creaminess: If you prefer a creamier texture, feel free to add more coconut milk to suit your taste. Beans Variations: Try different types of white beans or even mix in some chickpeas for added texture and protein. Spice it Up: For a spicier kick, consider adding a pinch of red pepper flakes or a dash of hot sauce to the stew. {{image_4}} You can change the beans for a new taste. Try black beans or chickpeas. Both add protein and flavor. You can also switch up the veggies. Toss in bell peppers or zucchini for more color and texture. If you want to spice things up, add cumin or oregano. These herbs enhance the stew's warmth and depth. This stew pairs well with crusty bread. The bread soaks up the tasty broth. You can also serve it with a fresh salad. A simple green salad adds crunch and freshness. For those watching carbs, enjoy the stew on its own. It is hearty and filling without extra sides. To keep your creamy vegan tomato white bean stew fresh, use airtight containers. Glass containers work great. They help keep the flavors in and prevent spills. If you have leftovers, let the stew cool down before sealing it in the container. This step helps avoid condensation. Store it in the fridge for up to four days. For longer storage, you can freeze it. Just make sure to leave some space in the container for expansion. When it's time to warm up your stew, the best method is on the stove. Pour the stew into a pot and heat it on medium. Stir it often to make sure it warms evenly. If you want to use a microwave, place it in a microwave-safe bowl. Heat in short intervals, stirring in between. This way, you’ll keep the tasty texture and flavor. If the stew seems thick, add a little vegetable broth or water to loosen it. Can I freeze the stew? Yes, you can freeze this stew. Let it cool first. Pour it into a freezer-safe container. Leave some space at the top for expansion. It should stay good for about three months. How can I make it spicier? To add heat, try adding red pepper flakes or diced jalapeños. You can also stir in hot sauce at the end. Adjust to your taste. Is this recipe suitable for meal prep? Absolutely! This stew is perfect for meal prep. It stores well and tastes even better the next day. Make a big batch and divide it into portions. Breakdown of calories, protein, and fiber per serving: Each serving has about 250 calories. It contains 10 grams of protein and 9 grams of fiber. Great for filling you up! Benefits of the key ingredients: - White beans: High in protein and fiber. They help with digestion. - Tomatoes: Packed with vitamins and antioxidants. Good for your heart. - Coconut milk: Adds creaminess and healthy fats. Great for energy. How it fits into various dietary plans: This stew is vegan and low-fat. It is also gluten-free. Perfect for many diets. Enjoy it for a wholesome meal any day! This blog post covered everything you need to make a great stew. We discussed the ingredients, from fresh choices to safe substitutions. The step-by-step cooking instructions helped you manage time and enhance flavors. Tips on variations and serving ideas kept your meals exciting. Finally, I shared storage and reheating methods to help you enjoy leftovers. I hope these insights inspire you to cook confidently and creatively! Happy cooking!

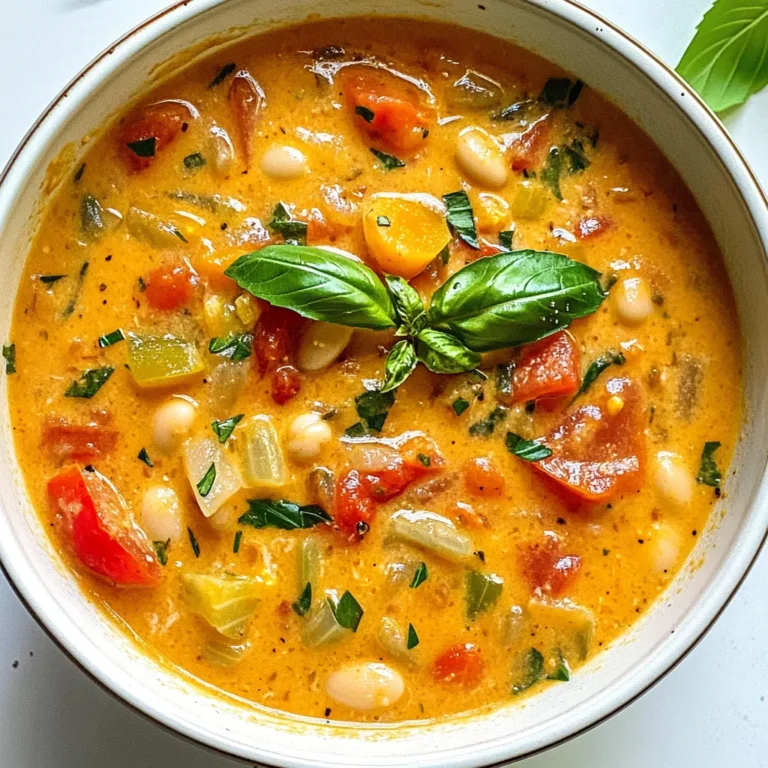
Creamy Vegan Tomato White Bean Stew Easy and Flavorful

- 1 ¾ cups all-purpose flour - 1 teaspoon baking soda - ½ teaspoon baking powder - ½ teaspoon salt - 1 teaspoon ground cinnamon - ½ teaspoon ground nutmeg - ½ teaspoon ground ginger - ½ cup unsalted butter, softened - 1 cup granulated sugar - ½ cup light brown sugar, packed - 2 large eggs, at room temperature - 1 cup canned pure pumpkin puree - 1 teaspoon pure vanilla extract - 1 cup chocolate chips (milk or dark) - ½ cup chopped walnuts (optional) If you need to convert measurements, here are some simple tips: - 1 cup = 240 milliliters - ½ cup = 120 milliliters - 1 teaspoon = 5 milliliters - 1 tablespoon = 15 milliliters Using these conversions can help if you lack measuring tools. If you lack an ingredient, you can make easy swaps: - Use whole wheat flour instead of all-purpose for added fiber. - Substitute coconut oil for unsalted butter for a dairy-free option. - Replace granulated sugar with coconut sugar for a lower glycemic index. - You can skip walnuts if you prefer a nut-free bread. These swaps keep the recipe tasty and fun! {{ingredient_image_2}} Preheat your oven to 350°F (175°C). Grease a 9x5 inch loaf pan. Dust the pan with flour to stop the bread from sticking. This step is key for a smooth removal after baking. In a medium bowl, whisk together these dry ingredients: - 1 ¾ cups all-purpose flour - 1 teaspoon baking soda - ½ teaspoon baking powder - ½ teaspoon salt - 1 teaspoon ground cinnamon - ½ teaspoon ground nutmeg - ½ teaspoon ground ginger Make sure everything is well mixed. This blend adds flavor and helps the bread rise. In a large bowl, cream together: - ½ cup unsalted butter, softened - 1 cup granulated sugar - ½ cup light brown sugar, packed Use an electric mixer for about 3-4 minutes. The mixture should turn light and fluffy. This step adds air to your bread, making it soft. Add two large eggs one by one, mixing well after each. Then, stir in: - 1 cup canned pure pumpkin puree - 1 teaspoon pure vanilla extract Mix until smooth. The pumpkin gives moisture, and the vanilla adds flavor. Now, gently fold the dry mixture into the wet mixture. Use a spatula to combine them well. Be careful not to overmix. This keeps your bread light and fluffy. Next, fold in: - 1 cup chocolate chips - ½ cup chopped walnuts (optional) Make sure to distribute them evenly through the batter. This step adds sweet and crunchy bites. Pour the batter into your prepared loaf pan. Smooth the top with a spatula. Place it in the oven and bake for 60-70 minutes. Check if it’s done by inserting a toothpick into the center. If it comes out clean, it’s ready! After baking, let the bread cool in the pan for about 10 minutes. Then, transfer the bread to a wire rack to cool completely. For a lovely presentation, slice the bread and serve it warm. Add a dusting of powdered sugar or a dollop of whipped cream for extra delight. Enjoy your tasty creation! To make your chocolate chip pumpkin bread moist, use canned pumpkin puree. It adds moisture and flavor. Always use softened butter for better mixing. Cream it with sugars until fluffy. This step adds air, which keeps the bread light. Avoid overmixing when you combine wet and dry ingredients. Overmixing can lead to a dense loaf. Also, let the bread cool in the pan for a bit. This helps keep it moist as it cools. For even baking, preheat your oven correctly. Set it to 350°F (175°C) before you start mixing. Prepare your loaf pan by greasing and flouring it. This prevents sticking and helps the bread rise evenly. Pour the batter into the pan and smooth the top. This way, the bread bakes uniformly. Use a toothpick to check doneness. Insert it into the center; it should come out clean when the bread is ready. To boost flavor, use fresh spices like ground cinnamon, nutmeg, and ginger. Fresh spices pack more punch than old ones. You can also add vanilla extract for a warm aroma. Consider adding chopped walnuts for a nutty crunch. If you love chocolate, use dark chocolate chips. They add a rich taste and contrast to the pumpkin. For a delightful finish, dust your slices with powdered sugar before serving. Pro Tips Use Room Temperature Ingredients: Allow your eggs and butter to come to room temperature before mixing. This helps create a smoother batter and improves the loaf's texture. Don’t Overmix the Batter: When combining wet and dry ingredients, mix just until incorporated. Overmixing can lead to a tough bread, so be gentle! Check for Doneness: Since ovens can vary, start checking your bread a few minutes before the recommended baking time. Insert a toothpick into the center; if it comes out clean, your bread is ready! Storage Tips: To keep your bread moist, wrap it tightly in plastic wrap or store it in an airtight container. It can also be frozen for up to three months! {{image_4}} To make vegan chocolate chip pumpkin bread, swap out the eggs and butter. Use flax eggs instead. Mix 1 tablespoon of ground flaxseed with 2.5 tablespoons of water for each egg. Replace the butter with a neutral oil like canola or melted coconut oil. This keeps the texture soft and moist. Use vegan chocolate chips for a fully plant-based treat. For a gluten-free version, replace the all-purpose flour with a gluten-free blend. Look for blends that include xanthan gum, as this helps mimic the texture of wheat flour. Make sure all other ingredients are gluten-free as well. This way, everyone can enjoy this tasty bread without worry. You can play with flavors in your chocolate chip pumpkin bread. Try adding different spices like allspice or cloves for a unique twist. You can also mix in chopped pecans or almonds for a nutty crunch. For a fun touch, try adding a swirl of cream cheese or nut butter in the batter before baking. To keep your chocolate chip pumpkin bread fresh, store it in an airtight container. This helps maintain its moisture and flavor. You can also wrap it tightly in plastic wrap. Place the wrapped loaf in a cool, dark place. For best taste, enjoy it within 3 to 5 days. If you want to save some for later, freezing works great. Wrap the cooled bread tightly in plastic wrap. Then, place the wrapped loaf in a freezer bag. Make sure to remove as much air as possible. You can freeze it for up to 3 months. When you're ready to eat, thaw it in the fridge overnight. To reheat your bread, preheat your oven to 350°F (175°C). Place the bread on a baking sheet. Heat it for about 10-15 minutes until warm. If you like, you can also use a microwave. Just heat a slice for about 15-20 seconds. Enjoy your warm, delicious bread! Yes, you can use fresh pumpkin instead of canned puree. Just cook and mash the pumpkin first. This adds a lovely freshness to your bread. Use about 1 cup of fresh pumpkin for this recipe. Chocolate Chip Pumpkin Bread lasts about 3 to 5 days when stored at room temperature. Keep it in an airtight container to maintain its moisture. If you want it to last longer, consider refrigerating it. Absolutely! You can make mini loaves using this recipe. Just adjust the baking time to about 30 to 40 minutes. Check with a toothpick to ensure they are done. You can serve this bread with many treats. I love it with whipped cream or cream cheese spread. It also pairs well with a hot cup of coffee or tea. You now have all you need to bake delicious Chocolate Chip Pumpkin Bread. We covered ingredients, measurement tips, and substitutions. Step-by-step instructions help you mix and bake with ease. Tips for moisture and flavor enhance your bread. You can try variations like vegan or gluten-free too. Don't forget to store any leftovers properly for later enjoyment. Baking should be fun and creative. Enjoy your tasty creations with family and friends.

Chocolate Chip Pumpkin Bread Easy and Delicious Recipe

- 1 cup finely crushed graham crackers - 3 tablespoons unsalted butter, melted - 8 oz cream cheese, softened to room temperature - 1/2 cup powdered sugar - 1 teaspoon pure vanilla extract - 1 cup heavy whipped cream (plus extra for topping) - 1 cup strawberries, hulled and tops removed - Mini chocolate chips for garnish These ingredients make a tasty treat. The crust uses graham crackers and butter for a sweet base. Cream cheese gives the filling a creamy texture. Powdered sugar adds sweetness, while vanilla enhances the flavor. Heavy whipped cream makes the filling light and fluffy. Strawberries are the stars, acting as Santa hats. You can add more fun toppings. Consider: - More whipped cream for extra fluffiness - Fresh mint leaves for a pop of color - Chocolate sauce drizzled around the bites - Crushed nuts for added crunch These garnishes make your cheesecake bites even more festive and fun. They also add flavor and texture. If you need swaps, here are some ideas: - Use almond flour instead of graham crackers for a gluten-free crust. - Swap cream cheese for a dairy-free cream cheese if needed. - Replace strawberries with raspberries or blueberries for a different look. These substitutions help you customize the recipe. You can make it fit your taste or dietary needs. {{ingredient_image_2}} To start, gather your ingredients. You need graham crackers and melted butter. In a bowl, mix 1 cup of crushed graham crackers with 3 tablespoons of melted butter. Stir well until the crumbs look sandy. This mixture is your crust. Next, line a muffin tin with mini cupcake liners. Press a tablespoon of the crumb mixture into each liner. Make sure the base is even and compact. Once done, place the muffin tin in the fridge for 15 to 20 minutes. This helps the crust set and hold its shape. Now for the filling! Grab a large bowl and use an electric mixer to beat 8 ounces of softened cream cheese. Mix until it is creamy and lump-free. Slowly add in 1/2 cup of powdered sugar and 1 teaspoon of vanilla extract. Keep mixing until smooth. Next, fold in 1 cup of heavy whipped cream. Use a spatula to gently combine the cream with the cheese mixture. You want a light and fluffy filling. Don’t overmix, or your filling may lose its airy texture. Take the chilled muffin tin from the fridge. Spoon or pipe the cheesecake filling into each liner. Fill them generously to the top. Now it’s time to make the hats! Take hulled strawberries and place them upside down on top of the filling. This mimics Santa’s hat. Add a small dollop of whipped cream at the base of each strawberry. This looks like the fluffy part of the hat. For a fun touch, sprinkle a few mini chocolate chips on the whipped cream. This adds a cute decorative detail to your Santa hats. Finally, cover the muffin tin with plastic wrap or foil. Chill the bites in the fridge for at least 2 hours. This helps everything set and makes them easier to serve. Enjoy your festive treat! To make a great cheesecake filling, start with softened cream cheese. This helps mix smoothly. Beat the cream cheese until creamy and free of lumps. Gradually add powdered sugar and vanilla for flavor. Fold in whipped cream gently. This keeps the filling light and fluffy. Use heavy whipping cream for the best results. Chill your bowl and beaters before whipping. This helps the cream whip faster. Beat on medium speed until soft peaks form. Be careful not to over-whip. Over-whipping can turn the cream grainy. Make your cheesecake bites pop with fun decorations. Use hulled strawberries as Santa hats. Add a dollop of whipped cream at the base for a fluffy look. Sprinkle mini chocolate chips on top for a cute touch. Arrange them on a bright platter for a festive display. Drizzle chocolate sauce around for extra flair. Pro Tips Keep Ingredients Room Temperature: Ensure your cream cheese is softened to room temperature before mixing to achieve a smooth and creamy filling without lumps. Chill for Optimal Texture: Allow the cheesecake bites to chill for at least 2 hours. This helps them set properly and makes for easier serving. Use Fresh Strawberries: Choose ripe and firm strawberries for the best presentation and flavor. They should be bright red and free of blemishes. Experiment with Toppings: Feel free to get creative with toppings! Try using different types of chocolate chips, crushed nuts, or even edible glitter for a festive touch. {{image_4}} You can mix up the flavor of your cheesecake filling. Try adding a splash of lemon juice for a refreshing twist. You can also use different extracts, like almond or peppermint, to change the taste. For a richer flavor, fold in melted chocolate or caramel sauce. Each option gives your cheesecake bites a unique flair. While strawberries are fun, you can use other fruits too. Raspberries or blueberries make great choices. Their colors pop and add a burst of flavor. You can even slice bananas for a tropical hint. Just be careful with bananas, as they brown quickly. Use citrus juice to keep them fresh. To make these bites gluten-free, switch the graham crackers for gluten-free crumbs. You can find these at most stores. For a dairy-free option, use vegan cream cheese and coconut whipped cream. These swaps keep the bites tasty and festive for everyone. Always check ingredient labels to ensure they meet your needs. Storing leftover cheesecake bites is easy. First, place them in an airtight container. Make sure to separate layers with parchment paper. This keeps them from sticking together. Store the container in the fridge. They will stay fresh and tasty this way. You can freeze these cheesecake bites for later. Wrap each bite in plastic wrap. Then, place them in a freezer-safe bag or container. This helps prevent freezer burn. They will stay good in the freezer for about three months. When you want to enjoy them, just thaw in the fridge overnight. Santa hat cheesecake bites last about five days in the fridge. Their taste may change after that, but they are still safe to eat. For the best flavor and texture, enjoy them within the first few days. Yes, you can make these cheesecake bites a day ahead. This gives them time to chill and set. The flavors will blend well overnight. Just cover them tightly with plastic wrap. This keeps them fresh in the fridge. If you want a different topping, try raspberries or cherries. Both fruits look great on top of the cheesecake. You could also use mini marshmallows for a fun twist. Just make sure they fit well on the filling. If you don't have liners, grease the muffin tin well with cooking spray. This helps the bites come out easily. After they chill, use a small knife to gently loosen the edges. Then, carefully pop them out. A spoon can help lift them out without breaking. In this post, we explored how to make Santa Hat Cheesecake Bites, from the key ingredients to step-by-step instructions. I shared tips for a creamy filling and ideas for festive flair. With various flavor options and storage tips, you can enjoy these treats anytime. Remember, getting creative with toppings can make them even more special. Keep practicing, and soon you'll master this delicious dessert! Enjoy every bite you create!

Santa Hat Cheesecake Bites Easy Festive Treat

- 4 large russet potatoes These potatoes are perfect for baking. They have a fluffy texture that holds the filling well. - 2 cups broccoli florets, steamed until tender Broccoli adds a fresh taste and bright color. It packs vitamins and minerals, making this dish healthier. - 1 cup sharp cheddar cheese, freshly shredded Sharp cheddar brings a bold flavor. Freshly shredded melts better than pre-shredded cheese, which often has additives. - ½ cup cream cheese, softened to room temperature Cream cheese adds creaminess to the filling. It helps blend flavors and makes the mixture smooth. - ½ cup Greek yogurt Greek yogurt adds tang and moisture. It’s a healthier alternative to sour cream, providing protein too. - 1 teaspoon garlic powder Garlic powder enhances the dish's flavor. It brings warmth without overpowering the other ingredients. - Salt and pepper, to taste Salt and pepper balance all the flavors. Adjust them based on your taste preferences. - 2 tablespoons olive oil Olive oil adds richness and helps crisp the potato skins. It also brings healthy fats to the meal. - Chopped green onions, for garnish Green onions provide a fresh crunch. They add color and a bit of onion flavor to the finished dish. - Potatoes: Use sweet potatoes for a sweeter taste and extra nutrients. - Broccoli: Swap it with spinach or kale for different greens. - Cheese: Try mozzarella for a milder flavor or a dairy-free cheese for vegan diets. - Cream Cheese: Use vegan cream cheese for a dairy-free option. - Greek Yogurt: Substitute with a plant-based yogurt for a vegan-friendly dish. - Olive Oil: Use avocado oil if you prefer a different flavor. First, we need to prep the russet potatoes. Start by rinsing them well. Scrub off any dirt. This step is key for clean potatoes. Next, pierce each potato several times with a fork. This allows steam to escape during baking. Now, place the potatoes directly on the oven rack. Make sure they have space between them. Bake at 400°F (200°C) for about 45-60 minutes. Check doneness by piercing them with a knife or fork. They should feel tender when done. While the potatoes bake, it’s time to make the filling. In a large bowl, combine the steamed broccoli florets with sharp cheddar cheese. Add softened cream cheese and Greek yogurt next. Sprinkle in garlic powder, salt, and pepper. Mix everything vigorously until it’s creamy. This mix creates a great texture and flavor. You want a balance of rich cheese and bright broccoli. This filling is what makes the stuffed spuds so special. When the potatoes are ready, take them out of the oven and let them cool for 5-10 minutes. Cut each potato in half lengthwise. Use a spoon to scoop out some potato flesh. Be careful to leave enough potato so the skin holds its shape. Gently fold the scooped-out potato into the broccoli-cheddar mixture. Once combined, it’s time to stuff! Fill each potato skin with the mixture, mounding it slightly on top. This makes them look hearty and inviting. Finally, drizzle olive oil over each stuffed potato. This adds flavor and helps them crisp up. Place the potatoes back in the oven for 15-20 minutes. You want the tops to be golden-brown and bubbly. Enjoy this delicious comfort food! To get the best flavor in your broccoli cheddar stuffed spuds, use fresh ingredients. Fresh broccoli and sharp cheddar cheese make a big difference. If you want a richer taste, try adding a bit more cream cheese. When baking, each oven may cook differently. If you use a convection oven, check the potatoes a bit earlier. They may finish in about 35-50 minutes. For a regular oven, stick to 45-60 minutes. Always check for tenderness by piercing with a fork. For a great presentation, serve these stuffed spuds on a rustic wooden board. It adds warmth to the dish. You can also use individual plates for a more formal setting. Consider adding a dollop of Greek yogurt on top. It gives a lovely creaminess. Pair your stuffed spuds with a light salad or some roasted veggies. A crisp white wine or sparkling water works well too. This adds a refreshing touch to the meal. {{image_4}} You can switch up the cheese in Broccoli Cheddar Stuffed Spuds. Try using mozzarella for a milder taste. Gouda adds a smoky flavor, while pepper jack gives a spicy kick. You can also toss in different veggies. Cauliflower, spinach, or even bell peppers work well. If you want to add protein, think about cooked chicken or crispy bacon. Adding these ingredients can make the dish heartier. Simply mix them into your filling for extra flavor and texture. For a gluten-free option, ensure your ingredients are certified gluten-free. The potatoes and veggies are naturally gluten-free. You can enjoy the same great taste without worry. If you want a low-carb version, consider using zucchini boats instead of potatoes. Cut zucchini in half, scoop out the insides, and fill them with the broccoli-cheddar mix. For a vegan twist, replace cheese with cashew cheese or nutritional yeast. Use non-dairy yogurt instead of Greek yogurt. This keeps the dish creamy while making it plant-based. You can still enjoy the comforting taste of stuffed spuds with these changes! To keep leftover broccoli cheddar stuffed spuds fresh, follow these steps: - Allow the spuds to cool first. - Place them in an airtight container. - Wrap each potato in plastic wrap for extra protection. The best temperature for storing them is in the fridge. They will last about 3-5 days. If you want to keep them longer, consider freezing. To reheat your stuffed spuds, the best method is using an oven: - Preheat your oven to 350°F (175°C). - Place the potatoes on a baking sheet. - Cover them with foil to keep moisture in. - Heat for about 20-25 minutes, or until hot. Common mistakes to avoid include using the microwave, which can make the skin soggy. Also, don’t skip the foil; it helps keep the filling creamy. Enjoy your warm, cheesy comfort food! How long do leftovers last? Leftovers of broccoli cheddar stuffed spuds can last about 3 to 5 days in the fridge. Keep them in an airtight container to maintain freshness. If you notice any off smells or colors, it's best to toss them out. Can I freeze stuffed spuds? Yes, you can freeze stuffed spuds. Wrap each spud tightly in plastic wrap, then place them in a freezer bag. They can last up to 3 months in the freezer. To enjoy, thaw them overnight in the fridge and reheat them in the oven. What to do if the potatoes are too hard/soft? If your potatoes are too hard, they likely need more baking time. Try baking them for an extra 10 to 15 minutes. If they are too soft, use a firmer potato next time, like Yukon Gold. They hold up better when baked. How can I make the filling creamier? For a creamier filling, add more cream cheese or Greek yogurt. You can also mix in some milk or a splash of heavy cream. Blend everything well for a smooth texture that melts in your mouth. You now have a complete guide for making delicious broccoli cheddar stuffed potatoes. We covered each step, from ingredient details to perfecting your recipe. Remember to take your time with the prep and filling. Use my tips for great flavor and appealing plating. Don't hesitate to try variations based on your taste. Whether you're sticking to a diet or adding proteins, you can adapt this dish to fit your needs. Enjoy your cooking and impress your loved ones with this tasty meal!

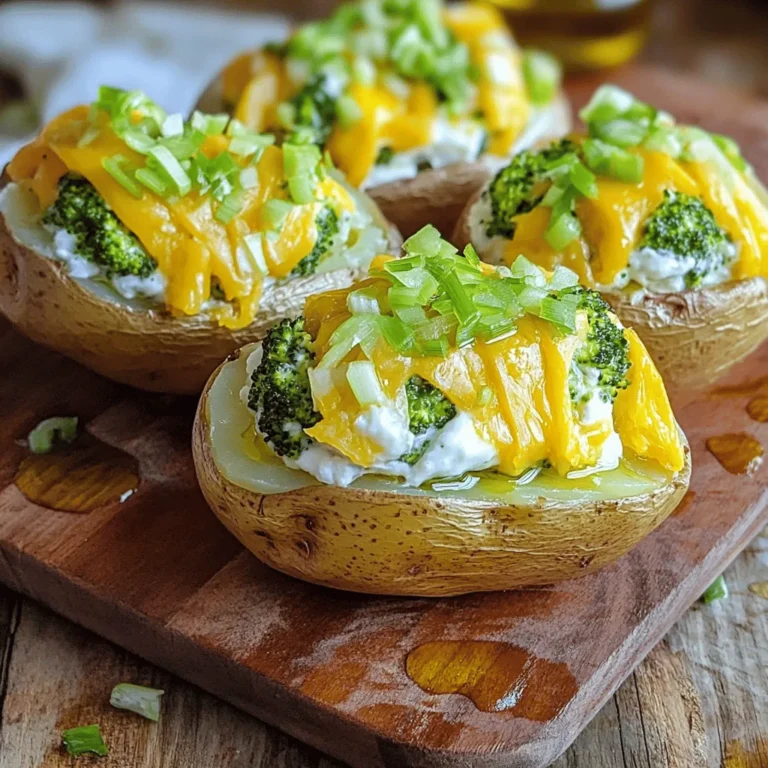
Broccoli Cheddar Stuffed Spuds Irresistible Comfort Food

For these tasty meatballs, gather the following items: - 1 pound ground beef or ground turkey - 1/2 cup seasoned breadcrumbs - 1/4 cup grated Parmesan cheese - 1/4 cup finely chopped fresh parsley - 1 large egg, beaten - 2 cloves garlic, minced - 1/2 teaspoon kosher salt - 1/4 teaspoon freshly ground black pepper - 1 cup honey - 1/2 cup low-sodium soy sauce - 1 tablespoon apple cider vinegar - 1 teaspoon ground ginger - 1 tablespoon cornstarch (optional, for thickening) - 1 tablespoon cold water (if thickening sauce) You can swap some ingredients for different flavors or dietary needs: - Use ground turkey instead of ground beef for a leaner option. - Replace Parmesan cheese with nutritional yeast for a dairy-free choice. - Use gluten-free breadcrumbs if you need a gluten-free meal. For extra flavor, consider adding these ingredients: - A pinch of red pepper flakes for heat. - Chopped green onions for a fresh bite. - Pineapple chunks for a sweet twist. These simple changes can make this dish feel new each time you make it. Enjoy the process of experimenting! To start, grab a big mixing bowl. Add 1 pound of ground beef or turkey to the bowl. Next, toss in 1/2 cup of seasoned breadcrumbs. Then, sprinkle in 1/4 cup of grated Parmesan cheese. Add 1/4 cup of finely chopped fresh parsley and 1 large beaten egg. Now, include 2 minced garlic cloves, 1/2 teaspoon of kosher salt, and 1/4 teaspoon of black pepper. Mix everything well with your hands or a spatula until it's all combined. Once mixed, shape the meat into small balls, about 1 inch wide. Place these meatballs on a baking sheet. This will make it easy to transfer them later. Now, let’s make the sauce. In a medium bowl, whisk together 1 cup of honey, 1/2 cup of low-sodium soy sauce, 1 tablespoon of apple cider vinegar, and 1 teaspoon of ground ginger. Make sure it’s smooth. Next, carefully drop the meatballs into the slow cooker. Pour the honey garlic sauce over the meatballs, covering each one well. Put the lid on the slow cooker. Set it to cook on low for 5-6 hours or on high for 2-3 hours. Check to make sure the meatballs are cooked and tender. If you want a thicker sauce, you can thicken it up. Mix 1 tablespoon of cornstarch with 1 tablespoon of cold water in a small bowl. Stir this mix into the slow cooker in the last 30 minutes of cooking. When they are done, serve the warm meatballs. You can drizzle extra sauce over them for added flavor. For a nice touch, arrange the meatballs on a pretty platter. Garnish with chopped parsley for color. Enjoy! To make great meatballs, start with quality meat. You can use ground beef or turkey. Both work well. I love mixing in seasoned breadcrumbs for texture. They help keep the meatballs moist. Adding grated Parmesan cheese gives a nice flavor boost. Don’t forget the parsley for freshness. Keep the garlic minced and even. This way, it spreads evenly for a great taste. Slow cooking is key for juicy meatballs. Cook them on low for 5-6 hours for the best results. This allows the flavors to blend perfectly. If you are short on time, you can cook on high for 2-3 hours. Make sure the meatballs are fully cooked and tender. To thicken the sauce, use cornstarch mixed with cold water. Stir in this mixture the last 30 minutes. It makes the sauce rich and hearty. These meatballs shine on their own, but you can enhance the meal. Serve them on a big platter, garnished with fresh parsley. This adds color and flair. For a full meal, place them over a bed of fluffy rice. You can also use toothpicks for fun finger food at parties. Pair with steamed veggies or a fresh salad for balance. Enjoying these meatballs is easy, and they are sure to please everyone! {{image_4}} You can easily add spice to your honey garlic meatballs. To make spicy meatballs, mix in 1 to 2 teaspoons of red chili flakes or sriracha sauce. This heat pairs well with the sweet honey taste. If you like it hotter, try adding diced jalapeños to the meatball mix. The spiciness will balance the sweetness nicely. If you want a meatless choice, use plant-based protein. You can substitute ground beef or turkey with lentils, quinoa, or chickpeas. Just mash them up and mix with breadcrumbs and spices. You can also try using store-bought vegetarian meatballs. These options keep the flavor while being good for you. You can switch up the sauce for different tastes. Instead of honey, try using maple syrup for a unique flavor. A teriyaki sauce can create a fun twist, giving the meatballs an Asian flair. For a tangy note, add some barbecue sauce. Each sauce will change the dish while keeping it tasty and fun. You can store leftover meatballs in an airtight container. Keep them in the fridge for up to three days. Make sure they cool down before sealing. This helps to avoid condensation, which can make them soggy. To reheat meatballs, use a microwave or stovetop. If using a microwave, heat them in short bursts to avoid overcooking. For the stovetop, place them in a pan with a splash of water or sauce. Cover and heat on low until warm. This keeps them juicy and flavorful. You can freeze meatballs for longer storage. Pack them in a single layer on a baking sheet and freeze for about two hours. Then, transfer them to a freezer-safe bag. Label the bag with the date. They can last up to three months in the freezer. When ready to eat, thaw in the fridge overnight before reheating. You should cook these meatballs for 5-6 hours on low or 2-3 hours on high. The longer you cook them, the more tender they become. This slow method lets the flavors blend well. You can check for doneness by cutting one open. The meat should be fully cooked and no longer pink. Yes, you can use frozen meatballs! Just add them straight to the slow cooker without thawing. This makes meal prep easy and quick. If using frozen meatballs, you may need to increase the cooking time by about an hour. These meatballs pair well with many sides. You can serve them over rice or noodles for a filling meal. They also taste great with steamed veggies or a fresh salad. For a fun touch, serve them with toothpicks as appetizers at a party. You learned how to make Slow Cooker Honey Garlic Meatballs. We covered ingredients, step-by-step cooking, and tips for success. Feel free to try different meats or sauces for unique flavors. Storing and reheating tips help you enjoy leftovers too. Now, you’re ready to impress at your next meal. Enjoy your cooking adventure!

Slow Cooker Honey Garlic Meatballs Quick and Tasty Meal

- 1 lb (450g) beef sirloin, thinly sliced against the grain - 2 tablespoons extra virgin olive oil - 1 medium onion, finely diced - 3 cloves garlic, minced - 8 oz (225g) cremini or button mushrooms, sliced - 1 teaspoon dried thyme - 1 teaspoon smoked paprika - Salt and freshly cracked black pepper to taste - 4 cups rich beef broth (low-sodium preferred) - 2 cups wide egg noodles - 1 tablespoon smooth Dijon mustard - 1 cup full-fat sour cream - Fresh parsley, finely chopped To make this dish, you will need: - A large pot or Dutch oven - A sharp knife for slicing - A cutting board - A wooden spoon for stirring - Measuring cups and spoons For added flavor and color, consider these garnishes: - Fresh parsley, finely chopped - A sprinkle of black pepper - A dollop of sour cream on top Start by heating 2 tablespoons of extra virgin olive oil in a large pot. Use medium-high heat. Once the oil is hot, add 1 lb of thinly sliced beef sirloin. Cook the beef for about 3-4 minutes. Stir occasionally until it is well browned on all sides. Remove the beef and set it aside on a plate. In the same pot, add 1 medium diced onion. Sauté for 2-3 minutes. Wait until the onion softens and becomes translucent. Next, stir in 3 cloves of minced garlic. Cook it for an additional 30 seconds. You want the garlic to be fragrant and slightly golden. Now it’s time to add the mushrooms. Toss in 8 oz of sliced cremini or button mushrooms. Cook them for about 5 minutes. Stir frequently until they become tender, and their moisture evaporates. Sprinkle in 1 teaspoon of dried thyme and 1 teaspoon of smoked paprika. Add salt and cracked black pepper to taste. Mix well and let it cook for another minute to bloom the spices. Carefully pour in 4 cups of beef broth. Stir to combine everything. Raise the heat to bring the mixture to a gentle boil. When it starts boiling, add 2 cups of wide egg noodles. Lower the heat to a simmer and cover the pot. Let the mixture simmer for 10-12 minutes. Stir occasionally to keep the noodles from sticking. Cook until the noodles are tender and absorb some broth. After the noodles are cooked, remove the pot from the heat. Stir in 1 tablespoon of Dijon mustard and 1 cup of full-fat sour cream. Mix until you create a creamy sauce. Gently add the beef back into the pot. Stir to combine and heat through for 1-2 minutes. Taste the stroganoff and adjust the seasoning if needed. To make your beef stroganoff rich, start by searing the beef. Use a hot pot with olive oil. This step adds a nice crust and deep flavor. After browning, remove the beef and let the pot stay hot. Next, sauté the onions until soft. Cook the garlic just until it smells good. This brings out their flavors. When you add mushrooms, let them cook until they are tender. This helps to release their moisture and flavor. If you don’t have sirloin, you can use other cuts of beef. Flank steak or chuck roast works well too. For a lighter option, try chicken or turkey. If you want a vegetarian dish, use mushrooms or tofu. For the broth, low-sodium options are best, but any beef broth works. You can also use vegetable broth for a meat-free version. Instead of sour cream, plain Greek yogurt can give a creamy texture with less fat. To boost the flavor, add more herbs. Fresh thyme or parsley can brighten your dish. A splash of Worcestershire sauce can add depth. If you like spice, a pinch of cayenne pepper can give it a kick. For more umami, consider adding a bit of soy sauce. Remember, tasting your dish as you cook is key. Adjust salt and pepper to suit your taste. {{image_4}} You can switch out beef for other proteins. Chicken works great and cooks quickly. Use thinly sliced chicken breast for the best results. Pork is another option; it gives a nice flavor. Just remember to adjust cooking times to keep everything tender. For seafood lovers, shrimp can add a fun twist to this dish. Cook the shrimp until they turn pink, about 3-4 minutes, for a tasty change. If you want a meatless meal, try mushrooms as the star. Use a mix of cremini and portobello mushrooms for rich flavor. You can also add lentils for protein. They soak up the sauce well and add a hearty touch. For creaminess, use plant-based sour cream or cashew cream. This keeps the dish rich and satisfying without meat. To make this stroganoff gluten-free, swap the egg noodles. You can use gluten-free pasta or rice. Both options work well and soak up the sauce nicely. Be sure to check the beef broth too; some brands contain gluten. Use a certified gluten-free broth to keep it safe. Enjoy this comforting meal without worry! To keep your beef stroganoff fresh, let it cool first. Transfer it to an airtight container. Seal it tightly to keep air out. You can also divide it into smaller portions for easy meals later. If you prefer, use freezer bags, removing as much air as possible. When you're ready to eat, reheat your stroganoff on the stove. Use medium heat and stir often. You can add a splash of beef broth or water if it seems too thick. If you use a microwave, heat it in short bursts. Stir in between to ensure even warming. You can store beef stroganoff in the fridge for up to 3 days. If you freeze it, it can last for about 2 to 3 months. Always check for any off smells or changes in color before eating. For best flavor, eat it sooner rather than later. You can serve One-Pot Beef Stroganoff with several sides. Here are my favorites: - Steamed vegetables like broccoli or green beans add a nice crunch. - Garlic bread is great for soaking up the creamy sauce. - A simple salad with fresh greens and a light vinaigrette complements the meal well. - Mashed potatoes are a classic choice that pairs perfectly with stroganoff. Yes, you can make this dish ahead of time. Cook the stroganoff and let it cool. Store it in an airtight container in the fridge for up to three days. When ready to eat, reheat it gently on the stove. You may need to add a splash of broth or water to restore creaminess. Yes, there are simple swaps to make it healthier. Here are some ideas: - Use lean beef like flank steak or sirloin for less fat. - Swap sour cream for Greek yogurt for fewer calories and more protein. - Add more veggies like spinach or bell peppers for extra nutrients. - Choose whole-grain noodles instead of regular egg noodles for more fiber. Beef sirloin works best for stroganoff. It cooks quickly and stays tender. You can also use flank steak or tenderloin for a leaner option. Yes, a slow cooker is great for stroganoff! Brown the beef and sauté the onions and mushrooms first. Then, place everything in the slow cooker with broth and noodles. Cook on low for 6-8 hours for a rich and flavorful meal. In this post, we explored making a delicious One-Pot Beef Stroganoff. We covered ingredients, step-by-step cooking, and helpful tips. I shared variations for different diets and detailed storage methods for leftovers. Remember, cooking is fun and allows for creativity. Don’t hesitate to try new things. Enjoy your meal and feel proud of your tasty creation!

One-Pot Beef Stroganoff Easy and Creamy Meal

- 4 large russet potatoes - 1 pound ground beef or turkey (or vegetarian alternative) - 1 cup shredded cheddar cheese - 1 cup canned black beans - 1 cup diced tomatoes - 1/2 cup sour cream - 1/4 cup sliced green onions - 1/2 cup sliced jalapeños - Fresh cilantro for garnish Loaded Taco Potato Skins start with simple yet hearty ingredients. You need four large russet potatoes. They have a great texture for baking. Next, choose one pound of ground beef or turkey. If you want a meat-free option, lentils work well too. Don’t forget the cheese! You’ll need one cup of shredded cheddar cheese. This cheese melts beautifully and adds rich flavor. For the extra kick, get one cup of canned black beans. Rinse and drain them first. Add one cup of diced tomatoes for freshness. You’ll also want half a cup of sour cream. This creamy touch balances the spices. If you like toppings, consider optional ingredients. Sliced green onions add a nice crunch. Jalapeños give heat, so use them if you want spice. Finally, fresh cilantro brightens the dish and adds color. With these ingredients, you can create a delicious and fun meal. Get ready for the tasty flavors of Loaded Taco Potato Skins! Preheat your oven to 400°F (200°C). Scrub the russet potatoes well under running water. This step clears away dirt and makes them clean. Pierce each potato several times with a fork. This allows steam to escape while they bake. Rub each potato with olive oil and sprinkle it with salt. This gives them flavor and helps them crisp up nicely in the oven. Next, heat a skillet over medium heat. Add your ground beef or turkey into the pan. Cook it while stirring often until it turns brown. This takes about 5-7 minutes. Once browned, drain any extra fat. Sprinkle the taco seasoning over the meat. Add water as the packet says, and let it simmer for about 5 minutes. Stir occasionally to mix the flavors. After the potatoes cool a bit, cut each one in half lengthwise. Use a spoon to scoop out the middle, but leave a bit of flesh for strength. Brush the empty potato skins with olive oil. Season them with salt and pepper. Place the skins cut side up on a baking sheet and bake them for about 10 minutes. This step makes them crispy. Once crispy, fill each potato skin with the taco meat mixture. Layer in black beans and diced tomatoes next. Top everything with shredded cheddar cheese. Return the loaded skins to the oven for 5-7 minutes. Watch for the cheese to melt and bubble. When done, take them out carefully. Top each skin with sour cream, sliced green onions, jalapeños if you like heat, and fresh cilantro for a burst of color. Enjoy this tasty dish! To ensure crispy potato skins, follow these steps: - Choose large russet potatoes. They have the right starch content. - Scrub the potatoes well. This removes dirt and helps with skin crispiness. - Pierce each potato with a fork. This allows steam to escape while baking. - Rub the skins with olive oil. This adds flavor and helps them crisp up. - Bake the potatoes directly on the oven rack. This promotes even cooking. For cooking ground meat, here’s what I recommend: - Use medium heat to brown the meat. This keeps it juicy and flavorful. - Stir often to avoid burning. You want even cooking. - Drain excess fat after cooking. This keeps the filling light and tasty. Here are some great ideas for additional toppings: - Fresh avocado slices add creaminess. - Salsa brings a fresh, zesty flavor. - Corn adds sweetness and crunch. - Guacamole pairs well with the taco theme. For spice adjustments, consider these ideas: - Add chili powder for more heat. - Try a sprinkle of cayenne pepper if you love spice. - Use diced bell peppers for a mild kick. - Adjust taco seasoning based on your taste. Experiment with these tips to make your loaded taco potato skins even more delicious! {{image_4}} For a tasty vegetarian version, try substituting meat with lentils or mushrooms. Lentils pack a protein punch and add a nice texture. Cook lentils until soft, and mix them with taco seasoning for flavor. If you choose mushrooms, sauté them until they are tender and mix in the seasoning as well. Using plant-based cheese alternatives can make this dish even better for vegetarians. Look for cheeses made from nuts or soy. They melt well and can give you that creamy topping you crave. Want to change things up? Adding different spices can elevate your loaded taco potato skins. Try cumin, chili powder, or smoked paprika for extra depth. A splash of hot sauce can also bring a fun kick. Incorporating other vegetables can add color and flavor. Diced bell peppers, corn, or even roasted zucchini work well. Just sauté them first to bring out their flavors. The more veggies, the better! To keep your loaded taco potato skins fresh, store them properly. First, let them cool completely. Then, place the skins in an airtight container. If you have leftovers, put them in the refrigerator. They will stay good for about three days. If you want to store them longer, consider freezing. Wrap each potato skin tightly in plastic wrap. Then, place them in a freezer-safe bag. They can last for up to three months in the freezer. When you're ready to eat, just thaw them in the fridge overnight. To enjoy your loaded taco potato skins again, reheating properly is key. I recommend using the oven for the best texture. Preheat your oven to 350°F (175°C). Place the skins on a baking sheet and heat for about 10-15 minutes. This keeps them crispy. If you're short on time, you can use the microwave. Place the skins on a microwave-safe plate. Heat them for about 1-2 minutes. The skin may not be as crispy, but they will still taste great. You can use different types of potatoes. Here are some good options: - Yukon Gold potatoes: They are creamy and rich in flavor. - Red potatoes: They hold their shape well and have a nice texture. - Sweet potatoes: These add a sweet twist to your skins. These alternatives can change the taste and texture. Choose what you like best! Yes! You can make them ahead. Here’s how: - Bake the potatoes and scoop them out. Store them in the fridge. - Prepare the taco filling and keep it separate. - When ready, fill the skins and bake them. This way, you save time. Just heat and serve for a fun meal! Dipping sauces can make your potato skins even better. Here are some tasty ideas: - Sour cream: A classic choice that cools the heat. - Salsa: Fresh and zesty, it adds great flavor. - Guacamole: Creamy and rich, it pairs well with tacos. - Cheese sauce: For extra cheese lovers, this is a hit. Try different sauces to find your favorite combo! You learned how to make loaded taco potato skins. We covered the main and additional ingredients, step-by-step prep, and cooking tips. I shared variations for vegetarians and flavor twists. Plus, I provided storage methods and answers to common questions. These tasty snacks are easy to make and fun to share. Enjoy trying new toppings and spices. Your kitchen will be the best place for delicious meals!

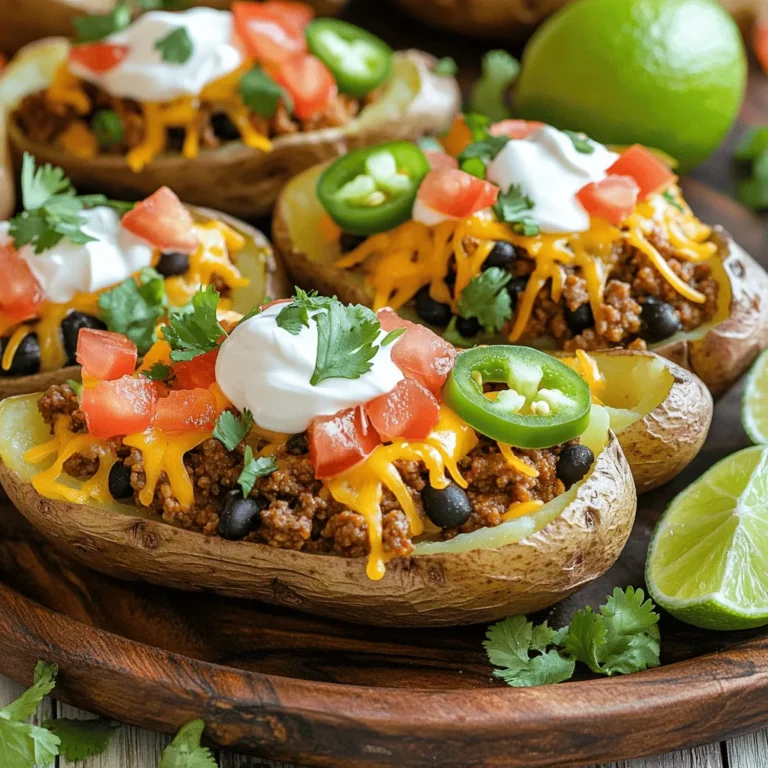
Loaded Taco Potato Skins Flavorful and Easy Recipe

PREV 1 … 20 21 22 … 47 NEXT
snack joy kitchen

explore

DessertsDinnerAppetizersDrinks

Our Policies

  • Cookie Policy
  • Copyright Policy
  • Disclaimer
  • GDPR Policy
  • Terms Of Use
Back to Top
  • About
  • Contact Us
  • Privacy Policy
© 2026 snack joy kitchen