FREE DINNER EBOOK! Get your copy!
  • Cookie Policy
  • GDPR Policy
  • Disclaimer
  • Terms Of Use
  • Visit my other site: Fun Cookie Recipes
snack joy kitchen
  • Home
  • Dinner
  • Desserts
  • Drinks
  • Appetizers
  • Contact
  • About
  • Privacy Policy
  • Home
  • Dinner
  • Desserts
  • Drinks
  • Appetizers
  • Contact
  • About
  • Privacy Policy
  • Cookie Policy
  • GDPR Policy
  • Disclaimer
  • Terms Of Use
Visit my other site: Fun Cookie Recipes

HOME / CATEGORIES /

Latest

- 8 cups of apple cider - 2 fresh apples, cored and sliced - 1 juicy orange, sliced into rounds - 4 cinnamon sticks - 1 teaspoon of whole cloves - 1 teaspoon of allspice berries - 1 teaspoon of freshly grated nutmeg - 1/4 cup of brown sugar - 1 tablespoon of vanilla extract (optional) When I make spiced slow-cooker apple cider, I love to start with fresh ingredients. The apple cider forms the base. I use 8 cups to ensure a hearty amount to share. For added fruity flavor, I slice 2 fresh apples and 1 juicy orange. The apple variety is up to you, but I suggest sweeter types for a better taste. Next, I focus on the spices. Nothing beats the warmth of 4 cinnamon sticks. They add a cozy touch. I also add 1 teaspoon of whole cloves and 1 teaspoon of allspice berries. These spices bring a unique depth to the cider. The last spice is 1 teaspoon of freshly grated nutmeg. Just a bit gives it a warm, nutty flavor. To sweeten the mix, I use 1/4 cup of brown sugar. This adds a rich sweetness that balances the tartness of the fruit. If I want an extra layer of flavor, I include 1 tablespoon of vanilla extract. This is optional, but it can make a big difference. With these ingredients, you create a warm and inviting drink that fills your home with a delightful aroma. Each sip brings a taste of fall, making it perfect for gatherings or cozy nights in. {{ingredient_image_2}} Start by pouring 8 cups of apple cider into your slow cooker. This cider serves as a warm and inviting base. Next, add 2 fresh apples, cored and sliced, along with 1 juicy orange, sliced into rounds. These fruits add a burst of flavor and a lovely aroma. Now, stir in the spices. Add 4 cinnamon sticks, 1 teaspoon of whole cloves, 1 teaspoon of allspice berries, and 1 teaspoon of freshly grated nutmeg. Mix these in well to spread the flavors evenly. Gradually sprinkle in 1/4 cup of brown sugar, stirring until it dissolves. Taste the mixture and adjust the sweetness as you prefer. If you like, add a tablespoon of vanilla extract for a deeper flavor. Secure the lid on your slow cooker. Set it to low heat and let it cook for 6-8 hours. This slow cooking allows the flavors to meld beautifully. The result will be a rich and aromatic cider that fills your home with warmth. When the time is up, use a ladle to pour the cider into mugs. You can choose to strain out the spices and fruit slices or leave them in for a rustic touch. Enjoy every sip of this delightful drink! To make your spiced slow-cooker apple cider sweeter, add more brown sugar. Start with 1/4 cup. Taste it after a few hours. If you want more sweetness, stir in a bit more. You can also use honey or maple syrup for a different flavor. Fresh spices are best for strong flavors. Ground spices can work too, but they may not taste as bright. If you have whole spices, use them! They stay fresh longer and add depth to your cider. You can choose to strain out the spices and fruit or leave them in. Straining gives you a smooth drink. But leaving them in adds a rustic look. The spices can also keep adding flavor as you serve. If you decide to leave the spices and fruit, it makes a nice display. Guests will enjoy the sight of cinnamon sticks and apple slices in their mugs. Garnish your cider with a cinnamon stick or a fresh apple slice. This adds a nice touch and makes it look special. A slice of orange can also enhance the drink’s appearance. When it comes to mugs, choose sturdy ones that hold heat well. A clear glass mug can show off the beautiful colors of your cider. You want your guests to feel cozy while sipping this warm drink. Pro Tips Adjust Sweetness: Taste the cider after a few hours of cooking and adjust the brown sugar to your desired sweetness level for a perfectly tailored flavor. Use Fresh Spices: Opt for whole spices instead of ground ones to enhance the flavor profile. Whole spices release their oils more effectively during slow cooking. Experiment with Fruits: Try adding other seasonal fruits like pears or cranberries to diversify the flavor and add a unique twist to your apple cider. Keep it Warm: If you’re serving the cider at a gathering, keep the slow cooker on the 'warm' setting to maintain the perfect temperature for sipping. {{image_4}} You can make your spiced slow-cooker apple cider even better with some fun twists. Try adding other fruits like pears or cranberries. These fruits bring in new flavors and textures. They add a nice touch, especially during fall gatherings. If you want a grown-up version, consider adding a splash of bourbon or rum. This gives your cider a warm kick and makes it perfect for cozy nights by the fire. The best part of making cider is adjusting the spices to suit your taste. You can play with different spice blends, too. If you like it spicier, add more cloves or cinnamon sticks. For a sweeter cider, increase the brown sugar or try a splash of maple syrup. Don’t be afraid to experiment. Each batch can have its own special flavor! For those watching sugar intake, there are great alternatives. You can use sugar substitutes like stevia or monk fruit. These options keep the sweetness without the extra calories. If you have gluten concerns, rest easy. This cider is naturally gluten-free. Enjoy this warm treat without worry! To store leftover cider, let it cool first. Pour it into a clean container. Seal it tightly with a lid. You can keep it in the fridge for up to five days. If you want it to last longer, consider freezing it. The best way to reheat is on the stove. Pour the cider into a pot and heat it gently. Stir it often to help the flavors blend. You can also use a microwave, but do it in short bursts. Heat until hot, but do not boil. Yes, you can freeze the cider. Just leave some space in the container for expansion. To keep cider warm for gatherings, use a slow cooker on low. This will help maintain the perfect temperature. You can make the cider ahead of time, too. Just reheat it right before serving. This way, you can enjoy the party without stress. To make apple cider on the stovetop, follow these simple steps. Start with 8 cups of apple cider in a large pot. Add your sliced apples and orange, just like in the slow-cooker method. Toss in the spices: cinnamon sticks, cloves, allspice, and nutmeg. Stir in the brown sugar and heat over medium. Once it starts to simmer, reduce the heat to low. Let it cook for about 30 to 45 minutes. This will let the flavors blend well. Stir occasionally, and then your cider is ready to serve! Drinking apple cider can have some great health perks. It may help with digestion and boost your immune system. Apple cider is rich in antioxidants, which fight free radicals in your body. It can also be hydrating and refreshing, especially when served warm. Some studies suggest that apple cider can help control blood sugar levels. Of course, enjoy it in moderation to reap the benefits without overdoing the sugar. Yes, you can use other sweeteners if you prefer! Honey adds a nice floral flavor and natural sweetness. Maple syrup is another tasty option that brings a unique twist. If you want a low-calorie choice, try stevia or monk fruit sweetener. Just remember to adjust the amount based on your taste. Start with a smaller amount and add more if needed. This way, you can find the perfect sweetness for your cider! This blog post shared a simple apple cider recipe with key ingredients and steps. You learned how to enhance flavor with spices and sweeteners. I also offered tips for serving, storing, and creative variations. In summary, this homemade cider is easy, fun, and delicious. You can customize it to your taste. Whether for a gathering or a cozy night in, this drink can warm your spirits. Enjoy making and sharing your special cider!

Spiced Slow-Cooker Apple Cider Warm and Inviting Drink

To make a delicious Fajita Chicken Casserole, gather these key items: - 2 cups cooked shredded chicken - 1 bell pepper (red or green), sliced into thin strips - 1 medium onion, sliced into thin wedges - 1 cup corn (fresh or frozen) - 1 can (15 oz) black beans, rinsed and drained - 1 cup salsa (choose mild or spicy based on your heat preference) - 2 cups shredded cheese (use cheddar or a Mexican cheese blend) - 1 teaspoon ground cumin - 1 teaspoon chili powder - Salt and pepper to taste - 8 small flour tortillas, cut into 1-inch strips - Fresh cilantro for garnish (optional, but recommended) You can swap some ingredients to fit your taste: - Use grilled chicken for a smoky flavor. - Try zucchini or mushrooms instead of bell peppers. - Substitute black beans with pinto beans or kidney beans. - Use homemade salsa for a fresh twist. - Replace flour tortillas with corn tortillas for a gluten-free option. Choosing fresh produce makes a big difference in flavor. Here are some tips: - Look for firm bell peppers with shiny skin. - Choose onions that are dry and have a strong smell. - For corn, pick ears that are bright green and tightly wrapped. - Check black beans for any signs of damage or age. - Always smell your salsa to ensure it’s fresh and zesty. {{ingredient_image_2}} First, set your oven to 375°F (190°C). This helps the casserole bake evenly. While it heats, gather your ingredients. You will need cooked shredded chicken, bell pepper, onion, corn, black beans, salsa, cheese, spices, tortillas, and cilantro. Having everything ready makes cooking much easier. In a medium skillet, add a splash of olive oil. Heat it over medium heat. Now, toss in the sliced bell pepper and onion. Cook them for 5-7 minutes until they soften and smell good. Add ground cumin, chili powder, salt, and pepper. Stir well to mix the spices with the vegetables. Grab a large mixing bowl. Combine the cooked chicken, sautéed veggies, corn, black beans, and salsa. Mix everything well with a spatula. Next, grease a 9x13 inch baking dish. Start layering by placing half of the tortilla strips on the bottom. Pour half of the chicken mixture on top, then add 1 cup of cheese. Repeat this with the rest of the ingredients, finishing with cheese on top. Cover your baking dish tightly with aluminum foil. Place it in the oven for 20 minutes. When the time is up, carefully remove the foil. Bake it for another 10-15 minutes. The cheese should melt, bubble, and turn golden brown. After baking, take the casserole out of the oven. Let it cool for a few minutes. If you like, sprinkle fresh cilantro on top for color and flavor. Serve it from the dish for a fun touch. A side of sour cream and guacamole makes it even better! You can prepare this casserole in advance. First, make the filling as usual. Layer it in your baking dish, but don't bake it yet. Cover it tightly with foil or plastic wrap. This way, it stays fresh in the fridge for up to three days. You can also freeze it for up to three months. Just thaw it overnight in the fridge before baking. Baking time may need adjustment if it’s cold from the fridge. Not everyone loves the same spice level. If you prefer a mild dish, choose mild salsa and skip the chili powder. For a bit more heat, add a pinch of cayenne pepper. You can also serve sliced jalapeños on the side. This way, each person can customize their plate. Seasoning is key to great flavor. When you sauté the veggies, let them cook until they are soft. This step releases their natural sweetness. Be sure to add salt and pepper as you go, not just at the end. Mix the spices into the filling well so every bite is tasty. Using fresh herbs, like cilantro, as a garnish adds a nice, bright flavor. Pro Tips Use Rotisserie Chicken: For a quicker prep time, consider using store-bought rotisserie chicken. It adds flavor and saves you cooking time! Customize Your Heat: Adjust the heat level by using different types of salsa or adding fresh jalapeños to the mixture. This way, everyone can enjoy their ideal spice level! Make Ahead: This casserole can be assembled ahead of time and stored in the fridge for up to 24 hours before baking, making it a great option for meal prep! Cheese Variation: Experiment with different cheeses like pepper jack for an extra kick or mozzarella for a milder flavor. Mixing cheeses can also create a more complex taste! {{image_4}} You can make a great vegetarian version of this dish. Instead of chicken, use a mix of veggies. Try adding mushrooms, zucchini, or more bell peppers. You can also use tofu for extra protein. Replace the cheese with a dairy-free option to keep the dish vegan. This way, you still get a hearty meal full of flavor. Want to change the protein? You can swap shredded chicken for ground beef or turkey. Cook the meat in a skillet with the spices before adding it to the mix. This option gives a different taste and texture. You can also use canned beans or lentils for a protein boost. Each choice brings its unique flair to the casserole. Cheese is key to a tasty casserole. While cheddar is classic, try other cheeses for fun. Pepper jack adds a nice kick, while Monterey Jack keeps it mild. You can mix different cheeses for more flavor. Cheese can also change the texture. Experiment to find your favorite combo. To keep your Fajita Chicken Casserole fresh, let it cool first. Once cooled, cover it tightly with plastic wrap or aluminum foil. You can also transfer it to an airtight container. Proper storage helps maintain flavor and texture. Store it in the fridge for up to four days. Reheat your casserole in the oven for the best results. Preheat your oven to 350°F (175°C). Place the casserole in an oven-safe dish. Cover it with foil to prevent it from drying out. Heat for about 20-25 minutes until it's warm throughout. You can also use the microwave if you're short on time. Just heat it in 1-minute intervals, stirring in between until hot. You can freeze Fajita Chicken Casserole for later use. To freeze, let it cool completely. Then, wrap it tightly with plastic wrap and foil or store it in a freezer-safe container. It can last up to three months in the freezer. When ready to eat, thaw it in the fridge overnight before reheating. This keeps it tasty and fresh. You can serve this casserole with many sides. I like to add sour cream and guacamole. You can also use tortilla chips for a crunchy touch. Fresh salsa pairs nicely too. A simple green salad adds freshness. You can even serve it with rice or beans for more heartiness. Yes, you can use whole wheat tortillas! They add a nice flavor and extra fiber. The texture is slightly different, but it works well. Just cut them into strips like flour tortillas. This choice makes the dish healthier while still being tasty. To spice it up, use hot salsa instead of mild. You can also add sliced jalapeños to the mix. For added heat, sprinkle in some cayenne pepper. Another option is to use pepper jack cheese instead of cheddar. Start with small amounts, then taste as you go! This casserole is not gluten-free as it contains flour tortillas. However, you can easily make it gluten-free. Just switch to corn tortillas instead. Make sure to check the labels on other ingredients too, like salsa and beans. When stored properly, the casserole lasts about 3-4 days in the fridge. Make sure to cover it tightly. If you want to keep it longer, you can freeze it. Just thaw it before reheating for the best taste. This blog post covered the key ingredients for a tasty Fajita Chicken Casserole and gave step-by-step instructions for cooking. I shared tips for choosing fresh produce and how to make the dish ahead of time. You can adjust flavors and explore variations to match your taste. Remember to store leftovers properly for the best taste. With these insights, you can create a delicious meal that fits your needs. Enjoy making this casserole and impressing your family and friends!

Fajita Chicken Casserole Simple Family Dinner Delight

- 8 oz rice noodles - 1 tablespoon sesame oil - 1 cup bell peppers (a mix of red, yellow, and green), thinly sliced - 1 cup snap peas, trimmed - 1 medium carrot, peeled and julienned - 3 tablespoons soy sauce (or tamari for gluten-free options) - 1 tablespoon rice vinegar - 1 tablespoon honey or maple syrup (to taste) - 1 tablespoon sesame seeds (toasted for extra flavor) - Fresh cilantro, loosely chopped, for garnish - 2 green onions, finely chopped To cook the rice noodles, first, boil water in a large pot. Add the noodles when the water bubbles. Cook them for about 4-6 minutes, checking for doneness. You want them al dente, not mushy. Once done, drain the noodles. Rinse them under cold water to stop cooking. This helps keep them firm and tasty. Heat a large skillet or wok over medium-high heat. Pour in one tablespoon of sesame oil. Let it warm up for a moment. Next, toss in thinly sliced bell peppers, snap peas, and julienned carrot. Stir-fry these colorful veggies for about 3-4 minutes. You want them tender-crisp, so they stay bright and crunchy. In a small bowl, mix together the grated ginger, soy sauce, rice vinegar, and honey or maple syrup. Use a whisk to blend everything until it’s smooth. Taste the sauce. If you want it sweeter, add more honey or syrup. Adjust the flavor to fit your liking. Add the rinsed noodles to the skillet with the sautéed veggies. Then pour the sauce over the noodles. Gently toss everything together for around 2 minutes. Make sure the noodles get an even coating of sauce and heat through. This makes each bite flavorful. Take the skillet off the heat. Fold in chopped green onions and toasted sesame seeds. Season with salt and pepper. Remember, the soy sauce adds some saltiness, so be careful not to overdo it. Finally, dish out the noodle bowl and top with fresh cilantro for a pop of flavor and color. - Cooking Tips for Rice Noodles: Start by bringing water to a boil. Add the rice noodles and cook for 4-6 minutes. Keep an eye on them; you want them tender, not mushy. Drain and rinse them with cold water to stop cooking. This keeps them from clumping together. - Best Practices for Stir-Frying Vegetables: Heat your skillet or wok to medium-high. Add sesame oil first, then toss in your veggies. Stir-fry for about 3-4 minutes. This keeps them crisp and colorful. You want them tender but still bright. - Customizing Sweetness with Honey or Maple Syrup: Use honey or maple syrup to add sweetness to your dish. Start with one tablespoon and taste. You can always add more if you want it sweeter. Adjusting it helps you find the right balance for your taste. - Optional Spices to Add Depth: Try adding red pepper flakes for heat or garlic powder for a savory kick. These spices can transform the dish and make it more exciting. A little goes a long way, so start small. - Serving Ideas: Serve the noodle bowl in deep bowls for a cozy feel. Add lime wedges on the side for a burst of brightness. It’s a nice touch when your guests can squeeze fresh lime over their dish. - Ways to Enhance Visual Appeal: Top your bowls with extra cilantro and sesame seeds. This adds color and texture. A sprinkle of chili flakes can also give a pop of color and a hint of spice. You want each bowl to look as good as it tastes! {{image_4}} You can switch rice noodles for other types. Try egg noodles or whole wheat noodles. For a gluten-free option, use rice noodles or quinoa noodles. Each type brings its own flavor and texture. Experiment to find your favorite! Feel free to use seasonal vegetables. Try zucchini, broccoli, or bok choy for a fresh twist. You can mix colors to make your dish vibrant. Think bright yellows, greens, and reds for a feast for the eyes. Adding protein makes this dish heartier. Chicken, shrimp, or tofu all work well. For chicken, cook it in the skillet first. If using shrimp, add it just before the noodles. For tofu, sauté it until golden. Each protein offers a different taste and texture. To store your sesame ginger noodle bowl, place it in a sealed container. Refrigerate it within two hours of cooking. This keeps the noodles fresh and safe to eat. The dish lasts for about 3 to 4 days in the fridge. After that, the noodles may become mushy. To reheat, use a microwave or a skillet. If using a microwave, heat on low power to avoid overcooking. Stir the noodles every minute for even heat. If using a skillet, add a splash of water or broth. This helps keep the noodles moist. Avoid high heat to prevent sogginess. You can freeze the noodle bowl for longer storage. Place it in an airtight container. It can last up to 3 months in the freezer. When ready to eat, thaw it in the fridge overnight. Reheat slowly in a skillet, adding a bit of water if needed. Enjoy your delicious meal again! To cook rice noodles, start by boiling water in a large pot. Add the noodles when the water is rolling. Cook according to the package, usually 4-6 minutes. Check for doneness; they should be al dente. Drain the noodles and rinse them under cold water. This stops the cooking and keeps them from sticking. Yes, you can mix it up! Broccoli, zucchini, or even mushrooms work well. Try adding bok choy for a unique flavor. Use seasonal veggies for freshness. Just cut them thin so they cook quickly. Absolutely! This dish is a great choice for meal prep. Cook the noodles and veggies ahead. Store them in airtight containers in the fridge. When ready to eat, just heat and add the sauce. This keeps the flavors fresh and tasty. This noodle bowl pairs well with many sides. Try a simple cucumber salad for a fresh crunch. You can also serve spring rolls for extra fun. A light soup can be a nice touch too. Enjoy experimenting with different sides! This blog post outlined the process to make a delicious sesame ginger noodle bowl. You learned about key ingredients, cooking techniques, and tips for perfecting your dish. I shared ways to customize flavors and adapt the recipe to your tastes. Keep these methods in mind as you create your noodle bowl. Enjoy experimenting and sharing your tasty results with others. Happy cooking!

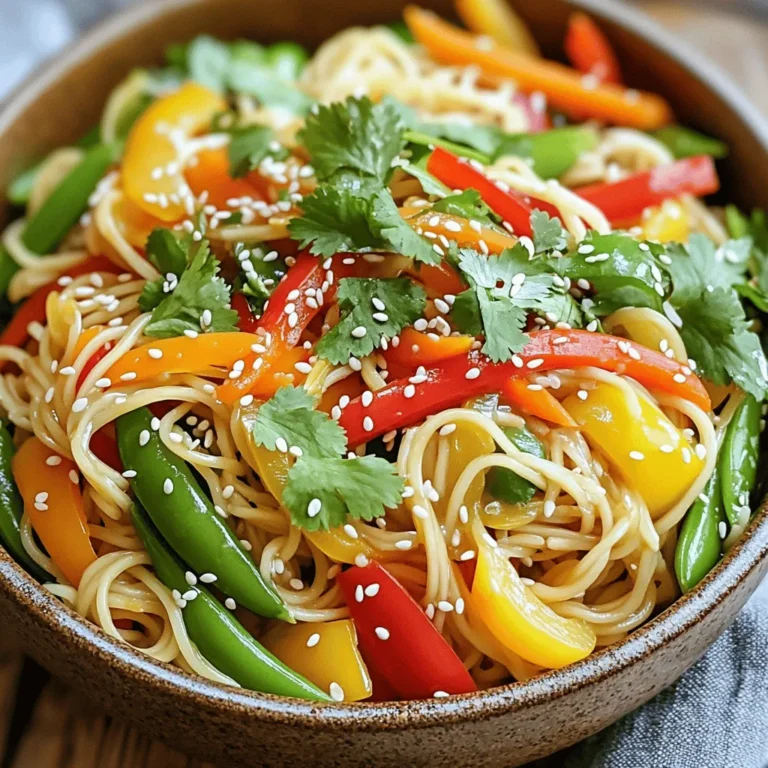
Savory Sesame Ginger Noodle Bowl Quick and Easy Recipe

- 1 loaf of challah bread, cubed - 2 cups fresh blueberries (or frozen, thawed) - 8 oz cream cheese, softened - 4 large eggs - 2 cups whole milk - 1/2 cup granulated sugar - 1 teaspoon pure vanilla extract - 1 teaspoon ground cinnamon - 1/4 teaspoon salt - Zest of 1 lemon Gather these ingredients to make your Blueberry Cheesecake French Toast Casserole. The main ingredients create a rich base. The challah bread gives the dish its fluffy texture. Fresh blueberries add a burst of sweetness. Cream cheese makes it creamy and decadent. Next, you need the additional ingredients. Four large eggs bind everything together. Whole milk adds moisture. Granulated sugar brings sweetness, while pure vanilla extract adds flavor. Don't forget the seasonings! Ground cinnamon gives warmth. A tiny bit of salt balances the sweetness. Lemon zest adds a bright note. These ingredients work together to create a delightful flavor. With these ingredients ready, you are set to create a fantastic dish. Enjoy the process and savor the flavors as you cook! - Preheat your oven to 350°F (175°C). - Grease a 9x13-inch baking dish. Use butter or cooking spray to prevent sticking. - In a large bowl, beat the cream cheese until smooth. This should take just a few minutes. - Add the eggs one at a time. Mix well after each egg goes in. - Next, pour in the milk, sugar, vanilla, cinnamon, salt, and lemon zest. Mix until everything is creamy and well combined. - Place the cubed challah bread in the greased baking dish. Spread it out evenly. - Gently fold in the blueberries. Make sure they are mixed well with the bread. - Now, pour the cream cheese mixture over the bread and blueberries. Ensure that all the bread cubes are coated. - Cover the dish tightly with aluminum foil. Chill it in the fridge for at least 30 minutes. For the best flavor, chill it overnight. - If you chilled it overnight, let it sit at room temperature for 15 minutes before baking. - Bake the casserole covered with foil for 30 minutes. After that, take off the foil and bake for another 15-20 minutes. Look for a golden top and make sure the center is set. A toothpick should come out clean. Using day-old challah bread makes a big difference. It absorbs all the creamy goodness better than fresh bread. This helps your casserole become rich and fluffy. Make sure the cream cheese is fully blended too. If it’s lumpy, the texture won’t be smooth. Use a whisk or a hand mixer to get it just right. Before you serve, dust the top with powdered sugar. It adds a nice touch and looks beautiful. A drizzle of maple syrup makes each bite even tastier. You can also add fresh blueberries on top for a pop of color. Keep an eye on your baking time. You want it golden brown, not burnt. After baking, let the casserole sit for a few minutes. This helps it set and makes it easier to cut into squares. Enjoy the lovely smell while you wait! {{image_4}} You can have fun with the fruit in this casserole. If you want a twist, swap blueberries for strawberries or raspberries. Each fruit brings its unique taste. Strawberries add a sweet and juicy vibe, while raspberries give a nice tart flavor. You could also mix berries together for a colorful and tasty dish. A mixed berry casserole is a feast for both the eyes and the palate. To make your casserole even better, think about adding chocolate chips. They melt into the dish, giving it a sweet touch. You can also try using vanilla bean instead of vanilla extract. This small change adds a rich layer of flavor that makes the dish feel gourmet. Little tweaks like these can turn a simple recipe into a crowd-pleaser. If you need a dairy-free option, almond milk works great in this recipe. It keeps the creamy texture without dairy. For those who are gluten-sensitive, use gluten-free bread instead of challah. This way, everyone can enjoy this delicious casserole without worry. With these easy swaps, you can cater to many different diets while keeping the flavors intact. To keep your Blueberry Cheesecake French Toast Casserole fresh, refrigerate it in an airtight container. It will stay good for up to 3 days. When you are ready to enjoy it again, simply reheat it in the microwave or oven. This keeps the flavors strong and the texture nice. If you want to save some for later, freeze the casserole before baking it. Wrap it tightly in plastic wrap or foil. This will keep it safe from freezer burn. When you are ready to bake, thaw it overnight in the fridge. This helps the casserole cook evenly. When reheating your casserole, cover it with foil. This prevents it from drying out. Set your oven to 350°F and reheat until it is warmed through. This way, every bite stays moist and delicious. Yes, it's best to chill overnight for optimal flavor. By letting it sit, the bread absorbs the creamy mix. This makes each bite rich and flavorful. If you prepare it the night before, you save time in the morning. You can wake up to a warm, delicious breakfast ready to bake! Yes, brioche or croissants are good alternatives. Both options add their own unique taste and texture. Brioche is soft and slightly sweet, while croissants add a flaky touch. You can mix and match or stick to your favorite. Experimenting with bread types can make your casserole even more exciting! The top should be golden brown, and a toothpick should come out clean from the center. This shows that the eggs are fully cooked. If the top is golden yet the center is wet, it needs more time. Keep an eye on it to achieve that perfect bake! This blog post laid out a simple, tasty recipe for blueberry challah casserole. You learned the key ingredients, step-by-step prep, and some clever tips. This dish shines with its creamy texture and sweet blueberries. By following these steps, you can impress anyone at your next meal. Remember, you can make variations to suit any taste. Now, gather your ingredients, start baking, and enjoy your delicious casserole creation!

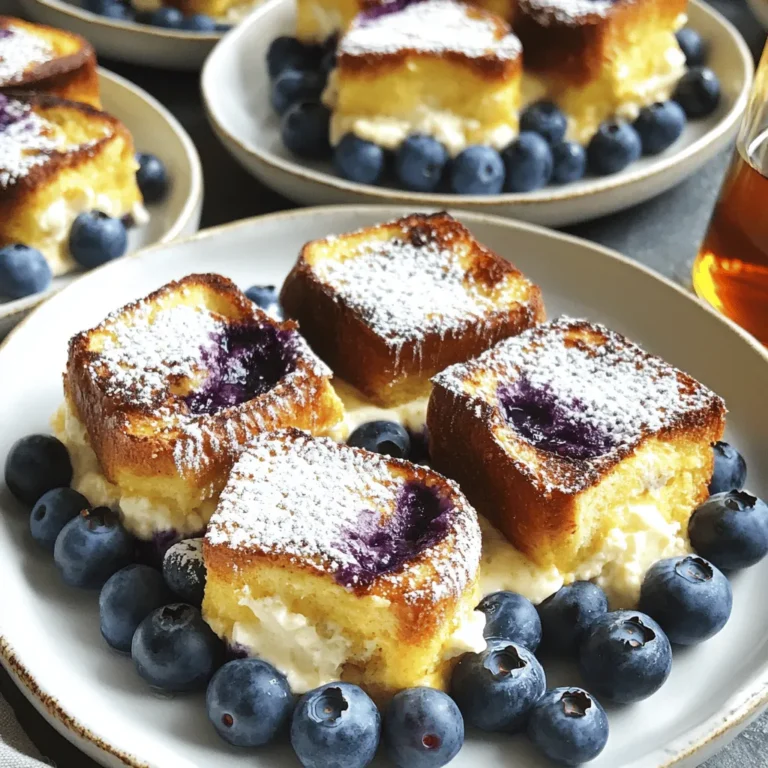
Blueberry Cheesecake French Toast Casserole Delight

To make Biscoff cookie butter truffles, you need: - 1 cup Biscoff cookie butter - 1 cup crushed Biscoff cookies (plus extra for rolling) - 1 cup white chocolate chips - 1 tablespoon coconut oil (or vegetable oil) - A pinch of sea salt These main ingredients create a tasty mix. The cookie butter gives a creamy base. The crushed cookies add a nice crunch. The white chocolate brings sweetness and a smooth finish. You can make these truffles even better with add-ins: - 2 tablespoons finely chopped nuts (hazelnuts or almonds) These nuts add texture and flavor. Feel free to skip them if you prefer a smoother truffle. You can also try adding spices like cinnamon for extra warmth. Using good quality ingredients makes a big difference. Choose a creamy Biscoff cookie butter with no added oils or fillers. Look for white chocolate chips that melt well. Premium chocolate gives a rich taste. For the best crunch, use fresh Biscoff cookies. They should be crisp and not stale. {{ingredient_image_2}} To start, get a large mixing bowl. Add 1 cup of Biscoff cookie butter and 1 cup of crushed Biscoff cookies. Mix these together using a spatula or your hands. You want it to have a thick, dough-like feel. If it feels too sticky, don’t worry! This mixture will be perfect after chilling. Once your mixture is ready, cover the bowl with plastic wrap. Place it in the fridge for about 30 minutes. This helps the mixture firm up. After it chills, take it out and scoop small portions, about 1 inch across. Roll these between your palms to shape smooth balls. Place the truffles on a baking sheet lined with parchment paper. This keeps them from sticking. Now, it’s time to melt the chocolate. In a microwave-safe bowl, combine 1 cup of white chocolate chips and 1 tablespoon of coconut oil. Heat them in the microwave in 30-second bursts. Stir after each interval until the chocolate is fully melted and smooth. Now dip each truffle into the melted chocolate. Make sure they are well coated. Let any extra chocolate drip off before rolling them in crushed Biscoff cookies or chopped nuts. Place them back on the baking sheet. Let the truffles harden either at room temperature or in the fridge for 15-20 minutes. For a fun touch, drizzle more melted chocolate over the top after they set. Enjoy your tasty truffles! To get the right texture for your truffles, start with room temperature Biscoff cookie butter. This makes mixing easier. Combine it with crushed Biscoff cookies until you have a thick dough. Chill the mixture for about 30 minutes. Chilling helps the dough firm up. It will be easier to roll into balls. Use your hands to shape the truffles. Roll them gently to keep them smooth. Avoid pressing too hard. This will help maintain the soft center. Keep your truffles fresh by storing them in an airtight container. Place a layer of parchment paper between each layer. This will prevent them from sticking together. Store them in the fridge for up to two weeks. If you want to keep them longer, freeze them. Use a freezer-safe container or bag. They can stay in the freezer for up to three months. Just remember to thaw them in the fridge before serving. Presentation makes a big difference! Arrange the truffles in a pretty box or on a cake stand. You can add extra crushed Biscoff cookies on top for a nice look. Sprinkle a bit of sea salt for a gourmet touch. For gifts, wrap them in clear cellophane and tie with a ribbon. This adds a nice personal touch. You can also drizzle more melted white chocolate over the top for extra flair. Let it set before serving. These simple ideas will impress your friends and family! Pro Tips Chill for Best Results: Chilling the truffle mixture is crucial for easier rolling. If the mixture feels too sticky, return it to the fridge for a few more minutes. Perfect Chocolate Coating: Make sure the white chocolate is fully melted and smooth before dipping. This ensures a beautiful and even coating on each truffle. Experiment with Flavors: Feel free to add different flavorings to the truffle mixture, such as vanilla extract or a pinch of cinnamon, for a unique twist on the classic recipe. Storage Tips: Store the truffles in an airtight container in the refrigerator for up to two weeks. They can also be frozen for longer storage—just allow them to thaw in the fridge before serving. {{image_4}} You can change the flavor of your Biscoff cookie butter truffles by using different types of chocolate. Dark chocolate gives a rich taste. Milk chocolate adds creaminess. Each type creates a unique treat. Choose what you like best! You can also mix chocolates for a fun twist. Melt them just like white chocolate, and dip the truffles. If you want nut-free truffles, skip the nuts in the recipe. The texture stays creamy and smooth without them. You can use crushed Biscoff cookies for the coating. This keeps the truffles safe for those with nut allergies. They will still be delicious and crunchy! Mixing other flavors into your truffles can heighten their taste. Adding a little coffee can give a great kick. Just blend in one tablespoon of instant coffee to the cookie butter mix. If you're a caramel lover, try drizzling caramel on top of the truffles. It adds a sweet surprise! You can also use caramel-flavored chocolate to coat your truffles. The options are endless! To keep your Biscoff cookie butter truffles fresh, store them in an airtight container. Place parchment paper between layers to prevent sticking. This method helps maintain their shape and flavor. Keep the container in a cool, dry place away from sunlight. Avoid the fridge unless it’s very hot outside, as cold can change their texture. You can freeze these truffles for long-term storage. First, freeze them on a baking sheet for about an hour until firm. Once frozen, transfer them to a freezer-safe bag or container. Make sure to label the bag with the date. You can enjoy them for up to three months. When ready to indulge, let them thaw in the fridge or at room temperature. Biscoff cookie butter truffles last about one week in the pantry. If stored in the fridge, they can last up to two weeks. Freezing extends their shelf life to three months. Always check for any off smells or changes in texture before enjoying. With proper storage, you can savor these delightful treats over time. No, regular peanut butter won’t work the same. Biscoff cookie butter has a unique spice and flavor. It adds a rich taste that peanut butter lacks. If you want a similar taste, look for cookie butter brands. They mimic Biscoff's flavor and texture well. You can find Biscoff cookie butter at most grocery stores. Check the aisle with spreads or near the cookies. Online retailers like Amazon also sell it. For pre-made truffles, local bakeries or specialty stores may offer them. Some grocery chains sell them in their dessert sections. Yes, you can make these truffles ahead. They stay fresh for up to a week in the fridge. Just keep them in an airtight container. You can also freeze them for longer storage. Thaw them in the fridge before serving. Making Biscoff Cookie Butter Truffles is fun and easy. You gather good ingredients, mix them, and chill. These steps create a rich, tasty treat that you can enjoy or share. Remember to store your truffles well for freshness. You can also try different chocolates or flavors for something new. With these tips, you can make great truffles at home. Enjoy the cooking journey and the sweet results!

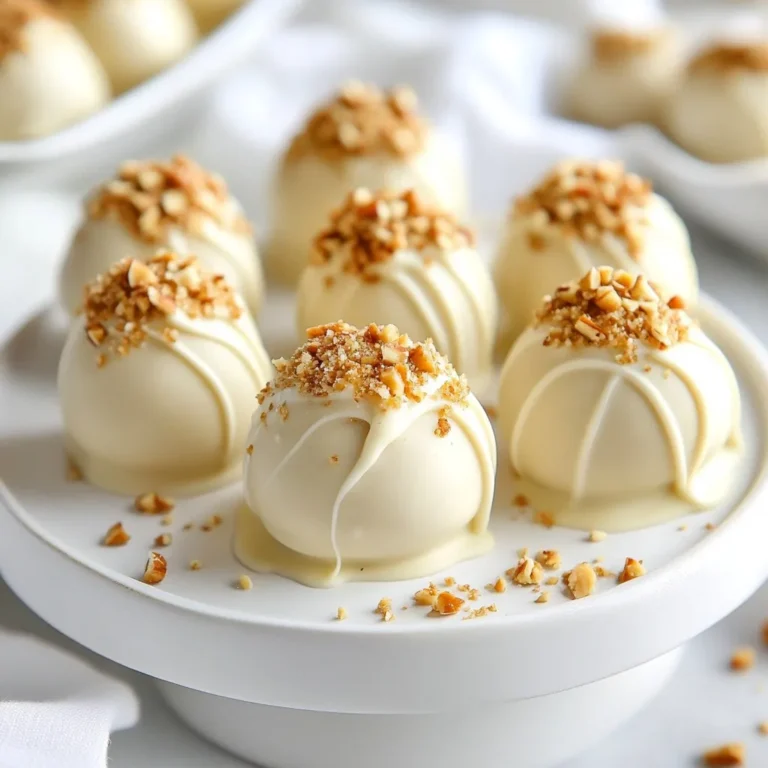
Biscoff Cookie Butter Truffles Irresistible Treats

To make these delightful scones, gather the following ingredients: - 2 cups all-purpose flour - 1/2 cup granulated sugar - 1 tablespoon baking powder - 1/2 teaspoon salt - 1/2 cup unsalted butter, cold and cubed - 1 cup fresh or dried cranberries - Zest of 1 large orange - 1/2 cup heavy cream - 1 egg, beaten (for egg wash) These items work together to create a perfect balance of sweet and tart. You can modify some ingredients in this recipe. Here are a few ideas: - Use whole wheat flour for a nuttier flavor. - Substitute brown sugar for a deeper sweetness. - Instead of heavy cream, try buttermilk for a lighter scone. - Use lemon zest if you want a different citrus flavor. These adjustments can add new layers to your scones. Each scone offers a delightful blend of flavors. Here’s a simple breakdown: - Calories: Approximately 200 per scone - Protein: 3 grams - Carbohydrates: 28 grams - Fat: 10 grams - Fiber: 1 gram These scones are a tasty treat, perfect for breakfast or a snack. Enjoy your baking! {{ingredient_image_2}} First, set your oven to 400°F (200°C). This heat makes the scones rise nicely. Next, grab a baking sheet. Line it with parchment paper. This helps the scones not stick. In a large bowl, combine 2 cups of all-purpose flour, 1/2 cup of granulated sugar, 1 tablespoon of baking powder, and 1/2 teaspoon of salt. Use a whisk to mix them well. Make sure there are no lumps left. This mix is the base for our scones. Now, add 1/2 cup of cold, cubed butter to the flour mix. You can use a pastry cutter or your fingers. Mix until the butter looks like small pebbles. Next, fold in 1 cup of cranberries and the zest of 1 large orange. This adds a burst of flavor. Pour in 1/2 cup of heavy cream slowly. Use a spatula to stir until the dough forms. Don’t worry if it looks a bit dry. Turn the dough onto a floured surface. Gently knead it just a few times until it’s smooth. Shape it into a circle about 1-inch thick. Cut it into wedges or use a round cutter for fun shapes. Place the scones on your prepared baking sheet. Leave some space between each one. Brush the tops with a beaten egg for a golden finish. Bake them for 15-20 minutes. They’re done when they are golden-brown and a toothpick comes out clean. After baking, cool them slightly on a wire rack. Enjoy your delicious Cranberry Orange Scones! To make your cranberry orange scones light and flaky, start with cold butter. Cold butter creates pockets of air, making your scones rise. Use a pastry cutter or your fingers to mix. Aim for pea-sized pieces. This helps keep the texture just right. Mixing the dough gently is key. After adding the cream, use a spatula to combine. Stir just until the dough forms. Overmixing can make scones tough. It's okay if some dry bits remain. A few gentle kneads on a floured surface will bring it together. Serve your scones warm for the best taste. Place them on a lovely platter. Dust with powdered sugar for a sweet touch. Add fresh cranberries and orange slices for color. A side of clotted cream or butter makes for a delightful pairing. Enjoy with tea or coffee! Pro Tips Use Cold Butter: Ensure your butter is cold and cubed before mixing it into the dry ingredients. This helps create a flaky texture in the scones. Don’t Overmix: When combining the dough, mix just until it comes together. Overmixing can lead to tough scones. Experiment with Flavors: Feel free to add other ingredients like chocolate chips or nuts to customize your scones to your taste. Serve Warm: For the best flavor and texture, serve the scones warm from the oven, ideally with a spread of butter or cream cheese. {{image_4}} You can use either dried or fresh cranberries in your scones. Fresh cranberries give a bright, tart flavor. They also add moisture, which makes the scones fluffy. Dried cranberries are sweeter and chewier. They can make the scones a bit denser. You can even mix both for a fun texture and flavor combo. While orange zest shines in this recipe, you can try other citrus fruits. Lemon zest adds a fresh, zesty taste. Lime zest gives a more tropical touch. Grapefruit zest can create a unique twist. Each zest brings a new flavor dimension, so feel free to experiment! Nuts and chocolate can elevate your scones. Walnuts or pecans add a crunchy texture and nutty flavor. They pair well with the tart cranberries. Dark chocolate chips add sweetness and richness. You can mix and match these additions to suit your taste. Just make sure they don’t overpower the cranberry and orange flavors! To keep your scones fresh, store them in an airtight container. You can also wrap them tightly in plastic wrap. Keep them at room temperature for up to two days. Avoid the fridge, as it can make them dry. If you want to keep them longer, try freezing instead. When you want to enjoy your scones again, reheating is key. Preheat your oven to 350°F (175°C). Place the scones on a baking sheet. Heat them for about 5 to 10 minutes. This method makes them warm and soft again. You can also use a microwave. Heat for about 15 to 20 seconds. But be careful not to overdo it, as they can become chewy. Freezing scones is a great way to save them for later. After they cool completely, wrap each scone in plastic wrap. Place them in a freezer-safe bag or box. This way, they last up to three months. When you’re ready to eat, thaw them overnight in the fridge. Then, reheat them in the oven for the best taste. Enjoy your fresh scones anytime! Yes, you can make Cranberry Orange Scones ahead of time. You can prepare the dough and shape it. Then, wrap the scones tightly in plastic wrap. Store them in the fridge for up to 24 hours. When you are ready to bake, just preheat your oven and bake as directed. This way, you can enjoy fresh scones quickly. If you need a substitute for heavy cream, you can use milk or half-and-half. For a thicker texture, mix equal parts of milk and plain yogurt. This will give a similar richness to your scones. You can also use almond milk or coconut cream for dairy-free options. Just remember that this might change the flavor a bit. To check if your scones are done, look for a golden-brown color on top. Insert a toothpick into the center of a scone. If it comes out clean, the scones are ready. The edges should feel firm but not hard. If they are still soft, give them a few more minutes in the oven. Enjoy the aroma while they bake! Cranberry orange scones are simple to make and great for any meal. You learned about the main ingredients, easy steps to bake, and useful tips for the best results. You also discovered tasty variations to try and how to store leftovers. Enjoy these scones fresh or save some for later. Each bite can bring a burst of flavor to your day. Now, get in the kitchen and bake some delicious scones!

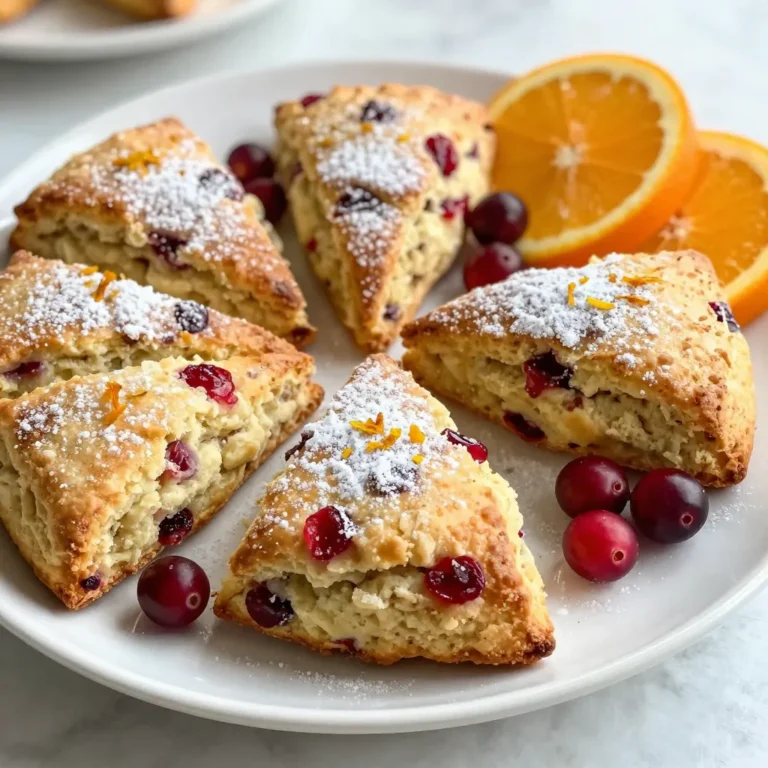
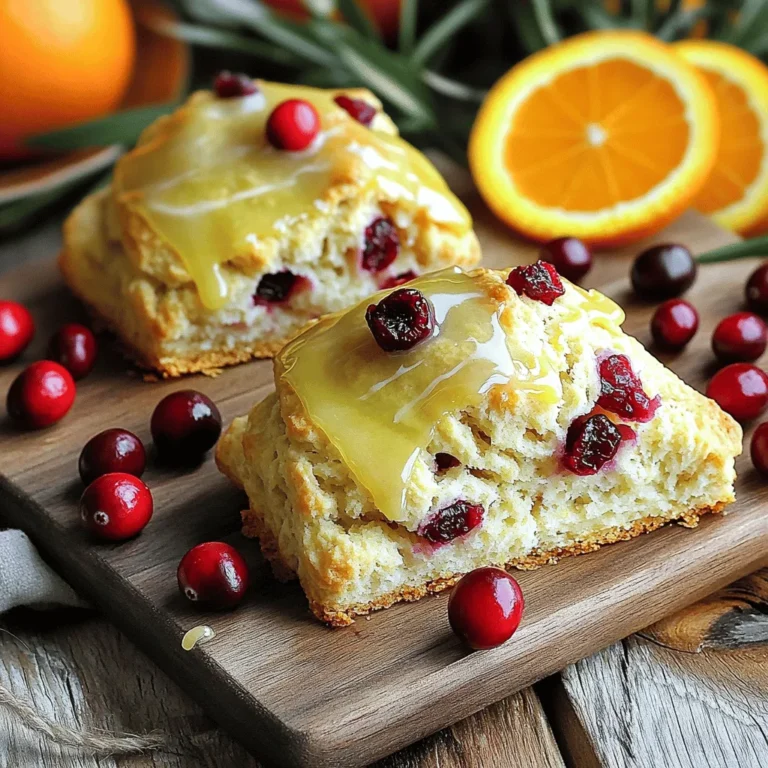
Cranberry Orange Scones Flavorful and Simple Recipe

To make roasted red pepper hummus, gather these key ingredients: - 1 can (15 oz) chickpeas, thoroughly drained and rinsed - 1 red bell pepper, roasted - 2 tablespoons tahini - 2 tablespoons extra virgin olive oil - 2 tablespoons freshly squeezed lemon juice - 1 clove of garlic, finely minced - 1/2 teaspoon ground cumin - Sea salt and freshly ground black pepper, to taste - Water, as needed - Fresh parsley, finely chopped, for garnish - Paprika, for garnish These ingredients work together to create a creamy and flavorful dip. Chickpeas are high in protein and fiber. They support good digestion and help you feel full. Red bell peppers are loaded with vitamin C and antioxidants. They add color and nutrition to the hummus. Tahini provides healthy fats and calcium. Olive oil is great for heart health. Garlic may boost your immune system. Each ingredient plays a role in making this dish not just tasty, but also nourishing. You can enhance your hummus with a few simple add-ins: - Lemon Zest: Adds a bright touch. - Spices: Try smoked paprika for a deeper flavor or cayenne for heat. - Herbs: Fresh basil or cilantro can add a unique twist. - Olives: Chopped olives can bring a salty kick. Experimenting with these options lets you customize your hummus to your taste. To roast a red bell pepper, preheat your oven to 450°F (230°C). Cut the pepper in half and remove the seeds and stem. Place the pepper cut-side down on a lined baking sheet. Roast it for about 20 to 25 minutes. Look for charred and blistered skin. Let the pepper cool before you peel off the skin. Set the flesh aside for your hummus. Use a powerful food processor for the best results. First, add the drained chickpeas, roasted red pepper, tahini, olive oil, lemon juice, minced garlic, and cumin into the processor. Pulse the mixture to combine. Then, blend on high speed until smooth. If it seems thick, add water one tablespoon at a time. Keep blending until you reach a creamy texture. Perfect hummus has a creamy, light feel. If your hummus is too thick, add water carefully. Blend well after each addition. Taste it before serving. Adjust the salt and pepper to your liking. This final step makes the flavors pop. For a beautiful finish, spoon the hummus into a bowl, smooth the top, and garnish with olive oil, paprika, and parsley. To make your hummus pop, use fresh ingredients. Fresh lemon juice and quality olive oil are key. The roasted red pepper adds a sweet, smoky taste. For an extra kick, try adding a pinch of cayenne pepper or smoked paprika. Blend everything well to ensure a creamy texture. You can also adjust the garlic to suit your taste. If you like a stronger flavor, add more garlic. Many people skip rinsing chickpeas. This can lead to a gritty texture. Always rinse them well before use. Another mistake is not blending long enough. Blend until smooth and creamy. If it seems thick, add water slowly. Avoid over seasoning; taste as you go. Lastly, don't forget to garnish! A little olive oil and fresh parsley can make a big difference. Store leftover hummus in an airtight container. It keeps well in the fridge for up to five days. Make sure to drizzle a bit of olive oil on top. This helps keep it fresh and tasty. If you freeze it, use a freezer-safe container. Thaw in the fridge overnight before serving. Always stir well after thawing to restore the texture. {{image_4}} To spice things up, add a kick! You can mix in some cayenne pepper or crushed red pepper flakes. Start with a pinch and taste. Adjust the heat to your liking. This variation adds warmth and depth to the hummus. It pairs well with pita chips or fresh veggies. Want a creamy, tangy twist? Add crumbled feta cheese to the mix. Just fold it into the finished hummus. The feta gives a rich flavor and creamy texture. It also adds a salty bite that complements the roasted red pepper. This version pairs nicely with olives and warm pita bread. This recipe is already vegan and gluten-free! Use chickpeas, tahini, and olive oil without worry. It’s perfect for all diets. If you're looking to make it even healthier, consider adding spinach or kale. They blend well and add extra nutrients without changing the taste. Enjoy with gluten-free crackers or fresh veggies. You can enjoy roasted red pepper hummus with many tasty dippers. Here are my favorites: - Warm pita bread - Fresh vegetable sticks (like carrots and cucumbers) - Crunchy crackers - Toasted pita chips These options add great flavors and textures. They also make your hummus fun to eat! Make your hummus stand out with a lovely presentation. Here are some tips: - Use a colorful bowl to serve the hummus. - Drizzle extra virgin olive oil on top. - Sprinkle paprika and parsley for color. - Arrange your dippers around the bowl for a fun display. This will make your dish look as good as it tastes! Roasted red pepper hummus is versatile. It pairs well with many meals. Here are some ideas: - Serve it as a spread on sandwiches. - Add it to a veggie platter for parties. - Use it as a dip for grilled meats. - Serve it alongside salads or grain bowls. These pairings enhance your meals and add delicious flavors! To make roasted red pepper hummus from scratch, you need simple ingredients. First, roast a red bell pepper. You can do this in your oven. Cut the pepper in half, remove seeds, and place it cut-side down on a baking sheet. Roast it for 20-25 minutes at 450°F (230°C) until the skin is charred. Let it cool, then peel off the skin. Next, add the roasted pepper and chickpeas to a food processor. Include tahini, olive oil, lemon juice, minced garlic, and cumin. Blend it all until smooth. If it’s too thick, add water slowly. Season with salt and pepper. Finally, serve it garnished with olive oil, paprika, and parsley. You can find pre-made roasted red pepper hummus in many grocery stores. Look in the refrigerated section, usually near other dips and spreads. Some popular brands make tasty options. You may also find it at health food stores or specialty markets. If you prefer local flavors, check if nearby shops make their own hummus. Hummus is not only delicious but also healthy. It contains chickpeas, which are a great source of protein and fiber. These nutrients can help keep you full and support digestion. Tahini adds healthy fats and minerals like calcium. Olive oil offers heart-healthy fats too. Hummus is low in calories, making it a smart snack choice. Plus, it’s rich in vitamins from the red pepper and garlic. Eating hummus can help you maintain a balanced diet. Homemade hummus usually lasts about 4-5 days in the fridge. Store it in an airtight container to keep it fresh. If you bought pre-made hummus, check the label for the expiration date. Once opened, it should also last about a week. If you notice any changes in smell or color, it's best to toss it. Enjoy your hummus while it's fresh for the best taste! In this post, we covered how to make roasted red pepper hummus from scratch. We explored the key ingredients, their nutritious benefits, and some fun add-ins for flavor. I shared step-by-step tips for roasting peppers and blending them for the perfect texture. We also discussed common mistakes and how to store leftovers. Finally, I shared exciting variations and serving suggestions. Homemade hummus is easy and fun. Enjoy making it your way!

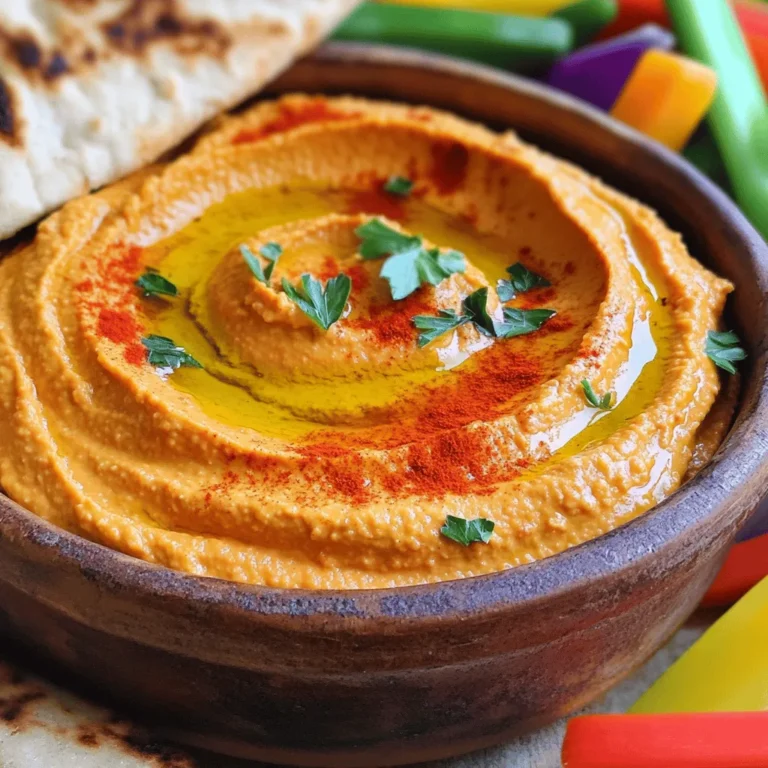
Roasted Red Pepper Hummus Flavorful and Easy Recipe

- 2 ripe avocados, halved, pitted, and flesh scooped out - 2 garlic cloves, finely minced - 1 tablespoon fresh lemon juice - 1/4 cup fresh basil leaves, tightly packed - 2 tablespoons extra virgin olive oil - Sea salt and freshly cracked black pepper, to taste - 8 oz spaghetti or any pasta of your choice - 1/4 cup grated Parmesan cheese (optional for garnishing) - Handful of cherry tomatoes, halved (for garnish) - Additional basil leaves for garnish Gathering fresh ingredients makes a big difference in flavor. Ripe avocados give the sauce a creamy texture. Look for ones that yield slightly to pressure. Garlic adds a nice kick, so use two cloves. Squeeze in fresh lemon juice to brighten the dish. Fresh basil leaves bring a lovely aroma and taste. A drizzle of extra virgin olive oil ties all flavors together. Use sea salt and black pepper to elevate the dish. For pasta, spaghetti works best, but feel free to choose your favorite type. Optional toppings like Parmesan cheese and cherry tomatoes add more flavor and color. The cheese adds a salty note, while tomatoes bring sweetness. Fresh basil leaves as a garnish make your dish pop! With the right ingredients, you can create a simple and hearty meal that will impress everyone. 1. Bring a large pot of salted water to a boil. 2. Add your favorite pasta, like spaghetti. Cook until al dente, usually 8-10 minutes. 3. Once cooked, drain the pasta but save about a cup of the pasta water for later. 1. In a food processor, add the scooped avocado flesh, minced garlic, lemon juice, and basil leaves. 2. Pour in the olive oil. 3. Blend everything until the mixture is smooth and creamy. Scrape down the sides to mix well. 1. Return the drained pasta to the pot over low heat. 2. Pour the creamy avocado sauce over the pasta. 3. Use tongs to toss the pasta gently, coating all the strands. 4. If you like, sprinkle grated Parmesan cheese on top and mix lightly for extra flavor. To make your sauce creamy, start with ripe avocados. If the sauce is too thick, add pasta water slowly. Blend until smooth and shiny. You want a silky texture that clings to the pasta. Use a food processor for the best results. Scrape the sides to blend evenly. For extra flavor, add a pinch of chili flakes or smoked paprika. Fresh herbs like parsley or chives work well too. If you love cheese, you can try using nutritional yeast as a vegan option. For garnish, consider adding roasted nuts or seeds for crunch. A sprinkle of lemon zest can brighten the dish. {{image_4}} To make your creamy avocado pasta vegan, skip the Parmesan cheese. You can use nutritional yeast instead. It adds a cheesy flavor without dairy. You can also boost the dish with more veggies. Try adding spinach or zucchini. Both will add nutrients and color. Toss in some peas for a sweet crunch. You can add protein to your pasta for a filling meal. Grilled chicken is a great choice. Simply slice it and mix it in with the pasta. Shrimp works well too. Sauté it in a pan with olive oil and garlic before adding it to the pasta. If you want a plant-based option, use beans. Chickpeas or black beans are tasty. They add fiber and protein to your dish. Both options make it heartier and more satisfying. To keep your creamy avocado pasta fresh, follow these tips: - Use airtight containers. Glass or plastic containers with tight lids work best. - Refrigerate within two hours. Store any leftovers in the fridge right away. - Avoid exposure to air. This helps prevent the avocado from browning. When it's time to reheat, keep these methods in mind: - Use the stovetop. Heat on low, stirring gently. Add a splash of reserved pasta water if needed. - Microwave with care. Place pasta in a bowl, cover it with a damp paper towel, and heat in short bursts. - Refresh flavors. Add a squeeze of lemon juice or a sprinkle of fresh herbs before serving. Yes, you can prepare creamy avocado pasta ahead. However, keep in mind that avocados can brown. To reduce browning, add lemon juice to the sauce. Store the sauce separately from the pasta. When ready to eat, mix them together. You can also warm it gently on the stove. If you can’t use avocados, try using cooked peas or silken tofu. Both options give a creamy texture. Blend them with lemon juice and garlic for flavor. Alternatively, you can use cashews soaked in water for a rich taste. Yes, creamy avocado pasta works well for meal prep. You can make the sauce and pasta separately. - Nutritional benefits of avocado in pasta: Avocados are full of healthy fats. They have vitamins like E and K. They also provide fiber, which is good for digestion. - Dietary restrictions considerations: For gluten-free options, use gluten-free pasta. This dish is versatile and fits many diets. Make it vegan by skipping the Parmesan cheese. Enjoy this meal without worry! You learned how to make a creamy avocado pasta with simple steps. Ripe avocados, garlic, lemon juice, and basil create a tasty sauce. Remember to cook your pasta to al dente for the best texture. You can add proteins or veggies for a boost. Store leftovers in airtight containers and reheat carefully. This dish is not just easy but also healthy. Enjoy this fresh meal any time!

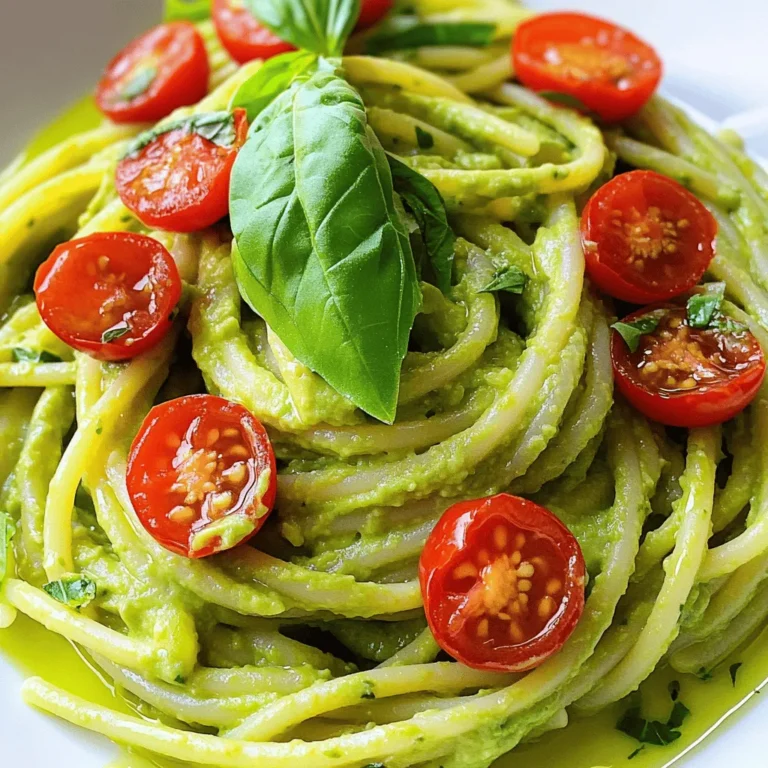
Creamy Avocado Pasta Hearty and Simple Delight

To make tasty cranberry orange scones, gather these simple ingredients: - 2 cups all-purpose flour - 1/3 cup granulated sugar - 1 tablespoon baking powder - 1/2 teaspoon salt - 1/2 cup unsalted butter, cold and cut into small cubes - 3/4 cup dried cranberries (or fresh, if preferred) - Zest of 1 medium-sized orange (about 1 tablespoon) - 1/2 cup buttermilk (homemade or store-bought) - 1 large egg, at room temperature - 1 teaspoon vanilla extract - Optional: 1/2 cup orange glaze made from powdered sugar mixed with fresh orange juice for drizzling Using the right ingredients is key. Fresh orange zest gives a bright flavor. Dried cranberries provide a sweet and tart contrast. Cold butter helps create a flaky texture. The buttermilk adds moisture and tenderness. If you want a sweet finish, you can make the glaze. Just mix powdered sugar with fresh orange juice. This glaze gives the scones a lovely shine and extra flavor. When you have all these ingredients ready, you can start baking. Each one plays an important role in making your scones delicious and memorable. 1. Preheat your oven to 400°F (200°C). This step is key for a good bake. 2. Line a baking sheet with parchment paper or a silicone mat. This helps with easy scone removal. 3. In a large bowl, mix together the all-purpose flour, granulated sugar, baking powder, and salt. Stir until everything blends well. 4. Cut the cold butter into small cubes. Add it to the flour mix. 5. Use your fingertips or a pastry cutter to mix the butter. You want the mix to look like coarse crumbs, with some pea-sized butter pieces. 6. Fold in the dried cranberries and orange zest. Make sure they are evenly spread throughout the mix. 7. In another bowl, whisk the buttermilk, egg, and vanilla extract. This mix adds moisture and flavor. 8. Pour the wet mix into the dry mix. Stir gently until just combined. Be careful not to overmix! 9. Lightly flour your work surface. Turn the dough out and pat it into a round disc, about 1-inch thick. 10. Cut the disc into 8 equal wedges using a sharp knife. Place the wedges on the baking sheet, leaving space between each. 11. Bake for 15-18 minutes. Check for doneness by inserting a toothpick into the center. It should come out clean. Cold butter is key for scones. It helps create a flaky texture. When you cut the butter into the flour, pieces should stay small. This forms layers as the scones bake. Use a pastry cutter or your fingers to mix. Avoiding overmixing is crucial. Mix just until you see no dry flour. Overmixing makes scones tough, and we want them soft and tender. To boost flavor, try adding spices. Cinnamon or nutmeg pairs well with cranberries. You can also add nuts for crunch. Chopped walnuts or pecans work nicely. For sweetness, consider a glaze. Mix powdered sugar with fresh orange juice. Drizzle this over warm scones. This adds a nice shine and extra sweetness. Serve the scones warm on a rustic wooden board. This makes them inviting. For a pop of color, garnish with fresh cranberries and orange slices. Pair these scones with tea or coffee. They complement each other perfectly. You can also serve them with butter or jam for a special touch. Enjoy your baking adventure! {{image_4}} You can switch out cranberries for other fruits. Dried cherries or blueberries work great. Fresh fruits like raspberries or diced apples also add a nice twist. You can mix in nuts, too. Try walnuts or pecans for a crunchy bite. If you want gluten-free scones, use a gluten-free flour blend. Look for one that has xanthan gum in it. For a vegan version, replace the butter with coconut oil and use a flax egg instead of a regular egg. Almond milk is a good stand-in for buttermilk. Adding spices makes scones festive. Cinnamon and nutmeg bring warmth in colder months. For Thanksgiving, consider using pumpkin puree in place of some buttermilk. You can also add a pinch of nutmeg for a holiday feel. Each of these twists brings new flavors to your table. Store your scones at room temperature. Use an airtight container to keep them fresh. Place parchment paper between layers to avoid sticking. They will stay good for up to two days this way. If you want to keep them longer, refrigerate them. Wrap each scone in plastic wrap. Then, place them in a container. This method helps prevent them from drying out. To freeze scones, let them cool completely first. Wrap each one in plastic wrap tightly. Then, place them in a freezer bag and seal it. You can freeze them for up to three months. When you're ready to enjoy them, simply take out a scone. Let it thaw in the fridge overnight or at room temperature for a few hours. The best way to reheat scones is in the oven. Preheat your oven to 350°F (175°C). Place the scone on a baking sheet. Heat for about 10 minutes, until warm. If you want a quick option, use the microwave. Heat the scone for about 15-20 seconds. However, the oven gives a better texture. Enjoy your leftovers warm for the best taste! Can I use fresh cranberries instead of dried? Yes, you can use fresh cranberries. They will add a nice tartness to the scones. Just chop them slightly to help them mix well. How do I know when scones are done baking? Check for a light golden color on top. Insert a toothpick into the center. If it comes out clean, the scones are done. What can I substitute for buttermilk? You can mix milk with vinegar or lemon juice. Let it sit for five minutes before using. This will give you a similar acidity. What to do if my dough is too dry or too wet? If too dry, add a little more buttermilk, one tablespoon at a time. If too wet, sprinkle in a bit of flour until it feels right. How can I make my scones fluffier? Make sure to use cold butter and avoid overmixing. This keeps the butter pieces intact, which helps create a fluffy texture. Can I use whole wheat flour? Yes, you can use whole wheat flour. However, it may make the scones denser. You can mix it with all-purpose flour for a lighter texture. What can I use instead of eggs? You can use a flaxseed meal or unsweetened applesauce. For one egg, mix one tablespoon of flaxseed meal with three tablespoons of water. Let it sit for five minutes. Cranberry orange scones are a delightful treat to bake and enjoy. We covered the key ingredients, step-by-step instructions, and tips for perfect texture and flavor. You can even explore variations based on your dietary needs and seasonal ingredients. Storing and reheating are simple, so your scones stay fresh. Now, with this guide, you can confidently create these scones. I hope you enjoy the process and flavor as much as I do!

Cranberry Orange Scones Perfect for Any Occasion

To make Protein Packed Egg Muffins, you need some simple, healthy ingredients. Here’s the list: - 6 large eggs - 1/2 cup cottage cheese - 1/2 cup fresh spinach, finely chopped - 1/4 cup bell pepper, diced - 1/4 cup onion, finely chopped - 1/2 cup cooked chicken, shredded - 1/4 teaspoon garlic powder - 1/4 teaspoon freshly ground black pepper - 1/4 teaspoon salt - 1/2 cup shredded cheese These ingredients combine to create a tasty and nutritious meal. The eggs provide protein, while the cottage cheese adds creaminess. Spinach and bell pepper give color and vitamins. Chicken adds more protein, making this a filling dish. You can even switch out chicken for turkey or tofu for a different flavor. I love using fresh ingredients. They enhance the taste and nutrition of the muffins. Plus, you can choose your favorite cheese, like cheddar or feta. This flexibility allows you to be creative and make it your own. Enjoy the process of gathering these ingredients; it’s the first step to a delicious meal! First, preheat your oven to 350°F (175°C). This step ensures your muffins cook evenly. Next, grease your muffin tin with cooking spray. You can also use muffin liners to make removal easy. In a medium bowl, crack 6 large eggs. Add 1/2 cup of cottage cheese and whisk them together until smooth. This mixture will give your muffins a creamy texture. Now, gently fold in 1/2 cup of finely chopped spinach, 1/4 cup of diced bell pepper, and 1/4 cup of finely chopped onion. Add 1/2 cup of shredded chicken, 1/4 teaspoon of garlic powder, 1/4 teaspoon of black pepper, and 1/4 teaspoon of salt. Stir carefully to combine everything. If you like cheese, fold in 1/2 cup of your choice, like cheddar or feta. Now, pour the egg mixture into each muffin cup. Fill them about three-quarters full. This allows them to rise while baking. Place the muffin tin in the preheated oven. Bake for 20 to 25 minutes. To check if they are done, use a toothpick. Insert it into the center of a muffin. If it comes out clean, your muffins are ready! Let them cool in the pan for about 5 minutes before moving them to a wire rack. To make your egg muffins truly shine, start with even mixing. This step ensures each muffin has the same great taste. Use a whisk to blend the eggs and cottage cheese well. Afterward, gently fold in the veggies and chicken. This keeps your mix light and fluffy. Be careful not to overfill the muffin cups. Fill them about three-quarters full. This allows space for rising as they bake. If you fill them too much, they might overflow and create a mess in your oven. Garnishing your muffins adds a fresh touch. I love using herbs like parsley or chives. They give a pop of color and flavor. For a tasty twist, serve the muffins with salsa or avocado slices. The creaminess of avocado pairs well with the muffins. Using the right kitchen tools makes a big difference. You’ll need a muffin tin, a whisk, and a mixing bowl. Quality ingredients also matter. Use fresh eggs, cheese, and veggies for the best flavor. This simple choice will elevate your dish and make it even more delicious. {{image_4}} You can change the protein in these muffins easily. Instead of chicken, you can use turkey. Ground turkey works well. It offers a lean option with a similar flavor. You can also try tofu for a plant-based choice. Firm tofu crumbles well and soaks up flavors. When it comes to cheese, there are many options. Sharp cheddar gives a strong taste. Feta cheese brings a tangy twist. You can even use mozzarella for a milder flavor. Try mixing different cheeses for fun combinations. Adding veggies can boost flavor and nutrition. Use seasonal vegetables like zucchini or cherry tomatoes. These add color and taste. You can also try mushrooms or broccoli for a hearty touch. For the best flavor, sauté your veggies first. This softens them and brings out their sweetness. Mixing in herbs like basil or thyme can elevate your muffins too. Making these muffins gluten-free is simple. Just ensure your cheese and other ingredients are gluten-free. You can use gluten-free bread crumbs for added texture if you like. For vegan options, replace eggs with a mixture of flaxseed and water. Use plant-based cheese or skip it altogether. You can also add chickpeas or lentils for protein. This keeps your muffins tasty and filling. To keep your protein-packed egg muffins fresh, store them in the fridge. Place the muffins in an airtight container. They will stay good for up to five days. If you want to keep them longer, freezing is a great option. Wrap each muffin in plastic wrap and place them in a freezer bag. This way, they will last for up to three months. When it's time to enjoy your muffins again, reheating them is easy. I recommend using the oven for the best texture. Preheat your oven to 350°F (175°C). Place the muffins on a baking sheet and heat for about 10-15 minutes. This helps them become warm and fluffy again. If you use a microwave, heat them for about 30 seconds. To keep them moist, cover them with a damp paper towel while microwaving. This keeps the muffins from drying out. Enjoy your tasty, protein-packed muffins any time! Protein-packed egg muffins last about 4-5 days in the fridge. Store them in an airtight container to keep them fresh. If you freeze them, they can last up to 3 months. Just let them cool completely before freezing. When you're ready to eat, thaw them in the fridge overnight. Yes, you can make this recipe ahead of time. Prepare a batch on the weekend for quick breakfasts during the week. Just store them in the fridge and reheat when needed. You can also freeze the muffins for later use. This makes meal prep easy and saves time. Absolutely! You can change the spices and veggies to suit your taste. Try adding herbs like thyme or basil for extra flavor. You can also mix in different cheese, like feta or mozzarella. For a spicier kick, add diced jalapeños or a dash of hot sauce. Egg muffins are a great source of protein, which helps build and repair muscles. They also contain vitamins and minerals from the veggies. Eating high-protein breakfasts can keep you full longer, which may help with weight management. Plus, they are low in carbs if you watch your carb intake. Yes! You can use dairy-free cheese or omit it altogether. Instead of cottage cheese, try using silken tofu blended until smooth. This keeps the muffins moist and adds protein. Always check labels to ensure your substitutes are dairy-free. Enjoy your tasty, dairy-free egg muffins! Egg muffins are a tasty, healthy choice for breakfast. We covered the key ingredients, mixing steps, and baking tips. I offered ideas for different proteins and veggies. You can store leftovers well and reheat them easily. These muffins fit many diets, making them great for meal prep. Enjoy experimenting with flavors and make them your own! This easy recipe will keep your mornings bright and nutritious.

Protein Packed Egg Muffins Easy and Healthy Recipe

PREV 1 … 19 20 21 … 47 NEXT
snack joy kitchen

explore

DessertsDinnerAppetizersDrinks

Our Policies

  • Cookie Policy
  • Copyright Policy
  • Disclaimer
  • GDPR Policy
  • Terms Of Use
Back to Top
  • About
  • Contact Us
  • Privacy Policy
© 2026 snack joy kitchen