FREE DINNER EBOOK! Get your copy!
  • Cookie Policy
  • GDPR Policy
  • Disclaimer
  • Terms Of Use
  • Visit my other site: Fun Cookie Recipes
snack joy kitchen
  • Home
  • Dinner
  • Desserts
  • Drinks
  • Appetizers
  • Contact
  • About
  • Privacy Policy
  • Home
  • Dinner
  • Desserts
  • Drinks
  • Appetizers
  • Contact
  • About
  • Privacy Policy
  • Cookie Policy
  • GDPR Policy
  • Disclaimer
  • Terms Of Use
Visit my other site: Fun Cookie Recipes

HOME / CATEGORIES /

Latest

- 4 boneless, skinless chicken breasts - 1 lb Brussels sprouts, halved - 1 cup cherry tomatoes, halved - 1/4 cup balsamic vinegar - 2 tablespoons olive oil - 2 tablespoons honey - 1 teaspoon garlic powder - 1 teaspoon onion powder - Salt and freshly ground black pepper to taste - Fresh basil leaves, for garnish - Calories: 350 - Protein: 30g - Carbohydrates: 20g - Fats: 15g - Fiber: 4g - Sugar: 6g If you're missing an ingredient, don't worry! Here are some easy swaps: - Use chicken thighs instead of breasts for a juicier bite. - Replace Brussels sprouts with green beans for a different texture. - Swap cherry tomatoes with diced bell peppers for added sweetness. - Use maple syrup instead of honey for a vegan option. - Try apple cider vinegar in place of balsamic vinegar for a tangy twist. Feel free to mix and match based on what you have at home! First, preheat your oven to 400°F (200°C). This helps cook the food evenly. While the oven heats, make the glaze. In a small bowl, mix 1/4 cup balsamic vinegar, 2 tablespoons olive oil, and 2 tablespoons honey. Add 1 teaspoon garlic powder and 1 teaspoon onion powder. Season with salt and pepper. Whisk until smooth and fragrant. Next, take 4 boneless, skinless chicken breasts. Place them on a large sheet pan. Make sure to space them apart. Drizzle half of the balsamic glaze over the chicken. Use a brush or a spoon to coat each piece well. This adds flavor and gives a nice shine. Now, let’s prep the veggies. Halve 1 pound of Brussels sprouts and 1 cup of cherry tomatoes. In a separate bowl, toss the veggies with the remaining balsamic glaze. Ensure they are evenly coated. Arrange the Brussels sprouts and tomatoes around the chicken on the sheet pan. This makes the dish colorful and appealing. Place the sheet pan in the preheated oven. Roast everything for 25 to 30 minutes. The chicken needs to reach an internal temperature of 165°F (75°C). The Brussels sprouts should be tender and caramelized. Keep an eye on them for perfect results. Once the timer goes off, remove the pan from the oven. Let the chicken and veggies rest for about 5 minutes. This allows the juices to settle in the chicken. Finally, sprinkle fresh basil leaves over the dish. This adds color and a fresh smell. Serve it up and enjoy! To get juicy chicken, start with even-sized breasts. This helps them cook at the same rate. Use a meat thermometer to check the chicken's temperature. You want it to reach 165°F (75°C). After roasting, let the chicken rest for five minutes. This step keeps all the tasty juices inside. For Brussels sprouts that crunch, cut them in half. This gives more surface area for roasting. Toss them in oil and glaze well. Space them out on the pan. If they are too close, they will steam instead of roast. Roast until they are golden and tender. Want to boost flavor? Add fresh herbs like thyme or rosemary. You can also include garlic cloves for a stronger taste. A pinch of red pepper flakes adds a nice kick. Drizzle more balsamic glaze right before serving for extra richness. These simple tweaks make your dish pop! {{image_4}} You can switch the chicken for other proteins. Pork tenderloin works great here. It cooks well and absorbs the glaze nicely. You can also use tofu for a vegetarian dish. Press the tofu to remove excess water. This helps it soak up the flavors. Each protein brings a new twist to the dish. Feel free to get creative with your veggies. Carrots and bell peppers add sweetness and color. Broccoli or cauliflower can add a nice crunch. As the seasons change, so can your veggies. In summer, use zucchini or corn. In fall, think about adding squash or sweet potatoes. The options are endless! You can change the flavor with different herbs and spices. Fresh rosemary or thyme brightens the dish. A pinch of red pepper flakes adds heat. You could also try a splash of orange juice for a citrus twist. Experiment with these options to find your favorite combination. Each change can make your meal feel new and exciting. After enjoying your balsamic chicken and Brussels sprouts, let the leftovers cool down. Place them in an airtight container. This helps keep the flavors fresh. Store the container in the fridge. Your meal will last for about three days. Just make sure you don’t leave it out too long. To reheat, you can use the oven or the microwave. If using the oven, set it to 350°F (175°C). Place the chicken and veggies on a baking sheet. Heat for about 15-20 minutes, until warm. If using the microwave, place your meal on a microwave-safe plate. Heat in short bursts, about 1-2 minutes, checking often. This way, you keep the chicken juicy. You can freeze leftovers for later. Place the cooled chicken and veggies in a freezer-safe container. Be sure to use a layer of plastic wrap before sealing. This keeps out air and prevents freezer burn. The meal will last about three months in the freezer. When you’re ready to eat, thaw it in the fridge overnight before reheating. This method helps keep the texture nice. The chicken is done when it reaches an internal temperature of 165°F (75°C). Use a meat thermometer to check the thickest part of the chicken. If you don’t have a thermometer, cut into the chicken. The juices should run clear, not pink. It’s best to let the chicken rest for five minutes after roasting. This helps keep it juicy. Yes, you can use frozen Brussels sprouts. However, they may not get as crispy as fresh ones. If using frozen, let them thaw first. Pat them dry to remove excess moisture. This helps them roast better and stay flavorful. You can serve this dish with various sides. Here are some ideas: - Mashed potatoes - Quinoa or rice - A fresh green salad - Crusty bread These sides complement the flavors of the chicken and veggies well. Yes, this recipe is gluten-free. The ingredients used, such as chicken, Brussels sprouts, and balsamic vinegar, do not contain gluten. Always check labels for any added sauces or seasonings. This ensures they meet gluten-free standards. This article covered ingredients, preparation steps, and tips for a delicious dish. You learned how to roast chicken and Brussels sprouts, plus storage and serving advice. I shared various substitutions and variations, making this meal adaptable for your taste. Remember, cooking is fun and a chance to be creative. Use these guidelines to enjoy your time in the kitchen. Explore new flavors and make this recipe your own!

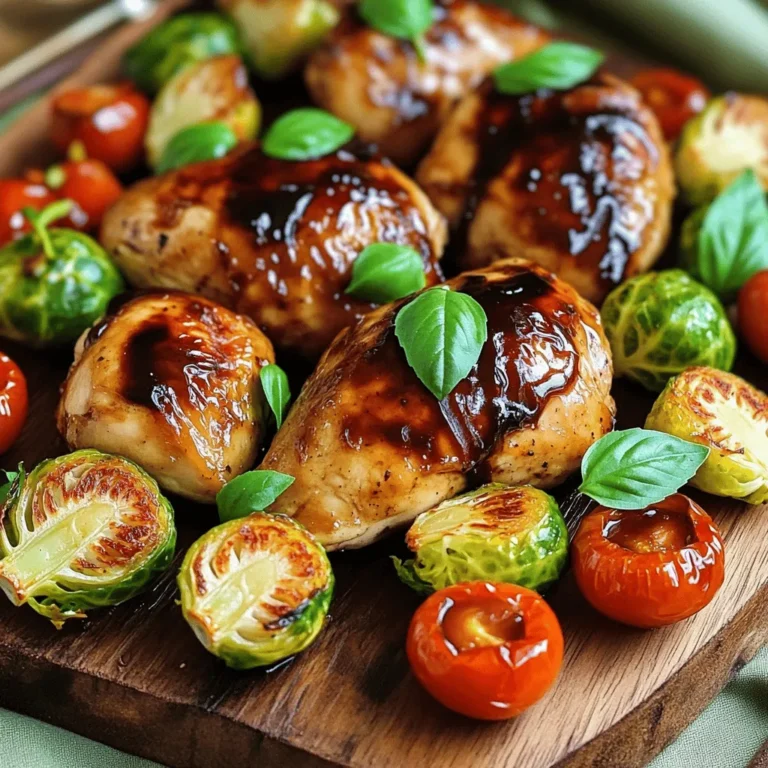
Balsamic Chicken & Brussels Sheet Pan Delightful Meal

For garlic butter chicken bites, you need: - 1 lb (450g) boneless, skinless chicken breasts, cut into bite-sized pieces - 4 tablespoons unsalted butter - 4 cloves of garlic, finely minced - 2 tablespoons fresh parsley, chopped - 1 teaspoon dried oregano - 1 teaspoon smoked paprika - Salt and freshly ground black pepper, to taste - Juice of 1 fresh lemon These ingredients create a rich flavor. The chicken absorbs the garlic and butter well. You can add more taste with: - 1/4 teaspoon red pepper flakes for a spicy kick This touch of heat brightens the dish. It’s not too spicy but adds depth. If you lack some ingredients, try these swaps: - Chicken breasts can be replaced with chicken thighs for juiciness. - Use olive oil instead of butter for a healthier option. - Replace fresh parsley with dried parsley if fresh isn’t available. - If you don’t have garlic, garlic powder works in a pinch. These substitutes keep the dish tasty. You still get great flavor even with changes. Start by cutting your chicken breasts into small pieces. This makes them easy to cook and eat. Place the chicken pieces in a large bowl. Add smoked paprika, dried oregano, salt, and pepper. Mix them well so each piece gets coated in spices. This step adds great flavor to our bites. Now, heat a large skillet over medium heat. Add the unsalted butter and let it melt. Once melted, add the minced garlic. Stir it for about 30 seconds. You want it fragrant, not burned. Then, raise the heat to medium-high. Put the seasoned chicken pieces into the skillet. Cook for about 5 to 7 minutes. Stir occasionally to cook evenly. The chicken should turn golden brown and reach 165°F inside. When the chicken is cooked, squeeze fresh lemon juice over it. This brightens the flavor. Toss in the chopped parsley and red pepper flakes if you like heat. Mix everything together. Let it sit for a minute off the heat. This helps the flavors blend before serving. To cook chicken just right, start with fresh chicken. Cut it into equal-sized bits. This helps it cook evenly. Use a good skillet and heat it well. Add butter before the chicken goes in. This keeps the chicken moist and tasty. Cook until it's golden brown all over. The chicken should reach 165°F inside. This means it is safe to eat. Garlic butter chicken bites shine with simple flavors. Fresh parsley adds a bright touch. Smoked paprika gives a warm, smoky taste. You can also add lemon juice for zing. For a spicy kick, try red pepper flakes. If you want to mix it up, add other herbs. Thyme or rosemary can work wonders too. Presenting your chicken bites well makes a big impact. Serve them on a rustic platter. Sprinkle extra parsley on top for color. Add lemon wedges for a fresh look. Toothpicks make it easy for guests to grab bites. Pair these with a simple salad or crusty bread. This creates a full meal that everyone will love. {{image_4}} You can easily add heat to garlic butter chicken bites. Just sprinkle in 1/4 teaspoon of red pepper flakes. This small change brings a bold kick to the dish. Adjust the amount based on your spice tolerance. More flakes mean more heat! This simple tweak makes your bites exciting and flavorful. If you're looking for a meat-free option, try plant-based proteins. You can use tofu, tempeh, or seitan. Cut these into bite-sized pieces just like chicken. Season them the same way with smoked paprika and oregano. Cook in garlic butter until they’re golden brown. You’ll still enjoy that rich, savory flavor without the chicken. Herbs can change the whole dish. Instead of just parsley and oregano, think outside the box. You can try basil, thyme, or rosemary. Each herb brings a new flavor twist. Mix and match to find your favorite blend. Just remember to keep the ratios balanced to let the garlic shine through. Store your garlic butter chicken bites in an airtight container. Make sure to let them cool first. This keeps them fresh and tasty. You can keep them in the fridge for up to three days. If you want to keep them longer, freezing is a great option. When reheating, use a skillet over medium heat. Add a little butter to keep the chicken moist. Heat until warm, stirring often. You can also use a microwave. Just cover the dish to keep the moisture in. Heat in short intervals to avoid overcooking. To freeze, place the chicken bites in a single layer on a baking sheet. Freeze until solid, then transfer to a freezer bag. This way, they won't stick together. Use them within three months for the best flavor. When ready to eat, thaw in the fridge overnight before reheating. It takes about 20 minutes to cook garlic butter chicken bites. You spend 10 minutes prepping the chicken. Cooking in the skillet takes another 10 minutes. This quick time makes it a great snack or meal option. Yes, you can use frozen chicken for this recipe. Make sure to thaw it first. Thawing lets the chicken cook evenly. If you start with frozen chicken, cooking time may increase slightly. Always check that the chicken reaches 165°F (75°C) to ensure it is safe to eat. You can serve garlic butter chicken bites with many side dishes. Here are some ideas: - Fresh salad for a light option - Rice or quinoa for a filling side - Garlic bread to soak up the butter - Veggies like carrots or bell peppers for crunch These pairs enhance the meal and add more flavors. You now know the key ingredients and steps to make garlic butter chicken bites. We explored tips for perfect cooking, flavor boosts, and fun variations. Remember, these bites are easy to customize, so get creative! Store leftovers properly for later enjoyment, and always reheat for the best taste. Follow these guidelines, and you'll impress everyone at your next meal. Enjoy your cooking!

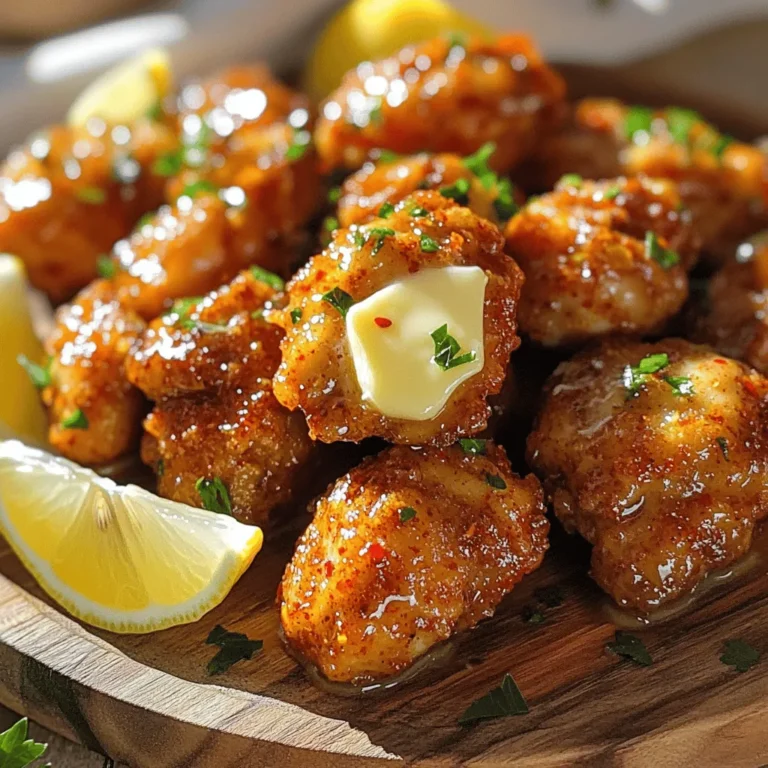
Garlic Butter Chicken Bites Easy Flavorful Snack

- 1 lb large shrimp, peeled and deveined - 2 cups broccoli florets, fresh or frozen - 1 red bell pepper, sliced into thin strips - 1/4 cup sweet chili sauce - 2 tablespoons soy sauce (low-sodium preferred) - 1 tablespoon cornstarch - 1 tablespoon sesame oil - 2 garlic cloves, minced - 1 teaspoon fresh ginger, grated - Salt and pepper to taste - Cooked jasmine rice (for serving) - Sesame seeds (for garnish) - Green onions, thinly sliced (for garnish) Using fresh ingredients makes a big difference. Choose shrimp that smell clean and have a firm texture. Look for bright green broccoli that feels crisp. The red bell pepper should be shiny and firm. Use a good sweet chili sauce; it should balance sweetness and heat well. Low-sodium soy sauce helps keep the dish healthy without losing flavor. If you have a shellfish allergy, try using chicken or tofu instead. For soy allergies, coconut aminos can replace soy sauce with a similar taste. Cornstarch can be swapped with arrowroot powder for a gluten-free option. If sesame oil poses an issue, try olive oil or avocado oil instead. Start by marinating the shrimp. In a medium bowl, mix together the shrimp, soy sauce, cornstarch, and a pinch of salt and pepper. It is important to coat each shrimp well. Let the shrimp sit for about 10 minutes. This will help them soak up the flavors. While the shrimp marinates, prepare the broccoli. Fill a pot with water and bring it to a rapid boil. Once boiling, add the broccoli florets. Blanch them for 2-3 minutes. You want them bright green and tender-crisp. After blanching, drain the broccoli. Quickly place it in cold water to stop cooking. Set the broccoli aside for later. Now, it’s time to cook. Heat sesame oil in a large skillet or wok over medium-high heat. Once the oil is hot, add minced garlic and grated ginger. Sauté for about 30 seconds. This will release a wonderful aroma. Next, increase the heat slightly. Add the marinated shrimp to the skillet. Cook them for about 2-3 minutes. Stir occasionally until the shrimp turns pink and opaque. After the shrimp is cooked, add in the sliced red bell pepper and the blanched broccoli. Stir-fry everything for another 2-3 minutes. You want the veggies to stay crunchy and mix well with the shrimp. Finally, drizzle sweet chili sauce over the mixture. Stir gently to coat everything evenly. Let it cook for another minute to heat through. Remove from heat and serve over jasmine rice. Garnish with sesame seeds and sliced green onions for a lovely finish. Enjoy your flavorful dinner delight! Cooking shrimp is simple but needs attention. Start with large, peeled, and deveined shrimp. Marinating them in soy sauce and cornstarch adds flavor and texture. Aim for a cooking time of 2-3 minutes. The shrimp should turn pink and opaque. If they curl up tightly, they may be overcooked. Remove them from heat as soon as they are done. For vibrant broccoli, blanching is key. First, boil water and add the florets. Cook them for only 2-3 minutes. The broccoli should be bright green and tender-crisp. After boiling, quickly place them in cold water. This stops the cooking and keeps the color. Avoid overcooking, as soggy broccoli isn't tasty. To boost flavor, consider adding fresh herbs. Cilantro or basil can bring a fresh touch. A squeeze of lime juice before serving adds zest. If you enjoy heat, try red pepper flakes or Sriracha. For a nutty taste, sprinkle toasted sesame seeds on top. These small changes can make your dish even more delightful. {{image_4}} You can swap shrimp for chicken or tofu. For chicken, use boneless, skinless breasts. Cut them into bite-sized pieces. Marinate the chicken just like the shrimp. Cook until golden brown. For tofu, use firm or extra-firm. Cut it into cubes and press to remove excess water. Cook it until crispy for a tasty bite. Feel free to change the veggies in this dish. Carrots add a nice crunch and sweetness. Simply slice them thin and add them with the broccoli. Peas are another great option. They add color and a sweet touch. You can also use snap peas or bell peppers. Get creative with your favorite vegetables! To make this dish gluten-free, choose tamari instead of soy sauce. Tamari has a similar flavor but is made without wheat. Always check labels on sweet chili sauce. Some brands may contain gluten. Look for gluten-free options to keep your meal safe and tasty. Enjoy this sweet chili shrimp and broccoli dish without worry! After enjoying your sweet chili shrimp and broccoli, let leftovers cool. Place them in an airtight container. Store the container in the fridge. This dish stays fresh for 2-3 days. Make sure to keep the shrimp and broccoli separate from the rice if possible. This helps keep everything fresh and tasty. To reheat, use the microwave or a skillet. If using the microwave, place the shrimp and broccoli in a bowl. Heat for about 1-2 minutes. Stir halfway through to heat evenly. If using a skillet, warm over medium heat. Add a splash of water to keep it moist. Stir until heated through, about 5 minutes. Freezing this dish is possible, but the texture may change. If you want to freeze it, cool it first. Use a freezer-safe container. It’s best to store shrimp and veggies separately if you can. This way, you can enjoy the shrimp and broccoli later, a few months down the line. To thaw, place in the fridge overnight before reheating. Yes, you can use frozen shrimp. Just make sure to thaw them first. Place them in cold water for about 15 minutes. Once thawed, peel and devein them if needed. The taste will still be great! Sweet Chili Shrimp and Broccoli pairs well with jasmine rice. You can also serve it with noodles or steamed quinoa. For a fresh touch, add a side salad or some spring rolls. This adds color and variety to your meal. If you like heat, add some crushed red pepper flakes. You can also stir in sriracha or chili paste. For a fresh kick, try adding sliced fresh jalapeños. Adjust the spice to match your taste. Enjoy the extra flavor! This blog post covered key ingredients, instructions, and tips for making Sweet Chili Shrimp and Broccoli. I shared how to select quality ingredients and offered substitutions for allergens. You learned step-by-step methods for cooking, marinating, and achieving the perfect texture for shrimp and broccoli. I also provided tips for variations and proper storage. Experiment with different proteins and vegetables to make it your own. Now, you can enjoy a delicious meal that fits your needs. Happy cooking!

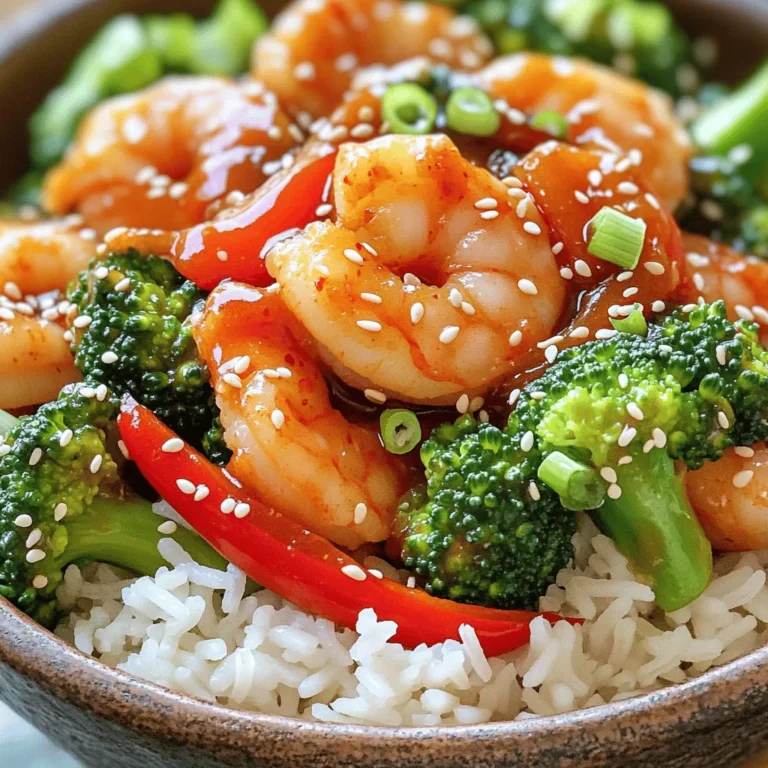
Sweet Chili Shrimp and Broccoli Flavorful Dinner Delight

- 1 large head of fresh broccoli, chopped into small florets - 1 cup of sharp cheddar cheese, shredded - 1 medium-sized onion, diced finely - 2 cloves of garlic, minced - 4 cups of vegetable broth - 1 cup of heavy cream - 4 tablespoons of unsalted butter - 1/4 cup of all-purpose flour - Salt and freshly ground pepper to taste - 4 large sourdough bread bowls - Fresh chives or parsley, chopped, for garnish When I make broccoli cheddar soup bread bowls, I focus on fresh ingredients. I love using a large head of broccoli. It gives the soup a bright color and great flavor. Sharp cheddar cheese makes the soup creamy and rich. The onion and garlic add a nice base. For the liquids, vegetable broth is key. It adds depth without overpowering the other flavors. Heavy cream brings a velvety touch, making the soup feel indulgent. In addition to these, I always have unsalted butter on hand. It helps sauté the onion and garlic perfectly. All-purpose flour thickens the soup, giving it the right texture. I season with salt and pepper to taste, enhancing all the flavors. Finally, sourdough bread bowls are a fun way to serve this soup. They hold the soup well and add a delightful crunch. Don't forget fresh herbs like chives or parsley for a pop of color and flavor! - Sautéing Onion and Garlic Start by melting the unsalted butter in a large pot over medium heat. Once melted, add the diced onion and minced garlic. Sauté for about 3-4 minutes. Stir occasionally until the onion turns translucent and smells great. This step builds the base flavor for the soup. - Adding Broccoli and Flour Next, add the chopped broccoli to the pot. Sauté the broccoli for another 5 minutes. This softens the broccoli and allows it to soak up the flavors. Now, sprinkle the all-purpose flour over the veggies. Stir well to coat everything. Cook for 1-2 more minutes to remove any raw flour taste. - Pouring in Vegetable Broth Gradually pour in the vegetable broth while stirring. This helps avoid lumps in your soup. Bring the mixture to a gentle simmer. Let it cook for about 10 minutes, or until the broccoli is fork-tender. - Blending the Soup Carefully remove the pot from the heat. If you have an immersion blender, use it to puree the soup right in the pot. If not, transfer the soup to a regular blender in batches. Be careful with hot liquid as it can splatter. - Stirring in Cream and Cheese Return the pot to low heat. Stir in the heavy cream and shredded cheddar cheese. Mix until the cheese melts and the soup is creamy. Taste and add salt and pepper to your liking. - Preparing the Bread Bowls While the soup simmers, prepare the sourdough bread bowls. Cut the tops off the bread bowls and scoop out the insides. Leave enough bread on the sides and bottom to hold the soup. Carefully ladle the hot broccoli cheddar soup into each bread bowl. Fill them generously. For a pretty touch, garnish with chopped chives or parsley. Enjoy your warm, cozy dish! To make your soup smooth, use an immersion blender. This tool lets you blend right in the pot. It saves time and is less messy. If you use a regular blender, be careful with hot soup. Blend in small batches to prevent spills. Adjust the soup's thickness by adding cream for a richer taste. If it's too thick, mix in more broth. For a thinner soup, add a little water. To boost flavor, try adding a pinch of nutmeg or a dash of cayenne. These spices add warmth and depth. You can also mix in some fresh lemon juice for brightness. For cheese, sharp cheddar is classic, but feel free to experiment. Try Gruyère for nuttiness or mozzarella for a stretchier texture. Each cheese brings its own twist to the soup. When preparing the bread bowls, cut off the tops carefully. Use a serrated knife for clean cuts. Scoop out the insides gently, leaving enough bread for strength. Make sure the walls are thick enough to hold the soup but not too thick. You want a nice balance. This prevents leaks and ensures a good eating experience. Enjoy the warm, cheesy soup in a fresh bread bowl! {{image_4}} You can switch up the cheese for fun. Gouda gives a nice, smoky flavor. It melts well and adds creaminess. Parmesan can offer a salty bite. It works great as a topping too. Mixing cheeses can enhance the taste. Try a blend of sharp cheddar and Gouda for depth. Feel free to add more veggies to the soup. Carrots add a sweet touch and nice color. Simply chop them small and sauté them with the onions. Cauliflower can give a creamy texture like broccoli. Just cut it into small pieces and cook until tender. Mixing in these veggies makes the soup more colorful and tasty. The bread bowl is key to this dish. You can use rye bread for a hearty flavor. It pairs well with the soup. Whole wheat bread adds nutrition and a nutty taste. Make sure the bread bowls are thick enough to hold the soup. This way, they won’t get soggy too quickly. To keep leftover soup fresh, store it in an airtight container. Let the soup cool first. I recommend using glass containers for easy reheating. Place the soup in the fridge if you plan to eat it within three days. If you want to save soup for longer, freezing is a great choice. Pour the cooled soup into freezer-safe bags or containers. Leave some space for expansion as it freezes. You can freeze the soup for up to three months. Just label the bags with the date. When you’re ready to enjoy your soup again, reheat it gently. Use a pot on low heat to avoid burning. Stir occasionally to keep the texture smooth. If the soup is too thick after freezing, add a bit of broth or cream. Heat until it’s hot, but not boiling. Enjoy! Yes, you can make broccoli cheddar soup in advance. Store it in an airtight container in the fridge for up to three days. When you reheat, add a splash of cream to restore creaminess. This method saves time on busy days. If you want to switch things up, try different breads. You can use whole wheat or rye bread bowls. They add a nice flavor. Another option is to use a crusty baguette. Just ensure it can hold the soup well. This recipe is not gluten-free due to the all-purpose flour. To make it gluten-free, use gluten-free flour instead. Check the bread you choose, too. Some brands offer gluten-free bread bowls that work great. To make this recipe vegetarian, use vegetable broth instead of chicken broth. The rest of the ingredients are already vegetarian. You can enjoy a rich and creamy soup that still tastes fantastic. Great sides for broccoli cheddar soup include simple green salads or roasted vegetables. You can also serve it with a light sandwich. These sides add balance and freshness to your meal. You've now learned all about making delicious broccoli cheddar soup in bread bowls. We covered key ingredients like broccoli, cheeses, and spices. I shared step-by-step instructions to help you prepare the base, create the soup, and finalize your dish. You also got tips for texture, flavor, and variations to keep meals exciting. This soup offers comfort and taste for everyone. Enjoy creating your own unique version and share it with friends and family!

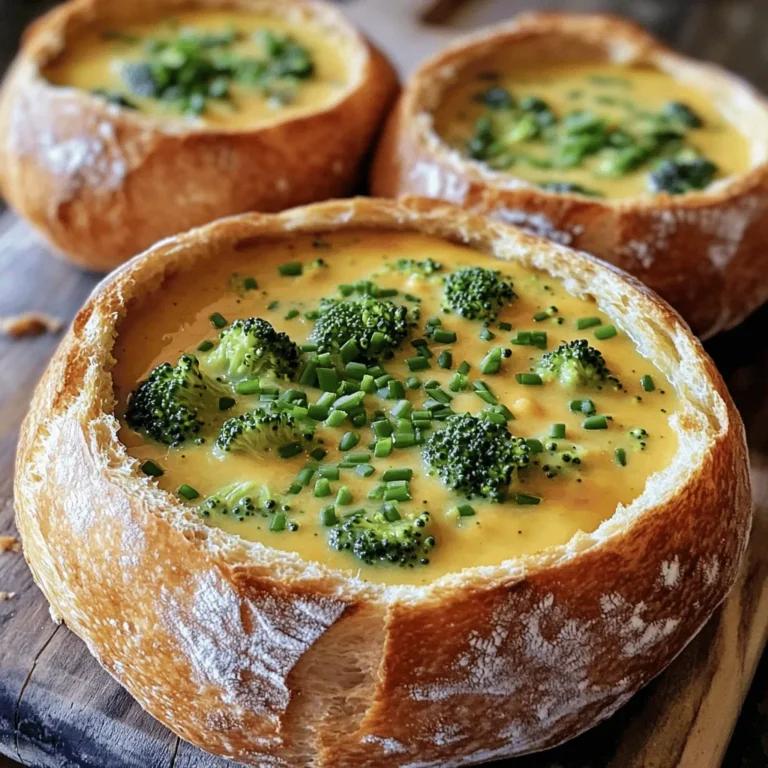
Broccoli Cheddar Soup Bread Bowls Tasty Comfort Dish

To make pumpkin cheesecake mousse cups, gather these ingredients: - 1 cup canned pumpkin puree - 1 cup cream cheese, softened - 1/2 cup powdered sugar - 1 teaspoon vanilla extract - 1 teaspoon ground cinnamon - 1/2 teaspoon ground nutmeg - 1 cup heavy cream - 1/2 cup graham cracker crumbs - 2 tablespoons unsalted butter, melted - Whipped cream, for topping - Extra ground cinnamon, for garnish You can swap some ingredients for different options. For a lighter mousse, use light cream cheese. If you want a sugar-free version, try a sugar substitute like erythritol. You can also use dairy-free cream cheese and coconut cream for a dairy-free treat. For gluten-free options, choose gluten-free graham crackers or crushed nuts. Accurate measuring is key for great results. Use dry measuring cups for solids and liquid measuring cups for liquids. Level off dry ingredients with a knife for precision. When softening cream cheese, leave it out at room temperature for about 30 minutes. This helps it blend smoothly. For the whipped cream, ensure your bowl and beaters are cold. This makes it whip better and increases volume. Start by taking a medium bowl. Add 1/2 cup of graham cracker crumbs and 2 tablespoons of melted unsalted butter. Mix these together until the crumbs look wet and combined. This helps form a tasty base for your mousse cups. Once mixed, set it aside to cool. It is important to let it cool so it can hold its shape later. In another bowl, take 1 cup of softened cream cheese. Beat it with an electric mixer until it is smooth. You want to make sure there are no lumps. Next, add 1 cup of canned pumpkin puree, 1/2 cup of powdered sugar, 1 teaspoon of vanilla extract, 1 teaspoon of ground cinnamon, and 1/2 teaspoon of ground nutmeg. Mix this well until everything is blended and smooth. This mix should taste like fall in a bowl! In a third clean bowl, whip 1 cup of heavy cream until stiff peaks form. This takes about 3 to 5 minutes. You want the cream thick and fluffy. Then, gently fold this whipped cream into the pumpkin mixture. Use a spatula to combine them. Be careful not to deflate the whipped cream. This step makes your mousse light and airy. Now, take your individual serving cups. Start by adding a layer of the graham cracker crust at the bottom of each cup. Press it down gently to make it firm. After the crust, spoon the pumpkin cheesecake mousse on top. Fill each cup to the brim for a delicious treat. The layers should look pretty, and they should taste even better! Cover your mousse cups with plastic wrap. Place them in the fridge for at least 1 hour. This time helps the flavors mix and lets the mousse set. The mousse will become firmer, making it easier to eat. Just before serving, add whipped cream on top of each cup. Finish with a sprinkle of ground cinnamon. This adds a festive touch and makes your dessert look great! When making pumpkin cheesecake mousse cups, avoid overmixing the cream cheese. Overmixing can make your mousse dense. Also, be careful not to skip the chilling step. Chilling helps the mousse set and improves the flavor. Lastly, don’t forget to fold the whipped cream gently. This preserves the light texture you want in your mousse. To get the best mousse texture, use cold heavy cream. Whip it until stiff peaks form. This means the cream should stand up straight when you lift the beaters. When you fold the whipped cream into the pumpkin mix, do it slowly. Use a spatula and gently lift the mixture. This helps keep the air in, making your mousse light and fluffy. For serving, choose clear cups. They show off the beautiful layers of graham cracker crust and mousse. Before serving, add a big dollop of whipped cream on top. Sprinkle some ground cinnamon for a nice touch. You can also add a small cinnamon stick on the edge for a fancy look. This makes your pumpkin cheesecake mousse cups even more appealing! {{image_4}} You can easily switch up the flavor of your pumpkin cheesecake mousse. Adding chocolate gives a rich twist. Just melt some semi-sweet chocolate and fold it in with the whipped cream. You can also use flavored extracts like almond or maple for a unique taste. Toppings can make your mousse cups even more fun. Try drizzling caramel sauce on top for extra sweetness. Chopped nuts like pecans or walnuts add a nice crunch. You can also use fresh fruit like berries for a pop of color and flavor. Making this dessert gluten-free is simple. Use gluten-free graham crackers for the crust. For a dairy-free option, swap cream cheese with a dairy-free cream cheese alternative. Use coconut cream instead of heavy cream for a rich and tasty mousse. To store leftover mousse cups, first cover them with plastic wrap. This keeps the air out and prevents drying. If you have a tight lid, you can use that too. Store the mousse cups in the fridge. They will stay fresh and tasty this way. Use glass or plastic containers with lids for best results. Clear containers let you see the layers, which is fun. If you used clear cups, you can simply cover them. Just make sure the wrap fits tight to avoid spills. These mousse cups last up to four days in the fridge. After that, the texture may change. If you want to freeze them, do so before adding the whipped cream on top. Freeze for up to one month. When you are ready to enjoy, thaw in the fridge overnight before serving. Yes, you can make these mousse cups ahead of time. Prepare them up to two days in advance. Just keep them in the fridge. This allows the flavors to blend well. The mousse will also set nicely in the fridge. It tastes great when served cold. You can use coconut cream or Greek yogurt instead of heavy cream. Coconut cream gives a similar rich texture and a hint of coconut flavor. Greek yogurt provides creaminess with less fat and adds some tang. Both options will work well in your mousse. To lower the sugar, you can use a sugar substitute like stevia or erythritol. These options have fewer calories and lower carbs. You can also reduce the amount of powdered sugar in the recipe. Adjust the sweetness to your taste for a healthier treat. This blog post covered the key steps to create delicious pumpkin cheesecake mousse cups. You learned about the ingredients, preparation, and some helpful tips. We also looked at fun variations, storage methods, and common questions. Making desserts can be simple and enjoyable. Remember, practice makes perfect. With these insights, you can create tasty treats that impress everyone. Enjoy your cooking journey and share these mousse cups with friends!

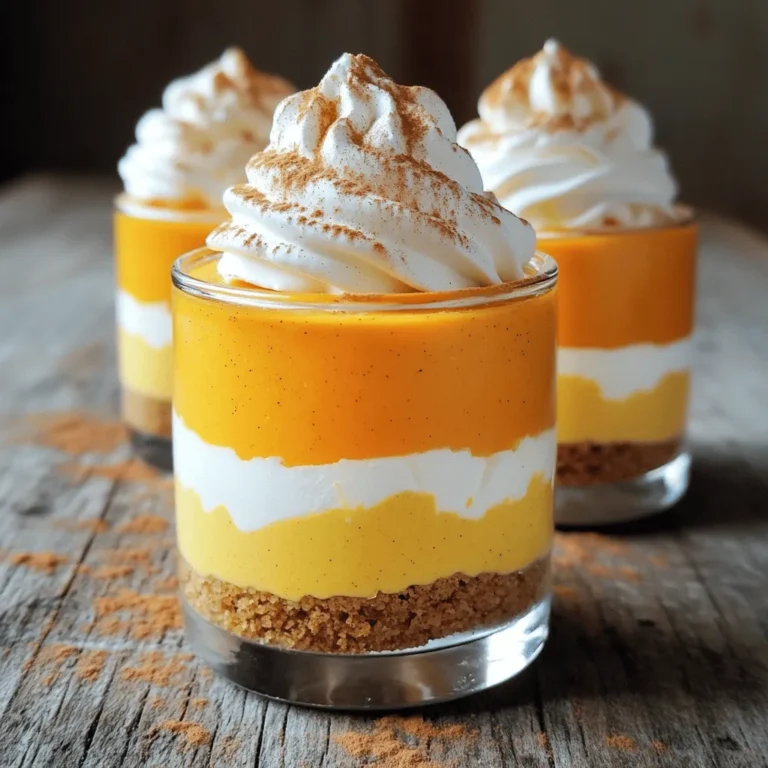
Pumpkin Cheesecake Mousse Cups Easy And Delicious Treat

- 1 cup unsalted butter - 1 cup granulated sugar - 1 cup packed brown sugar - 4 large eggs - 1 teaspoon pure vanilla extract - 1 cup all-purpose flour - 1 cup unsweetened cocoa powder - 1/2 teaspoon salt - 1 cup semisweet or dark chocolate chips - 1 cup fresh strawberries - 1 cup white chocolate chips (for drizzling) - Optional fresh strawberry slices for garnish When I make chocolate covered strawberry brownies, I gather my ingredients first. I use unsalted butter for a rich base. Then, I mix two types of sugar: granulated and brown. This blend gives the brownies a sweet and deep flavor. I add in four large eggs and one teaspoon of pure vanilla extract. The eggs help bind the mix, while vanilla adds warmth. Next, I sift one cup of all-purpose flour, one cup of unsweetened cocoa powder, and half a teaspoon of salt. This step ensures a smooth batter without lumps. I fold the dry mix into the wet ingredients gently. Over-mixing can ruin the texture! I also add one cup of semisweet or dark chocolate chips. They melt slightly and add pockets of gooey goodness. The final touch is one cup of fresh strawberries. I hull and slice them before folding them into the batter, bringing a fresh taste to the rich chocolate. For the toppings, I use one cup of white chocolate chips for drizzling. This adds a sweet contrast to the dark brownies. If I want an extra touch, I add fresh strawberry slices on top for a lovely garnish. It makes the brownies look as good as they taste! {{ingredient_image_2}} - Preheat your oven to 350°F (175°C). - Prepare a 9x13 inch baking pan by greasing it or lining it with parchment paper. - In a large bowl, mix 1 cup of melted butter with 1 cup of granulated sugar and 1 cup of brown sugar. Whisk until smooth. - Crack 4 large eggs into the bowl, mixing them in one by one. Add 1 teaspoon of pure vanilla extract and blend until the batter feels velvety. - In another bowl, sift together 1 cup of all-purpose flour, 1 cup of cocoa powder, and 1/2 teaspoon of salt. - Gradually add this dry mix into the wet ingredients. Fold gently until just combined. - Now, fold in 1 cup of chocolate chips and 1 cup of sliced strawberries. - Pour the brownie batter into the prepared pan. Use a spatula to spread it evenly. - Sprinkle a few reserved chocolate chips on top for extra richness. - Bake in the oven for about 25-30 minutes. To test for doneness, insert a toothpick in the center. It should come out with a few moist crumbs. - Once baked, let the brownies cool completely in the pan on a wire rack. - Melt 1 cup of white chocolate chips in a microwave-safe bowl. Heat in 30-second intervals, stirring until smooth. - Drizzle the melted white chocolate over the cooled brownies. Let it set before cutting. - For a nice touch, top the brownies with extra strawberry slices before serving. To get the best brownies, timing is key. Bake them for 25-30 minutes. Check for doneness by inserting a toothpick into the center. If it comes out with a few moist crumbs, they are ready. If you see wet batter, give them a few more minutes. When mixing, you want to be gentle. After adding the dry ingredients, fold them into the wet mix. Use a spatula and don’t stir too hard. Overworking the batter can make your brownies tough. You want them soft and chewy. For a stunning presentation, cut the brownies into even squares. Place them on a nice platter. Add a handful of fresh strawberries around them. Drizzle leftover melted white chocolate on top for flair. This makes your dessert look fancy and inviting. Pair these brownies with vanilla ice cream or whipped cream. The creaminess contrasts well with the rich chocolate. This combination will make your treat even more delightful. Enjoy your creation with family and friends! Pro Tips Use Room Temperature Ingredients: Ensure your eggs and butter are at room temperature for a smoother batter and better incorporation of ingredients. Don't Overmix: Gently fold the dry ingredients into the wet ingredients to keep your brownies fudgy and avoid a tough texture. Enhance Chocolate Flavor: For a richer chocolate taste, consider adding a teaspoon of espresso powder to the batter. Let Them Cool: Allow the brownies to cool completely in the pan before cutting to achieve clean, neat squares. {{image_4}} You can change the taste of your brownies easily. Try adding nuts like walnuts or pecans for crunch. This adds texture and flavor. You can also use different types of chocolate. Use dark chocolate chips for a richer taste. Or, go for milk chocolate for a sweeter bite. Adding extracts can boost the flavor too. A splash of almond or hazelnut extract adds a unique twist. You can also mix in spices like cinnamon or a pinch of salt to enhance the chocolate flavor. These small changes make a big difference in taste. When it comes to toppings, think outside the box! Instead of white chocolate drizzle, try dark chocolate. This gives a nice contrast to the sweet brownies. Melt some dark chocolate and drizzle it over the top for a bold look. You can also experiment with different fruits. Besides strawberries, consider using raspberries or blueberries. These fruits add color and a fresh taste to your brownies. You can mix and match to find your favorite combination. To keep your chocolate covered strawberry brownies fresh, use proper storage methods. For short-term storage, place brownies in an airtight container. You can keep them at room temperature for up to three days. If you want to store them longer, the fridge is your best bet. In the fridge, they stay good for about a week. Just make sure to wrap them well to prevent drying out. If you want to freeze brownies, they freeze nicely. Wrap each brownie in plastic wrap and then place them in a freezer bag or container. They can last for up to three months in the freezer. When you are ready to enjoy, just thaw them at room temperature. Reheating brownies can bring back their soft, gooey texture. To do this, preheat your oven to 350°F (175°C). Place your brownies on a baking sheet and cover them loosely with foil. Heat them for about 10 minutes. This method helps keep the brownies moist. You can also use the microwave for quick reheating. Place a brownie on a microwave-safe plate and cover it with a damp paper towel. Heat it in short bursts of 10-15 seconds until warm. Be careful not to overheat, as that can dry them out. Enjoy your warm brownies with an extra drizzle of white chocolate or a scoop of ice cream! How do I know when the brownies are done? You can test your brownies by inserting a toothpick into the center. If it comes out with a few moist crumbs, they are done. If there is wet batter, bake them a bit longer. Remember, they will continue to cook slightly after you take them out. Can I use different fruits in this recipe? Yes, you can! While strawberries shine here, feel free to try raspberries or cherries. Just make sure the fruit is fresh and sliced. This will keep the brownies moist and add tasty bursts of flavor. How long do chocolate covered strawberry brownies last? These brownies can last up to a week at room temperature. If you store them in the fridge, they can last even longer. Just make sure to keep them in an airtight container to maintain their freshness. Can I make these brownies gluten-free? Absolutely! You can swap all-purpose flour with a gluten-free flour blend. Just make sure the blend is suitable for baking. This will keep the texture nice and soft, just like traditional brownies. What can I substitute for eggs in this recipe? If you need an egg substitute, try using unsweetened applesauce. For one egg, use 1/4 cup of applesauce. This keeps the brownies moist and adds a hint of sweetness. You can also use flaxseed meal mixed with water for a similar effect. These brownies combine rich chocolate and fresh strawberries for a tasty treat. We covered the ingredients, steps, and key tips to ensure your success. You can customize flavors and toppings to fit your taste, too. Remember to store and reheat them correctly for the best bite. With these tips in mind, you’re ready to wow everyone with your baking. Enjoy making these chocolate-covered strawberry brownies!

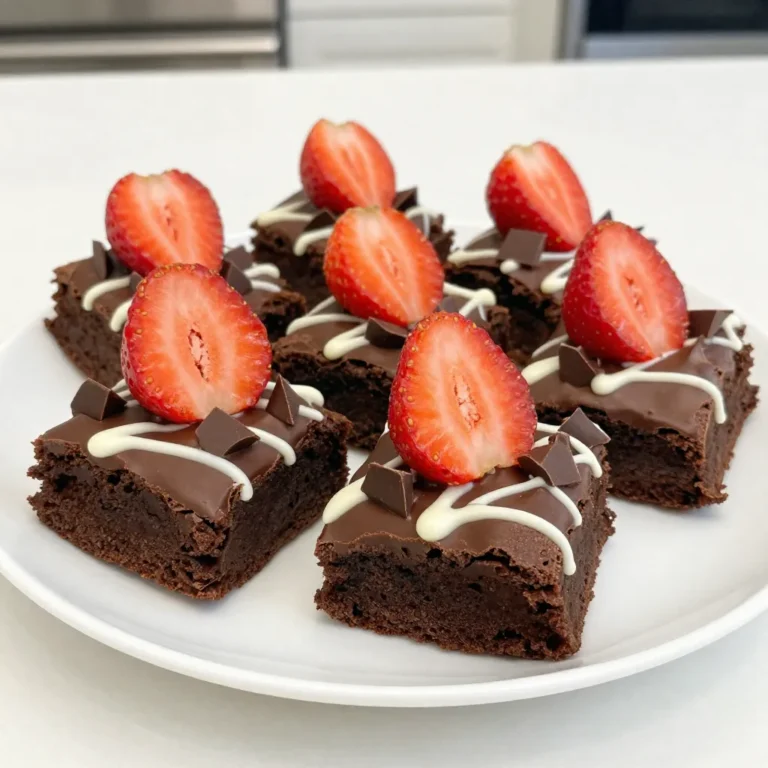
Chocolate Covered Strawberry Brownies Delightful Treat

- 4 boneless, skinless chicken breasts - 1 cup sun-dried tomatoes in oil, well-drained and chopped - 1 cup heavy cream - 1 cup low-sodium chicken broth - 1 cup fresh spinach, roughly chopped - 3 cloves garlic, finely minced - 1 tablespoon extra virgin olive oil - 1 teaspoon Italian seasoning blend - Sea salt and freshly ground black pepper to taste - 1/2 cup freshly grated Parmesan cheese - Fresh basil leaves, for garnishing When I make Creamy Sun-Dried Tomato Chicken, I love how simple the ingredients are. You start with boneless, skinless chicken breasts. They cook quickly and stay juicy. Next, sun-dried tomatoes add a burst of flavor. I recommend using tomatoes packed in oil. Their taste is rich and sweet. I use heavy cream to create a sauce that feels luxurious. Low-sodium chicken broth adds depth without too much salt. Fresh spinach brings color and nutrition. Minced garlic adds that wonderful aroma. For seasoning, I rely on Italian seasoning, salt, and pepper. These add layers of taste. Finally, freshly grated Parmesan cheese makes the sauce creamy and cheesy. I always finish with fresh basil leaves. They look pretty and taste fresh. This blend of ingredients makes a dish that is both comforting and exciting. Each bite is a reminder of why I love cooking! {{ingredient_image_2}} Start by seasoning your chicken breasts. Use sea salt, black pepper, and Italian seasoning. This mix adds great flavor. Let the chicken marinate for 5-10 minutes. This step enhances the taste. Next, heat olive oil in a large skillet over medium heat. Once hot, carefully add the seasoned chicken. Cook for about 6-7 minutes per side. You want a golden brown crust. Ensure the internal temperature reaches 165°F (75°C). Once done, move the chicken to a plate and cover it with foil to keep warm. In the same skillet, add minced garlic. Sauté it for about 30 seconds until it smells great. Be careful not to burn it. Then, add the chopped sun-dried tomatoes and sauté for another minute. This helps blend the flavors. Pour in the low-sodium chicken broth. Scrape the bottom of the pan to get the tasty browned bits. Bring this mix to a gentle simmer. This step builds the base for your sauce. Lower the heat to medium-low. Stir in the heavy cream and grated Parmesan cheese. Mix well until the cheese melts. The sauce should be creamy and rich. Next, fold in the fresh spinach. Cook just until it wilts down, about 2-3 minutes. This adds color and nutrients. Return the cooked chicken to the skillet. Nestle it into the creamy sauce. Let it simmer for another 5 minutes. This allows the chicken to absorb all those delicious flavors. Before serving, taste the sauce. Adjust with more salt or pepper if needed. Garnish with fresh basil leaves for a lovely finish. To cook chicken perfectly, ensure it reaches 165°F (75°C). Use a meat thermometer. This step keeps your chicken safe and juicy. Cook each side for about 6-7 minutes. A golden brown crust adds flavor and appeal. For a creamy sauce, mix heavy cream and Parmesan cheese well. Stir continuously to avoid lumps. If your sauce is too thick, add more chicken broth. If it's too thin, let it simmer longer. The right consistency makes it silky and rich. Spice it up with extra herbs like thyme or oregano. These add depth and layers of flavor. You can also try adding a pinch of red pepper flakes for a kick. For cheese, consider using goat cheese or ricotta. Each option gives a unique twist to the sauce. Experiment to find what you love best! Serve this dish over al dente pasta or fluffy rice. This allows the sauce to soak in and adds texture. Drizzle extra sauce over the top for a mouth-watering look. For garnish, sprinkle more Parmesan cheese and add fresh basil leaves. The basil adds color and a nice aroma. A beautiful plate always enhances the meal! Pro Tips Marinate for Maximum Flavor: Allow your seasoned chicken breasts to marinate for at least 10 minutes before cooking. This enhances the flavor and ensures a juicier result. Scrape the Pan: When adding the chicken broth, be sure to scrape the bottom of the skillet to incorporate any browned bits. These add depth and richness to your sauce. Spinach Substitution: If fresh spinach is unavailable, you can substitute with kale or arugula. Just be mindful of the cooking time, as these greens may require slightly longer to wilt. Serving Suggestions: For a complete meal, serve the chicken with a side of garlic bread or a fresh garden salad to complement the creamy sauce. {{image_4}} You can switch out chicken for shrimp or tofu. Shrimp cooks fast and adds a nice touch. Tofu keeps the dish plant-based and creamy. Both options soak up flavors well. As for vegetables, you can add mushrooms or bell peppers. Mushrooms give a rich, meaty taste. Bell peppers add a sweet crunch. Both enhance the dish's color and flavor. To change the creaminess, try different cream alternatives. Coconut cream is a great option for a tropical twist. Cashew cream offers a nutty flavor. Both give a unique taste while keeping it rich. Sun-dried tomatoes come in different forms. You can use dried ones, but soak them first. This way, they soften and blend well with the sauce. Fresh tomatoes also work; just cook them longer for a deep flavor. To add Mediterranean flair, use olives and feta cheese. These ingredients boost saltiness and tang. You can also try herbs like oregano or rosemary for a fresh touch. Incorporating regional ingredients makes the dish fun. Try adding jalapeños for a spicy kick or lime zest for brightness. Each twist gives a new taste to the creamy sun-dried tomato chicken. To keep your creamy sun-dried tomato chicken fresh, use an airtight container. This helps seal in flavor and moisture. Place the dish in the fridge within two hours of cooking. It will stay good for about 3 to 4 days. Always check for any signs of spoilage before eating. If you want to save some for later, freezing is a great option. First, let the dish cool completely. Then, divide it into portions. Use freezer-safe containers or bags. Make sure to remove excess air to avoid freezer burn. When ready to eat, thaw it in the fridge overnight. Reheat on the stove over low heat. This helps keep the chicken juicy and the sauce creamy. Leftover creamy sun-dried tomato chicken can shine in many ways. You can shred the chicken and mix it into pasta. It adds a burst of flavor to your favorite noodles. Another idea is to use it in a wrap with fresh veggies. Pair it with a simple salad for a light meal. You can also serve it on a bed of rice or quinoa for a hearty lunch. Enjoying leftovers can be just as exciting as the first meal! You can enjoy this dish with several tasty sides. Here are some ideas: - Pasta: Serve it over al dente spaghetti or fettuccine. - Rice: Fluffy white or brown rice soaks up the sauce well. - Vegetables: Roasted or steamed broccoli or green beans add color and crunch. - Salad: A fresh side salad with mixed greens complements the rich flavors. - Beverages: Pair with a crisp white wine or sparkling water for a refreshing touch. Yes, you can reduce calories and fat with these tips: - Chicken: Use skinless chicken thighs instead of breasts for juiciness without extra calories. - Cream: Substitute heavy cream with half-and-half or Greek yogurt. - Cheese: Use less Parmesan or switch to a low-fat version. - Broth: Opt for homemade broth, which is lower in sodium and fat. - Oil: Reduce the olive oil to one teaspoon or skip it altogether. If you lack sun-dried tomatoes, here are some alternatives: - Fresh Tomatoes: Use ripe tomatoes, diced, and sauté them until soft. - Roasted Red Peppers: These add a sweet, smoky flavor similar to sun-dried tomatoes. - Tomato Paste: A tablespoon can give a concentrated tomato flavor; adjust to taste. - Canned Tomatoes: Drained canned tomatoes can also work in a pinch. These options let you enjoy the dish even without sun-dried tomatoes! This dish blends juicy chicken with rich cream and sun-dried tomatoes. You learned how to prepare the sauce, mix in flavors, and present the meal beautifully. I shared tips on cooking and storage, plus fun variations to try. Now, you can enjoy this creamy dish with ease and creativity. Whether you stick to the recipe or add your twist, cooking can be fun and rewarding! Dive into delicious meals and impress others with your skills.

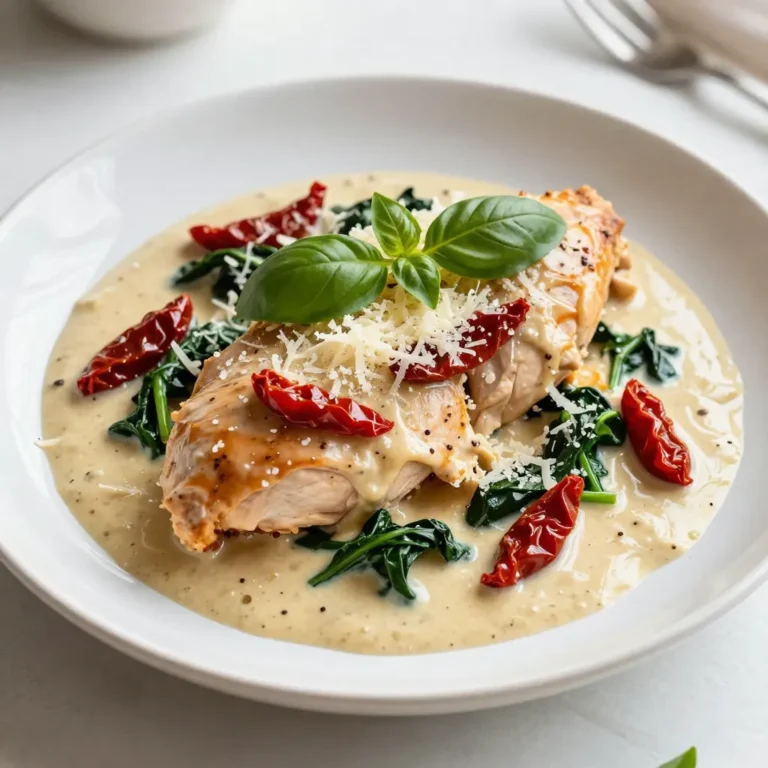
Creamy Sun-Dried Tomato Chicken Recipe Delight

- 8 oz (225 g) fettuccine or your preferred pasta - 1 lb (450 g) ground beef - 1 cup heavy cream - 1 medium onion, finely chopped - 3 cloves garlic, minced - 1 teaspoon Italian seasoning - 1 cup freshly grated Parmesan cheese - 1 cup beef broth When making creamy beef pasta, start by gathering these key ingredients. The fettuccine gives a nice base for the dish. You can use any pasta you like, but fettuccine holds the sauce well. Ground beef adds richness and flavor. Heavy cream makes the dish creamy and dreamy. Next, aromatics like onion and garlic are important. They add depth and fragrance. Always chop the onion finely, so it cooks evenly. Minced garlic should be fresh for the best taste. Italian seasoning brings warmth and herbs to the mix. Use a teaspoon for a lovely flavor boost. Finally, cheese and broth are must-haves. Freshly grated Parmesan melts beautifully and adds a salty kick. Beef broth creates a savory sauce that binds all the flavors. With these ingredients, you are on your way to a delicious meal. {{ingredient_image_2}} Preparing the Water Start by filling a large pot with water. Add a good amount of salt. This helps to flavor the pasta. Bring the water to a rolling boil. Cooking Time and Drain Once boiling, add the fettuccine. Cook it according to the package instructions until it's al dente. This usually takes around 8-10 minutes. When done, drain the pasta. Set it aside in a large bowl so it stays warm. Heating the Olive Oil In a large skillet, pour in the olive oil. Turn the heat to medium. Let the oil heat for a minute. Cooking the Onion and Ground Beef Add the finely chopped onion to the skillet. Sauté for about 2-3 minutes. Stir often until the onions are soft. Next, raise the heat to medium-high. Add the ground beef. Break it up as it cooks for about 5-7 minutes. Cook it until it turns brown. If you see excess fat, drain it carefully. Adding Garlic and Seasoning Now, stir in the minced garlic and Italian seasoning. Cook this mixture for another minute. The smell will be fantastic! Combining Broth and Cream Pour in the beef broth, stirring well. Lower the heat and let it simmer for 5 minutes. This helps the flavors blend together. Slowly add the heavy cream and stir in the freshly grated Parmesan cheese. Keep mixing until the cheese melts and the sauce is creamy. Taste it and add salt and black pepper as needed. Now you’re ready to mix everything together! Choosing the Right Pasta I love using fettuccine for this dish. Its wide shape holds the creamy sauce well. You can also try penne or rigatoni if you prefer. Just pick a pasta you enjoy. Avoiding Overcooked Noodles To keep your pasta firm, cook it until al dente. This means it should still have a little bite. Always taste a piece before draining to check its doneness. Suggested Seasoning Adjustments Italian seasoning adds great flavor, but you can adjust it. Try adding crushed red pepper for heat or dried basil for a different taste. Don’t be afraid to experiment. Adding Extra Ingredients for Depth For more flavor, toss in some mushrooms or spinach. They cook quickly and add a nice touch. You can also use sun-dried tomatoes for a burst of sweetness. Ideal Pairings Creamy beef pasta pairs well with a fresh salad or garlic bread. A light green salad balances the richness of the dish. You can also serve it with a nice glass of red wine. Presentation Tips When serving, use a large bowl or plate. Twirl the pasta into a nest to make it look fancy. Finish with a sprinkle of parsley for color and extra flavor. Pro Tips Perfect Pasta: Always salt the water generously before adding the pasta. This enhances the flavor of the pasta itself. Rich Flavor: For a deeper flavor, consider adding a splash of red wine after browning the beef and let it reduce before adding the broth. Cheese Secrets: Use freshly grated Parmesan instead of pre-grated for a creamier texture and better flavor in your sauce. Herb Infusion: For an extra burst of flavor, add fresh herbs like basil or oregano right before serving for a fresh taste. {{image_4}} Alternatives to Ground Beef You can swap ground beef for other meats. Try ground turkey or chicken for a lighter meal. For a vegetarian option, use plant-based ground meat. Lentils or mushrooms can also add a rich flavor. Dairy-Free Options If you want to make this dish dairy-free, use coconut cream instead of heavy cream. Nutritional yeast can replace Parmesan cheese for a cheesy flavor without dairy. Spicy Additions Add crushed red pepper flakes for heat. You can also toss in diced jalapeños for a fresh kick. Mixing in a dash of hot sauce can elevate the dish. Using Different Cheese Experiment with different cheeses to change the flavor. Try cheddar for a sharp taste or mozzarella for a milder flavor. Goat cheese can add a creamy tang that’s delightful. Other Pasta Options Fettuccine works great, but you can use penne or rotini. Bowtie pasta also holds the sauce well and adds fun shapes to your plate. Gluten-Free Choices For gluten-free pasta, choose options made from rice or chickpeas. These alternatives provide a similar texture and flavor without the gluten. - How to Store Leftovers: Allow your creamy beef pasta to cool to room temperature. Transfer the pasta into a container. Seal it tightly with a lid. - Suggested Container Types: Use glass or plastic airtight containers. They keep the pasta fresh and prevent odors. - Freezing Tips for Best Quality: For long storage, freeze the pasta in portions. Use freezer-safe bags or containers. Remove as much air as possible before sealing. - Reheating Instructions: Thaw your pasta overnight in the fridge. Heat it in a skillet over medium heat. Add a splash of broth or cream to restore creaminess. - How Long it Lasts in the Fridge: Creamy beef pasta lasts about 3 to 4 days in the fridge. Keep an eye on the texture and smell. - Warning Signs of Spoilage: If you see mold or if the pasta smells sour, discard it. Safety first! Yes, you can use other meats. Ground turkey or chicken works well. You can even try sausage for a spicy kick. Just cook it the same way. The flavors may change, but it will still taste great. To make it healthier, swap out heavy cream for Greek yogurt. You can also use whole wheat pasta for added fiber. Adding more veggies, like spinach or bell peppers, boosts nutrients. Serve this dish with a simple side salad. Garlic bread also pairs nicely and adds crunch. For a lighter option, consider steamed broccoli or green beans. - Additional Questions on Customization - Want extra flavor? Add crushed red pepper or fresh herbs. - For a creamier sauce, try adding more Parmesan cheese. - Common Cooking Mistakes and Solutions - Overcooking the pasta? Make sure to follow the package time. - If the sauce is too thick, add more beef broth or cream. - Not enough flavor? Taste and adjust with salt and pepper as needed. In this blog post, we explored how to make creamy beef pasta. We covered key ingredients, step-by-step cooking instructions, and some useful tips. Along the way, I shared variations to enhance flavors and make the dish your own. Proper storage and shelf life information ensure your leftovers stay fresh. Whether you try different meats or pasta types, experimenting can lead to delicious results. Enjoy creating this meal, and happy cooking!

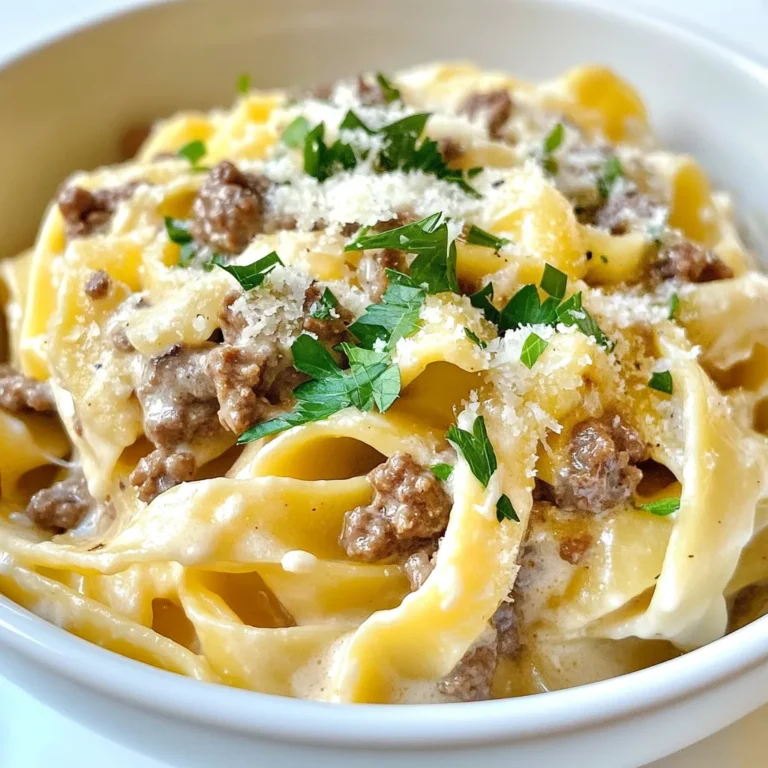
Creamy Beef Pasta Flavorful and Easy Weeknight Meal

To make my best homemade lasagna, you will need the following ingredients: - 12 lasagna noodles - 1 lb ground beef or turkey - 1 medium onion, finely chopped - 2 cloves garlic, minced - 3 cups marinara sauce (your choice of store-bought or homemade) - 15 oz ricotta cheese - 1 large egg - 2 cups shredded mozzarella cheese - 1 cup grated Parmesan cheese - 1 tablespoon dried oregano - 1 tablespoon fresh basil (or 1 teaspoon dried) - Salt and freshly ground black pepper, to taste - 1 tablespoon olive oil for cooking You can make changes if you need to. Here are some ideas: - Meat: Use ground chicken or plant-based meat for a lighter option. - Cheese: Swap ricotta for cottage cheese or use vegan cheese. - Noodles: Try whole wheat or gluten-free lasagna noodles if needed. - Sauce: Use pesto or a white sauce instead of marinara for a twist. This lasagna can fit many diets: - Gluten-Free: Use gluten-free lasagna noodles. - Vegetarian: Skip the meat and add more veggies like spinach or mushrooms. - Dairy-Free: Use non-dairy cheese and a plant-based ricotta. These options can help everyone enjoy my best homemade lasagna. {{ingredient_image_2}} First, I preheat the oven to 375°F (190°C). This step is key for great baking. While it heats, I boil salted water in a large pot. I carefully add 12 lasagna noodles, cooking them until they are al dente. After cooking, I drain the noodles and lay them flat on a baking sheet. This keeps them from sticking. Next, I heat 1 tablespoon of olive oil in a large skillet over medium heat. I add 1 finely chopped onion and sauté for about 3-4 minutes. Once the onion is soft, I throw in 2 minced garlic cloves. I let that cook for another minute to bring out the flavor. Then, I add 1 pound of ground beef or turkey. I break it apart with a spatula and cook until it is no longer pink. I drain any fat from the skillet. After that, I pour in 3 cups of marinara sauce. I add 1 tablespoon of dried oregano, 1 tablespoon of fresh basil, salt, and pepper. I let this simmer for about 5-10 minutes. This helps the flavors blend. Now, I grab a 9x13 inch baking dish and start layering. I spread a thin layer of meat sauce on the bottom. Then, I place 4 lasagna noodles on top, making sure they don’t overlap. Next, I spread half of the ricotta mixture over the noodles. I make the ricotta mixture by mixing 15 oz of ricotta cheese with 1 large egg and a pinch of salt and pepper in a bowl. After that, I add a layer of meat sauce and sprinkle on some mozzarella cheese. I repeat this process until I’ve used all ingredients. For the last layer, I place the final 4 noodles, top with the remaining meat sauce, and finish with more mozzarella and 1 cup of grated Parmesan cheese. I cover the dish with aluminum foil and pop it into the oven for 25 minutes. After that, I remove the foil and bake for another 15-20 minutes. I look for the cheese to be melted and bubbly. Once done, I let the lasagna cool for 10-15 minutes. This resting time is important. It helps the slices keep their shape when I serve them. Layering is key for great lasagna. Start with a thin meat sauce layer. This keeps noodles from sticking. Place four noodles on the sauce. Make sure they don’t overlap. Next, spread half of the ricotta mixture over the noodles. Follow that with meat sauce and a sprinkle of mozzarella. Repeat this until you run out of ingredients. For the top, end with noodles, more meat sauce, and a final layer of cheese. This creates a nice, even finish. To make flavors pop, use fresh herbs. Fresh basil gives a bright taste. Dried oregano adds warmth. Allow the meat sauce to simmer for 5-10 minutes. This helps the seasonings mix well. Taste and adjust salt and pepper as needed. A little seasoning goes a long way. The ricotta mix should be creamy, but not too runny. This keeps each bite flavorful and rich. Let the lasagna cool for about 10-15 minutes after baking. This resting time helps it hold shape. Slice into squares for easy serving. I like to top each piece with fresh basil. It adds color and a fresh taste. Serve with warm garlic bread on the side. This makes the meal feel complete. Enjoy every bite of your homemade lasagna! Pro Tips Use No-Cook Noodles: If you're short on time, consider using no-cook lasagna noodles. They save time and will cook perfectly in the oven with the moisture from the sauces. Let it Rest: Allow your lasagna to rest for 10-15 minutes after baking. This helps it set and makes slicing easier, resulting in cleaner portions. Experiment with Cheese: Feel free to mix different types of cheese, such as provolone or fontina, for a unique flavor twist. Just ensure the total cheese amount remains the same. Layer Wisely: When layering, avoid overlapping the noodles to ensure even cooking and to prevent sticking. Each layer should be evenly spread for the best results. {{image_4}} You can make a tasty vegetable lasagna. Use layers of fresh veggies like spinach, zucchini, and bell peppers. This makes a great meatless dish. Start with the same marinara sauce and noodles. Replace the meat with sautéed veggies. You can also add mushrooms for extra flavor. Use the ricotta mix as usual. This option is healthy and still very filling. Cheese plays a big role in lasagna. You can switch up the cheeses to find your favorite mix. Instead of just mozzarella, try provolone or gouda for a richer taste. You can add more layers of ricotta or even goat cheese for a creamy twist. Mixing cheeses gives depth and enhances the flavor. Always remember to balance the cheeses with the sauce and meat. If you like heat, consider a spicy lasagna. Add red pepper flakes to the meat sauce for a kick. You can also use spicy sausage instead of ground beef. For more heat, layer in jalapeños or hot peppers. This gives the dish a bold flavor. Don't forget to balance the spice with creamy cheese. A hot lasagna is a wonderful way to spice up dinner. To keep your leftover lasagna fresh, let it cool first. Then, cover it tightly with plastic wrap or aluminum foil. You can also place it in an airtight container. Store it in the fridge. It will stay good for up to four days. Make sure to label your container with the date. This way, you won't forget when you made it. If you want to save lasagna for later, freezing is a great option. First, let the lasagna cool completely. Then, cut it into portions. Wrap each piece in plastic wrap and then in foil. You can also use freezer bags. Make sure to press out as much air as you can. Frozen lasagna lasts for about three months. When you are ready to eat it, just thaw it overnight in the fridge. Reheating lasagna can be easy. If you want to use the oven, preheat it to 350°F (175°C). Place the lasagna in an oven-safe dish and cover it with foil. This keeps it moist. Bake for about 20-30 minutes, or until heated through. You can also use the microwave. Just place a slice on a microwave-safe plate. Heat it for about 2-3 minutes, checking often. Enjoy your warm, comforting meal! Yes, you can make lasagna ahead of time. Just prepare it fully, but do not bake it. Cover it well with plastic wrap or foil. Store it in the fridge for up to two days. When you are ready to bake, take it out and add 10 to 15 extra minutes to the baking time. Lasagna can last in the fridge for about three to five days. Make sure to keep it in an airtight container. This helps keep it fresh and tasty. If you want to enjoy it longer, freezing is a great option. Lasagna pairs well with many sides. Here are a few ideas: - Garlic bread for a crunchy, buttery taste. - A fresh salad with greens, tomatoes, and a light dressing. - Steamed vegetables like broccoli or green beans for color and nutrition. - A side of Italian-style roasted potatoes for a heartier meal. These sides enhance your lasagna experience and provide balance to your meal. You now have a clear guide to making delicious lasagna. We covered the ingredients, step-by-step prep, and cooking tips. You can try various options, including vegetarian. Plus, learn how to store leftovers for later use. Lasagna is truly versatile and easy to adapt. Keep experimenting, and enjoy sharing your meals with family and friends. Remember, cooking is about having fun and being creative!

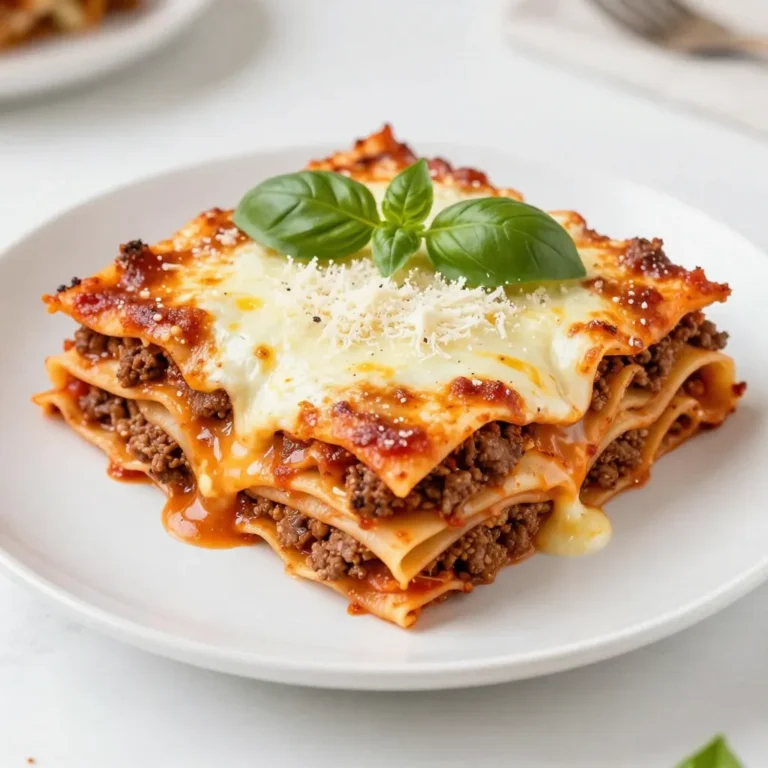
My Best Homemade Lasagna Flavorful and Comforting Meal

- 2 cups pre-cooked white cornmeal (masarepa) - 2 1/2 cups warm water - 1 teaspoon salt - 1 cup shredded queso blanco or mozzarella cheese - 2 tablespoons butter, melted - Optional: Fresh cilantro, chopped for garnish You will need: - A large mixing bowl - A wooden spoon or your hands - A non-stick skillet or griddle - A spatula for flipping - Measuring cups and spoons You can add: - Fresh cilantro for flavor - Slices of creamy avocado - A vibrant salsa for dipping - Additional spices like paprika or chili powder for a kick These ingredients and tools will help you make the perfect arepas con queso. The combination of warm cornmeal and cheesy goodness creates a dish that is both comforting and delicious. {{ingredient_image_2}} Start by gathering your ingredients. In a big bowl, mix 2 cups of cornmeal and 1 teaspoon of salt. Next, pour in 2 1/2 cups of warm water. Use your hands or a spoon to mix well. Keep mixing until you get a smooth dough. Let the dough rest for about 5 minutes. This wait helps the cornmeal soak up water, making the arepas soft and tasty. After the dough has rested, divide it into 8 equal pieces. Roll each piece into a ball. Then, flatten each ball gently in your hands. Make discs about 1/2-inch thick. Take half of these discs and put a spoonful of cheese in the middle. Use the other discs to cover them. Press the edges firmly so the cheese stays inside. Heat a non-stick skillet over medium heat. Add a little melted butter to the pan. Once hot, place the arepas in the skillet. Cook for 5-7 minutes on each side. You want them to be crispy and golden brown. If you like them crispier, bake them in a preheated oven at 375°F (190°C) for 10-15 minutes after frying. When they smell good and look golden, take them out. Let them cool a bit, then slice them open to see the melted cheese inside. To make great arepas, use pre-cooked white cornmeal, called masarepa. This cornmeal has a fine texture and cooks easily. It helps create soft and tasty arepas. Avoid regular cornmeal, as it will not work well. Look for masarepa at local Latin markets or online. For cheesy arepas, I recommend using queso blanco or mozzarella cheese. Queso blanco melts nicely and adds a mild flavor. Mozzarella gives a gooey texture that everyone loves. You can mix cheeses for more taste. Try adding cheddar for a sharp kick or pepper jack for some heat. To get a crispy outside, use a non-stick skillet and medium heat. Preheat the skillet well before adding the arepas. A drizzle of melted butter adds flavor and helps them crisp. Cook each side for about 5-7 minutes until golden brown. For extra crunch, bake them in the oven at 375°F for 10-15 minutes. This will make your arepas even more delightful. Pro Tips Use Warm Water: Using warm water helps the cornmeal to hydrate better, resulting in a smoother dough that's easier to work with. Seal Properly: Ensure the edges of the arepas are pressed firmly together to prevent the cheese from oozing out during cooking. Crispy Texture: For extra crispiness, you can fry the arepas first and then bake them in the oven to finish cooking through. Cheese Variations: Feel free to experiment with different types of cheese such as cheddar or pepper jack for a unique flavor twist. {{image_4}} You can use many kinds of cheese in arepas. While I love queso blanco and mozzarella, other cheeses work great too. Cheddar adds a sharp flavor. Feta brings a nice tang. For a creamier texture, try ricotta or cream cheese. Mixing cheeses creates a unique taste. Add-ins can take arepas to the next level. You can include cooked meats like chicken, beef, or even shrimp for added protein. Vegetables like sautéed peppers or onions add color and flavor. Want some spice? Toss in jalapeños or hot sauce. Fresh herbs like cilantro or parsley can brighten the dish. Different regions have their own take on arepas. In Venezuela, you might find arepas stuffed with black beans and avocado. Colombian arepas often feature cheese mixed into the dough. Some areas serve arepas with sweet fillings, like guava or coconut. Exploring these variations can lead to exciting new tastes! To store leftover arepas, let them cool first. Place them in an airtight container. They last in the fridge for about three days. You can also wrap them in plastic wrap for extra protection. Just make sure they are sealed well. To reheat your arepas, use a skillet or griddle. Heat them on medium for about 5 minutes on each side. This keeps them crispy. You can also use an oven. Preheat it to 375°F (190°C) and bake for 10-15 minutes. This method warms them through without making them soggy. If you want to freeze arepas, wrap each one in plastic wrap. Then, place them in a freezer bag. They can last for up to three months. When you are ready to eat, thaw them in the fridge overnight. Then, reheat as mentioned above. This way, you can enjoy arepas whenever you want! Arepas con Queso are corn cakes filled with cheese. They come from Colombia and Venezuela. The base is made from pre-cooked white cornmeal. You mix the cornmeal with water and salt to form dough. Then, you fill the dough with cheese, like queso blanco or mozzarella. Cooking them gives a crispy outside and gooey inside. They are perfect for any meal or snack. Yes, you can make Arepas in advance. Prepare the dough and shape the arepas. You can store them in the fridge for up to 24 hours. Just cover them tightly with plastic wrap. You can also freeze them for longer storage. When ready to eat, just cook them straight from the fridge or thawed from the freezer. They still taste great! You can add many toppings to your Arepas. Popular choices include: - Avocado slices - Salsa - Sour cream - Shredded lettuce - Tomatoes - Pulled pork or chicken These toppings add flavor and texture. Feel free to get creative and mix your favorites! Arepas are done cooking when they are golden brown. Cook them for about 5-7 minutes on each side. You can check the color by lifting one with a spatula. If they look crispy and brown, they are ready. You can also tap the outside; it should sound hollow. This means the inside is cooked well. Arepas are a fun and tasty dish. We covered what you need, from ingredients to tools. You learned how to make, cook, and store these treats. Remember to try new fillings and garnishes for variety. Picking the right cornmeal and cheese makes a big difference. With practice, you will master the art of arepa-making. Enjoy crafting your own delicious creations!

Arepas con Queso Delicious and Easy to Prepare

PREV 1 … 12 13 14 … 47 NEXT
snack joy kitchen

explore

DessertsDinnerAppetizersDrinks

Our Policies

  • Cookie Policy
  • Copyright Policy
  • Disclaimer
  • GDPR Policy
  • Terms Of Use
Back to Top
  • About
  • Contact Us
  • Privacy Policy
© 2026 snack joy kitchen