WANT TO SAVE THIS RECIPE?
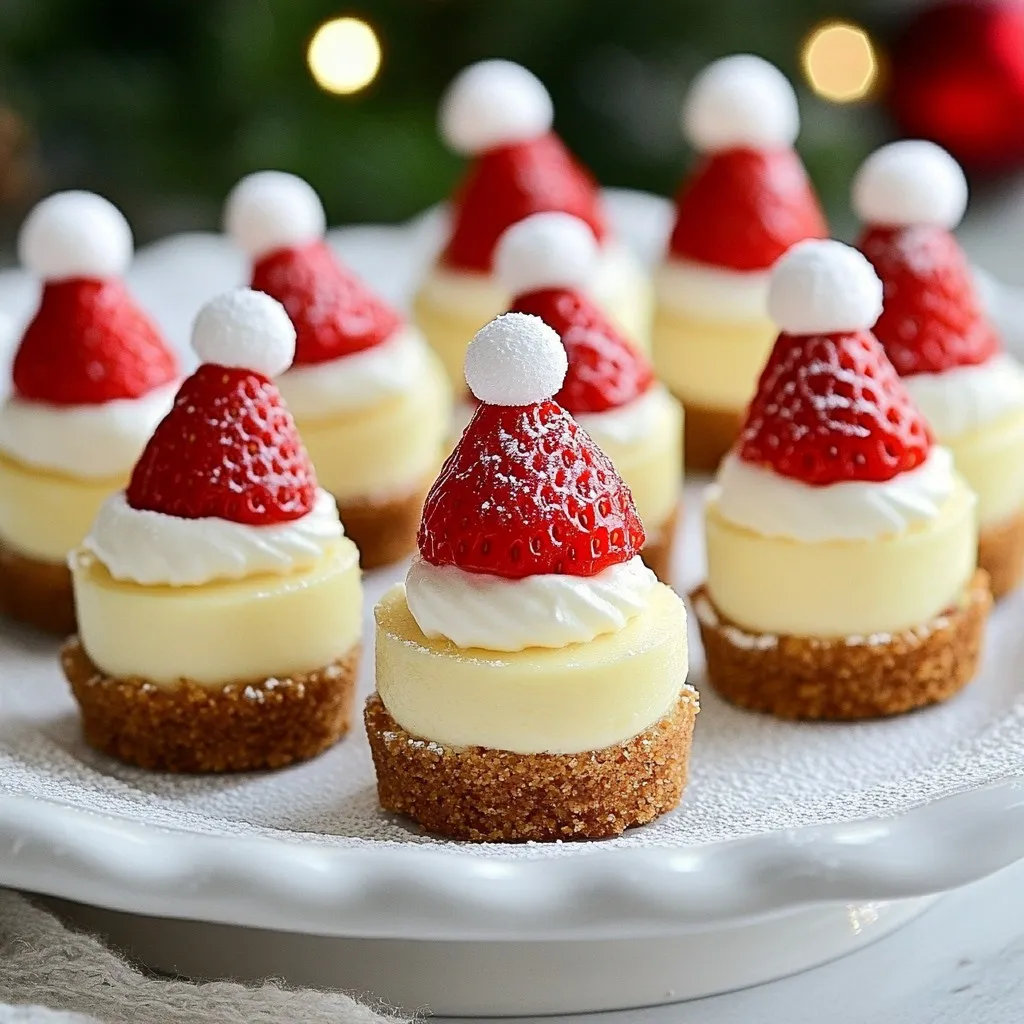
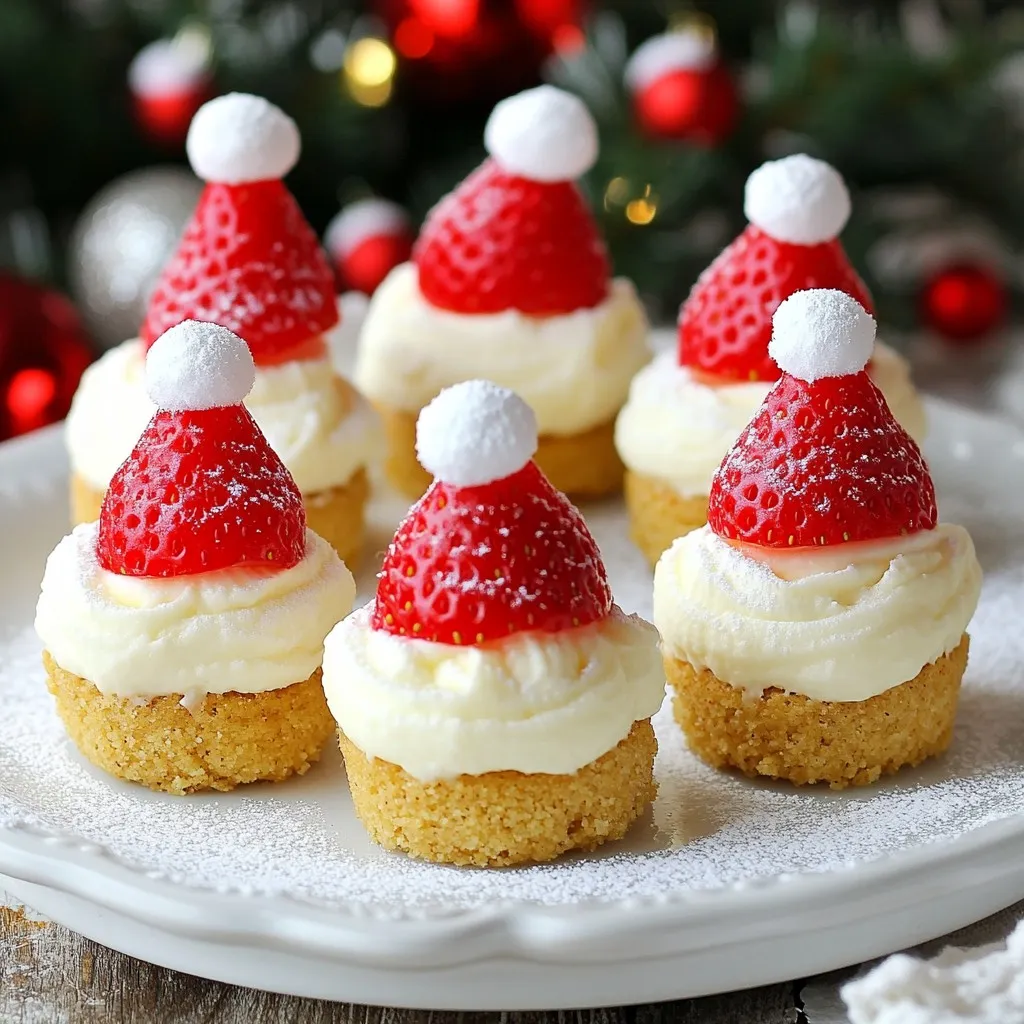
Get ready to spread holiday cheer with my Santa Hat Cheesecake Bites! These fun and festive treats combine rich cream cheese with a sweet, fruity touch of strawberries. Simple to make and perfect for gatherings, they’re sure to impress your guests. In this guide, I’ll walk you through the easy steps and share tips to make them even better. Let’s dive into creating these delightful dessert bites!

Why I Love This Recipe
- Festive Presentation: These cheesecake bites not only taste amazing but also look adorable, making them a perfect addition to your holiday celebrations.
- Easy to Make: With just a few simple ingredients and quick steps, you can whip up these delightful treats in no time.
- Versatile Flavor: The creamy cheesecake filling combined with fresh strawberries provides a delicious balance of sweetness and tartness.
- Fun for All Ages: These bites are a hit with both kids and adults, making them a crowd-pleaser at any holiday gathering.
Ingredients
To make Santa Hat Cheesecake Bites, you will need the following ingredients:
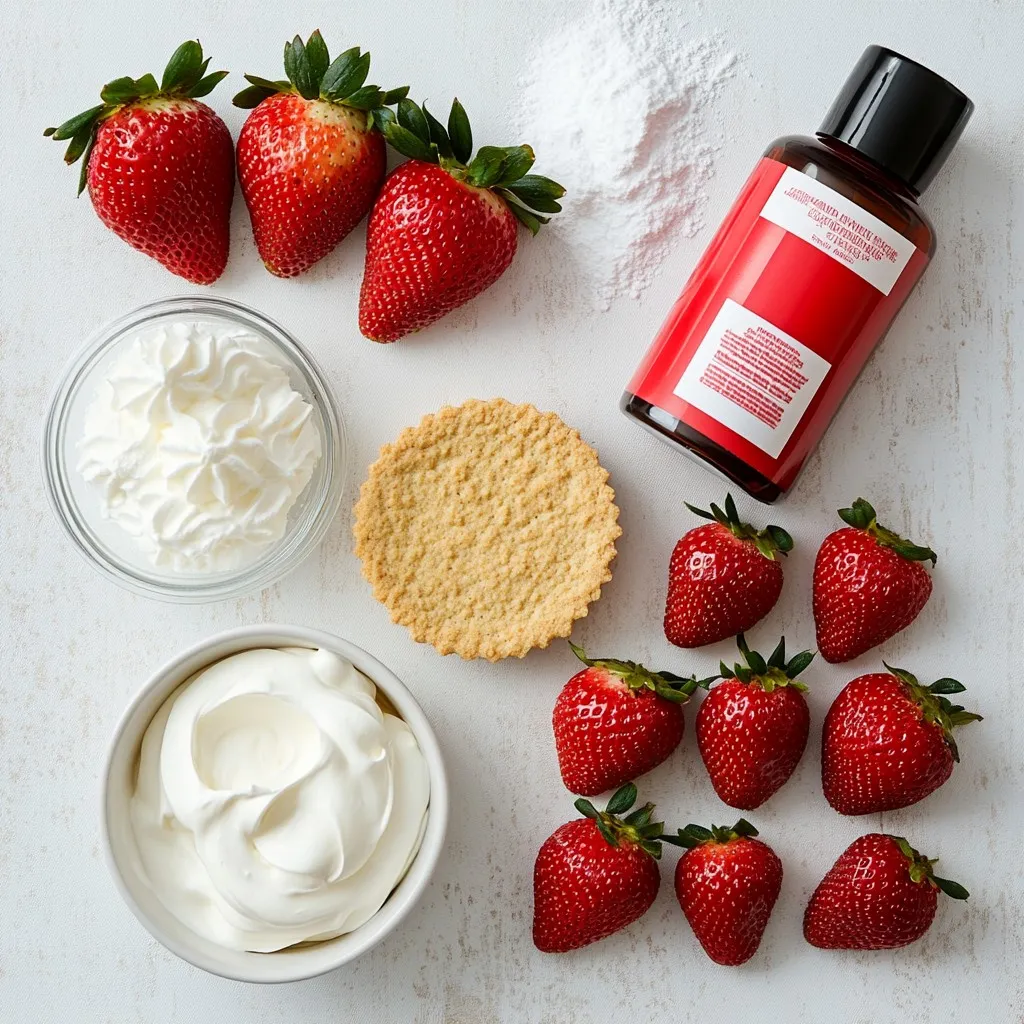
– 1 cup cream cheese, softened to room temperature
– 1/4 cup granulated sugar
– 1 teaspoon pure vanilla extract
– 1 cup whipped cream, homemade or store-bought
– 1 box of mini graham cracker crusts (6-8 crusts)
– 6-8 ripe strawberries with their green tops intact
– Red decorating frosting
– A pinch of powdered sugar
These ingredients work together to create a festive and delicious treat. The cream cheese forms the base, giving it a rich flavor. The sugar adds sweetness, while the vanilla extract contributes a lovely aroma. Whipped cream lightens the filling, making it airy and fluffy. Mini graham cracker crusts provide a crunchy base that holds everything together.
The strawberries not only add a pop of color but also mimic Santa’s hat. The red decorating frosting is perfect for that extra detail, and a light dusting of powdered sugar gives a snowy finish. Each ingredient plays a crucial role in this fun holiday recipe.
Step-by-Step Instructions
Preparing the Cheesecake Filling
To start, you need to mix some key ingredients. In a mixing bowl, combine:
– 1 cup cream cheese, softened
– 1/4 cup granulated sugar
– 1 teaspoon pure vanilla extract
Use an electric mixer to beat these together until smooth. You want a creamy texture with no lumps. Once that’s done, it’s time to fold in the whipped cream.
Add 1 cup of whipped cream to the bowl. Gently fold it in with a rubber spatula. Be sure to keep that light, airy feel. This is what makes your cheesecake filling fluffy and delightful.
Assembling the Cheesecake Bites
Now it’s time to fill the crusts. Grab your mini graham cracker crusts. Using a small spoon or piping bag, fill each crust with the cheesecake mixture. Stop just short of the edge to leave room for toppings.
Next, let’s add the strawberries. Rinse 6-8 ripe strawberries and dry them well. Make sure their green tops stay on. If they are too tall, trim them a bit for a better fit. Place one strawberry on top of each cheesecake bite, with the pointed end facing up. This makes it look like a Santa hat.
Adding Decorative Elements
Now for the fun part—decorating! Take your red decorating frosting and pipe a small circle at the base of each strawberry. This looks like the fluffy trim of Santa’s hat.
To add a snowy effect, dust a pinch of powdered sugar over the tops of the strawberries. This makes them look extra festive and fun!
Once you have decorated all the bites, cover them with plastic wrap. Chill the cheesecake bites in the fridge for at least 30 minutes. This helps the flavors meld and firms them up for serving.
Tips & Tricks
Perfecting Your Cheesecake Filling
To make a perfect cheesecake filling, avoid lumps. Start with room temperature cream cheese. When you mix the cheese, sugar, and vanilla, use a medium speed. Beat until smooth, about one minute. If you mix too long, you can add too much air. This can cause cracks later.
Next, gently fold in the whipped cream with a spatula. Be careful here. Too much mixing will make it dense. You want it light and airy. The goal is a fluffy filling that melts in your mouth.
Decorating Ideas
For variety, try different toppings. You can use blueberries or raspberries instead of strawberries. If you want a different look, add chocolate shavings or crushed nuts. These can add flavor and texture.
You can also get creative with your presentation. Place the cheesecake bites on a colorful platter. Scatter mint leaves around them for a fresh look. Edible gold stars can add a festive touch too. These small details make your dish pop.
Serving Suggestions
Presentation matters at parties. Arrange the bites close together for a neat look. You can also use mini cupcake liners for an extra touch. This makes serving easy and fun.
Pair these bites with hot cocoa or coffee. The rich flavors work well together. You can also serve with a fruit punch for a refreshing twist. These suggestions will make your dessert table shine.
Pro Tips
- Use Room Temperature Cream Cheese: Allow the cream cheese to soften completely before mixing. This helps achieve a smooth and creamy cheesecake filling without lumps.
- Don’t Over-Mix the Whipped Cream: Gently fold in the whipped cream to keep the mixture light and airy, ensuring a fluffy texture that is essential for cheesecake bites.
- Choose the Right Strawberries: Select ripe strawberries with intact green tops, as they will best resemble Santa hats. Look for strawberries that have a nice shape and are firm to the touch.
- Chill for Best Results: Allow the cheesecake bites to chill for at least 30 minutes before serving. This helps the flavors meld together and firms up the cheesecake, making it easier to eat.
Variations
Flavor Variations
You can change the flavor of your cheesecake bites. Try adding chocolate or peppermint. Just mix in cocoa powder for chocolate. For peppermint, add a few drops of extract. You can also swap the strawberries for other fruits. Raspberries or blueberries can add a fun twist. They will still look festive and taste amazing.
Different Crust Options
If you want a different crust, consider using crushed cookies. Oreo or gingersnap cookies work great. You can also make a homemade crust with almond flour for a gluten-free option. This adds a nutty flavor and keeps it safe for those with gluten issues.
Mini vs. Standard Size
You can make these bites in two sizes: mini or standard. If you go for mini, the cook time stays the same. For standard sizes, you might need a bit longer in the fridge to set. Plan on serving sizes based on your event. Mini bites are great for parties, while standard sizes can be a fun dessert option.
Storage Info
Storing Leftovers
To keep your Santa Hat Cheesecake Bites fresh, store them in the fridge. Place them in an airtight container. This helps prevent drying out. They will stay good for about 3 to 5 days. Make sure to eat them within this time for the best taste.
Freezing Instructions
Yes, you can freeze cheesecake bites! Wrap each bite in plastic wrap and then place them in a freezer-safe bag. They will last for about a month in the freezer. To enjoy them later, thaw in the fridge overnight. This keeps the taste and texture just right.
FAQs
Can I use low-fat cream cheese?
Yes, you can use low-fat cream cheese. However, it may change the texture and taste. Low-fat cream cheese can make the bites less creamy and rich. The cheesecake might feel a bit denser. If you want a lighter option, low-fat works, but full-fat gives the best flavor.
How do I make it gluten-free?
To make these cheesecake bites gluten-free, you can swap the mini graham cracker crusts. Look for gluten-free graham crackers or use crushed gluten-free cookies. Another option is to make a crust using ground almonds or oats. Both choices keep the festive spirit without gluten.
Can I make these in advance?
You can make these bites a day ahead. Just prepare them and chill them in the fridge. This helps the flavors blend well. If you want, add the toppings just before serving to keep them fresh and pretty.
In this post, I shared how to make delicious cheesecake bites. We covered key ingredients like cream cheese and strawberries. I outlined simple steps for mixing and assembling. Tips and variations let you customize your dessert. Remember to store leftovers properly and consider gluten-free options.
In closing, these cheesecake bites are fun to make and share. Enjoy experimenting with flavors and topping
Santa Hat Cheesecake Bites
Delicious cheesecake bites topped with strawberries resembling Santa hats, perfect for holiday celebrations.
Prep Time 20 minutes mins
Total Time 50 minutes mins
Course Dessert
Cuisine American
Servings 6
Calories 150 kcal
- 1 cup cream cheese, softened to room temperature
- 1/4 cup granulated sugar
- 1 teaspoon pure vanilla extract
- 1 cup whipped cream, homemade or store-bought
- 1 box mini graham cracker crusts (6-8 crusts)
- 6-8 pieces ripe strawberries with their green tops intact
- 1 tube red decorating frosting
- a pinch powdered sugar
In a mixing bowl, use an electric mixer to beat together the softened cream cheese, granulated sugar, and vanilla extract until the mixture is completely smooth and creamy, ensuring there are no lumps.
With a rubber spatula, gently fold in the whipped cream into the cream cheese mixture. Be careful not to over-mix; you want to maintain that light, airy texture throughout, resulting in a fluffy cheesecake filling.
Using a small spoon or a piping bag, carefully fill each mini graham cracker crust with the cheesecake mixture, stopping just short of the edge to allow for toppings.
Rinse the strawberries under cool water and gently pat them dry with a paper towel. If the leafy tops of the strawberries are excessively tall, trim them down slightly to ensure they sit securely atop the cheesecake bites.
Position one strawberry on top of each cheesecake bite, ensuring the pointed end is facing upwards to mimic a Santa hat's shape.
With the red frosting, pipe a small decorative circle along the base of each strawberry where it meets the cheesecake, simulating the fluffy fur trim of Santa's hat.
To add a festive touch, lightly dust a pinch of powdered sugar over the tops of the strawberries, creating a delightful snowy appearance that enhances their holiday appeal.
Cover the platter with plastic wrap and chill the cheesecake bites in the refrigerator for at least 30 minutes. This step allows the flavors to meld and the cheesecake to firm up for perfect serving.
Arrange on a colorful holiday platter for a festive presentation.
Keyword cheesecake, dessert, holiday, strawberry
WANT TO SAVE THIS RECIPE?